warning DODGE SPRINTER 2007 2.G Owners Manual
[x] Cancel search | Manufacturer: DODGE, Model Year: 2007, Model line: SPRINTER, Model: DODGE SPRINTER 2007 2.GPages: 393, PDF Size: 7.61 MB
Page 192 of 393
191 Operation
Engine
4
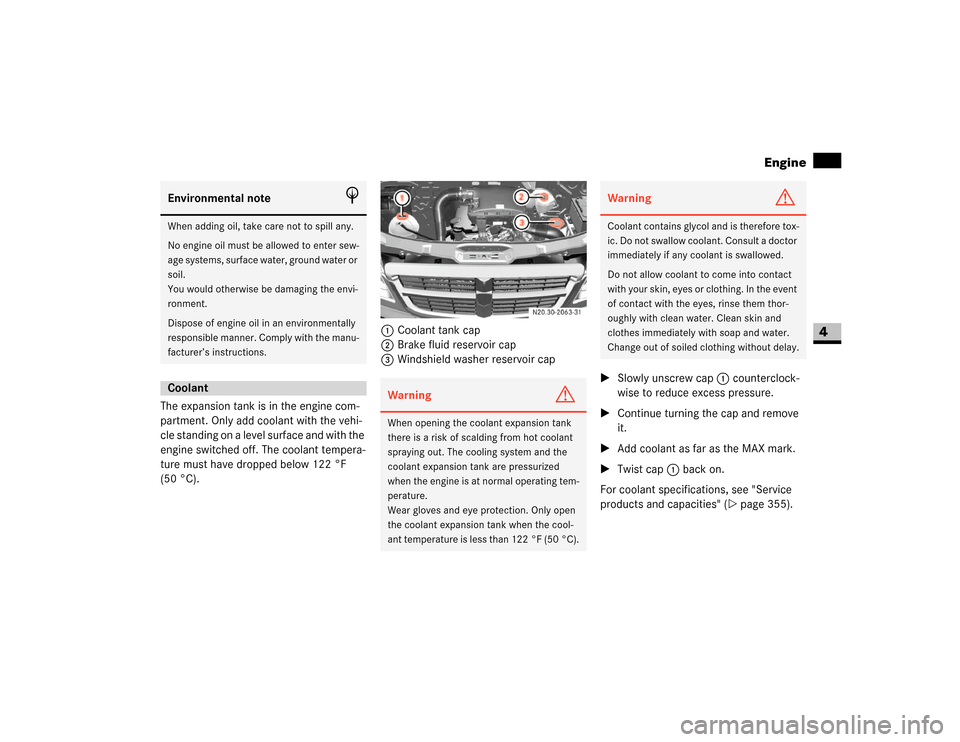
The expansion tank is in the engine com-
partment. Only add coolant with the vehi-
cle standing on a level surface and with the
engine switched off. The coolant tempera-
ture must have dropped below 122 °F
(50 °C).1Coolant tank cap
2Brake fluid reservoir cap
3Windshield washer reservoir cap
\1Slowly unscrew cap1 counterclock-
wise to reduce excess pressure.
\1Continue turning the cap and remove
it.
\1Add coolant as far as the MAX mark.
\1Twist cap1 back on.
For coolant specifications, see "Service
products and capacities" (\2page 355).Environmental note
H
When adding oil, take care not to spill any.
No engine oil must be allowed to enter sew-
age systems, surface water, ground water or
soil.
You would otherwise be damaging the envi-
ronment.
Dispose of engine oil in an environmentally
responsible manner. Comply with the manu-
facturer’s instructions.Coolant
Warning
G
When opening the coolant expansion tank
there is a risk of scalding from hot coolant
spraying out. The cooling system and the
coolant expansion tank are pressurized
when the engine is at normal operating tem-
perature.
Wear gloves and eye protection. Only open
the coolant expansion tank when the cool-
ant temperature is less than 122 °F (50 °C).
N20.30-2063-31
Warning
G
Coolant contains glycol and is therefore tox-
ic. Do not swallow coolant. Consult a doctor
immediately if any coolant is swallowed.
Do not allow coolant to come into contact
with your skin, eyes or clothing. In the event
of contact with the eyes, rinse them thor-
oughly with clean water. Clean skin and
clothes immediately with soap and water.
Change out of soiled clothing without delay.
Page 193 of 393
192 OperationEngine
4
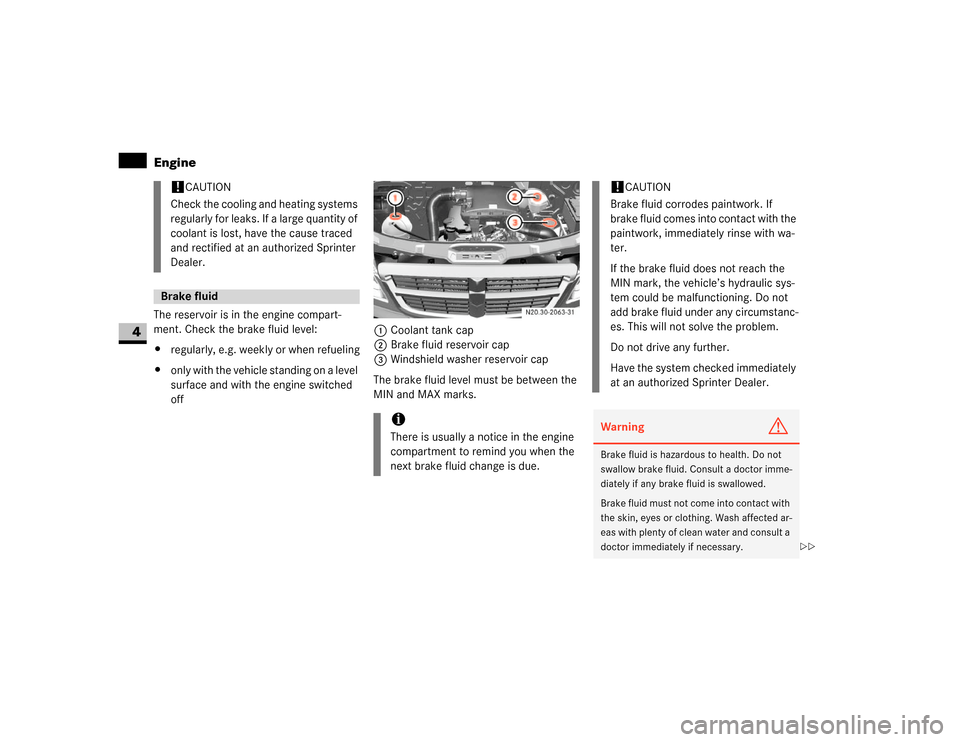
The reservoir is in the engine compart-
ment. Check the brake fluid level:
\4regularly, e.g. weekly or when refueling
\4only with the vehicle standing on a level
surface and with the engine switched
off1Coolant tank cap
2Brake fluid reservoir cap
3Windshield washer reservoir cap
The brake fluid level must be between the
MIN and MAX marks.
!
CAUTION
Check the cooling and heating systems
regularly for leaks. If a large quantity of
coolant is lost, have the cause traced
and rectified at an authorized Sprinter
Dealer.
Brake fluid
iThere is usually a notice in the engine
compartment to remind you when the
next brake fluid change is due.
N20.30-2063-31
!
CAUTION
Brake fluid corrodes paintwork. If
brake fluid comes into contact with the
paintwork, immediately rinse with wa-
ter.
If the brake fluid does not reach the
MIN mark, the vehicle’s hydraulic sys-
tem could be malfunctioning. Do not
add brake fluid under any circumstanc-
es. This will not solve the problem.
Do not drive any further.
Have the system checked immediately
at an authorized Sprinter Dealer.
Warning
G
Brake fluid is hazardous to health. Do not
swallow brake fluid. Consult a doctor imme-
diately if any brake fluid is swallowed.
Brake fluid must not come into contact with
the skin, eyes or clothing. Wash affected ar-
eas with plenty of clean water and consult a
doctor immediately if necessary.
\2\2
Page 194 of 393
193 Operation
Engine
4
For specifications of brake fluid, see
"Service products and capacities"
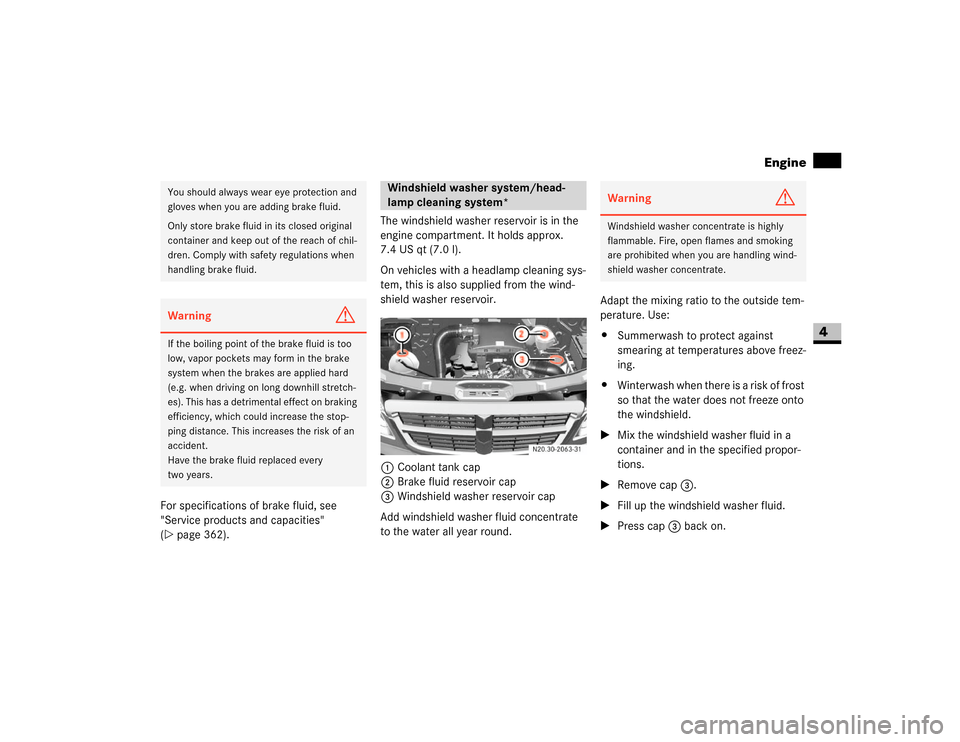
(\2page 362).The windshield washer reservoir is in the
engine compartment. It holds approx.
7.4 US qt (7.0 l).
On vehicles with a headlamp cleaning sys-
tem, this is also supplied from the wind-
shield washer reservoir.
1Coolant tank cap
2Brake fluid reservoir cap
3Windshield washer reservoir cap
Add windshield washer fluid concentrate
to the water all year round.Adapt the mixing ratio to the outside tem-
perature. Use:
\4Summerwash to protect against
smearing at temperatures above freez-
ing.
\4Winterwash when there is a risk of frost
so that the water does not freeze onto
the windshield.
\1Mix the windshield washer fluid in a
container and in the specified propor-
tions.
\1Remove cap3.
\1Fill up the windshield washer fluid.
\1Press cap3 back on.You should always wear eye protection and
gloves when you are adding brake fluid.
Only store brake fluid in its closed original
container and keep out of the reach of chil-
dren. Comply with safety regulations when
handling brake fluid.Warning
G
If the boiling point of the brake fluid is too
low, vapor pockets may form in the brake
system when the brakes are applied hard
(e.g. when driving on long downhill stretch-
es). This has a detrimental effect on braking
efficiency, which could increase the stop-
ping distance. This increases the risk of an
accident.
Have the brake fluid replaced every
two years.
Windshield washer system/head-
lamp cleaning system*
N20.30-2063-31
Warning
G
Windshield washer concentrate is highly
flammable. Fire, open flames and smoking
are prohibited when you are handling wind-
shield washer concentrate.
Page 196 of 393
195 Operation
Battery
4
\3 BatteryYour vehicle may be equipped with two
batteries, depending on the equipment
version:
\4Starter battery in the battery recess in
the driver’s footwell
\4Auxiliary battery in the engine compart-
ment*Warning
G
A
Risk of explosion
When batteries are being charged,
explosive detonating gas is emit-
ted. Only charge batteries in well-
ventilated areas.
D
Risk of explosion
Because of the risk of explosion,
avoid creating sparks from fire,
open flames and smoking.
B
Battery acid is caustic.
Wear acid-proof protective gloves.
Neutralize splashes of acid on skin
or clothing immediately with soapy
water or acid neutralizer and clean
with water.
C
Keep out of the reach of children.
Children cannot appreciate the
dangers involved in handling bat-
teries and acid.
E
Wear eye protection.
When mixing water and acid, the
liquid can splash in your eyes.
Rinse out your eyes immediately
after acid splashes with clean wa-
ter, and consult a doctor immedi-
ately.
F
When handling batteries, observe
the safety precautions and special
protective measures contained in
these operating instructions.
Environmental note
H
Á
Batteries contain pollutants. Do
not dispose of old batteries with
the household garbage.
À
Dispose of batteries in an environ-
mentally responsible manner.
Take batteries to an authorized
Sprinter Dealer or a special collec-
tion point for old batteries.
Transport and store full batteries
in an upright position. When trans-
porting batteries, secure them so
that they do not tip over. Battery
acid can spill from the cell cap
vents and cause damage to the en-
vironment.
Page 198 of 393
197 Operation
Battery isolating switch*
4
You can disconnect the current to all your
vehicle’s consumers using the battery
isolating switch. This will prevent uncon-
trolled battery discharge caused by quies-
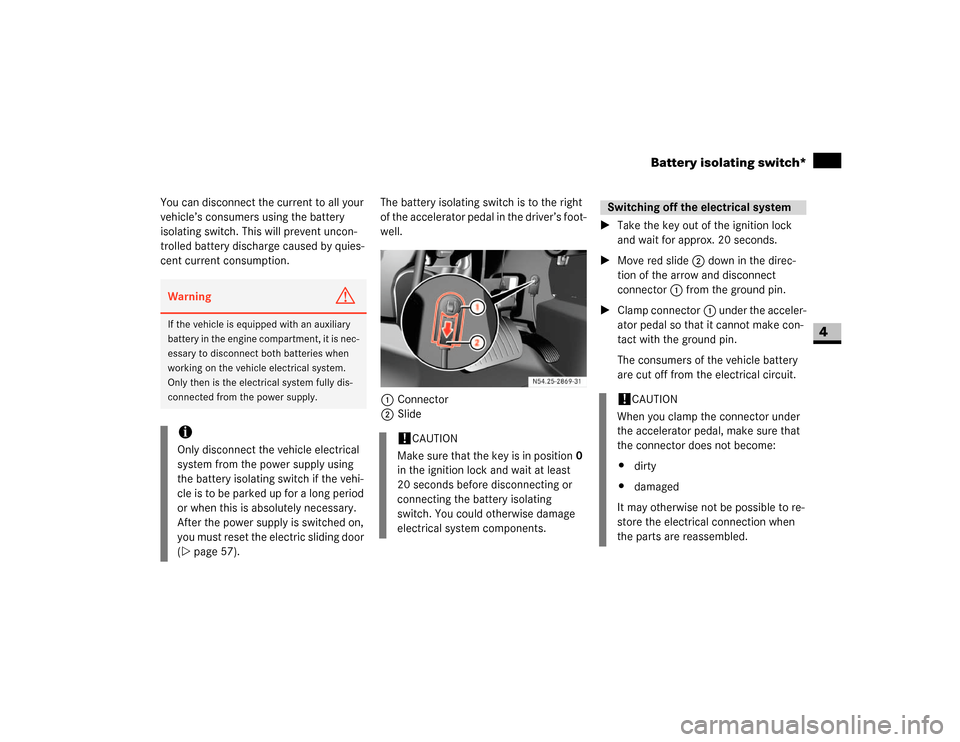
cent current consumption.The battery isolating switch is to the right
of the accelerator pedal in the driver’s foot-
well.
1Connector
2Slide\1Take the key out of the ignition lock
and wait for approx. 20 seconds.
\1Move red slide2 down in the direc-
tion of the arrow and disconnect
connector1 from the ground pin.
\1Clamp connector1 under the acceler-
ator pedal so that it cannot make con-
tact with the ground pin.
The consumers of the vehicle battery
are cut off from the electrical circuit.Warning
G
If the vehicle is equipped with an auxiliary
battery in the engine compartment, it is nec-
essary to disconnect both batteries when
working on the vehicle electrical system.
Only then is the electrical system fully dis-
connected from the power supply.iOnly disconnect the vehicle electrical
system from the power supply using
the battery isolating switch if the vehi-
cle is to be parked up for a long period
or when this is absolutely necessary.
After the power supply is switched on,
you must reset the electric sliding door
(\2page 57).
!
CAUTION
Make sure that the key is in position0
in the ignition lock and wait at least
20 seconds before disconnecting or
connecting the battery isolating
switch. You could otherwise damage
electrical system components.
Switching off the electrical system!
CAUTION
When you clamp the connector under
the accelerator pedal, make sure that
the connector does not become:
\4dirty
\4damaged
It may otherwise not be possible to re-
store the electrical connection when
the parts are reassembled.
Page 201 of 393
200 OperationTires and wheels
4
Only use wheels and tires which have been
tested and approved by the vehicle manu-
facturer.
Warning
G
Do not use a tire, wheel size or rating other
than that specified for your Sprinter vehicle.
Some combinations of unapproved tires and
wheels may change suspension dimensions
and performance characteristics, resulting
in changes to steering, handling, and brak-
ing of your Sprinter vehicle. This can cause
unpredictable handling and stress to steer-
ing and suspension components. You could
lose control and have an accident resulting
in serious injury or death. Only use the tire
and wheel sizes with load ratings approved
for your Sprinter vehicle, refer to "Tire and
loading information".
Never use a tire with a smaller load index or
speed index or capacity other than what was
originally equipped on your Sprinter vehicle.
Using a tire with a smaller load index could
result in tire overloading and failure. You
could lose control and have an accident.
Failure to equip the vehicle with tires having
adequate speed capability can result in sud-
den tire failure and loss of vehicle control.
!
CAUTION
Replacing original tires with tires of a
different size may result in false speed-
ometer and odometer readings.
Warning
G
Worn, old tires can cause accidents. If the
tire tread is badly worn, or if the tires have
sustained damage, replace them.
When replacing rims, only use genuine
wheel bolts approved by the vehicle manu-
facturer and specified for the particular rim
type. Failure to do so can result in the bolts
loosening and possibly an accident.
Do not use retreaded/remolded tires. This
process does not always permit previous
damage to be detected. Therefore vehicle
safety cannot be guaranteed if retreaded/
remolded tires are fitted.
Warning
G
Fitting other wheel sizes to the vehicle will
change the vehicle’s handling characteris-
tics and may lead to an accident resulting in
death, severe personal injuries and property
damage.
Only certain tires meeting the tire size/
load/speed rating specifications are certi-
fied to conform to FMVSS 110 for the
Sprinter vehicle at this time. Please check
your side walls of your originally equipped
tires for specific makes/sizes, and speed
load ratings when you need to replace your
tires.
To prevent accidents resulting in possible
death, severe injury or property damage,
use only the tire and wheel sizes with load
ratings approved for your Sprinter vehicle
for your tire replacement.
Refer to "Tire and loading information"
(\2page 205).
Page 202 of 393
201 Operation
Tires and wheels
4
Cuts and punctures in radial tires are re-
pairable only in the tread area because of
side wall flexing. Consult an authorized tire
dealer for radial tire repairs.\4Only use sets of tires and rims of the
same type and make.
\4Tires must be of the correct size for the
rim.
\4Break in new tires for approximately
65 miles (100 km) at moderate
speeds.
\4Regularly check the tires and rims for
damage. Dented or bent rims can
cause tire inflation pressure loss or
damage to the tire beads.
\4If the vehicle is heavily loaded, check
tire inflation pressure and correct as
required.
\4Do not allow your tires to wear down
too far. Adhesion properties on wet
roads are sharply reduced at tread
depths under
1/8in (3 mm) for sum-
mer tires and
1/6in (4 mm) for winter
tires.
Radial-ply tiresWarning
G
Combining radial ply tires with other types
of tires on your Sprinter vehicle will change
the vehicle’s handling characteristics and
may lead to an accident resulting in death,
severe personal injuries and property dam-
age. Always use radial ply tires in sets of 4
(or 6, in case of vehicles with dual rear
wheels).
Never combine them with other types of
tires.
Tire valves (snap-in valves)Warning
G
Sprinter tire valves are tested and approved
under rough operating conditions.
The installation of additional hub caps or
other wheel simulators could cause damage
to the tire valve and lead to a loss of tire
pressure at the valve stem.
Do not install any of these parts on your
Sprinter vehicle. To help ensure safe and re-
liable operation of your Sprinter vehicle,
only use parts and accessories tested and
approved by the vehicle manufacturer for
your Sprinter vehicle.!
CAUTION
For safety reasons, the following tire
valves from the Schrader company
must be used on the vehicles:
\4TR 600 for vehicle model type 2500
\4TR 418 for vehicle model type 3500
Other tire valves could be damaged by
the specified tire pressures.Important guidelines
Page 203 of 393
202 OperationTires and wheels
4
\4When replacing individual tires, you
should mount new tires on the front
wheels first.
The tire inflation pressure should be
checked regularly, i.e. at least each time
you refuel the vehicle. The preferred inter-
val for checking the tire inflation pressure,
however, is before each trip.
For more information on checking tire in-
flation pressure, refer to "Recommended
tire inflation pressure" (\2page 210).Tire inspection
Every time when checking the tire inflation
pressure, the tires should also be inspect-
ed for the following:
\4excessive treadwear, refer to "Tread
depth". the condition of the tread
depths, i.e. uneven tread wear or ex-
cessive treadwear on one side. Turn
the front wheels to full lock if neces-
sary to enable you to check the inner
edge of the front tires more easily. You
must also always check the inside of
the tire tread on the rear wheels.
\4cord or fabric showing through the
tire’s rubber
\4bumps, bulges, cuts, cracks or splits in
the tread or side of the tire
\4foreign objects between the tires
(on vehicles with twin tires)
Replace the tire if any of the above condi-
tions is found.
Also inspect the spare tire periodically for
condition and inflation. Spare tires will age
and become worn over time even if never
used, and thus should be inspected and re-
placed when necessary.Tire damage
Tire damage can be caused
by:
\4the vehicle’s operating conditions
\4tire aging
\4curbs
\4foreign objects
\4insufficient or excessive tire pressures
\4weather and environmental influences
\4contact with oil, grease, fuel, etc.
Tire care and maintenanceWarning
G
Regularly check the tires for damage. Dam-
aged tires can cause tire inflation pressure
loss. As a result, you could lose control of
your vehicle.
Worn, old tires can cause accidents. If the
tire tread is badly worn, or if the tires have
sustained damage, replace them.
Warning
G
Driving over curbs or sharp-edged objects
can cause damage to the tire substructure
which is not visible from the outside.
Damage to the tire substructure cannot be
detected until later and can cause the tire to
burst.
\2\2
Page 204 of 393
203 Operation
Tires and wheels
4
Life of tire
The service life of a tire depends on varying
factors including but not limited to:
\4Driving style
\4Tire inflation pressure
\4Distance drivenTread depth
Do not allow your tires to wear down too
far. Adhesion properties on wet roads are
sharply reduced at tread depths under
1/8in (3 mm) for summer tires and
1/6in
(4 mm) for winter tires.
Treadwear indicators (TWI) are required by
law. These indicators are located in six
places on the tread circumference and be-
come visible at a tread depth of approxi-
mately
1/16
in (1.6 mm), at which point
the tire is considered worn and should be
replaced.
Recommended minimum tire tread depth:
\4Summer tires
1/8in (3 mm)
\4Winter tires
1/6in (4 mm)
You could lose control of the vehicle as a re-
sult, cause an accident and injure yourself
or others.
Avoid driving up against curbs or parking the
vehicle with part of the tire tread surface on
the curb.Warning
G
Tires and spare tire should be replaced after
6 years, regardless of the remaining tread.
Warning
G
Although the applicable federal motor safety
laws consider a tire to be worn when the
Treadwear Indicators (TWI) become visible
at approximately
1/16in (1.6 mm), we rec-
ommend that you do not allow your tires to
wear down to that level. As tread depth ap-
proaches
1/8in (3 mm) for summer tires or
1/6in (4 mm) for winter tires, the adhesion
properties on a wet road are sharply re-
duced.
Depending upon the weather and/or road
surface (conditions), the tire traction varies
widely.
Page 206 of 393
205 Operation
Tires and wheels
4
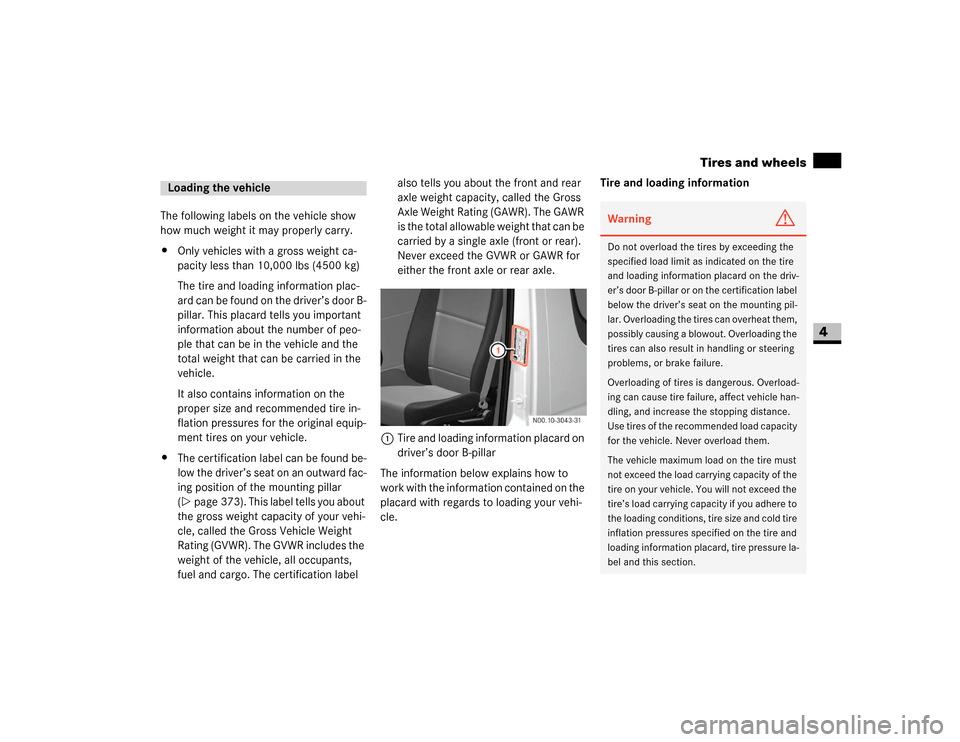
The following labels on the vehicle show
how much weight it may properly carry.
\4Only vehicles with a gross weight ca-
pacity less than 10,000 lbs (4500 kg)
The tire and loading information plac-
ard can be found on the driver’s door B-
pillar. This placard tells you important
information about the number of peo-
ple that can be in the vehicle and the
total weight that can be carried in the
vehicle.
It also contains information on the
proper size and recommended tire in-
flation pressures for the original equip-
ment tires on your vehicle.
\4The certification label can be found be-
low the driver’s seat on an outward fac-
ing position of the mounting pillar
(\2page 373). This label tells you about
the gross weight capacity of your vehi-
cle, called the Gross Vehicle Weight
Rating (GVWR). The GVWR includes the
weight of the vehicle, all occupants,
fuel and cargo. The certification label also tells you about the front and rear
axle weight capacity, called the Gross
Axle Weight Rating (GAWR). The GAWR
is the total allowable weight that can be
carried by a single axle (front or rear).
Never exceed the GVWR or GAWR for
either the front axle or rear axle.
1Tire and loading information placard on
driver’s door B-pillar
The information below explains how to
work with the information contained on the
placard with regards to loading your vehi-
cle.Tire and loading informationLoading the vehicle
Warning
G
Do not overload the tires by exceeding the
specified load limit as indicated on the tire
and loading information placard on the driv-
er’s door B-pillar or on the certification label
below the driver’s seat on the mounting pil-
lar. Overloading the tires can overheat them,
possibly causing a blowout. Overloading the
tires can also result in handling or steering
problems, or brake failure.
Overloading of tires is dangerous. Overload-
ing can cause tire failure, affect vehicle han-
dling, and increase the stopping distance.
Use tires of the recommended load capacity
for the vehicle. Never overload them.
The vehicle maximum load on the tire must
not exceed the load carrying capacity of the
tire on your vehicle. You will not exceed the
tire’s load carrying capacity if you adhere to
the loading conditions, tire size and cold tire
inflation pressures specified on the tire and
loading information placard, tire pressure la-
bel and this section.