DODGE SPRINTER 2007 2.G Owners Manual
Manufacturer: DODGE, Model Year: 2007, Model line: SPRINTER, Model: DODGE SPRINTER 2007 2.GPages: 393, PDF Size: 7.61 MB
Page 231 of 393
230 OperationTires and wheels
4
Production options weight
The combined weight of those installed
regular production options weighing over
5 lbs (2.3 kilograms) in excess of those
standard items which they replace, not
previously considered in curb weight or ac-
cessory weight, including heavy duty
brakes, ride levelers, roof rack, heavy duty
battery, and special trim.
PSI (P
ounds per S
quare I
nch)
A standard unit of measure for air pres-
sure. Another metric unit for air pressure is
bar or kilopascal (kPa).
Recommended tire inflation pressure
Recommended tire inflation pressure list-
ed on the placard located on driver’s door
B-pillar for normal driving conditions. Pro-
vides best handling, tread life and riding
comfort.Rim
A metal support for a tire or a tire and tube
assembly upon which the tire beads are
seated.
Side wall
The portion of a tire between the tread and
the bead.
TIN (T
ire I
dentification N
umber)
Unique identifier which facilitates efforts
by tire manufacturers to notify purchasers
in recall situations or other safety matters
concerning tires and gives purchases the
means to easily identify such tires. The TIN
is comprised of the “manufacturer’s identi-
fication mark”, “tire size”, “tire type code”
and “date of manufacture”.
Tire load rating
Numerical code associated with the maxi-
mum load a tire can support.Tire ply composition and material used
This indicates the number of plies or the
number of layers of rubber-coated fabric in
the tire tread and side wall. Tire manufac-
turers also must indicate the ply materials
in the tire and side wall, which include
steel, nylon, polyester, and others.
Tire speed rating
Part of tire designation; indicates the
speed range for which a tire is approved.
Traction
Force exerted by the vehicle on the road
via the tires. The amount of grip provided.
Tread
The portion of a tire that comes into con-
tact with the road.
Treadwear Indicators
Narrow bands, sometimes called
“wear bars” that show across the tread of
a tire when only
1/16
in (1.6 mm) of tread
remains.
Page 232 of 393
231 Operation
Tires and wheels
4
TWR (T
ongue W
eight R
ating)
Maximum permissible weight on the trailer
tongue.
Uniform tire quality grading standards
A tire information system that provides
consumers with ratings for a tire’s traction,
temperature and treadwear. Ratings are
determined by tire manufacturers using
government testing procedures. The rat-
ings are molded into the side wall of the
tire.
Vehicle capacity weight
Rated cargo and luggage load plus
68 kilograms (150 lbs) times the vehicle’s
designated seating capacity.
Vehicle maximum load on the tire
Load on an individual tire that is deter-
mined by distributing to each axle its share
of the maximum loaded vehicle weight and
dividing it by two.
Tires on the front and rear axles of vehicles
operate at different loads and perform dif-
ferent steering, driving and braking func-
tions. For these reasons, they wear at unequal rates, and develop irregular wear
patterns. These effects can be reduced by
timely rotation of tires.
The benefits of rotation are especially
worthwhile with aggressive tread designs
such as those on On/Off Road type tires.
Rotation will increase tread life, help to
maintain mud, snow, and wet traction lev-
els, and contribute to a smooth ride.
If applicable to your vehicle’s tire configu-
ration, tires can be rotated according to
the tire manufacturer’s recommended in-
tervals in the tire manufacturer’s warranty
pamphlet located in your vehicle literature
portfolio. If none is available, tires should
be rotated every 10,000 miles
(16,000 km), or sooner if necessary, ac-
cording to the degree of tire wear.
The same rotation (spinning) direction
must be maintained when mounted, see
"Direction of rotation" (\2page 204).
Rotate tires before the characteristic tire
wear pattern becomes visible (shoulder
wear on front tires and tread center wear
on rear tires).
Rotating tiresWarning
G
Rotate front and rear wheels only if they are
of the same dimension.
Changing the tire dimension for an axle
\4could cause the tire to come into con-
tact with the vehicle body or axle parts.
Damage to the tire or the vehicle may be
the result.
\4could result in changes to steering, han-
dling, and braking of your Sprinter vehi-
cle. This can cause unpredictable
handling and stress to steering and sus-
pension components. You could lose
control and have an accident resulting in
serious injury or death.
\4could result in tire overloading and fail-
ure, if the tires' load index are not iden-
tical. You could lose control and have an
accident.
Page 233 of 393
232 OperationTires and wheels
4
The reasons for any rapid or unusual wear
should be corrected prior to rotation being
performed.
Thoroughly clean the mounting face of
wheels and brake disks, i.e. the inner side
of the wheels/tires, during each rotation.
Check for and ensure proper tire inflation
pressure, refer to "Recommended tire in-
flation pressure" (\2page 210).
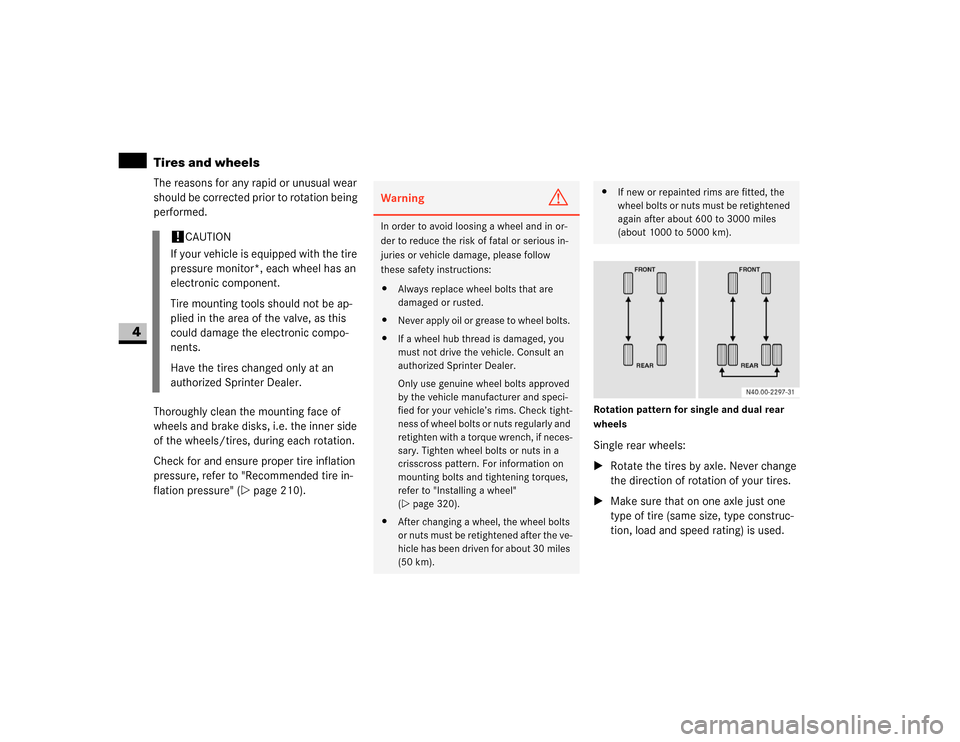
Rotation pattern for single and dual rear
wheelsSingle rear wheels:
\1Rotate the tires by axle. Never change
the direction of rotation of your tires.
\1Make sure that on one axle just one
type of tire (same size, type construc-
tion, load and speed rating) is used.
!
CAUTION
If your vehicle is equipped with the tire
pressure monitor*, each wheel has an
electronic component.
Tire mounting tools should not be ap-
plied in the area of the valve, as this
could damage the electronic compo-
nents.
Have the tires changed only at an
authorized Sprinter Dealer.
Warning
G
In order to avoid loosing a wheel and in or-
der to reduce the risk of fatal or serious in-
juries or vehicle damage, please follow
these safety instructions:
\4Always replace wheel bolts that are
damaged or rusted.
\4Never apply oil or grease to wheel bolts.
\4If a wheel hub thread is damaged, you
must not drive the vehicle. Consult an
authorized Sprinter Dealer.
Only use genuine wheel bolts approved
by the vehicle manufacturer and speci-
fied for your vehicle’s rims. Check tight-
ness of wheel bolts or nuts regularly and
retighten with a torque wrench, if neces-
sary. Tighten wheel bolts or nuts in a
crisscross pattern. For information on
mounting bolts and tightening torques,
refer to "Installing a wheel"
(\2page 320).
\4After changing a wheel, the wheel bolts
or nuts must be retightened after the ve-
hicle has been driven for about 30 miles
(50 km).
\4If new or repainted rims are fitted, the
wheel bolts or nuts must be retightened
again after about 600 to 3000 miles
(about 1000 to 5000 km).
Page 234 of 393
233 Operation
Tires and wheels
4
Dual rear wheels:
\1Rotate front tires by axle and the outer
rear tire side to side if there is no ap-
proved direction of rotation.
The tires used on dual wheel assem-
blies should be matched for wear to
prevent overloading one tire in a set.
\1To check if tires are even, lay a straight
edge across all four tires.
The straight edge should touch all the
tires.
For information on wheel change, see the
“Practical hints” section (\2page 320).
!
CAUTION
3500 dual rear tires have only one ap-
proved direction of rotation. This is to
accommodate the asymmetrical de-
sign (tread pattern) of the ON/OFF
road tire and the use of Outline White
Letter (OWL) tires.
When replacing a flat tire, the spare tire
may have to be remounted on the rim
or installed at a different location to
maintain the correct placement of the
tire on the wheel relative to the tire/
wheel position on the vehicle. For ex-
ample, if the spare is used to replace an
outer rear tire it will have to remounted
on the rim so that the wheel is dished
inward.
That way the tread design of asymmet-
rical tires and the white writing of the
OWL tires will maintain proper position.
Page 235 of 393
234 OperationWinter driving
4
\3 Winter drivingHave your vehicle winterproofed at the
onset of winter at an authorized Sprinter
Dealer. This service includes the following:
\4Oil change, if the current engine oil
used has not been approved for winter
use
\4The antifreeze / anti-corrosion concen-
tration in the coolant is checked
\4The addition of a concentrated clean-
ing agent to the water in the windshield
washer system
\4Battery check
\4A tire change
You will find information about diesel fuel
for use at low outside temperatures in the
“Technical data” section (\2page 360).
Please also observe the information about
winter driving (\2page 235).Always use winter tires at temperatures
below 45°F (7°C) and whenever wintry
road conditions prevail. Winter tires should
be of the same size and type construction
as the summer tires.
Winter tires should also be operated as
printed on the tire and loading information
placard, refer to "Tires and wheels"
(\2page 199). Not all M+S rated radial-ply
tires provide special winter performance.
Make sure the tires you use show M+S and
the mountain/snowflake marking.on
the tire side wall. These tires meet specific
snow traction performance requirements
of the Rubber Manufacturers Association
(RMA) and the Rubber Association of Can-
ada (RAC) and have been designed specif-
ically for use in snow conditions. Use of
winter tires is the only way to achieve the
maximum effectiveness of the ABS, BAS,
ASR and ESP
® in winter operation.
For safe handling, make sure all winter
tires mounted are of the same make and
have the same tread design.Always observe the speed rating of the
winter tires installed on your vehicle. If the
maximum speed for which your tires are
rated is below the speed rating of your ve-
hicle, you must place a notice to this effect
where it will be seen by the driver. Such no-
tices are available at your tire dealer or any
authorized Sprinter Dealer.
\1Reactivate the tire pressure monitor.
While studded tires improve performance
on ice, skid and traction capability on wet
or dry surfaces may be poorer than that of
non-studded tires. Some states prohibit
studded tires; therefore, local laws should
be checked before using these tire types.
Winter tires
Warning
G
Winter tires with a tread depth under 1/6 in
(4 mm) must be replaced. They are no long-
er suitable for winter operation.
Page 236 of 393
235 Operation
Winter driving
4
Drive with particular care on icy roads.
Avoid sudden acceleration, steering move-
ments and braking.If it seems likely that the vehicle is about to
enter a skid or cannot be stopped at a low
speed:
\4Move the selector lever to position N.
\4Try to maintain control of the vehicle
using light corrective steering.
Road salt may adversely affect braking ef-
ficiency. It may therefore be necessary to
apply the brakes more forcefully in order to
achieve the same braking force as normal.
Apply the brakes regularly when making
longer journeys on gritted or salted roads.
This will have the effect of restoring the
brakes to their normal level of perfor-
mance.
When stopping the vehicle after traveling
on roads that have been salted, check that
the brakes are fully functional before pro-
ceeding further.
Warning
G
If you use your spare tire when winter tires
are fitted on the other wheels, be aware that
the difference in tire characteristics may im-
pair turning stability and overall driving sta-
bility may be reduced. Adapt your driving
style accordingly.
Have the spare tire replaced with a winter
tire at the nearest authorized Sprinter Deal-
er.iWhen they have been removed, store
wheels and tires in a cool, dry, and if
possible dark place. Protect the tires
from oil, grease, and gasoline / diesel.
Driving in winterWarning
G
Downshifting to brake could cause the drive
wheels to lose grip on a slippery surface due
to the increased difference in speed be-
tween the engine and the drive wheels at
this time.
Do not downshift for additional engine brak-
ing on a slippery surface. Use the service
brake in accordance with road conditions.
Only downshift to a lower gear when travel-
ing at a low engine speed.
Page 237 of 393
236 OperationWinter driving
4
Use "Class U" chains, or other traction aids
that meet SAE Type "U" specifications.
Snow chains must be the proper size for
the vehicle, as recommended by the chain
manufacturer. They should only be driven
on snow-covered roads at speeds not to
exceed 30 mph (50 km / h). Remove
chains as soon as possible when driving on
roads without snow.Please observe the following guidelines
when using snow chains:
\4Snow chains should only be used on
rear wheels. In vehicles with dual rear
wheels, they should be mounted on the
exterior wheels. Follow the manufac-
turer’s mounting instructions.
\4Only use snow chains that are ap-
proved by the vehicle manufacturer.
For approved snow chains, please con-
tact your authorized Sprinter Dealer.
\4Use of snow chains may be prohibited
depending on location. Always check
local and state laws before mounting
snow chains.
To avoid damage to your vehicle, tires or
chains, observe the following precautions:
\4Because of limited chain clearance be-
tween tires and other suspension com-
ponents, it is important that only
chains in good condition are used. Bro-
ken chains can cause serious vehicle
damage. Stop the vehicle immediately if noise occurs that could suggest chain
breakage. Remove the damaged parts
of the chain before further use.
\4Install chains as tightly as possible and
then retighten after driving about 1/2
mile (0.8 km).
\4Do not exceed 30 mph (50 km/h).
\4Drive cautiously and avoid severe turns
and large bumps, especially with a
loaded vehicle.
\4Do not install tire chains on front
wheels.
\4Do not drive for a prolonged period on
dry pavement.
\4Observe the tire chain manufacturer’s
instructions on method of installation,
operating speed, and conditions for us-
age. Always use the lower suggested
operating speed of the chain manufac-
turer if different than the speed recom-
mended by the manufacturer.Snow chains!
CAUTION
Use snow chains on rear wheels only.
Some tire sizes do not leave adequate
clearance for snow chains. To help
avoid serious damage to your vehicle or
tires, use of snow chains is not permis-
sible with the spare wheel.
iWhen driving with snow chains, you
may wish to deactivate the ASR
(\2page 44) before setting the vehicle
in motion. This will improve the vehi-
cle’s traction.
Page 238 of 393
237 Operation
Maintenance and servicing
4
\3 Maintenance and servicing
Mechanical elements and the lubricants
used for them must be carefully matched.
For this reason, only brands tested and ap-
proved by the manufacturer should be
used. Please contact your Sprinter Dealer
to obtain the necessary information. No lu-
bricant additives should be used.
The use of such additives could affect your
warranty rights. Information is available
from any authorized Sprinter Dealer.
For specifications of engine oils, coolant
and brake fluid, see "Service products and
capacities" (\2page 355) and contact your
authorized Sprinter Dealer.
Observe the information on spare parts in
the “Technical data” section
(\2page 352).
Warning
G
Before carrying out maintenance operations
and repairs, please make sure that you read
the relevant sections of the technical docu-
mentation, such as:
\4Operating instructions and workshop in-
formation
Familiarize yourself in advance in particular
with legal requirements, such as:
\4Safety at work and accident prevention
regulations.
You may otherwise fail to recognize dangers
and could injure yourself or others.
When working underneath the vehicle, you
must place the vehicle on stands with suffi-
cient load-bearing capacity.
Never use the vehicle jack instead. There is
a risk that the vehicle jack could give way
and the vehicle could drop, seriously injuring
yourself or others, or causing damage to
property.
The jack is only designed to raise the vehicle
for a short time.
Always have the maintenance work carried
out and checked at an authorized Sprinter
Dealer which has the necessary specialist
knowledge and tools to carry out the work
required.
The manufacturer recommends that you use
an authorized Sprinter Dealer for this pur-
pose. In particular, work relevant to safety
or on safety-related systems must be car-
ried out at an authorized Sprinter Dealer.
Service products
Page 239 of 393
238 OperationMaintenance and servicing
4
ASSYST, the A
ctive S
ervice Syst
em, in-
forms you when the next service is due.
A service that is due is displayed about a
month or 1900 miles (3000 km) in ad-
vance. A message is then displayed while
the vehicle is in motion or the ignition is
switched on.
Service due date display
Vehicles with steering wheel buttons
The following messages may be displayed:
\49
Service A in .. days
\49
Service A in .. miles
(km)
\49
Service A due now
The letters
A or
B indicate the type of ser-
vice that is due.
Warning
G
If handled incorrectly, service products can
constitute a health risk for people and an en-
vironmental hazard.
Always observe relevant guidelines for han-
dling, storing and disposing of service prod-
ucts.
Active Service System (ASSYST)*!
CAUTION
Periods when the battery is disconnect-
ed will not be recorded by ASSYST. To
make sure that you have the vehicle
serviced at the correct time, you should
therefore subtract periods when the
battery is disconnected from the days
shown.
The service indicator does not provide
information about the engine oil level.
The service indicator should not, there-
fore, be confused with theP engine
oil level display.
iThe service due date is displayed in
days or kilometers, depending on the
total distance driven.
The time between the individual service
due dates depends on your style of
driving. You can increase this by:
\4driving with care and at a moderate
engine speed
\4avoiding short journeys where the
engine does not reach the operat-
ing temperature
Page 240 of 393
239 Operation
Maintenance and servicing
4
Vehicles without steering wheel buttons
The following messages may be displayed:
\49 for service A
\4´ for service B
The following are also shown, depending
on the style of driving:
\4the remaining distance in kilometers,
e.g.
1900 miles
(3000 km
)
\4the remaining time in days, e.g.
30 days
.
Missing the service due date
An authorized Sprinter Dealer, can reset
the service indicator when the service has
been carried out.Vehicles with steering wheel buttons*
If you have missed the service due date,
one of the following messages appears in
the display:
\49
Service A overdue by .. days
\49
Service A overdue by .. miles
(km)
A signal also sounds.
Vehicles without steering wheel buttons
If you have missed the service due date,
the following symbol flashes in the display
for 10 seconds after the ignition is
switched on:
\49 for service A
\4´ for service B
You will also see a minus sign before the
service due date.Calling up the service due date
\1Switch on the ignition (\2page 67).
The display is activated.
Vehicles with steering wheel buttons*
\1Press the è or ÿ button on the
steering wheel repeatedly until you see
the standard display (\2page 89) .
\1Press the j or k button on the
steering wheel repeatedly until you see
the following in the display, for exam-
ple:
\49
Service A in .. days
\49
Service A in .. miles
(km)
The letters
A or
B indicate the type of
service that is due.
!
CAUTION
If you fail to have the specified service
carried out, you could be in breach of
relevant regulations and warranty and
goodwill settlements could be invali-
dated.
\2\2