DODGE TRUCK 1993 Service Repair Manual
Manufacturer: DODGE, Model Year: 1993, Model line: TRUCK, Model: DODGE TRUCK 1993Pages: 1502, PDF Size: 80.97 MB
Page 1051 of 1502
21
- 50
G360
MANUAL
TRANSMISSION
•
FRAME RAIL
CROSSMEMBER
DRIVER SIDE
BRACKET
PASSENGER.
SIDE
BRACE
CROSSMEMBER
J9221-65
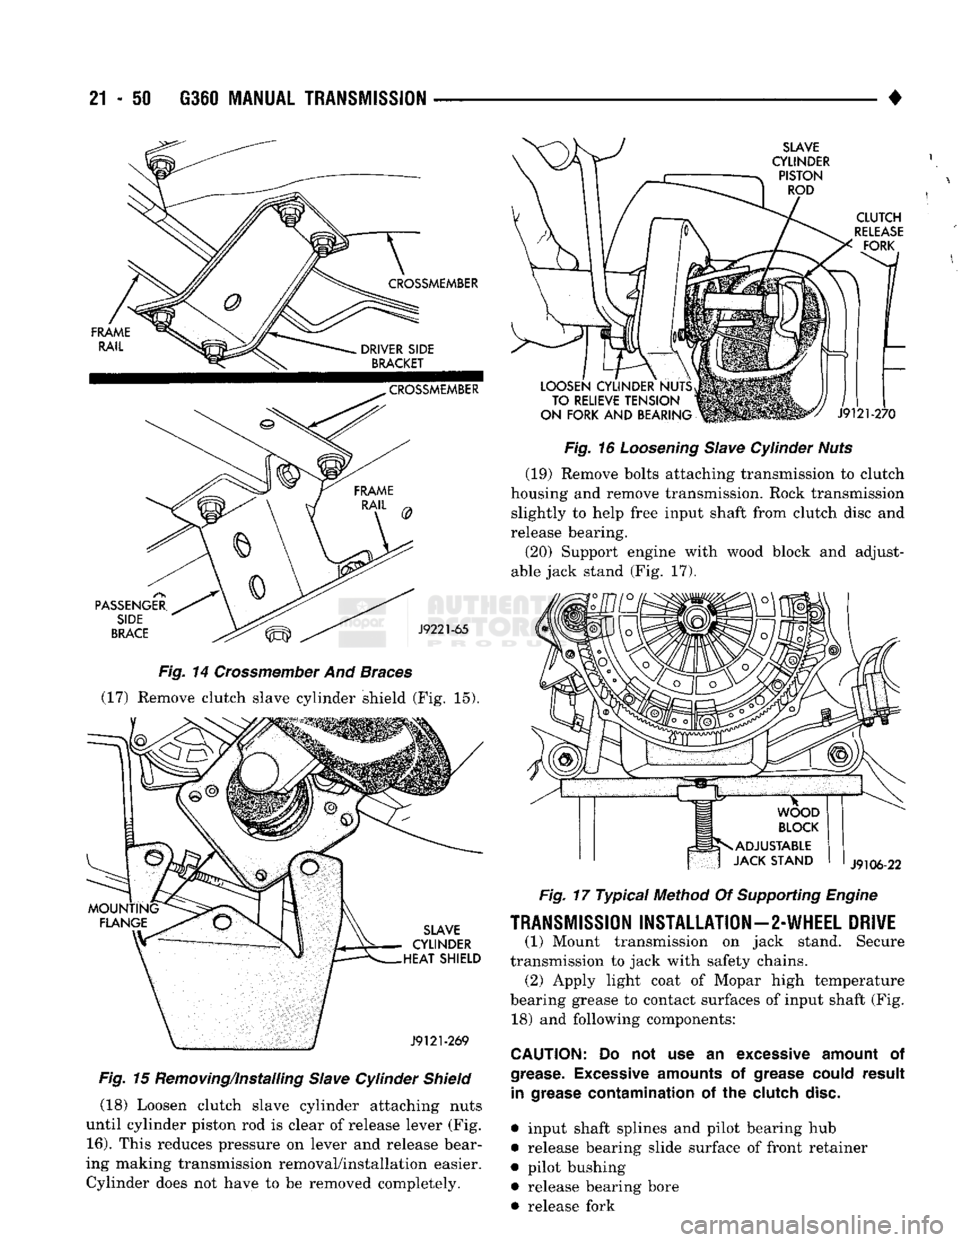
Fig.
14
Crossmember
And
Braces
(17) Remove clutch slave cylinder shield (Fig. 15).
SLAVE
CYLINDER
HEAT SHIELD
J9121-269
Fig.
15 Removing/Installing
Slave
Cylinder
Shield
(18) Loosen clutch slave cylinder attaching nuts
until cylinder piston rod is clear of release lever (Fig.
16).
This reduces pressure on lever and release bear
ing making transmission removal/installation easier. Cylinder does not have to be removed completely.
SLAVE
CYLINDER PISTON ROD
CLUTCH
RELEASE
FORK
LOOSEN CYLINDER NUTS TO RELIEVE TENSION
ON FORK AND BEARING
J9121-270
Fig.
16
Loosening
Slave
Cylinder
Nuts
(19) Remove bolts attaching transmission to clutch
housing and remove transmission. Rock transmission slightly to help free input shaft from clutch disc and
release bearing.
(20) Support engine with wood block and adjust
able jack stand (Fig. 17).
J9106-22
Fig.
17 Typical Method Of
Supporting
Engine
TRANSMISSION
INSTALLATION—2-WHEEL
DRIVE
(1) Mount transmission on jack stand. Secure
transmission to jack with safety chains. (2) Apply light coat of Mopar high temperature
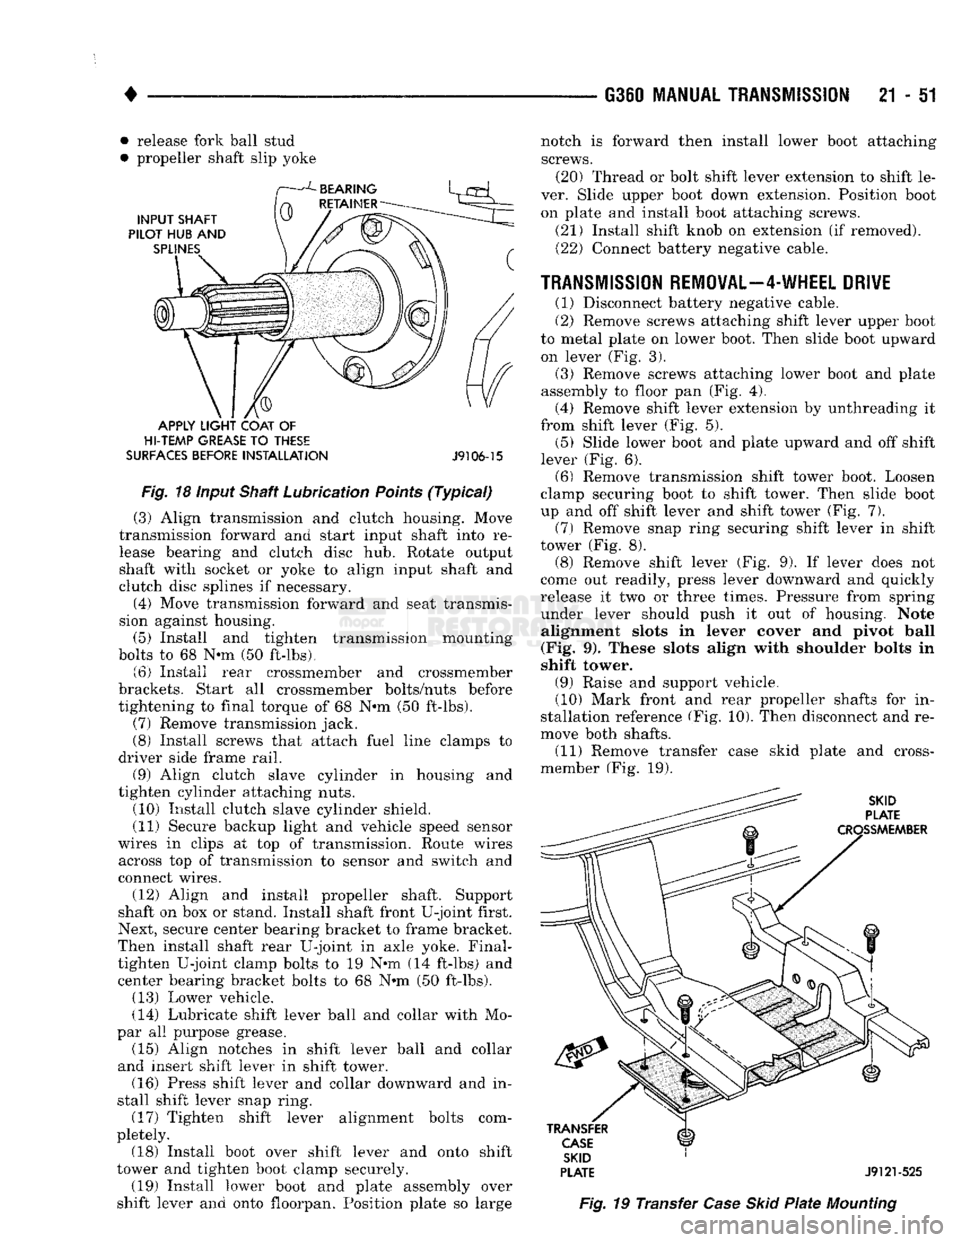
bearing grease to contact surfaces of input shaft (Fig. 18) and following components:
CAUTION:
Do not use an
excessive
amount
of
grease. Excessive
amounts
of
grease
could
result
in
grease
contamination
of the
clutch
disc.
• input shaft splines and pilot bearing hub
• release bearing slide surface of front retainer
• pilot bushing • release bearing bore
• release fork
Page 1052 of 1502
•
• release fork ball stud
• propeller shaft slip yoke
APPLY
LIGHT
COAT
OF
HI-TEMP
GREASE
TO
THESE
SURFACES
BEFORE
INSTALLATION
J9106-15
Fig.
18 input Shaft Lubrication
Points
(Typical)
(3) Align transmission and clutch housing. Move
transmission forward and start input shaft into re lease bearing and clutch disc hub. Rotate output
shaft with socket or yoke to align input shaft and
clutch disc splines if necessary.
(4) Move transmission forward and seat transmis
sion against housing. (5) Install and tighten transmission mounting
bolts to 68 N-m (50 ft-lbs). (6) Install rear crossmember and crossmember
brackets. Start all crossmember bolts/nuts before
tightening to final torque of 68 N»m (50 ft-lbs). (7) Remove transmission jack.
(8) Install screws that attach fuel line clamps to
driver side frame rail. (9) Align clutch slave cylinder in housing and
tighten cylinder attaching nuts. (10) Install clutch slave cylinder shield.
(11) Secure backup light and vehicle speed sensor
wires in clips at top of transmission. Route wires across top of transmission to sensor and switch and
connect wires.
(12) Align and install propeller shaft. Support
shaft on box or stand. Install shaft front U-joint first.
Next, secure center bearing bracket to frame bracket.
Then install shaft rear U-joint in axle yoke. Final- tighten U-joint clamp bolts to 19 N@m (14 ft-lbs) and center bearing bracket bolts to 68 N»m (50 ft-lbs). (13) Lower vehicle.
(14) Lubricate shift lever ball and collar with Mo
par all purpose grease. (15) Align notches in shift lever ball and collar
and insert shift lever in shift tower. (16) Press shift lever and collar downward and in
stall shift lever snap ring. (17) Tighten shift lever alignment bolts com
pletely. (18) Install boot over shift lever and onto shift
tower and tighten boot clamp securely. (19) Install lower boot and plate assembly over
shift lever and onto floorpan. Position plate so large G360
MANUAL TRANSMISSION
21 - 51
SKID
PLATE
J9121-525
Fig.
19 Transfer
Case
Skid
Plate
Mounting
notch is forward then install lower boot attaching
screws. (20) Thread or bolt shift lever extension to shift le
ver. Slide upper boot down extension. Position boot on plate and install boot attaching screws.
(21) Install shift knob on extension (if removed). (22) Connect battery negative cable.
TRANSMISSION REMOVAL—4-WHEEL DRIVE
(1) Disconnect battery negative cable.
(2) Remove screws attaching shift lever upper boot
to metal plate on lower boot. Then slide boot upward on lever (Fig. 3).
(3) Remove screws attaching lower boot and plate
assembly to floor pan (Fig. 4). (4) Remove shift lever extension by unthreading it
from shift lever (Fig. 5). (5) Slide lower boot and plate upward and off shift
lever (Fig. 6). (6) Remove transmission shift tower boot. Loosen
clamp securing boot to shift tower. Then slide boot
up and off shift lever and shift tower (Fig. 7).
(7)
Remove snap ring securing shift lever in shift
tower (Fig. 8). (8) Remove shift lever (Fig. 9). If lever does not
come out readily, press lever downward and quickly
release it two or three times. Pressure from spring under lever should push it out of housing. Note alignment slots in lever cover and pivot ball
(Fig. 9). These slots align with shoulder bolts in
shift tower.
(9) Raise and support vehicle.
(10) Mark front and rear propeller shafts for in
stallation reference (Fig. 10). Then disconnect and re
move both shafts. (11) Remove transfer case skid plate and cross-
member (Fig. 19).
Page 1053 of 1502
21 - 52 G360
MANUAL
TRANSMISSION
• (12) Disconnect wires at vehicle speed sensor and
backup light switch.
(13) Disconnect transfer case shift lever from lever
on transfer case.
(14) Temporarily support transmission with adjust
able jack stand. Then support transfer case with
transmission jack.
(15) Remove nuts attaching transfer case to trans
mission adapter and move transfer case away from
transmission rear retainer.
(16) Lower transfer case and move it from under
vehicle. Remove transfer case from transmission jack and place transfer case on workbench.
(17) Support transmission with transmission jack.
Secure transmission to jack with safety chains. Then
remove jack stand previously used to support trans
mission.
(18) Spread clamps that secure switch wires to
transmission top cover and remove wires from clamps. Move wires aside to protect them and pro
vide working clearance.
(19) Remove bolts attaching transmission rear
mount to crossmember.
(20) On some models, it is necessary to remove
screws attaching fuel line clamps to driver side
frame rail. Three clamps must be removed to so fuel lines can be moved for access to crossmember bolts at
this side of frame rail.
(21) Remove left and right crossmember-to-frame
braces and remove crossmember.
(22) Remove clutch slave cylinder shield.
(23) Loosen clutch slave cylinder attaching nuts
until cylinder piston rod is clear of release lever (Fig.
20).
This reduces pressure on lever and release bear
ing making transmission removal/installation easier. Cylinder does not have to be removed completely.
(24) Remove bolts attaching transmission to clutch
housing and remove transmission. Rock transmission slightly to help free input shaft from clutch disc and
release bearing.
(25) Support engine with wood block and another
adjustable jack stand.
TRANSMISSION
INSTALLATION—4-WHEEL
DRIVE
(1) Mount transmission on jack stand. Secure
transmission to jack with safety chains.
(2) Apply light coat of Mopar high temperature
bearing grease to contact surfaces of input shaft (Fig. 20) and following components:
CAUTION:
Do not use
excessive
amounts
of
grease.
This
practice
could
result in contamination of the
clutch
disc.
• input shaft splines and pilot bearing hub
• release bearing slide surface of front retainer
• pilot bushing
• release bearing bore
• release fork
• release fork ball stud • propeller shaft slip yoke
(3) Align transmission and clutch housing. Move
transmission forward and start input shaft into re lease bearing and hub of clutch disc. (4) Rotate output shaft with socket or yoke to align
input shaft and clutch disc splines. If input shaft will
not rotate enough in neutral to align splines, it will
be necessary to shift transmission into third or fourth gear with screwdriver. (5) Seat transmission against clutch housing and
align bolt holes in transmission and housing. (6) Install and tighten transmission-to-clutch hous
ing bolts to 68 N-m (50 ft. lbs.). (7) Install rear crossmember and mount. Start all
crossmember bolts/nuts then tighten them to 68 N*m (50 ft. lbs.) torque. (8) Remove transmission jack.
(9) Install screws that attach fuel line clamps to
driver side frame rail. (10) Align clutch slave cylinder in housing and
tighten cylinder attaching nuts. (11) Install clutch slave cylinder shield.
(12) Secure backup light and vehicle speed sensor
wires in clips at top of transmission. Route wires across top of transmission to sensor and switch and
connect wires.
(13) Install gasket and transfer case on transmis
sion rear retainer. Tighten transfer case attaching
nuts to 47 N-m (35 ft. lbs.) torque. (14) Check transmission and transfer case lubri
cant levels. Add lubricant if necessary and install fill
plugs.
(15) Connect transfer case shift lever to lever on
transfer case.
(16) Align and install propeller shafts. Tighten
U-joint clamp bolts to 19 N-m (14 ft. lbs.). (17) Install skid plate and crossmember. Tighten
skid plate and crossmember bolts/nuts to 41 N—m
(30 ft. lbs.) torque.
(18) Lower vehicle.
(19) Shift transmission into neutral if necessary.
(20) Lubricate shift lever ball and collar with Mo
par all purpose grease. (21) Align notches in shift lever ball and collar
and insert shift lever in shift tower. (22) Press shift lever and collar downward and in
stall shift lever snap ring. (23) Install boot over shift lever and onto shift
tower and tighten boot clamp securely. (24) Install lower boot and plate assembly over
shift lever and onto floorpan. Position plate so large
notch is forward then install lower boot attaching screws. (25) Thread or bolt shift lever extension to shift le
ver. Slide upper boot down extension. Position boot on plate and install boot attaching screws. (26) Install shift knob on extension (if removed).
(27) Connect battery negative cable.
Page 1054 of 1502
•
G360
TRANSMISSION OVERHAUL
21 - 53
G360
TRANSMISSION
OVERHAUL
INDEX
page
Transmission
Assembly
and
Adjustment
.......
63
Transmission
Cleaning
and
Inspection
59
TRANSMISSION
DISASSEMBLY
SHIFT COVER REMOVAL (1) Shift transmission into neutral.
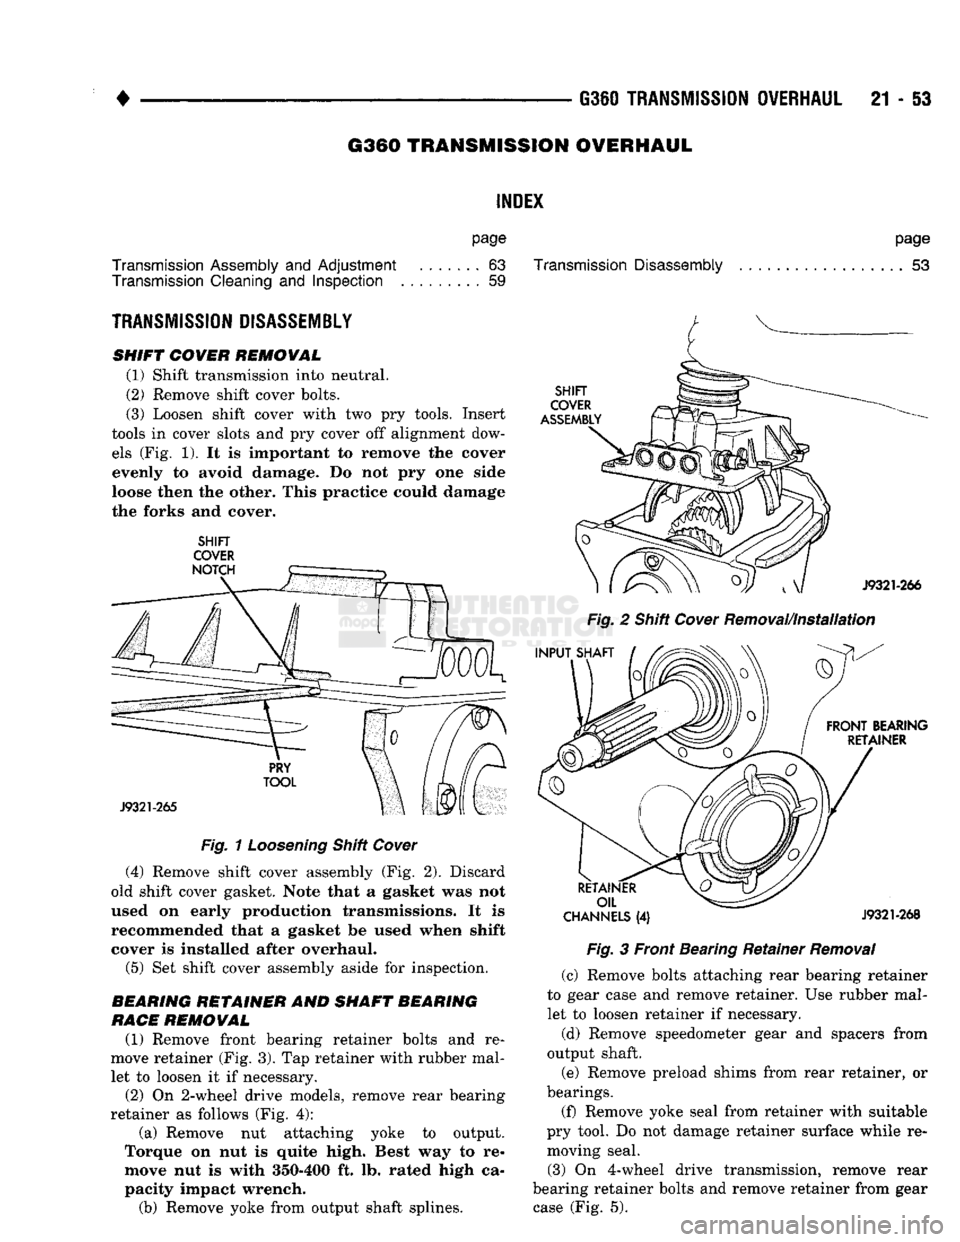
(2) Remove shift cover bolts.
(3) Loosen shift cover with
two pry
tools. Insert
tools
in
cover slots
and pry
cover
off
alignment dow els
(Fig. 1). It is
important
to
remove
the
cover evenly
to
avoid damage.
Do not pry one
side
loose then
the
other. This practice could damage the forks
and
cover.
SHIFT
COVER
Fig.
1
Loosening
Shift
Cover
(4) Remove shift cover assembly
(Fig. 2).
Discard
old shift cover gasket. Note that
a
gasket
was not
used
on
early production transmissions.
It is
recommended that
a
gasket
be
used when shift
cover
is
installed after overhaul. (5)
Set
shift cover assembly aside
for
inspection.
REARING
RETAINER
AND
SHAFT BEARING
RACE
REMOVAL (1) Remove front bearing retainer bolts
and re
move retainer
(Fig. 3). Tap
retainer with rubber mal let
to
loosen
it if
necessary.
(2)
On
2-wheel drive models, remove rear bearing
retainer
as
follows
(Fig. 4):
(a) Remove
nut
attaching yoke
to
output.
Torque
on nut is
quite high. Best
way to re
move
nut is
with 350-400
ft. lb.
rated high
ca
pacity impact wrench.
(b) Remove yoke from output shaft splines.
page
Transmission
Disassembly
53
Fig.
2
Shift
Cover
Removal/Installation
CHANNELS
(4)
J9321-268
Fig.
3
Front Bearing Retainer
Removal
(c) Remove bolts attaching rear bearing retainer
to gear case
and
remove retainer.
Use
rubber mal let
to
loosen retainer
if
necessary.
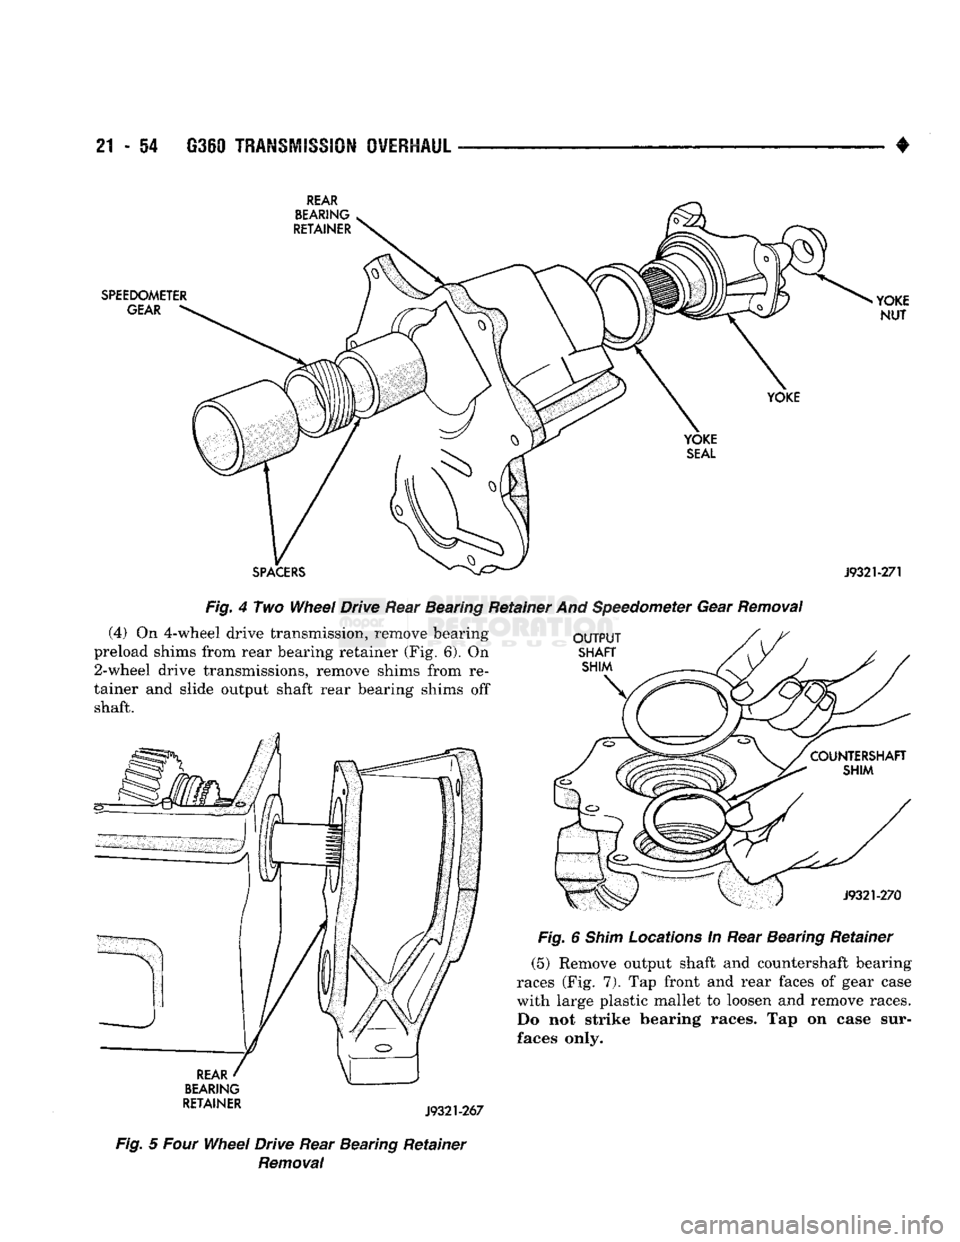
(d) Remove speedometer gear
and
spacers from
output shaft.
(e) Remove preload shims from rear retainer,
or
bearings.
(f) Remove yoke seal from retainer with suitable
pry tool.
Do not
damage retainer surface while
re
moving seal.
(3)
On
4-wheel drive transmission, remove rear
bearing retainer bolts
and
remove retainer from gear case
(Fig. 5).
Page 1055 of 1502
21
- 54
G350
TRANSMISSION
OVERHAUL
4-
REAR
BEARING
RETAINER
SPEEDOMETER
GEAR
>YOKE
NUT
YOKE
SPACERS
YOKE
SEAL
J9321-271
Fig.
4 Two Wheel Drive Rear Bearing Retainer And Speedometer Gear
Removal
(4)
On 4-wheel drive transmission, remove bearing
OUTPUT
preload shims from rear bearing retainer (Fig. 6). On
SHAFT
2-wheel
drive transmissions, remove shims from re-
SHIM
tainer and slide output shaft rear bearing shims off \, shaft.
REAR
BEARING
RETAINER
J9321-270
Fig.
6
Shim
Locations In Rear Bearing Retainer
(5)
Remove output shaft and countershaft bearing
races (Fig. 7). Tap front and rear faces of gear case
with large plastic mallet to loosen and remove races. Do not strike bearing races. Tap on case sur
faces only.
J9321-267
Fig.
5
Four
Wheel Drive Rear Bearing Retainer
Removal
Page 1056 of 1502
•
G360
TRANSMISSION
OVERHAUL
21 - ii
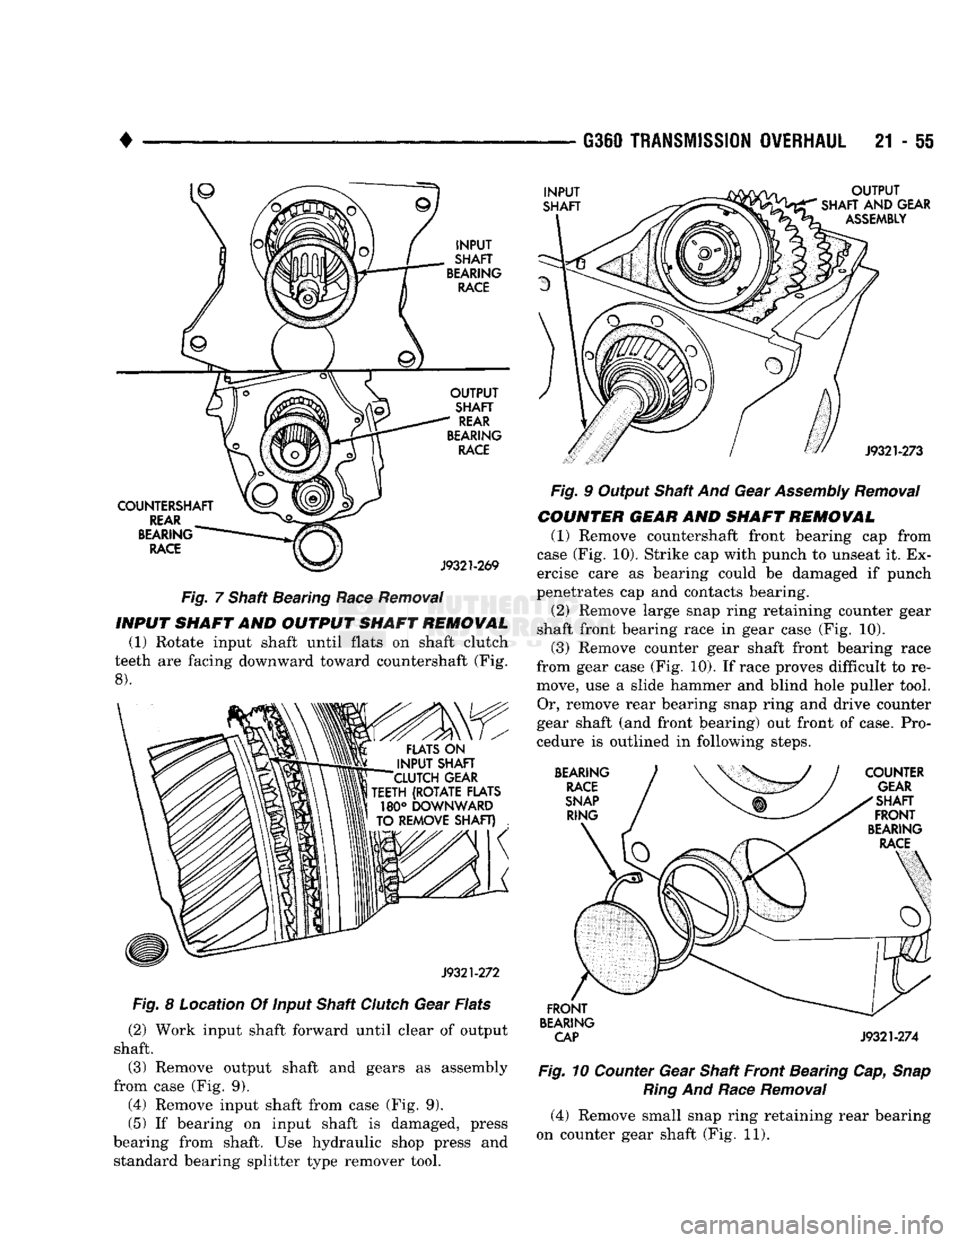
Fig. 7 Shaft Bearing Race Removal
INPUT
SHAFT
AND OUTPUT
SHAFT REMOWAL
(1)
Rotate input shaft until flats on shaft clutch
teeth are facing downward toward countershaft (Fig.
8).
Fig. 8 Location Of Input Shaft Clutch Gear Flats
(2)
Work input shaft forward until clear of output
shaft.
(3)
Remove output shaft and gears as assembly
from case (Fig. 9).
(4)
Remove input shaft from case (Fig. 9).
(5)
If bearing on input shaft is damaged, press
bearing from shaft. Use hydraulic shop press and standard bearing splitter type remover tool. Fig. 9 Output Shaft And Gear Assembly Removal
COUNTER GEAR
AND
SHAFT REMOWAL
(1)
Remove countershaft front bearing cap from
case (Fig. 10). Strike cap with punch to unseat it. Ex
ercise care as bearing could be damaged if punch
penetrates cap and contacts bearing.
(2)
Remove large snap ring retaining counter gear
shaft front bearing race in gear case (Fig. 10).
(3)
Remove counter gear shaft front bearing race
from gear case (Fig. 10). If race proves difficult to re move, use a slide hammer and blind hole puller tool. Or, remove rear bearing snap ring and drive counter
gear shaft (and front bearing) out front of case. Pro
cedure is outlined in following steps.
BEARING
CAP
J9321-274
Fig. 10 Counter Gear Shaft Front Bearing Cap, Snap Ring And Race Removal
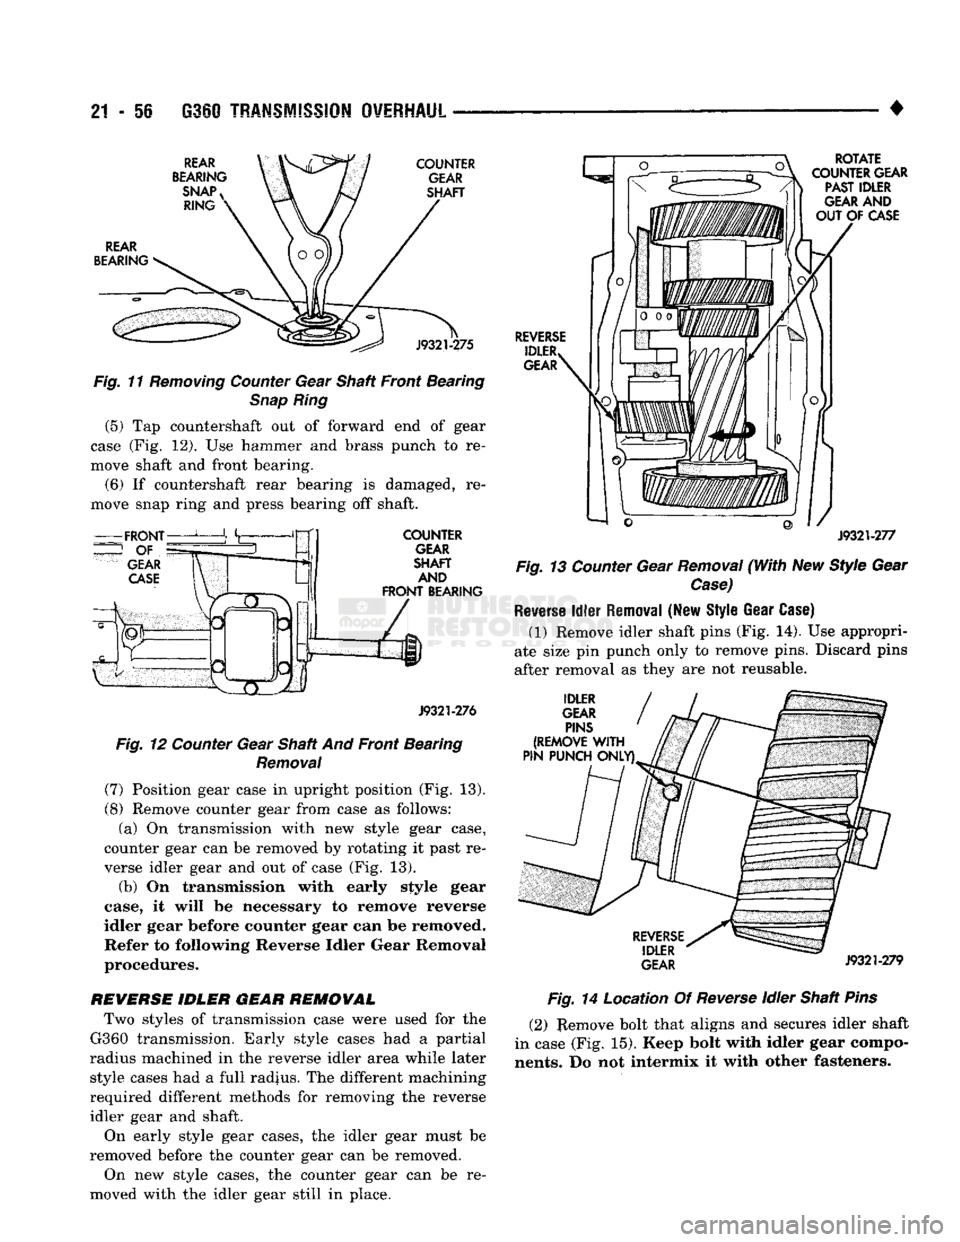
(4)
Remove small snap ring retaining rear bearing
on counter gear shaft (Fig. 11).
Page 1057 of 1502
21
-
56
G360
TRANSMISSION OVERHAUL
^ ^ ^ ^ •
REAR
BEARING
SNAP
RING COUNTER
GEAR
SHAFT
REAR
BEARING
J9321-275
Fig.
11
Removing
Counter
Gear Shaft Front Bearing
Snap
Ring
(5) Tap countershaft out of forward end of gear
case (Fig. 12). Use hammer and brass punch to re
move shaft and front bearing.
(6)
If countershaft rear bearing is damaged, re
move snap ring and press bearing off shaft.
COUNTER
GEAR
SHAFT
AND
FRONT
BEARING
J9321-276
Fig.
12
Counter
Gear Shaft And Front Bearing
Removal
(7) Position gear case in upright position (Fig. 13).
(8) Remove counter gear from case as follows: (a) On transmission with new style gear case,
counter gear can be removed by rotating it past re
verse idler gear and out of case (Fig. 13).
(b) On transmission with early style gear
case, it will be necessary to remove reverse
idler gear before counter gear can be removed. Refer to following Reverse Idler Gear Removal
procedures.
REVERSE IDLER GEAR REMOVAL Two styles of transmission case were used for the
G360 transmission. Early style cases had a partial
radius machined in the reverse idler area while later style cases had a full radius. The different machining
required different methods for removing the reverse idler gear and shaft.
On early style gear cases, the idler gear must be
removed before the counter gear can be removed.
On new style cases, the counter gear can be re
moved with the idler gear still in place.
REVERSE
IDLER
GEAR
ROTATE
COUNTER
GEAR
PAST
IDLER
GEAR
AND
OUT OF
CASE
J9321-277
Fig.
13
Counter
Gear
Removal
(With
New Style Gear
Case)
Reverse
Idler
Removal (New Style Gear Case)
(1) Remove idler shaft pins (Fig. 14). Use appropri
ate size pin punch only to remove pins. Discard pins
after removal as they are not reusable.
IDLER
GEAR
PINS
(REMOVE
WITH
PIN
PUNCH
ONLY)
REVERSE IDLER
GEAR
J9321-279
Fig.
14 Location Of
Reverse
Idler Shaft
Pins
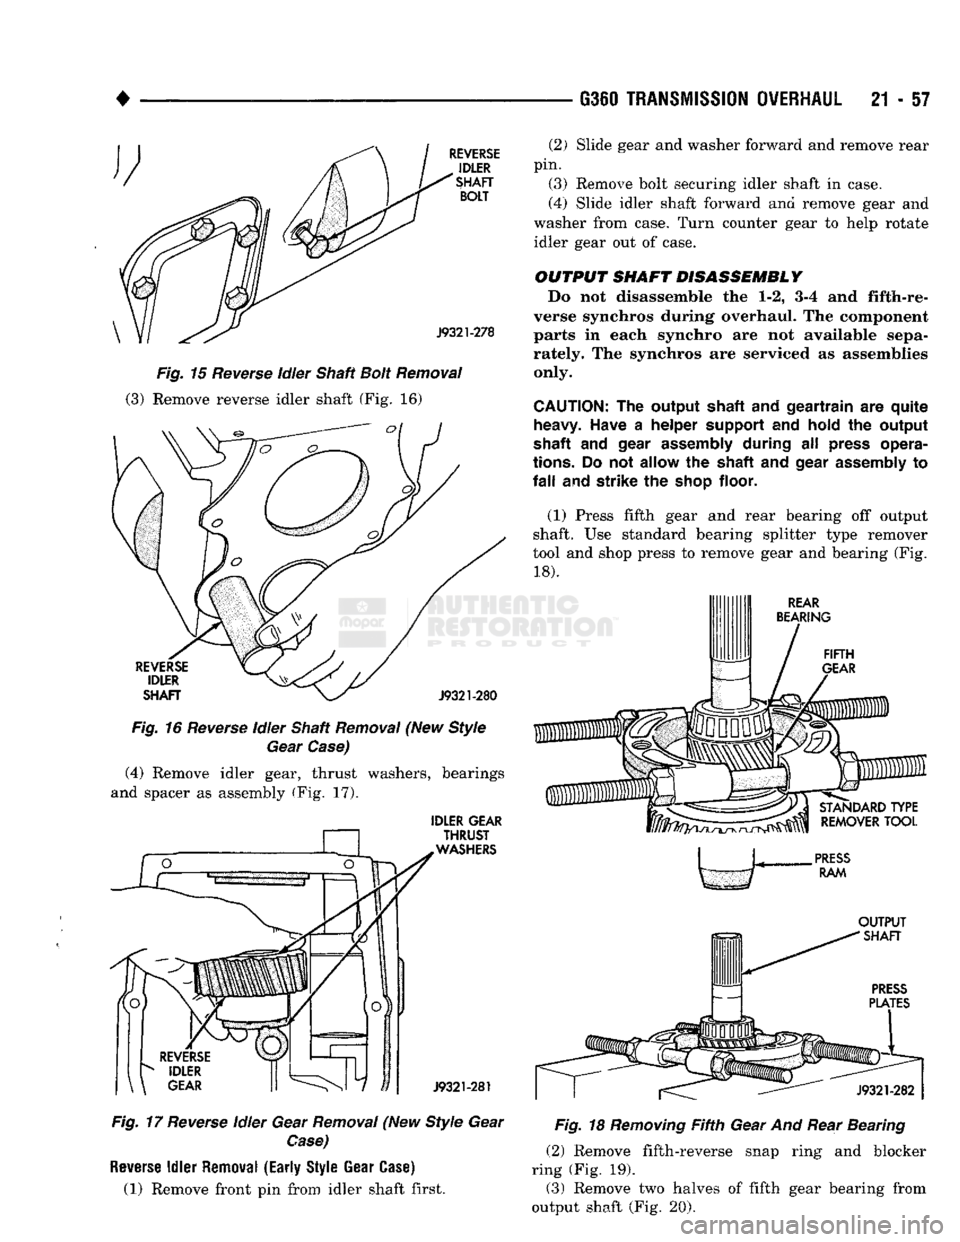
(2) Remove bolt that aligns and secures idler shaft
in case (Fig. 15). Keep bolt with idler gear compo
nents.
Do not intermix it with other fasteners.
Page 1058 of 1502
G350 TRANSMISSION OVERHAUL
21 - 57
REVERSE
IDLER
SHAFT
BOLT
J9321-278
Fig.
15
Reverse
idler
Shaft
-Bolt
Removal
(3) Remove reverse idler shaft (Fig. 16)
REVERSE
IDLER
SHAFT
J9321-280
Fig.
16
Reverse
Idler Shaft
Removal
(New Style
Gear
Case)
(4) Remove idler gear, thrust washers, bearings
and spacer as assembly (Fig. 17).
IDLER
GEAR
THRUST
WASHERS
J9321-281
Fig.
17
Reverse
Idler Gear
Removal
(New Style Gear
Case)
Reverse
Idler
Removal (Early Style Gear
Case)
(1) Remove front pin from idler shaft first. (2) Slide gear and washer forward and remove rear
pin.
(3) Remove bolt securing idler shaft in case.
(4) Slide idler shaft forward and remove gear and
washer from case. Turn counter gear to help rotate idler gear out of case.
OUTPUT
SHAFT DISASSEMBLY
Do not disassemble the 1-2, 3-4 and fifth-re
verse synchros during overhaul. The component
parts in each synchro are not available sepa
rately. The synchros are serviced as assemblies only.
CAUTION:
The
output shaft
and
geartrain
are
quite heavy. Have
a
helper support
and
hold
the
output
shaft
and
gear assembly during
all
press opera
tions.
Do not
allow
the
shaft
and
gear assembly
to
fall
and
strike
the
shop floor.
(1) Press fifth gear and rear bearing off output
shaft. Use standard bearing splitter type remover
tool and shop press to remove gear and bearing (Fig.
18).
REAR
BEARING
STANDARD
TYPE
REMOVER
TOOL
PRESS
RAM
OUTPUT
SHAFT
Fig.
18
Removing
Fifth
Gear And Rear Bearing (2) Remove fifth-reverse snap ring and blocker
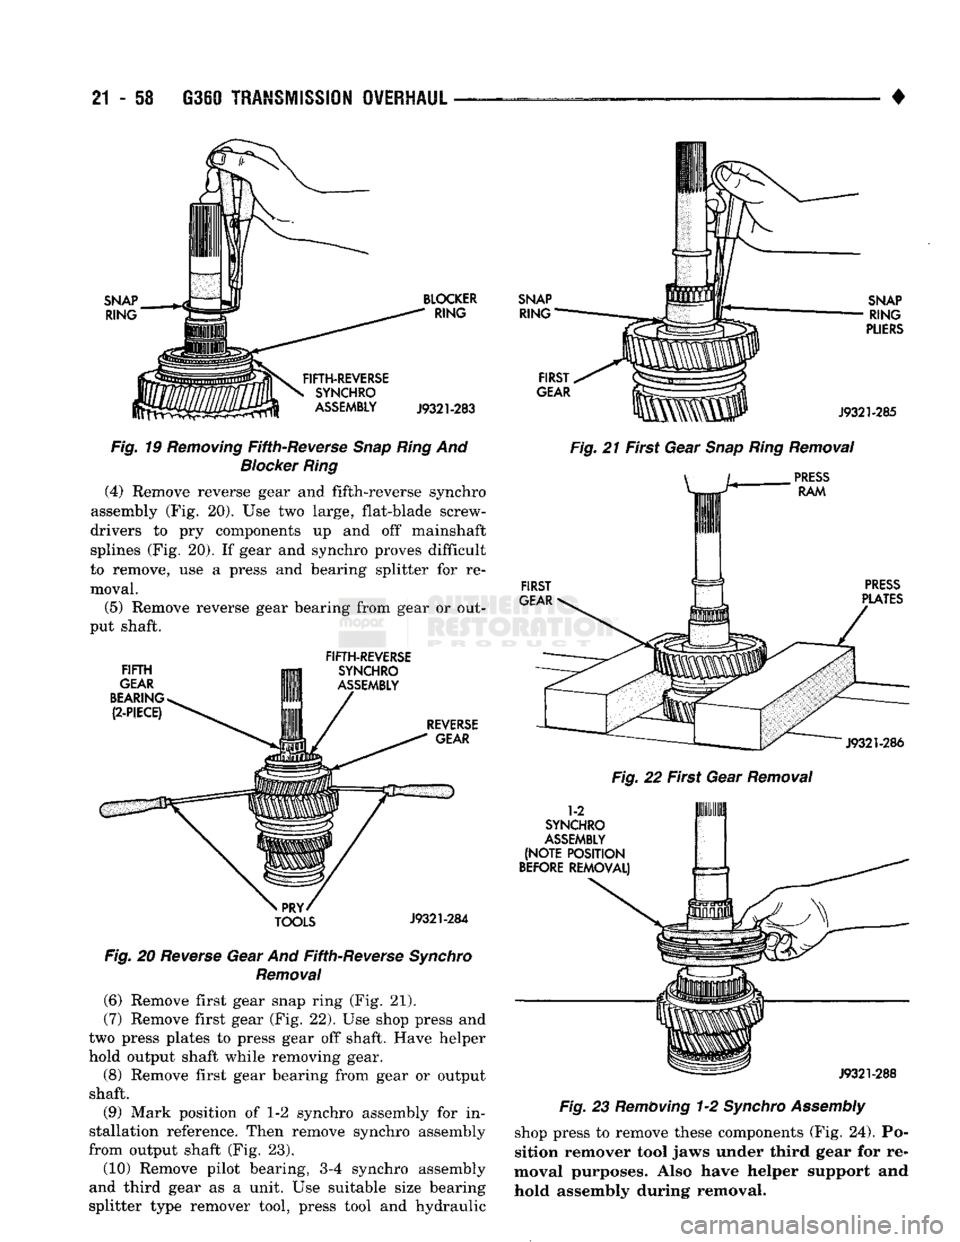
ring (Fig. 19). (3) Remove two halves of fifth gear bearing from
output shaft (Fig. 20).
Page 1059 of 1502
21
- 58
G360
TRANSMISSION
OVERHAUL
•
SNAP
RING
BLOCKER
RING
FIFTH-REVERSE
SYNCHRO
ASSEMBLY
J9321-283
Fig.
19
Removing
Fifth-Reverse
Snap Ring
And
Blocker Ring
(4) Remove reverse gear and fifth-reverse synchro
assembly (Fig. 20). Use two large, flat-blade screw
drivers to pry components up and off mainshaft splines (Fig. 20). If gear and synchro proves difficult
to remove, use a press and bearing splitter for re
moval.
(5) Remove reverse gear bearing from gear or out
put shaft.
FIFTH
GEAR
BEARING
(2-PIECE) FIFTH-REVERSE
SYNCHRO
ASSEMBLY
REVERSE
GEAR
PRY>
TOOLS
J9321-284
Fig.
20
Reverse
Gear And Fifth-Reverse
Synchro
Removal
(6) Remove first gear snap ring (Fig. 21).
(7) Remove first gear (Fig. 22). Use shop press and
two press plates to press gear off shaft. Have helper
hold output shaft while removing gear.
(8) Remove first gear bearing from gear or output
shaft. (9) Mark position of 1-2 synchro assembly for in
stallation reference. Then remove synchro assembly
from output shaft (Fig. 23).
(10) Remove pilot bearing, 3-4 synchro assembly
and third gear as a unit. Use suitable size bearing
splitter type remover tool, press tool and hydraulic
SNAP
RING
FIRST
GEAR
SNAP
RING
PLIERS
J9321-285
Fig.
21 First Gear
Snap Ring
Removal
PRESS
RAM
FIRST
GEAR
PRESS
PLATES
J9321-286
Fig.
22 First Gear
Removal
1-2
SYNCHRO
ASSEMBLY
(NOTE POSITION
BEFORE
REMOVAL)
J9321-288
Fig.
23
Removing
1-2
Synchro Assembly
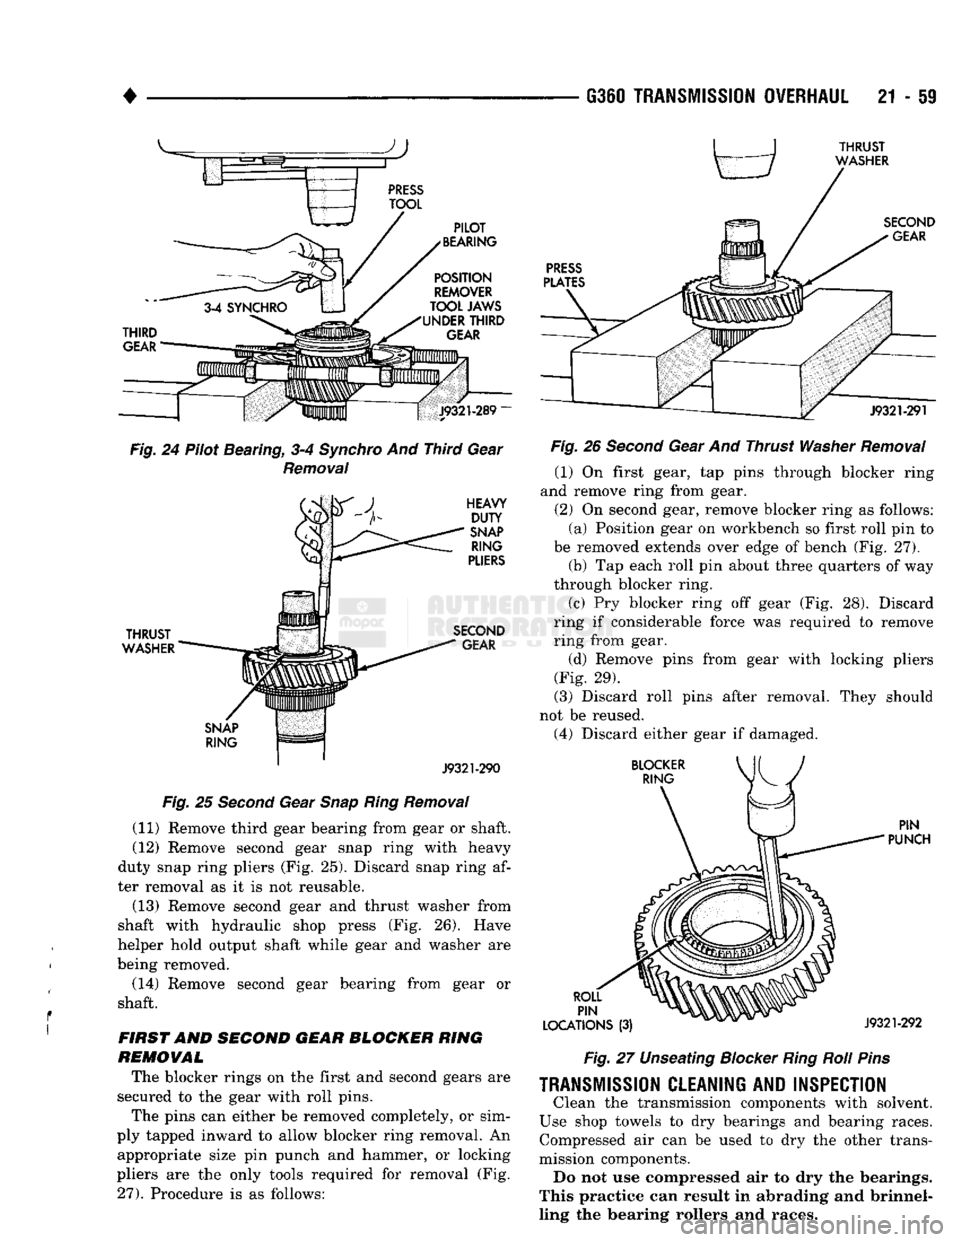
shop press to remove these components (Fig. 24). Po
sition remover tool jaws under third gear for re
moval purposes. Also have helper support and
hold assembly during removal.
Page 1060 of 1502
•
Fig.
24 Pilot Bearing, 3-4
Synchro
And Third Gear
Removal
THRUST
WASHER
J9321-290
Fig.
25
Second
Gear
Snap
Ring
Removal
(11) Remove third gear bearing from gear or shaft.
(12) Remove second gear snap ring with heavy
duty snap ring pliers (Fig. 25). Discard snap ring af
ter removal as it is not reusable. (13) Remove second gear and thrust washer from
shaft with hydraulic shop press (Fig. 26). Have
helper hold output shaft while gear and washer are
being removed.
(14) Remove second gear bearing from gear or
shaft.
FIRST
AND SECOND GEAR BLOCKER RING
REMOVAL The blocker rings on the first and second gears are
secured to the gear with roll pins. The pins can either be removed completely, or sim
ply tapped inward to allow blocker ring removal. An appropriate size pin punch and hammer, or locking
pliers are the only tools required for removal (Fig.
27).
Procedure is as follows:
G360
TRANSMISSION
OVERHAUL
21 - 59
Fig.
26
Second
Gear And Thrust
Washer
Removal
(1) On first gear, tap pins through blocker ring
and remove ring from gear.
(2) On second gear, remove blocker ring as follows: (a) Position gear on workbench so first roll pin to
be removed extends over edge of bench (Fig. 27). (b) Tap each roll pin about three quarters of way
through blocker ring. (c) Pry blocker ring off gear (Fig. 28). Discard
ring if considerable force was required to remove
ring from gear.
(d) Remove pins from gear with locking pliers
(Fig. 29).
(3) Discard roll pins after removal. They should
not be reused. (4) Discard either gear if damaged.
Fig.
27 Unseating
Blocker
Ring
Roll
Pins
TRANSMISSION
CLEANING
AND
INSPECTION
Clean the transmission components with solvent.
Use shop towels to dry bearings and bearing races. Compressed air can be used to dry the other trans
mission components. Do not use compressed air to dry the bearings.
This practice can result in abrading and brinnel-
ling the bearing rollers and races.