DODGE TRUCK 1993 Service Repair Manual
Manufacturer: DODGE, Model Year: 1993, Model line: TRUCK, Model: DODGE TRUCK 1993Pages: 1502, PDF Size: 80.97 MB
Page 1101 of 1502
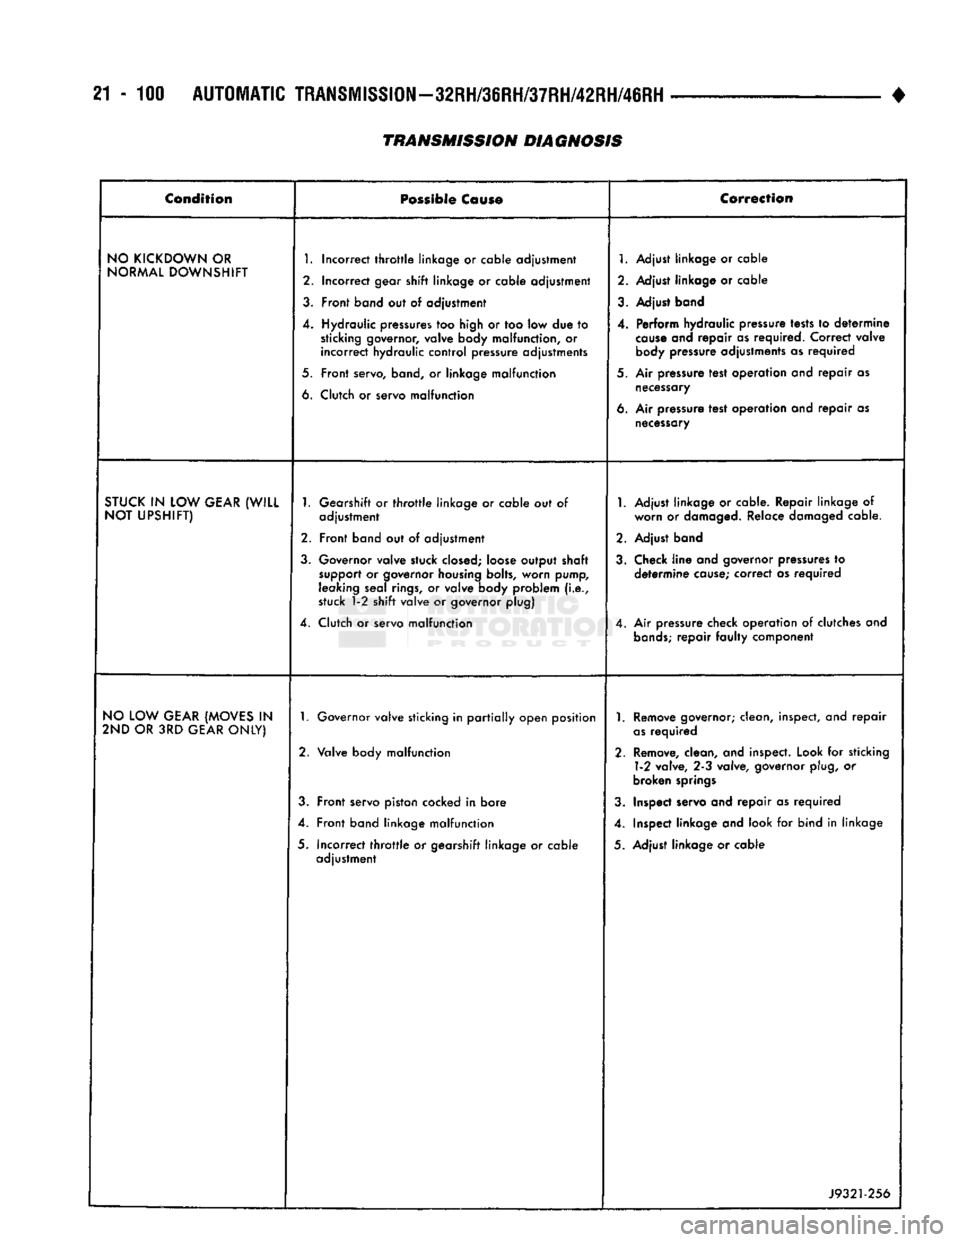
21-100
AUTOMATIC
TRANSMISSION-32RH/36RH/37RH/42RH/46RH
• Condition
Possibie
Cause Correction
NO KICKDOWN
OR
NORMAL DOWNSHIFT
1.
Incorrect
throttle
linkage
or
cable adjustment
2.
Incorrect gear
shift
linkage
or
cable adjustment
3.
Front band
out of
adjustment
4
Hydraulic
pressures
too high
or
too low due
to
sticking governor, valve body malfunction,
or
incorrect
hydraulic
control
pressure adjustments
5.
Front
servo,
band,
or
linkage malfunction
6.
Clutch
or
servo malfunction
1.
Adjust linkage
or
cable
2.
Adjust linkage
or
cable
3.
Adjust band
4.
Perform hydraulic
pressure
tests
to
determine
cause
and repair
as
required. Correct valve
body
pressure
adjustments as required
5.
Air
pressure
test
operation and repair as
necessary
6.
Air
pressure
test
operation and repair as
necessary
STUCK
IN
LOW GEAR
(WILL
NOT UPSHIFT)
1.
Gearshift
or throttle
linkage
or
cable out
of
adjustment
2.
Front band
out of
adjustment
3.
Governor valve stuck
closed;
loose
output
shaft support
or
governor
housing
bolts, worn pump,
leaking seal rings,
or
valve body problem (i.e.,
stuck 1-2
shift
valve
or
governor plug)
4.
Clutch
or
servo malfunction
1.
Adjust linkage
or
cable. Repair linkage
of
worn
or
damaged.
Relace
damaged
cable.
2.
Adjust band
3.
Check
line
and governor
pressures
to
determine
cause;
correct
as required
4.
Air
pressure
check operation
of
clutches and
bands;
repair
faulty
component
NO LOW GEAR (MOVES
IN
2ND OR 3RD GEAR ONLY)
1.
Governor valve sticking
in
partially
open position
2.
Valve body malfunction
3.
Front servo piston cocked
in
bore
4.
Front band linkage malfunction
5.
Incorrect
throttle or
gearshift linkage
or
cable adjustment
1.
Remove
governor; clean, inspect, and repair
as
required
2.
Remove,
clean, and inspect. Look
for
sticking 1-2 vafve, 2-3 valve, governor plug,
or
broken springs
3.
Inspect servo and repair as required
4.
Inspect linkage and look
for
bind
in
linkage
5.
Adjust linkage
or
cable
J9321-256
TRANSMISSION DIAGNOSIS
Page 1102 of 1502
+
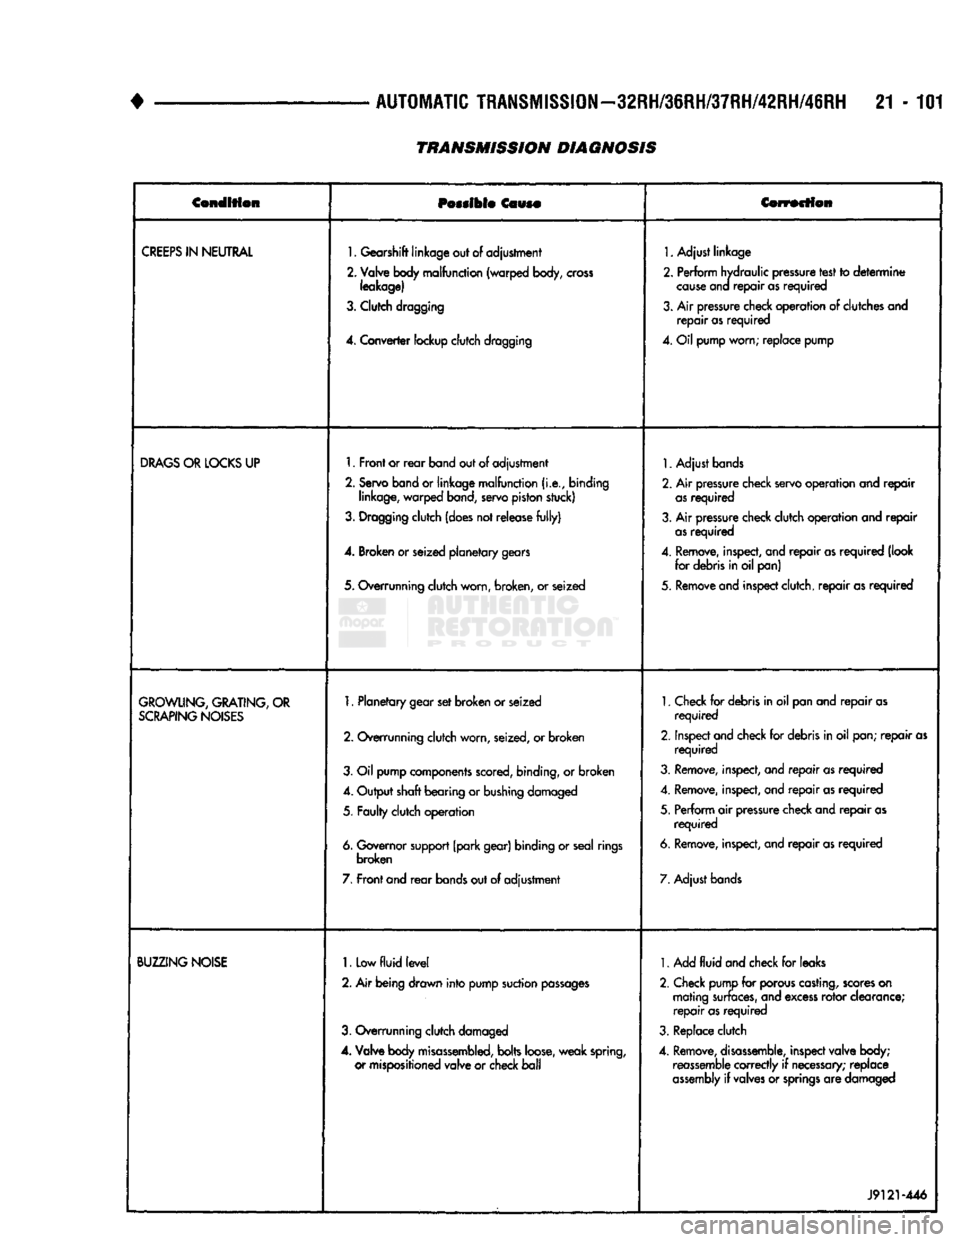
AUTOMATIC TRANSMISSION—32RH/36RH/37RH/42RH/46RH 21 - 101
TRANSMISSION DIAGNOSIS
Condition
Possible
Cause Correction
CREEPS
IN
NEUTRAL
1. Gearshift linkage out of adjustment
2. Valve body malfunction (warped body,
cross
leakage)
3. Clutch dragging
4.
Converter lockup clutch dragging 1. Adjust linkage
2. Perform hydraulic pressure test to
determine
cause
ana
repair
as
required
3. Air pressure check operation of clutches and
repair
as
required
4. Oil pump worn; replace pump
DRAGS
OR
LOCKS
UP 1. Front or
rear
band out of adjustment
2. Servo band or linkage malfunction
(i.e.,
binding linkage, warped band, servo piston stuck)
3. Dragging clutch (does not release
fully)
4. Broken or seized planetary gears
5. Overrunning clutch worn, broken, or seized 1. Adjust bands
2. Air pressure check servo operation and
repair
as
required
3. Air pressure check clutch operation and
repair
as
required
4. Remove, inspect, and
repair
as
required
(look for debris in oil pan)
5. Remove and inspect clutch,
repair
as
required
GROWLING,
GRATING,
OR
SCRAPING
NOISES
1. Planetary gear set broken or seized
2. Overrunning clutch worn, seized, or broken
3. Oil pump components scored, binding, or broken
4. Output shaft bearing or bushing damaged
5. Faulty clutch operation
6. Governor support (park gear) binding or seal rings broken
7. Front and
rear
bands out of adjustment 1. Check for debris in oil pan and
repair
as
required
2. Inspect and check for debris in oil pan;
repair
as
required
3. Remove, inspect, and
repair
as
required
4. Remove, inspect, and
repair
as
required
5. Perform air pressure check and
repair
as
required
6. Remove, inspect, and
repair
as
required
7. Adjust bands
BUZZING
NOISE
1.
Low
fluid
level
2. Air being drawn into pump suction
passages
3. Overrunning clutch damaged
4.
Valve body
misassembled,
bolts loose, weak spring, or mispositioned valve or check
ball
1. Add
fluid
and check for leaks
2. Check pump for porous casting, scores on mating surfaces, and excess rotor clearance;
repair
as
required
3. Replace clutch
4. Remove,
disassemble,
inspect valve body; reassemble correctly if
necessary;
replace
assembly
if valves or
springs
are damaged
J9121-446
Page 1103 of 1502
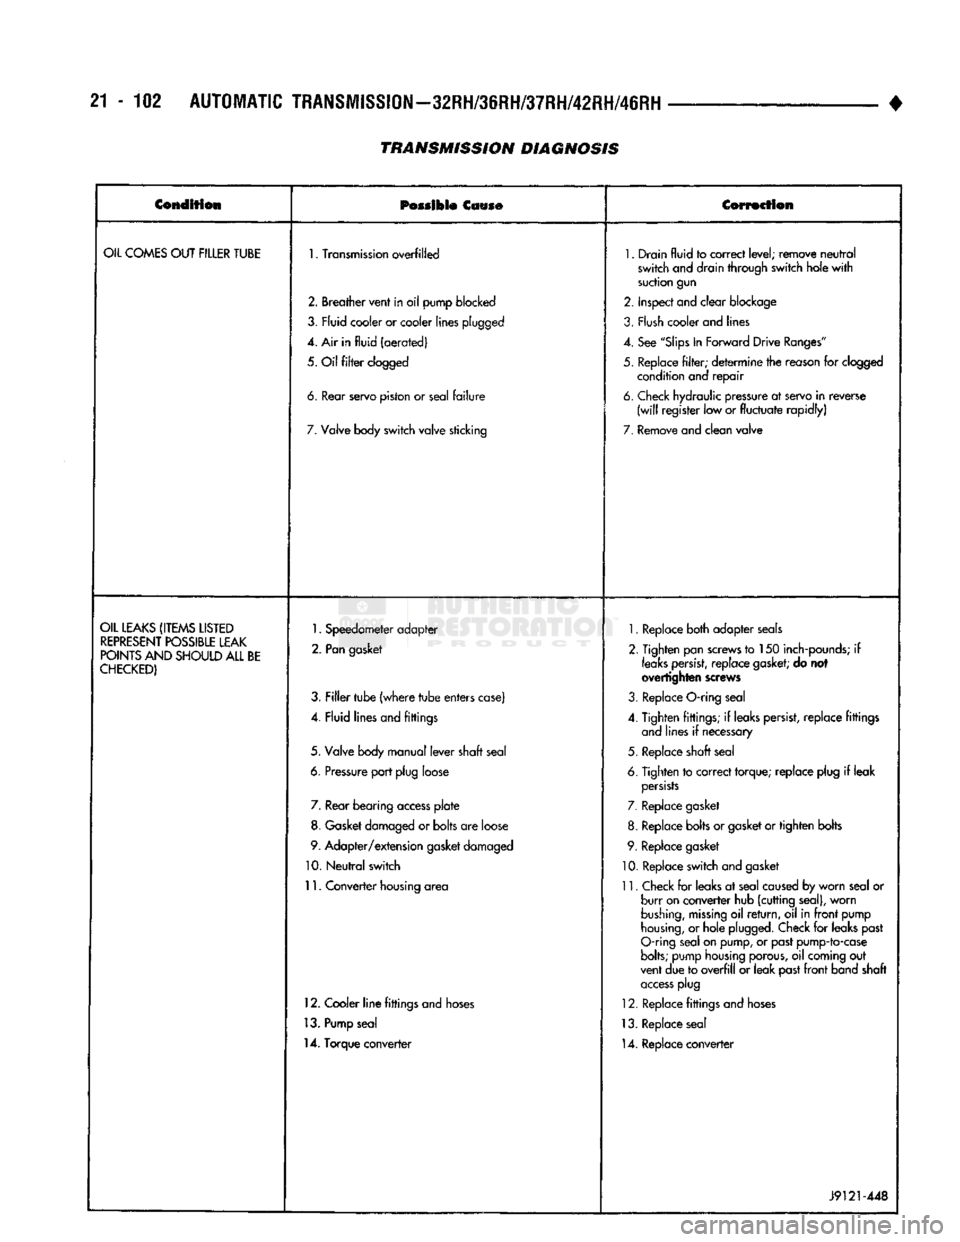
21-102
AUTOMATIC
TRANSMISSION—32RH/36RH/37RH/42RH/46RH
TRANSMISSION
DIAGNOSIS
•
Condition
Possible
Cause Correction
OIL
COMES
OUT
FILLER
TUBE
1.
Transmission
overfilled
1.
Drain
fluid
to
correct
level;
remove
neutral
switch
and drain
through
switch
hole
with
suction
gun
2.
Breather
vent
in
oil
pump
blocked
2.
Inspect
and
clear
blockage
3,
Fly id
cooler
or cooler
lines
plugged
3.
Flush
cooler and lines
4. Air in
fluid
(aerated)
4.
See
"Slips
In
Forward
Drive
Ranges"
5.
Oil
filter
clogged
5.
Replace
filter;
determine
the reason for clogged
condition and
repair
6.
tear
servo
piston
or
seal
failure
6.
Check hydraulic pressure at servo
in
reverse
(will
register
low or
fluctuate
rapidly)
7.
Valve body
switch
valve
sticking
7.
Remove
and
clean
valve
OIL
LEAKS
(ITEMS
LISTED
REPRESENT
POSSIBLE
LEAK
POINTS
AND
SHOULD
ALL
BE
CHECKED)
1.
Speedometer
adapter
2.
Pan
gasket
3.
Filler
tube
(where
tube
enters
case)
4.
Fluid
lines
and
fittings
5.
Valve body
manual
lever
shaft
seal
6.
Pressure
port
plug
loose 7. Rear
bearing
access
plate
8. Gasket damaged or
bolts
are loose
9.
Adapter/extension
gasket damaged
10.
Neutral
switch
11.
Converter
housing area
12. Cooler
line
fittings and hoses
13. Pump seal
14. Torque converter
1.
Replace both adapter seals
2. Tighten pan screws to 150 inch-pounds; if
leaks
persist,
replace
gasket;
do not
overtighten screws
3. Replace O-ring seal
4. Tighten fittings; if leaks persist, replace fittings and lines if necessary
5. Replace shaft seal
6. Tighten to correct torque; replace plug if leak
persists
7. Replace gasket
8. Replace bolts or gasket or tighten bolts
9. Replace gasket
10. Replace switch and gasket
11. Check for leaks at seal caused by worn seal or burr on converter hub (cutting seal), worn
bushing,
missing
oil
return,
oil in
front
pump
housing,
or hole plugged. Check for leaks past
O-ring seal on pump, or past pump-to-case
bolts;
pump housing porous, oil coming out
vent due to
overfill
or leak past
front
band shaft
access
plug
12. Replace fittings and hoses
13. Replace seal 14. Replace converter
J9121-448
Page 1104 of 1502
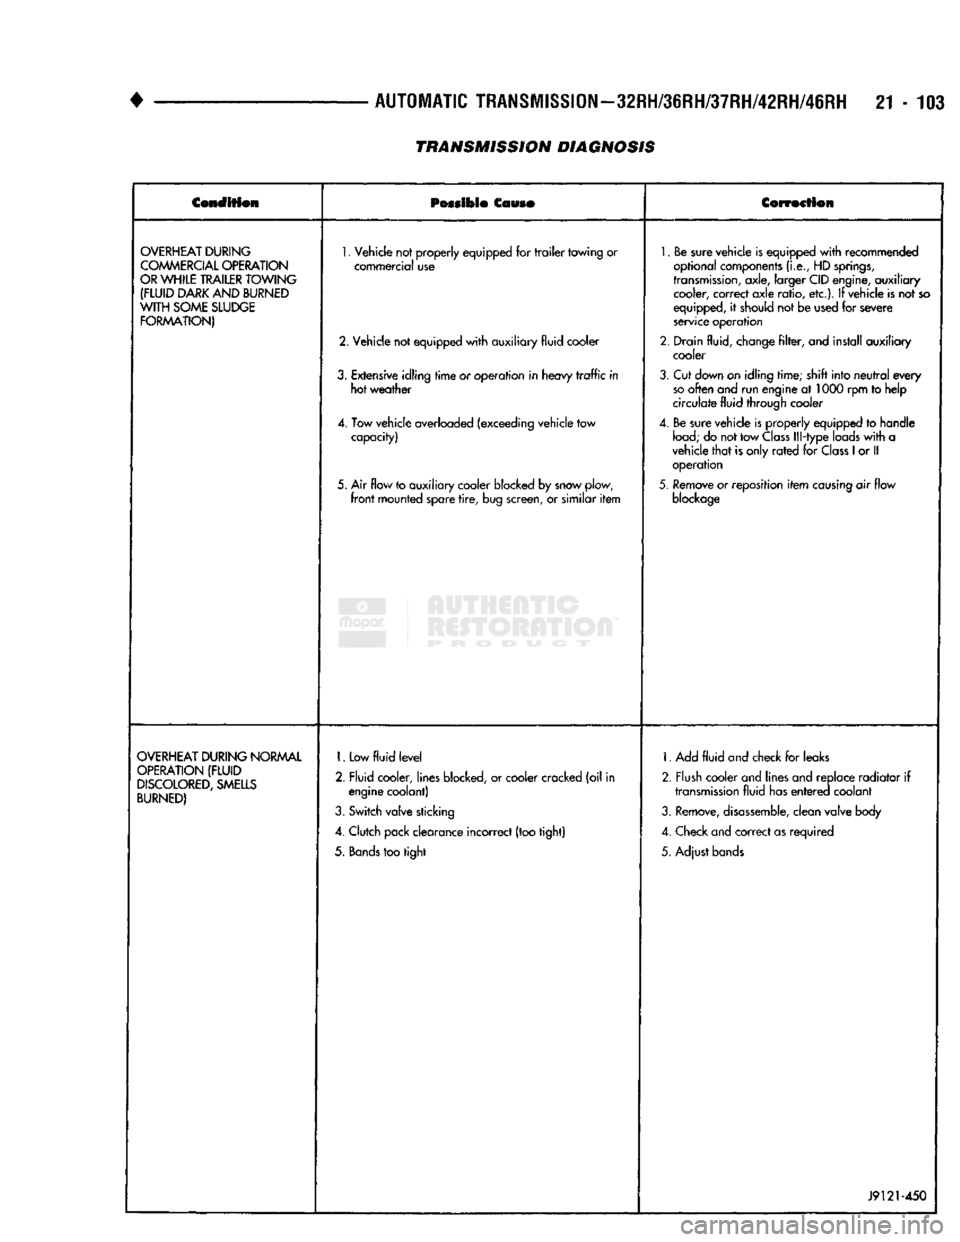
•
AUTOMATIC
TRANSMISSION—32RH/36RH/37RH/42RH/46RH
21-103
TRANSMISSION DIAGNOSIS
Condition
Possible
Couso
Correction
OVERHEAT
DURING
COMMERCIAL
OPERATION
OR
WHILE
TRAILER
TOWING
(FLUID
DARK
AND
BURNED
WITH
SOME
SLUDGE
FORMATION)
1.
Vehicle not properly equipped for
trailer
towing or
commercial use
2. Vehicle not equipped
with
auxiliary fluid cooler
3.
Extensive idling
time
or operation in heavy
traffic
in hot weather
4. Tow vehicle overloaded (exceeding vehicle tow capacity)
5. Air flow to auxiliary cooler blocked by snow plow,
front
mounted spare
tire,
bug screen, or similar
item
1.
Be sure vehicle is equipped
with
recommended
optional components
(i.e.,
HD
springs,
transmission,
axle, larger CID engine, auxiliary cooler, correct axle ratio, etc.). If vehicle is not so
equipped, it should not be used for severe
service operation
2. Drain fluid, change
filter,
and install auxiliary cooler
3.
Cut down on idling time; shift into
neutral
every
so
often and run engine at 1000 rpm to help
circulate fluid through cooler
4. Be sure vehicle is properly equipped to handle
load;
do not tow
Class
Ill-type loads
with
a
vehicle
that
is only
rated
for
Class
1
or II operation
5.
Remove or reposition
item
causing
air flow
blockage
OVERHEAT
DURING
NORMAL
OPERATION
(FLUID
DISCOLORED,
SMELLS
BURNED)
1.
Low
fluid
level
2. Fluid cooler, lines blocked, or cooler cracked (oil in engine coolant)
3.
Switch valve sticking
4. Clutch pack clearance incorrect (too tight)
5.
Bands
too tight 1. Add
fluid
and check for leaks
2. Flush cooler and lines and replace radiator if
transmission
fluid has
entered
coolant
3.
Remove,
disassemble,
clean valve body
4. Check and correct as required
5. Adjust bands
J9121-450
Page 1105 of 1502
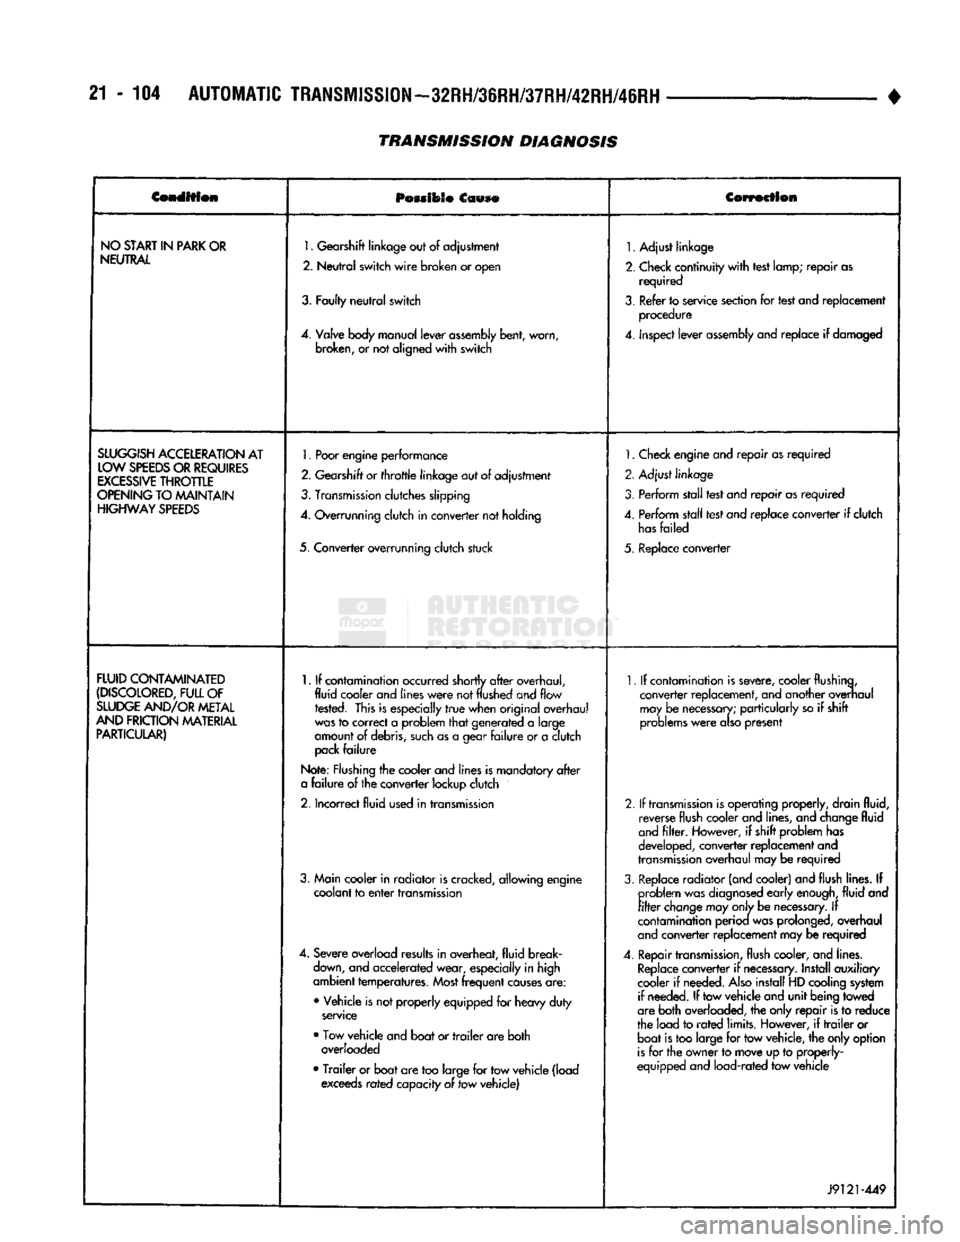
21 - 104
AUTOMATIC
TRANSMISSION—32RH/36RH/37RH/42RH/46RH
•
Condition
POMIOSO
Ccwse
Correction
NO
START
IN
PARK
OR
NEUTRAL
1.
Gearshift
linkage
out
of
adjustment
2.
Neutral
switch
wire
broken
or
open
3.
Faulty
neutral
switch
4.
Valve
body
manual
lever
assembly
bent,
worn,
broken,
or not
aligned
with
switch
1.
Adjust linkage
2.
Check continuity
with
test lamp; repair as required
3.
Refer to service section for test and replacement procedure
4.
inspect lever
assembly
and replace if damaged
SLUGGISH
ACCELERATION
AT
LOW
SPEEDS
OR
REQUIRES
EXCESSIVE
THROTTLE
OPENING
TO MAINTAIN
HIGHWAY
SPEEDS
1.
Poor
engine
performance
2.
Gearshift
or
throttle
linkage
out of adjustment
3.
Transmission
clutches slipping
4.
Overrunning clutch in converter not holding
5. Converter overrunning clutch stuck
1.
Check engine and repair as required
2. Adjust linkage
3. Perform stall test and repair as required
4.
Perform stall test and replace converter if clutch
has
failed
5. Replace converter
FLUID
CONTAMINATED
(DISCOLORED,
FULL
OF
SLUDGE
AND/OR
METAL
AND
FRICTION
MATERIAL
PARTICULAR)
1.
If contamination occurred shortly
after
overhaul,
fluid cooler and
lines
were
not
flushed
and flow rested. This is especially
true
when original overhaul
was
to correct a problem
that
generated a large
amount of debris,
such
as a gear
failure
or a clutch
pack
failure
Note: Flushing the cooler and lines is mandatory
after
a
failure
of the converter lockup clutch
2.
Incorrect fluid used in transmission
3. Main cooler in radiator is cracked, allowing engine coolant to
enter
transmission
4.
Severe overload results in overheat, fluid break
down,
and accelerated wear, especially in high
ambient temperatures.
Most
frequent
causes
are:
• Vehicle is not properly equipped for heavy duty
service
• Tow vehicle and boat or
trailer
are both overloaded
•
Trailer
or boat are too large for tow vehicle (load exceeds rated capacity of tow vehicle)
1.
If contamination is severe, cooler flushing,
converter replacement, and another overhaul may be
necessary;
particularly so if shift
problems
were
also
present
2.
If
transmission
is operating properly, drain fluid, reverse flush cooler and lines, and change fluid
and
filter.
However, if shift problem has
developed, converter replacement and
transmission
overhaul may be required
3.
Replace radiator (and cooler) and flush lines. If problem was
diagnosed
early
enough,
fluid and
filter
change
may
only
be
necessary.
If
contamination perioa was prolonged, overhaul
and
converter replacement may be required
4.
Repair
transmission,
flush cooler, and lines.
Replace
converter if
necessary.
Install auxiliary
cooler if needed.
Also
install HD cooling system if needed. If tow vehicle and unit being towed
are both overloaded, the only repair is to reduce
the load to
rated
limits. However, if
trailer
or boat is too large for tow vehicle, the only option
is
for the owner to move up to properly-
equipped and load-rated tow vehicle
J9121-449
TRANSMISSION DIAGNOSIS
Page 1106 of 1502
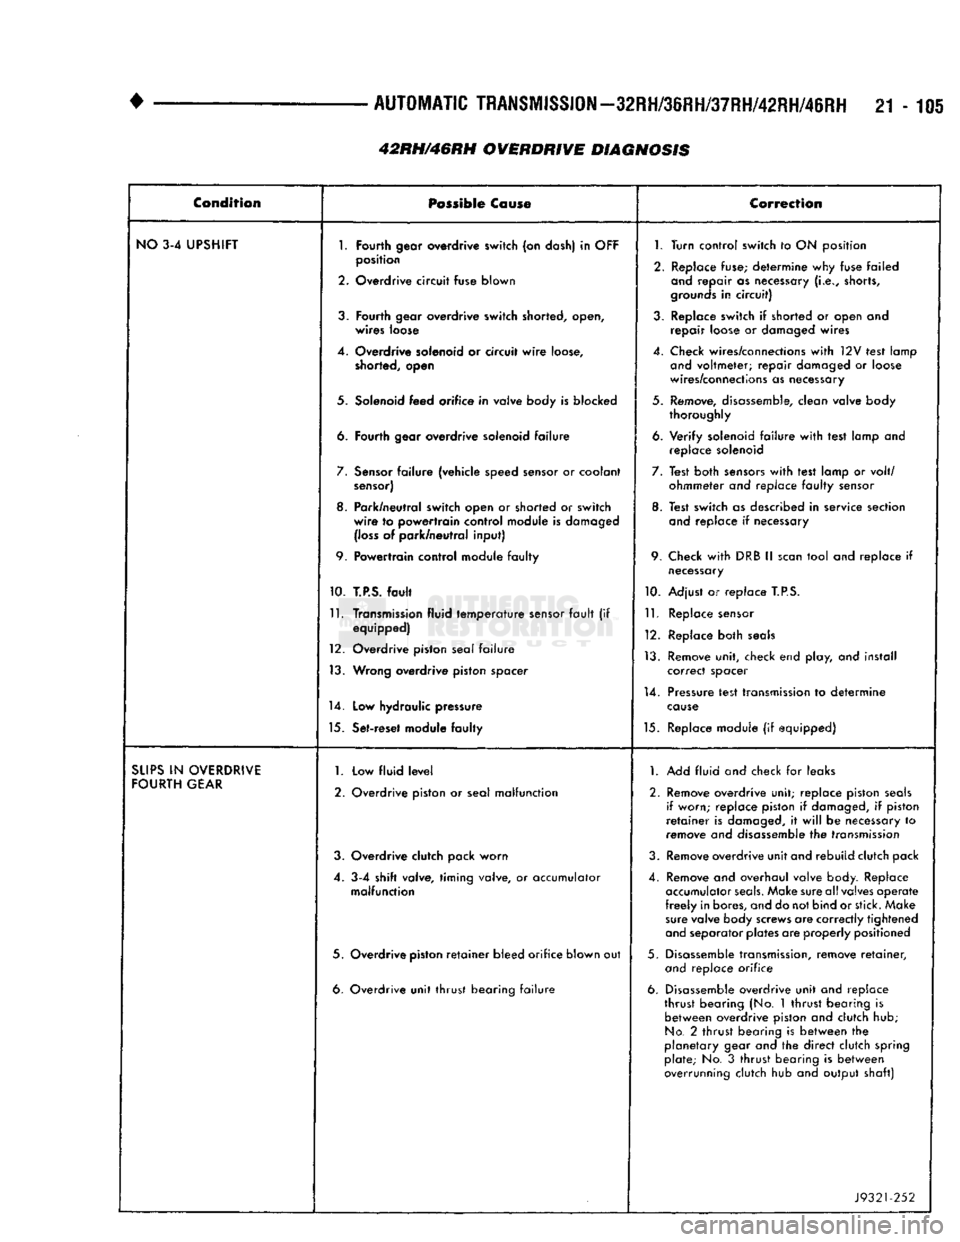
•
AUTOMATIC
TRANSMISSION—32RH/36RH/37RH/42RH/46RH
21-105 Condition
Possible
Co
use
Correction
NO
3-4 UPSHIFT
1.
Fourth
gear overdrive
switch
(on dash) in
OFF
1.
Turn control
switch
to ON position
2.
position
Overdrive
circuit
fuse
blown
2. Replace fuse; determine why fuse failed
and
repair as necessary
(i.e.,
shorts,
grounds
in
circuit)
3.
Fourth
gear
overdrive
switch
shorted, open,
wires
loose 3. Replace switch if shorted or open and
repair loose or damaged wires
4. Overdrive solenoid or circuit
wire
loose,
shorted, open 4. Check wires/connections
with
12V test lamp
and
voltmeter; repair damaged or loose
wires/connections as necessary
5. Solenoid
feed
orifice
in valve body is
blocked
5. Remove, disassemble, clean valve body
thoroughly
6.
Fourth
gear
overdrive
solenoid
failure
6. Verify solenoid
failure
with
test lamp and
replace solenoid
7.
Sensor
failure
(vehicle speed sensor or coolant
sensor)
7. Test both
sensors
with
test lamp or volt/
ohmmeter and replace
faulty
sensor
8. Park/neutral switch open or
shorted
or
switch
wire
to
powertrain
control
module is damaged
(loss
of park/neutral
input)
8. Test switch as described in service section
and
replace if necessary
9.
Powertrain
control module
faulty
9. Check
with
DRB II
scan
tool and replace if
necessary
10.
T.P.S.
fault
10. Adjust or replace
T.P.S.
11.
Transmission fluid
temperature
sensor
fault
(if equipped)
12. Overdrive piston seal
failure
13. Wrong
overdrive
piston
spacer
11.
Replace sensor
12. Replace both
seals
13. Remove unit, check end play, and install correct spacer
14.
Low
hydraulic pressure 14. Pressure test transmission to determine
cause
15. Set-reset module
faulty
15. Replace module (if equipped)
SUPS
IN
OVERDRIVE
FOURTH
GEAR
1.
2. Low
fluid
level
Overdrive piston or seal
malfunction
1.
Add fluid and check for leaks
2. Remove overdrive unit; replace piston
seals
if worn; replace piston if damaged, if piston
retainer
is damaged, it
will
be necessary to
remove and disassemble the transmission
3. Overdrive clutch pack
worn
3. Remove overdrive unit and rebuild clutch pack
4. 3-4
shift
valve,
timing
valve, or accumulator
malfunction
4. Remove and overhaul valve body. Replace
accumulator
seals.
Make sure all valves operate
freely
in bores, and do not bind or stick. Make
sure
valve body screws are correctly tightened
and
separator plates are properly positioned
5. Overdrive
piston
retainer
bleed
orifice
blown out 5. Disassemble transmission, remove
retainer,
and
replace orifice
6. Overdrive
unit
thrust
bearing
failure
6. Disassemble overdrive unit and replace
thrust bearing (No. 1 thrust bearing is between overdrive piston and clutch hub;
No.
2 thrust bearing is between the
planetary gear and the direct clutch spring plate; No. 3
thrust
bearing is between
overrunning clutch hub and output shaft)
J9321-252
42RH/46RH OVERDRIVE DIAGNOSIS
Page 1107 of 1502
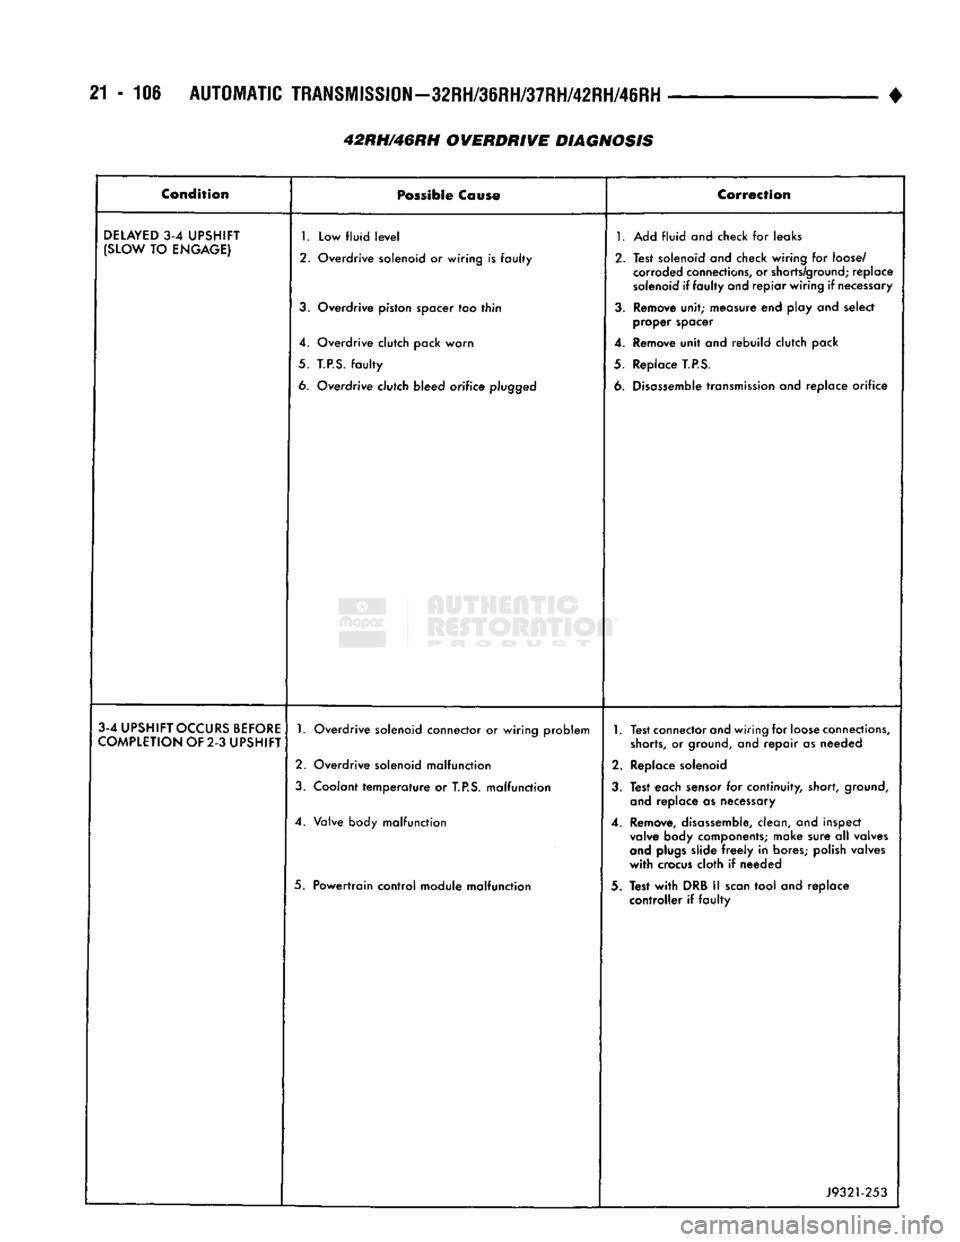
21-106
AUTOMATIC
TRANSMISSION—32RH/36RH/37RH/42RH/46RH
42RH/46RH OVERDRIVE DIAGNOSIS •
Condition
Possible
Cause
Correction
DELAYED
3-4
UPSHIFT
(SLOW
TO
ENGAGE)
1.
Low fluid
level
2. Overdrive solenoid or wiring is faulty
3.
Overdrive piston spacer too thin
4. Overdrive clutch pack worn
5.
T.P.S.
faulty
6. Overdrive clutch bleed orifice
plugged
1.
Add fluid and check for leaks
2. Test solenoid and check wiring for
loose/
corroded
connections,
or
shorts/ground;
replace
solenoid
if faulty and repiar wiring if
necessary
3.
Remove unit; measure end play and select proper spacer
4. Remove unit and rebuild clutch pack
5. Replace
T.P.S.
6.
Disassemble
transmission
and replace orifice
3-4
UPSHIFT
OCCURS
BEFORE
COMPLETION
OF 2-3
UPSHIFT
1.
Overdrive solenoid connector or wiring problem
2. Overdrive solenoid malfunction
3.
Coolant temperature or
T.P.S.
malfunction
4. Valve body malfunction
5. Powertrain control module malfunction
1.
Test connector and wiring for
loose
connections,
shorts,
or
ground,
and repair as needed
2. Replace solenoid
3.
Test each
sensor
for continuity, short,
ground,
and
replace as necessary
4. Remove,
disassemble,
clean, and inspect
valve
body components; make sure all valves
and
plugs
slide
freely
in bores; polish valves
with
crocus
cloth if needed
3. Test
with
DRB II
scan
tool and replace controller if faulty
J9321-253
Page 1108 of 1502
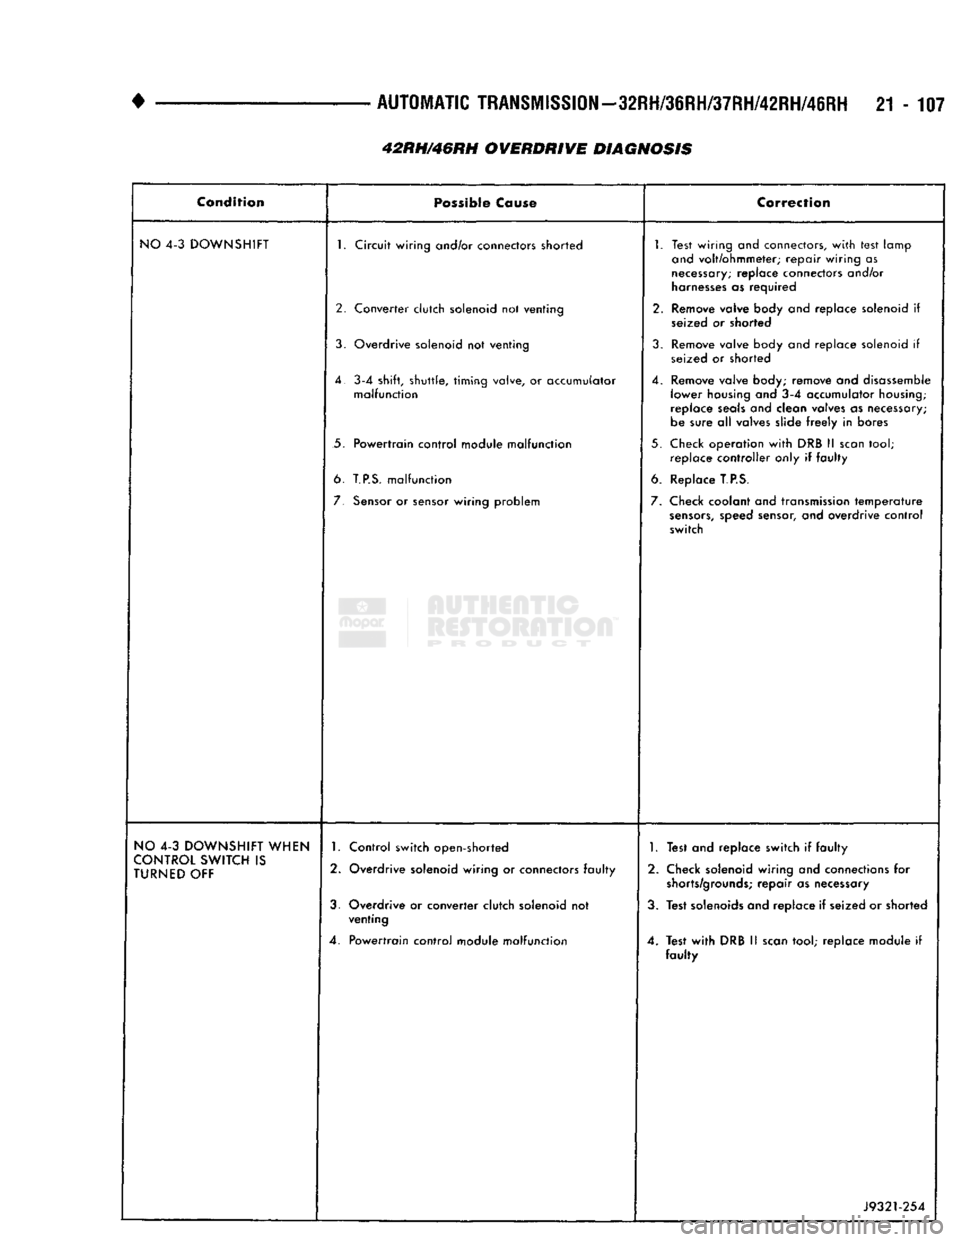
+
AUTOMATIC
TRANSMISSION-32RH/36RH/37RH/42RH/46RH
21-107
42RH/46RH
OVERDRIVE
DIAGNOSIS
Condition
Possible
Cause
Correction
NO
4-3 DOWNSHIFT 1. Circuit wiring and/or connectors shorted
2. Converter clutch solenoid not venting
3. Overdrive solenoid not venting
4.
3-4 shift, shuttle, timing
valve,
or accumulator malfunction
5. Powertrain control module malfunction
6.
T.P.S.
malfunction
7.
Sensor
or sensor wiring problem 1. Test wiring and connectors,
with
test lamp
and
volt/ohmmeter; repair wiring as
necessary;
replace connectors and/or
harnesses
as required
2. Remove valve body and replace solenoid if seized or shorted
3. Remove valve body and replace solenoid if seized or shorted
4. Remove valve body; remove and disassemble lower housing and 3-4 accumulator
housing;
replace
seals
and clean valves as necessary;
be sure all valves slide
freely
in bores
5. Check operation
with
DRB II
scan
tool; replace controller only if faulty
6. Replace
T.P.S.
7. Check coolant and transmission
temperature
sensors,
speed sensor, and overdrive control
switch
NO
4-3 DOWNSHIFT WHEN
CONTROL
SWITCH
IS
TURNED
OFF 1. Control switch open-shorted
2. Overdrive solenoid wiring or connectors faulty
3. Overdrive or converter clutch solenoid not venting
4. Powertrain control module malfunction
1.
Test and replace switch if faulty
2. Check solenoid wiring and connections for
shorts/grounds;
repair as necessary
3. Test solenoids and replace if seized or shorted
4. Test
with
DRB II
scan
tool; replace module if faulty
J9321-254
Page 1109 of 1502
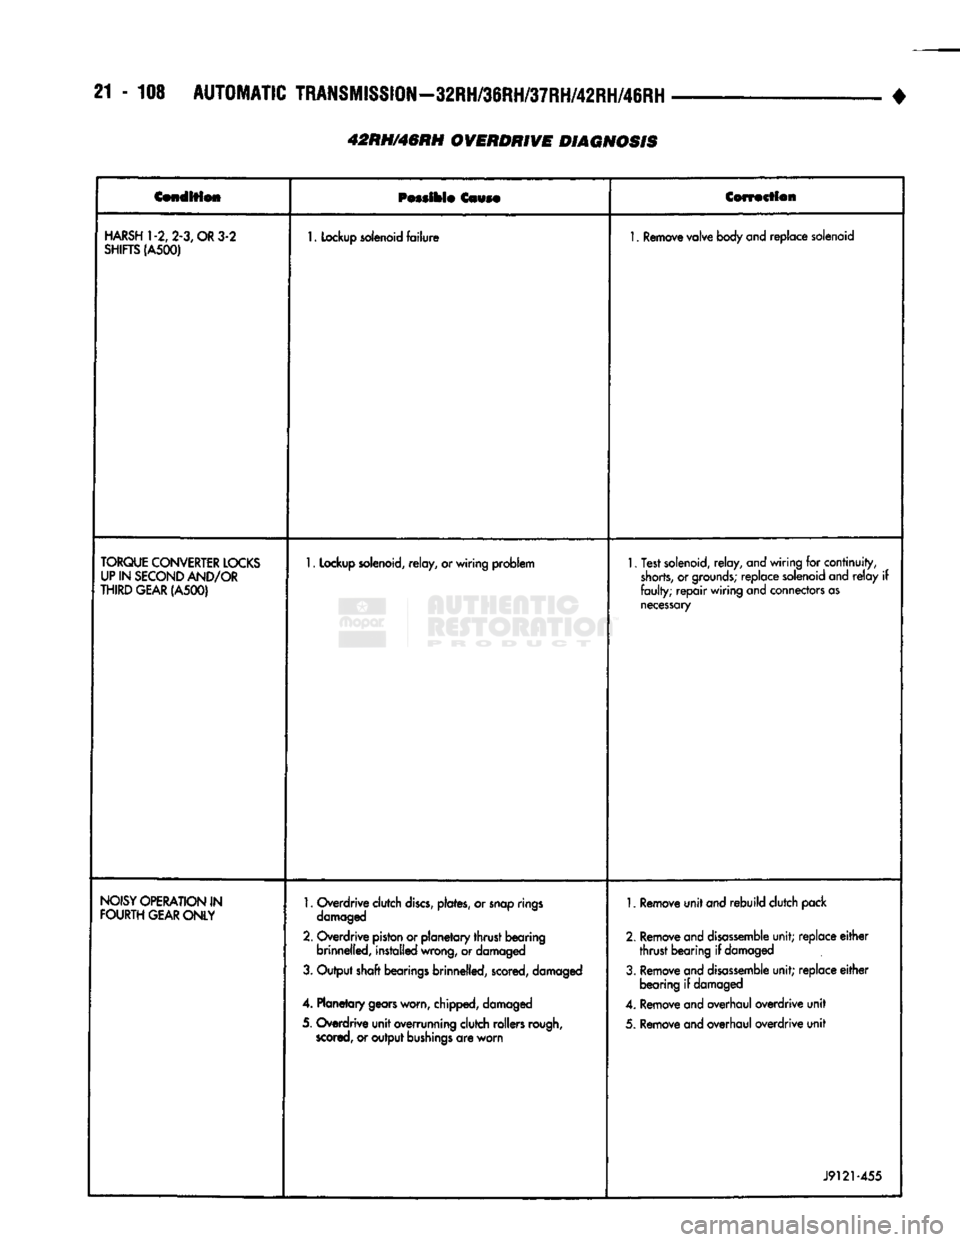
21 - 108
AUTOMATIC
TRANSMISSION—32RH/36RH/37RH/42RH/46RH
•
42RH/46RH OVERDRIVE DIAGNOSIS
Condition
Possible
Cause
Correction
HARSH
1-2, 2-3, OR 3-2
SHIFTS
(A500)
1.
Lockup
solenoid
failure
1.
Remove
valve
body
and
replace
solenoid
TORQUE
CONVERTER
LOCKS
UP
IN
SECOND
AND/OR
THIRD
GEAR
(A500)
1.
Lockup
solenoid,
relay, or wiring problem
1.
Test
solenoid,
relay, and wiring for continuity,
shorts,
or
grounds;
replace
solenoid
and
relay
if
faulty;
repair
wiring and
connectors
as
necessary
NOISY
OPERATION
IN
FOURTH
GEAR
ONLY
1.
Overdrive
clutch
discs,
plates,
or
snap
rings
damaged
2. Overdrive
piston
or planetary thrust bearing brinnelled,
installed
wrong,
or
damaged
3.
Output shaft
bearings
brinnelled,
scored,
damaged
4. Planetary
gears
worn,
chipped,
damaged
5. Overdrive unit
overrunning
clutch rollers
rough,
scored,
or output
bushings
are worn
1.
Remove
unit
and
rebuild
clutch
pack
2.
Remove
and
disassemble
unit; replace
either
thrust bearing if
damaged
3.
Remove
and
disassemble
unit; replace
either
bearing
if
damaged
4.
Remove
and
overhaul overdrive unit
5.
Remove
and
overhaul overdrive unit
J9121 455
Page 1110 of 1502
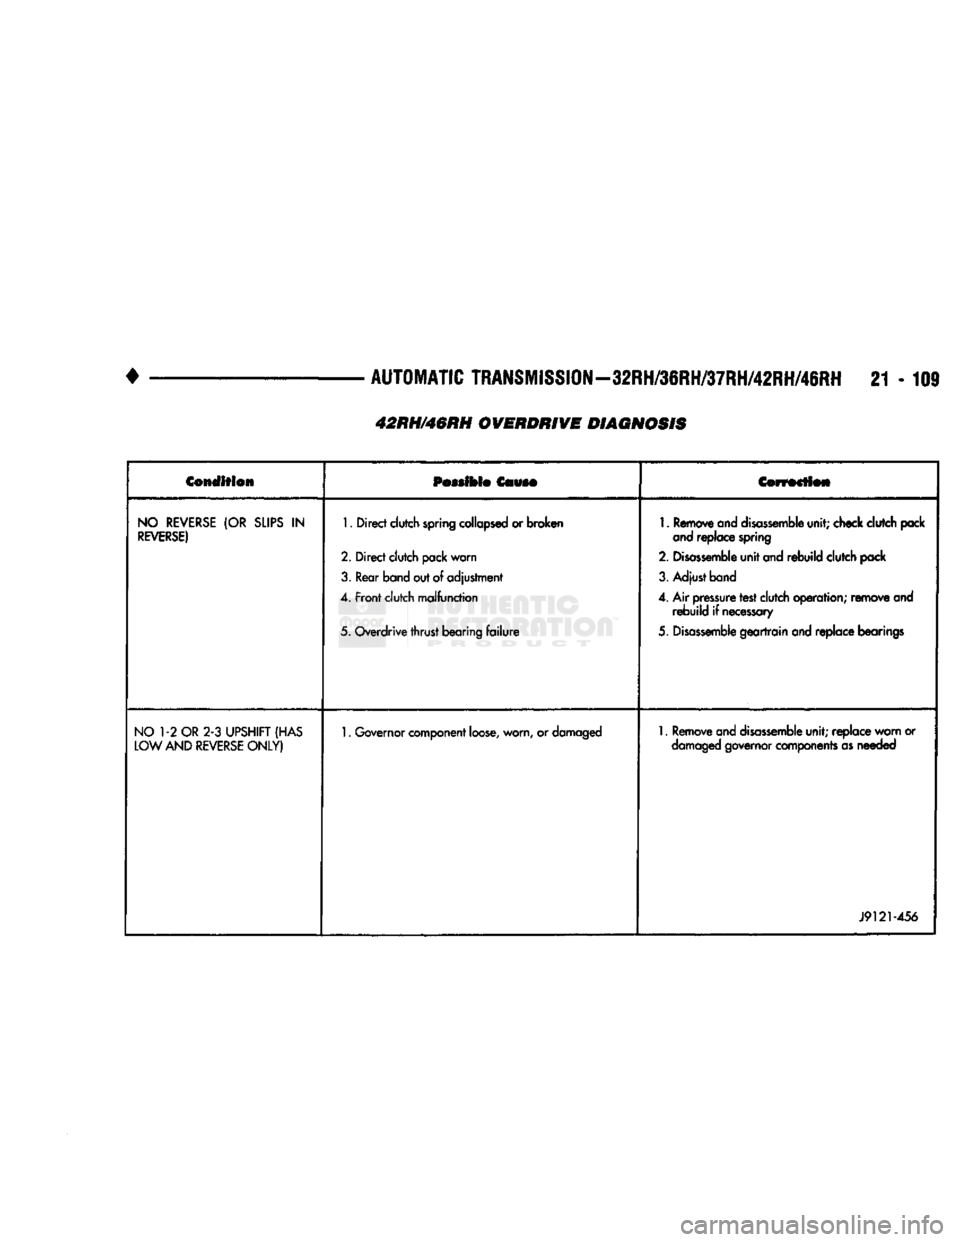
+
AUTOMATIC
TRANSMISSION—32RH/36RH/37RH/42RH/46RH
21 - 109
Condition
Possible Cause
Correction
NO
REVERSE
(OR
SLIPS
IN
REVERSE)
1.
Direct
clutch
spring
collapsed
or
broken
2.
Direct
clutch
pack
worn
3.
Rear
band
out of
adjustment
4.
Front
clutch
malfunction
5.
Overdrive
thrust
bearing
failure
1.
Remove
and disassemble
unit;
check
clutch
pack
and
replace
spring
2. Disassemble
unit
and
rebuild
clutch
pack
3.
Adjust
band
4. Air
pressure
test
clutch
operation;
remove
and
rebuild
if
necessary
5. Disassemble
geartrain
and
replace
bearings
NO
1-2
OR
2-3
UPSHIFT (HAS
LOW
AND REVERSE
ONLY)
1.
Governor
component
loose,
worn,
or
damaged
1.
Remove
and disassemble
unit;
replace
worn
or
damaged
governor
components
as
needed
J9121-456
42RH/46RH OVERDRIVE DIAGNOSIS