DODGE TRUCK 1993 Service Repair Manual
Manufacturer: DODGE, Model Year: 1993, Model line: TRUCK, Model: DODGE TRUCK 1993Pages: 1502, PDF Size: 80.97 MB
Page 1231 of 1502
21
- 230
TRANSMISSION
OWERHAUL-3IRH/37RH
•
J9121-103
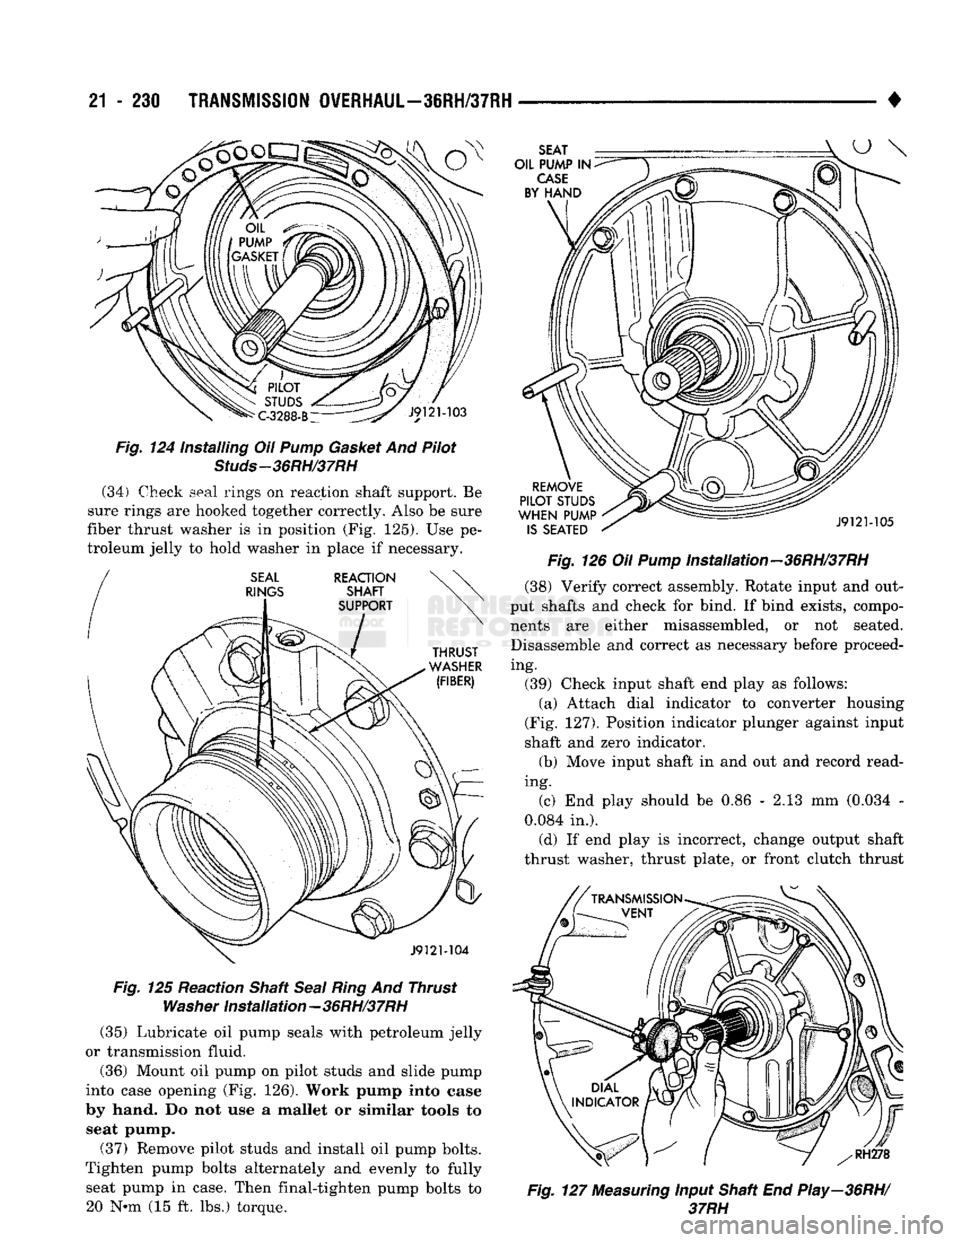
Fig.
124 Installing Oil
Pump
Gasket
And Pilot
Studs-36RH/37RH
(34) Check seal rings on reaction shaft support. Be
sure rings are hooked together correctly. Also be sure
fiber thrust washer is in position (Fig. 125). Use pe
troleum jelly to hold washer in place if necessary. J9121-104
Fig.
125 Reaction Shaft
Seal
Ring
And Thrust
Washer
Installation-36RH/37RH (35) Lubricate oil pump seals with petroleum jelly
or transmission fluid.
(36) Mount oil pump on pilot studs and slide pump
into case opening (Fig. 126). Work pump into case
by hand. Do not use a mallet or similar tools to seat pump.
(37) Remove pilot studs and install oil pump bolts.
Tighten pump bolts alternately and evenly to fully seat pump in case. Then final-tighten pump bolts to 20 Nnn (15 ft. lbs.) torque. SEAT
OIL PUMP IN
CASE
BY HAND
REMOVE
PILOT STUDS
WHEN PUMP IS SEATED J9121-105
Fig.
126 Oil
Pump
Installation-36RH/37RH (38) Verify correct assembly. Rotate input and out
put shafts and check for bind. If bind exists, compo nents are either misassembled, or not seated. Disassemble and correct as necessary before proceed
ing. (39) Check input shaft end play as follows: (a) Attach dial indicator to converter housing
(Fig. 127). Position indicator plunger against input
shaft and zero indicator. (b) Move input shaft in and out and record read
ing. (c) End play should be 0.86 - 2.13 mm (0.034 -
0.084 in.). (d) If end play is incorrect, change output shaft
thrust washer, thrust plate, or front clutch thrust
f
RH278
Fig.
127
Measuring
Input Shaft End Play—36RH/
37RH
Page 1232 of 1502
#
s ; _
TRANSMISSION
OWERHAUL—38RH/37RH
21 - 231
washer as needed. Thrust washer is select and
comes in three thicknesses.
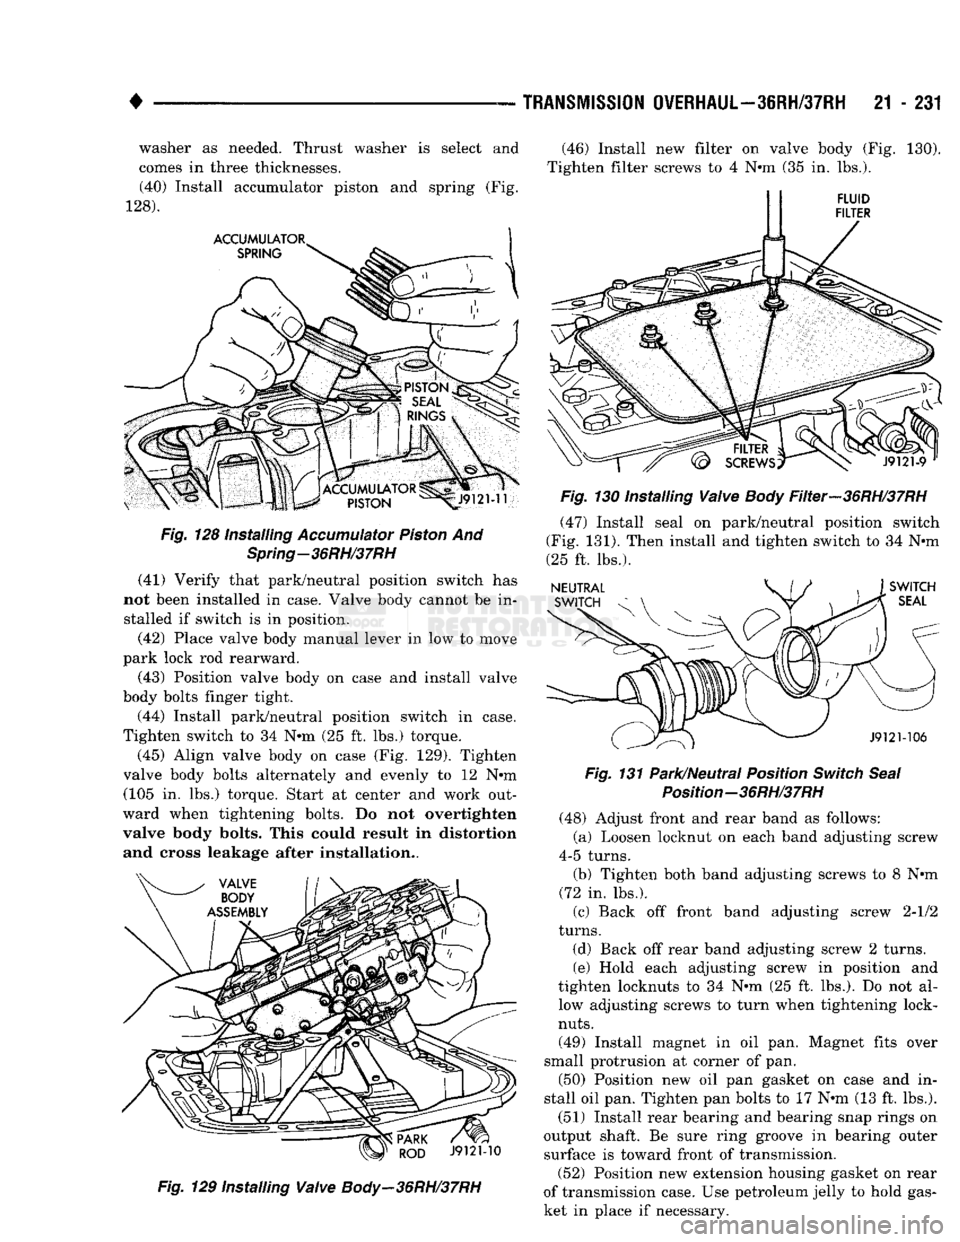
(40) Install accumulator piston and spring (Fig.
128). Fig.
128 Installing
Accumulator
Piston
And
Spring-36RH/37RH
(41) Verify that park/neutral position switch has
not been installed in case. Valve body cannot be in stalled if switch is in position.
(42) Place valve body manual lever in low to move
park lock rod rearward.
(43) Position valve body on case and install valve
body bolts finger tight.
(44) Install park/neutral position switch in case.
Tighten switch to 34 Nnn (25 ft. lbs.) torque.
(45) Align valve body on case (Fig. 129). Tighten
valve body bolts alternately and evenly to 12 Nnn (105 in. lbs.) torque. Start at center and work out
ward when tightening bolts. Do not overtighten
valve body bolts. This could result in distortion and cross leakage after installation..
Fig.
129 Installing
Valve
Body-36RH/37RH
(46) Install new filter on valve body (Fig. 130).
Tighten filter screws to 4 Nnn (35 in. lbs.).
Fig.
130 Installing
Valve
Body
Filter-36RH/37RH
(47) Install seal on park/neutral position switch
(Fig. 131). Then install and tighten switch to 34 Nnn
(25 ft. lbs.).
Fig.
131 Park/Neutral Position
Switch
Seal
Position-36RH/37RH
(48) Adjust front and rear band as follows:
(a) Loosen locknut on each band adjusting screw
4-5 turns. (b) Tighten both band adjusting screws to 8 Nnn
(72 in. lbs.).
(c) Back off front band adjusting screw 2-1/2
turns.
(d) Back off rear band adjusting screw 2 turns.
(e) Hold each adjusting screw in position and
tighten locknuts to 34 Nnn (25 ft. lbs.). Do not al low adjusting screws to turn when tightening lock-
nuts.
(49) Install magnet in oil pan. Magnet fits over
small protrusion at corner of pan. (50) Position new oil pan gasket on case and in
stall oil pan. Tighten pan bolts to 17 Nnn (13 ft. lbs.).
(51) Install rear bearing and bearing snap rings on
output shaft. Be sure ring groove in bearing outer surface is toward front of transmission. (52) Position new extension housing gasket on rear
of transmission case. Use petroleum jelly to hold gas
ket in place if necessary.
Page 1233 of 1502
21 - 232
TRANSMISSION OVERHAUL—36RH/37RH
• (53) Spread rear bearing locating ring and start
extension housing on output shaft and rear bearing. (54) Align park rod in sprag and work housing
into place. Install and tighten housing bolts to 43
Nin (32 ft. lbs,).
(55) Install rear bearing locating ring access cover
and gasket. (56) Remove repair stand and turn transmission
over.
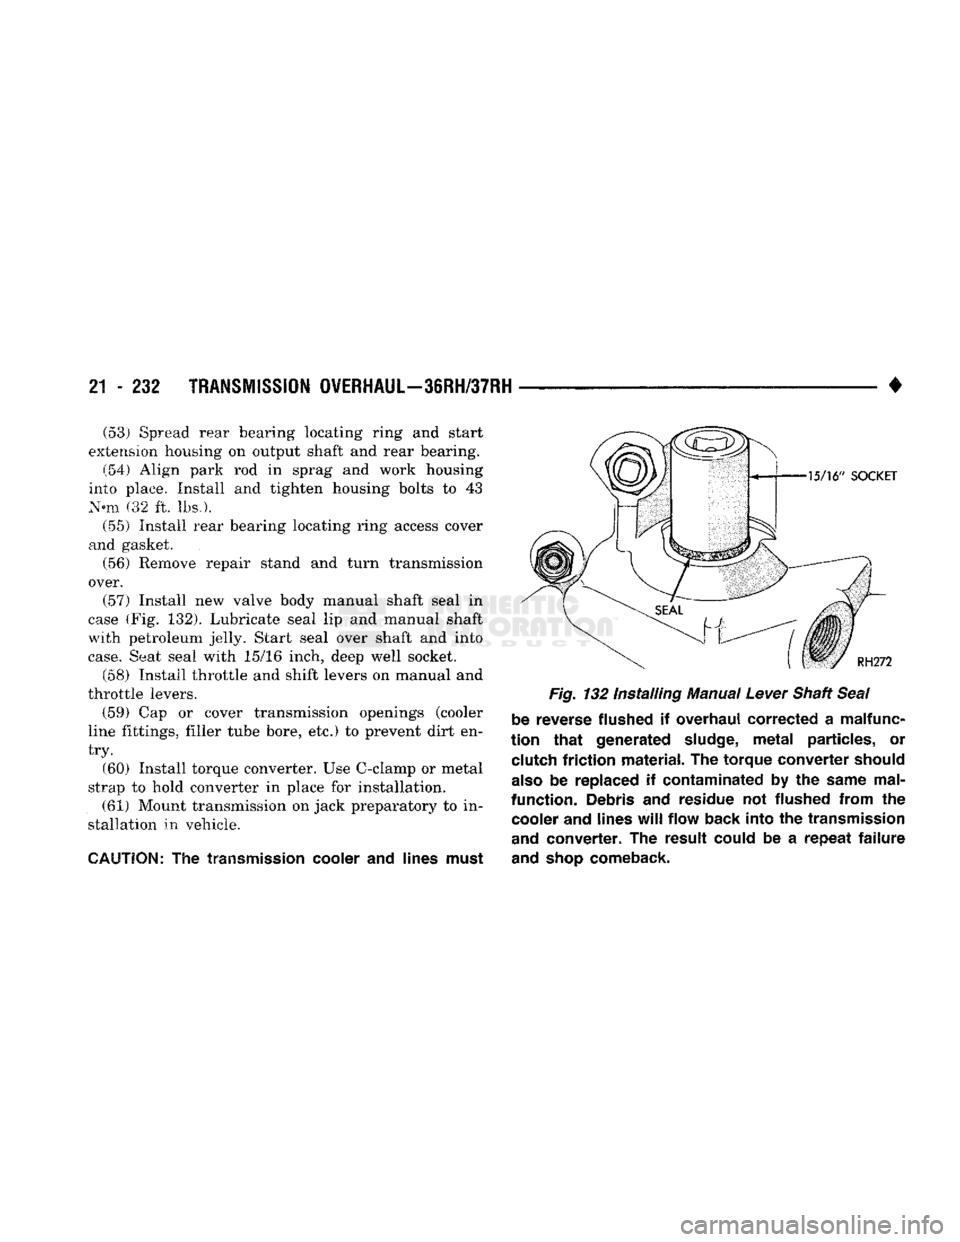
(57) Install new valve body manual shaft seal in
case (Fig. 132). Lubricate seal lip and manual shaft
with petroleum jelly. Start seal over shaft and into
case.
Seat seal with 15/16 inch, deep well socket.
(58) Install throttle and shift levers on manual and
throttle levers. (59) Cap or cover transmission openings (cooler
line fittings, filler tube bore, etc.) to prevent dirt en
try.
(60) Install torque converter. Use C-clamp or metal
strap to hold converter in place for installation. (61) Mount transmission on jack preparatory to in
stallation in vehicle.
CAUTION;
The
transmission cooler
and
lines must Fig.
132 Installing Manual
Lever
Shaft
Seal
be reverse flushed
if
overhaul corrected
a
malfunc
tion
that
generated
sludge,
metal
particles,
or
clutch friction material.
The
torque converter should
also
be
replaced
if
contaminated
by the
same mal
function. Debris
and
residue
not
flushed from
the
cooler and lines
will
flow back into
the
transmission
and
converter.
The
result could
be a
repeat
failure
and
shop
comeback.
Page 1234 of 1502
•
TRANSMISSION
OVERHAUL-42RH
21
-
233
TRANSMISSION 0¥ERHAUL—42RH
INDEX
page
Front Clutch Overhaul
245
Front Servo
and
Band Overhaul
254
Oil Pump
and
Reaction Shaft Support Overhaul
.
241
Overhaul Service Information
239
Overrunning Clutch—Low-Reverse Drum—Overdrive
Piston
Retainer Inspection
and
Overhaul
....
240
Planetary Gear Train
and
Intermediate
Shaft
Overhaul
250
page
Rear
Clutch Overhaul
.................... 247
Rear
Servo
and
Band Overhaul
255
Transmission
Assembly
and
Adjustment
. 269
Transmission
Case
Cleaning
and
Inspection
. . .
240
Transmission
Disassembly
. 233
Valve
Body Cleaning
and
Inspection
262
Valve
Body Service
and
Adjustment
256
TRANSMISSION
DISASSEMBLY
(1)
Remove torque converter
if not
previously
re
moved.
(2)
Clean transmission exterior with steam gun
or
with solvent. Wear
eye
protection during cleaning
operations.
(3)
Remove shift
and
throttle levers from valve
body manual lever shaft.
(4)
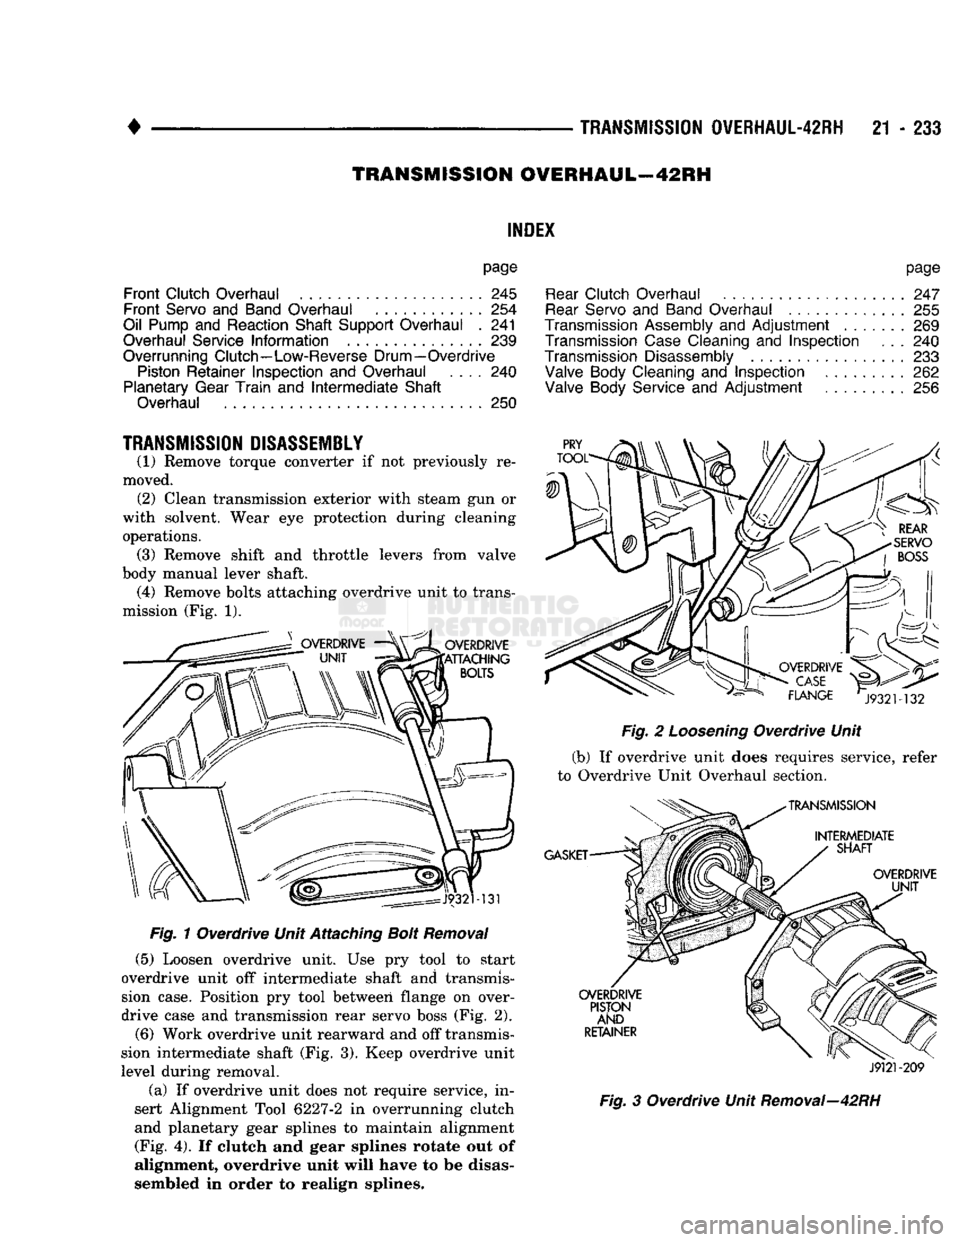
Remove bolts attaching overdrive unit
to
trans
mission (Fig. 1).
Fig.
1 Overdrive Unit Attaching
Bolt
Removal
(5)
Loosen overdrive unit.
Use pry
tool
to
start
overdrive unit
off
intermediate shaft
and
transmis
sion case. Position
pry
tool between flange
on
over
drive case and transmission rear servo boss (Fig. 2).
(6)
Work overdrive unit rearward and off transmis
sion intermediate shaft (Fig. 3). Keep overdrive unit
level during removal.
(a)
If
overdrive unit does
not
require service,
in
sert Alignment Tool
6227-2
in
overrunning clutch
and planetary gear splines
to
maintain alignment (Fig. 4).
If
clutch
and
gear splines
rotate out
of
alignment,
overdrive unit will have
to
be
disas
sembled
in
order
to
realign splines.
J9121-209
Fig.
3
Overdrive Unit Removal—42RH
Page 1235 of 1502
21
- 234
TRANSMISSION
0VERHAUL-42RH
J9321-133
Fig.
4 Overdrive
Spline
Alignment
Tool
Installation
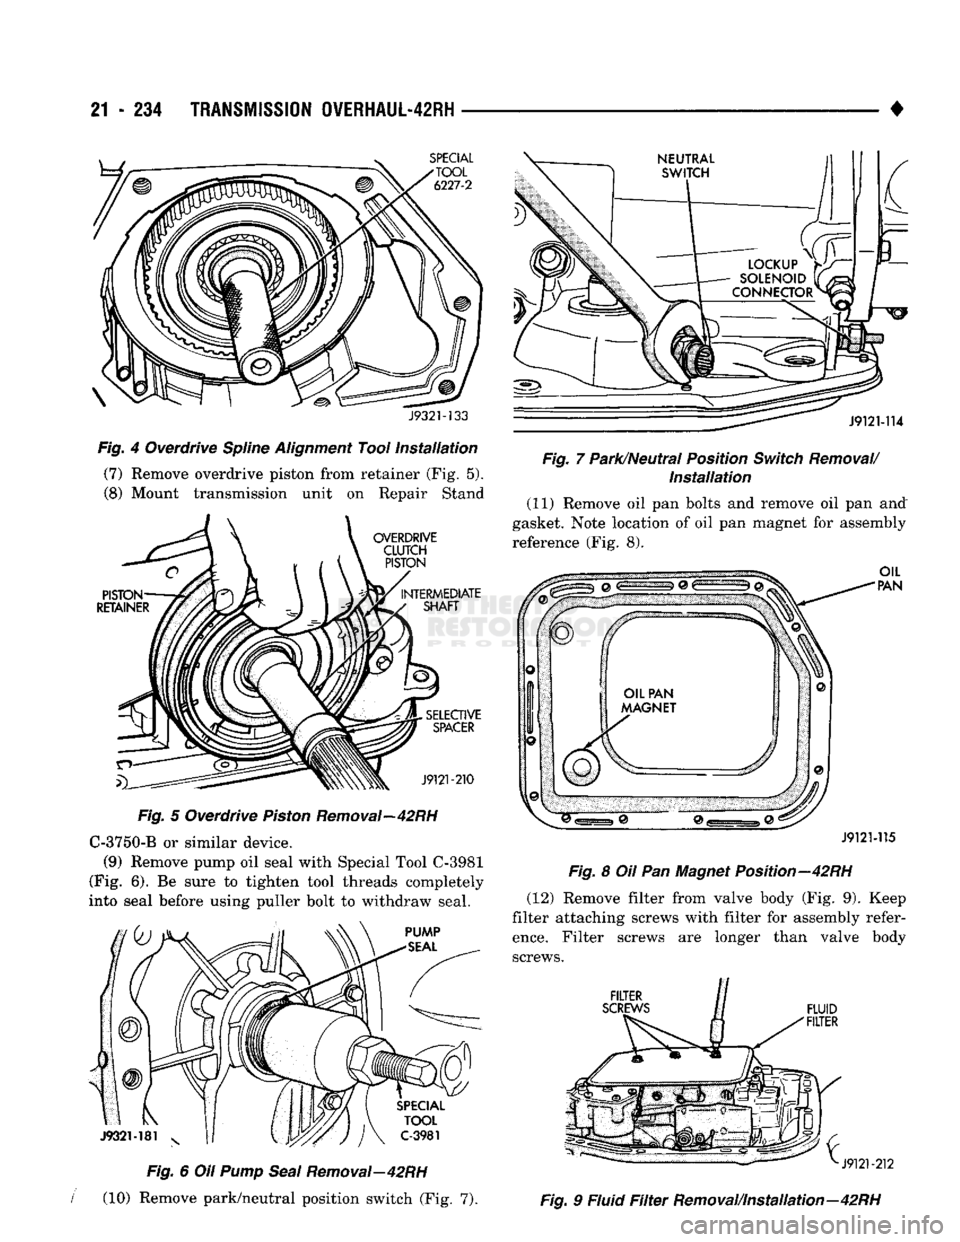
(7) Remove overdrive piston from retainer (Fig. 5).
(8) Mount transmission unit on Repair Stand
Fig.
5 Overdrive
Piston
Removal—42RH C-3750-B or similar device.
(9) Remove pump oil seal with Special Tool C-3981
(Fig. 6). Be sure to tighten tool threads completely
into seal before using puller bolt to withdraw seal.
Fig.
6 Oil
Pump
Seal
Removal—42RH
I
(10) Remove park/neutral position switch (Fig. 7). •
Fig.
7 Park/Neutral Position
Switch
Removal/
Installation
(11) Remove oil pan bolts and remove oil pan and
gasket. Note location of oil pan magnet for assembly reference (Fig. 8).
J9121-115
Fig.
8 Oil Pan Magnet Position—42RH (12) Remove filter from valve body (Fig. 9). Keep
filter attaching screws with filter for assembly refer
ence.
Filter screws are longer than valve body screws.
Fig.
9 Fluid
Filter
Removal/Installation—42RH
Page 1236 of 1502
•
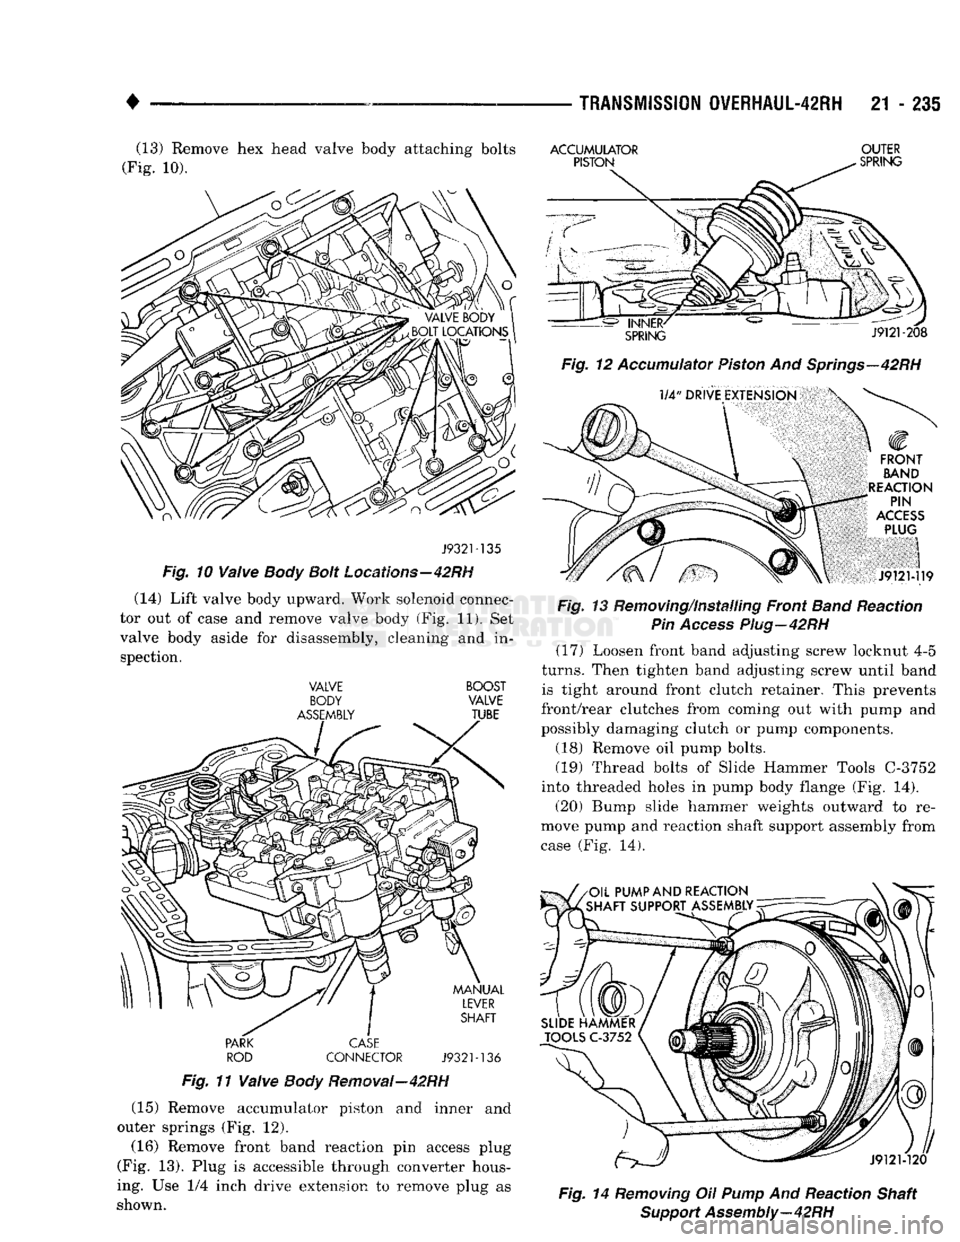
(13) Remove hex head valve body attaching bolts
(Fig. 10).
J9321-135
Fig.
10
Valve
Body
Bolt
Locations—42RH
(14) Lift valve body upward. Work solenoid connec
tor out of case and remove valve body (Fig. 11). Set
valve body aside for disassembly, cleaning and in spection.
VALVE
BOOST
BODY
VALVE
ASSEMBLY
TUBE
PARK
CASE
ROD
CONNECTOR
J9321-136
Fig.
11
Valve
Body
Removal—42RH
(15) Remove accumulator piston and inner and
outer springs (Fig. 12).
(16) Remove front band reaction pin access plug
(Fig. 13). Plug is accessible through converter hous
ing. Use 1/4 inch drive extension to remove plug as
shown.
TRANSMISSION
0VERHAUL-42RH
21 - 235
ACCUMULATOR
OUTER
Fig.
12
Accumulator
Piston
And
Springs—42RH
Fig.
13 Removing/Installing Front
Band
Reaction
Pin
Access
Plug—42RH
(17) Loosen front band adjusting screw locknut 4-5
turns.
Then tighten band adjusting screw until band is tight around front clutch retainer. This prevents
front/rear clutches from coming out with pump and
possibly damaging clutch or pump components.
(18) Remove oil pump bolts.
(19) Thread bolts of Slide Hammer Tools C-3752
into threaded holes in pump body flange (Fig. 14).
(20) Bump slide hammer weights outward to re
move pump and reaction shaft support assembly from
case (Fig. 14).
Fig.
14
Removing
Oil
Pump
And Reaction Shaft
Support
Assembly—42RH
Page 1237 of 1502
21
- 236
TRANSMISSION
0VERHAUL-42RH
• (21) Loosen front band adjusting screw until band
is completely loose.
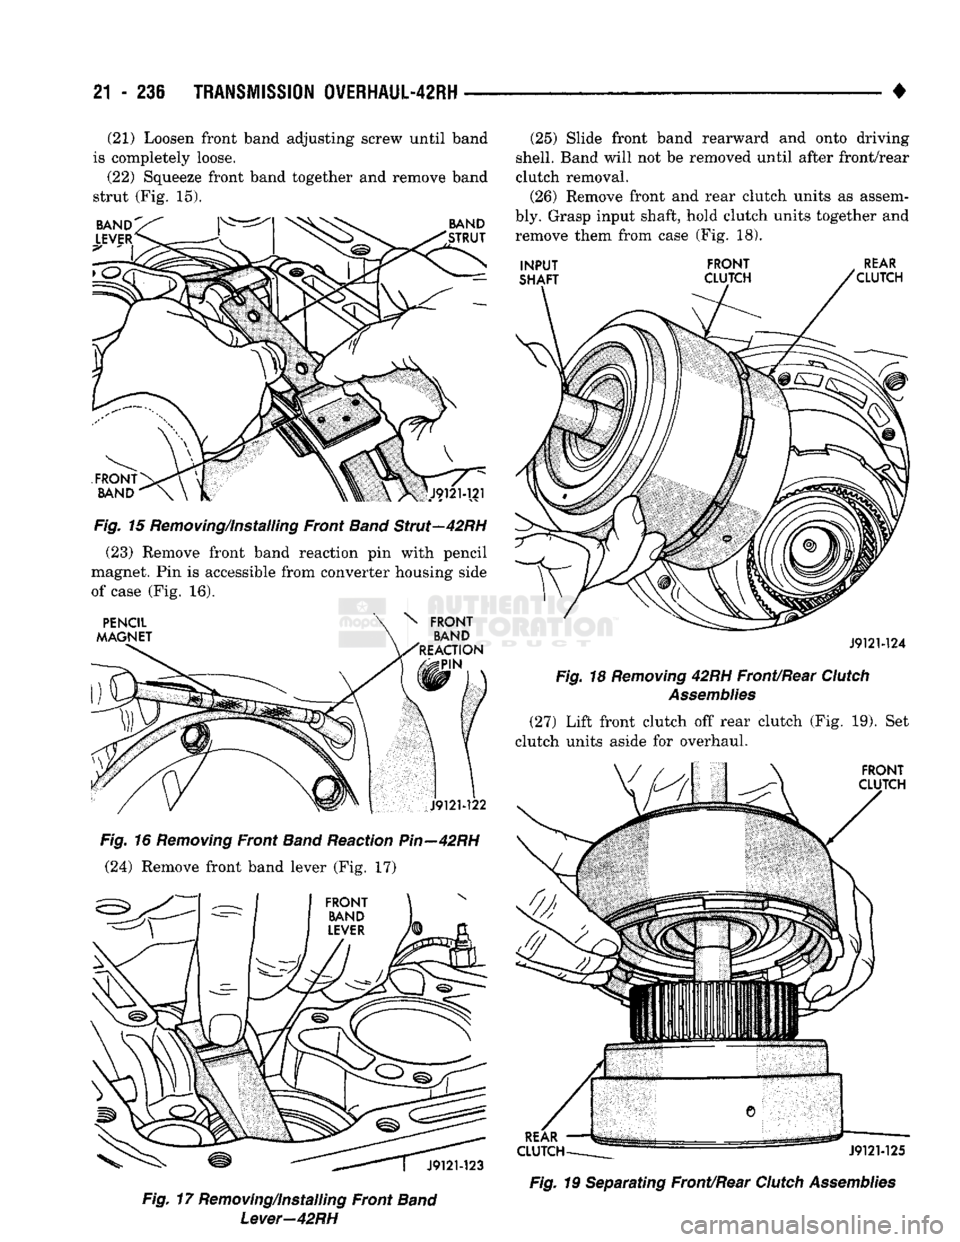
(22) Squeeze front band together and remove band
strut (Fig. 15).
Fig.
15 Removing/Installing Front
Band
Strut—42RH (23) Remove front band reaction pin with pencil
magnet. Pin is accessible from converter housing side
of case (Fig. 16).
Fig.
16
Removing
Front
Band
Reaction
Pin—42RH
(24) Remove front band lever (Fig. 17)
Fig.
17 Removing/Installing Front
Band
Lever—42RH
(25) Slide front band rearward and onto driving
shell. Band will not be removed until after front/rear
clutch removal. (26) Remove front and rear clutch units as assem
bly. Grasp input shaft, hold clutch units together and remove them from case (Fig. 18).
J9121-124
Fig.
18
Removing
42RH
Front/Rear
Clutch
Assemblies
(27) Lift front clutch off rear clutch (Fig. 19). Set
clutch units aside for overhaul.
Fig.
19 Separating Front/Rear
Clutch
Assemblies
Page 1238 of 1502
TRANSMISSION
OVERHAUL-42RH
21 - 237
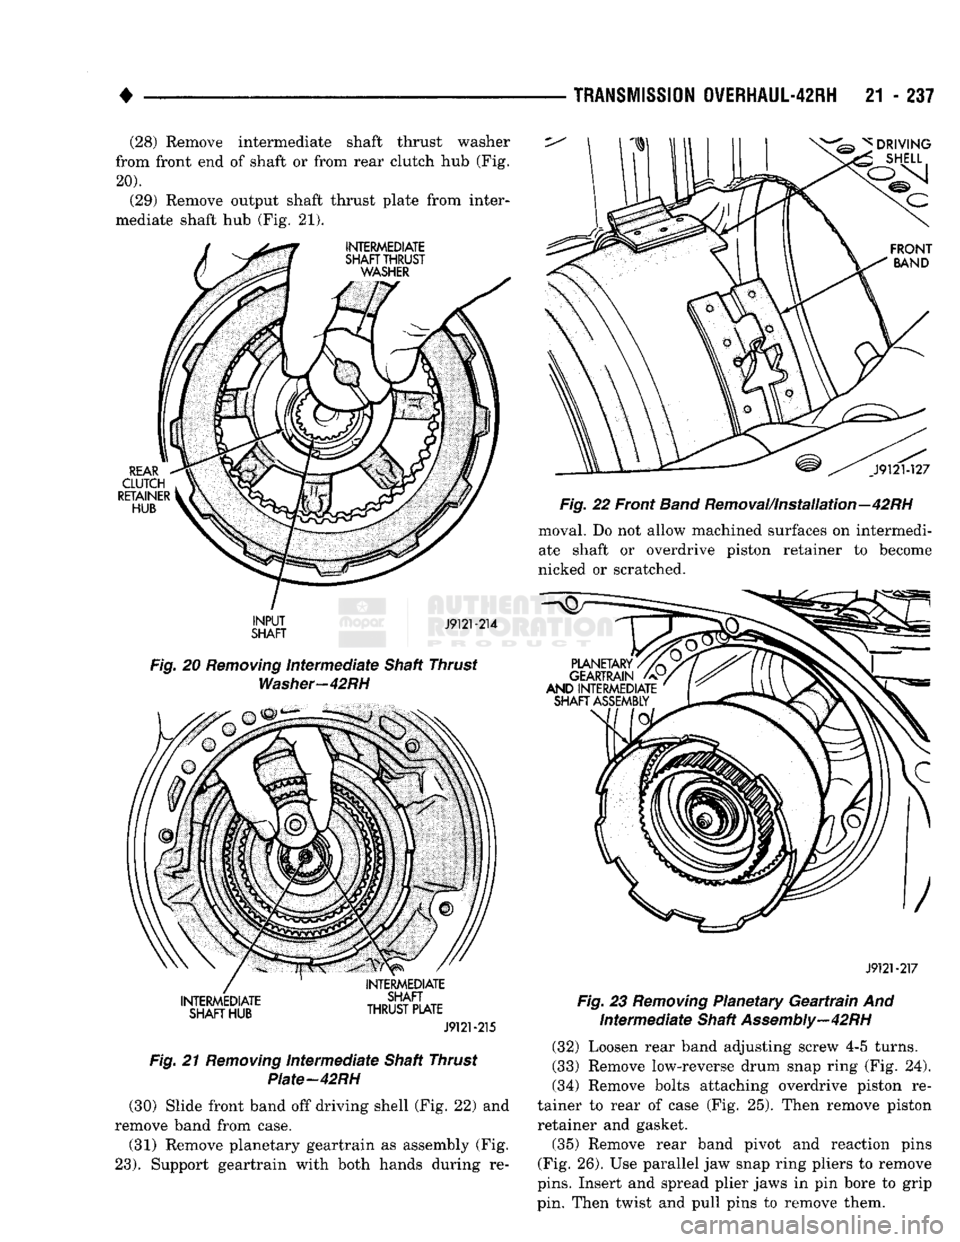
(28) Remove intermediate shaft thrust washer
from front end of shaft or from rear clutch hub (Fig.
20).
(29) Remove output shaft thrust plate from inter
mediate shaft hub (Fig. 21).
INTERMEDIATE
SHAFT
THRUST
WASHER
^
DRIVING
SHELL
REAR
CLUTCH
RETAINER
HUB
J9121-127
Fig.
22 Front
Band
Removal/Installation—42RH moval. Do not allow machined surfaces on intermedi
ate shaft or overdrive piston retainer to become
nicked or scratched.
INPUT
SHAFT
J9121-214
Fig.
20
Removing
Intermediate
Shaft Thrust
Washer-42RH
INTERMEDIATE
SHAFT
HUB
INTERMEDIATE
SHAFT
THRUST
PLATE
J9121-215
Fig.
21
Removing
Intermediate
Shaft Thrust Plate-42RH (30) Slide front band off driving shell (Fig. 22) and
remove band from case.
(31) Remove planetary geartrain as assembly (Fig.
23).
Support geartrain with both hands during re-
J9121-217
Fig.
23
Removing
Planetary
Geartrain
And
Intermediate
Shaft
Assembly—42RH
(32) Loosen rear band adjusting screw 4-5 turns.
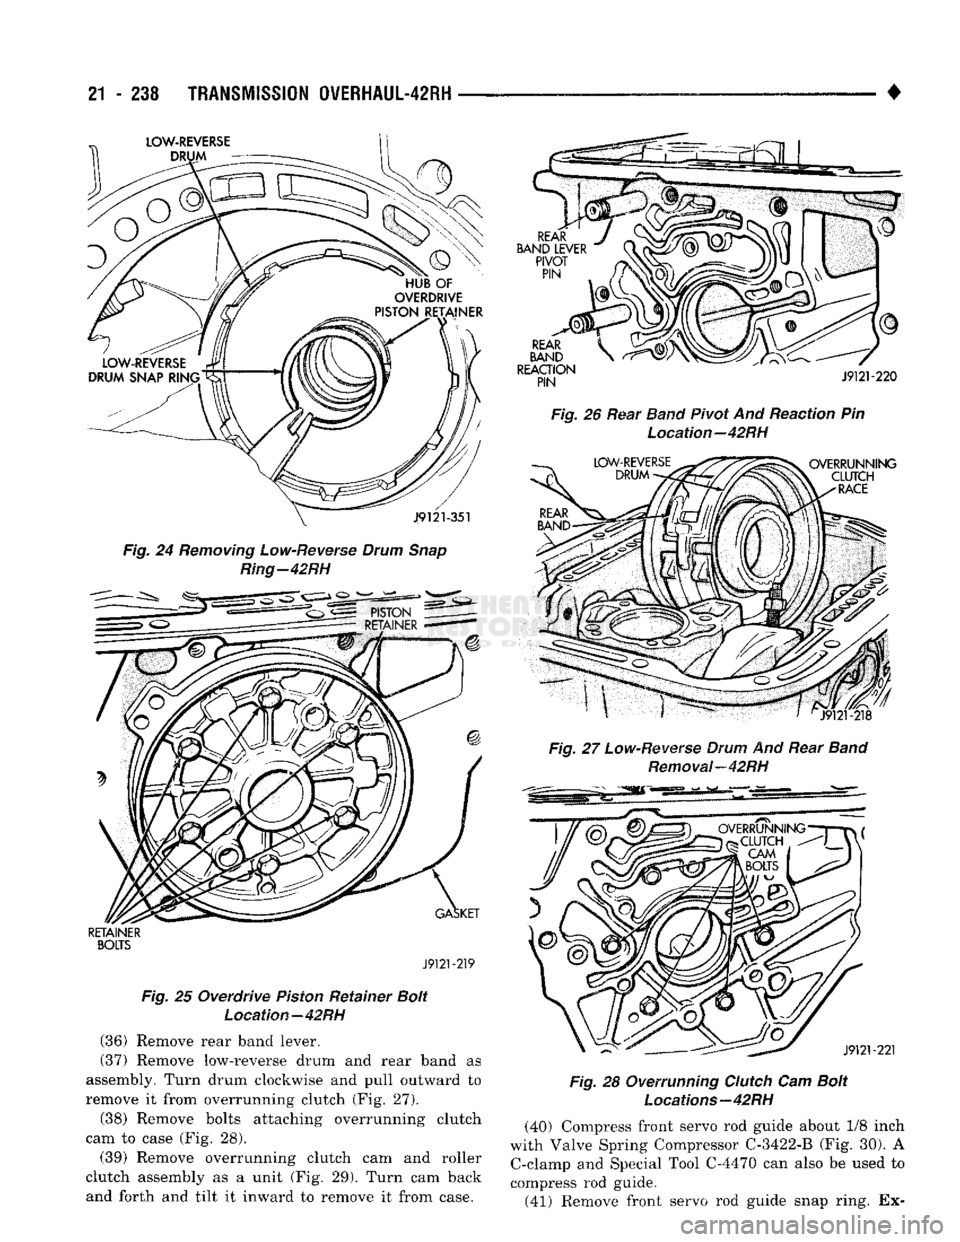
(33) Remove low-reverse drum snap ring (Fig. 24).
(34) Remove bolts attaching overdrive piston re
tainer to rear of case (Fig. 25). Then remove piston retainer and gasket.
(35) Remove rear band pivot and reaction pins
(Fig. 26). Use parallel jaw snap ring pliers to remove
pins.
Insert and spread plier jaws in pin bore to grip
pin. Then twist and pull pins to remove them.
Page 1239 of 1502
21
- 238
TRANSMISSION
0VERHAUL-42RH
Fig. 24
Removing
Low-Reverse
Drum
Snap
Ring-42RH
RETAINER
BOLTS
J9121-219
Fig. 25 Overdrive
Piston
Retainer
Bolt
Location—42RH
(36)
Remove rear
band
lever.
(37)
Remove low-reverse drum and rear band as
assembly. Turn drum clockwise and pull outward to
remove it from overrunning clutch (Fig. 27). (38) Remove bolts attaching overrunning clutch
cam to case (Fig. 28).
(39) Remove overrunning clutch cam and roller
clutch assembly as a unit (Fig. 29). Turn cam back
and forth and tilt it inward to remove it from case.
Fig.
26 Rear
Band
Pivot And Reaction Pin
Location—42RH
Fig.
27
Low-Reverse
Drum
And Rear
Band
Removal—42RH
Fig.
28 Overrunning
Clutch
Cam
Bolt
Locations—42RH
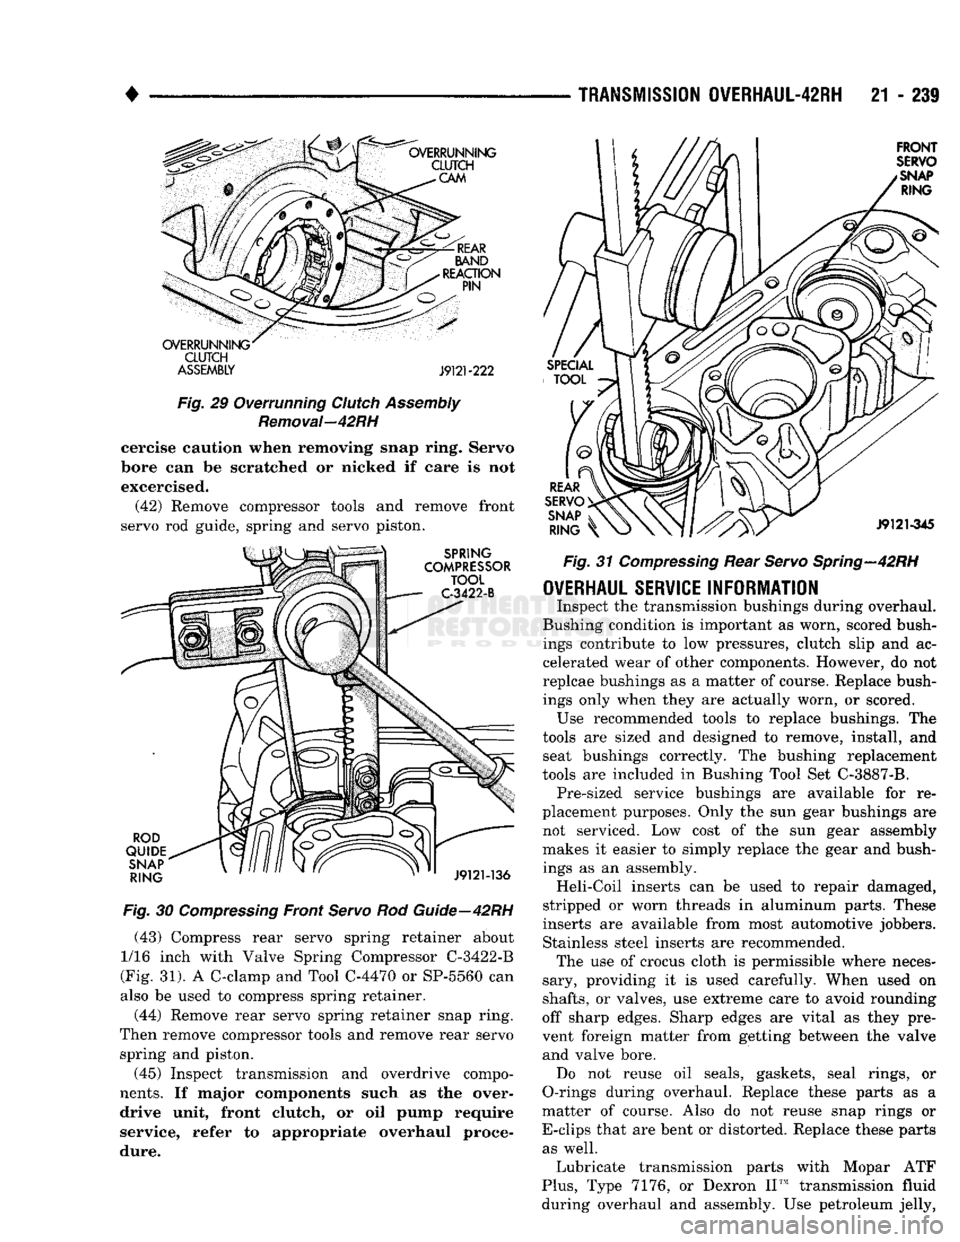
(40) Compress front servo rod guide about 1/8 inch
with Valve Spring Compressor
C-3422-B
(Fig. 30). A C-clamp and Special Tool C-4470 can also be used to
compress rod guide. (41) Remove front servo rod guide snap ring. Ex-
Page 1240 of 1502
•
TRANSMISSION
OVERHAUL-42RH
21 - 239
CLUTCH
ASSEMBLY J9121-222
Fig.
29 Overrunning
Clutch
Assembly
Removal—42RH
cercise caution when removing snap ring. Servo
bore can be scratched or nicked if care is not
excercised. (42) Remove compressor tools and remove front
servo rod guide, spring and servo piston.
Fig.
30
Compressing
Front
Servo
Rod
Guide—42RH
(43) Compress rear servo spring retainer about
1/16 inch with Valve Spring Compressor C-3422-B
(Fig. 31). A C-clamp and Tool C-4470 or SP-5560 can
also be used to compress spring retainer.
(44) Remove rear servo spring retainer snap ring.
Then remove compressor tools and remove rear servo spring and piston.
(45) Inspect transmission and overdrive compo
nents.
If major components such as the over drive unit, front clutch, or oil pump require
service, refer to appropriate overhaul proce
dure.
Fig.
31
Compressing
Rear
Servo
Spring—42RH
OVERHAUL
SERVICE
INFORMATION
Inspect the transmission bushings during overhaul.
Bushing condition is important as worn, scored bush ings contribute to low pressures, clutch slip and ac
celerated wear of other components. However, do not
replcae bushings as a matter of course. Replace bush ings only when they are actually worn, or scored. Use recommended tools to replace bushings. The
tools are sized and designed to remove, install, and seat bushings correctly. The bushing replacement
tools are included in Bushing Tool Set C-3887-B. Pre-sized service bushings are available for re
placement purposes. Only the sun gear bushings are
not serviced. Low cost of the sun gear assembly makes it easier to simply replace the gear and bush
ings as an assembly. Heli-Coil inserts can be used to repair damaged,
stripped or worn threads in aluminum parts. These
inserts are available from most automotive jobbers.
Stainless steel inserts are recommended. The use of crocus cloth is permissible where neces
sary, providing it is used carefully. When used on
shafts,
or valves, use extreme care to avoid rounding
off sharp edges. Sharp edges are vital as they pre
vent foreign matter from getting between the valve and valve bore. Do not reuse oil seals, gaskets, seal rings, or
O-rings during overhaul. Replace these parts as a
matter of course. Also do not reuse snap rings or
E-clips that are bent or distorted. Replace these parts as well. Lubricate transmission parts with Mopar ATF
Plus,
Type 7176, or Dexron II™ transmission fluid
during overhaul and assembly. Use petroleum jelly,