DODGE TRUCK 1993 Service Repair Manual
Manufacturer: DODGE, Model Year: 1993, Model line: TRUCK, Model: DODGE TRUCK 1993Pages: 1502, PDF Size: 80.97 MB
Page 411 of 1502
•
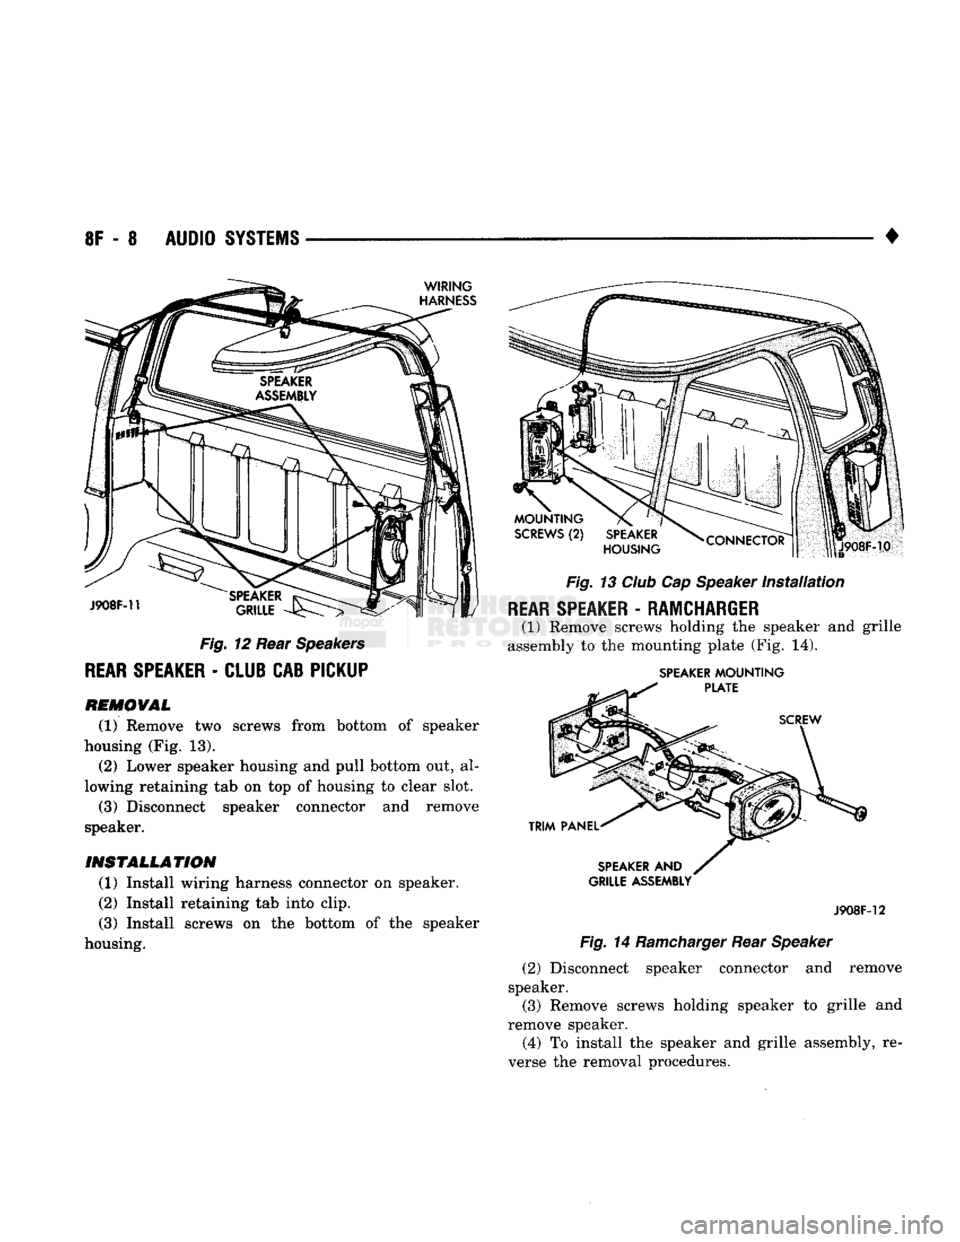
Fig.
12 Rear
Speakers
REAR
SPEAKER
-
CLUB CAB PICKUP
REMOVAL
(1) Remove two screws from bottom of speaker
housing (Fig. 13). (2) Lower speaker housing and pull bottom out, al
lowing retaining tab on top of housing to clear slot. (3) Disconnect speaker connector and remove
speaker.
INSTALLATION
(1) Install wiring harness connector on speaker.
(2) Install retaining tab into clip.
(3) Install screws on the bottom of the speaker
housing.
Fig.
13
Club
Cap
Speaker
Installation
REAR
SPEAKER
-
RAMCHARGER
(1) Remove screws holding the speaker and grille
assembly to the mounting plate (Fig. 14).
SPEAKER
MOUNTING
GRILLE
ASSEMBLY
J908F-12
Fig.
14
Ramcharger
Rear
Speaker
(2) Disconnect speaker connector and remove
speaker.
(3) Remove screws holding speaker to grille and
remove speaker.
(4) To install the speaker and grille assembly, re
verse the removal procedures.
Page 412 of 1502
•
HORNS
8G - 1
HORNS
CONTENTS
SERVICE
PROCEDURES
page
.. 3
TEST PROCEDURES
page
.. 1
GENERAL
INFORMATION plied from the fuse block and grounded in the horn The horn system consists of a horn switch, horn re- switch. When the horn switch on the steering column
lay (located on the fuse block), horns, and all their is pressed, the ground circuit is completed, energiz-
wiring and connections. The circuit voltage is sup- ing the relay, and supplying power to the horns.
TEST PROCEDURES
HORNS
WILL
NOT
SOUND
If the horns do not sound, check for a blown horn
fuse in cavity number 4 of the fuse block. If the fuse is blown, replace it with the same type fuse. If the
horns fail to sound and the newly replaced fuse blows
the horn switch is depressed, check for one of the fol lowing:
• a short circuit in the horn
• the horn wiring between the fuse terminal and the
horn is faulty. If the fuse is intact, unplug wire connector at horn.
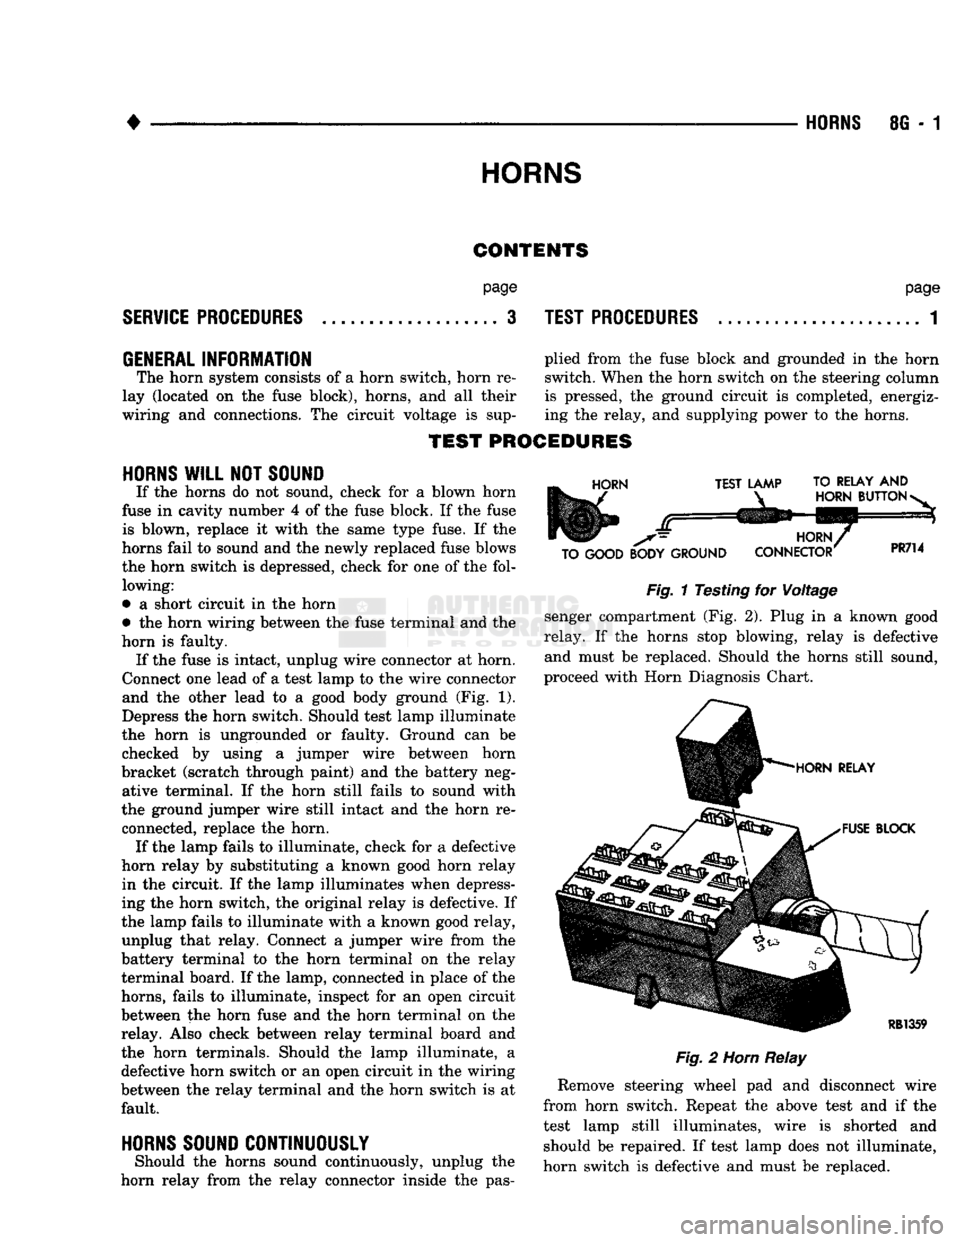
Connect one lead of a test lamp to the wire connector and the other lead to a good body ground (Fig. 1).
Depress the horn switch. Should test lamp illuminate
the horn is ungrounded or faulty. Ground can be checked by using a jumper wire between horn
bracket (scratch through paint) and the battery neg ative terminal. If the horn still fails to sound with
the ground jumper wire still intact and the horn re connected, replace the horn. If the lamp fails to illuminate, check for a defective
horn relay by substituting a known good horn relay in the circuit. If the lamp illuminates when depress
ing the horn switch, the original relay is defective. If
the lamp fails to illuminate with a known good relay, unplug that relay. Connect a jumper wire from the
battery terminal to the horn terminal on the relay
terminal board. If the lamp, connected in place of the
horns, fails to illuminate, inspect for an open circuit
between the horn fuse and the horn terminal on the relay. Also check between relay terminal board and
the horn terminals. Should the lamp illuminate, a defective horn switch or an open circuit in the wiring
between the relay terminal and the horn switch is at fault.
HORNS SOUND CONTINUOUSLY
Should the horns sound continuously, unplug the
horn relay from the relay connector inside the pas-
HORN
TEST LAMP TO RELAY
AND
HORN
BUTTON
-
TO GOOD BODY GROUND HORN,
CONNECTOR
PR714
Fig.
1 Testing for Voltage
senger compartment (Fig. 2). Plug in a known good
relay. If the horns stop blowing, relay is defective and must be replaced. Should the horns still sound,
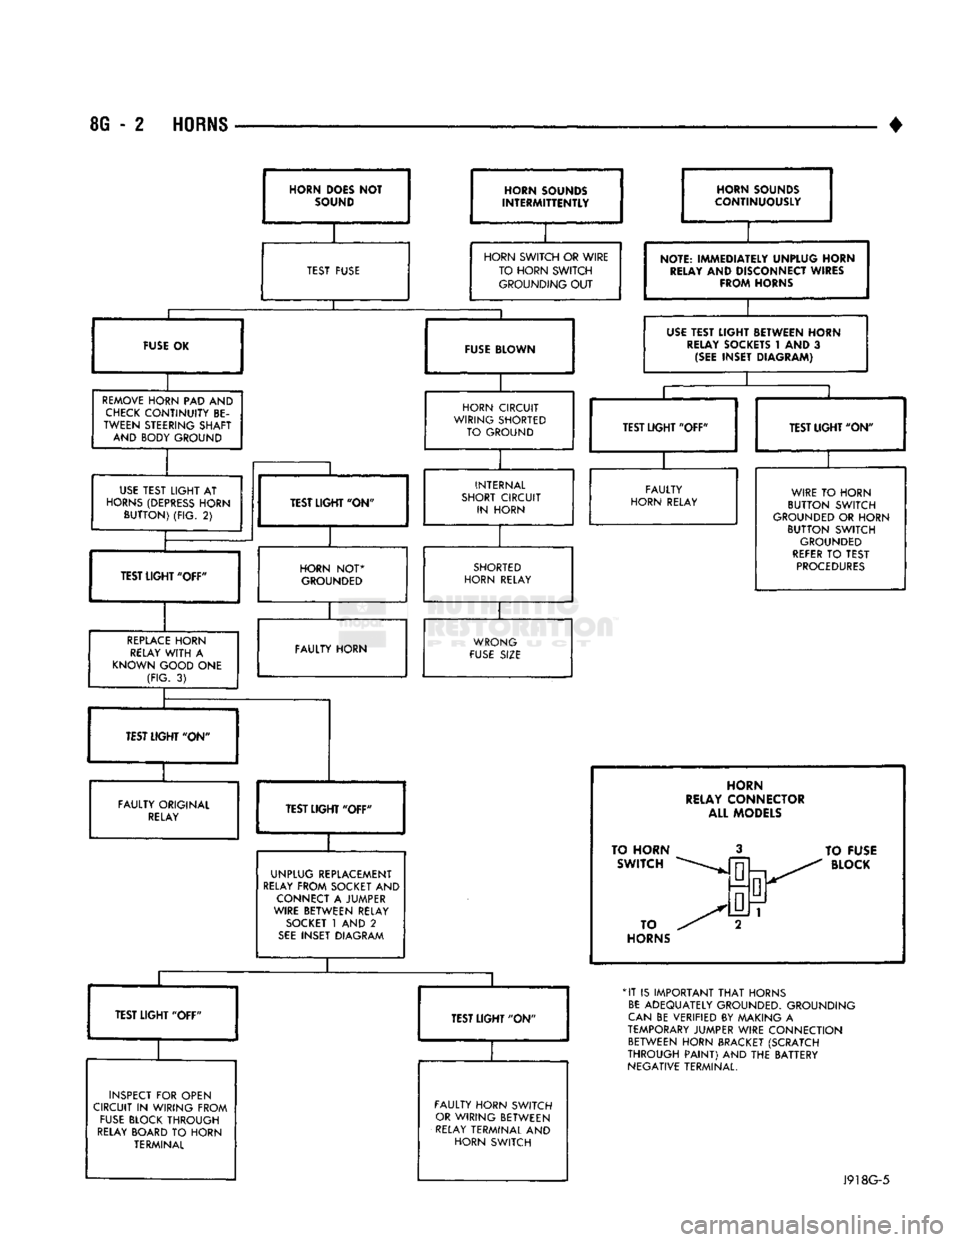
proceed with Horn Diagnosis Chart.
HORN RELAY
FUSE BLOCK
RB1359
Fig.
2
Horn
Relay
Remove steering wheel pad and disconnect wire
from horn switch. Repeat the above test and if the
test lamp still illuminates, wire is shorted and should be repaired. If test lamp does not illuminate,
horn switch is defective and must be replaced.
Page 413 of 1502
8G
- 2
HORNS
•
HORN
DOES NOT
SOUND HORN SOUNDS
INTERMITTENTLY
TEST FUSE
HORN SOUNDS
CONTINUOUSLY
HORN SWITCH
OR
WIRE TO HORN SWITCH GROUNDING
OUT
FUSE BLOWN
REMOVE
HORN
PAD AND
CHECK
CONTINUITY
BE
TWEEN STEERING SHAFT AND BODY GROUND
NOTE:
IMMEDIA1
RELAY
AND
Dl
FRO/V
rELY UNPLUG HORN
SCONNECT
WIRES
\HORNS
USE
TEST LIGHT BETWEEN HORN
RELAY
SOCKETS
t AND 3
(SEE
INSET DIAGRAM)
HORN CIRCUIT
WIRING SHORTED TO GROUND
USE
TEST
LIGHT
AT
HORNS
(DEPRESS
HORN
BUTTON)
(FIG.
2)
TEST LIGHT' ON
TEST
UGHT
"OFF" TEST LIGHT "OFF"
INTERNAL
SHORT CIRCUIT IN HORN
HORN
NOT*
GROUNDED
REPLACE
HORN
RELAY
WITH
A
KNOWN GOOD
ONE
(FIG.
3)
TEST LIGHT "ON"
FAULTY
HORN RELAY
SHORTED
HORN RELAY WIRE
TO
HORN
BUTTON SWITCH
GROUNDED
OR
HORN BUTTON SWITCH
GROUNDED
REFER
TO
TEST
PROCEDURES
FAULTY HORN WRONG
FUSE
SIZE
TEST LIGHT "ON"
FAULTY ORIGINAL
RELAY
TEST LIGI
HT
"OFF"
UNPLUG REPLACEMENT
RELAY
FROM SOCKET
AND
CONNECT
A
JUMPER
WIRE BETWEEN RELAY
SOCKET
1
AND
2
SEE
INSET DIAGRAM
INSPECT
FOR
OPEN
CIRCUIT
IN
WIRING FROM
FUSE
BLOCK THROUGH
RELAY
BOARD
TO
HORN TERMINAL FAULTY HORN SWITCH
OR
WIRING BETWEEN
RELAY
TERMINAL
AND
HORN SWITCH
HORN
RELAY CONNECTOR ALL MODELS
TO HORN SWITCH
TO
HORNS
TO
FUSE
BLOCK
*IT
IS
IMPORTANT
THAT
HORNS
BE
ADEQUATELY GROUNDED. GROUNDING
CAN
BE
VERIFIED
BY
MAKING
A
TEMPORARY
JUMPER WIRE CONNECTION BETWEEN HORN BRACKET (SCRATCH
THROUGH
PAINT)
AND THE
BATTERY
NEGATIVE TERMINAL.
J918G-5
Page 414 of 1502
•
HORNS
8G - 3
SERVICE
PROCEDURES
HORN
SWITCH (HORN PAD ASSEMBLY)
REPLACEMENT
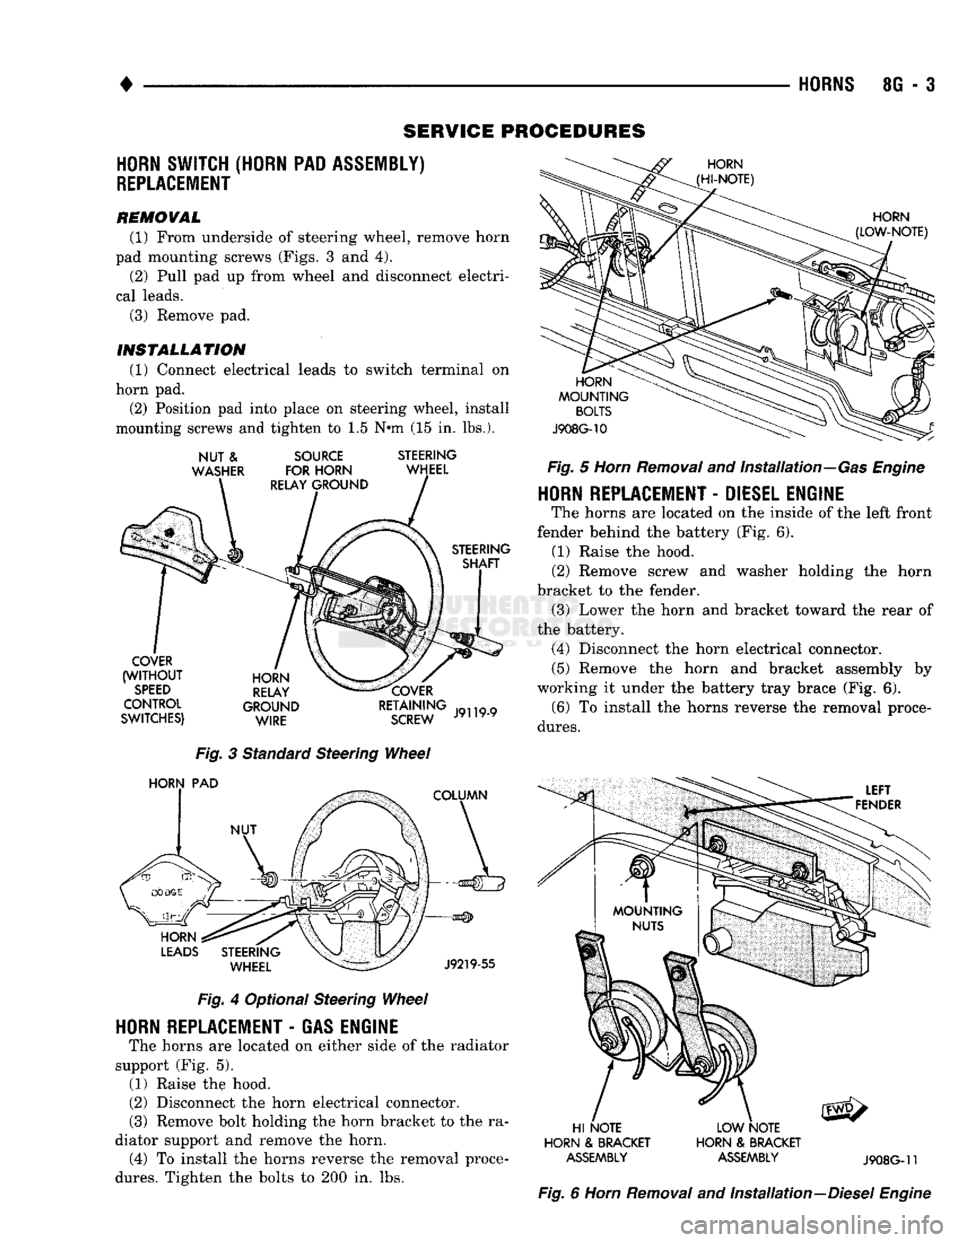
REMOVAL (1) From underside of steering wheel, remove horn
pad mounting screws (Figs. 3 and 4). (2) Pull pad up from wheel and disconnect electri
cal leads. (3) Remove pad.
INSTALLATION
(1) Connect electrical leads to switch terminal on
horn pad. (2) Position pad into place on steering wheel, install
mounting screws and tighten to 1.5 N*m (15 in. lbs.).
NUT
&
WASHER
SOURCE
FOR HORN
RELAY GROUND STEERING
WHEEL
STEERING SHAFT
COVER
(WITHOUT
SPEED
CONTROL
SWITCHES) HORN
RELAY
GROUND WIRE COVER
RETAINING
SCREW
J9119-9
Fig.
3 Standard Steering
Wheel
HORN
PAD
COLUMN
HORN
LEADS
STEERING WHEEL
J9219-55
Fig.
4 Optional Steering
Wheel
HORN
REPLACEMENT
-
GAS ENGINE
The horns are located on either side of the radiator
support (Fig. 5). (1) Raise the hood.
(2) Disconnect the horn electrical connector.
(3) Remove bolt holding the horn bracket to the ra
diator support and remove the horn. (4) To install the horns reverse the removal proce
dures.
Tighten the bolts to 200 in. lbs.
HORN
(HI-NOTE)
HORN
(LOW-NOTE)
HORN
MOUNTING
BOLTS
J908G-10
Fig.
5
Horn
Removal
and Installation—Gas
Engine
HORN
REPLACEMENT
-
DIESEL ENGINE
The horns are located on the inside of the left front
fender behind the battery (Fig. 6). (1) Raise the hood.
(2) Remove screw and washer holding the horn
bracket to the fender. (3) Lower the horn and bracket toward the rear of
the battery. (4) Disconnect the horn electrical connector.
(5) Remove the horn and bracket assembly by
working it under the battery tray brace (Fig. 6). (6) To install the horns reverse the removal proce
dures.
LEFT
FENDER
HI NOTE
HORN
&
BRACKET
ASSEMBLY
LOW NOTE
HORN
&
BRACKET
ASSEMBLY
J908G-11
Fig.
6
Horn
Removal
and Installation—Diesel
Engine
Page 415 of 1502

Page 416 of 1502
•
VEHICLE SPEED CONTROL SYSTEM
8H - 1
VEHICLE SPEED CONTROL SYSTEM
CONTENTS
SERVICE
PROCEDURES
page
. 11
TEST PROCEDURES
page
.. 7
GENERAL
INFORMATION
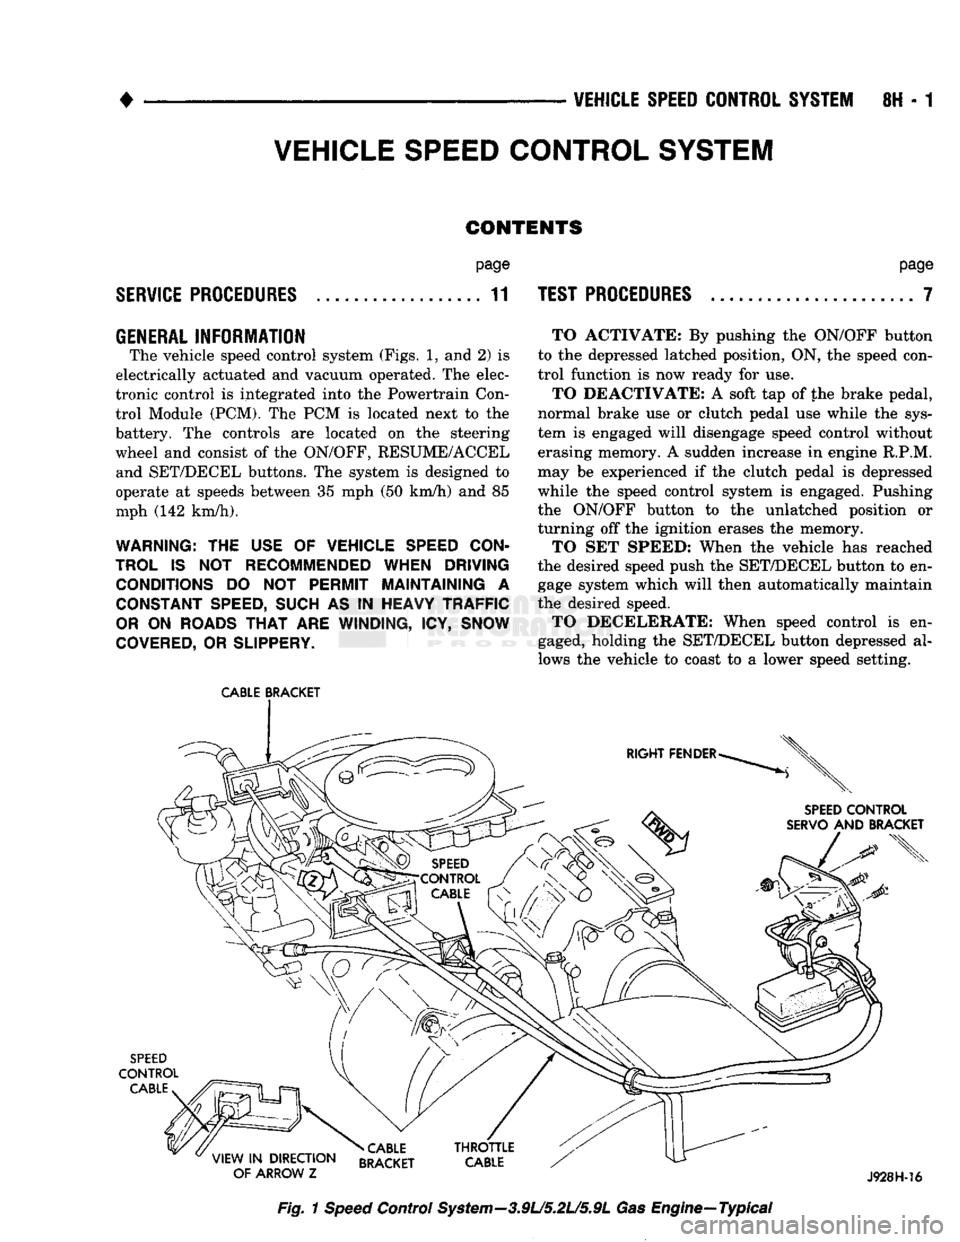
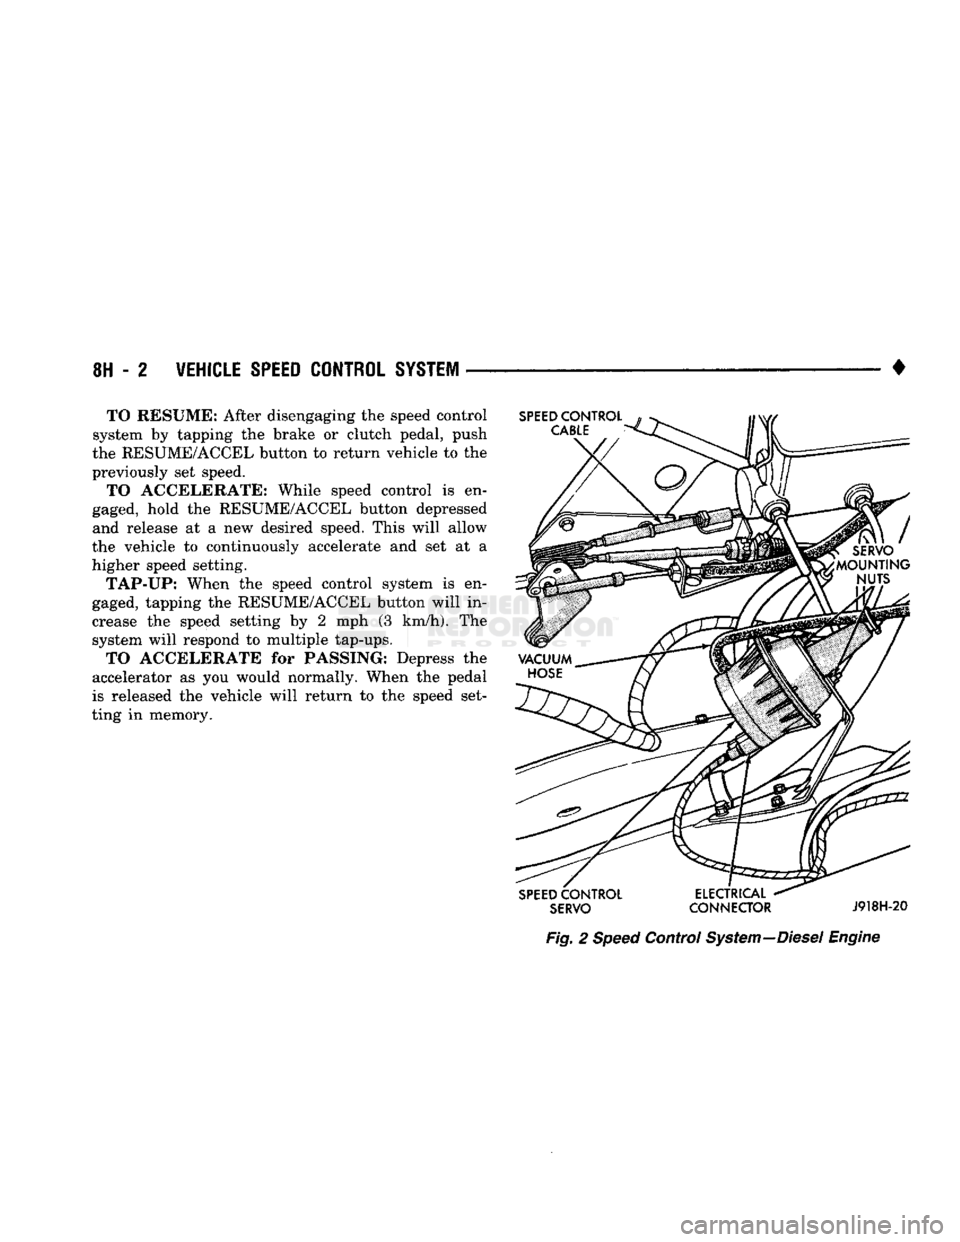
The vehicle speed control system (Figs. 1, and 2) is
electrically actuated and vacuum operated. The elec
tronic control is integrated into the Powertrain Con trol Module (PCM). The PCM is located next to the
battery. The controls are located on the steering
wheel and consist of the ON/OFF, RESUME/ACCEL and SET/DECEL buttons. The system is designed to
operate at speeds between 35 mph (50 km/h) and 85
mph (142 km/h).
WARNING: THE USE OF VEHICLE SPEED CON
TROL IS NOT RECOMMENDED WHEN DRIVING CONDITIONS DO NOT PERMIT MAINTAINING A CONSTANT SPEED, SUCH AS IN HEAVY TRAFFIC
OR ON ROADS THAT ARE WINDING, ICY, SNOW
COVERED, OR SLIPPERY.
CABLE
BRACKET
TO ACTIVATE: By pushing the ON/OFF button
to the depressed latched position, ON, the speed con
trol function is now ready for use.
TO DEACTIVATE: A soft tap of the brake pedal,
normal brake use or clutch pedal use while the sys
tem is engaged will disengage speed control without
erasing memory. A sudden increase in engine R.P.M.
may be experienced if the clutch pedal is depressed
while the speed control system is engaged. Pushing
the ON/OFF button to the unlatched position or
turning off the ignition erases the memory.
TO SET SPEED: When the vehicle has reached
the desired speed push the SET/DECEL button to en gage system which will then automatically maintain
the desired speed. TO DECELERATE: When speed control is en
gaged, holding the SET/DECEL button depressed al
lows the vehicle to coast to a lower speed setting.
SPEED
CONTROL
SERVO
AND BRACKET
SPEED
CONTROL
CABLE
»CABLE
VIEW
IN
DIRECTION RRAfKFT
OF ARROW
Z BRACKET J928H-16
Fig.
1
Speed
Control System—3.9L/5.2L/5.9L Gas Engine—Typical
Page 417 of 1502
8H - 2
VEHICLE SPEED CONTROL SYSTEM
• TO RESUME: After disengaging the speed control
system by tapping the brake or clutch pedal, push
the RESUME/ACCEL button to return vehicle to the
previously set speed. TO ACCELERATE: While speed control is en
gaged, hold the RESUME/ACCEL button depressed and release at a new desired speed. This will allow
the vehicle to continuously accelerate and set at a
higher speed setting.
TAP-UP: When the speed control system is en
gaged, tapping the RESUME/ACCEL button will in
crease the speed setting by 2 mph (3 km/h). The system will respond to multiple tap-ups.
TO ACCELERATE for PASSING: Depress the
accelerator as you would normally. When the pedal
is released the vehicle will return to the speed set
ting in memory.
SERVO
CONNECTOR
J918H-20
Fig.
2
Speed
Control
System
—Diesel
Engine
Page 418 of 1502
VEHICLE
SPEED
CONTROL
SYSTEM
8H - 3
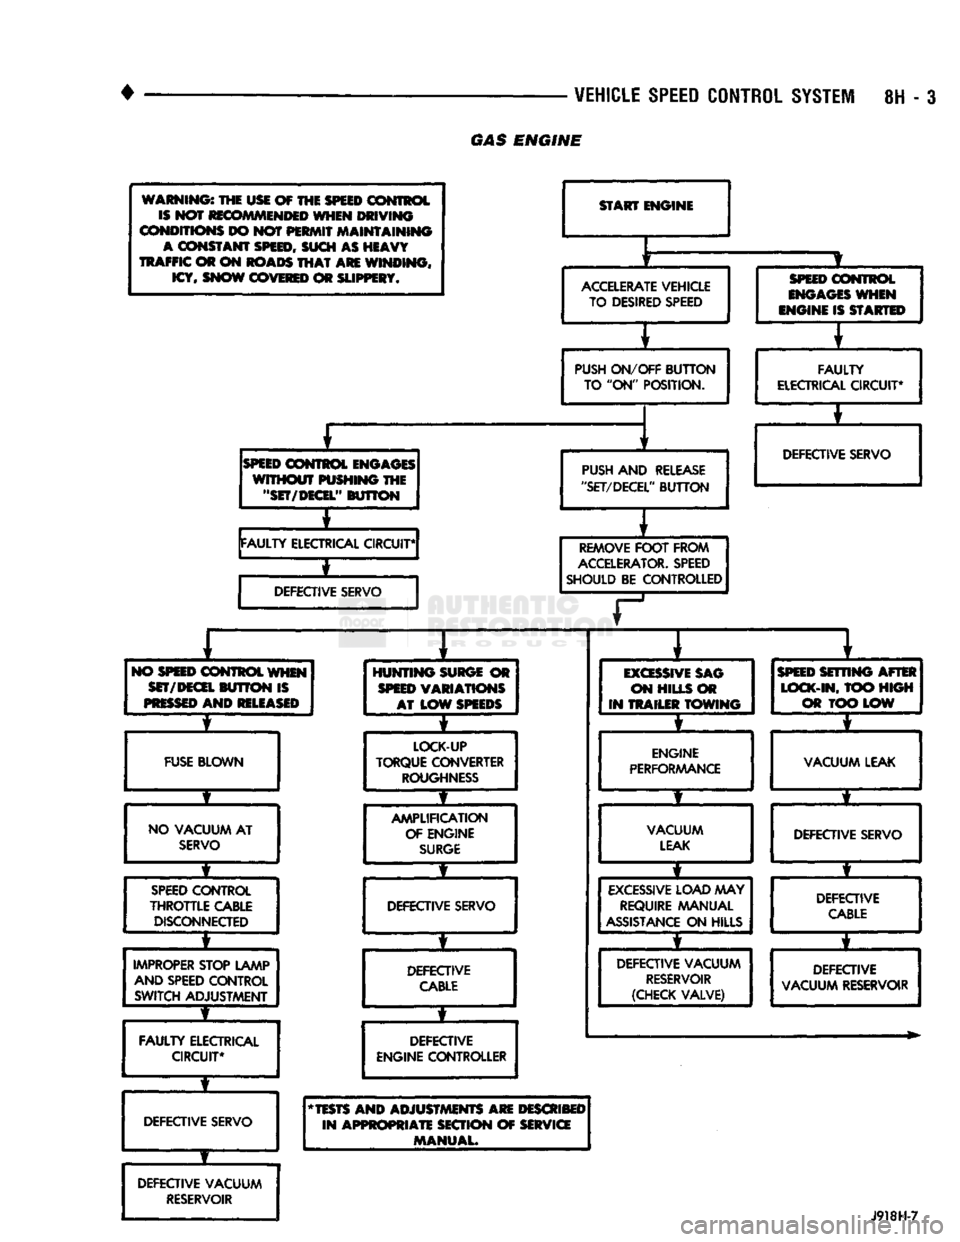
GAS
ENGINE
warnings the usi of THE
SPEED
control is NOT recommended when
DRIVING
CONDITIONS
DO not
PERMIT
maintaining
A
constant
SPEED, SUCH
AS
HEAVY
TRAFFIC
©r on
ROADS
THAT ARE
WINDING, ICY, SNOW COVERED
OR
SLIPPERY*
START
ENGINE
r
ACCELERATE
VEHICLE TO DESIRED SPEED
SPEED
CONTROL
ENGAGES
WHEN
mmm is
STARTED
PUSH
ON/OFF
BUTTON
TO "ON"
POSITION.
E
FAULTY
ELECTRICAL CIRCUIT*
SPEED
CONTROL ENGAGES
WITHOUT
PUSHING
THE
"SET/DECEL"
BUTTON
PUSH
AND
RELEASE
"SET/DECEL'
'
BUTTON
FAULTY
ELECTRICAL CIRCUIT* DEFECTIVE SERVO
i
DEFECTIVE SERVO
REMOVE
FOOT
FROM
ACCELERATOR.
SPEED
SHOULD
BE
CONTROLLED
T
1
i
1
*
NO
WEED
CONTROL
WHEN
SET/DECEL
BUTTON IS
PRESSED
AND RELEASED
HUNTING
SURGE
OR
SPEED
VARIATIONS AT
LOW
SPEEDS
EXCESSIVE
SAG
ON
HILLS
OR
IN
TRAILER TOWING
SPEED
SETTING AFTER
LOCK-IN,
TOO
HIGH
C3«t LOW
4 *
FUSE
BLOWN
LOCK-UP
TORQUE CONVERTER
ROUGHNESS
ENGINE
PERFORMANCE
VACUUM LEAK
# f
t f
NO
VACUUM
AT
SERVO
AMPLIFICATION
OF ENGINE
SURGE
VACUUM
LEAK
DEFECTIVE SERVO
1
f
it
t
t
SPEED
CONTROL
THROTTLE
CABLE
DISCONNECTED
DEFECTIVE SERVO
EXCESSIVE
LOAD
MAY
REQUIRE MANUAL
ASSISTANCE
ON
HILLS DEFECTIVE
CABLE
i
f
f • *
IMPROPER
STOP LAMP
AND
SPEED CONTROL SWITCH ADJUSTMENT DEFECTIVE
CABLE
DEFECTIVE VACUUM
RESERVOIR
(CHECK VALVE) DEFECTIVE
VACUUM RESERVOIR
1
f
*
FAULTY
ELECTRICAL CIRCUIT* DEFECTIVE
ENGINE
CONTROLLER
DEFECTIVE SERVO
* TESTS AND
ADJUSTMENTS
ARE DESCRIBED
IN
APPROPRIATE
SECTION
OF SERVICE
MANUAL.
DEFECTIVE VACUUM
RESERVOIR
J918H-7
Page 419 of 1502
8H - 4 VEHICLE
SPEED
CONTROL SYSTEM
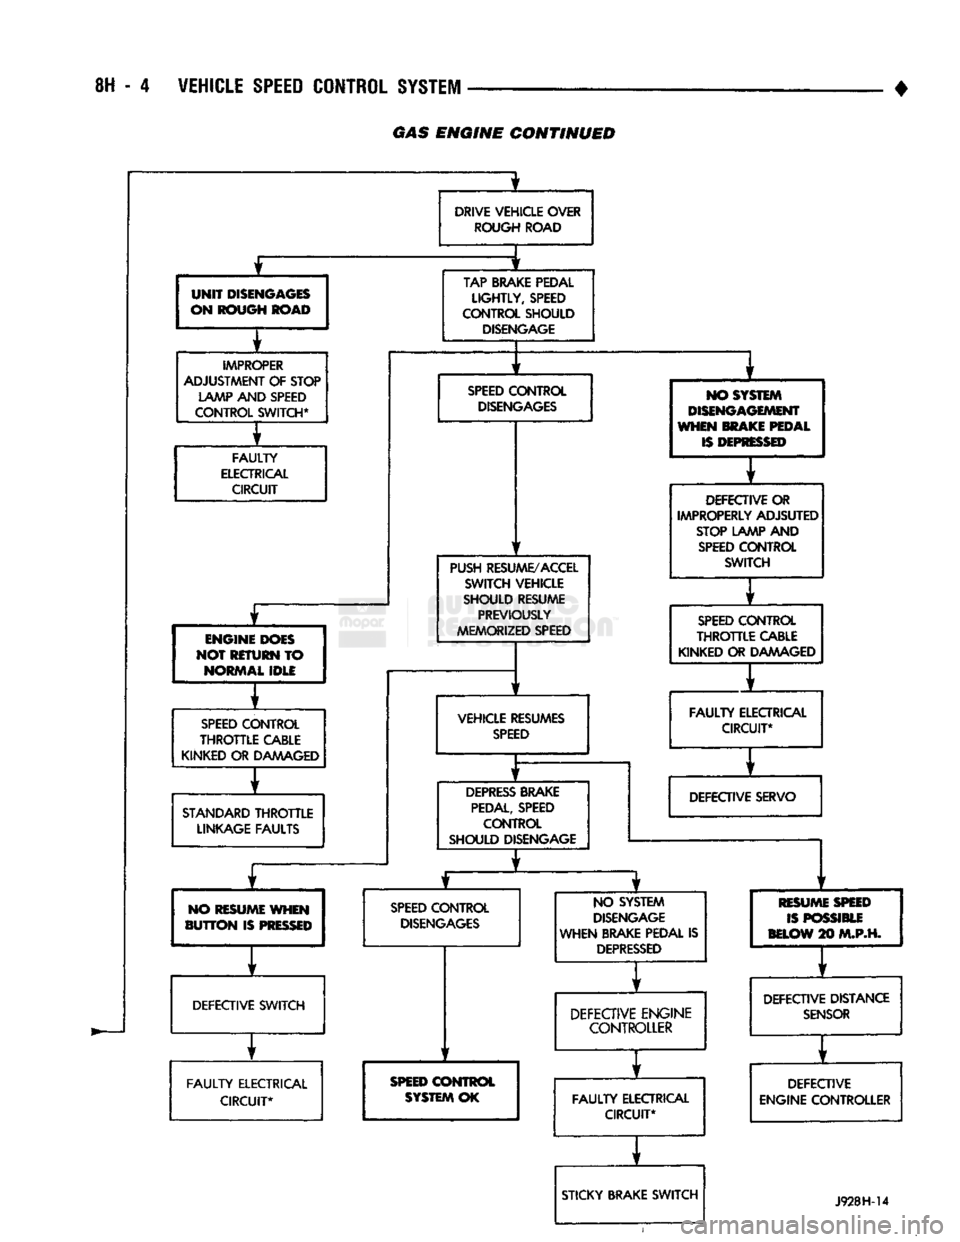
GAS
ENGINE
CONTINUED
UNIT
DISENGAGES
ON ROUGH ROAD
IMPROPER
ADJUSTMENT OF STOP LAMP AND SPEED
CONTROL SWITCH*
FAULTY
ELECTRICAL CIRCUIT
£
ENGINE DOES
NOT RETURN TO NORMAL IDLE
SPEED
CONTROL
THROTTLE
CABLE
KINKED OR DAMAGED
STANDARD
THROTTLE
LINKAGE FAULTS 1
DRIVE VEHICLE OVER
ROUGH ROAD
TAP BRAKE PEDAL
LIGHTLY,
SPEED
CONTROL SHOULD
DISENGAGE
SPEED
CONTROL
DISENGAGES
PUSH RESUME/ACCEL SWITCH VEHICLE
SHOULD RESUME PREVIOUSLY
MEMORIZED SPEED
VEHICLE RESUMES
SPEED
DEPRESS
BRAKE
PEDAL,
SPEED CONTROL
SHOULD DISENGAGE NO SYSTEM
DISENGAGEMENT
WHEN MAKE PEDAL
IS
DEPRESSED
DEFECTIVE OR
IMPROPERLY ADJSUTED
STOP LAMP AND
SPEED
CONTROL SWITCH
y
f
SPEED
CONTROL
THROTTLE
CABLE
KINKED OR DAAAAGED
1
FAULTY
ELECTRICAL CIRCUIT*
f
DEFECTIVE SERVO NO RESUME WHEN
BUTTON
IS
PRESSED
SPEED
CONTROL
DISENGAGES
DEFECTIVE SWITCH
FAULTY
ELECTRICAL CIRCUIT* NO SYSTEM
DISENGAGE
WHEN BRAKE PEDAL IS
DEPRESSED
SPEED
CONTROL
SYSTEM OK
1
f
DEFECTIVE ENGINE CONTROLLER
1
FAULTY
ELECTRICAL CIRCUIT*
r
STICKY BRAKE SWITCH RESUM
ISPO
BELOW
2
E
SPEED
SSIBLE
10
M.P.H.
y t
DEFECTIVE DISTANCE
SENSOR
y f
DEFECTIVE
ENGINE CONTROLLER
J928H-14
Page 420 of 1502
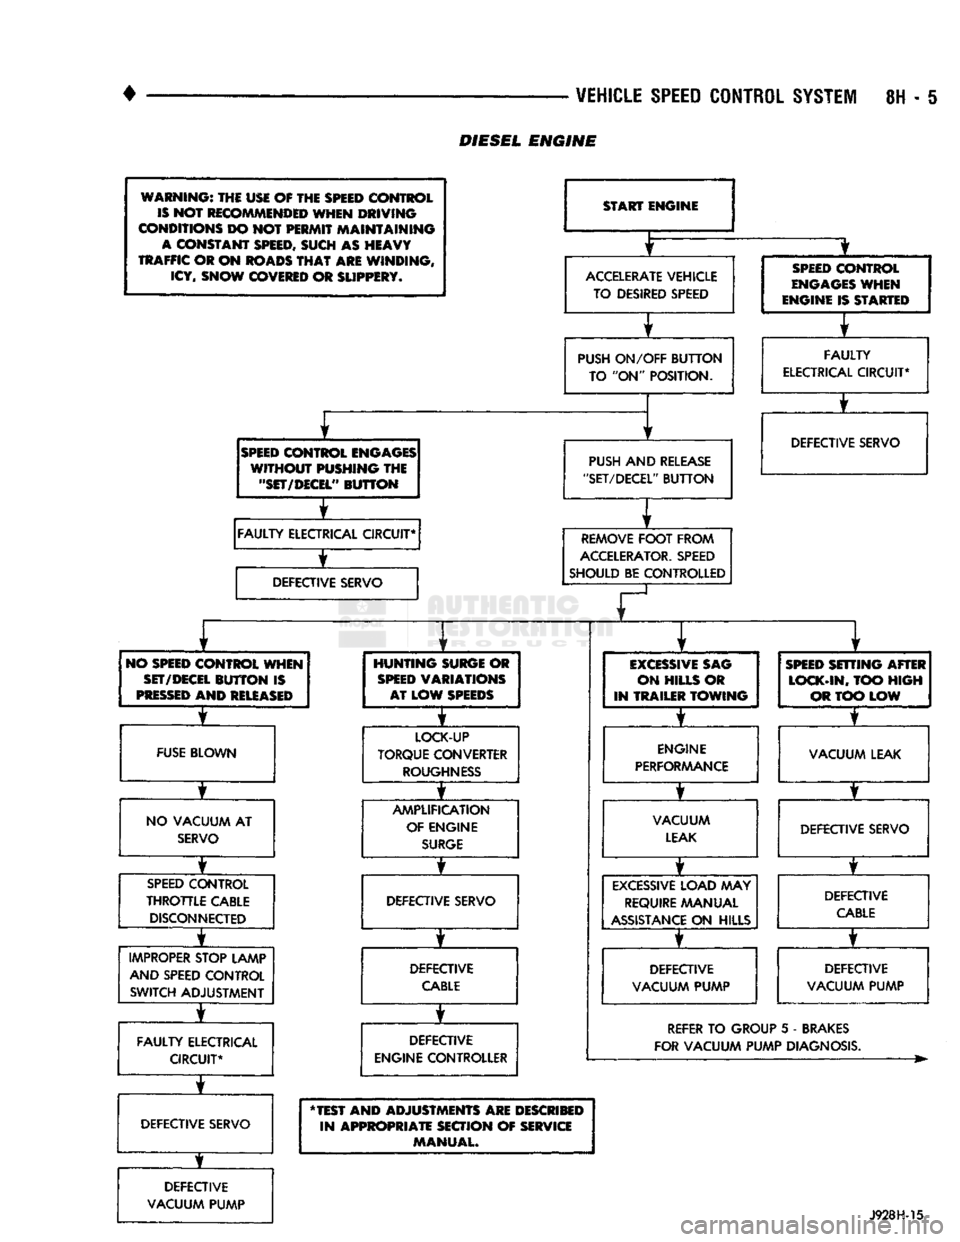
•
^ ^ VEHICLE
SPEED
CONTROL
SYSTEM
8H - I
WARNING:
THE USE OF THE
SPEED
CONTROL
IS
NOT
RECOMMENDED
WHEN DRIVING
CONDITIONS
DO NOT PERMIT MAINTAINING
A
CONSTANT
SPEED,
SUCH AS HEAVY
TRAFFIC
OR ON
ROADS
THAT
ARE WINDING,
ICY,
SNOW
COVERED
OR
SLIPPERY*
SPEED
CONTROL
ENGAGES
WITHOUT PUSHING THE
"SET/DECEL"
BUTTON
±
FAULTY
ELECTRICAL CIRCUIT*
±
DEFECTIVE
SERVO
START ENGINE
ACCELERATE
VEHICLE TO DESIRED SPEED
PUSH
ON/OFF
BUTTON
TO "ON" POSITION.
PUSH
AND
RELEASE
"SET/DECEL"
BUTTON
REMOVE
FOOT
FROM
ACCELERATOR.
SPEED
SHOULD BE CONTROLLED
SPEED
CONTROL
ENGAGES
WHEN
ENGINE IS STARTED
FAULTY
ELECTRICAL
CIRCUIT*
T
DEFECTIVE SERVO
NO
SPEED
CONTROL WHEN
SET/DECEL
BUTTON
IS
PRESSED
AND
RELEASED
FUSE
BLOWN
NO VACUUM AT
SERVO
T
SPEED
CONTROL
THROTTLE
CABLE DISCONNECTED
IMPROPER
STOP LAMP AND SPEED CONTROL SWITCH ADJUSTMENT
FAULTY
ELECTRICAL CIRCUIT*
T
DEFECTIVE SERVO
DEFECTIVE
VACUUM PUMP
HUNTING
SURGE
OR
SPEED
VARIATIONS AT LOW
SPEEDS
I
LOCK-UP
TORQUE CONVERTER
ROUGHNESS
AMPLIFICATION OF ENGINE
SURGE
DEFECTIVE SERVO
DEFECTIVE
CABLE
DEFECTIVE
ENGINE CONTROLLER
EXCESSIVE
SAG
ON HILLS OR
IN TRAILER
TOWING
ENGINE
PERFORAAANCE
VACUUM
LEAK
EXCESSIVE
LOAD MAY
REQUIRE
MANUAL
ASSISTANCE
ON HILLS
DEFECTIVE
VACUUM PUMP
SPEED
SETTING AFTER
LOCK-IN,
TOO
HIGH
OR TOO LOW
T
VACUUM LEAK
DEFECTIVE SERVO DEFECTIVE
CABLE
T
DEFECTIVE
VACUUM PUMP
REFER
TO GROUP 5 - BRAKES
FOR VACUUM PUMP DIAGNOSIS.
"TEST AND ADJUSTMENTS ARE DESCRIBED IN APPROPRIATE SECTION OF SERVICE MANUAL.
J928H-15
DIESEL
ENGINE