DODGE VIPER 2010 ZB II / 2.G Repair Manual
Manufacturer: DODGE, Model Year: 2010, Model line: VIPER, Model: DODGE VIPER 2010 ZB II / 2.GPages: 80, PDF Size: 8.08 MB
Page 61 of 80
OPENING THE HOOD
• Reach into the lower right grille opening and pull the primary hood latch forward.
• Raise the front of the hood slightly and push the safety catch handle to the right. Thesafety catch handle is located under the front edge of the hood.
• Assist props will ra ise the hood to a normal usage p osition. If greater access is
required, the hood may be pushed up at the front, raising the hood beyond the initial
opening height.
• To close, lower the hood until it is open ap proximately 6 in (15 cm) and then drop it.
This should secure both latches.
WARNING!
Be sure the hood is fully latched before driving your vehicle. If the hood is not fully
latched, it could open when the vehicle is in motion and block your vision. Failure to
follow this warning could result in serious injury or death.
59
MAINTAINING YOUR VEHICLE
Page 62 of 80
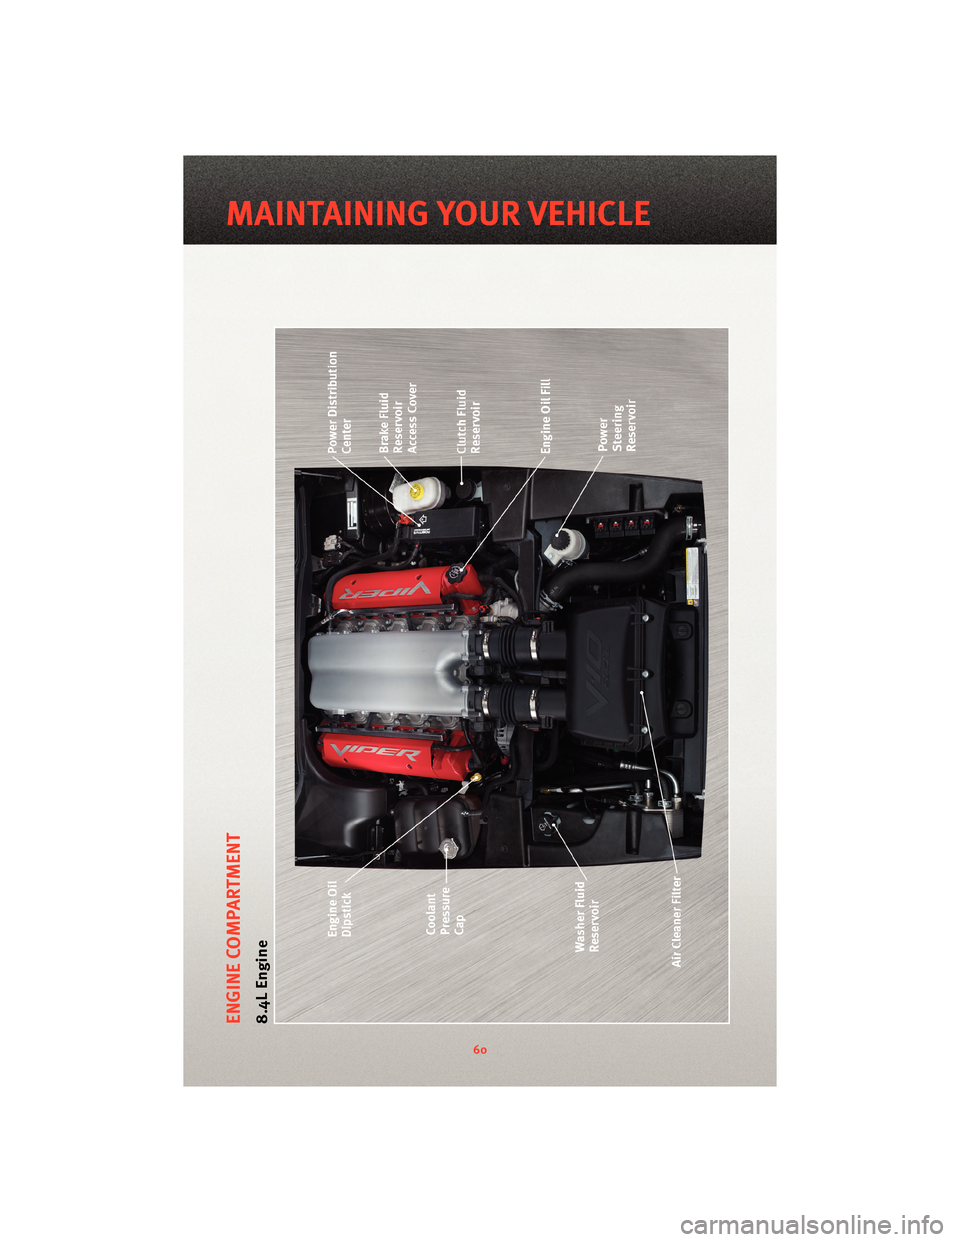
ENGINE COMPARTMENT8.4L Engine
60
MAINTAINING YOUR VEHICLE
Page 63 of 80
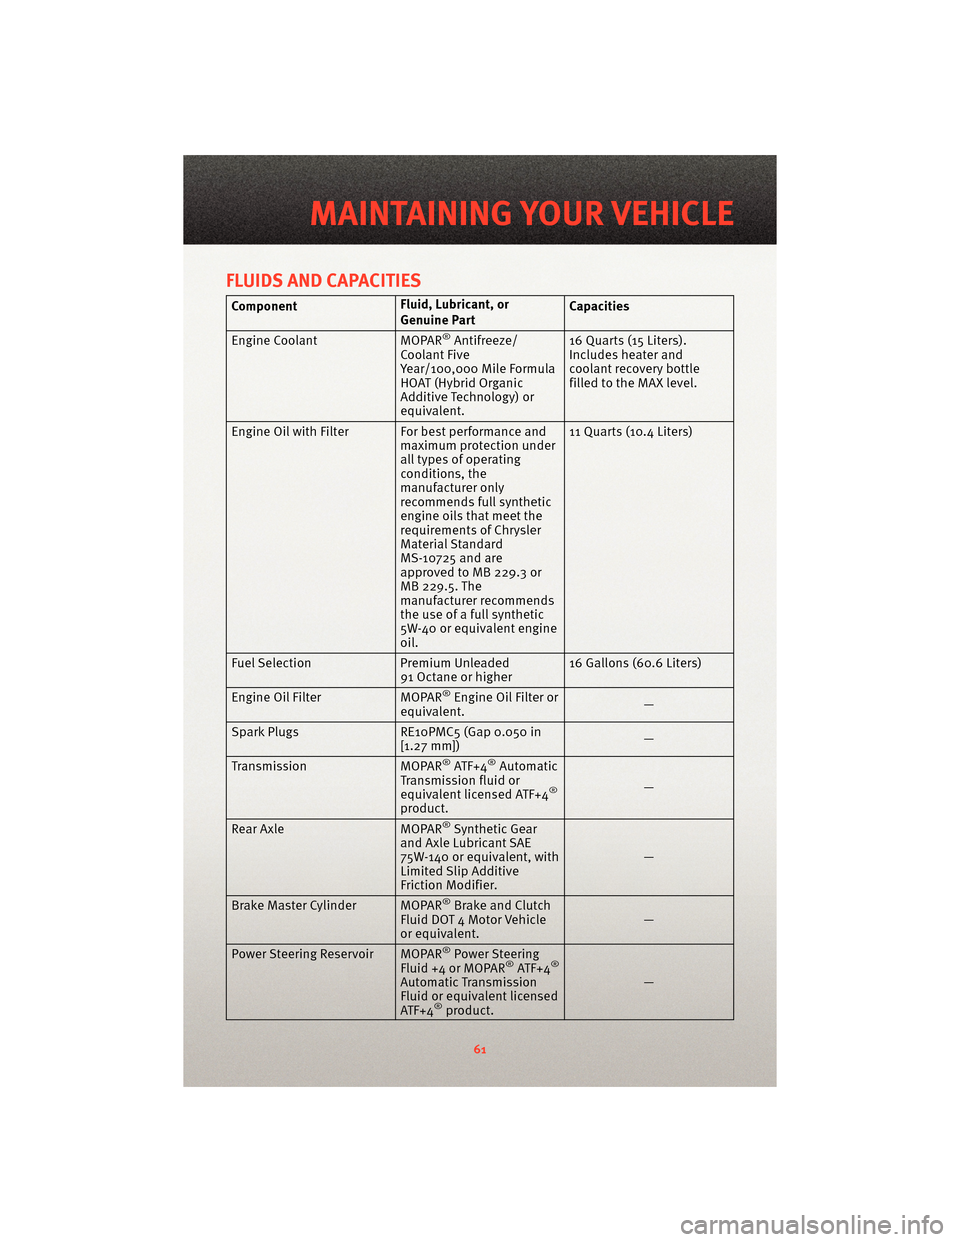
FLUIDS AND CAPACITIES
ComponentFluid, Lubricant, or
Genuine PartCapacities
Engine Coolant MOPAR
®Antifreeze/
Coolant Five
Year/100,000 Mile Formula
HOAT (Hybrid Organic
Additive Technology) or
equivalent. 16 Quarts (15 Liters).
Includes heater and
coolant recovery bottle
filled to the MAX level.
Engine Oil with Filter For best performance and maximum protection under
all types of operating
conditions, the
manufacturer only
recommends full synthetic
engine oils that meet the
requirements of Chrysler
Material Standard
MS-10725 and are
approved to MB 229.3 or
MB 229.5. The
manufacturer recommends
the use of a full synthetic
5W-40 or equivalent engine
oil.11 Quarts (10.4 Liters)
Fuel Selection Premium Unleaded
91 Octane or higher 16 Gallons (60.6 Liters)
Engine Oil Filter MOPAR
®Engine Oil Filter or
equivalent. —
Spark Plugs RE10PMC5 (Gap 0.050 in
[1.27 mm]) —
Transmission MOPAR
®ATF+4®Automatic
Transmission fluid or
equivalent licensed ATF+4
®
product. —
Rear Axle MOPAR®Synthetic Gear
and Axle Lubricant SAE
75W-140 or equivalent, with
Limited Slip Additive
Friction Modifier. —
Brake Master Cylinder MOPAR
®Brake and Clutch
Fluid DOT 4 Motor Vehicle
or equivalent. —
Power Steering Reservoir MOPAR
®Power Steering
Fluid +4 or MOPAR®ATF+4®
Automatic Tr ansmission
Fluid or equivalent licensed
ATF+4
®product. —
61
MAINTAINING YOUR VEHICLE
Page 64 of 80
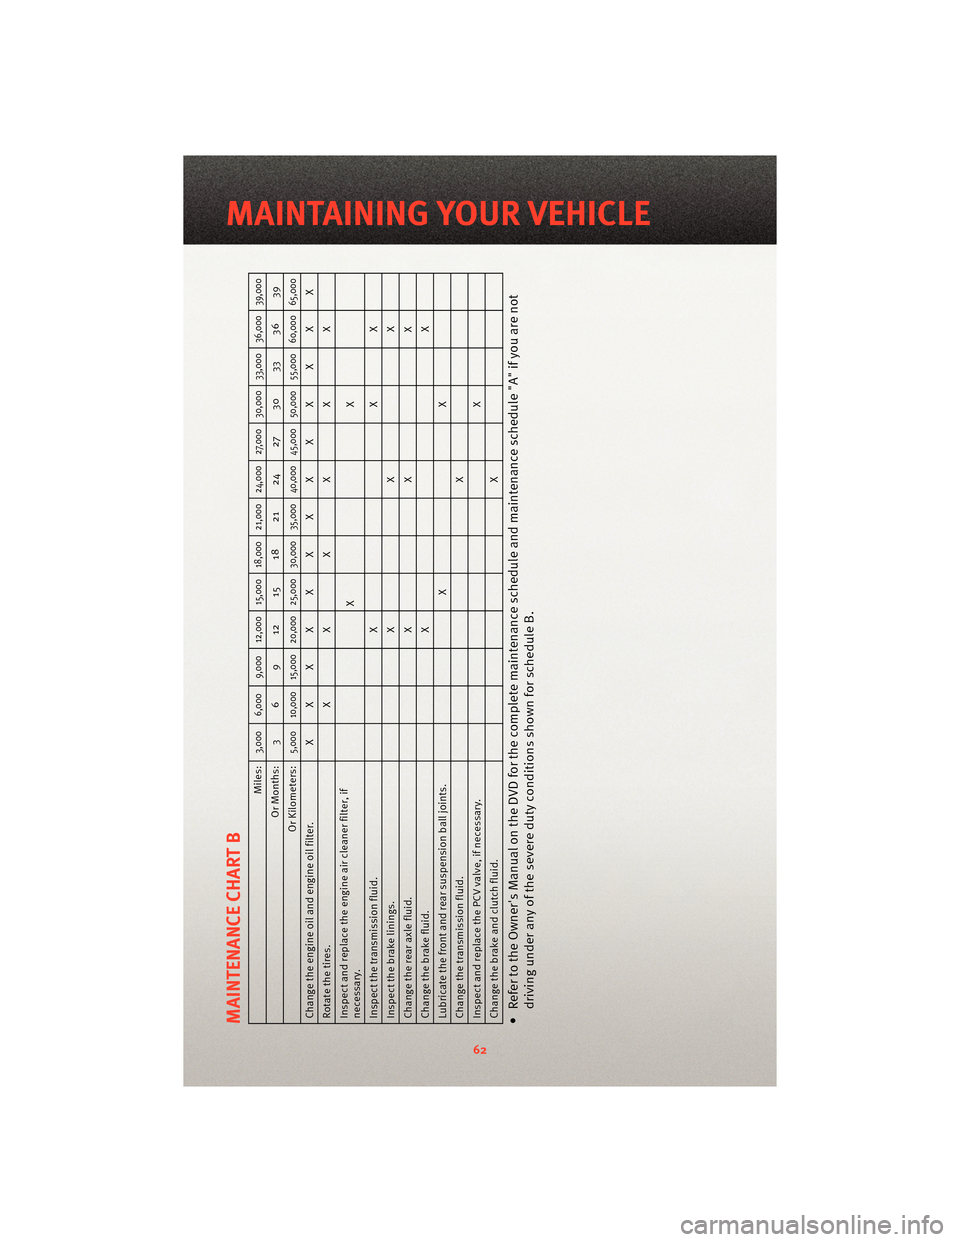
MAINTENANCE CHART B
Miles:
3,000 6,000 9,000 12,000 15,000 18,000 21,000 24,000 27,000 30,000 33,000 36,000 39,000
Or Months: 3 6 9 12 15 18 21 24 27 30 33 36 39
Or Kilometers:
5,000 10,000 15,000 20,000 25,000 30,000 35,000 40,000 45,000 50,000 55,000 60,000 65,000
Change the engine oil and engine oil filter. XXXXXXXXXXXXX
Rotate the tires. X X X X X X
Inspect and replace the engine air cleaner filter, if
necessary. XX
Inspect the tran smissionfluid. X X X
Inspect the brake linings. X X X
Change the rear axle fluid. X X X
Change the brake fluid. X X
Lubricate the front and rear suspension ball joints. X X
Change the transmission fluid. X
Inspect and replace the PCV valve, if necessary. X
Change the brake and clutch fluid. X• Refer to the Owner's Manual on the DVD for the complete maintenance schedule and maintenance schedule "A" if you are not
driving under any of the severe duty conditions shown for schedule B.
62
MAINTAINING YOUR VEHICLE
Page 65 of 80
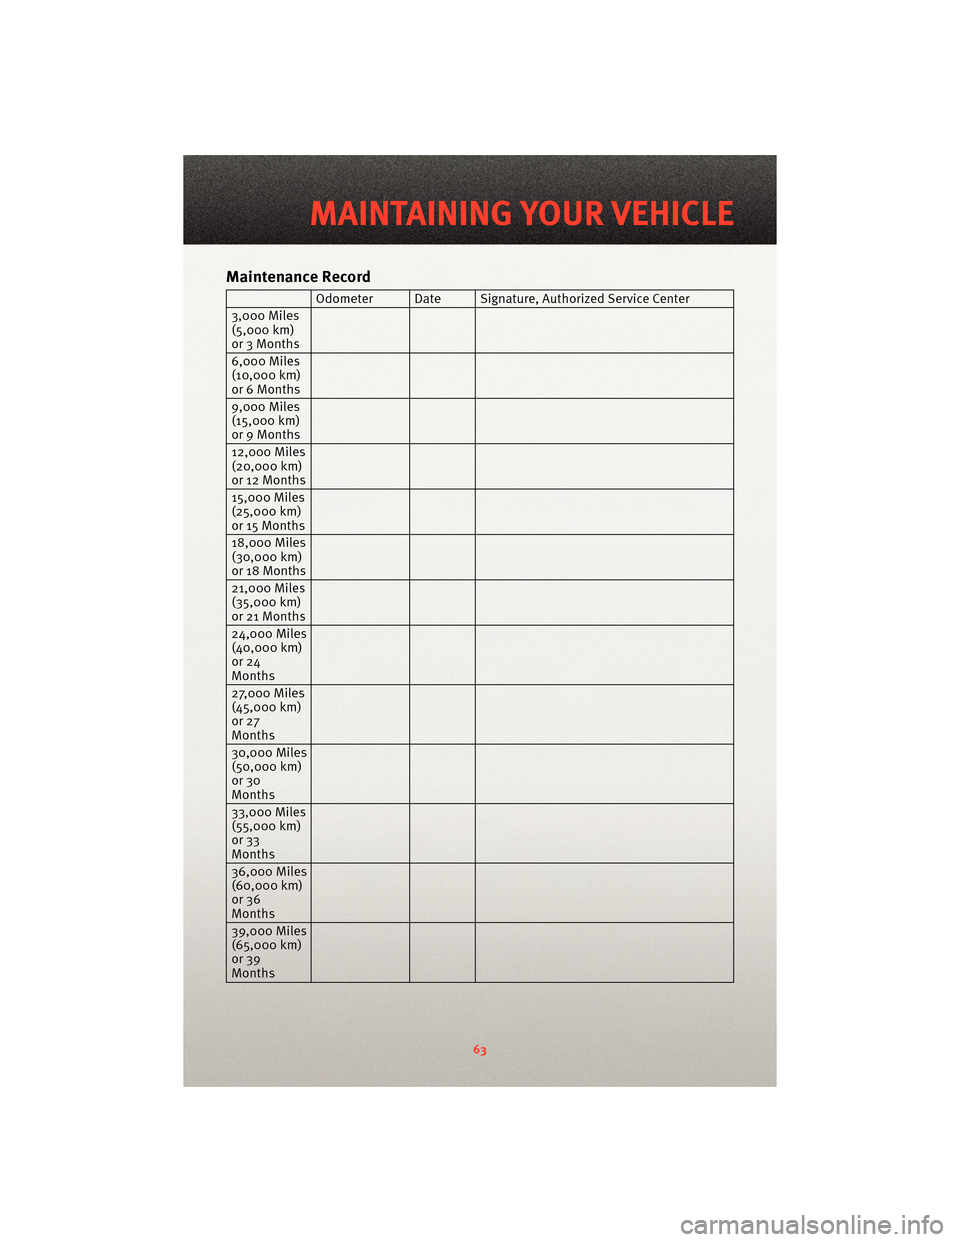
Maintenance Record
Odometer Date Signature,Authorized Service Center
3,000 Miles
(5,000 km)
or 3 Months
6,000 Miles
(10,000 km)
or 6 Months
9,000 Miles
(15,000 km)
or 9 Months
12,000 Miles
(20,000 km)
or 12 Months
15,000 Miles
(25,000 km)
or 15 Months
18,000 Miles
(30,000 km)
or 18 Months
21,000 Miles
(35,000 km)
or 21 Months
24,000 Miles
(40,000 km)
or 24
Months
27,000 Miles
(45,000 km)
or 27
Months
30,000 Miles
(50,000 km)
or 30
Months
33,000 Miles
(55,000 km)
or 33
Months
36,000 Miles
(60,000 km)
or 36
Months
39,000 Miles
(65,000 km)
or 39
Months
63
MAINTAINING YOUR VEHICLE
Page 66 of 80
FUSES
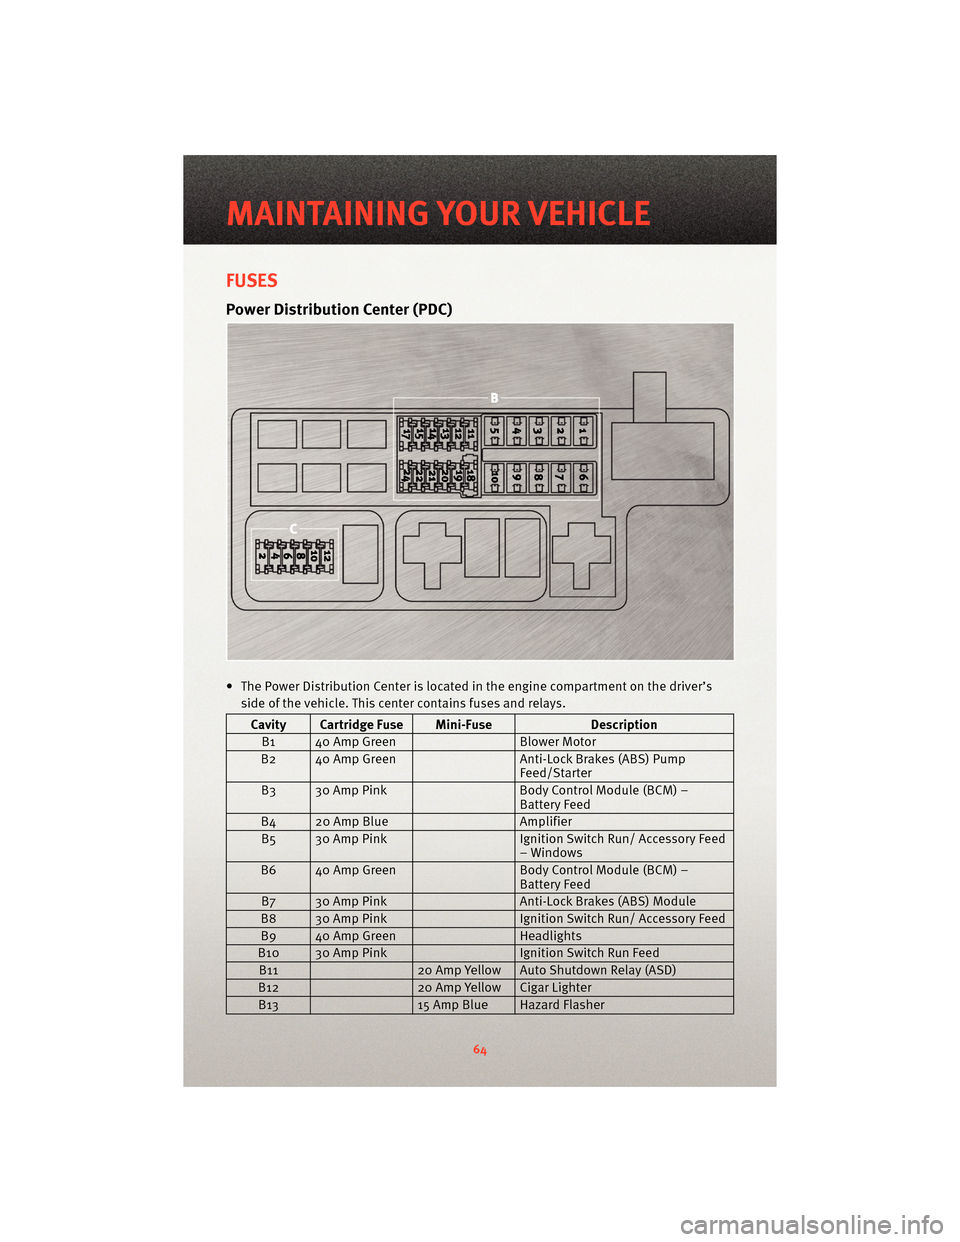
Power Distribution Center (PDC)
• The Power Distribution Center is located in the engine compartment on the driver’s
side of the vehicle. This center contains fuses and relays.
Cavity Cartridge Fuse Mini-Fuse Description
B1 40 Amp Green Blower Motor
B2 40 Amp Green Anti-Lock Brakes (ABS) Pump
Feed/Starter
B3 30 Amp Pink Body Control Module (BCM) –
Battery Feed
B4 20 Amp Blue Amplifier
B5 30 Amp Pink Ignition Switch Run/ Accessory Feed
– Windows
B6 40 Amp Green Body Control Module (BCM) –
Battery Feed
B7 30 Amp Pink Anti-Lock Brakes (ABS) Module
B8 30 Amp Pink Ignition Switch Run/ Accessory Feed
B9 40 Amp Green Headlights
B10 30 Amp Pink Ignition Switch Run Feed
B11 20 Amp Yellow Auto Shutdown Relay (ASD)
B12 20 Amp Yellow Cigar Lighter
B13 15 Amp Blue Hazard Flasher
MAINTAINING YOUR VEHICLE
64
Page 67 of 80
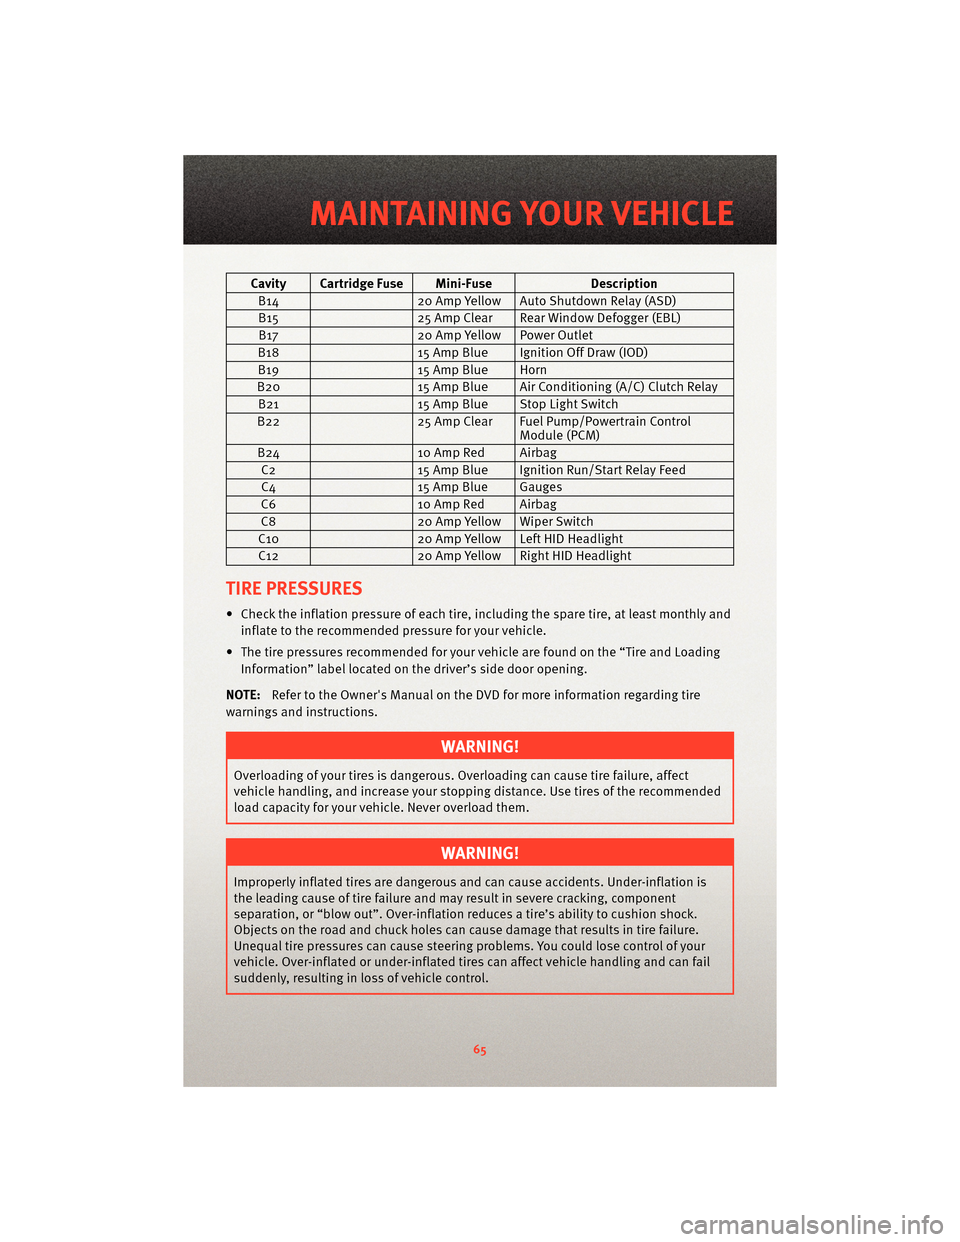
Cavity Cartridge Fuse Mini-FuseDescription
B14 20 Amp Yellow Auto Shutdown Relay (ASD)
B15 25 Amp Clear Rear Window Defogger (EBL)
B17 20 Amp Yellow Power Outlet
B18 15 Amp Blue Ignition Off Draw (IOD)
B19 15 Amp Blue Horn
B20 15 Amp Blue Air Conditioning (A/C) Clutch Relay
B21 15 Amp Blue Stop Light Switch
B22 25 Amp Clear Fuel Pump/Powertrain Control
Module (PCM)
B24 10 Amp Red Airbag
C2 15 Amp Blue Ignition Run/Start Relay Feed
C4 15 Amp Blue Gauges
C6 10 Amp Red Airbag
C8 20 Amp Yellow Wiper Switch
C10 20 Amp Yellow Left HID Headlight
C12 20 Amp Yellow Right HID Headlight
TIRE PRESSURES
• Check the inflation pressure of each tire, including the spare tire, at least monthly and
inflate to the recommended pressure for your vehicle.
• The tire pressures recommended for your vehicle are found on the “Tire and Loading Information” label located on the driver’s side door opening.
NOTE: Refer to the Owner's Manual on the DVD f or more information regarding tire
warnings and instructions.
WARNING!
Overloading of your tires is dangerous. Ov erloading can causetire failure, affect
vehicle handling, and increase your stopping distance. Use tires of the recommended
load capacity for your vehicle. Never overload them.
WARNING!
Improperly inflated tires are dangerous and can cause accidents. Under-inflation is
the leading cause of tire failure and may result in severe cracking, component
separation, or “blow out”. Over-inflation r educes a tire’s ability to cushion shock.
Objects on the road and chuck holes can cause damage that results in tire failure.
Unequal tire pressures can cause steering problems. You could lose control of your
vehicle. Over-inflated or under-inflated ti res can affect vehicle handling and can fail
suddenly, resulting in loss of vehicle control.
65
MAINTAINING YOUR VEHICLE
Page 68 of 80
WHEEL AND WHEEL TRIM CARE
• All wheels and wheel trim, especially aluminum and chrome plated wheels, should becleaned regularly with a mild soap and water to prevent corrosion.
• To remove heavy soil and/or excessive brake dust, use MOPAR
®Wheel Cleaner or
equivalent or select a non-ab rasive,non-acidic cleaner.
CAUTION!
Do not use scouring pads, steel wool, a bristle brush, or metal polishes. Do not use
oven cleaner. These products may damage the wheel's protective finish. Avoid
automatic car washes that use acidic solution s or harsh brushes that may damage the
wheel's protective finish. Only MOPAR
®Wheel Cleaner or equivalent is recommended.
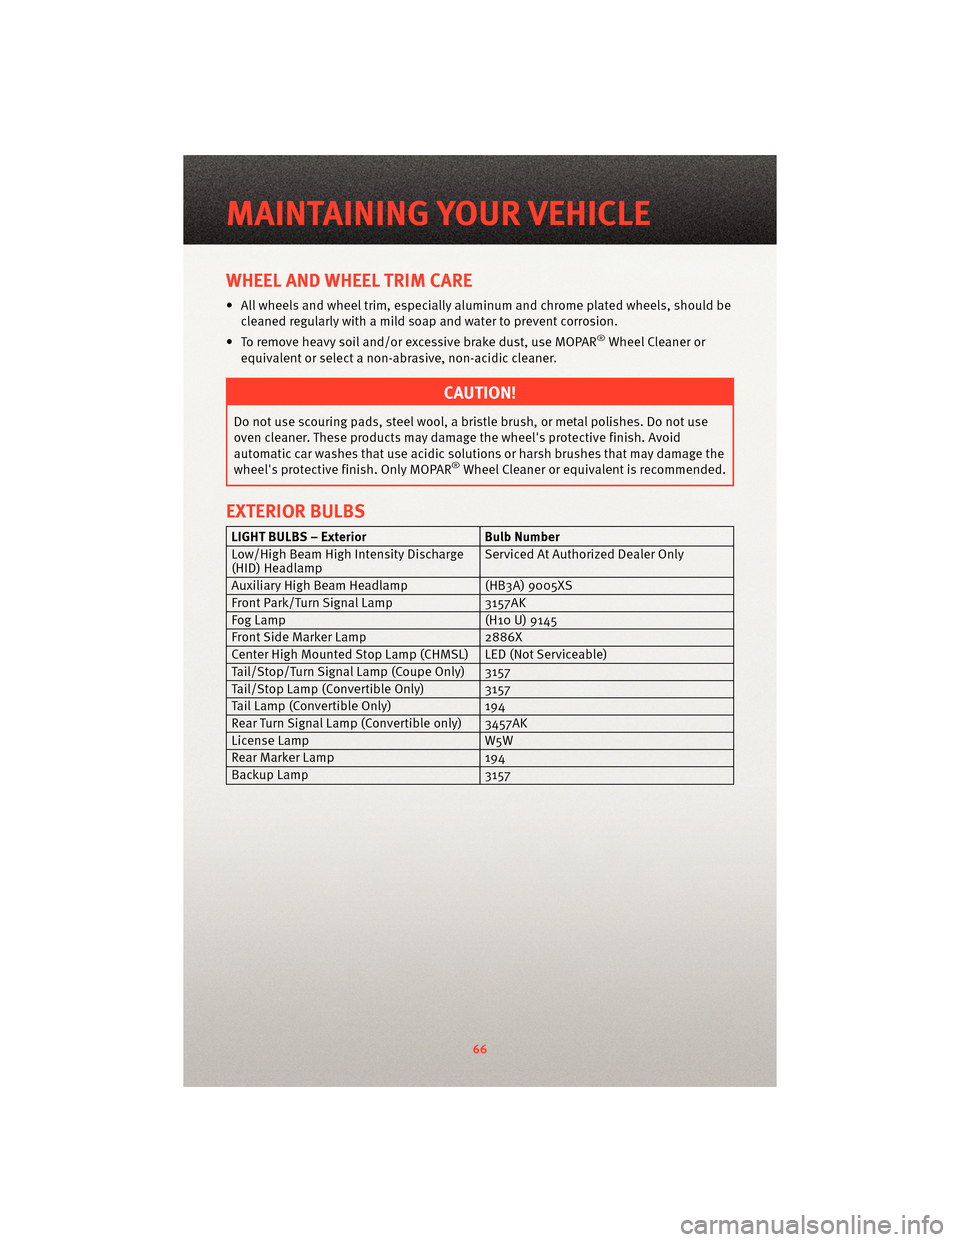
EXTERIOR BULBS
LIGHT BULBS – Exterior Bulb Number
Low/High Beam High Intensity Discharge
(HID) Headlamp Serviced At Authorized Dealer Only
Auxiliary High Beam Headlamp (HB3A) 9005XS
Front Park/Turn Signal Lamp 3157AK
Fog Lamp (H10 U) 9145
Front Side Marker Lamp 2886X
Center High Mounted Stop Lamp (CHMSL) LED (Not Serviceable)
Tail/Stop/Turn Signal Lamp (Coupe Only) 3157
Tail/Stop Lamp (Convertible Only) 3157
Tail Lamp (Convertible Only) 194
Rear Turn Signal Lamp (Convertible only) 3457AK
License Lamp W5W
Rear Marker Lamp 194
Backup Lamp 3157
MAINTAINING YOUR VEHICLE
66
Page 69 of 80
VEHICLE STORAGE
We recommend that you follow these guidelines for storing your vehicle for extended
periods.
• Fill the fuel tank. This will prevent water condensation inside the tank. If you plan to store your vehicle more than two months, add an anti-oxidant fuel stabilizer to the
fuel tank.
• Change the oil to remove any corrosive combustion related acids in the crankcase.
• Check that the radiator coolant level of protection is to at least -20°F (-29°C).
• Make sure that all tires are inflated to the optimum pressure.
• Wash and wax the vehicle to protect the finish.
• Store the vehicle in a dry, well-ventilated location.
• Move the wiper blades away from the windshield.
• Block the wheels. Do not apply the parking brake.
• Cut blocks of plywood about the same size of the tires. Cover each block with indoor/outdoor carpeting and place them between the tires and concrete. This will
prevent tire flat spotting.
• For long-term storage, remove the tires and put the vehicle up on blocks. Stack the tires on plywood and cover wit h a tarp to prevent flat spotting.
• If the vehicle will be subjected to freezin g temperatures, either remove the battery and
store it in a dry, well ventilated area or connect a trickle charger (1.5 Amp) with
automatic shutdown / overcharge protection to the battery. However, do not leave the
trickle charger hooked up to the battery without being plugged in to a 110 Volt AC
outlet, as this will result in further drain on the vehicle's battery. If the vehicle is not
going to be driven in the next three weeks, per form the battery recharge procedure in
the Service Manual. Then, either disconnect the b attery at the negative terminal or use
the “Battery Save Feature” to conserve battery power.
NOTE: Disconnecting the battery causes the en gine control system to lose memory of
some “learned” functions. After reconnecting the b attery, the engine may run rough until
the control module “relearns” these functions. Using the Battery Save Feature will
prevent the engine controller from loosing its memory.
CAUTION!
Use care when disconnecting the remote positive cable. It is connected to the battery
and can short out to any metal on the vehicle. Always tape or wrap the exposed cable
end to prevent electrical shorts.
• Check the battery every four to six weeks to ensure that the voltage is above 12.40 Volts. The voltage will drop more rapidly in hot temperatures. If battery voltage
drops below 12.40 Volts, follow the battery r echarge procedure in the Service Manual.
67
MAINTAINING YOUR VEHICLE
Page 70 of 80
NOTE:To help prevent the battery from dischar ging during shorter periods of inactivity,
perform the following:
• Make sure that the trunk/liftgate, hood, doors, windows, and convertible top are completely closed.
• Make sure that Key Fob is operating and that the battery is good.
• Make sure that the HOOD, TRUNK/LIFTGATE, and DOOR switches are in adjustment. Perform the quick system check, which follows:
• Use the remote transmitter to set the alarm. If the alarm SET light comes on and flashes, the system is operating properly. If not, there is a problem with a switch or the
system. See your authorized dealer for service.
• Cover the vehicle whenever possible to prevent accidental damage to the finish.
MAINTAINING YOUR VEHICLE
68