DODGE VIPER 2015 VX / 3.G Owner's Manual
Manufacturer: DODGE, Model Year: 2015, Model line: VIPER, Model: DODGE VIPER 2015 VX / 3.GPages: 148, PDF Size: 21.7 MB
Page 21 of 148
CAUTION!
Do not place any article under a power seat or impede its ability to move as it may cause
damage to the seat controls. Seat travel may become limited if movement is stopped
by an obstruction in the seat's path.
WARNING!
•Adjusting a seat while the vehicle is moving is dangerous. The sudden movement of
the seat could cause you to lose control. The seat belt might not be properly adjusted,
and you could be severely injured or killed. Only adjust a seat while the vehicle is
parked.
•Donotridewiththeseatbackreclinedsothattheseatbeltisnolongerresting
against your chest. In a collision, you could slide under the seat belt and be severely
injured or killed. Use the recliner only when the vehicle is parked.
ADJUSTABLE PEDALS
•Theadjustablepedalscanbemovedinanypositionoftheenginestart/stopbutton
(OFF/ACC/RUN).
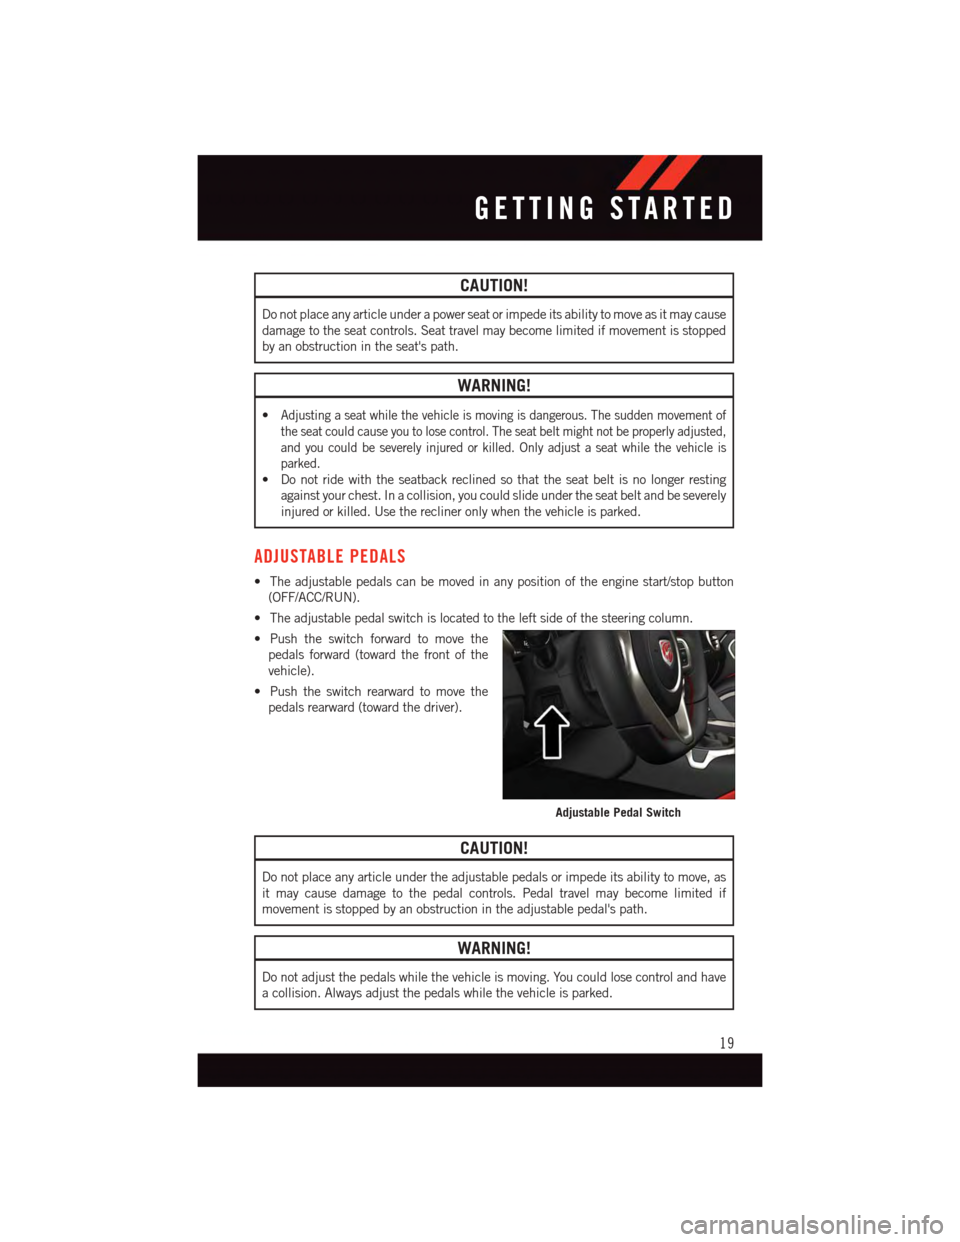
•Theadjustablepedalswitchislocatedtotheleftsideofthesteeringcolumn.
•Pushtheswitchforwardtomovethe
pedals forward (toward the front of the
vehicle).
•Pushtheswitchrearwardtomovethe
pedals rearward (toward the driver).
CAUTION!
Do not place any article under the adjustable pedals or impede its ability to move, as
it may cause damage to the pedal controls. Pedal travel may become limited if
movement is stopped by an obstruction in the adjustable pedal's path.
WARNING!
Do not adjust the pedals while the vehicle is moving. You could lose control and have
acollision.Alwaysadjustthepedalswhilethevehicleisparked.
Adjustable Pedal Switch
GETTING STARTED
19
Page 22 of 148
ADJUSTABLE FOOT REST
•Theadjustablefootrestcanbeadjustedforwardorrearwardandrotatedupwardor
downward to allow for greater driving comfort.
•Toadjustthepedal:
1. Adjust the seat and steering column to a
comfortable position.
2. Using a socket wrench, loosen the nut
on the pedal.
3. Slide the pedal either forward or rear-
ward and rotate it upward or downward
as desired.
4. Tighten the nut, being careful not to over
tighten it.
TILT STEERING COLUMN
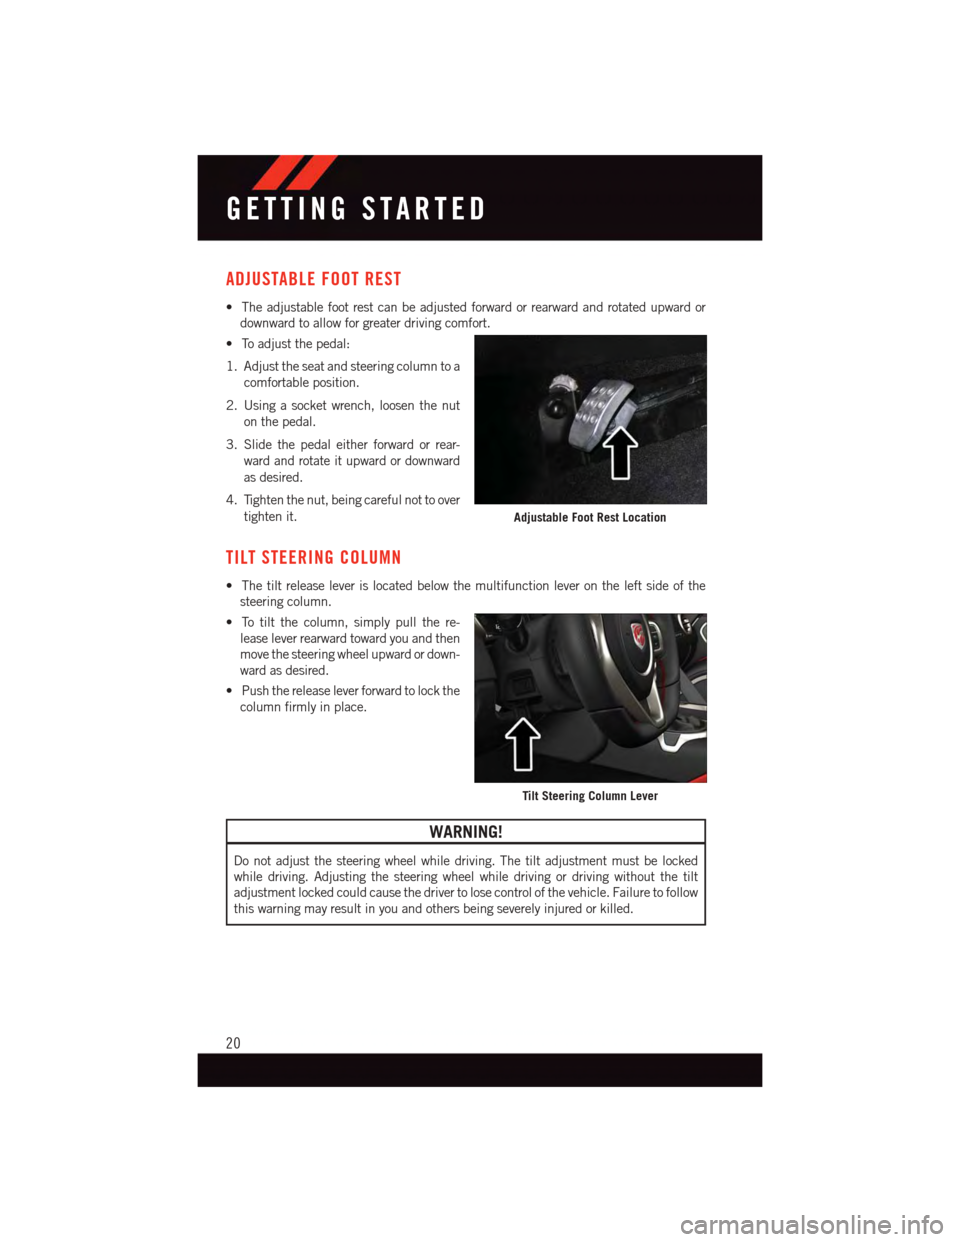
•Thetiltreleaseleverislocatedbelowthemultifunctionleverontheleftsideofthe
steering column.
•Totiltthecolumn,simplypullthere-
lease lever rearward toward you and then
move the steering wheel upward or down-
ward as desired.
•Pushthereleaseleverforwardtolockthe
column firmly in place.
WARNING!
Do not adjust the steering wheel while driving. The tilt adjustment must be locked
while driving. Adjusting the steering wheel while driving or driving without the tilt
adjustment locked could cause the driver to lose control of the vehicle. Failure to follow
this warning may result in you and others being severely injured or killed.
Adjustable Foot Rest Location
Tilt Steering Column Lever
GETTING STARTED
20
Page 23 of 148
SRT ENGINE BREAK-IN RECOMMENDATIONS
SRT Engine Break-In Recommendations: The following tips will be helpful in obtaining
optimum performance and maximum durability for your new SRT Vehicle.
Despite modern technology and World Class manufacturing methods, the moving parts of
the vehicle must still wear in with each other. This wearing in occurs mainly during the first
500 miles (805 km) and continues through the first oil change interval.
It is recommended for the operator to observe the following driving behaviors during the
new vehicle break-in period:
0to100miles(0to161km):
•Donotallowtheenginetooperateatidleforanextendedperiodoftime.
•Depress the accelerator pedal slowly and not more than halfway to avoid rapid accelera-
tion.
•Avoidaggressivebraking.
•Drivewiththeenginespeedlessthan3,500RPM.
•Maintainvehiclespeedbelow55mph(88km/h)andobservelocalspeedlimits.
100 to 300 miles (161 to 483 km):
•Depress the accelerator pedal slowly and not more than halfway to avoid rapid acceleration
in lower gears (1st to 3rd gears).
•Avoidaggressivebraking.
•Drivewiththeenginespeedlessthan5,000RPM.
•Maintainvehiclespeedbelow70mph(112km/h)andobservelocalspeedlimits.
300 to 500 miles (483 to 805 km):
•Exercisethefullenginerpmrange,shiftingmanually(paddlesorgearshift)athigher
rpms when possible.
•Donotperformsustainedoperationwiththeacceleratorpedalatwideopenthrottle.
•Maintainvehiclespeedbelow85mph(136km/h)andobservelocalspeedlimits.
For the first 1500 mi (2414 km):
•Donotparticipateintrackevents,sportdrivingschools,orsimilaractivitiesduringthe
first 1500 mi (2414 km).
NOTE:
Check engine oil with every refueling and add if necessary. Oil and fuel consumption may
be higher through the first oil change interval.
OPERATING YOUR VEHICLE
21
Page 24 of 148
TURN SIGNALS/WIPER/WASHER/HIGH BEAMS LEVER
Wipers
Intermittent, Low And High Operation
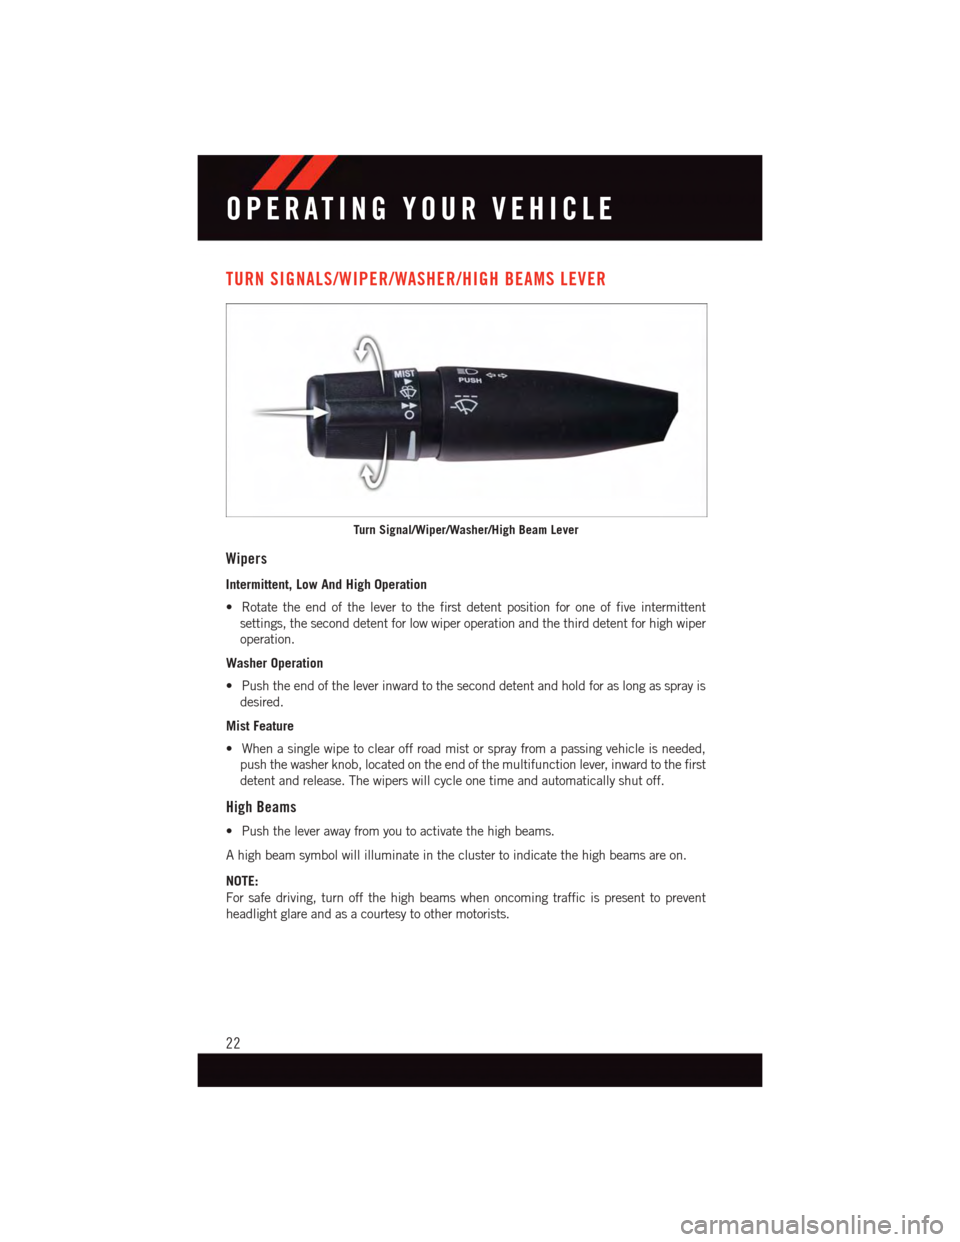
•Rotatetheendofthelevertothefirstdetentpositionforoneoffiveintermittent
settings, the second detent for low wiper operation and the third detent for high wiper
operation.
Washer Operation
•Pushtheendoftheleverinwardtotheseconddetentandholdforaslongassprayis
desired.
Mist Feature
•Whenasinglewipetoclearoffroadmistorsprayfromapassingvehicleisneeded,
push the washer knob, located on the end of the multifunction lever, inward to the first
detent and release. The wipers will cycle one time and automatically shut off.
High Beams
•Pushtheleverawayfromyoutoactivatethehighbeams.
Ahighbeamsymbolwillilluminateintheclustertoindicatethehighbeamsareon.
NOTE:
For safe driving, turn off the high beams when oncoming traffic is present to prevent
headlight glare and as a courtesy to other motorists.
Turn Signal/Wiper/Washer/High Beam Lever
OPERATING YOUR VEHICLE
22
Page 25 of 148
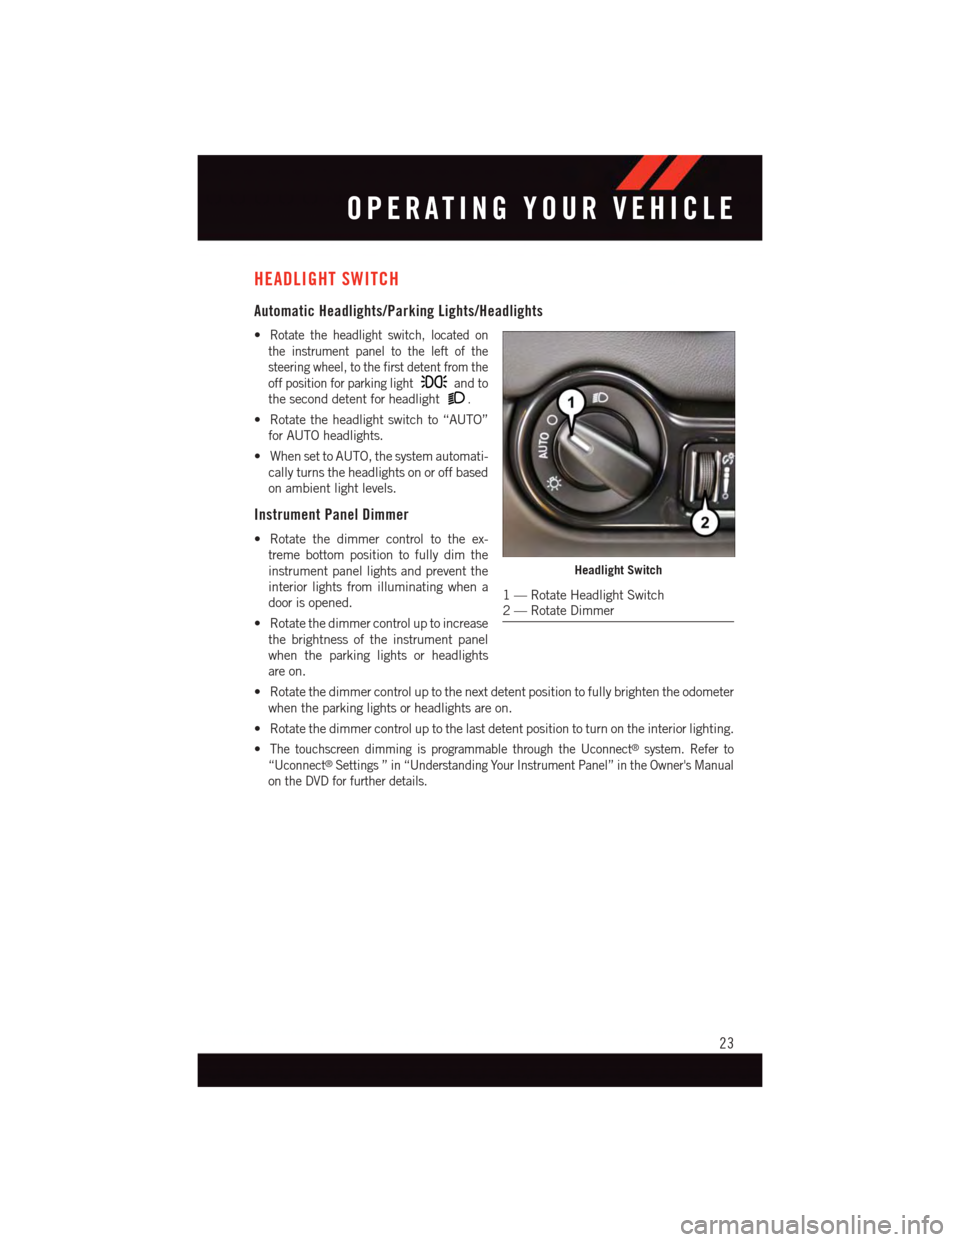
HEADLIGHT SWITCH
Automatic Headlights/Parking Lights/Headlights
•Rotate the headlight switch, located on
the instrument panel to the left of the
steering wheel, to the first detent from the
off position for parking lightand to
the second detent for headlight.
•Rotatetheheadlightswitchto“AUTO”
for AUTO headlights.
•WhensettoAUTO,thesystemautomati-
cally turns the headlights on or off based
on ambient light levels.
Instrument Panel Dimmer
•Rotatethedimmercontroltotheex-
treme bottom position to fully dim the
instrument panel lights and prevent the
interior lights from illuminating when a
door is opened.
•Rotatethedimmercontroluptoincrease
the brightness of the instrument panel
when the parking lights or headlights
are on.
•Rotatethedimmercontroluptothenextdetentpositiontofullybrightentheodometer
when the parking lights or headlights are on.
•Rotatethedimmercontroluptothelastdetentpositiontoturnontheinteriorlighting.
•The touchscreen dimming is programmable through the Uconnect®system. Refer to
“Uconnect®Settings ” in “Understanding Your Instrument Panel” in the Owner's Manual
on the DVD for further details.
Headlight Switch
1—RotateHeadlightSwitch2—RotateDimmer
OPERATING YOUR VEHICLE
23
Page 26 of 148
ELECTRONIC SPEED CONTROL
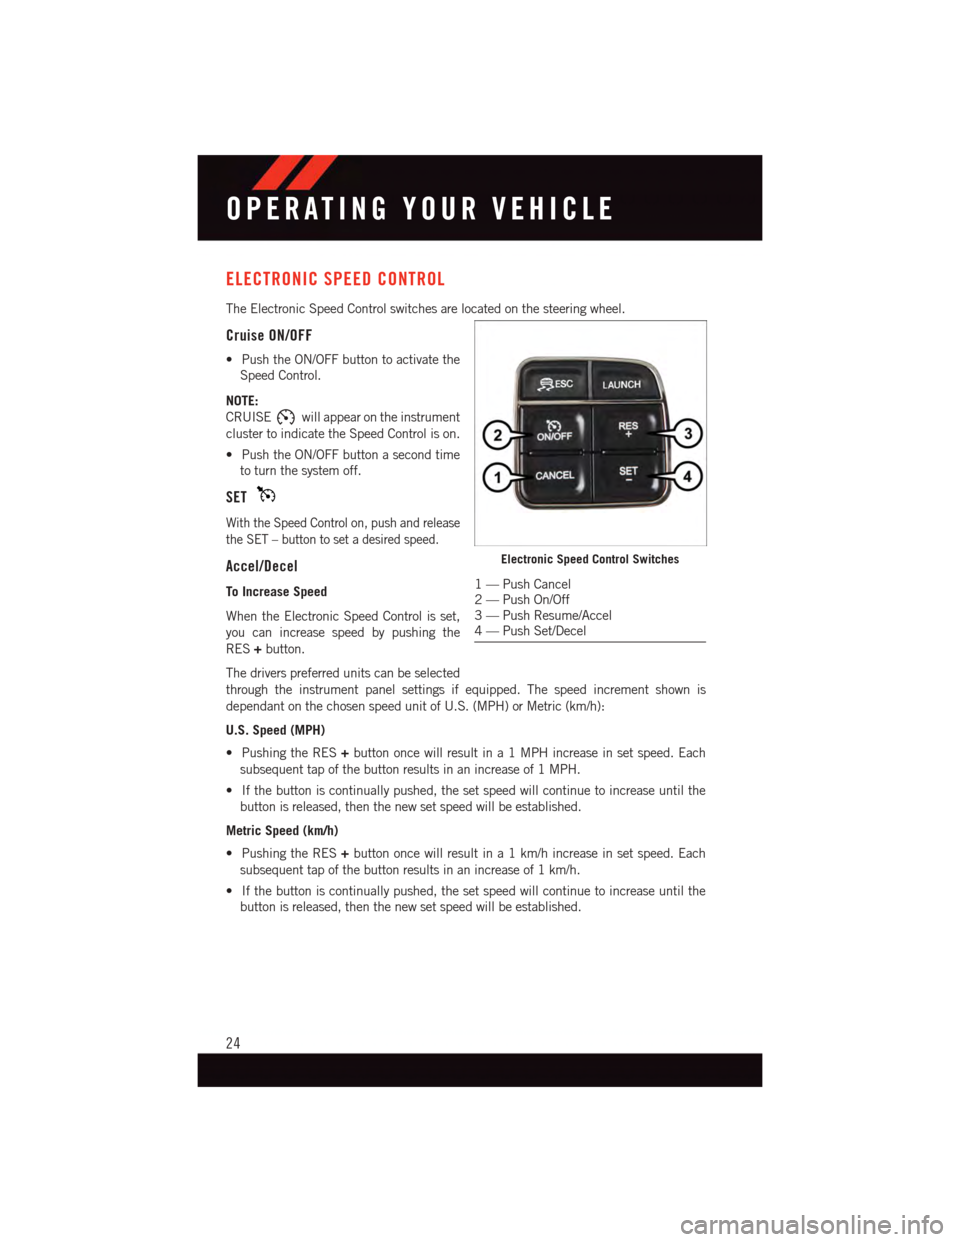
The Electronic Speed Control switches are located on the steering wheel.
Cruise ON/OFF
•PushtheON/OFFbuttontoactivatethe
Speed Control.
NOTE:
CRUISEwill appear on the instrument
cluster to indicate the Speed Control is on.
•PushtheON/OFFbuttonasecondtime
to turn the system off.
SET
With the Speed Control on, push and release
the SET – button to set a desired speed.
Accel/Decel
To Increase Speed
When the Electronic Speed Control is set,
you can increase speed by pushing the
RES+button.
The drivers preferred units can be selected
through the instrument panel settings if equipped. The speed increment shown is
dependant on the chosen speed unit of U.S. (MPH) or Metric (km/h):
U.S. Speed (MPH)
•PushingtheRES+button once will result in a 1 MPH increase in set speed. Each
subsequent tap of the button results in an increase of 1 MPH.
•Ifthebuttoniscontinuallypushed,thesetspeedwillcontinuetoincreaseuntilthe
button is released, then the new set speed will be established.
Metric Speed (km/h)
•PushingtheRES+button once will result in a 1 km/h increase in set speed. Each
subsequent tap of the button results in an increase of 1 km/h.
•Ifthebuttoniscontinuallypushed,thesetspeedwillcontinuetoincreaseuntilthe
button is released, then the new set speed will be established.
Electronic Speed Control Switches
1—PushCancel2—PushOn/Off3—PushResume/Accel4—PushSet/Decel
OPERATING YOUR VEHICLE
24
Page 27 of 148
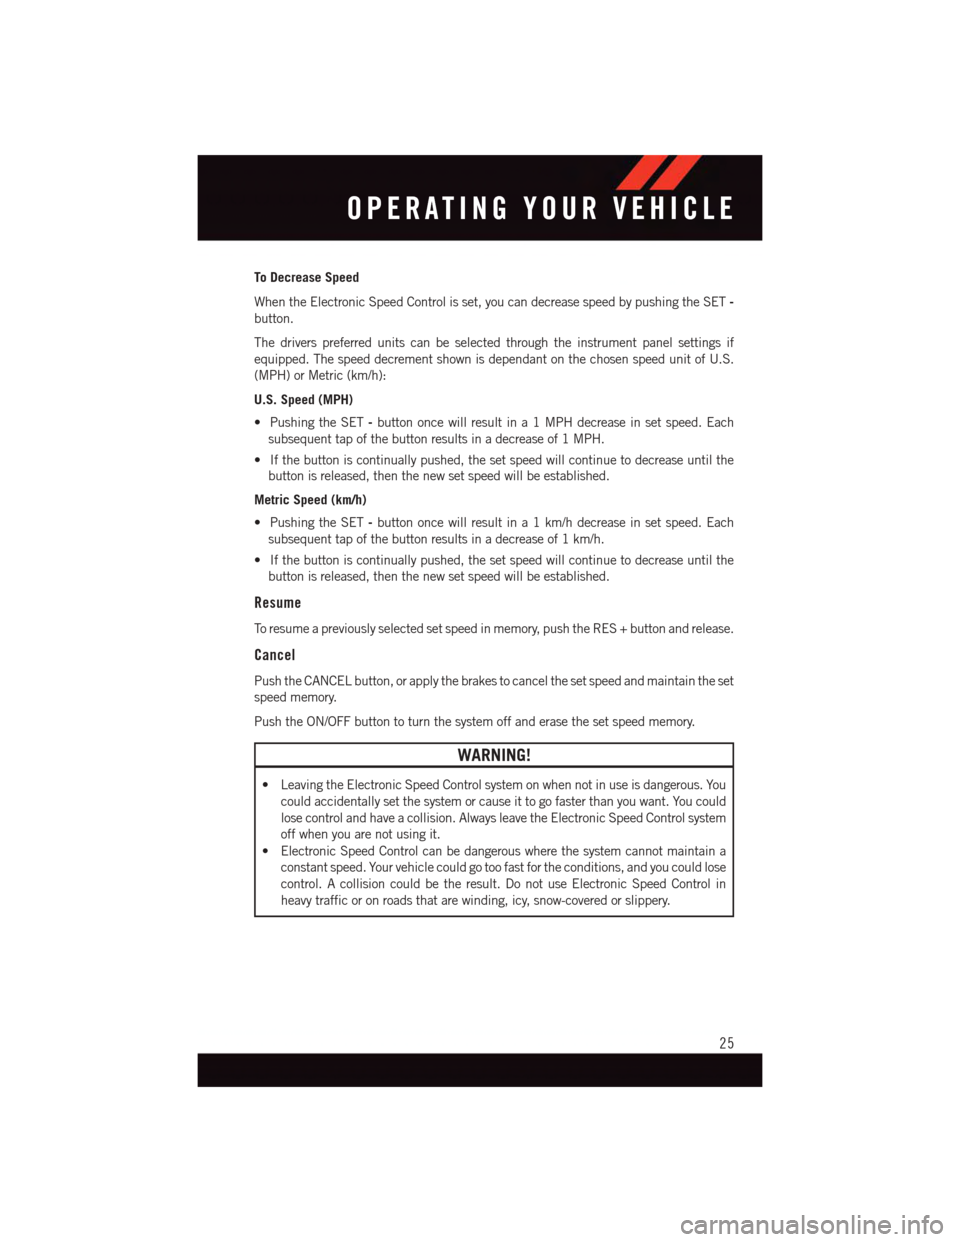
To Decrease Speed
When the Electronic Speed Control is set, you can decrease speed by pushing the SET-
button.
The drivers preferred units can be selected through the instrument panel settings if
equipped. The speed decrement shown is dependant on the chosen speed unit of U.S.
(MPH) or Metric (km/h):
U.S. Speed (MPH)
•PushingtheSET-button once will result in a 1 MPH decrease in set speed. Each
subsequent tap of the button results in a decrease of 1 MPH.
•Ifthebuttoniscontinuallypushed,thesetspeedwillcontinuetodecreaseuntilthe
button is released, then the new set speed will be established.
Metric Speed (km/h)
•PushingtheSET-button once will result in a 1 km/h decrease in set speed. Each
subsequent tap of the button results in a decrease of 1 km/h.
•Ifthebuttoniscontinuallypushed,thesetspeedwillcontinuetodecreaseuntilthe
button is released, then the new set speed will be established.
Resume
To r e s u m e a p r e v i o u s l y s e l e c t e d s e t s p e e d i n m e m o r y, p u s h t h e R E S + b u t t o n a n d r e l e a s e .
Cancel
Push the CANCEL button, or apply the brakes to cancel the set speed and maintain the set
speed memory.
Push the ON/OFF button to turn the system off and erase the set speed memory.
WARNING!
•LeavingtheElectronicSpeedControlsystemonwhennotinuseisdangerous.You
could accidentally set the system or cause it to go faster than you want. You could
lose control and have a collision. Always leave the Electronic Speed Control system
off when you are not using it.
•ElectronicSpeedControlcanbedangerouswherethesystemcannotmaintaina
constant speed. Your vehicle could go too fast for the conditions, and you could lose
control. A collision could be the result. Do not use Electronic Speed Control in
heavy traffic or on roads that are winding, icy, snow-covered or slippery.
OPERATING YOUR VEHICLE
25
Page 28 of 148
LAUNCH MODE
This system maximizes acceleration traction for straight line racing.
1. Bring the vehicle to complete stop on a level track surface with the engine running.
2. Set the steering wheel for straight ahead driving.
3. Fully depress the clutch and select the first gear position.
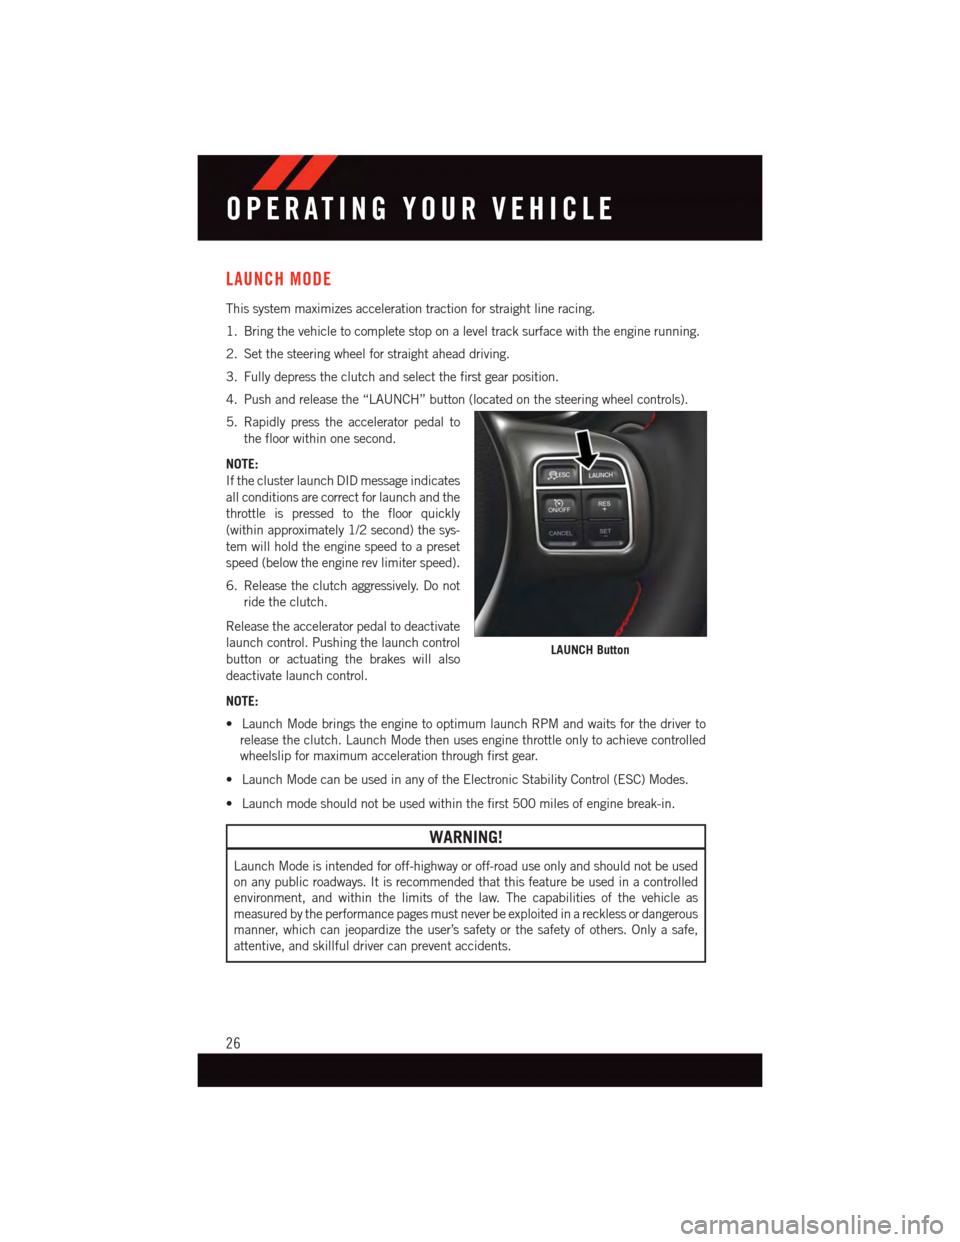
4. Push and release the “LAUNCH” button (located on the steering wheel controls).
5. Rapidly press the accelerator pedal to
the floor within one second.
NOTE:
If the cluster launch DID message indicates
all conditions are correct for launch and the
throttle is pressed to the floor quickly
(within approximately 1/2 second) the sys-
tem will hold the engine speed to a preset
speed (below the engine rev limiter speed).
6. Release the clutch aggressively. Do not
ride the clutch.
Release the accelerator pedal to deactivate
launch control. Pushing the launch control
button or actuating the brakes will also
deactivate launch control.
NOTE:
•LaunchModebringstheenginetooptimumlaunchRPMandwaitsforthedriverto
release the clutch. Launch Mode then uses engine throttle only to achieve controlled
wheelslip for maximum acceleration through first gear.
•LaunchModecanbeusedinanyoftheElectronicStabilityControl(ESC)Modes.
•Launchmodeshouldnotbeusedwithinthefirst500milesofenginebreak-in.
WARNING!
Launch Mode is intended for off-highway or off-road use only and should not be used
on any public roadways. It is recommended that this feature be used in a controlled
environment, and within the limits of the law. The capabilities of the vehicle as
measured by the performance pages must never be exploited in a reckless or dangerous
manner, which can jeopardize the user’s safety or the safety of others. Only a safe,
attentive, and skillful driver can prevent accidents.
LAUNCH Button
OPERATING YOUR VEHICLE
26
Page 29 of 148
ELECTRONIC CONTROL DAMPING SYSTEM
•Thisvehiclemaybeequippedwithanelectroniccontrolleddampeningsystem.This
system reduces body roll and pitch in many driving situations including cornering,
acceleration and braking.
•Thissystemallowsforastreetsuspensiondampingsettingorafirmerracesuspension
damping setting. There are two modes of operation:
STREET MODE
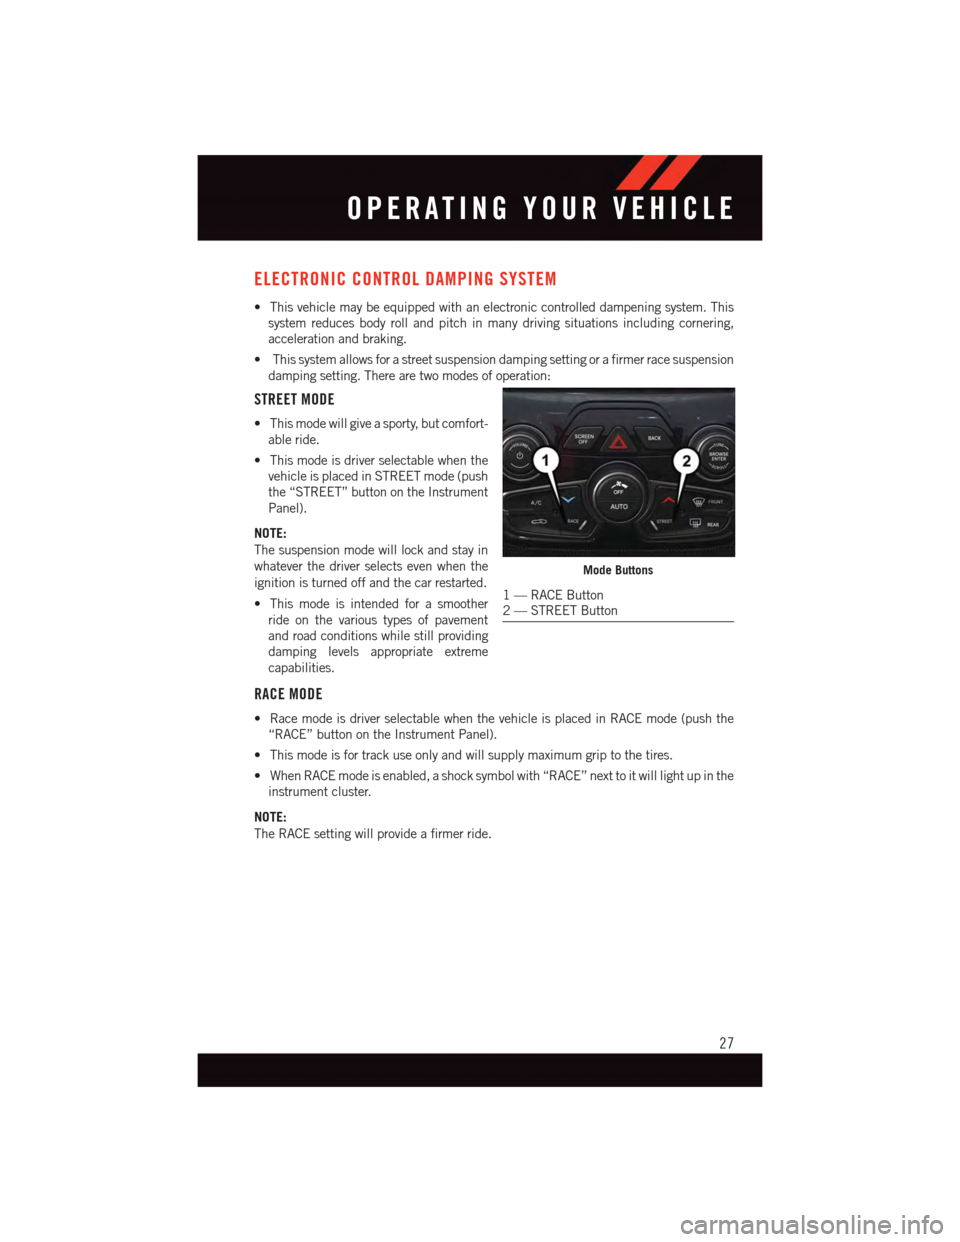
•Thismodewillgiveasporty,butcomfort-
able ride.
•Thismodeisdriverselectablewhenthe
vehicle is placed in STREET mode (push
the “STREET” button on the Instrument
Panel).
NOTE:
The suspension mode will lock and stay in
whatever the driver selects even when the
ignition is turned off and the car restarted.
•Thismodeisintendedforasmoother
ride on the various types of pavement
and road conditions while still providing
damping levels appropriate extreme
capabilities.
RACE MODE
•RacemodeisdriverselectablewhenthevehicleisplacedinRACEmode(pushthe
“RACE” button on the Instrument Panel).
•Thismodeisfortrackuseonlyandwillsupplymaximumgriptothetires.
•WhenRACEmodeisenabled,ashocksymbolwith“RACE”nexttoitwilllightupinthe
instrument cluster.
NOTE:
The RACE setting will provide a firmer ride.
Mode Buttons
1—RACEButton2—STREETButton
OPERATING YOUR VEHICLE
27
Page 30 of 148
ELECTRONIC STABILITY CONTROL (ESC)
•TheESCcorrectsforoversteeringandundersteeringthevehiclebyapplyingthebrake
of the appropriate wheel. Engine power may also be reduced to assist in counteracting
the condition of oversteer or understeer and help the vehicle maintain the desired path.
•InfullonmodeESCutilizessensorsinthevehicletodeterminethepaththatthedriver
intends to steer the vehicle and compares it to the actual path of the vehicle. When the
actual path does not match the intended path, the ESC applies the brake of the
appropriate wheel to assist in counteracting the condition of oversteer or understeer.
Electronic Stability Control (ESC) Operating Modes
The ESC system may have five available operating modes:
ESC On
•ThisisthenormaloperatingmodefortheESCsystem.Wheneverthevehicleisstarted,
the ESC system will be in this mode. The ESC On mode should be used for most driving
situations. The ESC should only be turned OFF for specific reasons as noted in the
following paragraphs.
ESC Full Off
•TheESCOffmodeisintendedforoff-highwayoroff-roaduseonlyandshouldnotbeused on any public roadways. In this mode, all TCS and ESC stability features areturned OFF. To enter the “Full Off” mode, push and hold the “ESC Off” switch for fiveseconds while the vehicle is stopped with the engine running. After five seconds, achime will sound, the “ESC Activation/Malfunction Indicator Light” will illuminate, andthe “ESC OFF” message will display in the vehicle cluster (left of the odometer). The“ESC OFF” message may appear in the Driver Information Display (DID). To turn ESCON again, momentarily push the “ESC Off” switch.
Sport Mode
•Sportmodehasreducedtractioncontrolandreducedstabilitycontrol.Toenterthe
“Sport Mode” mode, push the “ESC” switch once (located on the steering wheel). The
“ESC SPORT” light will illuminate, and the “ESC SPORT” message will display in the
vehicle cluster (left of the odometer).
Track Mode
•Tr a c k M o d e h a s n o t r a c t i o n c o n t r o l a n d h a s r e d u c e d s t a b i l i t y c o n t r o l . To e n t e r t h e “ Tr a c k
Mode” mode, push the “ESC” switch twice. The “ESC TRACK” light will illuminate, and
the “ESC TRACK” message will display in the vehicle cluster (left of the odometer).
OPERATING YOUR VEHICLE
28