technical specifications FIAT DOBLO COMBI 2011 Owner handbook (in English)
[x] Cancel search | Manufacturer: FIAT, Model Year: 2011, Model line: DOBLO COMBI, Model: FIAT DOBLO COMBI 2011Pages: 274, PDF Size: 5.96 MB
Page 183 of 274
182
KNOW
YOUR
VEHICLE
SAFETY
STARTING
AND
DRIVING
WARNING
LIGHTS AND
MESSAGES
IN AN
EMERGENCY
SERVICING
AND
MAINTENANCE
TECHNICAL
SPECIFICATIONS
INDEX
F0V0081mfig. 174F0V0089mfig. 175
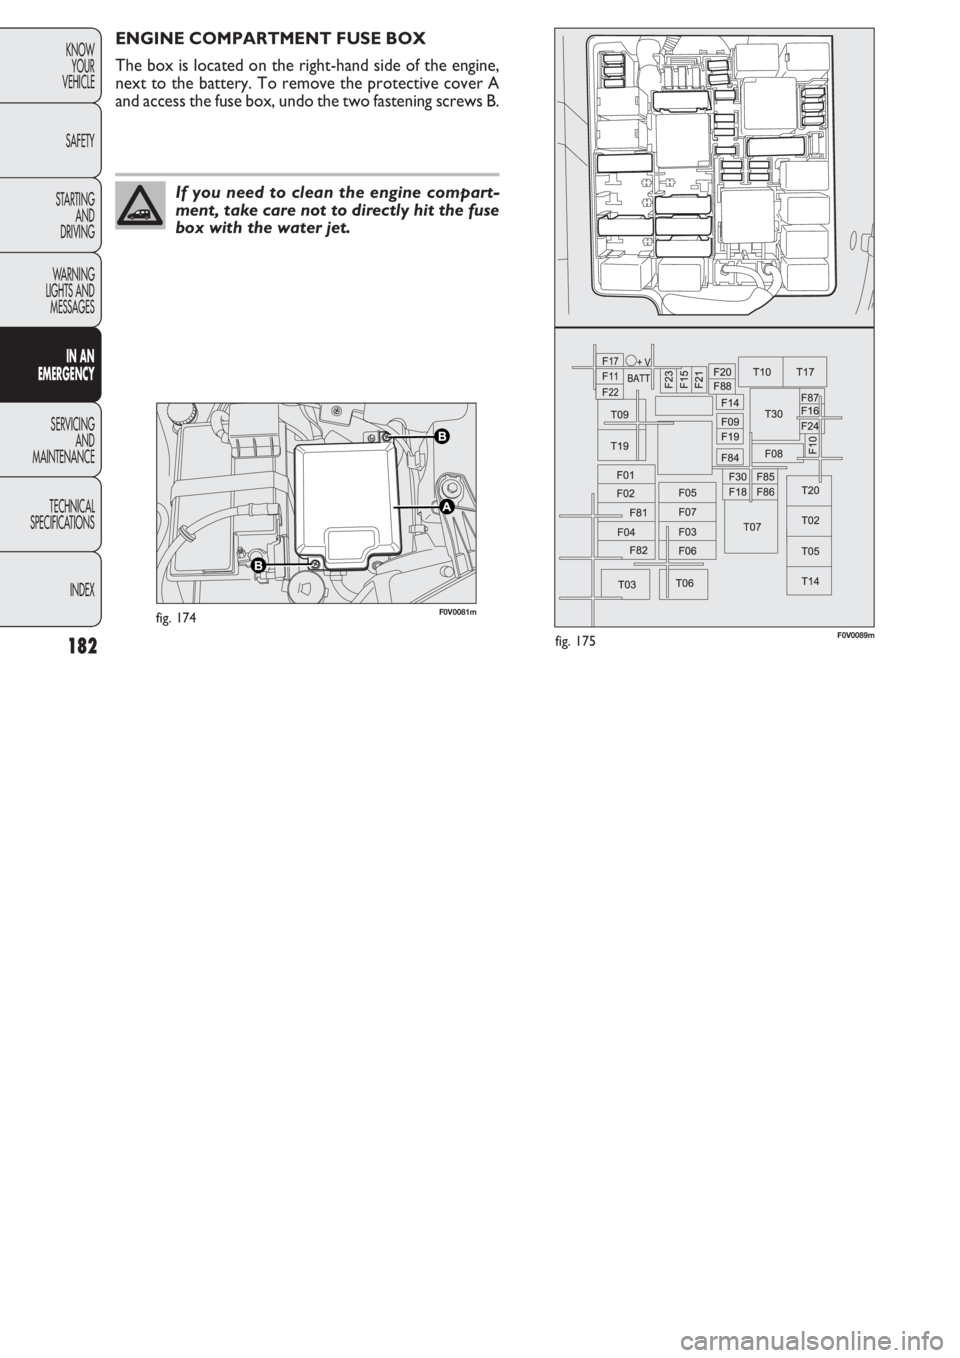
ENGINE COMPARTMENT FUSE BOX
The box is located on the right-hand side of the engine,
next to the battery. To remove the protective cover A
and access the fuse box, undo the two fastening screws B.
If you need to clean the engine compart-
ment, take care not to directly hit the fuse
box with the water jet.
Page 184 of 274
183
KNOW
YOUR
VEHICLE
SAFETY
STARTING
AND
DRIVING
WARNING
LIGHTS AND
MESSAGES
IN AN
EMERGENCY
SERVICING
AND
MAINTENANCE
TECHNICAL
SPECIFICATIONS
INDEX
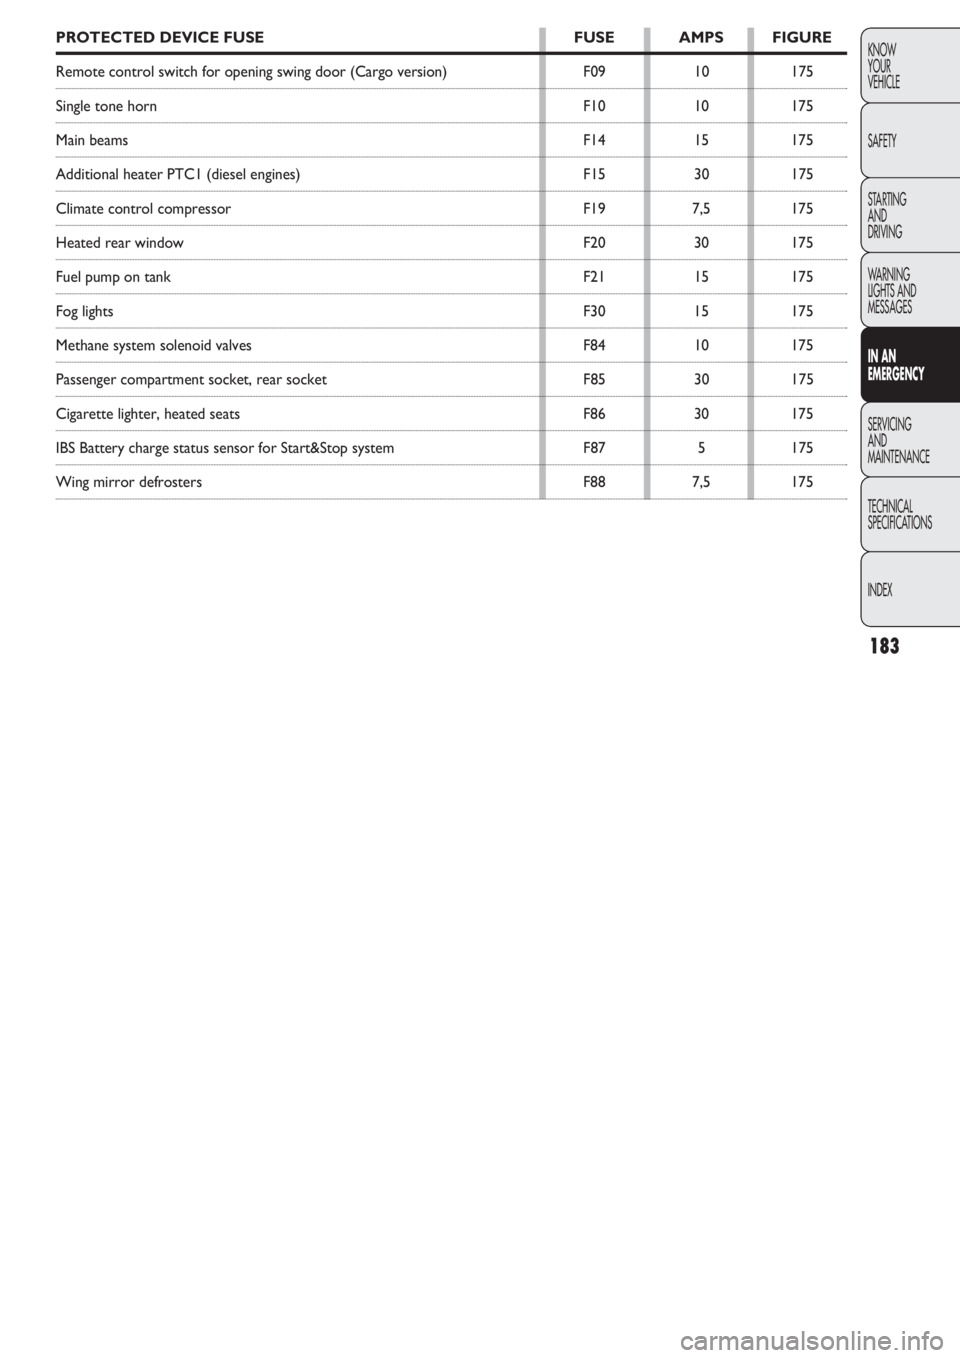
PROTECTED DEVICE FUSE FUSE AMPS FIGURE
Remote control switch for opening swing door (Cargo version) F09 10 175
Single tone horn F10 10 175
Main beams F14 15 175
Additional heater PTC1 (diesel engines) F15 30 175
Climate control compressor F19 7,5 175
Heated rear window F20 30 175
Fuel pump on tank F21 15 175
Fog lights F30 15 175
Methane system solenoid valves F84 10 175
Passenger compartment socket, rear socket F85 30 175
Cigarette lighter, heated seats F86 30 175
IBS Battery charge status sensor for Start&Stop system F87 5 175
Wing mirror defrosters F88 7,5 175
Page 185 of 274
184
KNOW
YOUR
VEHICLE
SAFETY
STARTING
AND
DRIVING
WARNING
LIGHTS AND
MESSAGES
IN AN
EMERGENCY
SERVICING
AND
MAINTENANCE
TECHNICAL
SPECIFICATIONS
INDEX
F0V0082mfig. 176F0V0083mfig. 177
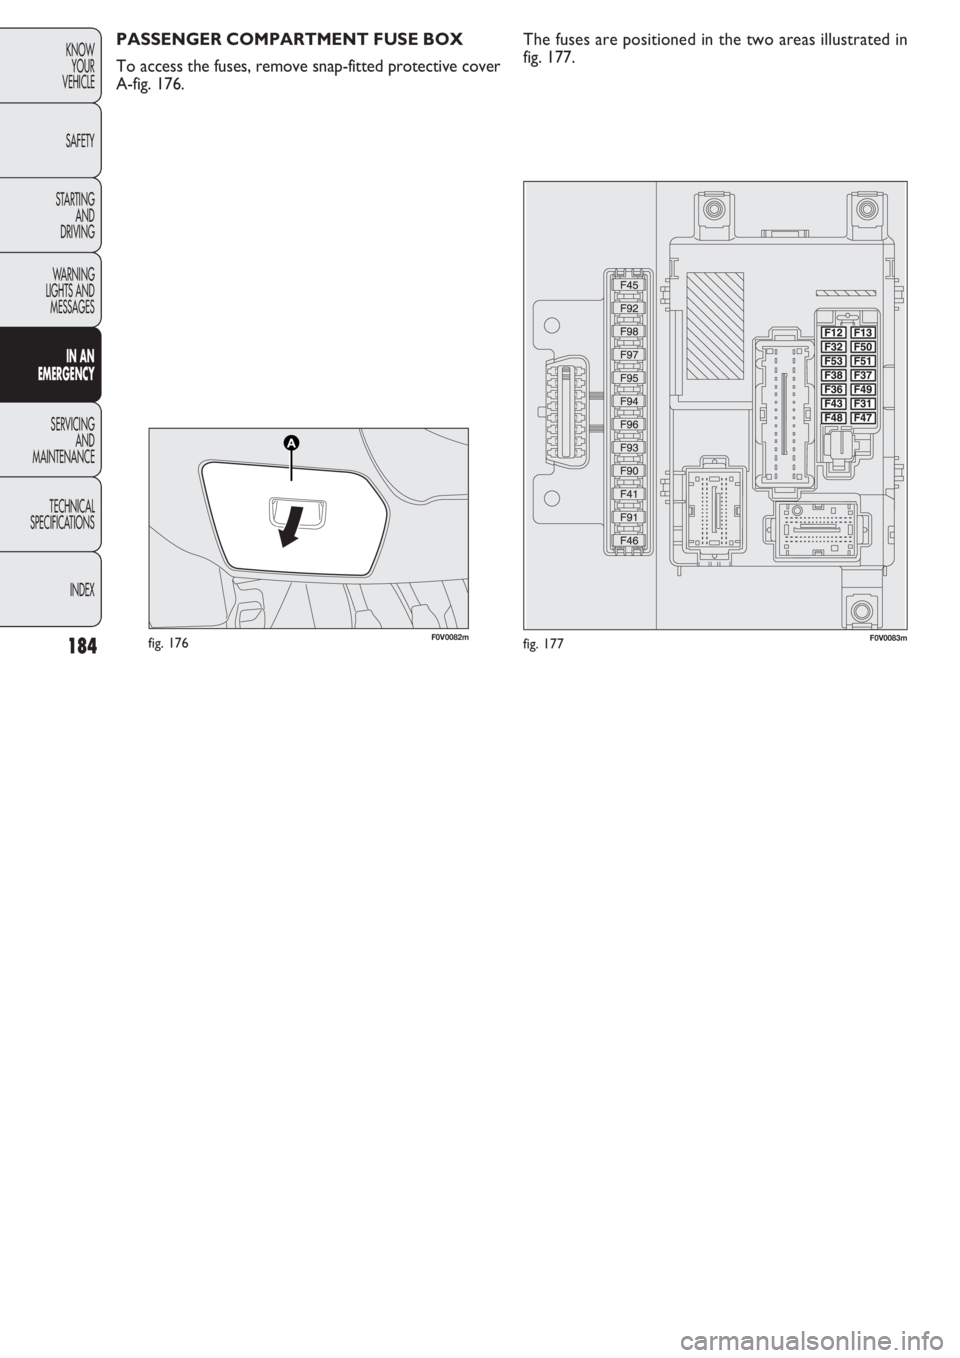
PASSENGER COMPARTMENT FUSE BOX
To access the fuses, remove snap-fitted protective cover
A-fig. 176.The fuses are positioned in the two areas illustrated in
fig. 177.
Page 186 of 274
185
KNOW
YOUR
VEHICLE
SAFETY
STARTING
AND
DRIVING
WARNING
LIGHTS AND
MESSAGES
IN AN
EMERGENCY
SERVICING
AND
MAINTENANCE
TECHNICAL
SPECIFICATIONS
INDEX
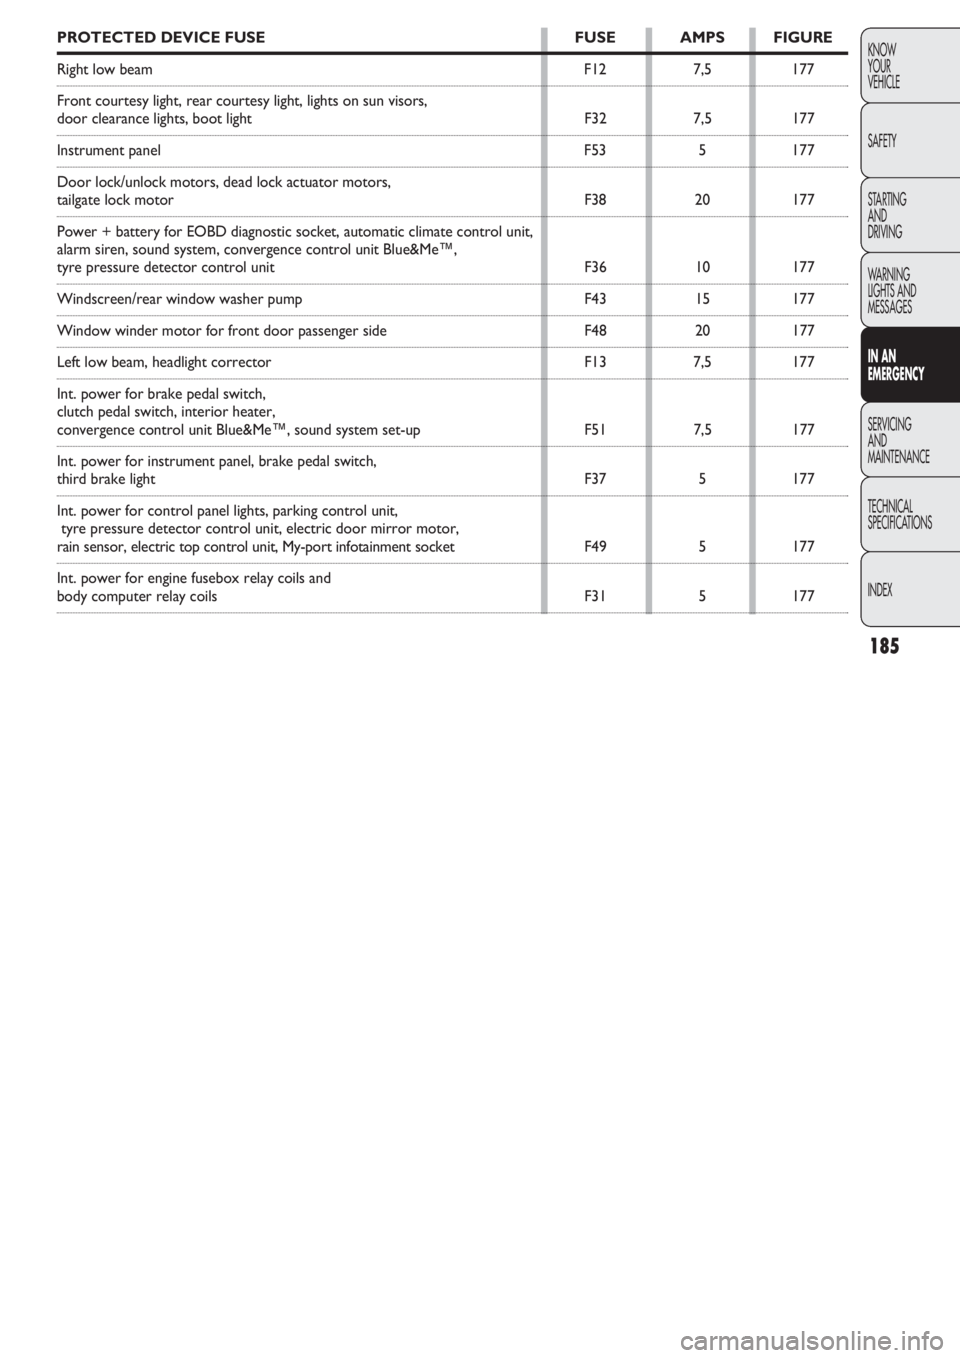
PROTECTED DEVICE FUSE FUSE AMPS FIGURE
Right low beam F12 7,5 177
Front courtesy light, rear courtesy light, lights on sun visors,
door clearance lights, boot light F32 7,5 177
Instrument panel F53 5 177
Door lock/unlock motors, dead lock actuator motors,
tailgate lock motor F38 20 177
Power + battery for EOBD diagnostic socket, automatic climate control unit,
alarm siren, sound system, convergence control unit Blue&Me™,
tyre pressure detector control unit F36 10 177
Windscreen/rear window washer pump F43 15 177
Window winder motor for front door passenger side F48 20 177
Left low beam, headlight corrector F13 7,5 177
Int. power for brake pedal switch,
clutch pedal switch, interior heater,
convergence control unit Blue&Me™, sound system set-up F51 7,5 177
Int. power for instrument panel, brake pedal switch,
third brake light F37 5 177
Int. power for control panel lights, parking control unit,
tyre pressure detector control unit, electric door mirror motor,
rain sensor, electric top control unit, My-port infotainment socket F49 5 177
Int. power for engine fusebox relay coils and
body computer relay coils F31 5 177
Page 187 of 274
186
KNOW
YOUR
VEHICLE
SAFETY
STARTING
AND
DRIVING
WARNING
LIGHTS AND
MESSAGES
IN AN
EMERGENCY
SERVICING
AND
MAINTENANCE
TECHNICAL
SPECIFICATIONS
INDEX
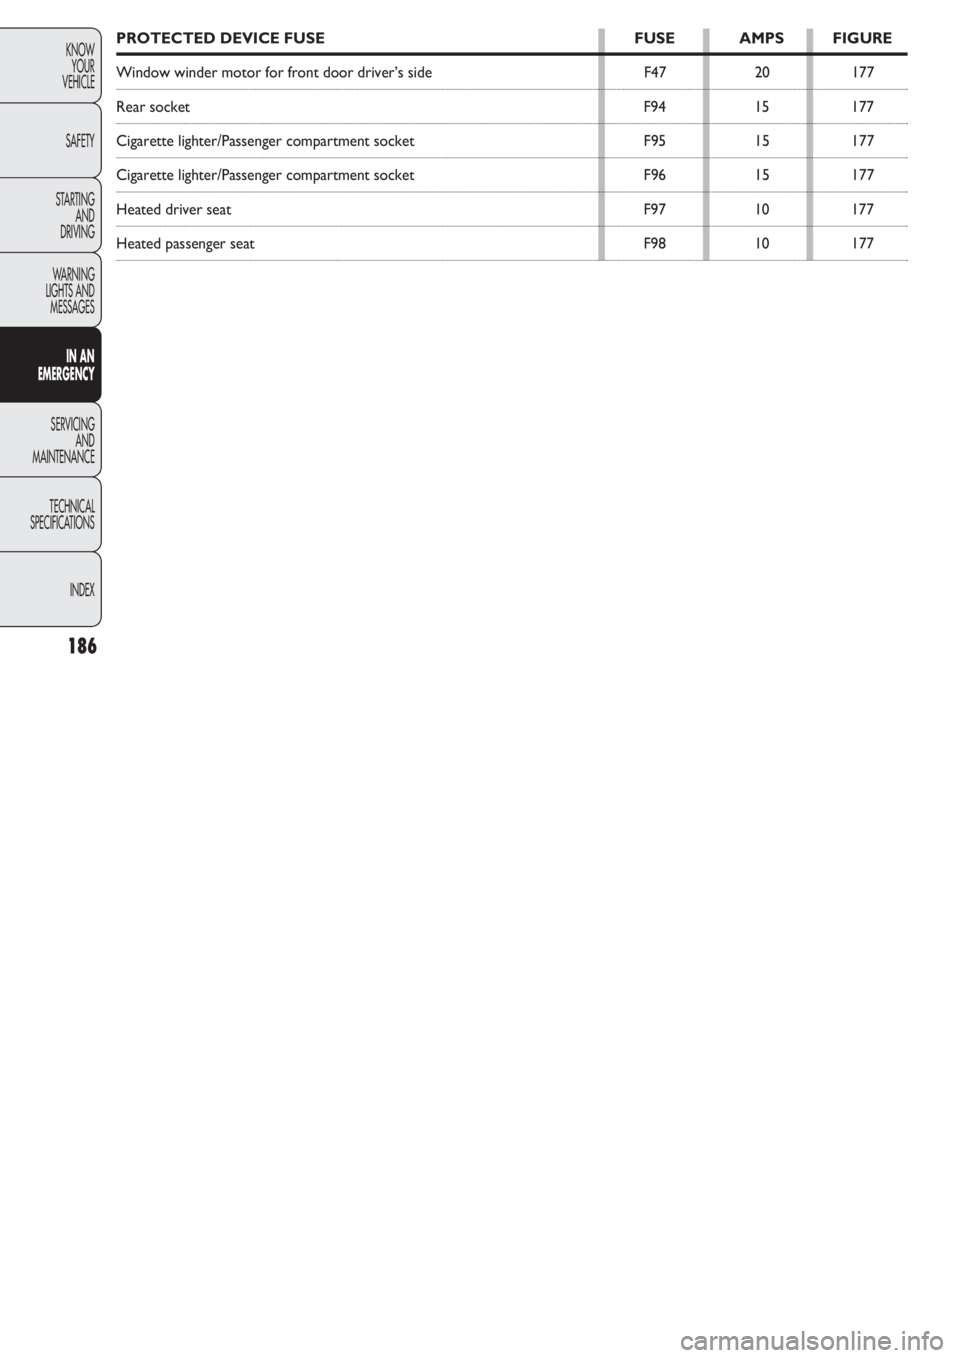
PROTECTED DEVICE FUSE FUSE AMPS FIGURE
Window winder motor for front door driver’s side F47 20 177
Rear socket F94 15 177
Cigarette lighter/Passenger compartment socket F95 15 177
Cigarette lighter/Passenger compartment socket F96 15 177
Heated driver seat F97 10 177
Heated passenger seat F98 10 177
Page 188 of 274
187
KNOW
YOUR
VEHICLE
SAFETY
STARTING
AND
DRIVING
WARNING
LIGHTS AND
MESSAGES
IN AN
EMERGENCY
SERVICING
AND
MAINTENANCE
TECHNICAL
SPECIFICATIONS
INDEX
RECHARGING THE BATTERY
IMPORTANT The battery recharging procedure is pro-
vided for information purposes only. You are recom-
mended to go to a Fiat Dealership to have this operation
performed.
We recommend recharging the battery slowly for ap-
proximately 24 hours at low amperage. A prolonged
recharge might damage the battery.
Charge the battery as follows:
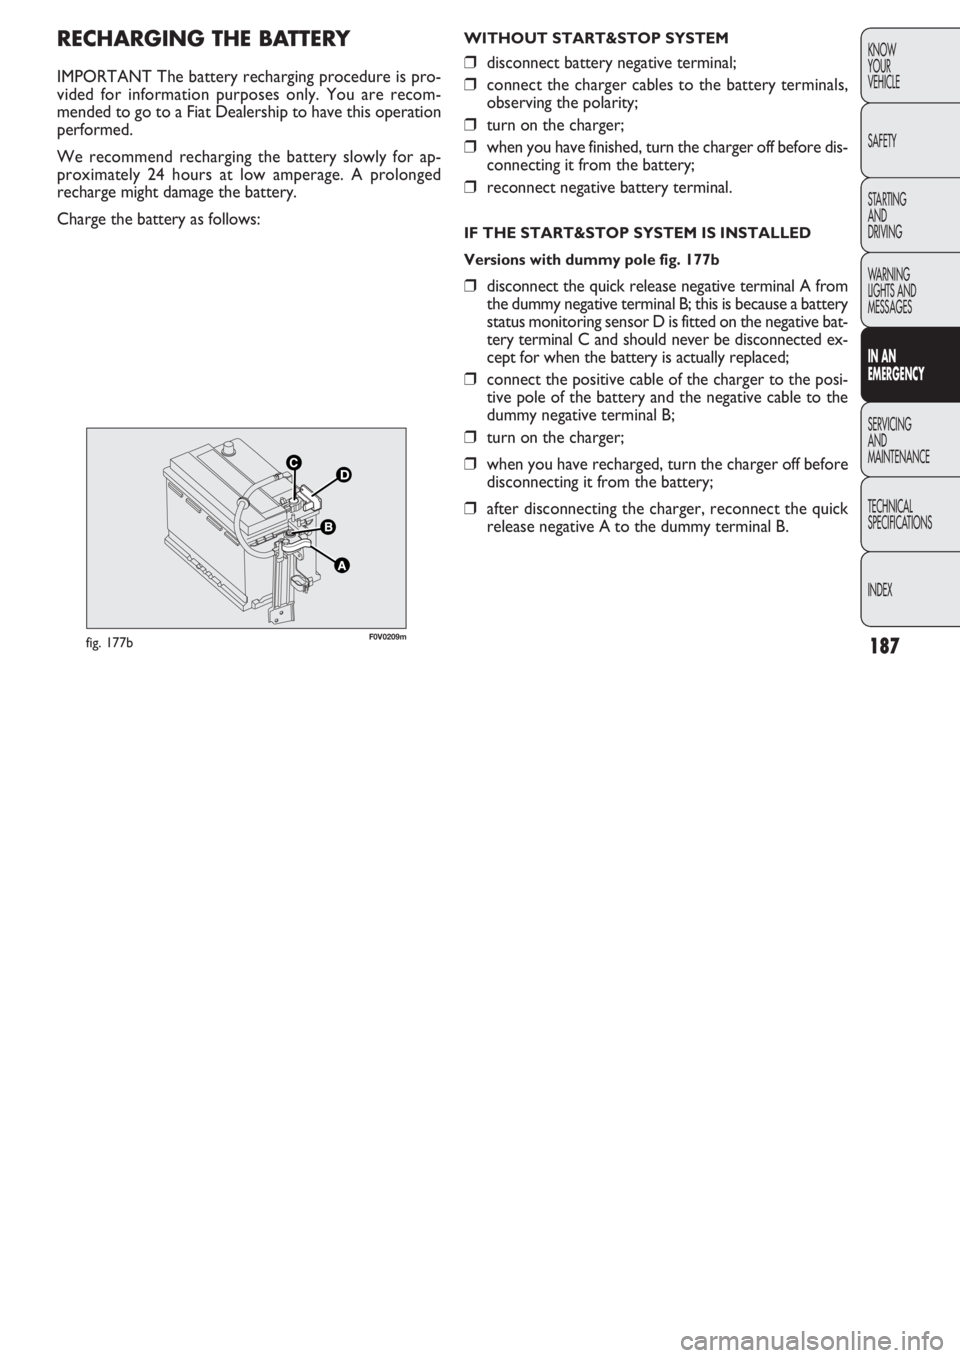
F0V0209mfig. 177b
WITHOUT START&STOP SYSTEM
❒disconnect battery negative terminal;
❒connect the charger cables to the battery terminals,
observing the polarity;
❒turn on the charger;
❒when you have finished, turn the charger off before dis-
connecting it from the battery;
❒reconnect negative battery terminal.
IF THE START&STOP SYSTEM IS INSTALLED
Versions with dummy pole fig. 177b
❒disconnect the quick release negative terminal A from
the dummy negative terminal B; this is because a battery
status monitoring sensor D is fitted on the negative bat-
tery terminal C and should never be disconnected ex-
cept for when the battery is actually replaced;
❒connect the positive cable of the charger to the posi-
tive pole of the battery and the negative cable to the
dummy negative terminal B;
❒turn on the charger;
❒when you have recharged, turn the charger off before
disconnecting it from the battery;
❒after disconnecting the charger, reconnect the quick
release negative A to the dummy terminal B.
Page 189 of 274
188
KNOW
YOUR
VEHICLE
SAFETY
STARTING
AND
DRIVING
WARNING
LIGHTS AND
MESSAGES
IN AN
EMERGENCY
SERVICING
AND
MAINTENANCE
TECHNICAL
SPECIFICATIONS
INDEX
Battery fluid is poisonous and corrosive:
avoid contact with your skin and eyes. The
battery recharging operation must be performed
in a ventilated place, away from naked flames or
possible sources of sparks to avoid the risk of ex-
plosion and fire.
WARNING
Don’t try to recharge a frozen battery: de-
frost it first or it might explode. If the bat-
tery was frozen, have it inspected by specialised
personnel before recharging to check that the in-
ternal elements are not damaged and that the cas-
ing is not cracked, which could cause poisonous,
corrosive acid to leak.
WARNING
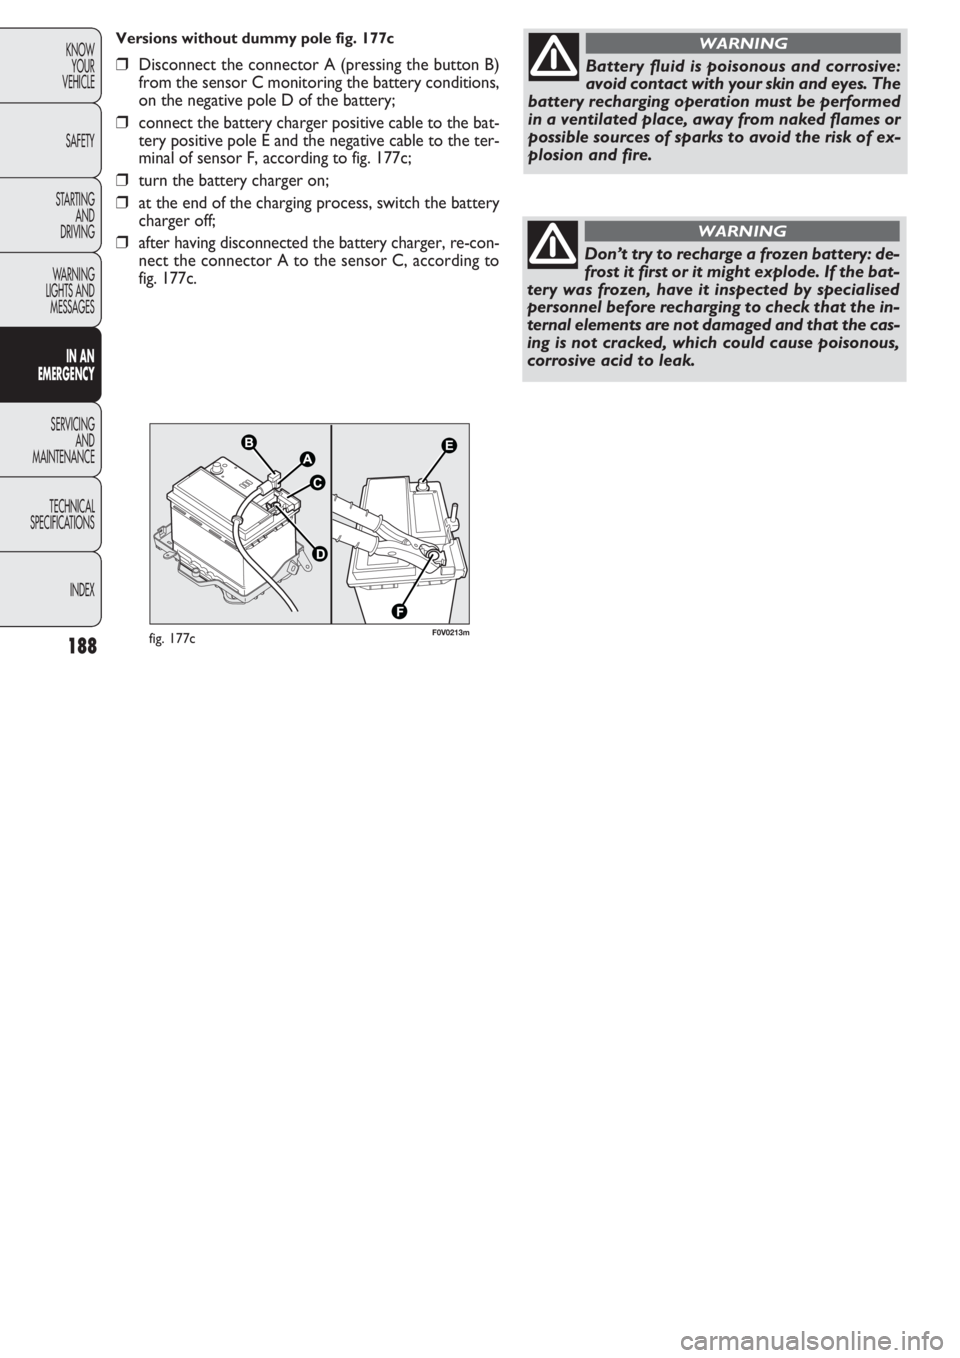
F0V0213mfig. 177c
Versions without dummy pole fig. 177c
❒Disconnect the connector A (pressing the button B)
from the sensor C monitoring the battery conditions,
on the negative pole D of the battery;
❒connect the battery charger positive cable to the bat-
tery positive pole E and the negative cable to the ter-
minal of sensor F, according to fig. 177c;
❒turn the battery charger on;
❒at the end of the charging process, switch the battery
charger off;
❒after having disconnected the battery charger, re-con-
nect the connector A to the sensor C, according to
fig. 177c.
Page 190 of 274
189
KNOW
YOUR
VEHICLE
SAFETY
STARTING
AND
DRIVING
WARNING
LIGHTS AND
MESSAGES
IN AN
EMERGENCY
SERVICING
AND
MAINTENANCE
TECHNICAL
SPECIFICATIONS
INDEX
TOWING THE VEHICLE
The tow ring supplied with the vehicle is located in the
tool box located either behind the left seat backrest (Car-
go versions) or in the boot (Doblò / Doblò Combi ver-
sions).
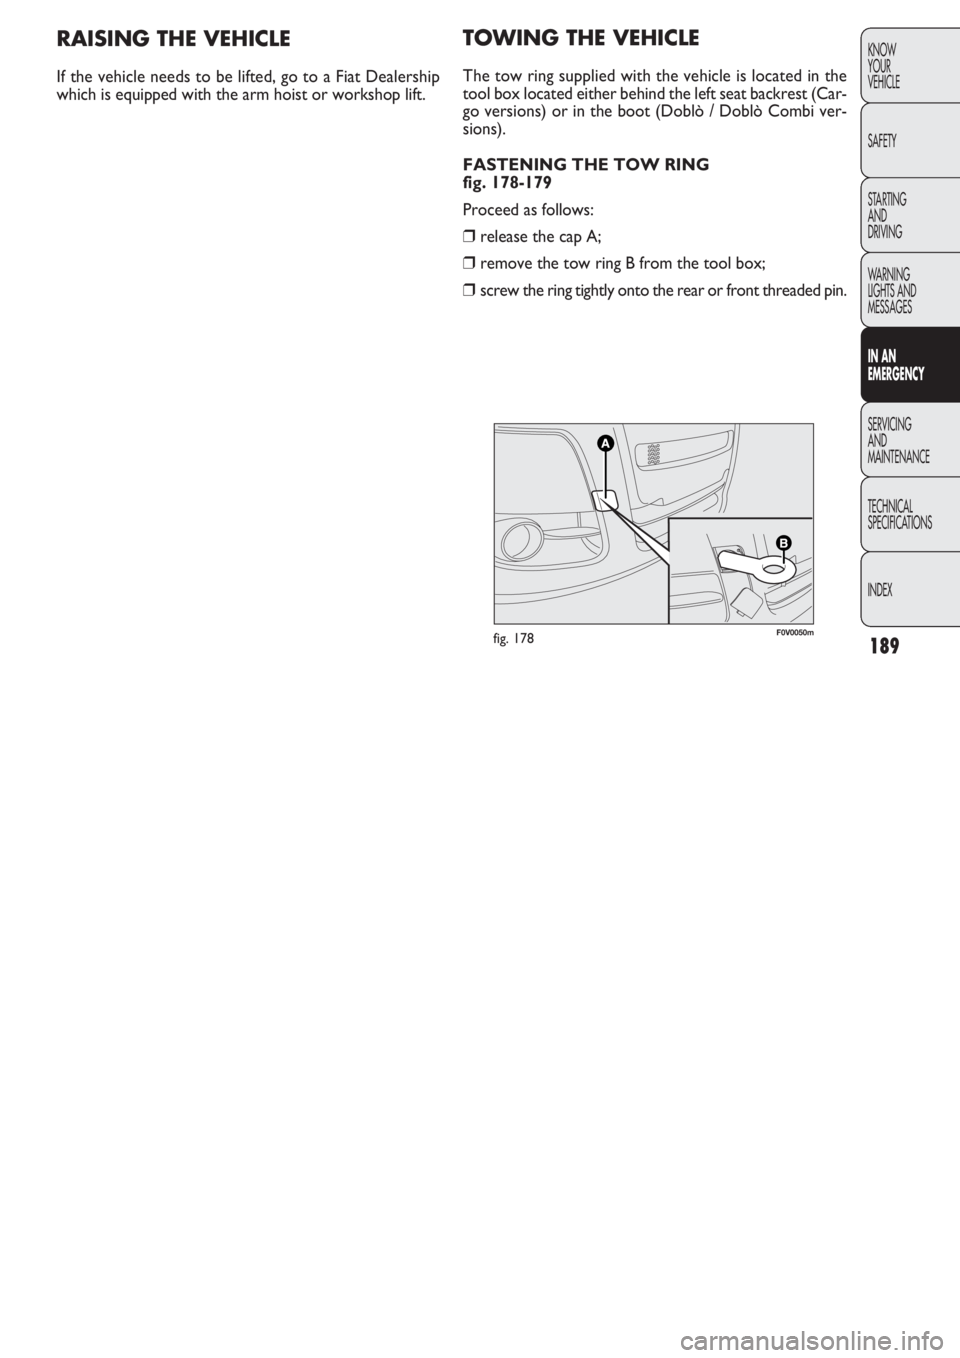
FASTENING THE TOW RING
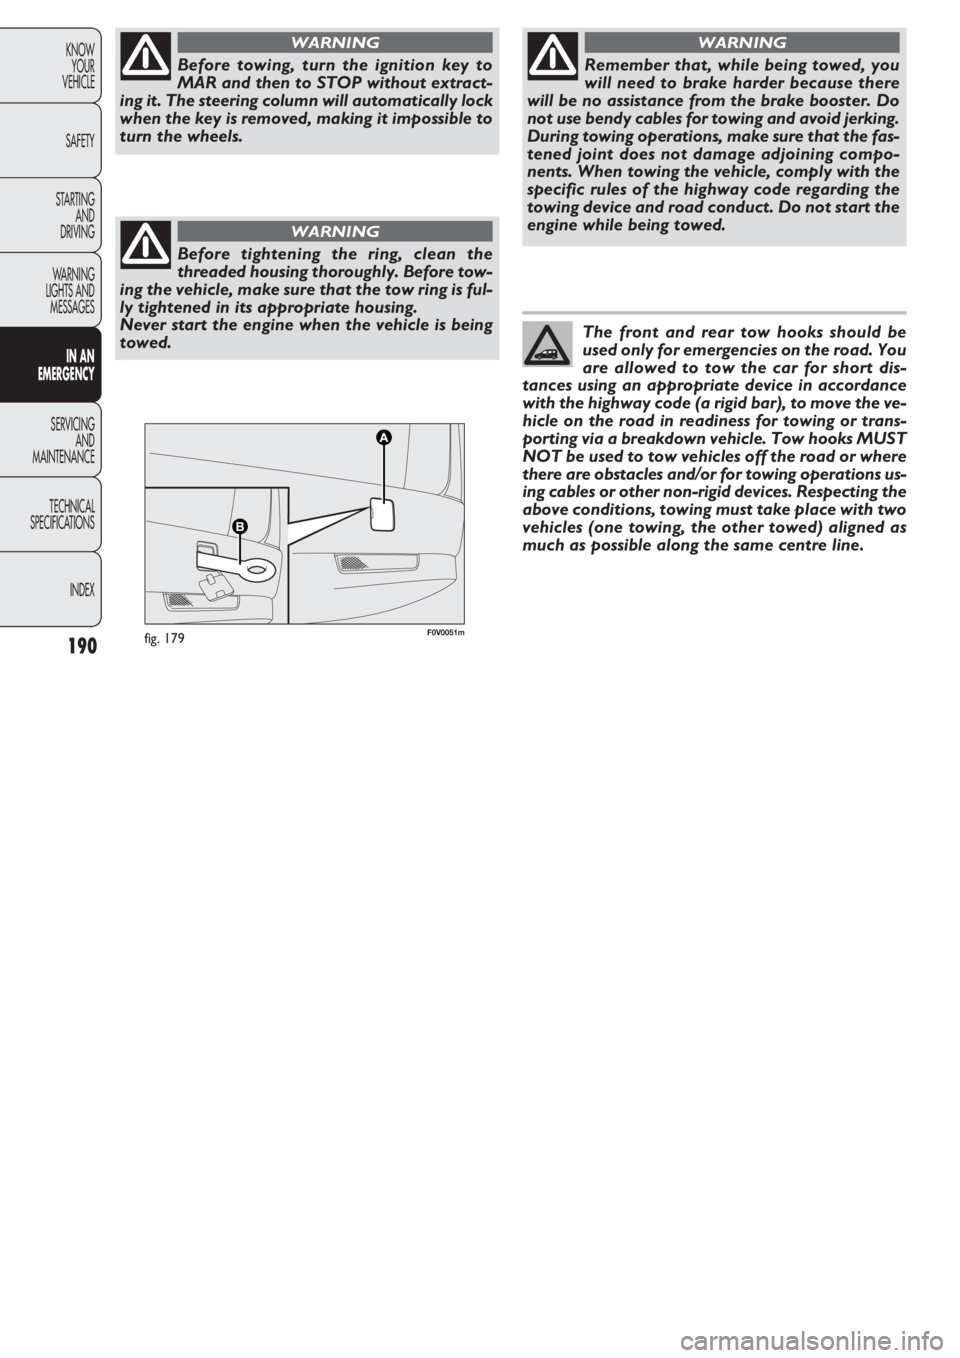
fig. 178-179
Proceed as follows:
❒release the cap A;
❒remove the tow ring B from the tool box;
❒screw the ring tightly onto the rear or front threaded pin.
F0V0050mfig. 178
RAISING THE VEHICLE
If the vehicle needs to be lifted, go to a Fiat Dealership
which is equipped with the arm hoist or workshop lift.
Page 191 of 274
190
KNOW
YOUR
VEHICLE
SAFETY
STARTING
AND
DRIVING
WARNING
LIGHTS AND
MESSAGES
IN AN
EMERGENCY
SERVICING
AND
MAINTENANCE
TECHNICAL
SPECIFICATIONS
INDEX
F0V0051mfig. 179
Before towing, turn the ignition key to
MAR and then to STOP without extract-
ing it. The steering column will automatically lock
when the key is removed, making it impossible to
turn the wheels.
WARNING
Before tightening the ring, clean the
threaded housing thoroughly. Before tow-
ing the vehicle, make sure that the tow ring is ful-
ly tightened in its appropriate housing.
Never start the engine when the vehicle is being
towed.
WARNING
Remember that, while being towed, you
will need to brake harder because there
will be no assistance from the brake booster. Do
not use bendy cables for towing and avoid jerking.
During towing operations, make sure that the fas-
tened joint does not damage adjoining compo-
nents. When towing the vehicle, comply with the
specific rules of the highway code regarding the
towing device and road conduct. Do not start the
engine while being towed.
WARNING
The front and rear tow hooks should be
used only for emergencies on the road. You
are allowed to tow the car for short dis-
tances using an appropriate device in accordance
with the highway code (a rigid bar), to move the ve-
hicle on the road in readiness for towing or trans-
porting via a breakdown vehicle. Tow hooks MUST
NOT be used to tow vehicles off the road or where
there are obstacles and/or for towing operations us-
ing cables or other non-rigid devices. Respecting the
above conditions, towing must take place with two
vehicles (one towing, the other towed) aligned as
much as possible along the same centre line.
Page 199 of 274
198
KNOW
YOUR
VEHICLE
SAFETY
STARTING
AND
DRIVING
WARNING
LIGHTS AND
MESSAGES
IN AN
EMERGENCY
SERVICING
AND
MAINTENANCE
TECHNICAL
SPECIFICA
TIONS
INDEX
HEAVY USAGE OF THE VEHICLE
If the vehicle is primarily used in one of the following
particularly onerous conditions:
❒ towing trailers;
❒ dusty roads;
❒ short, repeated journeys (less than 7-8 km) at sub-ze-
ro temperatures;
❒ frequently idling engine or long-distance, low-speed dri-
ving (e.g. door-to-door deliveries) or lengthy inactivi-
ty;
❒ driving in towns and cities;
you should perform the following inspections more fre-
quently than shown on the Scheduled Servicing Plan:
❒ check front disc brake pad conditions and wear;
❒ check cleanliness of bonnet and boot locks, and clean-
liness and lubrication of linkages;
❒ visually inspect the conditions of: engine, gearbox,
transmission, pipes and tubes (exhaust – fuel – brakes),
rubber parts (boots, sleeves, bushes, etc.);
❒ check battery charge and fluid level (electrolite) (check
to be carried out only by specialists or at a Fiat Deal-
ership – see the “Battery” paragraph in this section);
❒ visually inspect the condition of the accessory drive
belts;
❒ check pollen filter and replace, if required;
❒ check and, if necessary, replace air filter.
REGULAR CHECKS
Every 1,000 km or before long journeys, check and, if nec-
essary, top up:
❒ engine coolant fluid level;
❒ brake fluid level;
❒ windscreen washer level;
❒ tyre pressure and conditions.
❒ operation of lighting system (headlights, direction in-
dicators, hazard lights, etc.);
❒ operation of windscreen washer/wipers system and po-
sitioning/wear of windscreen/rear window wiper blades
(for versions/markets where provided);
Check and top up, if required, the engine oil level every
3,000 km.
You are recommended to use
PETRONAS LUBRICANTS
products, which have been designed and produced specif-
ically for Fiat vehicles (see “Capacities” table in the “Tech-
nical specifications” section).