technical specifications FIAT DOBLO COMBI 2011 Owner handbook (in English)
[x] Cancel search | Manufacturer: FIAT, Model Year: 2011, Model line: DOBLO COMBI, Model: FIAT DOBLO COMBI 2011Pages: 274, PDF Size: 5.96 MB
Page 163 of 274
162
KNOW
YOUR
VEHICLE
SAFETY
STARTING
AND
DRIVING
WARNING
LIGHTS AND
MESSAGES
IN AN
EMERGENCY
SERVICING
AND
MAINTENANCE
TECHNICAL
SPECIFICATIONS
INDEX
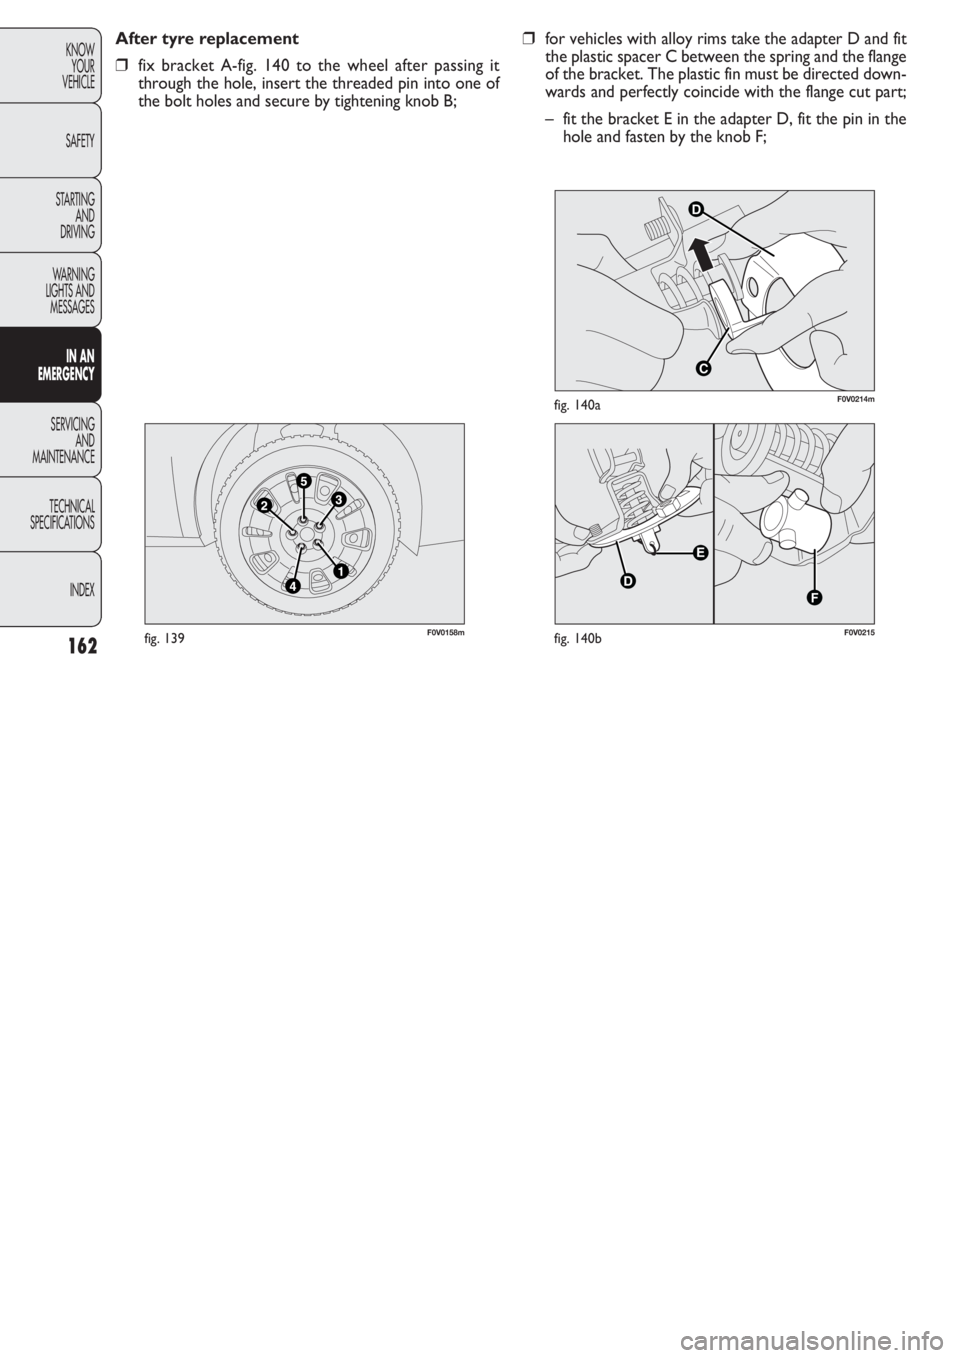
F0V0158mfig. 139
After tyre replacement
❒fix bracket A-fig. 140 to the wheel after passing it
through the hole, insert the threaded pin into one of
the bolt holes and secure by tightening knob B;
D
C
F0V0214mfig. 140a
F0V0215fig. 140b
❒for vehicles with alloy rims take the adapter D and fit
the plastic spacer C between the spring and the flange
of the bracket. The plastic fin must be directed down-
wards and perfectly coincide with the flange cut part;
– fit the bracket E in the adapter D, fit the pin in the
hole and fasten by the knob F;
Page 164 of 274
163
KNOW
YOUR
VEHICLE
SAFETY
STARTING
AND
DRIVING
WARNING
LIGHTS AND
MESSAGES
IN AN
EMERGENCY
SERVICING
AND
MAINTENANCE
TECHNICAL
SPECIFICATIONS
INDEX
Automatic FIX&GO QUICK TYRE
REPAIR KIT
The automatic Fix & Go quick tyre repair kit is contained
in a specific bag located under the left seat (Cargo ver-
sions) or inside the compartment in the rear right side pan-
el.
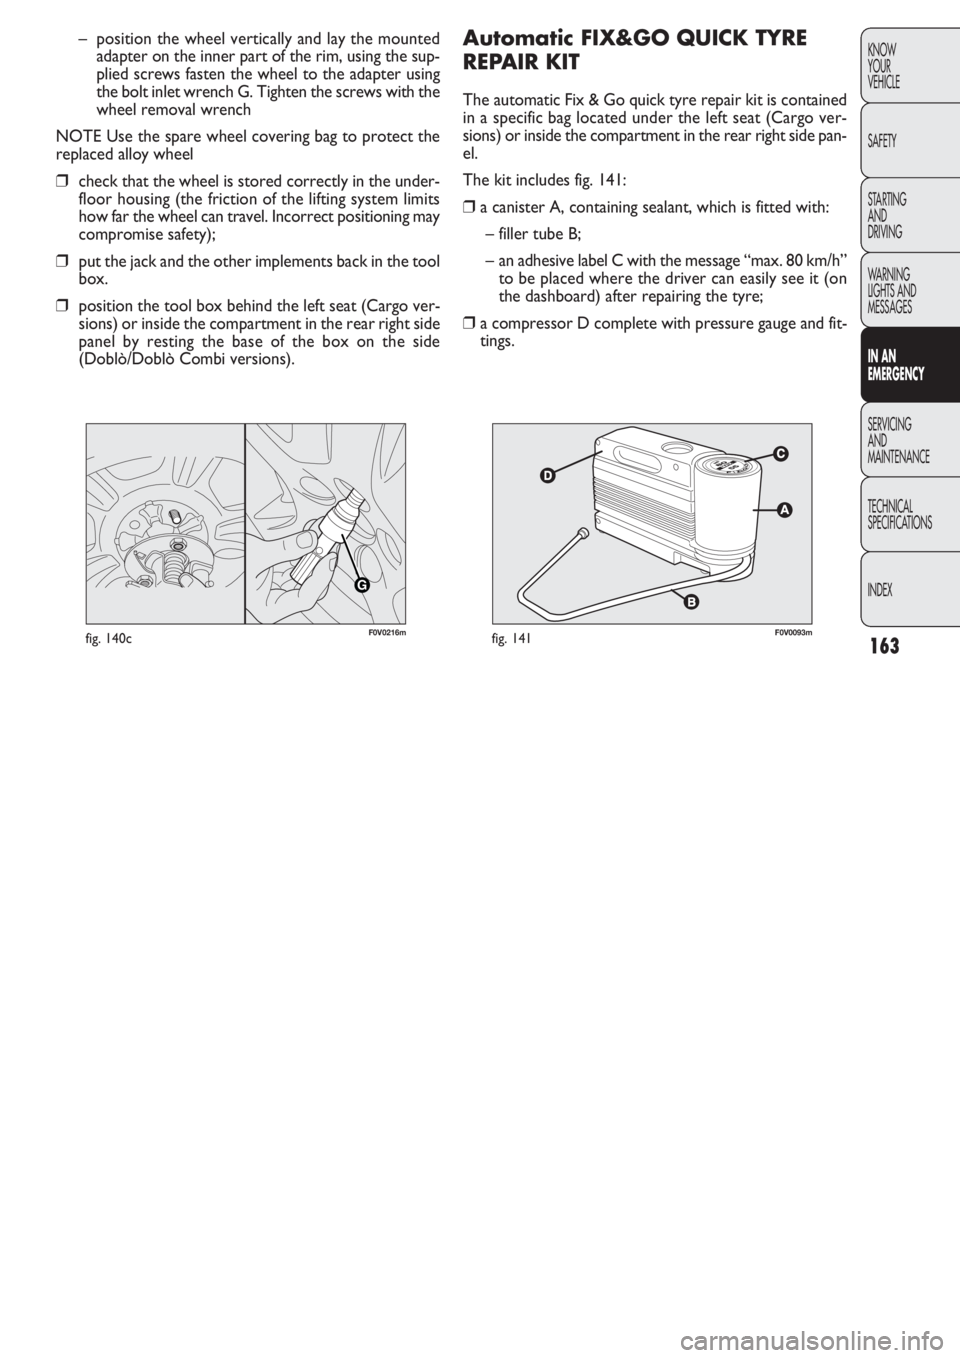
The kit includes fig. 141:
❒a canister A, containing sealant, which is fitted with:
– filler tube B;
– an adhesive label C with the message “max. 80 km/h”
to be placed where the driver can easily see it (on
the dashboard) after repairing the tyre;
❒a compressor D complete with pressure gauge and fit-
tings. – position the wheel vertically and lay the mounted
adapter on the inner part of the rim, using the sup-
plied screws fasten the wheel to the adapter using
the bolt inlet wrench G. Tighten the screws with the
wheel removal wrench
NOTE Use the spare wheel covering bag to protect the
replaced alloy wheel
❒check that the wheel is stored correctly in the under-
floor housing (the friction of the lifting system limits
how far the wheel can travel. Incorrect positioning may
compromise safety);
❒put the jack and the other implements back in the tool
box.
❒position the tool box behind the left seat (Cargo ver-
sions) or inside the compartment in the rear right side
panel by resting the base of the box on the side
(Doblò/Doblò Combi versions).
G
F0V0216mfig. 140cF0V0093mfig. 141
Page 165 of 274
164
KNOW
YOUR
VEHICLE
SAFETY
STARTING
AND
DRIVING
WARNING
LIGHTS AND
MESSAGES
IN AN
EMERGENCY
SERVICING
AND
MAINTENANCE
TECHNICAL
SPECIFICATIONS
INDEX
In the event of a puncture caused by for-
eign bodies, it is possible to repair tyres
showing holes on the track or shoulder of
up to 4 mm in diameter.
It is not possible to repair damage to the
tyre sidewall. Do not use the quick repair
kit if the damage has been caused by travelling on
a flat tyre.
WARNING
IMPORTANT INFORMATION:
The sealing fluid of the quick tyre repair kit is effective at
external temperatures of between -20 °C and +50 °C.
Do not operate the compressor for longer
than 20 minutes at a time. Risk of over-
heating. The quick repair kit is not suitable for per-
manent repairs. The tyres repaired must therefore
be used only temporarily.
WARNING
Do not dispose of the cylinder and sealant
in the open environment. Dispose of them
according to the national and local laws in
force.
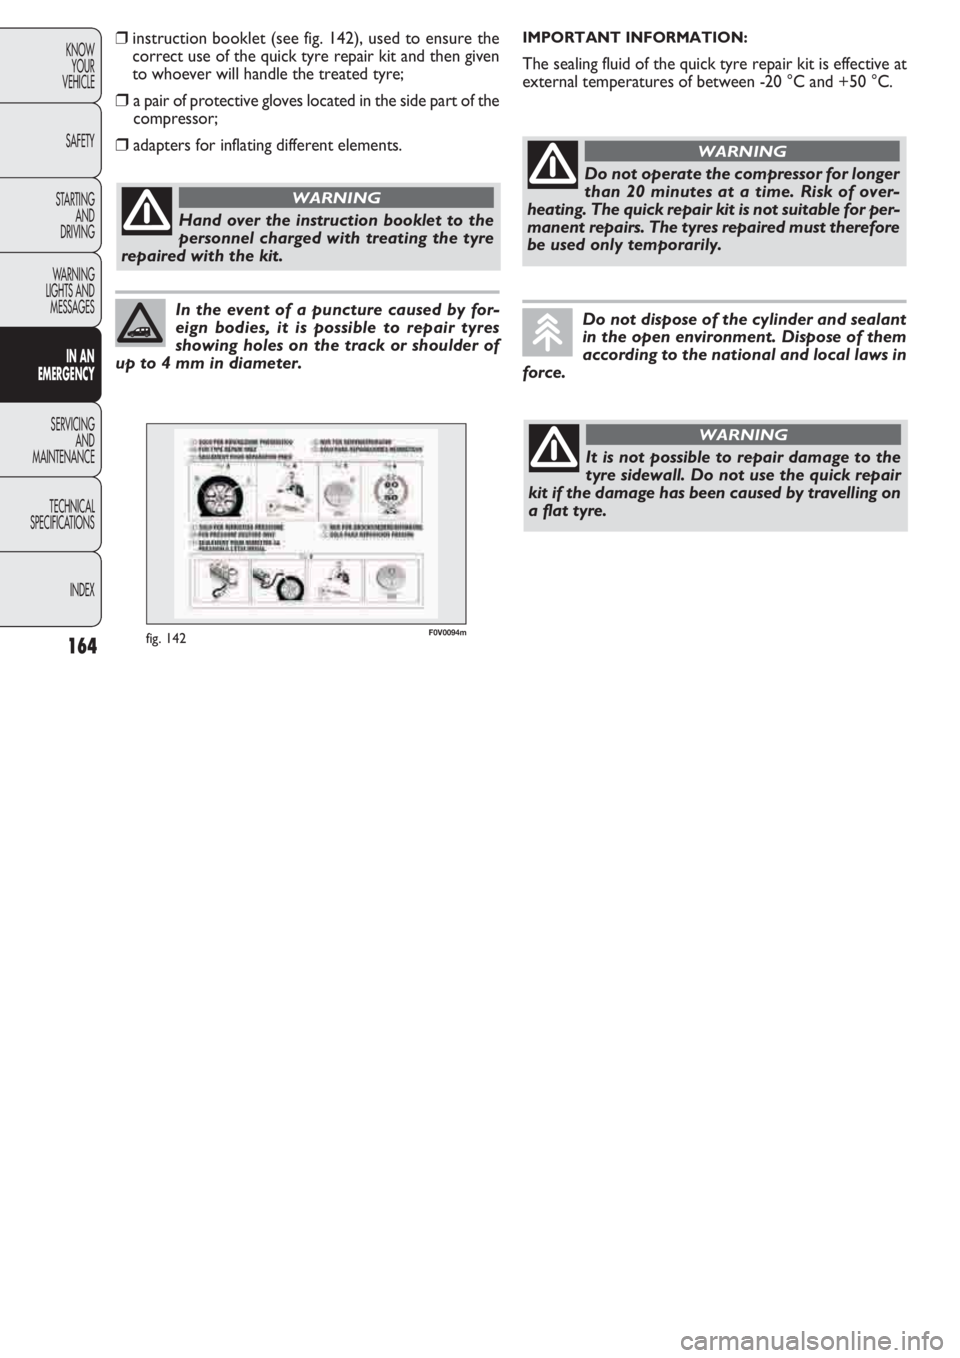
❒instruction booklet (see fig. 142), used to ensure the
correct use of the quick tyre repair kit and then given
to whoever will handle the treated tyre;
❒a pair of protective gloves located in the side part of the
compressor;
❒adapters for inflating different elements.
Hand over the instruction booklet to the
personnel charged with treating the tyre
repaired with the kit.
WARNING
F0V0094mfig. 142
Page 166 of 274
165
KNOW
YOUR
VEHICLE
SAFETY
STARTING
AND
DRIVING
WARNING
LIGHTS AND
MESSAGES
IN AN
EMERGENCY
SERVICING
AND
MAINTENANCE
TECHNICAL
SPECIFICATIONS
INDEX
F0V0095mfig. 143
INFLATION PROCEDURE
If the wheel rim is damaged (the channel
is so deformed as to cause an air leakage)
it cannot be repaired. Do not remove foreign bod-
ies (screws or nails) from the tyre.
WARNING
The cylinder contains ethylene glycol. It
contains latex, which may cause an aller-
gic reaction. Harmful if swallowed. Irritates the
eyes. There could be a reaction in case of inhala-
tion or contact. Avoid contact with your eyes, skin
and clothes. In the event of contact, wash imme-
diately with plenty of water. Do not induce vom-
iting if swallowed. Rinse your mouth out and drink
plenty of water. Call a doctor immediately. Keep
out of the reach of children. The product must not
be used by asthmatics. Do not breathe in the
vapours during insertion and suction. Call a doc-
tor immediately if allergic reactions are noted.
Store the canister in its proper compartment,
away from sources of heat. The sealant has an ex-
piry date. Replace the cylinder if its sealant is out
of date.
WARNING
Put on the protective gloves provided with
the quick tyre repair kit.
WARNING
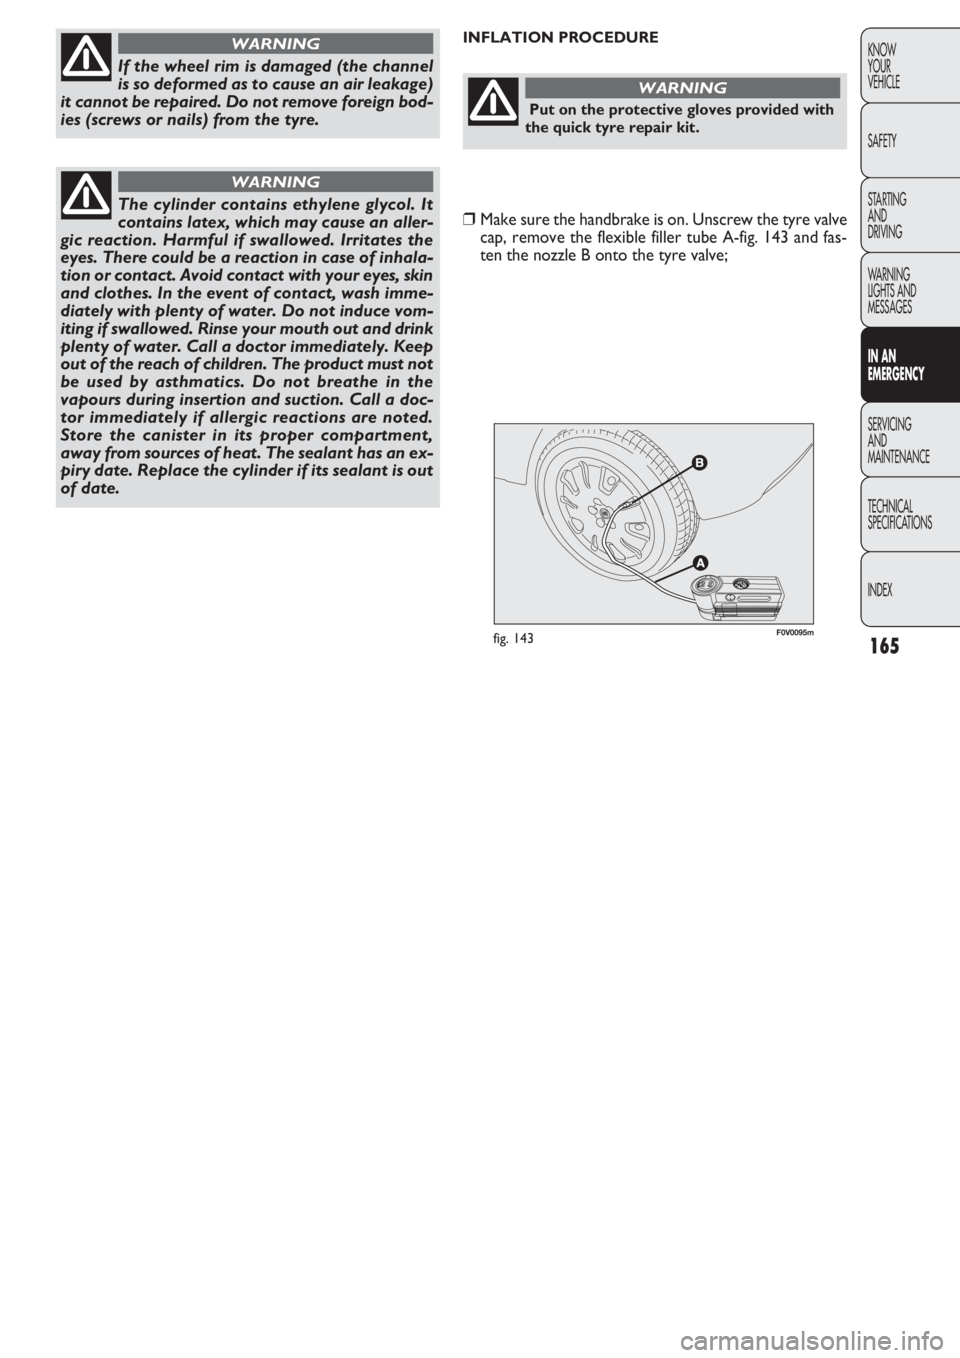
❒Make sure the handbrake is on. Unscrew the tyre valve
cap, remove the flexible filler tube A-fig. 143 and fas-
ten the nozzle B onto the tyre valve;
Page 167 of 274
166
KNOW
YOUR
VEHICLE
SAFETY
STARTING
AND
DRIVING
WARNING
LIGHTS AND
MESSAGES
IN AN
EMERGENCY
SERVICING
AND
MAINTENANCE
TECHNICAL
SPECIFICATIONS
INDEX
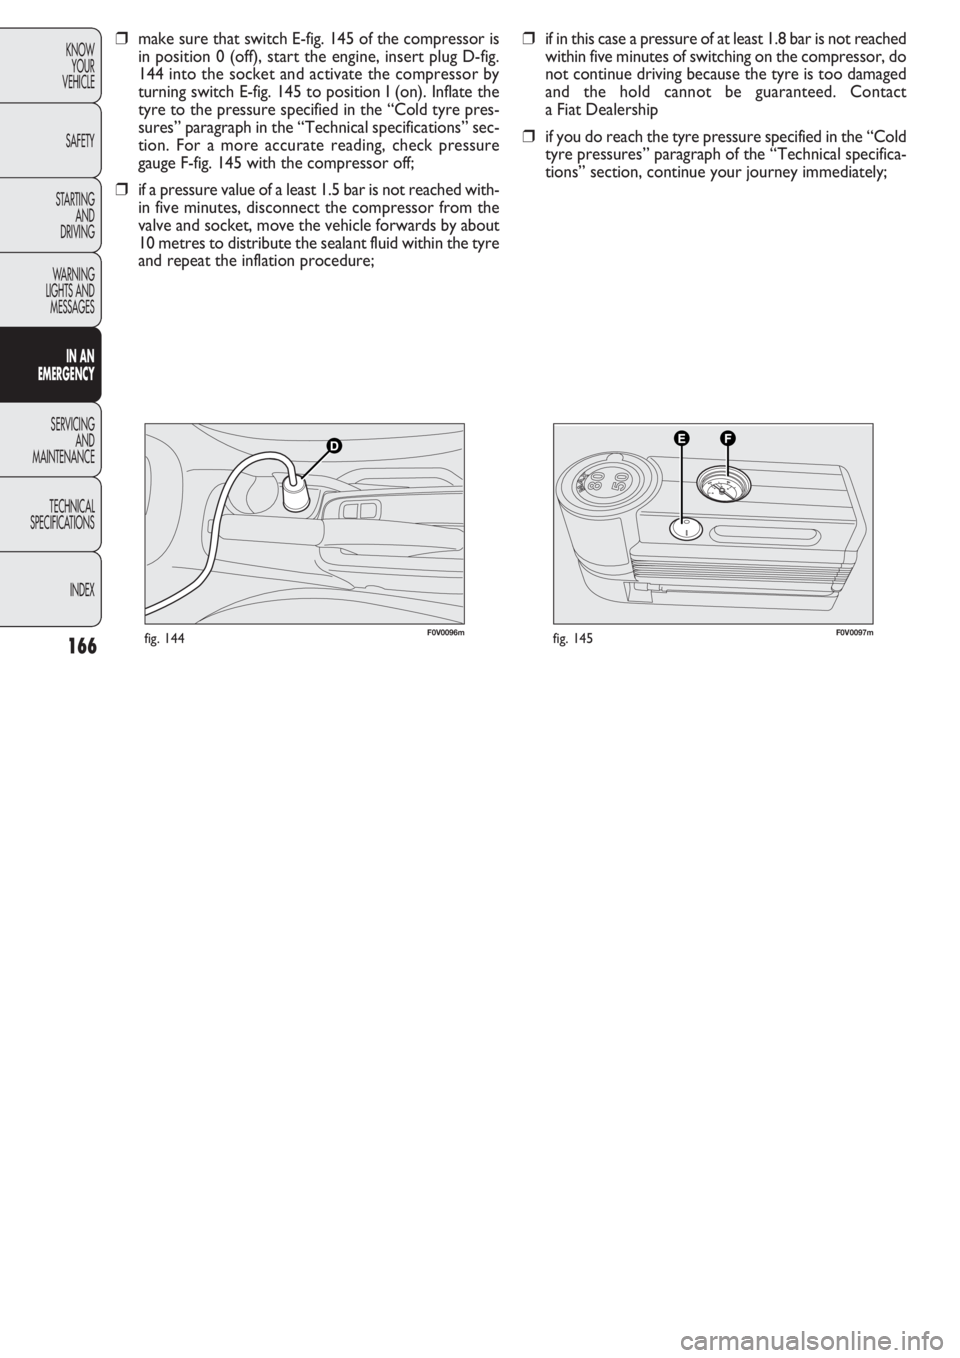
F0V0096mfig. 144F0V0097mfig. 145
❒if in this case a pressure of at least 1.8 bar is not reached
within five minutes of switching on the compressor, do
not continue driving because the tyre is too damaged
and the hold cannot be guaranteed. Contact
a Fiat Dealership
❒if you do reach the tyre pressure specified in the “Cold
tyre pressures” paragraph of the “Technical specifica-
tions” section, continue your journey immediately; ❒make sure that switch E-fig. 145 of the compressor is
in position 0 (off), start the engine, insert plug D-fig.
144 into the socket and activate the compressor by
turning switch E-fig. 145 to position I (on). Inflate the
tyre to the pressure specified in the “Cold tyre pres-
sures” paragraph in the “Technical specifications” sec-
tion. For a more accurate reading, check pressure
gauge F-fig. 145 with the compressor off;
❒if a pressure value of a least 1.5 bar is not reached with-
in five minutes, disconnect the compressor from the
valve and socket, move the vehicle forwards by about
10 metres to distribute the sealant fluid within the tyre
and repeat the inflation procedure;
Page 168 of 274
167
KNOW
YOUR
VEHICLE
SAFETY
STARTING
AND
DRIVING
WARNING
LIGHTS AND
MESSAGES
IN AN
EMERGENCY
SERVICING
AND
MAINTENANCE
TECHNICAL
SPECIFICATIONS
INDEX
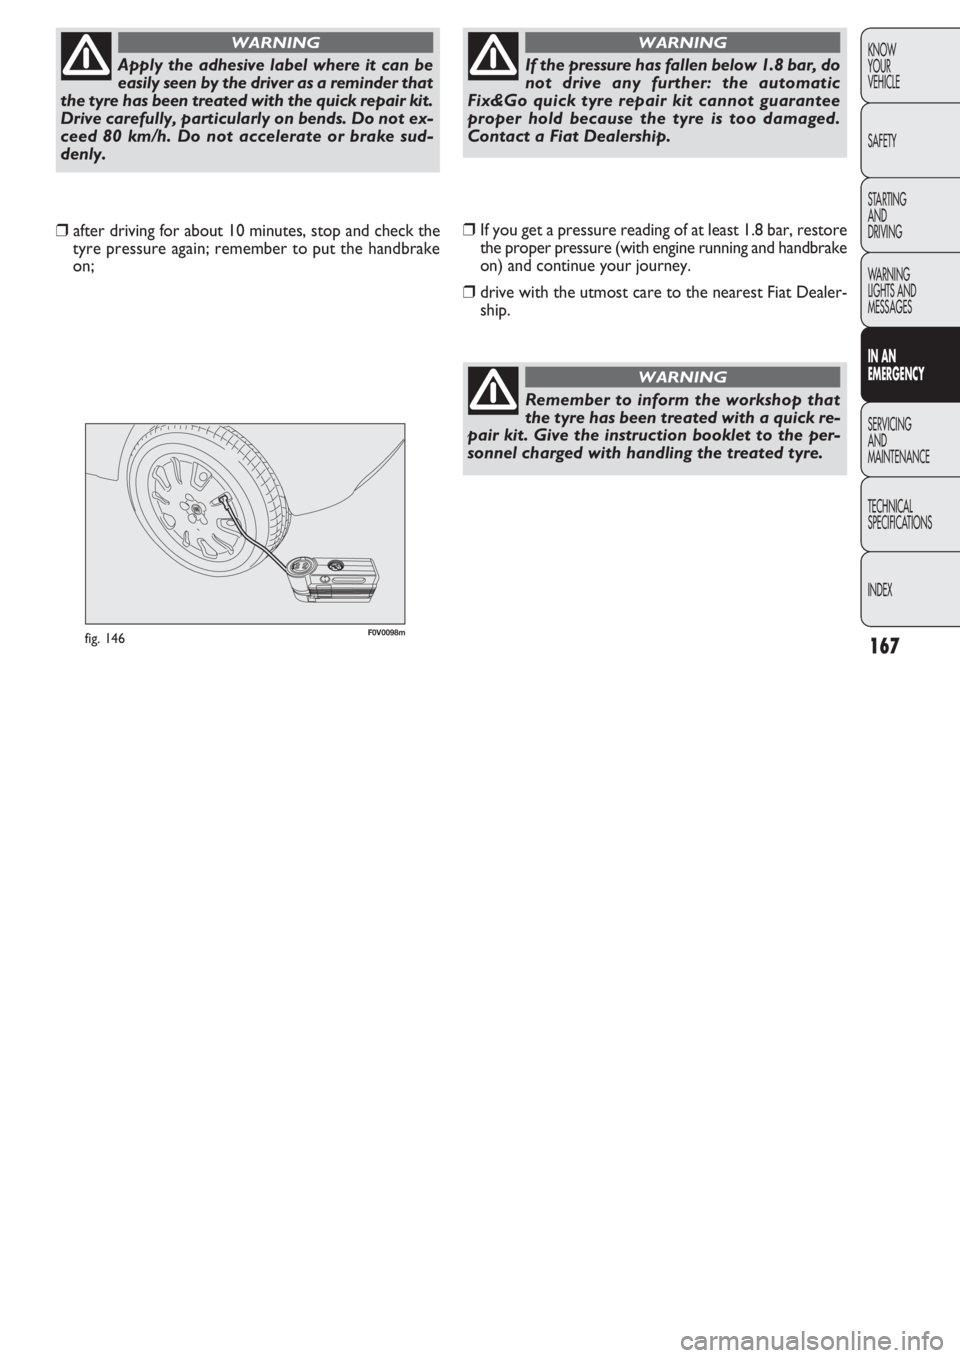
F0V0098mfig. 146
❒If you get a pressure reading of at least 1.8 bar, restore
the proper pressure (with engine running and handbrake
on) and continue your journey.
❒drive with the utmost care to the nearest Fiat Dealer-
ship. ❒after driving for about 10 minutes, stop and check the
tyre pressure again; remember to put the handbrake
on;
Apply the adhesive label where it can be
easily seen by the driver as a reminder that
the tyre has been treated with the quick repair kit.
Drive carefully, particularly on bends. Do not ex-
ceed 80 km/h. Do not accelerate or brake sud-
denly.
WARNING
If the pressure has fallen below 1.8 bar, do
not drive any further: the automatic
Fix&Go quick tyre repair kit cannot guarantee
proper hold because the tyre is too damaged.
Contact a Fiat Dealership.
WARNING
Remember to inform the workshop that
the tyre has been treated with a quick re-
pair kit. Give the instruction booklet to the per-
sonnel charged with handling the treated tyre.
WARNING
Page 169 of 274
168
KNOW
YOUR
VEHICLE
SAFETY
STARTING
AND
DRIVING
WARNING
LIGHTS AND
MESSAGES
IN AN
EMERGENCY
SERVICING
AND
MAINTENANCE
TECHNICAL
SPECIFICATIONS
INDEX
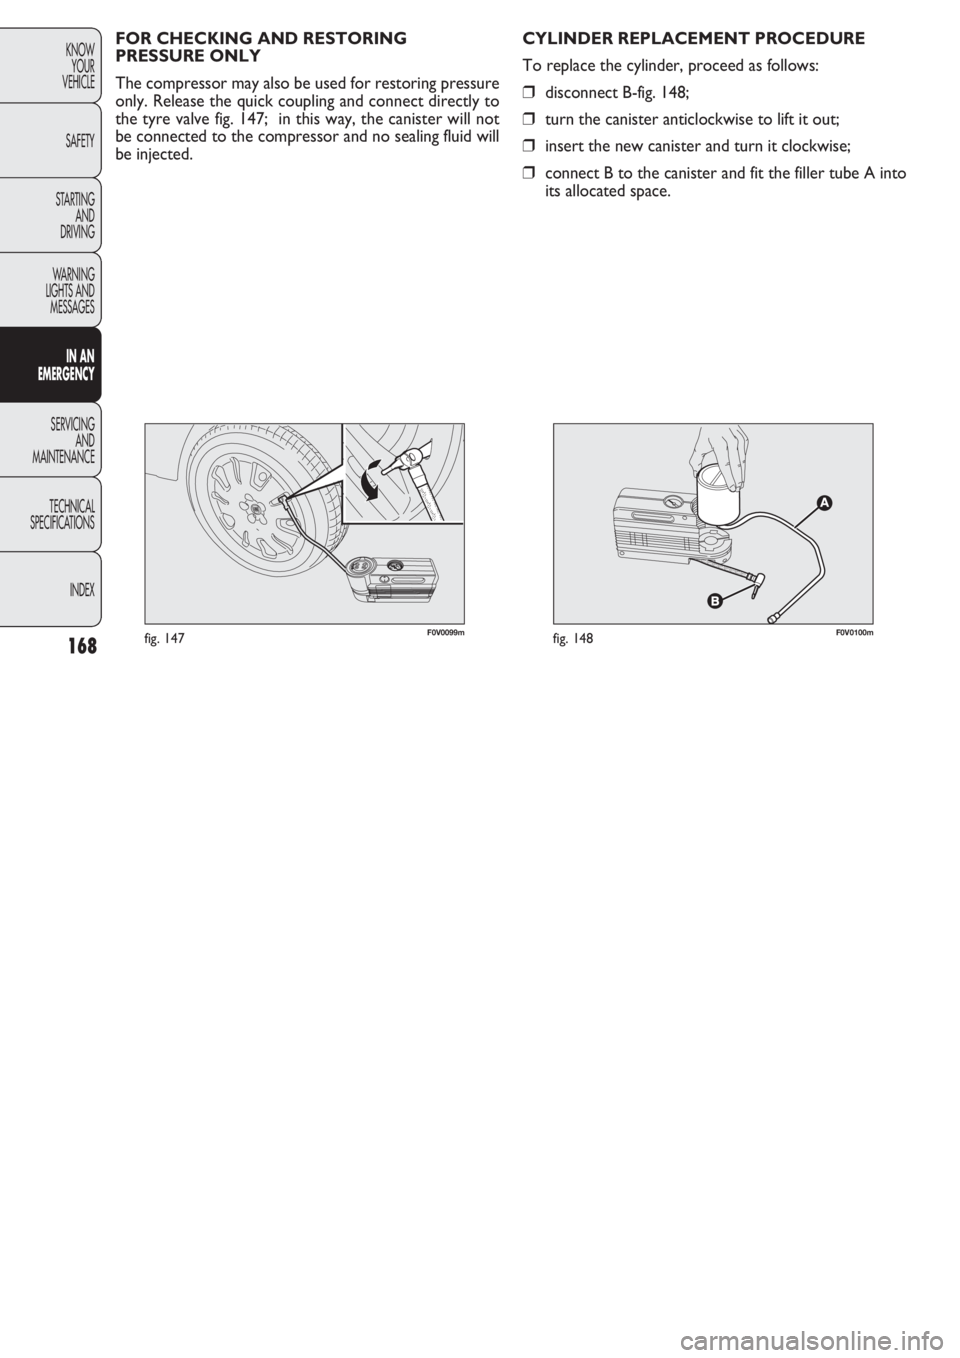
F0V0099mfig. 147F0V0100mfig. 148
CYLINDER REPLACEMENT PROCEDURE
To replace the cylinder, proceed as follows:
❒disconnect B-fig. 148;
❒turn the canister anticlockwise to lift it out;
❒insert the new canister and turn it clockwise;
❒connect B to the canister and fit the filler tube A into
its allocated space. FOR CHECKING AND RESTORING
PRESSURE ONLY
The compressor may also be used for restoring pressure
only. Release the quick coupling and connect directly to
the tyre valve fig. 147; in this way, the canister will not
be connected to the compressor and no sealing fluid will
be injected.
Page 170 of 274
169
KNOW
YOUR
VEHICLE
SAFETY
STARTING
AND
DRIVING
WARNING
LIGHTS AND
MESSAGES
IN AN
EMERGENCY
SERVICING
AND
MAINTENANCE
TECHNICAL
SPECIFICATIONS
INDEX
CHANGING A BULB
GENERAL INSTRUCTIONS
❒Before changing a bulb, check the contacts for rusting;
❒burnt-out bulbs must be replaced by others of the same
type and wattage;
❒always check the direction of the beam after changing
a headlight bulb;
❒when a light is not working, check that the corre-
sponding fuse is intact before changing the bulb. For the
location of fuses, refer to the “Changing a fuse” para-
graph in this section.
Changes or repairs to the electrical system
carried out incorrectly and without due
consideration for the technical specifications of
the system can lead to malfunctioning and gen-
erate a fire hazard.
WARNING
Halogen lamps contain pressurised gas. If
they break, glass fragments could fly every-
where.
WARNING
Touch only the metal part of a halogen
lamp. Touching the transparent part of the
bulb with your fingers may reduce the in-
tensity of the emitted light and even reduce the
lifespan of the bulb. If you do touch it accidental-
ly, rub the bulb with an alcohol-soaked cloth and
leave to dry.
If possible, we recommend that you let
a Fiat Dealership replace the bulbs. Prop-
er operation and orientation of the exter-
nal lights are essential for driving safety and com-
plying with the law.
IMPORTANT The internal surface of the light may appear
slightly misty: this does not indicate a fault, and is actually
caused by low temperature and the degree of humidity
in the air. Misting will rapidly disappear when the head-
lights are switched on. The presence of drops inside the
headlights indicates infiltration of water. Go to a Fiat Deal-
ership.
Page 171 of 274
170
KNOW
YOUR
VEHICLE
SAFETY
STARTING
AND
DRIVING
WARNING
LIGHTS AND
MESSAGES
IN AN
EMERGENCY
SERVICING
AND
MAINTENANCE
TECHNICAL
SPECIFICATIONS
INDEX
F0V0027mfig. 149
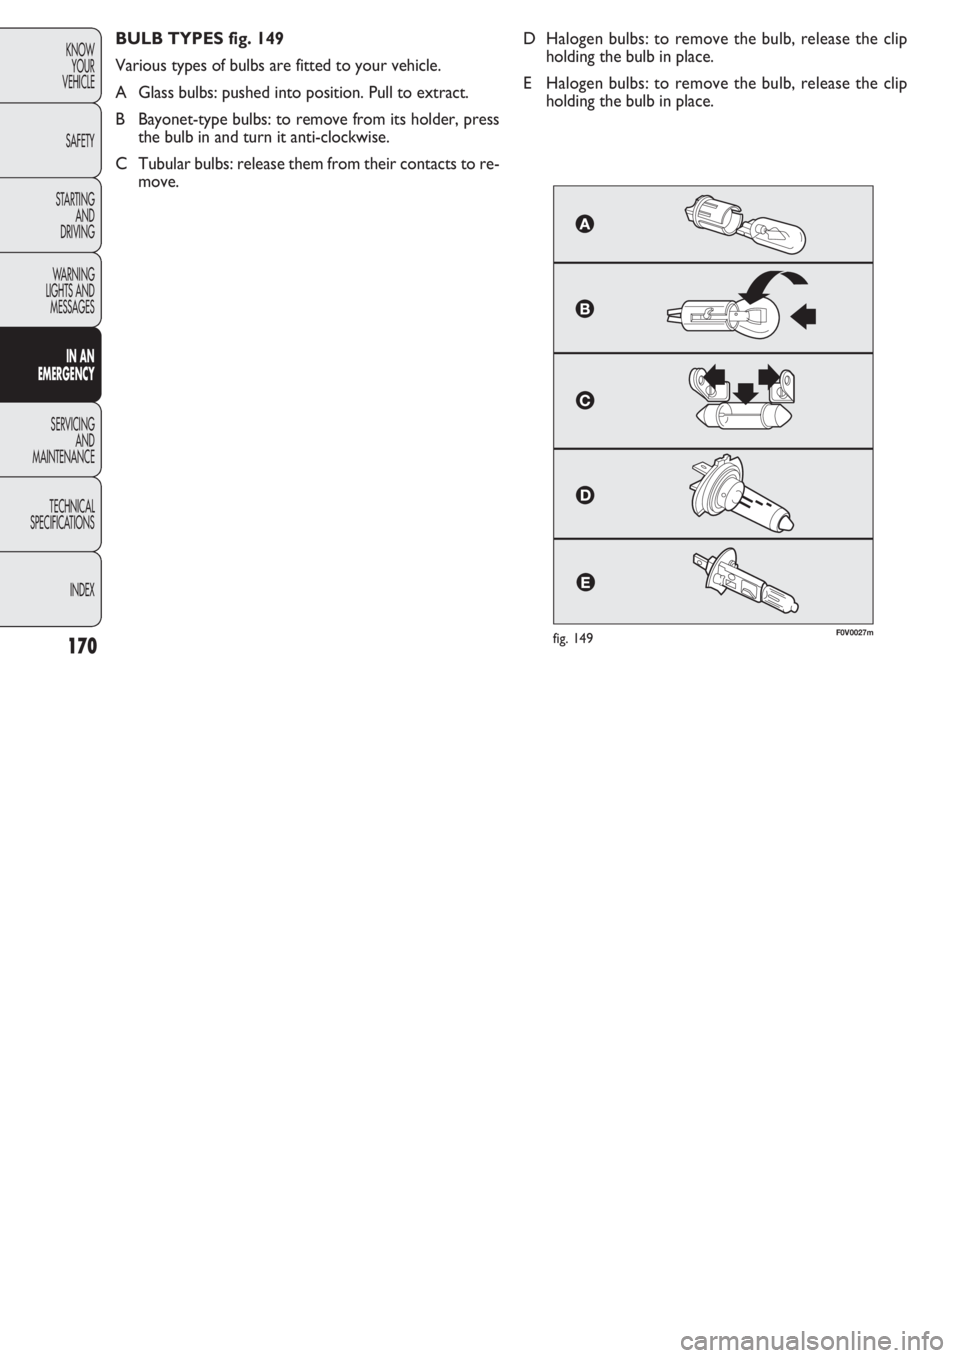
BULB TYPES fig. 149
Various types of bulbs are fitted to your vehicle.
A Glass bulbs: pushed into position. Pull to extract.
B Bayonet-type bulbs: to remove from its holder, press
the bulb in and turn it anti-clockwise.
C Tubular bulbs: release them from their contacts to re-
move.D Halogen bulbs: to remove the bulb, release the clip
holding the bulb in place.
E Halogen bulbs: to remove the bulb, release the clip
holding the bulb in place.
Page 172 of 274
171
KNOW
YOUR
VEHICLE
SAFETY
STARTING
AND
DRIVING
WARNING
LIGHTS AND
MESSAGES
IN AN
EMERGENCY
SERVICING
AND
MAINTENANCE
TECHNICAL
SPECIFICATIONS
INDEX
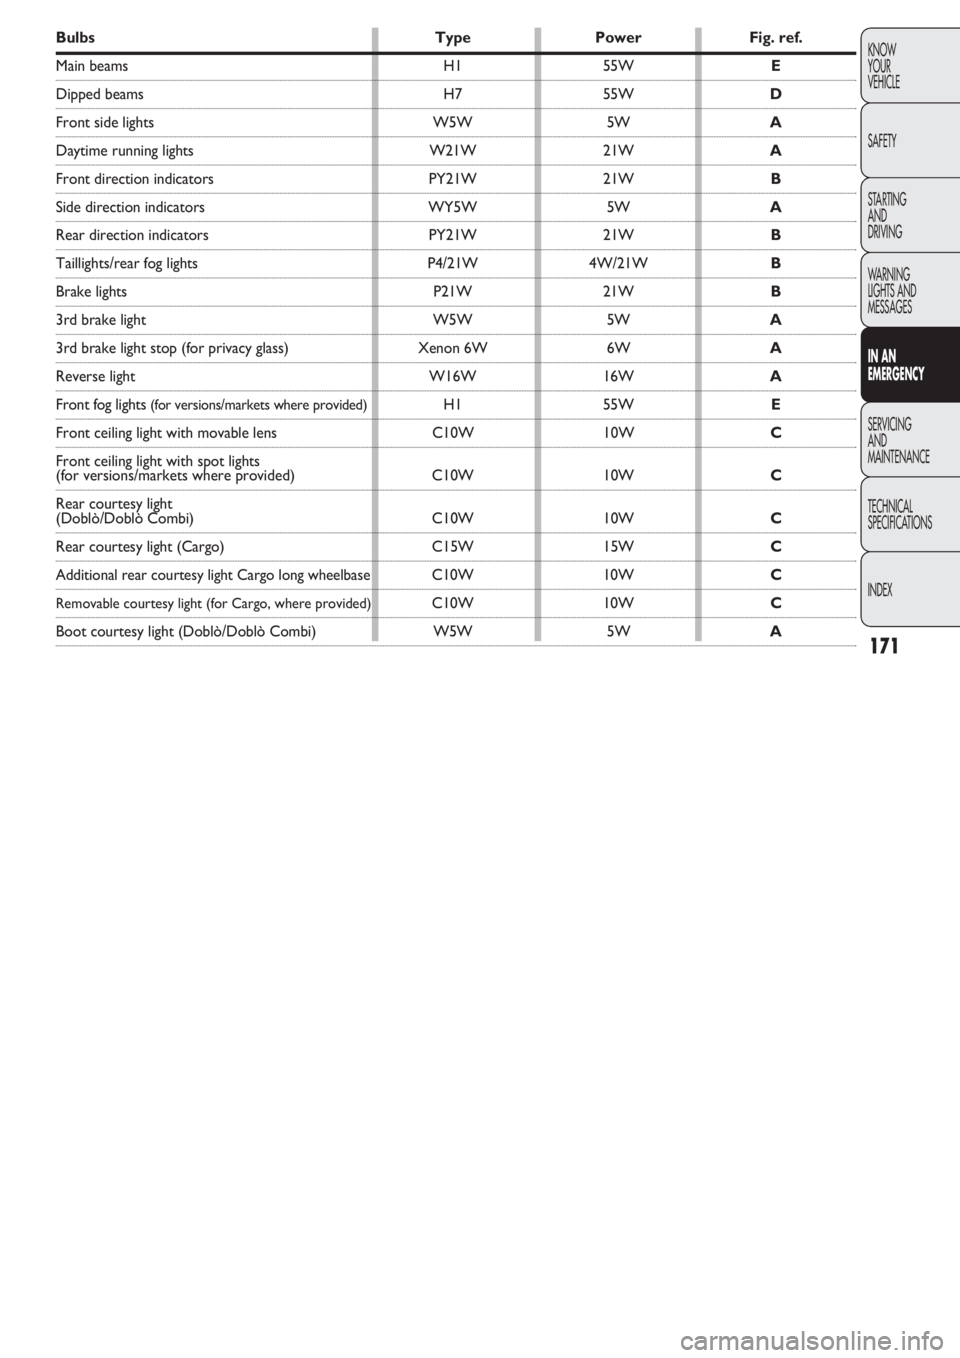
Bulbs Type Power Fig. ref.
Main beams H1 55W E
Dipped beams H7 55WD
Front side lights W5W 5WA
Daytime running lights W21W 21WA
Front direction indicators PY21W 21WB
Side direction indicators WY5W 5WA
Rear direction indicators PY21W 21WB
Taillights/rear fog lights P4/21W 4W/21WB
Brake lights P21W 21WB
3rd brake light W5W 5WA
3rd brake light stop (for privacy glass) Xenon 6W 6WA
Reverse light W16W 16WA
Front fog lights (for versions/markets where provided)H1 55WE
Front ceiling light with movable lens C10W 10WC
Front ceiling light with spot lights
(for versions/markets where provided) C10W 10WC
Rear courtesy light
(Doblò/Doblò Combi) C10W 10WC
Rear courtesy light (Cargo) C15W 15WC
Additional rear courtesy light Cargo long wheelbaseC10W 10WC
Removable courtesy light (for Cargo, where provided)C10W 10WC
Boot courtesy light (Doblò/Doblò Combi) W5W 5WA