technical specifications FIAT DUCATO 2007 Owner handbook (in English)
[x] Cancel search | Manufacturer: FIAT, Model Year: 2007, Model line: DUCATO, Model: FIAT DUCATO 2007Pages: 282, PDF Size: 4.49 MB
Page 185 of 282
184
WARNING
LIGHTS AND
MESSAGES
VEHICLE
MAINTENANCE
TECHNICAL
SPECIFICATIONS
IINDEX
DASHBOARD
AND CONTROLS
SAFETY
DEVICES
CORRECT USE
OF THE
VEHICLE
IN AN
EMERGENCY
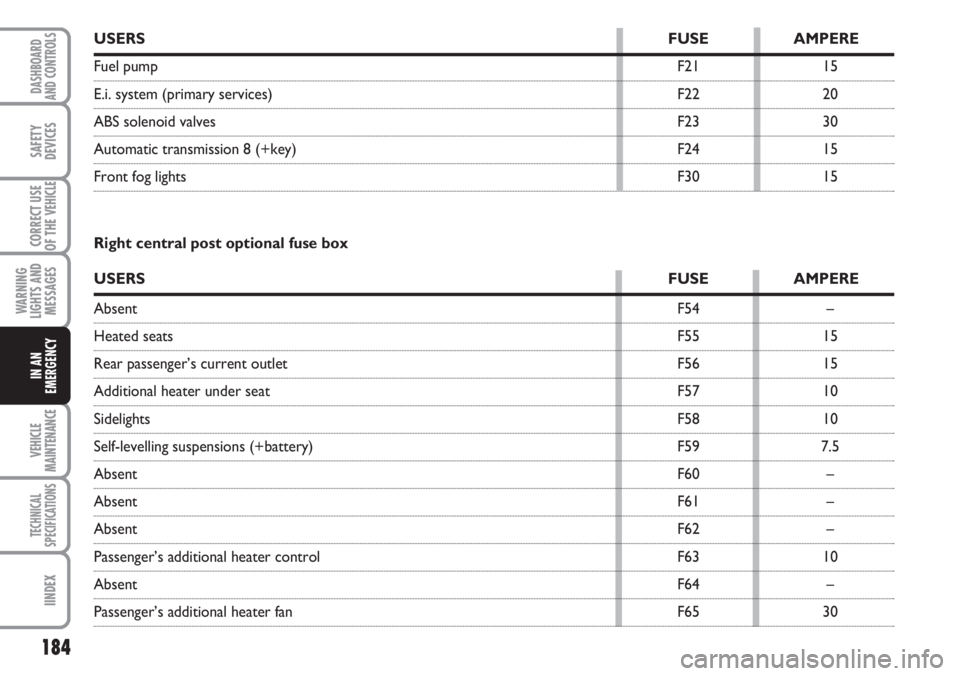
USERSFUSE AMPERE
Fuel pump F21 15
E.i. system (primary services) F22 20
ABS solenoid valves F23 30
Automatic transmission 8 (+key) F24 15
Front fog lightsF30 15
Right central post optional fuse box
USERSFUSE AMPERE
AbsentF54 –
Heated seatsF55 15
Rear passenger’s current outlet F56 15
Additional heater under seat F57 10
SidelightsF58 10
Self-levelling suspensions (+battery) F59 7.5
AbsentF60 –
AbsentF61 –
AbsentF62 –
Passenger’s additional heater control F63 10
AbsentF64 –
Passenger’s additional heater fan F65 30
Page 186 of 282
185
WARNING
LIGHTS AND
MESSAGES
VEHICLE
MAINTENANCE
TECHNICAL
SPECIFICATIONS
INDEX
DASHBOARD
AND CONTROLS
SAFETY
DEVICES
CORRECT USE
OF THE
VEHICLE
IN AN
EMERGENCY
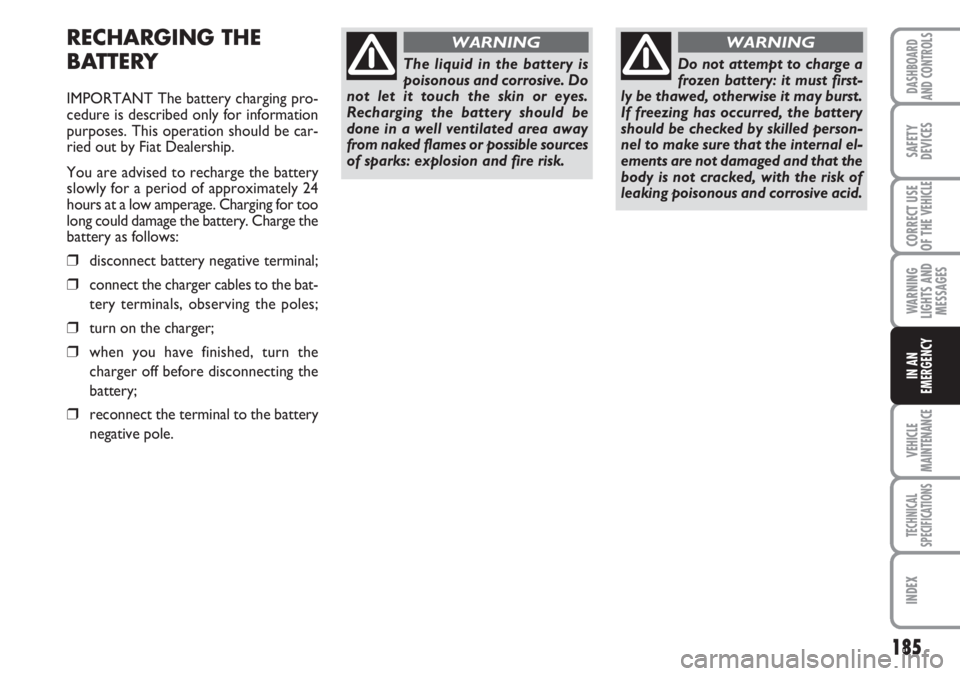
RECHARGING THE
BATTERY
IMPORTANT The battery charging pro-
cedure is described only for information
purposes. This operation should be car-
ried out by Fiat Dealership.
You are advised to recharge the battery
slowly for a period of approximately 24
hours at a low amperage. Charging for too
long could damage the battery. Charge the
battery as follows:
❒disconnect battery negative terminal;
❒connect the charger cables to the bat-
tery terminals, observing the poles;
❒turn on the charger;
❒when you have finished, turn the
charger off before disconnecting the
battery;
❒reconnect the terminal to the battery
negative pole.
The liquid in the battery is
poisonous and corrosive. Do
not let it touch the skin or eyes.
Recharging the battery should be
done in a well ventilated area away
from naked flames or possible sources
of sparks: explosion and fire risk.
WARNING
Do not attempt to charge a
frozen battery: it must first-
ly be thawed, otherwise it may burst.
If freezing has occurred, the battery
should be checked by skilled person-
nel to make sure that the internal el-
ements are not damaged and that the
body is not cracked, with the risk of
leaking poisonous and corrosive acid.
WARNING
Page 187 of 282
186
WARNING
LIGHTS AND
MESSAGES
VEHICLE
MAINTENANCE
TECHNICAL
SPECIFICATIONS
IINDEX
DASHBOARD
AND CONTROLS
SAFETY
DEVICES
CORRECT USE
OF THE
VEHICLE
IN AN
EMERGENCY
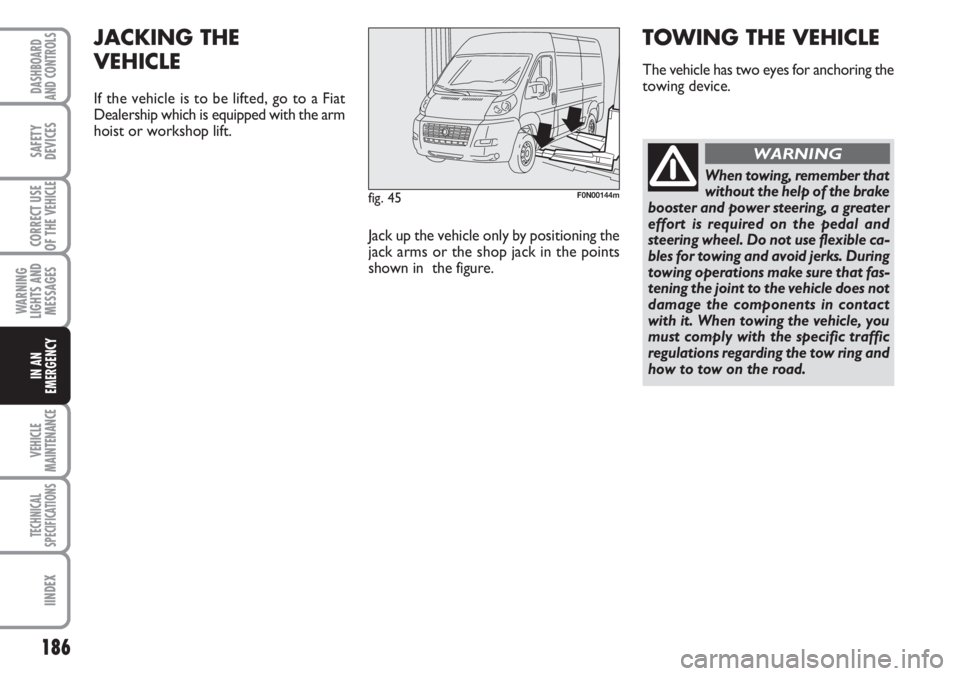
fig. 45F0N00144m
JACKING THE
VEHICLE
If the vehicle is to be lifted, go to a Fiat
Dealership which is equipped with the arm
hoist or workshop lift.
Jack up the vehicle only by positioning the
jack arms or the shop jack in the points
shown in the figure.
TOWING THE VEHICLE
The vehicle has two eyes for anchoring the
towing device.
When towing, remember that
without the help of the brake
booster and power steering, a greater
effort is required on the pedal and
steering wheel. Do not use flexible ca-
bles for towing and avoid jerks. During
towing operations make sure that fas-
tening the joint to the vehicle does not
damage the components in contact
with it. When towing the vehicle, you
must comply with the specific traffic
regulations regarding the tow ring and
how to tow on the road.
WARNING
Page 188 of 282
187
WARNING
LIGHTS AND
MESSAGES
VEHICLE
MAINTENANCE
TECHNICAL
SPECIFICATIONS
INDEX
DASHBOARD
AND CONTROLS
SAFETY
DEVICES
CORRECT USE
OF THE
VEHICLE
IN AN
EMERGENCY
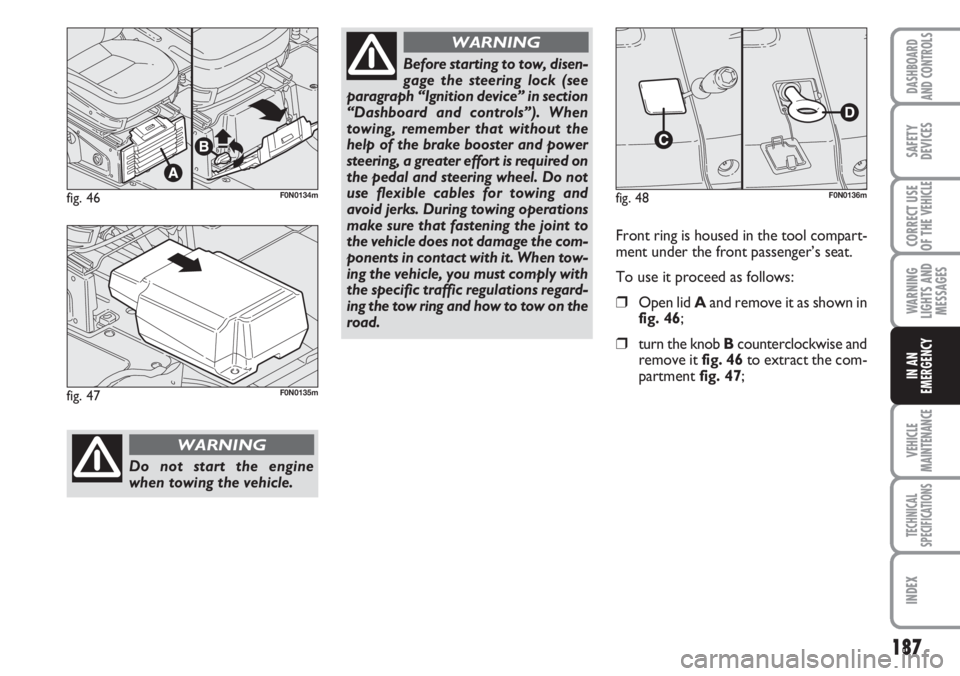
fig. 46F0N0134m
Do not start the engine
when towing the vehicle.
WARNING
Before starting to tow, disen-
gage the steering lock (see
paragraph “Ignition device” in section
“Dashboard and controls”). When
towing, remember that without the
help of the brake booster and power
steering, a greater effort is required on
the pedal and steering wheel. Do not
use flexible cables for towing and
avoid jerks. During towing operations
make sure that fastening the joint to
the vehicle does not damage the com-
ponents in contact with it. When tow-
ing the vehicle, you must comply with
the specific traffic regulations regard-
ing the tow ring and how to tow on the
road.
WARNING
fig. 47F0N0135m
fig. 48F0N0136m
Front ring is housed in the tool compart-
ment under the front passenger’s seat.
To use it proceed as follows:
❒Open lid Aand remove it as shown in
fig. 46;
❒turn the knob Bcounterclockwise and
remove it fig. 46 to extract the com-
partment fig. 47;
Page 189 of 282
188
WARNING
LIGHTS AND
MESSAGES
VEHICLE
MAINTENANCE
TECHNICAL
SPECIFICATIONS
IINDEX
DASHBOARD
AND CONTROLS
SAFETY
DEVICES
CORRECT USE
OF THE
VEHICLE
IN AN
EMERGENCY
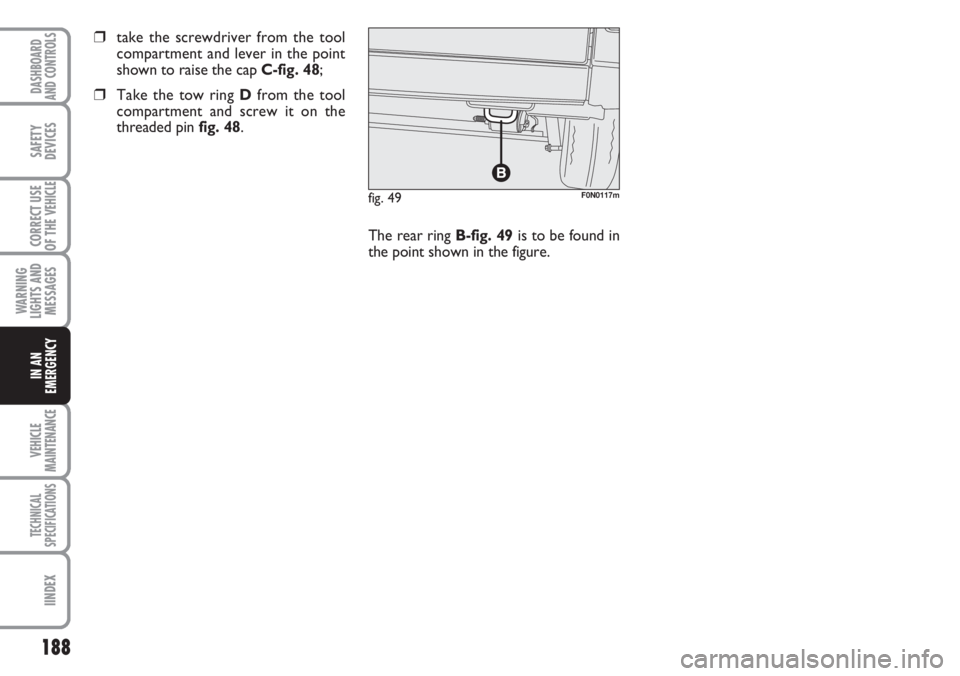
fig. 49F0N0117m
❒take the screwdriver from the tool
compartment and lever in the point
shown to raise the cap C-fig. 48;
❒Take the tow ring Dfrom the tool
compartment and screw it on the
threaded pin fig. 48.
The rear ring B-fig. 49is to be found in
the point shown in the figure.
Page 190 of 282
189
WARNING
LIGHTS AND
MESSAGES
TECHNICAL
SPECIFICATIONS
INDEX
DASHBOARD
AND CONTROLS
SAFETY
DEVICES
CORRECT USE
OF THE VEHICLE
IN AN
EMERGENCY
VEHICLE
MAINTENANCE
SCHEDULED SERVICING ................................................. 190
SERVICE SCHEDULE ............................................................. 191
ROUTINE MAINTENANCE .............................................. 195
HEAVY-DUTY ........................................................................ 195
CHECKING FLUID LEVELS ................................................. 196
AIR FILTER .............................................................................. 202
POLLEN FILTER ..................................................................... 202
BATTERY .................................................................................. 202
WHEELS AND TYRES .......................................................... 205
RUBBER HOSES ...................................................................... 206
WINDSCREEN/REAR WINDOW WIPERS.................... 206
BODYWORK .......................................................................... 208
INTERIORS ............................................................................. 210
V V
E E
H H
I I
C C
L L
E E
M M
A A
I I
N N
T T
E E
N N
A A
N N
C C
E E
Page 191 of 282
190
WARNING
LIGHTS AND
MESSAGES
TECHNICAL
SPECIFICATIONS
INDEX
DASHBOARD
AND CONTROLS
SAFETY
DEVICES
CORRECT USE
OF THE VEHICLE
IN AN
EMERGENCY
VEICHLE
MAINTENANCE
IMPORTANT The Programmed Mainte-
nance coupons are specified by the Man-
ufacturer. The failure to have them car-
ried out may invalidate the warranty.
Scheduled Servicing is performed by all Fi-
at Dealership, at pre-established times.
If during each operation, in addition to the
ones programmed, the need arises for fur-
ther replacements or repairs, these may
be carried out only with the explicit agree-
ment of the Customer.IMPORTANT You are advised to contact
Fiat Dealership in the event of any minor
operating faults, without waiting for the
next service coupon.
If your vehicle is used frequently for tow-
ing, the interval between one service
coupon and the other must be reduced.SCHEDULED SERVICING
Correct maintenance is essential for en-
suring long life to your vehicle at top con-
ditions.
This is why Fiat has programmed a series
of checks and maintenance operations
every 40,000/45,000 km according to en-
gine models.
It is however important to remember that
scheduled servicing does not completely
cover all the vehicle requirements: also
in the initial period before 40,000/45,000
km service coupon and later, between one
coupon and another, ordinary care is still
required such as for example routine
check and topping up the level of fluids,
tyre pressure check, etc...
Page 192 of 282
191
WARNING
LIGHTS AND
MESSAGES
TECHNICAL
SPECIFICATIONS
INDEX
DASHBOARD
AND CONTROLS
SAFETY
DEVICES
CORRECT USE
OF THE VEHICLE
IN AN
EMERGENCY
VEHICLE
MAINTENANCE
45 90 135 180 225
●●●●●
●●●●●
●●●●●
●●●●●
●●●●●
●●●●●
●●
●●●●●
●●●●●
●●●●●
●●●●●
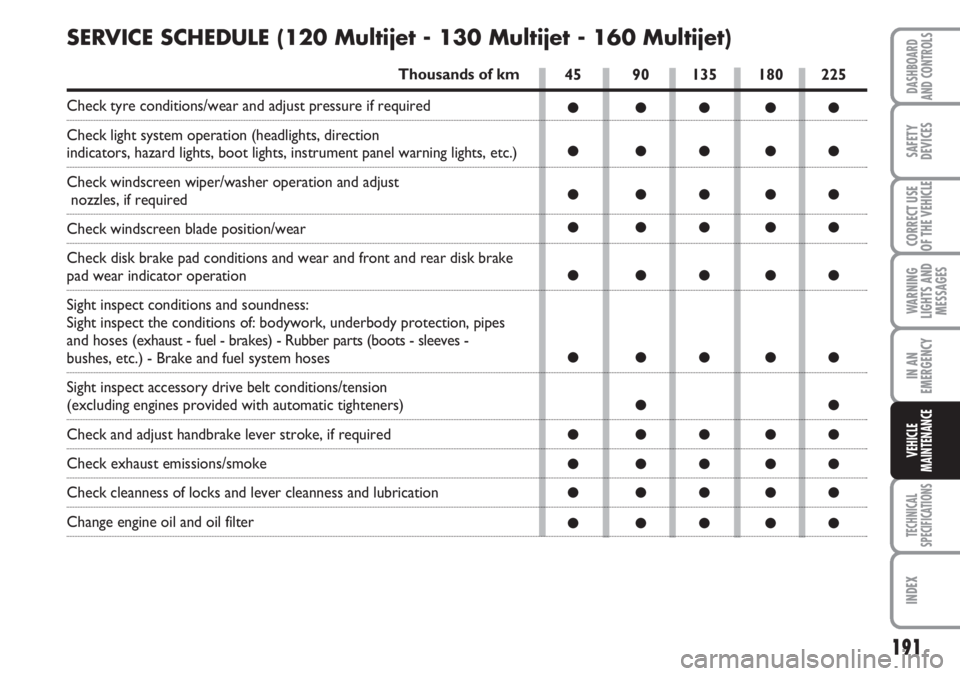
SERVICE SCHEDULE (120 Multijet - 130 Multijet - 160 Multijet)
Thousands of km
Check tyre conditions/wear and adjust pressure if required
Check light system operation (headlights, direction
indicators, hazard lights, boot lights, instrument panel warning lights, etc.)
Check windscreen wiper/washer operation and adjust
nozzles, if required
Check windscreen blade position/wear
Check disk brake pad conditions and wear and front and rear disk brake
pad wear indicator operation
Sight inspect conditions and soundness:
Sight inspect the conditions of: bodywork, underbody protection, pipes
and hoses (exhaust - fuel - brakes) - Rubber parts (boots - sleeves -
bushes, etc.) - Brake and fuel system hoses
Sight inspect accessory drive belt conditions/tension
(excluding engines provided with automatic tighteners)
Check and adjust handbrake lever stroke, if required
Check exhaust emissions/smoke
Check cleanness of locks and lever cleanness and lubrication
Change engine oil and oil filter
Page 193 of 282
192
WARNING
LIGHTS AND
MESSAGES
TECHNICAL
SPECIFICATIONS
INDEX
DASHBOARD
AND CONTROLS
SAFETY
DEVICES
CORRECT USE
OF THE VEHICLE
IN AN
EMERGENCY
VEICHLE
MAINTENANCE
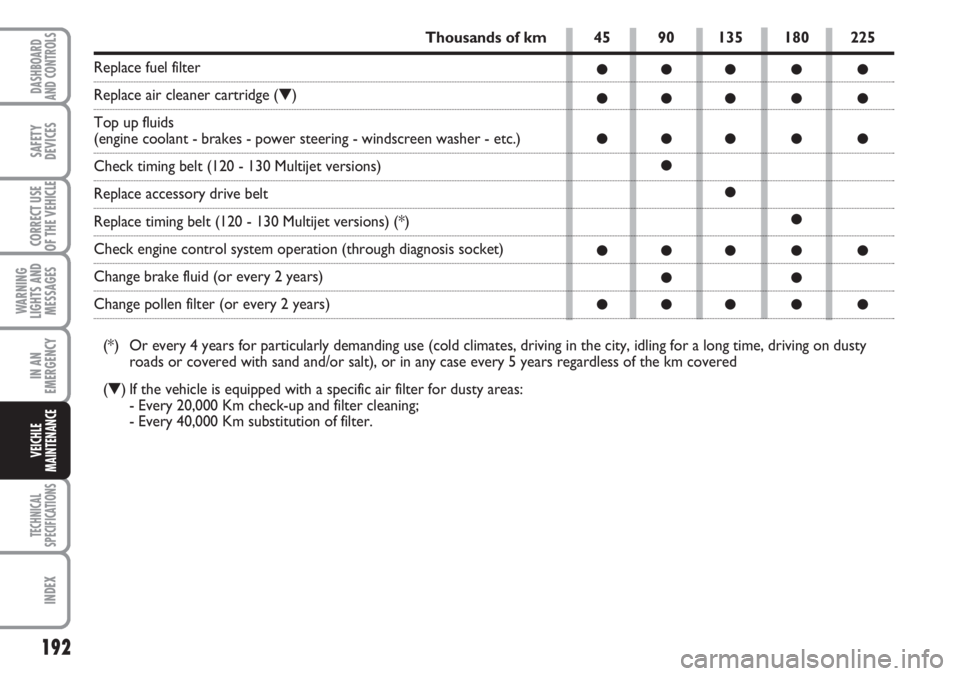
45 90 135 180 225
●●●●●
●●●●●
●●●●●
●
●
●
●●●●●
●●
●●●●●
Thousands of km
Replace fuel filter
Replace air cleaner cartridge (▼)
Top up fluids
(engine coolant - brakes - power steering - windscreen washer - etc.)
Check timing belt (120 - 130 Multijet versions)
Replace accessory drive belt
Replace timing belt (120 - 130 Multijet versions) (*)
Check engine control system operation (through diagnosis socket)
Change brake fluid (or every 2 years)
Change pollen filter (or every 2 years)
(*) Or every 4 years for particularly demanding use (cold climates, driving in the city, idling for a long time, driving on dusty
roads or covered with sand and/or salt), or in any case every 5 years regardless of the km covered
(▼) If the vehicle is equipped with a specific air filter for dusty areas:
- Every 20,000 Km check-up and filter cleaning;
- Every 40,000 Km substitution of filter.
Page 194 of 282
193
WARNING
LIGHTS AND
MESSAGES
TECHNICAL
SPECIFICATIONS
INDEX
DASHBOARD
AND CONTROLS
SAFETY
DEVICES
CORRECT USE
OF THE VEHICLE
IN AN
EMERGENCY
VEHICLE
MAINTENANCE
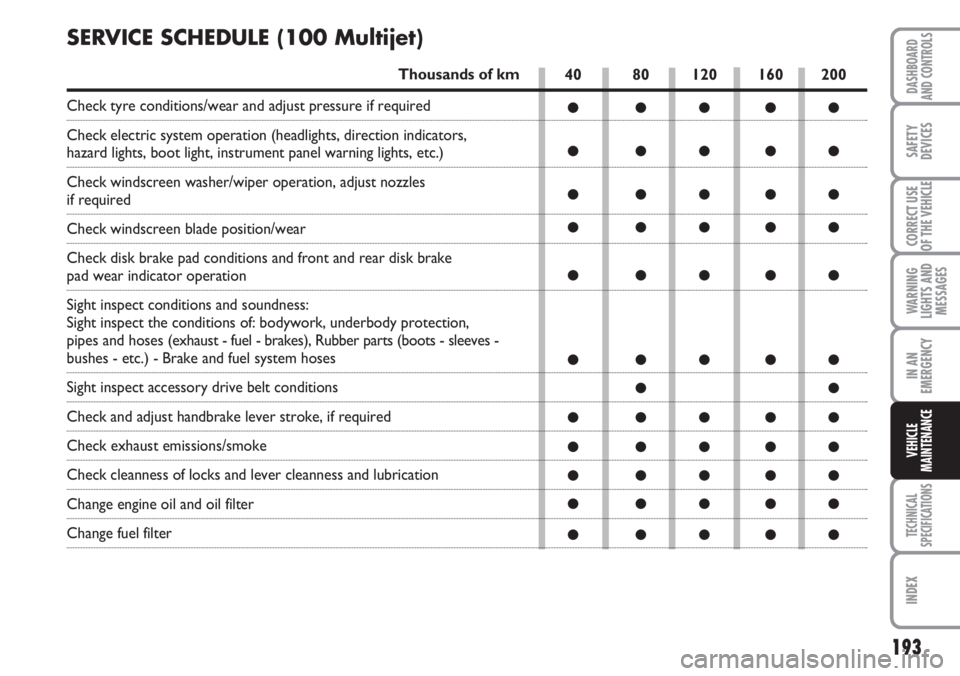
40 80 120 160 200
●●●●●
●●●●●
●●●●●
●●●●●
●●●●●
●●●●●
●●
●●●●●
●●●●●
●●●●●
●●●●●
●●●●●
SERVICE SCHEDULE (100 Multijet)
Thousands of km
Check tyre conditions/wear and adjust pressure if required
Check electric system operation (headlights, direction indicators,
hazard lights, boot light, instrument panel warning lights, etc.)
Check windscreen washer/wiper operation, adjust nozzles
if required
Check windscreen blade position/wear
Check disk brake pad conditions and front and rear disk brake
pad wear indicator operation
Sight inspect conditions and soundness:
Sight inspect the conditions of: bodywork, underbody protection,
pipes and hoses (exhaust - fuel - brakes), Rubber parts (boots - sleeves -
bushes - etc.) - Brake and fuel system hoses
Sight inspect accessory drive belt conditions
Check and adjust handbrake lever stroke, if required
Check exhaust emissions/smoke
Check cleanness of locks and lever cleanness and lubrication
Change engine oil and oil filter
Change fuel filter