tow FIAT DUCATO 2012 Owner handbook (in English)
[x] Cancel search | Manufacturer: FIAT, Model Year: 2012, Model line: DUCATO, Model: FIAT DUCATO 2012Pages: 287, PDF Size: 4.5 MB
Page 157 of 287
153
KNOWING
YOUR CAR
SAFETY
STARTING
AND
DRIVING
WARNING
LIGHTS AND
MESSAGES
IN AN
EMERGENCY
MAINTENANCE
AND CARE
TECHNICAL
SPECIFICATIONS
INDEX
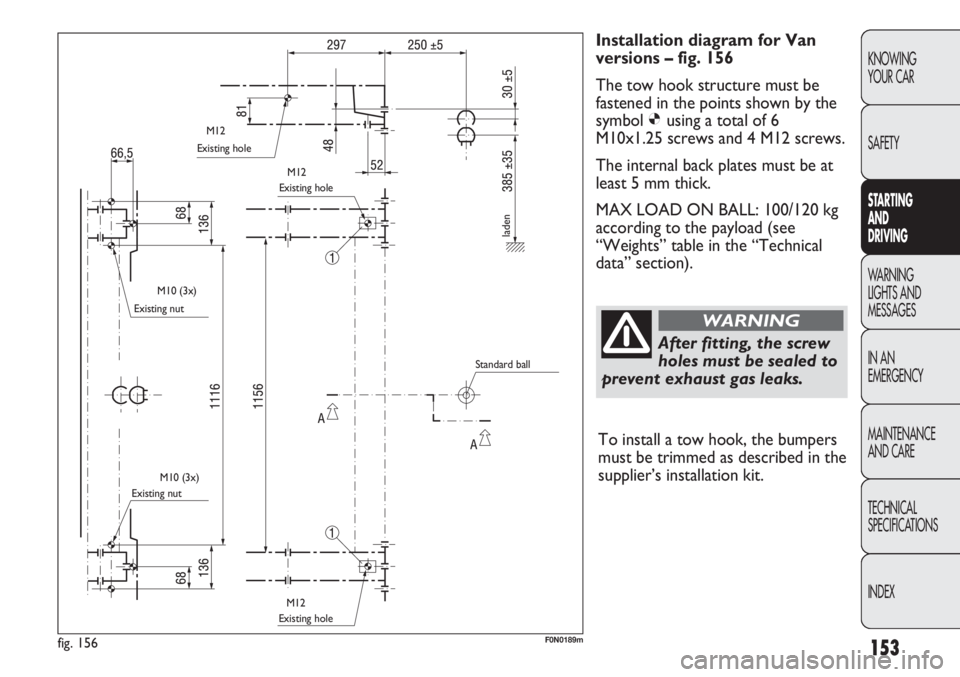
Installation diagram for Van
versions – fig. 156
The tow hook structure must be
fastened in the points shown by the
symbol Øusing a total of 6
M10x1.25 screws and 4 M12 screws.
The internal back plates must be at
least 5 mm thick.
MAX LOAD ON BALL: 100/120 kg
according to the payload (see
“Weights” table in the “Technical
data” section).
After fitting, the screw
holes must be sealed to
prevent exhaust gas leaks.
WARNING
fig. 156F0N0189m
Existing hole
Existing nut
Existing nutExisting hole
Existing hole
laden
Standard ball M12
M12
M10 (3x)
M10 (3x)
M12
To install a tow hook, the bumpers
must be trimmed as described in the
supplier’s installation kit.
Page 158 of 287
154
KNOWING
YOUR CAR
SAFETY
STARTING
AND
DRIVING
WARNING
LIGHTS AND
MESSAGES
IN AN
EMERGENCY
MAINTENANCE
AND CARE
TECHNICAL
SPECIFICATIONS
INDEX
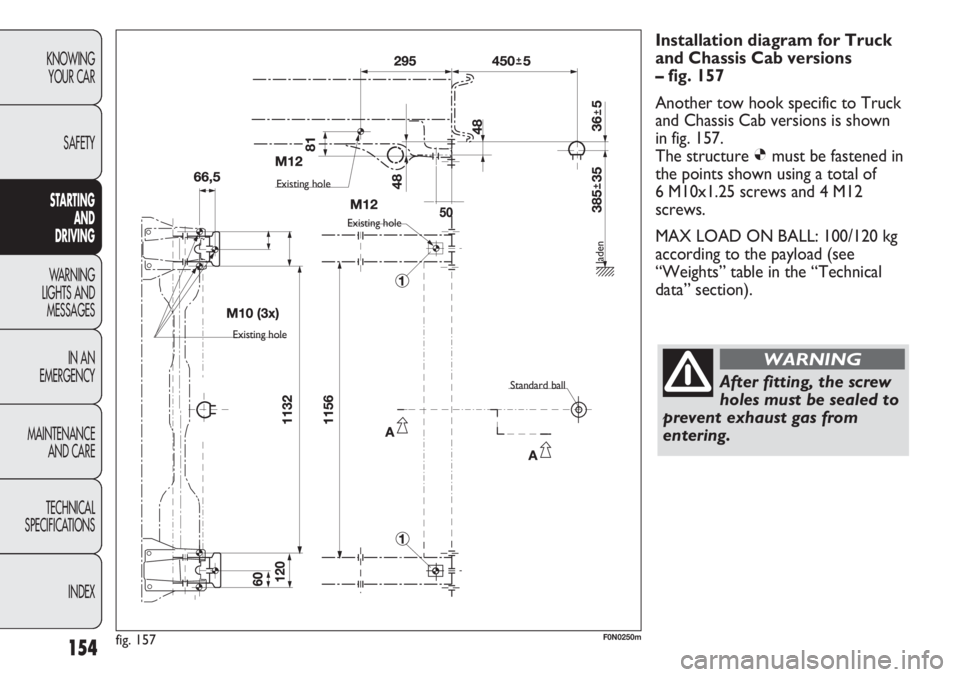
Installation diagram for Truck
and Chassis Cab versions
– fig. 157
Another tow hook specific to Truck
and Chassis Cab versions is shown
in fig. 157.
The structure Ømust be fastened in
the points shown using a total of
6 M10x1.25 screws and 4 M12
screws.
MAX LOAD ON BALL: 100/120 kg
according to the payload (see
“Weights” table in the “Technical
data” section).
After fitting, the screw
holes must be sealed to
prevent exhaust gas from
entering.
WARNING
fig. 157F0N0250m
Existing hole
Existing hole
Existing hole
Standard ball
laden
Page 162 of 287
158
KNOWING
YOUR CAR
SAFETY
STARTING
AND
DRIVING
WARNING
LIGHTS AND
MESSAGES
IN AN
EMERGENCY
MAINTENANCE
AND CARE
TECHNICAL
SPECIFICATIONS
INDEX
AIRBAG FAILURE (red)
When the key is turned to the MAR-ON
position the warning light comes on but should
go out after a few seconds.
The warning light stays on constantly if there is a failure
in the air bag system.
On some versions the display shows the dedicated
message.
The warning light ¬for airbag fault comes on if the
warning light Ffor passenger’s bag deactivation is
faulty.
¬
If when turning the key to MAR-ON
the warning light ¬does not turn on
or if it stays on when travelling, there could be
a failure in the safety systems; in this event air
bags or pretensioners may not be deployed in
the event of impact or, in a lower number of
cases, they deploy accidentally. Contact a Fiat
Dealership immediately to have the system
checked.
WARNING
HOT ENGINE COOLANT (red)
When the key is turned to the MAR-ON
position the warning light comes on but should
go out after a few seconds.
The warning light turns on when the engine is
overheated.
ç
If the warning light comes on, proceed as follows:
❒when driving normally: stop the vehicle, switch off
the engine and check that the water level in the
reservoir is not below the MIN mark. If it is not, wait
for a few minutes for the engine to cool down then
slowly and carefully open the cap, top up with
coolant and check that the level is between the MIN
and MAX marks. Also check for any fluid leaks.
If, when restarting, the warning light should come on
again, contact a Fiat Dealership.
❒heavy duty use of vehicle (e.g.: towing trailer uphill
or fully laden car): decrease speed and if the warning
light stays on, stop the vehicle. Wait for 2 or
3 minutes with the engine running and slightly
accelerated to further accelerate the coolant
circulation. Then stop the engine. Check the correct
liquid level as described above.
IMPORTANT Over demanding routes, it is advisable to
keep the engine on and slightly accelerated for a few
minutes before switching it off.
On some versions the display shows the dedicated
message.
Page 163 of 287
159
KNOWING
YOUR CAR
SAFETY
STARTING
AND
DRIVING
WARNING
LIGHTS AND
MESSAGES
IN AN
EMERGENCY
MAINTENANCE
AND CARE
TECHNICAL
SPECIFICATIONS
INDEX
2. Exhausted engine oil
(only Multijet versions with DPF)
The warning light vblinks along with a message on
the display (for versions/markets, where provided)
when the system detects that engine oil pressure is low.
If the warning light flashes, this does not mean that the
vehicle is defective, but simply informs the driver that
the oil needs to be changed as a result of regular
vehicle use. If the oil is not changed, warning light will
also come on and engine operation is limited to 3000
rpm when a second threshold is reached.
If the oil is not changed, the engine is limited to 1500
rpm to prevent damage when a third threshold is
reached.
Remember that the deterioration of the engine oil is
accelerated by:
– mainly town use of the vehicle which makes the DPF
regeneration process more frequent;
– use of the vehicle for short trips, preventing the
engine from reaching operating temperature;
– repeated interruption of the regeneration process,
signalled by the DPF warning light coming on. LOW BATTERY CHARGE (red)
The warning light comes on when the ignition
key is turned to MAR-ON, but it should go
out as soon as the engine has started (with the
engine running at idle speed a brief delay before going
out is acceptable).
If the warning light stays on constantly or keeps flashing:
contact immediately Fiat Dealership.
w
LIGHT STAYS ON: LOW ENGINE OIL
PRESSURE (red)
FLASHING: EXHAUSTED ENGINE OIL
(red)
(only Multijet versions with DPF)
When the ignition key is moved to MAR-ON, the
warning light switches on, and should go out as soon as
the engine is started.
1. Low engine oil pressure
The warning light turns on and stays on constantly
along with a message on the display (for versions/
markets where provided) when the system detects that
engine oil pressure is low.
v
If the warning light vturns on when
the car is travelling (on certain versions
together with the message on the display) stop
the engine immediately and contact a Fiat
Dealership.
WARNING
Engine oil must be replaced when warning
light vstarts blinking to avoid damage
to the engine. Contact a Fiat Dealership.
Page 174 of 287
170
KNOWING
YOUR CAR
SAFETY
STARTING
AND
DRIVING
WARNING
LIGHTS AND
MESSAGES
IN AN
EMERGENCY
MAINTENANCE
AND CARE
TECHNICAL
SPECIFICATIONS
INDEX
REPLACING A WHEEL
GENERAL INSTRUCTIONS
Wheel changing and correct use of the jack and spare
wheel (for versions/markets where provided) call for
some precautions, which are listed below. Proceed as follows to start the car:
❒raise the flap A to gain access to the positive battery
terminal fig. 157.
❒connect the positive terminals (+ sign near the
terminal) of the two batteries with a jump lead;
❒connect the negative terminal (–) of the auxiliary
battery to the earth point with a second cable as
shown in fig. 158;
❒Start the engine;
❒when the engine has been started, follow the
sequence above in reverse order to remove the
leads.
If after a few attempts the engine does not start, do not
persist but contact the nearest Fiat Dealership.
IMPORTANT Do not directly connect the negative
terminals of the two batteries: any sparks may ignite the
explosive gas which could come out of the battery.
If the auxiliary battery is installed on another vehicle,
prevent any metal parts on the latter and the vehicle
with the flat battery from accidentally coming into
contact.
BUMP STARTING
Never bump start the engine by pushing, towing or
driving downhill. This could cause a flow of fuel into the
catalytic converter and damage it beyond repair.
IMPORTANT Remember that the brake servo and the
power steering system are not activated until the engine
is started, a greater effort will therefore be required to
press the brake pedal or turn the steering wheel.Indicate that the vehicle is stationary
according to the regulations in force:
emergency lights, refracting warning triangle,
etc. Passengers should leave the vehicle,
particularly if it is very loaded, and wait for the
wheel to be changed away from on-coming
traffic. Apply the handbrake.
WARNING
The spare wheel (for versions/markets
where provided) is specific for your
vehicle. Therefore, it must not be used on
vehicles of a different model. Do not use spare
wheels of different models on your vehicle. The
wheel bolts are specific to your vehicle: do not
use them on other models and do not use bolts
of other models.
WARNING
Page 207 of 287
203
KNOWING
YOUR CAR
SAFETY
STARTING
AND
DRIVING
WARNING
LIGHTS AND
MESSAGES
IN AN
EMERGENCY
MAINTENANCE
AND CARE
TECHNICAL
SPECIFICATIONS
INDEX
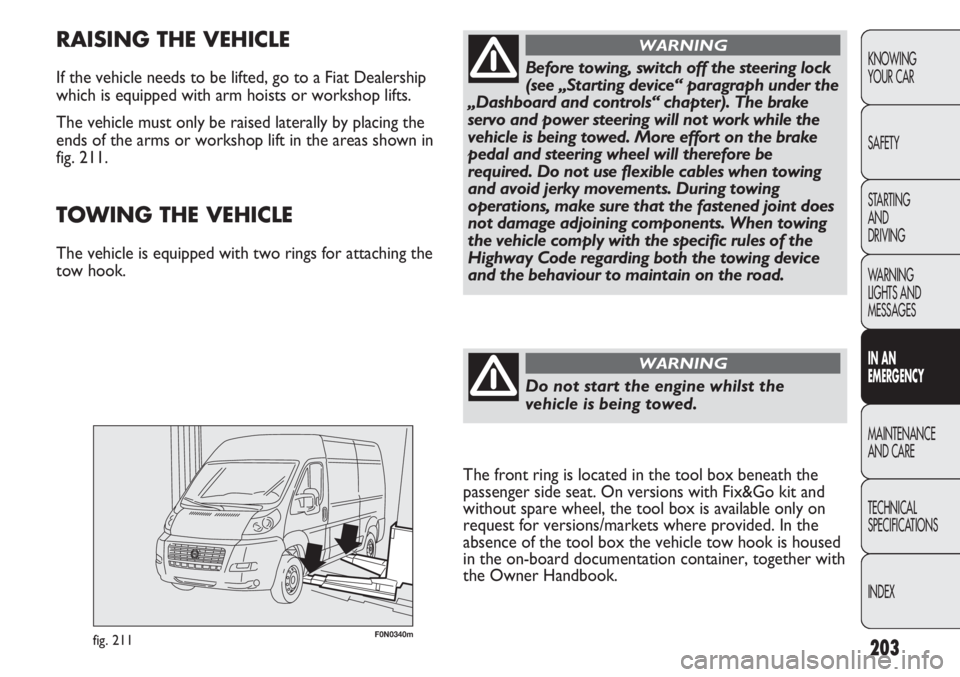
F0N0340mfig. 211
RAISING THE VEHICLE
If the vehicle needs to be lifted, go to a Fiat Dealership
which is equipped with arm hoists or workshop lifts.
The vehicle must only be raised laterally by placing the
ends of the arms or workshop lift in the areas shown in
fig. 211.
Do not start the engine whilst the
vehicle is being towed.
WARNING
Before towing, switch off the steering lock
(see „Starting device“ paragraph under the
„Dashboard and controls“ chapter). The brake
servo and power steering will not work while the
vehicle is being towed. More effort on the brake
pedal and steering wheel will therefore be
required. Do not use flexible cables when towing
and avoid jerky movements. During towing
operations, make sure that the fastened joint does
not damage adjoining components. When towing
the vehicle comply with the specific rules of the
Highway Code regarding both the towing device
and the behaviour to maintain on the road.
WARNING
TOWING THE VEHICLE
The vehicle is equipped with two rings for attaching the
tow hook.
The front ring is located in the tool box beneath the
passenger side seat. On versions with Fix&Go kit and
without spare wheel, the tool box is available only on
request for versions/markets where provided. In the
absence of the tool box the vehicle tow hook is housed
in the on-board documentation container, together with
the Owner Handbook.
Page 208 of 287
204
KNOWING
YOUR CAR
SAFETY
STARTING
AND
DRIVING
WARNING
LIGHTS AND
MESSAGES
IN AN
EMERGENCY
MAINTENANCE
AND CARE
TECHNICAL
SPECIFICATIONS
INDEX
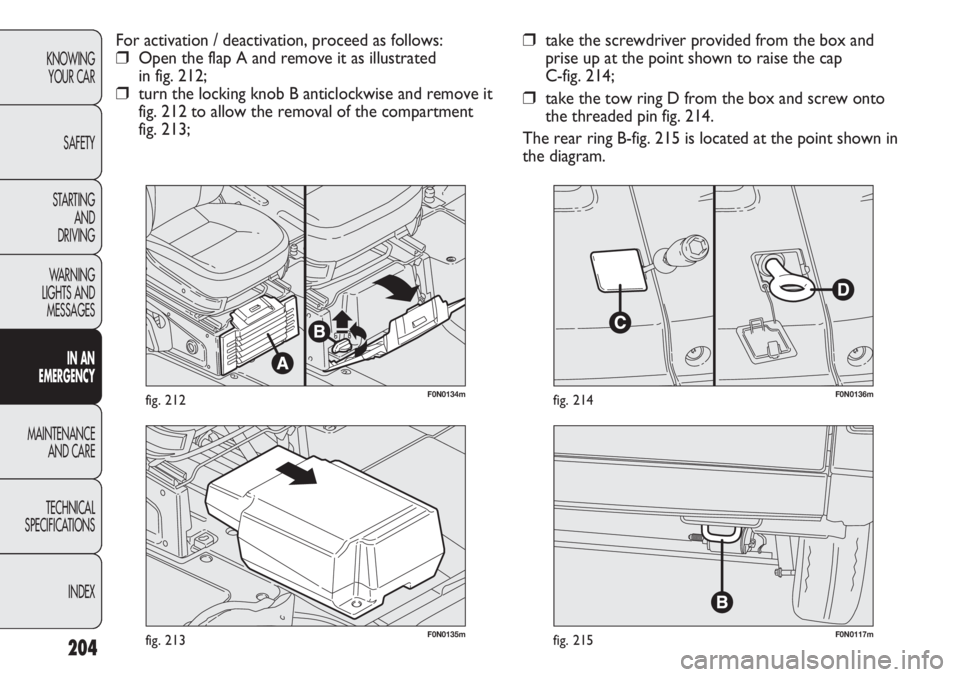
F0N0117mfig. 215F0N0135mfig. 213
F0N0136mfig. 214
❒take the screwdriver provided from the box and
prise up at the point shown to raise the cap
C-fig. 214;
❒take the tow ring D from the box and screw onto
the threaded pin fig. 214.
The rear ring B-fig. 215 is located at the point shown in
the diagram. For activation / deactivation, proceed as follows:
❒Open the flap A and remove it as illustrated
in fig. 212;
❒turn the locking knob B anticlockwise and remove it
fig. 212 to allow the removal of the compartment
fig. 213;
F0N0134mfig. 212
Page 209 of 287
205
KNOWING
YOUR CAR
SAFETY
STARTING
AND
DRIVING
WARNING
LIGHTS AND
MESSAGES
IN AN
EMERGENCY
MAINTENANCE
AND CARE
TECHNICAL
SPECIFICATIONS
INDEX
MAINTENANCE AND CARE
SCHEDULED SERVICING
Correct servicing is essential for ensuring long vehicle
life under the best conditions.
This is why Fiat has planned a series of checks and
maintenance operations every 48,000 km.
The scheduled maintenance programme does not,
however, cover all the vehicle requirements; during the
initial period, before the 48,000 kilometre service and
later on, between services, routine operations must be
carried out like systematically checking and topping up
fluid levels, checking the tyre inflation pressure, etc.IMPORTANT Scheduled Servicing coupons are specified
by the Manufacturer. Failure to have them carried out
may invalidate the warranty.
Schedule servicing can be carried out by any Fiat
Dealership, at pre-established times.
If there is a need for further replacements or repairs
during any operation in addition to those planned, prior
consent of the Customer must be obtained first.
IMPORTANT It is advisable to contact a Fiat Dealership
in the event of any minor operating failure, without
waiting for the next service coupon.
If your vehicle is used frequently for trailer towing, the
interval between scheduled maintenance services must
be reduced.
Page 211 of 287
●
●● ● ● ●
●● ● ● ●
●● ● ● ●
●● ● ● ●
●● ● ● ●
●● ● ● ●
●
●●
●
●
●● ● ● ●
●●
●● ● ● ●
207
KNOWING
YOUR CAR
SAFETY
STARTING
AND
DRIVING
WARNING
LIGHTS AND
MESSAGES
IN AN
EMERGENCY
MAINTENANCE
AND CARE
TECHNICAL
SPECIFICATIONS
INDEX
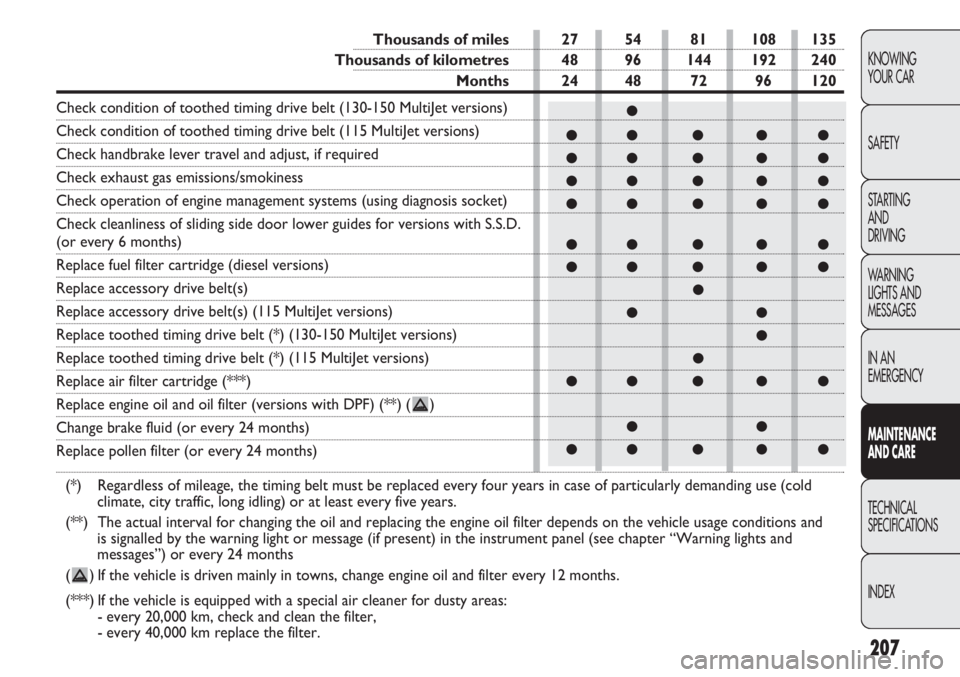
Thousands of miles 27 54 81 108 135
Thousands of kilometres 48 96 144 192 240
Months 24 48 72 96 120
Check condition of toothed timing drive belt (130-150 MultiJet versions)
Check condition of toothed timing drive belt (115 MultiJet versions)
Check handbrake lever travel and adjust, if required
Check exhaust gas emissions/smokiness
Check operation of engine management systems (using diagnosis socket)
Check cleanliness of sliding side door lower guides for versions with S.S.D.
(or every 6 months)
Replace fuel filter cartridge (diesel versions)
Replace accessory drive belt(s)
Replace accessory drive belt(s) (115 MultiJet versions)
Replace toothed timing drive belt (*) (130-150 MultiJet versions)
Replace toothed timing drive belt (*) (115 MultiJet versions)
Replace air filter cartridge (***)
Replace engine oil and oil filter (versions with DPF) (**) ( )
Change brake fluid (or every 24 months)
Replace pollen filter (or every 24 months)
(*) Regardless of mileage, the timing belt must be replaced every four years in case of particularly demanding use (cold
climate, city traffic, long idling) or at least every five years.
(**) The actual interval for changing the oil and replacing the engine oil filter depends on the vehicle usage conditions and
is signalled by the warning light or message (if present) in the instrument panel (see chapter “Warning lights and
messages”) or every 24 months
( ) If the vehicle is driven mainly in towns, change engine oil and filter every 12 months.
(***) If the vehicle is equipped with a special air cleaner for dusty areas:
- every 20,000 km, check and clean the filter,
- every 40,000 km replace the filter.
Page 212 of 287
208
KNOWING
YOUR CAR
SAFETY
STARTING
AND
DRIVING
WARNING
LIGHTS AND
MESSAGES
IN AN
EMERGENCY
MAINTENANCE
AND CARE
TECHNICAL
SPECIFICATIONS
INDEX
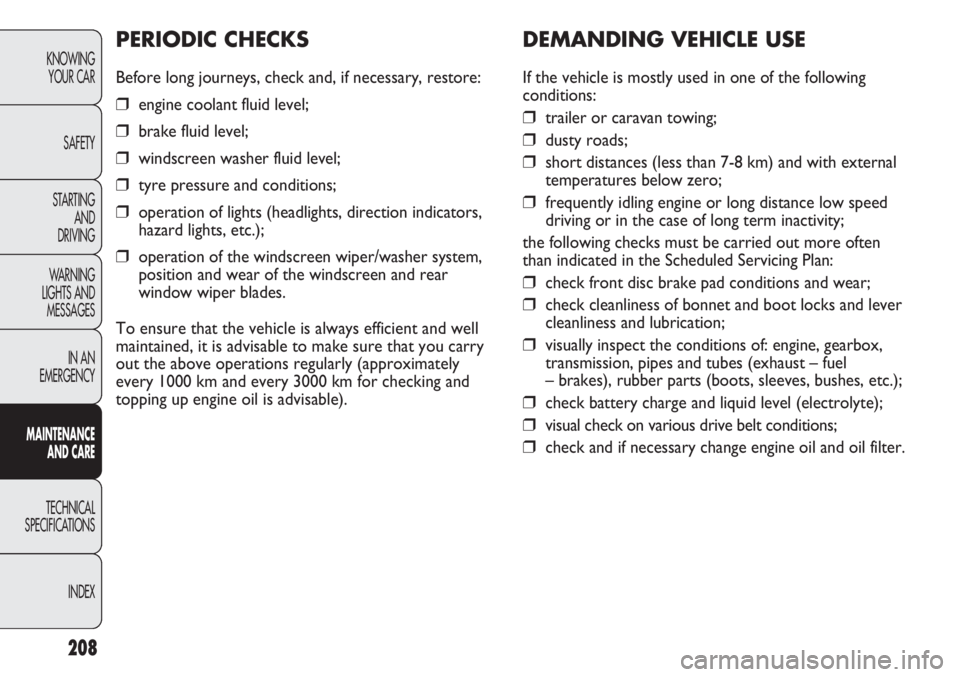
DEMANDING VEHICLE USE
If the vehicle is mostly used in one of the following
conditions:
❒trailer or caravan towing;
❒dusty roads;
❒short distances (less than 7-8 km) and with external
temperatures below zero;
❒frequently idling engine or long distance low speed
driving or in the case of long term inactivity;
the following checks must be carried out more often
than indicated in the Scheduled Servicing Plan:
❒check front disc brake pad conditions and wear;
❒check cleanliness of bonnet and boot locks and lever
cleanliness and lubrication;
❒visually inspect the conditions of: engine, gearbox,
transmission, pipes and tubes (exhaust – fuel
– brakes), rubber parts (boots, sleeves, bushes, etc.);
❒check battery charge and liquid level (electrolyte);
❒visual check on various drive belt conditions;
❒check and if necessary change engine oil and oil filter.
PERIODIC CHECKS
Before long journeys, check and, if necessary, restore:
❒engine coolant fluid level;
❒brake fluid level;
❒windscreen washer fluid level;
❒tyre pressure and conditions;
❒operation of lights (headlights, direction indicators,
hazard lights, etc.);
❒operation of the windscreen wiper/washer system,
position and wear of the windscreen and rear
window wiper blades.
To ensure that the vehicle is always efficient and well
maintained, it is advisable to make sure that you carry
out the above operations regularly (approximately
every 1000 km and every 3000 km for checking and
topping up engine oil is advisable).