FIAT DUCATO BASE CAMPER 2018 Owner handbook (in English)
Manufacturer: FIAT, Model Year: 2018, Model line: DUCATO BASE CAMPER, Model: FIAT DUCATO BASE CAMPER 2018Pages: 304, PDF Size: 14.93 MB
Page 41 of 304

Air distribution ring nut C
to convey air to the central and
side vents;
to warm the feet and convey
slightly cooler air to the dashboard
vents, in intermediate temperature
conditions;
for heating when the outside
temperature is very low: to direct
as much air as possible to the
feet;
to warm the feet and demist the
windscreen at the same time;
for quick windscreen demisting.
Air recirculation on/off knob D
Press the button (button LED on) to
turn the internal air recirculation on.
Press the button again (button LED off)
to turn the internal air recirculation off.
Climate control system on/off
button E
Press the button (button LED on) to
turn the climate control system on.
Press the button again (button LED off)
to turn the climate control system off.
AUTOMATIC
CLIMATE CONTROL
SYSTEM
2)
(for versions/markets, where provided)
CONTROLS
AAUTO button automatic control of all
functions.
BAir distribution selection button.
CDisplay.
DMAX DEF function control button.
ESystem off button.
FCompressor enabling/disabling
control button.
GAir recirculation control button.
HFan speed increase/decrease control
buttons.
ITemperature increase/decrease
control knob.USING THE CLIMATE
CONTROL SYSTEM
The system can be started in different
ways, but it is advisable to start by
pressing the AUTO button and then
turning the knob to set the temperature
required on the display.
The system will adjust the temperature,
the quantity and the distribution of the
air sent into the passenger
compartment and, by managing the
recirculation function, the activation of
the climate control system compressor.
During fully automatic operation, the
only manual intervention required is the
possible activation of the following
functions:
air recirculation (to keep the
recirculation constantly on or constantly
off);
to speed up demisting/
defrosting the windscreen, rearscreen
and external rear-view mirrors.
74F1A0054
39
Page 42 of 304
During fully automatic system
operation, you can change the set
temperature, air distribution and fan
speed at any time by using the relevant
buttons or knobs: the system will
automatically change its settings to
adjust to the new requirements. During
fully automatic operation (FULL AUTO),
the word FULL will disappear if the air
distribution and/or flow rate and/or
engagement of the compressor and/or
recirculation settings are changed. In
this way, the functions will switch from
automatic to manual control until the
AUTO button is pressed again.
WARNING
2)The air conditioning system uses R134a
or R1234yf refrigerant compatible with
the regulations in force in the countries
where the vehicle is sold. When charging,
only use the gas indicated on the
dedicated plate in the engine compartment
. The use of other coolants affects the
efficiency and condition of the system. The
lubricant used for the compressor is also
strictly linked to the type of cooling gas,
please refer to a Fiat Dealership.
ADDITIONAL
HEATER
(for versions/markets, where provided)
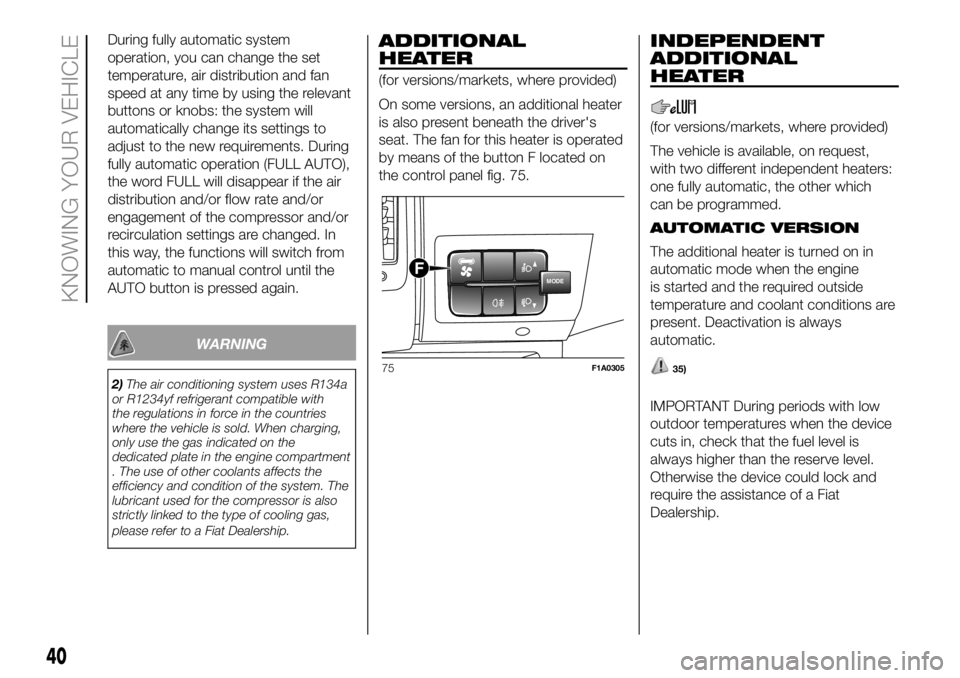
On some versions, an additional heater
is also present beneath the driver's
seat. The fan for this heater is operated
by means of the button F located on
the control panel fig. 75.
INDEPENDENT
ADDITIONAL
HEATER
(for versions/markets, where provided)
The vehicle is available, on request,
with two different independent heaters:
one fully automatic, the other which
can be programmed.
AUTOMATIC VERSION
The additional heater is turned on in
automatic mode when the engine
is started and the required outside
temperature and coolant conditions are
present. Deactivation is always
automatic.
35)
IMPORTANT During periods with low
outdoor temperatures when the device
cuts in, check that the fuel level is
always higher than the reserve level.
Otherwise the device could lock and
require the assistance of a Fiat
Dealership.
MODEF
75F1A0305
40
KNOWING YOUR VEHICLE
Page 43 of 304
PROGRAMMABLE
VERSION
The additional heater operates
completely independently of engine
operation and allows the following:
heating the passenger compartment
with the engine off
defrosting the windows;
heat the engine coolant and then the
engine itself prior to starting.
The system consists of:
a diesel burner for heating the water
with an exhaust silencer for the
combustion gases;
a metering pump connected to the
reservoir pipes for supplying the burner;
a heat exchanger connected to the
engine cooling system pipes;
a control unit connected to the
passenger compartment heating/
ventilation system to allow automatic
operation;
an electronic control unit for
controlling and adjusting the built-in
burner;
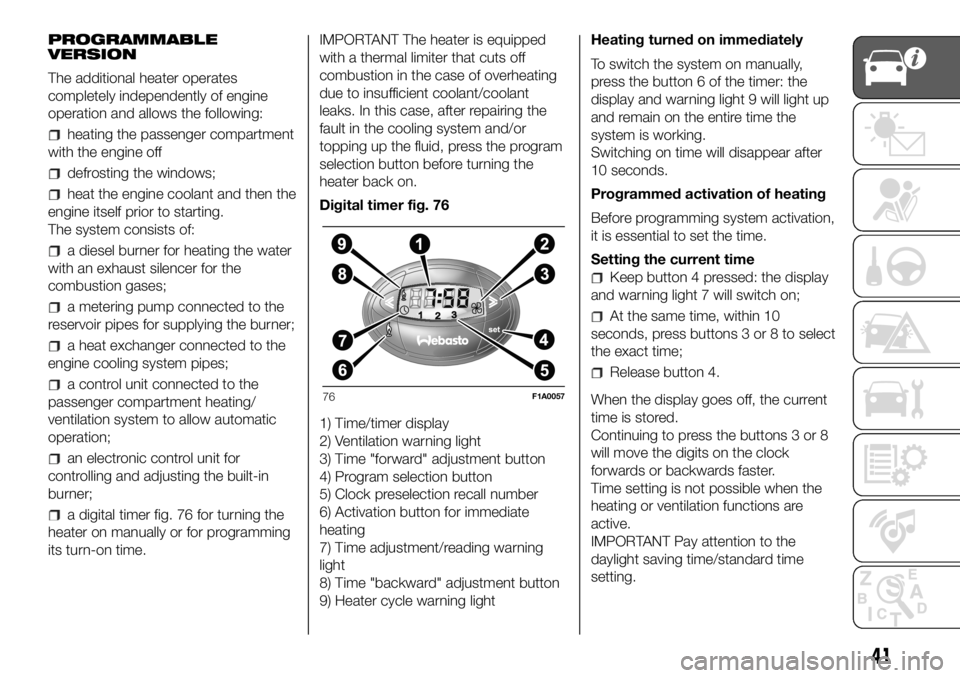
a digital timer fig. 76 for turning the
heater on manually or for programming
its turn-on time.IMPORTANT The heater is equipped
with a thermal limiter that cuts off
combustion in the case of overheating
due to insufficient coolant/coolant
leaks. In this case, after repairing the
fault in the cooling system and/or
topping up the fluid, press the program
selection button before turning the
heater back on.
Digital timer fig. 76
1) Time/timer display
2) Ventilation warning light
3) Time "forward" adjustment button
4) Program selection button
5) Clock preselection recall number
6) Activation button for immediate
heating
7) Time adjustment/reading warning
light
8) Time "backward" adjustment button
9) Heater cycle warning lightHeating turned on immediately
To switch the system on manually,
press the button 6 of the timer: the
display and warning light 9 will light up
and remain on the entire time the
system is working.
Switching on time will disappear after
10 seconds.
Programmed activation of heating
Before programming system activation,
it is essential to set the time.
Setting the current time
Keep button 4 pressed: the display
and warning light 7 will switch on;
At the same time, within 10
seconds, press buttons 3 or 8 to select
the exact time;
Release button 4.
When the display goes off, the current
time is stored.
Continuing to press the buttons 3 or 8
will move the digits on the clock
forwards or backwards faster.
Time setting is not possible when the
heating or ventilation functions are
active.
IMPORTANT Pay attention to the
daylight saving time/standard time
setting.
76F1A0057
41
Page 44 of 304

Programming the switching on time
To program the activation time:
press button 4: the symbol 10 or the
time set previously and the number 5
corresponding to the preselection
recalled will light up in the display for 10
seconds.
IMPORTANT If you wish to recall other
preselected times, press button 4
from time to time within 10 seconds.
– within 10 seconds, press the buttons
3 or 8 to select the desired switching
on time.
IMPORTANT The confirmation that the
time has been memorised is given by:
the disappearance of the switching
on time;
the presence of the preselection
number 5;
the lighting of the display.
IMPORTANT When the boiler comes
on:
the flame warning light 9 switches
on in the display;
the preselection number 5 goes out.
Standard settings:
Preselected time 1: 6:00
Preselected time 2: 16:00
Preselected time 3: 22:00IMPORTANT Factory pre-settings are
cancelled with a new setting.
Preselected times are stored until the
following change. If the clock is
detached from the on-board network
(e.g. if the battery is disconnected), the
factory pre-settings are restored.
Deactivation of the programmed
switching on time
To delete the programmed activation
time, press button 4 briefly: the display
lighting will go off and the number 5
relating to the preselected time will
disappear.
Recalling one of the preselected
switching on times
Operate button 4 within 10 seconds
until the program number with the
desired preselected time is displayed.
The preselected time you have chosen
to set is automatically activated after
about 10 seconds without the need for
any further confirmation with another
button.
Activate the preselected time taking
into account the safety instructions for
the operation of the independent
heating (for this purpose consult the
Owner's Manual for use of independent
heating).IMPORTANT Independent heating
switches on at the preselected time,
both with vehicle parked and while
driving.
IMPORTANT The programmed
switching on time can be altered or
cancelled by following the instructions
given previously.
Operation duration setting
Hold the button pressed. At the same
time press button 3 or 8.
The time and warning light 7 are
displayed.
Press the button 4 again and hold it
down. At the same time press the
button 3 or 8.
The preset activation duration is
displayed and warning light 9 or 2
flashes.
Set the activation duration with button
3or8.
The set activation duration is stored as
soon as the text in the display
disappears, or pressing button 4.
Switching the heating system off
Deactivation of the system, depending
on the type of activation (automatic
or manual), may be:
automaticwhen the programmed
duration is over; when the set time is
over, the display switches off.
42
KNOWING YOUR VEHICLE
Page 45 of 304
manualpressing the “immediate
heating” button on the timer again
(flame button 6).
The heating warning light and the
display light are switched off. The fluid
circulation pump keeps working for
approximately two minutes: the heater
can be switched back on again during
this time.
IMPORTANT The parking heater goes
off when battery voltage is low to allow
the vehicle to be started.
IMPORTANT Before turning on the
device, ensure that the fuel level is
above the reserve. Otherwise the
device could lock and require
the assistance of a Fiat Dealership.
Always turn off the heater when
refuelling and near service stations to
avoid the risk of explosion or fire
hazards.
Do not park the vehicle on
inflammable material such as paper,
grass or dry leaves: fire hazard!
The temperature near the heater
should not exceed 120°C (e.g. during
oven painting in a body shop). The
electronic control unit components may
be damaged at higher temperatures.
Whilst the heater is operating with
the engine switched off, it absorbs
energy from the battery; the engine
should therefore be left running for
a while to make sure that the battery is
properly recharged.
To check the coolant level, follow the
instructions in the "Vehicle
maintenance" chapter, "Engine coolant
system fluid" paragraph. The water in
the heating circuit must contain a
minimum percentage of 10% antifreeze.
For maintenance and repairs,
consult only a Fiat Dealership and use
only original parts.
MAINTENANCE
Have the additional heater checked
regularly at a Fiat Dealership (and
always at the start of every winter). This
will guarantee safe and economic
operation of the heater as well as a long
duration.
ADDITIONAL REAR
HEATING (Panorama and
Combinato)
(for versions/markets, where provided)
The Panorama and Combi versions
are equipped with a main heating
system plus an additional system
(available on request) with controls in
the roof panel trim above the second
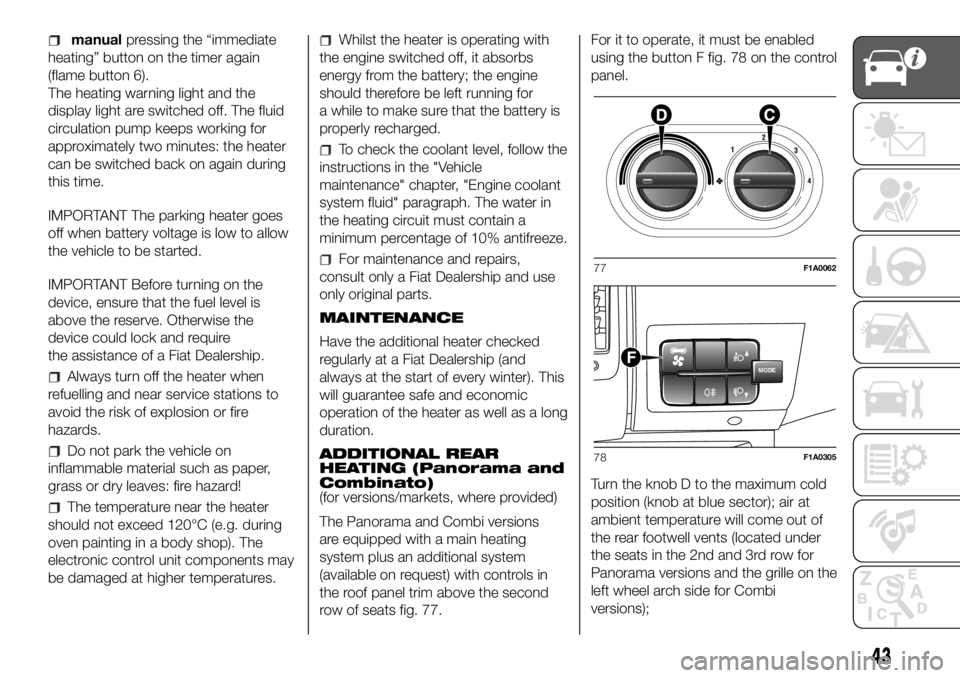
row of seats fig. 77.For it to operate, it must be enabled
using the button F fig. 78 on the control
panel.
Turn the knob D to the maximum cold
position (knob at blue sector); air at
ambient temperature will come out of
the rear footwell vents (located under
the seats in the 2nd and 3rd row for
Panorama versions and the grille on the
left wheel arch side for Combi
versions);77F1A0062
MODEF
78F1A0305
43
Page 46 of 304
Turn the knob D to the maximum
heating position (knob at red
sector);warm air will emerge (with the
engine warmed up), from the rear
footwell outlets (located under the seats
in the 2nd and 3rd row for Panorama
versions and the grille on the left wheel
arch side for Combi versions).
ADDITIONAL REAR
CLIMATE CONTROL
(Panorama and Combi)
(for versions/markets, where provided)
The Panorama and Combi versions
are equipped with a main heating/air
conditioning system plus an additional
system (available on request) with
controls in the roof panel trim above the
second row of seats fig. 77. Button F
fig. 78 on the control panel must be
enabled for operation; the air
conditioning only works if the main
climate control system is on.
When the knob D is placed in the
fully cold position (control in blue sector)
cold air comes out the vents in the
ceiling.
Turn the knob D to the maximum
heating position (knob at red
sector);warm air will emerge (with the
engine warmed up), from the rear
footwell outlets (located under the seats
in the 2nd and 3rd row for Panorama
versions and the grille on the left wheel
arch side for Combi versions).
If the selector knob D is placed in
the intermediate positions, the air
will be distributed between the vents in
the ceiling and the rear footwell vents,
varying the temperature.
IMPORTANT If the compressor on the
main climate control system control
is turned on (operation of button E),
even if the additional climate control
system fan is in position 0, the 1st
speed will automatically be activated to
prevent ice formation, with possible
damage to the component.
WARNING
35)The heater burns fuel in the same way
as the engine, though to a lesser extent. To
prevent poisoning and asphyxiation, the
supplementary heater must never be
turned on, not even for short periods, in
closed environments such as a garage or
workshops without extraction fans for
the exhaust gases.
ELECTRIC WINDOWS
ELECTRIC
Switches fig. 79 on the inner armrest of
the driver's door control the following
with the ignition key in the MAR
position:
A: left front window opening/closing;
B: right front window opening/closing.
Continuous automatic operation
Keep one of the buttons pressed for
longer than half a second to operate
the automatic continuous window
operation function. The window stops
when it reaches the end of travel
position, or when the button is pressed
again.
79F1A0125
44
KNOWING YOUR VEHICLE
Page 47 of 304

IMPORTANT With the ignition key in the
STOP position or extracted, the
electric windows remain activated for
about 3 minutes and are deactivated
immediately when one of the doors
is opened.
Front passenger side door
A dedicated switch for operating the
window is located on the inner armrest
of the passenger side front door.
36)
WARNING
36)Improper use of the electric windows
can be dangerous. Before and during
operation, always check that passengers
are not exposed to the risk of being injured
either directly by the moving windows or
through objects getting caught or struck by
them. When leaving the vehicle, always
remove the key from the ignition switch to
avoid the risk of injury to anyone remaining
in the vehicle due to accidental operation
of the electric windows.
BONNET
OPENING
Proceed as follows:
open the driver's door to gain
access to the bonnet release handle;
pull the lever fig. 80 in the direction
indicated by the arrow;
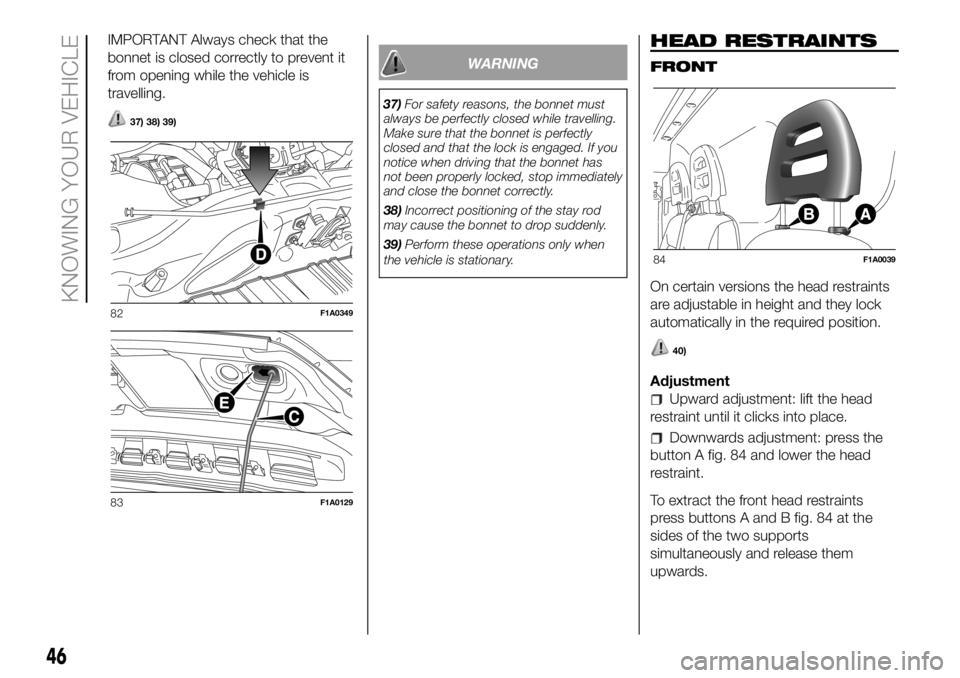
lift lever A fig. 81 as shown in the
figure;
lift the bonnet and, at the same time,
release the bonnet stay fig. 82 from its
locking device D, then insert the end
C fig. 83 of the bonnet stay into the
housing E.
IMPORTANT Before opening the
bonnet, check that the windscreen
wiper arms are not lifted from the
windscreen.CLOSING
Proceed as follows:
hold the bonnet up with one hand
and with the other remove the stay
C fig. 83 from the housing E and fit it
back in its locking device D fig. 82;
lower the bonnet to approximately
20 centimetres from the engine
compartment and let it drop. Make sure
that the bonnet is completely closed
and not only fastened by the locking
device by trying to open it. If it is not
perfectly closed, do not try to press the
bonnet down but open it and repeat
the procedure.
80F1A0126
81F1A0339
45
Page 48 of 304
IMPORTANT Always check that the
bonnet is closed correctly to prevent it
from opening while the vehicle is
travelling.
37) 38) 39)
WARNING
37)For safety reasons, the bonnet must
always be perfectly closed while travelling.
Make sure that the bonnet is perfectly
closed and that the lock is engaged. If you
notice when driving that the bonnet has
not been properly locked, stop immediately
and close the bonnet correctly.
38)Incorrect positioning of the stay rod
may cause the bonnet to drop suddenly.
39)Perform these operations only when
the vehicle is stationary.
HEAD RESTRAINTS
FRONT
On certain versions the head restraints
are adjustable in height and they lock
automatically in the required position.
40)
Adjustment
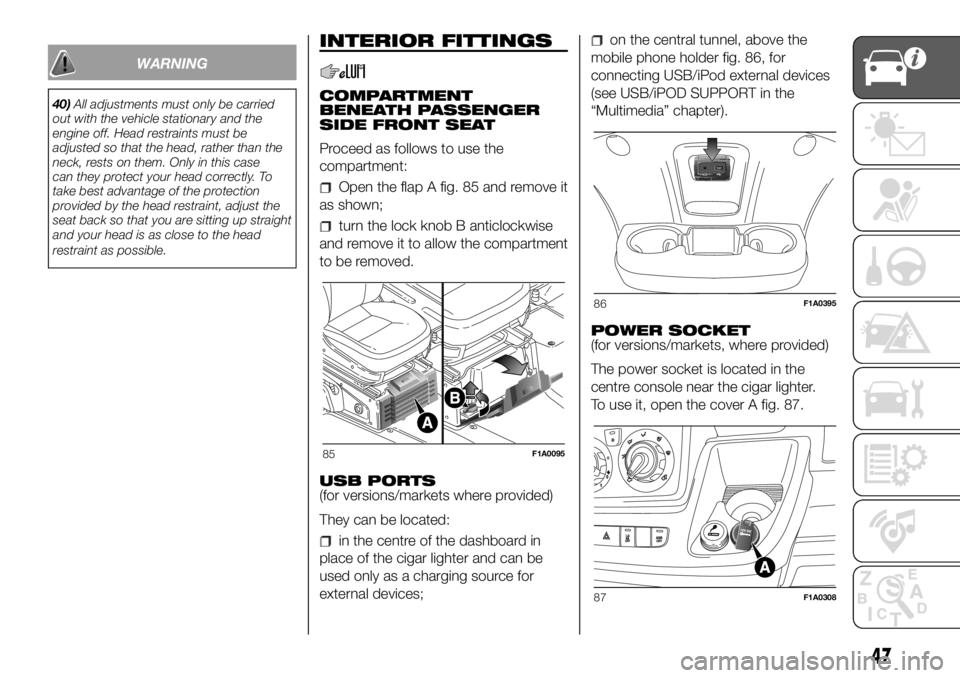
Upward adjustment: lift the head
restraint until it clicks into place.
Downwards adjustment: press the
button A fig. 84 and lower the head
restraint.
To extract the front head restraints
press buttons A and B fig. 84 at the
sides of the two supports
simultaneously and release them
upwards.
82F1A0349
83F1A0129
84F1A0039
46
KNOWING YOUR VEHICLE
Page 49 of 304
WARNING
40)All adjustments must only be carried
out with the vehicle stationary and the
engine off. Head restraints must be
adjusted so that the head, rather than the
neck, rests on them. Only in this case
can they protect your head correctly. To
take best advantage of the protection
provided by the head restraint, adjust the
seat back so that you are sitting up straight
and your head is as close to the head
restraint as possible.
INTERIOR FITTINGS
COMPARTMENT
BENEATH PASSENGER
SIDE FRONT SEAT
Proceed as follows to use the
compartment:
Open the flap A fig. 85 and remove it
as shown;
turn the lock knob B anticlockwise
and remove it to allow the compartment
to be removed.
USB PORTS
(for versions/markets where provided)
They can be located:
in the centre of the dashboard in
place of the cigar lighter and can be
used only as a charging source for
external devices;
on the central tunnel, above the
mobile phone holder fig. 86, for
connecting USB/iPod external devices
(see USB/iPOD SUPPORT in the
“Multimedia” chapter).
POWER SOCKET
(for versions/markets, where provided)
The power socket is located in the
centre console near the cigar lighter.
To use it, open the cover A fig. 87.
85F1A0095
86F1A0395
87F1A0308
47
Page 50 of 304
TABLET HOLDER
(for versions/markets, where provided)
It is located in the centre of the
dashboard and is designed to anchor a
tablet.
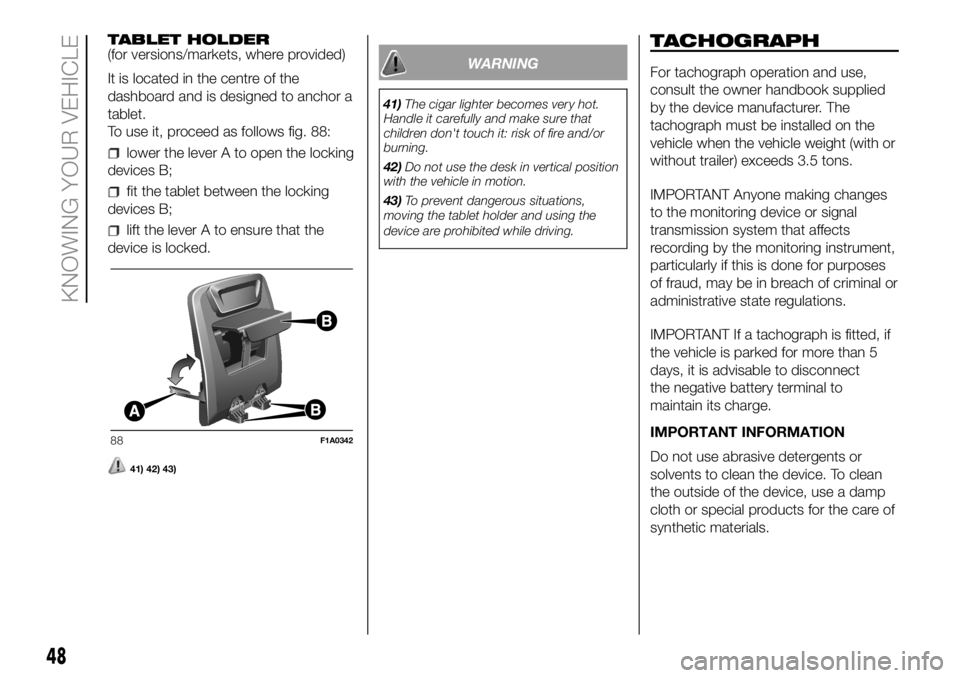
To use it, proceed as follows fig. 88:
lower the lever A to open the locking
devices B;
fit the tablet between the locking
devices B;
lift the lever A to ensure that the
device is locked.
41) 42) 43)
WARNING
41)The cigar lighter becomes very hot.
Handle it carefully and make sure that
children don't touch it: risk of fire and/or
burning.
42)Do not use the desk in vertical position
with the vehicle in motion.
43)To prevent dangerous situations,
moving the tablet holder and using the
device are prohibited while driving.
TACHOGRAPH
For tachograph operation and use,
consult the owner handbook supplied
by the device manufacturer. The
tachograph must be installed on the
vehicle when the vehicle weight (with or
without trailer) exceeds 3.5 tons.
IMPORTANT Anyone making changes
to the monitoring device or signal
transmission system that affects
recording by the monitoring instrument,
particularly if this is done for purposes
of fraud, may be in breach of criminal or
administrative state regulations.
IMPORTANT If a tachograph is fitted, if
the vehicle is parked for more than 5
days, it is advisable to disconnect
the negative battery terminal to
maintain its charge.
IMPORTANT INFORMATION
Do not use abrasive detergents or
solvents to clean the device. To clean
the outside of the device, use a damp
cloth or special products for the care of
synthetic materials.
88F1A0342
48
KNOWING YOUR VEHICLE