FIAT FIORINO 2007 Owner handbook (in English)
Manufacturer: FIAT, Model Year: 2007, Model line: FIORINO, Model: FIAT FIORINO 2007Pages: 210, PDF Size: 3.22 MB
Page 31 of 210
30
SAFETY
STARTING
AND DRIVING
WARNING
LIGHTS AND
MESSAGES
IN AN
EMERGENCY
MAINTENANCE
AND CARE
TECHNICAL
SPECIFICATIONS
INDEX
DASHBOARD
AND CONTROLS
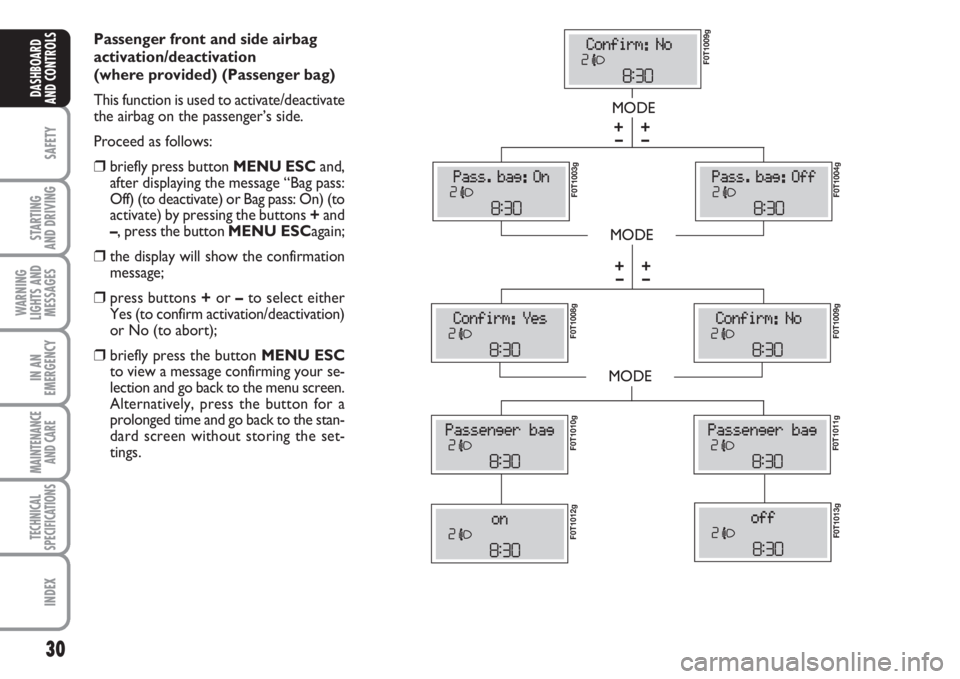
Passenger front and side airbag
activation/deactivation
(where provided) (Passenger bag)
This function is used to activate/deactivate
the airbag on the passenger’s side.
Proceed as follows:
❒briefly press button MENU ESCand,
after displaying the message “Bag pass:
Off) (to deactivate) or Bag pass: On) (to
activate) by pressing the buttons +and
–, press the button MENU ESCagain;
❒the display will show the confirmation
message;
❒press buttons +or –to select either
Yes (to confirm activation/deactivation)
or No (to abort);
❒briefly press the button MENU ESC
to view a message confirming your se-
lection and go back to the menu screen.
Alternatively, press the button for a
prolonged time and go back to the stan-
dard screen without storing the set-
tings.
MODE
MODE
MODE
– +
– +
F0T1009g F0T1003g
F0T1004g F0T1008g
F0T1009g F0T1011gF0T1010g
F0T1012gF0T1013g
– +
– +
Page 32 of 210
31
SAFETY
STARTING
AND DRIVING
WARNING
LIGHTS AND
MESSAGES
IN AN
EMERGENCY
MAINTENANCE
AND CARE
TECHNICAL
SPECIFICATIONS
INDEX
DASHBOARD
AND CONTROLS
TRIP COMPUTER
General features
The “Trip computer” is used to display in-
formation on vehicle operation when the
key is turned to MAR. This function al-
lows to define two separate trips called
“Trip A” and “Trip B” for monitoring the
“complete mission” of the vehicle (trip) in
a reciprocally independent manner. Both
functions are resettable (reset - start of
new mission).
“Trip A” is used to display data relating to:
– Range
– Trip distance
– Average consumption
– Instant consumption
– Average speed
– Travel time (driving time).
“Trip B” is supplied on versions having a
multifunctional display and is used to dis-
play data relating to:
– Trip distance B
– Average consumption B
– Average speed B
– Travel time B (driving time).
Note“Trip B” functions may be disabled
(see paragraph “Trip B on”). “Range” and
“Instant consumption” cannot be reset.Values displayed
Range
Indicates the travel distance left before the
vehicle runs out of the fuel in the tank.
The message “----” will appear on the dis-
play in the following cases:
– value lower than 50 km (or 30 mi)
– vehicle left parked with engine running
for long.
IMPORTANT Changes of the range value
can be affected by many factors: driving
style (see paragraph “Driving style” in sec-
tion “Starting and driving”), type of route
(motorway, urban cycle, mountain roads,
etc…), conditions of use of the vehicle
(load, tyre pressure, etc…). Trip planning
must take into account the above notes. Exit Menu
This is the last function that closes the set-
ting cycle listed in the initial menu screen.
Briefly press button MENU ESCto go
back to the standard screen without stor-
ing settings.
Press button –to return to the first menu
option (Speed Beep).
Page 33 of 210
32
SAFETY
STARTING
AND DRIVING
WARNING
LIGHTS AND
MESSAGES
IN AN
EMERGENCY
MAINTENANCE
AND CARE
TECHNICAL
SPECIFICATIONS
INDEX
DASHBOARD
AND CONTROLS
Trip distance
Indicates the distance covered from the
start of a new mission.
Average consumption
Represents the approximate average con-
sumption from the start of a new mission.
Instant consumption
Indicates the fuel consumption. The val-
ue is constantly updated. The message
“----” will appear on the display if the ve-
hicle is parked with the engine running.
Average speed
Represents the vehicle average speed as a
function of the overall time elapsed since
the start of a new mission.
Trip time
Indicates the time elapsed since the start
of a new mission.
IMPORTANT If information is not avail-
able, the message “----” will appear instead
of the Trip Computer values. Counting of
the different values will be resumed reg-
ularly when normal operation is restored.
This will not cause any resetting of the val-
ues displayed before the failure nor start-
ing a new mission.
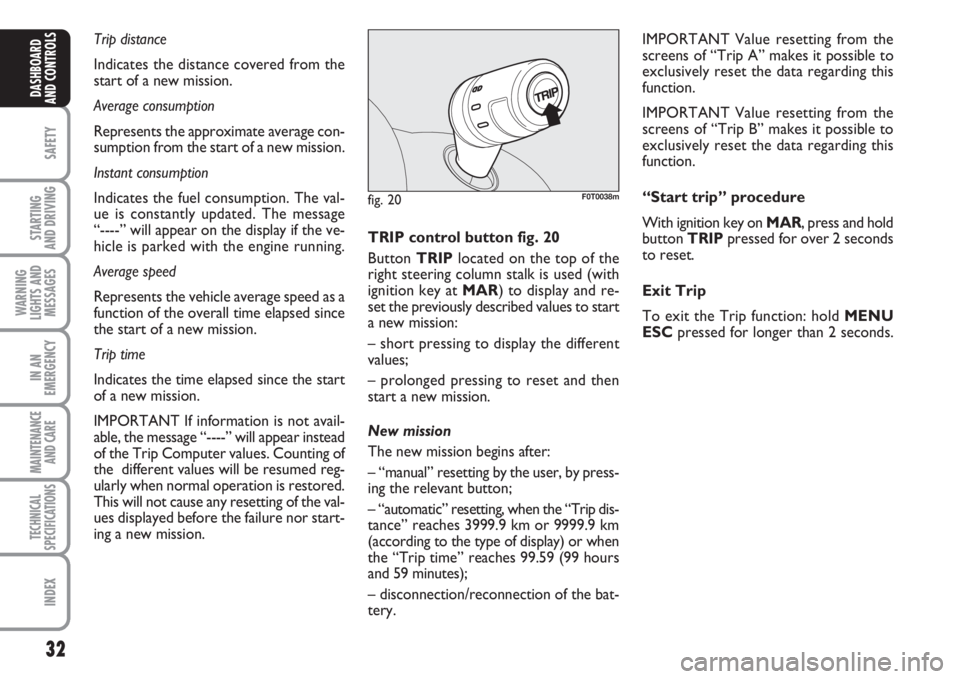
fig. 20F0T0038m
TRIP control button fig. 20
Button TRIPlocated on the top of the
right steering column stalk is used (with
ignition key at MAR) to display and re-
set the previously described values to start
a new mission:
– short pressing to display the different
values;
– prolonged pressing to reset and then
start a new mission.
New mission
The new mission begins after:
– “manual” resetting by the user, by press-
ing the relevant button;
– “automatic” resetting, when the “Trip dis-
tance” reaches 3999.9 km or 9999.9 km
(according to the type of display) or when
the “Trip time” reaches 99.59 (99 hours
and 59 minutes);
– disconnection/reconnection of the bat-
tery.IMPORTANT Value resetting from the
screens of “Trip A” makes it possible to
exclusively reset the data regarding this
function.
IMPORTANT Value resetting from the
screens of “Trip B” makes it possible to
exclusively reset the data regarding this
function.
“Start trip” procedure
With ignition key on MAR, press and hold
button TRIPpressed for over 2 seconds
to reset.
Exit Trip
To exit the Trip function: hold MENU
ESCpressed for longer than 2 seconds.
Page 34 of 210
33
SAFETY
STARTING
AND DRIVING
WARNING
LIGHTS AND
MESSAGES
IN AN
EMERGENCY
MAINTENANCE
AND CARE
TECHNICAL
SPECIFICATIONS
INDEX
DASHBOARD
AND CONTROLS
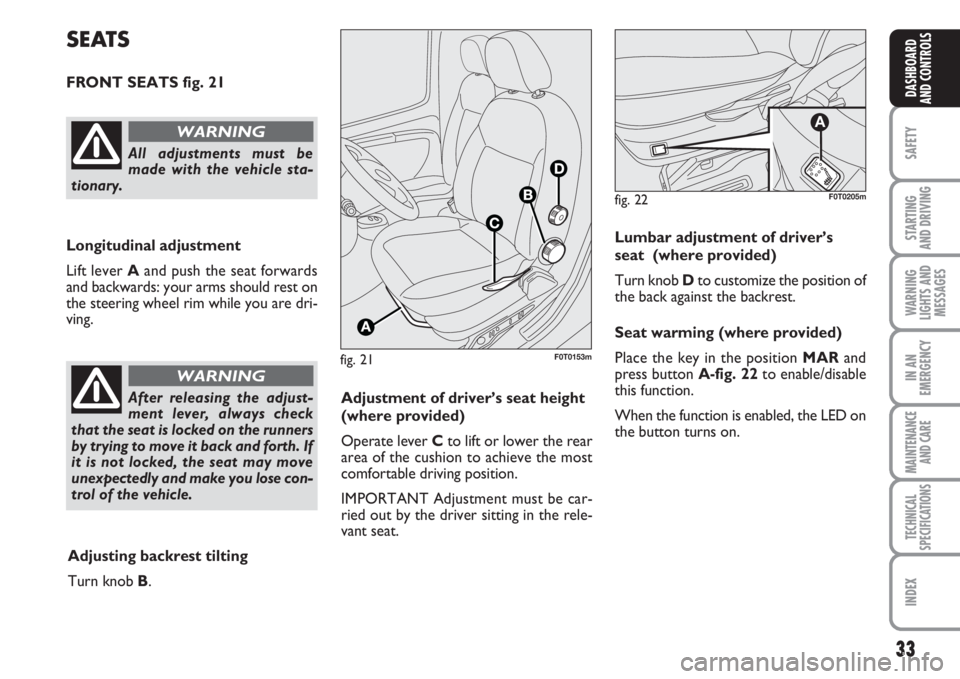
fig. 21F0T0153m
SEATS
FRONT SEATS fig. 21
Longitudinal adjustment
Lift lever Aand push the seat forwards
and backwards: your arms should rest on
the steering wheel rim while you are dri-
ving.
All adjustments must be
made with the vehicle sta-
tionary.
WARNING
After releasing the adjust-
ment lever, always check
that the seat is locked on the runners
by trying to move it back and forth. If
it is not locked, the seat may move
unexpectedly and make you lose con-
trol of the vehicle.
WARNING
Adjustment of driver’s seat height
(where provided)
Operate lever Cto lift or lower the rear
area of the cushion to achieve the most
comfortable driving position.
IMPORTANT Adjustment must be car-
ried out by the driver sitting in the rele-
vant seat.
Adjusting backrest tilting
Turn knob B.Lumbar adjustment of driver’s
seat (where provided)
Turn knob Dto customize the position of
the back against the backrest.
Seat warming (where provided)
Place the key in the position MARand
press button A-fig. 22to enable/disable
this function.
When the function is enabled, the LED on
the button turns on.
fig. 22
A
F0T0205m
Page 35 of 210
34
SAFETY
STARTING
AND DRIVING
WARNING
LIGHTS AND
MESSAGES
IN AN
EMERGENCY
MAINTENANCE
AND CARE
TECHNICAL
SPECIFICATIONS
INDEX
DASHBOARD
AND CONTROLS
RECESSING FOLDABLE
PASSENGER’S SEAT
(where provided)
Some versions have the passenger’s seat
which folds into a recessed compartment.
Folding the seat
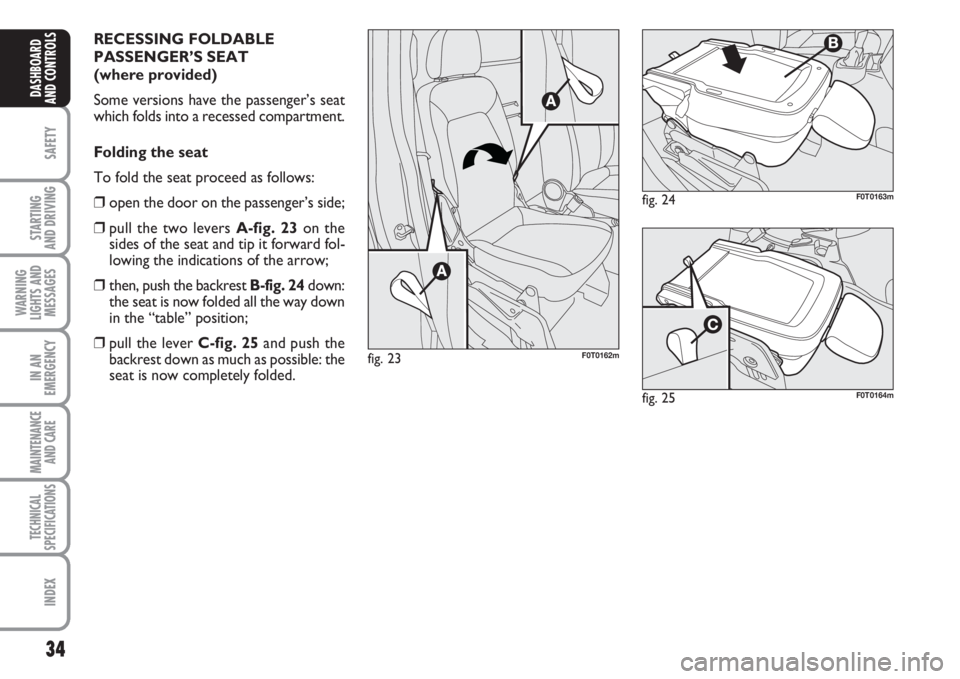
To fold the seat proceed as follows:
❒open the door on the passenger’s side;
❒pull the two levers A-fig. 23on the
sides of the seat and tip it forward fol-
lowing the indications of the arrow;
❒then, push the backrest B-fig. 24down:
the seat is now folded all the way down
in the “table” position;
❒pull the lever C-fig. 25and push the
backrest down as much as possible: the
seat is now completely folded.
fig. 23F0T0162m
fig. 24F0T0163m
fig. 25F0T0164m
Page 36 of 210
35
SAFETY
STARTING
AND DRIVING
WARNING
LIGHTS AND
MESSAGES
IN AN
EMERGENCY
MAINTENANCE
AND CARE
TECHNICAL
SPECIFICATIONS
INDEX
DASHBOARD
AND CONTROLS
fig. 26F0T0165mfig. 27F0T0166m
Putting the seat back in position
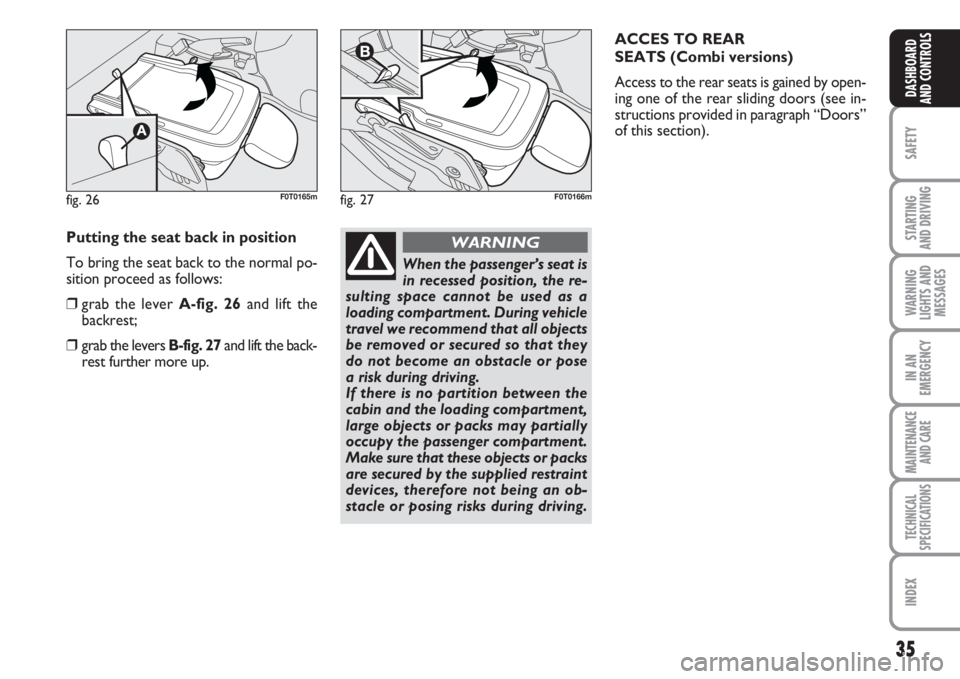
To bring the seat back to the normal po-
sition proceed as follows:
❒grab the lever A-fig. 26and lift the
backrest;
❒grab the levers B-fig. 27and lift the back-
rest further more up.
When the passenger’s seat is
in recessed position, the re-
sulting space cannot be used as a
loading compartment. During vehicle
travel we recommend that all objects
be removed or secured so that they
do not become an obstacle or pose
a risk during driving.
If there is no partition between the
cabin and the loading compartment,
large objects or packs may partially
occupy the passenger compartment.
Make sure that these objects or packs
are secured by the supplied restraint
devices, therefore not being an ob-
stacle or posing risks during driving.
WARNING
ACCES TO REAR
SEATS (Combi versions)
Access to the rear seats is gained by open-
ing one of the rear sliding doors (see in-
structions provided in paragraph “Doors”
of this section).
Page 37 of 210
36
SAFETY
STARTING
AND DRIVING
WARNING
LIGHTS AND
MESSAGES
IN AN
EMERGENCY
MAINTENANCE
AND CARE
TECHNICAL
SPECIFICATIONS
INDEX
DASHBOARD
AND CONTROLS
PARTITIONS
(where provided)
CARGO VERSIONS
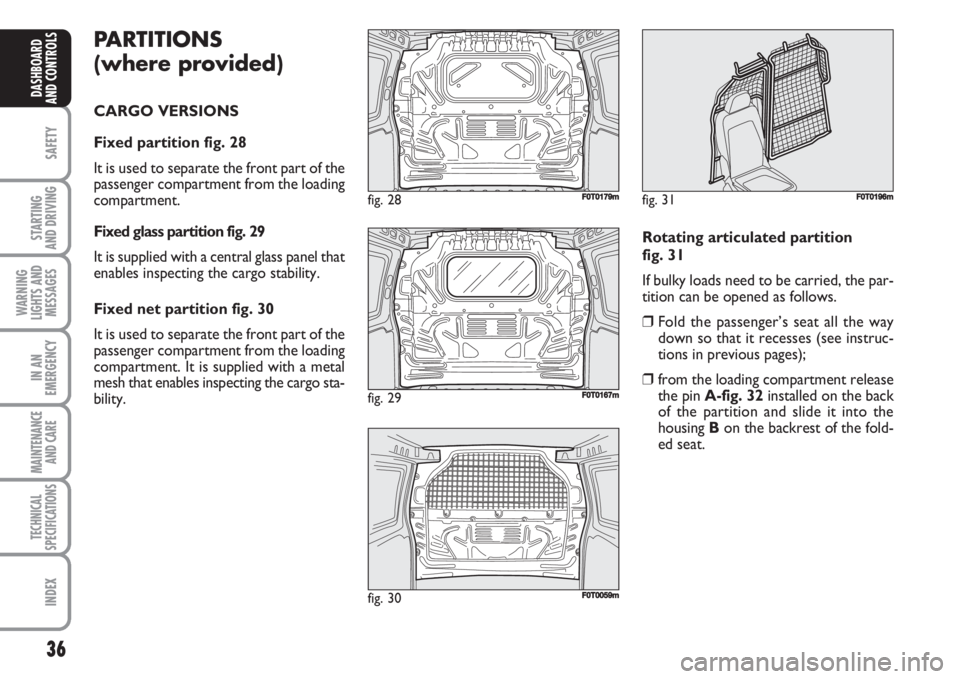
Fixed partition fig. 28
It is used to separate the front part of the
passenger compartment from the loading
compartment.
Fixed glass partition fig. 29
It is supplied with a central glass panel that
enables inspecting the cargo stability.
Fixed net partition fig. 30
It is used to separate the front part of the
passenger compartment from the loading
compartment. It is supplied with a metal
mesh that enables inspecting the cargo sta-
bility.
fig. 28F0T0179m
Rotating articulated partition
fig. 31
If bulky loads need to be carried, the par-
tition can be opened as follows.
❒Fold the passenger’s seat all the way
down so that it recesses (see instruc-
tions in previous pages);
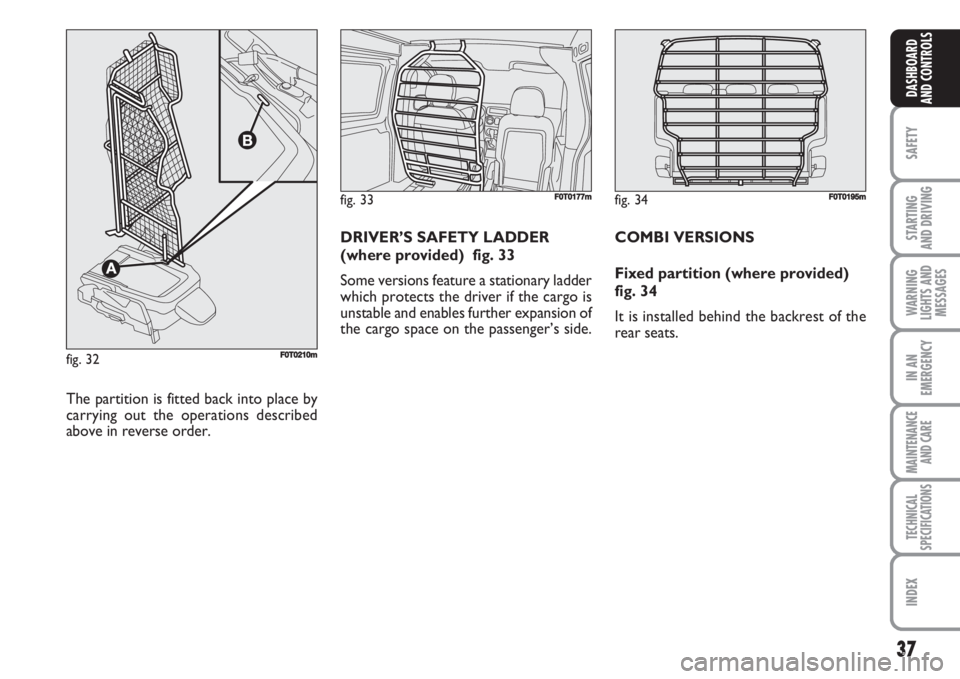
❒from the loading compartment release
the pin A-fig. 32installed on the back
of the partition and slide it into the
housing B on the backrest of the fold-
ed seat.
fig. 29F0T0167m
fig. 31F0T0196m
fig. 30F0T0059m
Page 38 of 210
37
SAFETY
STARTING
AND DRIVING
WARNING
LIGHTS AND
MESSAGES
IN AN
EMERGENCY
MAINTENANCE
AND CARE
TECHNICAL
SPECIFICATIONS
INDEX
DASHBOARD
AND CONTROLS
fig. 33FF0T0177m
The partition is fitted back into place by
carrying out the operations described
above in reverse order.DRIVER’S SAFETY LADDER
(where provided) fig. 33
Some versions feature a stationary ladder
which protects the driver if the cargo is
unstable and enables further expansion of
the cargo space on the passenger’s side.
fig. 32F0T0210m
fig. 34F0T0195m
COMBI VERSIONS
Fixed partition (where provided)
fig. 34
It is installed behind the backrest of the
rear seats.
Page 39 of 210
38
SAFETY
STARTING
AND DRIVING
WARNING
LIGHTS AND
MESSAGES
IN AN
EMERGENCY
MAINTENANCE
AND CARE
TECHNICAL
SPECIFICATIONS
INDEX
DASHBOARD
AND CONTROLS
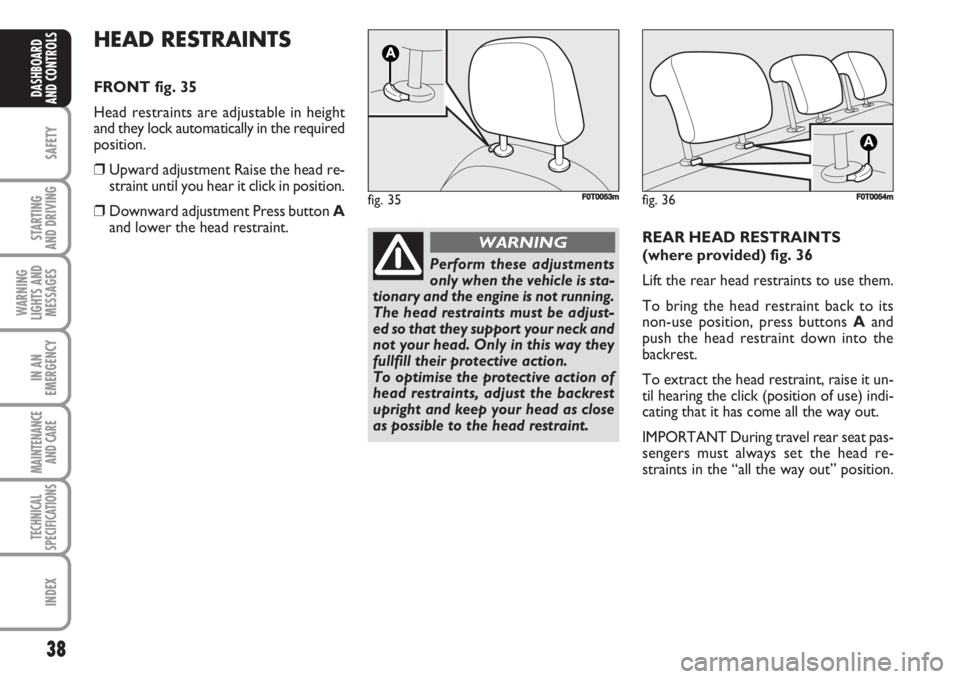
HEAD RESTRAINTS
FRONT fig. 35
Head restraints are adjustable in height
and they lock automatically in the required
position.
❒Upward adjustment Raise the head re-
straint until you hear it click in position.
❒Downward adjustment Press button A
and lower the head restraint.
fig. 35F0T0053m
Perform these adjustments
only when the vehicle is sta-
tionary and the engine is not running.
The head restraints must be adjust-
ed so that they support your neck and
not your head. Only in this way they
fullfill their protective action.
To optimise the protective action of
head restraints, adjust the backrest
upright and keep your head as close
as possible to the head restraint.
WARNINGREAR HEAD RESTRAINTS
(where provided) fig. 36
Lift the rear head restraints to use them.
To bring the head restraint back to its
non-use position, press buttons Aand
push the head restraint down into the
backrest.
To extract the head restraint, raise it un-
til hearing the click (position of use) indi-
cating that it has come all the way out.
IMPORTANT During travel rear seat pas-
sengers must always set the head re-
straints in the “all the way out” position.
fig. 36F0T0054m
Page 40 of 210
39
SAFETY
STARTING
AND DRIVING
WARNING
LIGHTS AND
MESSAGES
IN AN
EMERGENCY
MAINTENANCE
AND CARE
TECHNICAL
SPECIFICATIONS
INDEX
DASHBOARD
AND CONTROLS
Perform these adjustments
only when the vehicle is sta-
tionary and the engine is not running.
WARNING
Under no circumstances
should aftermarket opera-
tions involving steering system or
steering column modifications (e.g.:
installation of anti-theft device) be
carried out that could badly affect
performance and safety. This also
causes the warranty to become null
and void and results in vehicle non-
compliance with type-approval re-
quirements.
WARNING
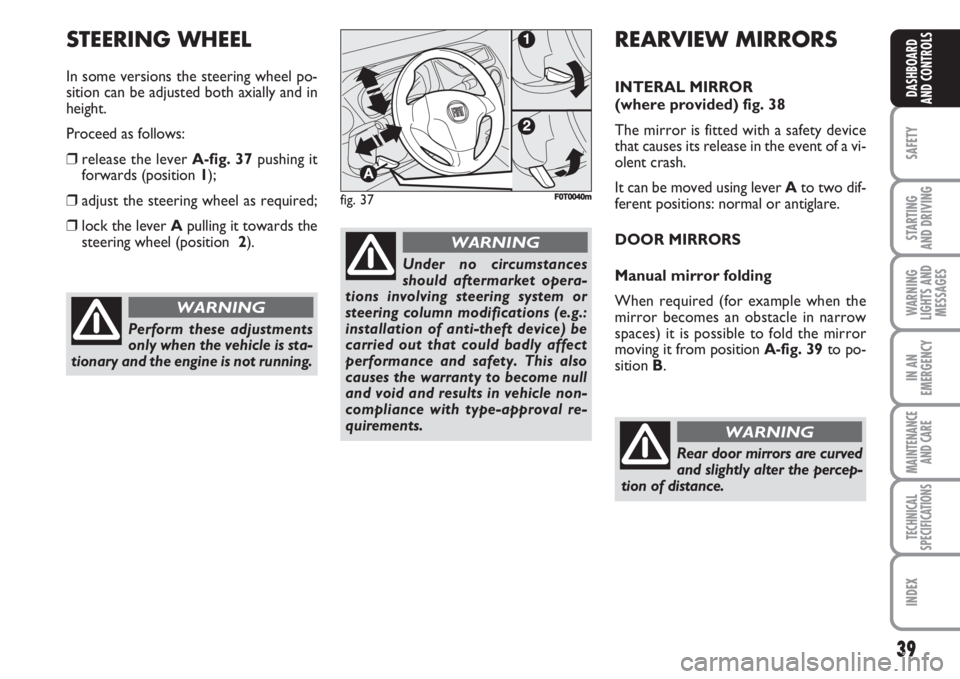
fig. 37FF0T0040m
STEERING WHEEL
In some versions the steering wheel po-
sition can be adjusted both axially and in
height.
Proceed as follows:
❒release the lever A-fig. 37pushing it
forwards (position 1);
❒adjust the steering wheel as required;
❒lock the lever Apulling it towards the
steering wheel (position 2).
REARVIEW MIRRORS
INTERAL MIRROR
(where provided) fig. 38
The mirror is fitted with a safety device
that causes its release in the event of a vi-
olent crash.
It can be moved using lever Ato two dif-
ferent positions: normal or antiglare.
DOOR MIRRORS
Manual mirror folding
When required (for example when the
mirror becomes an obstacle in narrow
spaces) it is possible to fold the mirror
moving it from position A-fig. 39to po-
sition B.
Rear door mirrors are curved
and slightly alter the percep-
tion of distance.
WARNING