engine FIAT FULLBACK 2017 Owner handbook (in English)
[x] Cancel search | Manufacturer: FIAT, Model Year: 2017, Model line: FULLBACK, Model: FIAT FULLBACK 2017Pages: 312, PDF Size: 12.31 MB
Page 159 of 312
104)In the following cases, the engine will
restart automatically even if the engine was
stopped by the Start&Stop system. Pay
careful attention, otherwise an unexpected
accident might occur when the engine
restarts: vehicle speed is 3 km/h or higher
when coasting down a slope; brake
booster vacuum pressure is low because
the brake pedal is depressed repeatedly or
depressed harder than usual; engine
coolant temperature is low; when the air
conditioner is operated by pressing the air
conditioning switch; when the preset
temperature of the air conditioner is
changed significantly; when the air
conditioner is operated in AUTO mode
where the temperature control is set to the
max. hot or the max. cool (for vehicles with
automatic climate air conditioning); when
the air conditioner is ON, the passenger
compartment temperature rises and the air
conditioning compressor operates to lower
the temperature; demister switch is
pressed. Refer to “For quick demisting”;
electric power consumption is high, such
as when the rear window demister or other
electrical components are operating or the
blower speed is set to a high setting;
battery voltage or battery performance is
low; operate the steering wheel; driver’s
seat belt is unfastened; driver’s door is
opened.MANUAL
TRANSMISSION
The shift pattern is shown on the
gearshift lever knob. To start off,
depress the clutch pedal all the way
down and shift into 1st or “R” (Reverse)
position. Then gradually release the
clutch pedal while depressing the
accelerator pedal.
227)
105) 106) 107) 108) 109)
During cold weather, shifting may be
difficult until the transmission lubricant
has warmed up. This is normal and not
harmful to the transmission.
If it is hard to shift into 1st, depress the
clutch pedal again; the shift will then be
easier to make.
In case of hot weather condition or long
time cruising with high speed, a speed
limitation function may work to restrict
the oil temperature rising of the manual
transmission. After the oil temperature
drops to the appropriate level, the
speed limitation function is cancelled.
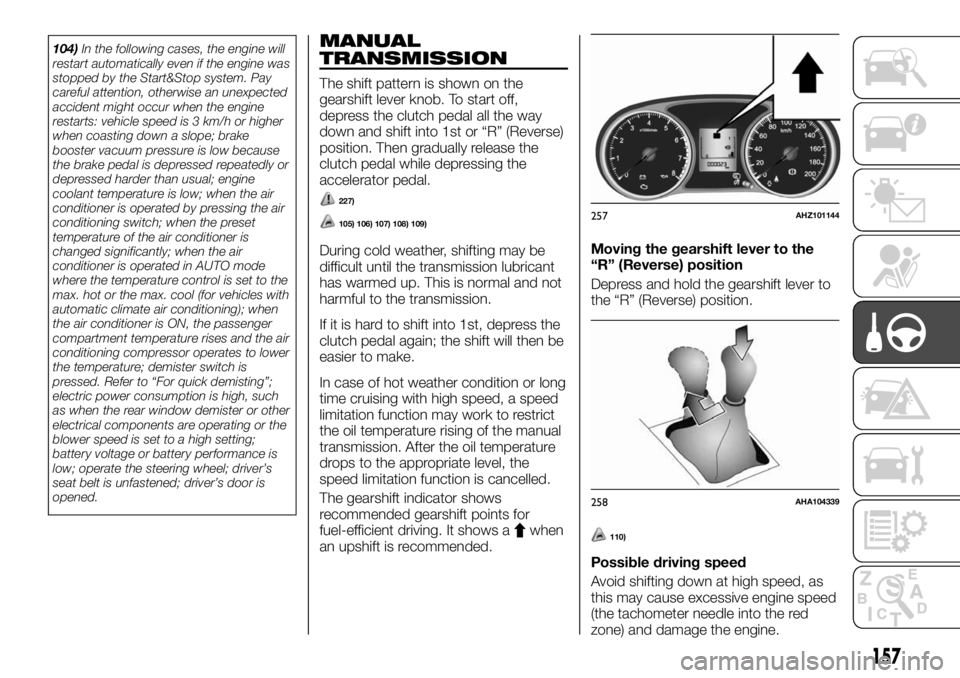
The gearshift indicator shows
recommended gearshift points for
fuel-efficient driving. It shows a
when
an upshift is recommended.Moving the gearshift lever to the
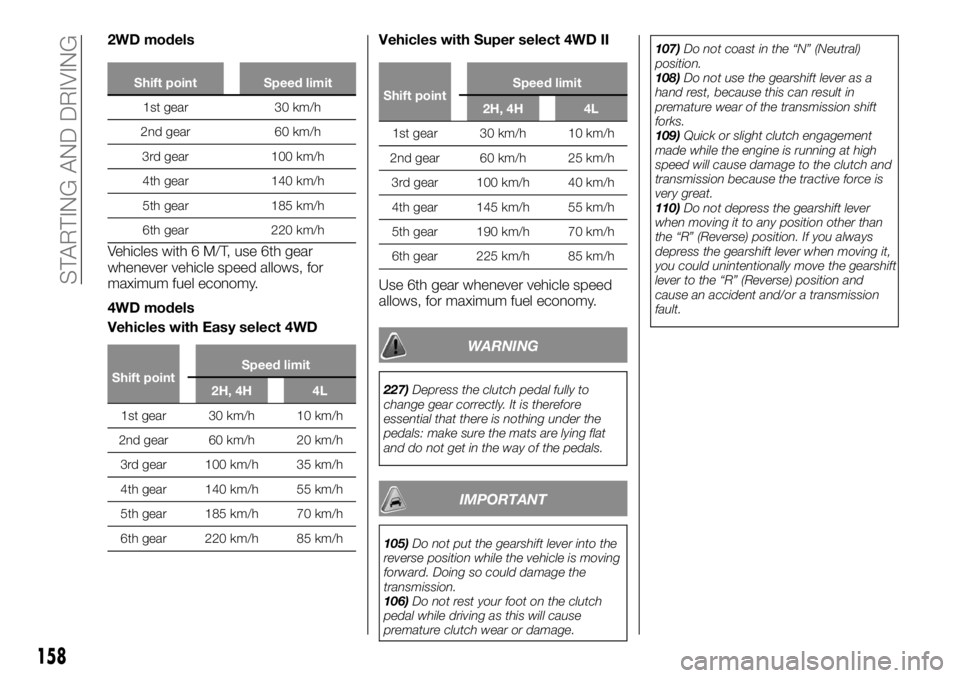
“R” (Reverse) position
Depress and hold the gearshift lever to
the “R” (Reverse) position.110)
Possible driving speed
Avoid shifting down at high speed, as
this may cause excessive engine speed
(the tachometer needle into the red
zone) and damage the engine.
257AHZ101144
258AHA104339
157
Page 160 of 312
2WD models
Shift point Speed limit
1st gear 30 km/h
2nd gear 60 km/h
3rd gear 100 km/h
4th gear 140 km/h
5th gear 185 km/h
6th gear 220 km/h
Vehicles with 6 M/T, use 6th gear
whenever vehicle speed allows, for
maximum fuel economy.
4WD models
Vehicles with Easy select 4WD
Shift pointSpeed limit
2H, 4H 4L
1st gear 30 km/h 10 km/h
2nd gear 60 km/h 20 km/h
3rd gear 100 km/h 35 km/h
4th gear 140 km/h 55 km/h
5th gear 185 km/h 70 km/h
6th gear 220 km/h 85 km/h
Vehicles with Super select 4WD II
Shift pointSpeed limit
2H, 4H 4L
1st gear 30 km/h 10 km/h
2nd gear 60 km/h 25 km/h
3rd gear 100 km/h 40 km/h
4th gear 145 km/h 55 km/h
5th gear 190 km/h 70 km/h
6th gear 225 km/h 85 km/h
Use 6th gear whenever vehicle speed
allows, for maximum fuel economy.
WARNING
227)Depress the clutch pedal fully to
change gear correctly. It is therefore
essential that there is nothing under the
pedals: make sure the mats are lying flat
and do not get in the way of the pedals.
IMPORTANT
105)Do not put the gearshift lever into the
reverse position while the vehicle is moving
forward. Doing so could damage the
transmission.
106)Do not rest your foot on the clutch
pedal while driving as this will cause
premature clutch wear or damage.107)Do not coast in the “N” (Neutral)
position.
108)Do not use the gearshift lever as a
hand rest, because this can result in
premature wear of the transmission shift
forks.
109)Quick or slight clutch engagement
made while the engine is running at high
speed will cause damage to the clutch and
transmission because the tractive force is
very great.
110)Do not depress the gearshift lever
when moving it to any position other than
the “R” (Reverse) position. If you always
depress the gearshift lever when moving it,
you could unintentionally move the gearshift
lever to the “R” (Reverse) position and
cause an accident and/or a transmission
fault.
158
STARTING AND DRIVING
Page 162 of 312
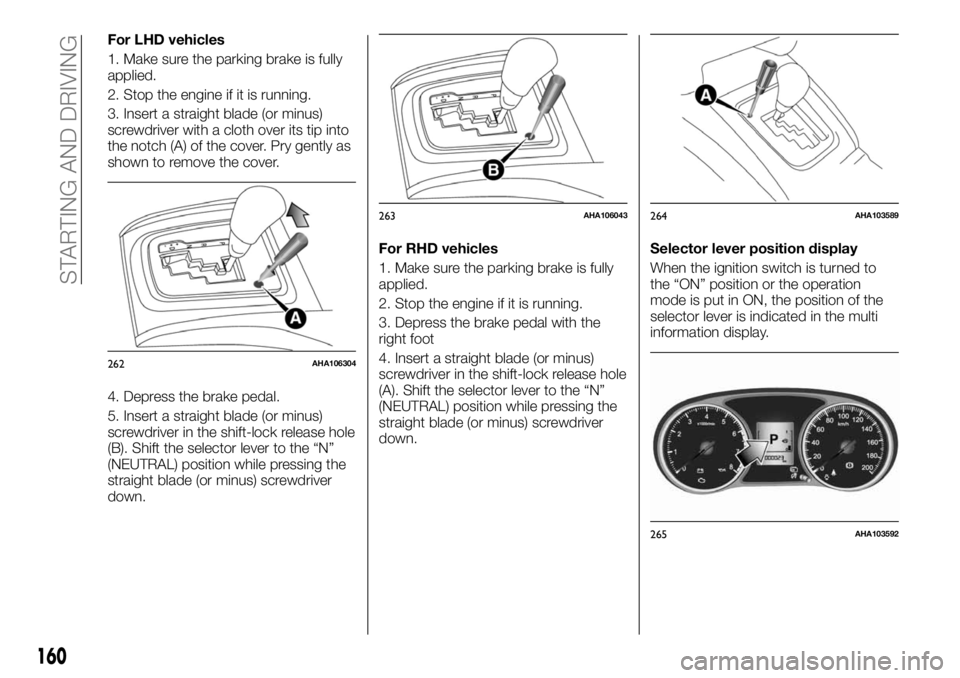
For LHD vehicles
1. Make sure the parking brake is fully
applied.
2. Stop the engine if it is running.
3. Insert a straight blade (or minus)
screwdriver with a cloth over its tip into
the notch (A) of the cover. Pry gently as
shown to remove the cover.
4. Depress the brake pedal.
5. Insert a straight blade (or minus)
screwdriver in the shift-lock release hole
(B). Shift the selector lever to the “N”
(NEUTRAL) position while pressing the
straight blade (or minus) screwdriver
down.For RHD vehicles
1. Make sure the parking brake is fully
applied.
2. Stop the engine if it is running.
3. Depress the brake pedal with the
right foot
4. Insert a straight blade (or minus)
screwdriver in the shift-lock release hole
(A). Shift the selector lever to the “N”
(NEUTRAL) position while pressing the
straight blade (or minus) screwdriver
down.Selector lever position display
When the ignition switch is turned to
the “ON” position or the operation
mode is put in ON, the position of the
selector lever is indicated in the multi
information display.
262AHA106304
263AHA106043264AHA103589
265AHA103592
160
STARTING AND DRIVING
Page 163 of 312
Selector lever positions
“P” PARK
This position locks the transmission to
prevent the vehicle from moving. The
engine can be started in this position.
“R” REVERSE
This position is to back up.
112)
“N” NEUTRAL
At this position the transmission is
disengaged. It is the same as the
neutral position on a manual
transmission, and should only be used
when the vehicle is stationary for an
extended length of time during driving,
such as in a traffic jam.
113) 114) 115)
“D” DRIVE
This position is used for most city and
highway driving. The transmission will
automatically change its gear
depending on road and driving
conditions.
116)
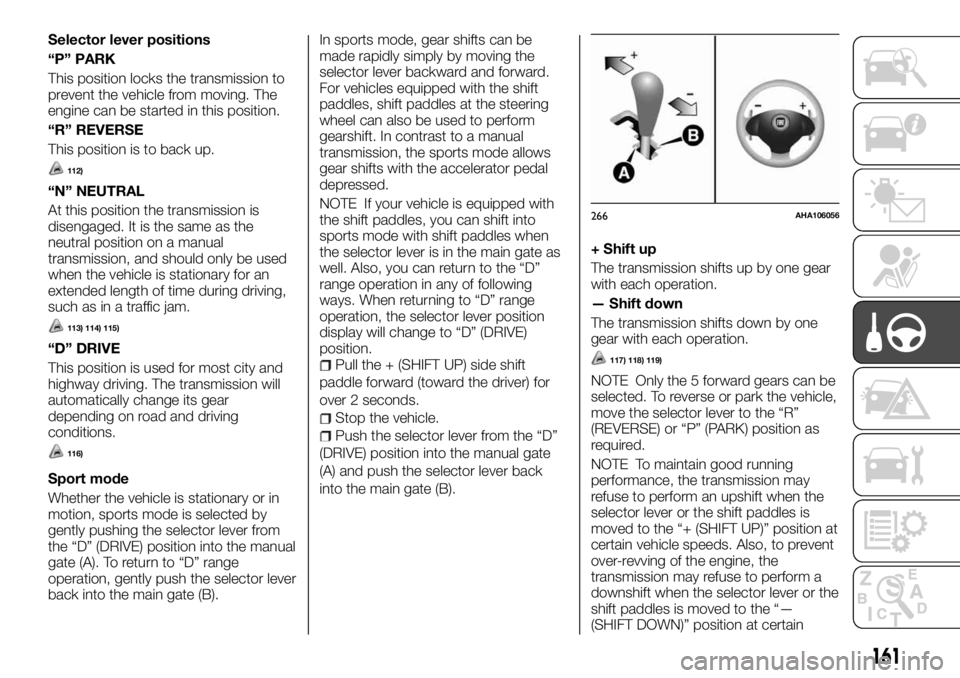
Sport mode
Whether the vehicle is stationary or in
motion, sports mode is selected by
gently pushing the selector lever from
the “D” (DRIVE) position into the manual
gate (A). To return to “D” range
operation, gently push the selector lever
back into the main gate (B).In sports mode, gear shifts can be
made rapidly simply by moving the
selector lever backward and forward.
For vehicles equipped with the shift
paddles, shift paddles at the steering
wheel can also be used to perform
gearshift. In contrast to a manual
transmission, the sports mode allows
gear shifts with the accelerator pedal
depressed.
NOTE If your vehicle is equipped with
the shift paddles, you can shift into
sports mode with shift paddles when
the selector lever is in the main gate as
well. Also, you can return to the “D”
range operation in any of following
ways. When returning to “D” range
operation, the selector lever position
display will change to “D” (DRIVE)
position.
Pull the + (SHIFT UP) side shift
paddle forward (toward the driver) for
over 2 seconds.
Stop the vehicle.
Push the selector lever from the “D”
(DRIVE) position into the manual gate
(A) and push the selector lever back
into the main gate (B).
+ Shift up
The transmission shifts up by one gear
with each operation.
— Shift down
The transmission shifts down by one
gear with each operation.
117) 118) 119)
NOTE Only the 5 forward gears can be
selected. To reverse or park the vehicle,
move the selector lever to the “R”
(REVERSE) or “P” (PARK) position as
required.
NOTE To maintain good running
performance, the transmission may
refuse to perform an upshift when the
selector lever or the shift paddles is
moved to the “+ (SHIFT UP)” position at
certain vehicle speeds. Also, to prevent
over-revving of the engine, the
transmission may refuse to perform a
downshift when the selector lever or the
shift paddles is moved to the “—
(SHIFT DOWN)” position at certain
266AHA106056
161
Page 165 of 312
Operation of the A/T
122) 123) 124) 125) 126) 127)
Passing acceleration
To gain extra acceleration in “D” (DRIVE)
position, push the accelerator to the
floor. The A/T will automatically
downshift.
In sports mode, downshifts do not take
place when the accelerator is
depressed all the way to the floor.
Waiting
For short waiting periods, such as at
traffic signals the vehicle can be left in
gear and held stationary with the
service brake. For longer waiting
periods with the engine running, place
the selector lever in the “N” (NEUTRAL)
position and apply the parking brake,
while holding the vehicle stationary with
the service brake.
128)
Parking
To park the vehicle, first bring it to a
complete stop, fully engage the parking
brake, and then move the selector lever
to the “P” (PARK) position.
If you are going to leave the vehicle
unattended, always switch off the
engine and carry the key.
On a slope, be sure to apply the
parking brake before moving the
selector lever to the “P” (PARK)
position. If you move the selector lever
to the “P” (PARK) position beforeapplying the parking brake, it may be
difficult to disengage the selector lever
from the “P” (PARK) position when next
you drive the vehicle, requiring
application of a strong force to the
selector lever to move from the “P”
(PARK) position.
When the A/T makes no speed
change
If the transmission does not change
speeds while driving, or your vehicle
does not pick up enough speed when
starting on an uphill slope, it may be
that there is something unusual
happening in the transmission, causing
a safety device to activate. Immediately
have your vehicle checked by a Fiat
Dealership as soon as possible.
1. If your vehicle has difficulty moving
uphill, shift the selector lever into 2nd
gear of the sports mode. This method
might not work depending on the
transmission malfunction.
2. Once the vehicle is moving on a level
road, move the selector lever back to
“D” (DRIVE).
When the selector lever position display
in the instrument panel blinks, it means
that there is an abnormal condition in
the transmission. Refer to “When the
selector lever position display blinks”.
IMPORTANT
111)Always depress the brake pedal when
shifting the selector lever into a gear from
the “P” (PARK) or “N” (NEUTRAL) position.
Never put your foot on the accelerator
pedal while shifting the selector lever from
the “P” (PARK) or “N” (NEUTRAL) position.
112)Never shift into the “P” (PARK) or “R”
(REVERSE) position while the vehicle is in
motion to avoid a transmission damage.
113)Never move the selector lever to the
“N” (NEUTRAL) position while driving. A
serious accident could occur since you
could accidentally move the lever into the
“P” (PARK) or “R” (REVERSE) position or
you will lose engine braking.
114)On a gradient, the engine should be
started in the “P” (PARK) position, not in the
“N” (NEUTRAL) position.
115)To prevent rolling, always keep your
foot on the brake pedal when the vehicle is
in “N” (NEUTRAL) position, or when shifting
into or out of “N” (NEUTRAL) position.
116)To prevent transmission damage,
never shift into the “D” (DRIVE) position
from the “R” (REVERSE) position while the
vehicle is in motion.
117)In sports mode, the driver must
execute upward shifts in accordance with
prevailing road conditions, taking care to
keep the engine speed below the red zone.
118)Repeated continuous operation of the
selector lever or the shift paddles will
continuously switch shift position.
163
Page 166 of 312
119)For vehicles equipped with the shift
paddles, do not use the left- and right-hand
shift paddles at the same time. Doing so
could cause a shift of gear ratio that you do
not expect.
120)If the selector lever position display
blinks while you are driving, it is likely that a
safety device is operating because of a
malfunction in the automatic transmission.
Have the vehicle inspected by a Fiat
Dealership as soon as possible.
121)If the lamp comes on, reduce the
engine speed and stop the vehicle in a safe
area. Then set the selector lever to “P”
(PARK) position and idle the engine until the
warning lamp goes off. When the warning
lamp goes off, resume normal driving. If the
warning lamp does not go off, we
recommend you to have your vehicle
inspected by a Fiat Dealership.
122)Before selecting a gear with the
engine running and the vehicle stationary,
fully depress the brake pedal to prevent the
vehicle from creeping. The vehicle will begin
to move as soon as the gear is engaged,
especially when the engine speed is high,
at fast idle or with the air conditioner
operating, the brakes should only be
released when you are ready to drive away.
123)Depress the brake pedal with the right
foot at all times. Using the left foot could
cause driver movement delay in case of an
emergency.
124)To prevent sudden acceleration, never
race the engine when shifting from the “P”
(PARK) or “N” (NEUTRAL) position.
125)Operating the accelerator pedal while
the other foot is resting on the brake pedal
will affect braking efficiency and may cause
premature wear of brake pads.126)Use the selector lever in the correct
shift position in accordance with driving
conditions. Never coast downhill backward
with the selector lever in the {“D” (DRIVE) or
sports mode} or coast forward with the
selector lever in the “R” (REVERSE)
position. The engine may stop and the
unexpected increase in brake pedal effort
and steering wheel weight could lead to an
accident.
127)Do not race the engine with brake
pedal pressed when the vehicle is
stationary. This can damage the A/T. Also,
when you depress the accelerator pedal
while holding down the brake pedal with
the selector lever in the “P” (PARK), “N”
(NEUTRAL) or “D” (DRIVE) position, the
engine revolutions may not rise as high as
when performing the same operation with
the selector lever in the “N” (NEUTRAL)
position.
128)Never hold the vehicle stationary on a
hill using the accelerator pedal (without
using the brake pedal). Always apply the
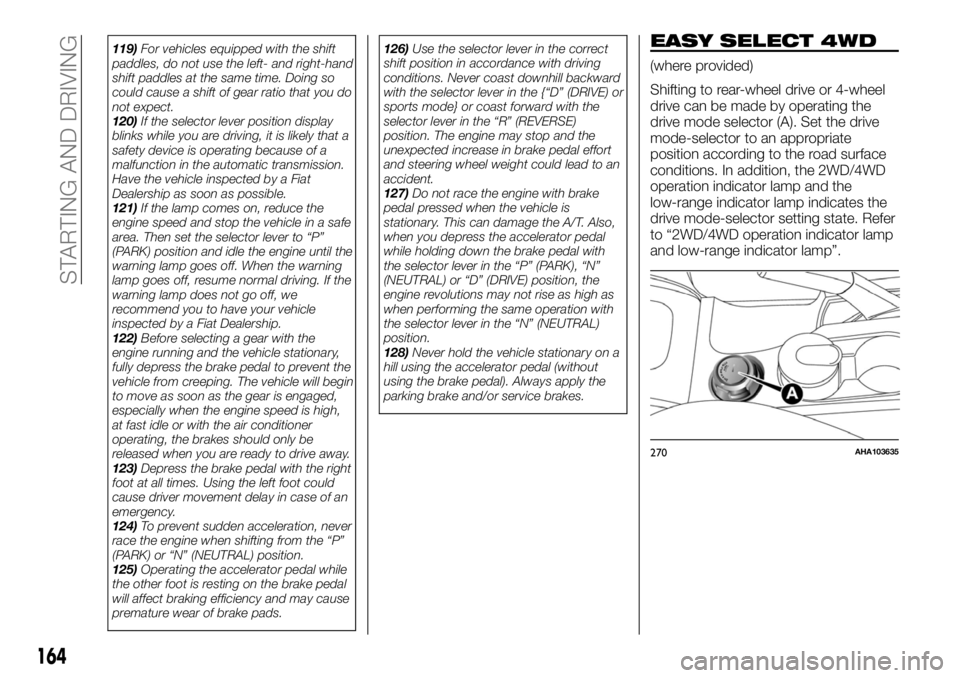
parking brake and/or service brakes.EASY SELECT 4WD
(where provided)
Shifting to rear-wheel drive or 4-wheel
drive can be made by operating the
drive mode selector (A). Set the drive
mode-selector to an appropriate
position according to the road surface
conditions. In addition, the 2WD/4WD
operation indicator lamp and the
low-range indicator lamp indicates the
drive mode-selector setting state. Refer
to “2WD/4WD operation indicator lamp
and low-range indicator lamp”.
270AHA103635
164
STARTING AND DRIVING
Page 168 of 312
To shift from ToProcedure
Vehicles with manual transmission Vehicles with automatic transmission
2H 4HThe drive mode-selector can be operated while the
vehicle is either moving or stationary. When the
vehicle is not in motion, shift the gearshift lever to
the “N” (Neutral) position before operating the drive
mode-selector. When the vehicle is moving, and
only while it can be steered straight ahead, release
the accelerator pedal before operating the drive
mode-selector.The drive mode-selector can be operated while the
vehicle is either moving or stationary. When the
vehicle is not in motion, shift the selector lever to
the “N” (NEUTRAL) position before operating the
drive mode-selector. When the vehicle is moving,
and only while it can be steered straight ahead,
shift the selector lever to the “D” (DRIVE) position,
and release the accelerator pedal before operating
the drive mode-selector. 4H 2H
4H 4L
Stop the vehicle, depress the clutch pedal to the
floor and operate the drive mode-selector. Keep
depressing the clutch pedal while 2WD/4WD
operation indicator lamp continues to blink.Stop the vehicle, shift the selector lever to the “N”
(NEUTRAL) position, and operate the drive
mode-selector. If operation is made with the
selector lever placed in any other position than “N”
(NEUTRAL) position, a gear noise may be
generated, with a possible failure to shift into a
proper gear. 4L 4H
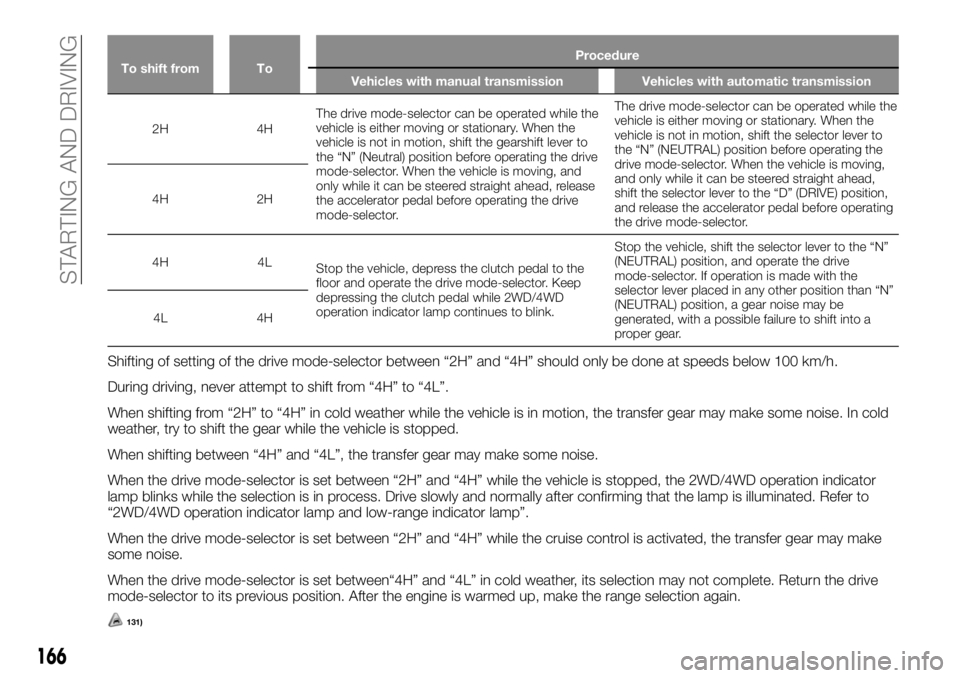
Shifting of setting of the drive mode-selector between “2H” and “4H” should only be done at speeds below 100 km/h.
During driving, never attempt to shift from “4H” to “4L”.
When shifting from “2H” to “4H” in cold weather while the vehicle is in motion, the transfer gear may make some noise. In cold
weather, try to shift the gear while the vehicle is stopped.
When shifting between “4H” and “4L”, the transfer gear may make some noise.
When the drive mode-selector is set between “2H” and “4H” while the vehicle is stopped, the 2WD/4WD operation indicator
lamp blinks while the selection is in process. Drive slowly and normally after confirming that the lamp is illuminated. Refer to
“2WD/4WD operation indicator lamp and low-range indicator lamp”.
When the drive mode-selector is set between “2H” and “4H” while the cruise control is activated, the transfer gear may make
some noise.
When the drive mode-selector is set between“4H” and “4L” in cold weather, its selection may not complete. Return the drive
mode-selector to its previous position. After the engine is warmed up, make the range selection again.
131)
166
STARTING AND DRIVING
Page 170 of 312
“4H” <-> “4L”
Selector
positionIndicator lamp
4H
and
and
and
Drive
mode
switching
in
progress
4L
— Blink
— Illuminate
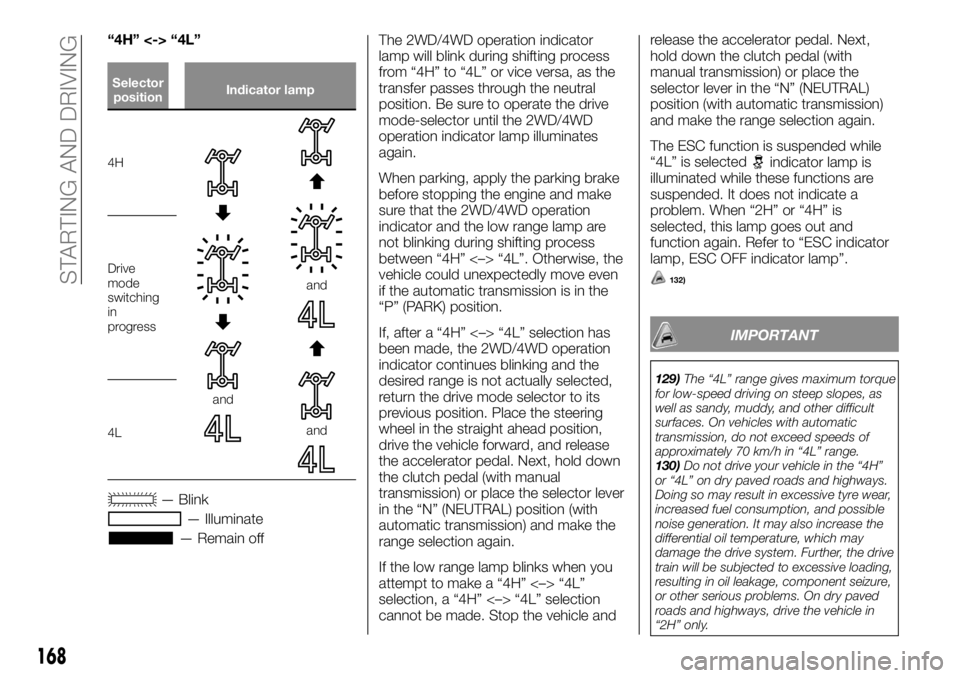
— Remain offThe 2WD/4WD operation indicator
lamp will blink during shifting process
from “4H” to “4L” or vice versa, as the
transfer passes through the neutral
position. Be sure to operate the drive
mode-selector until the 2WD/4WD
operation indicator lamp illuminates
again.
When parking, apply the parking brake
before stopping the engine and make
sure that the 2WD/4WD operation
indicator and the low range lamp are
not blinking during shifting process
between “4H” <–> “4L”. Otherwise, the
vehicle could unexpectedly move even
if the automatic transmission is in the
“P” (PARK) position.
If, after a “4H” <–> “4L” selection has
been made, the 2WD/4WD operation
indicator continues blinking and the
desired range is not actually selected,
return the drive mode selector to its
previous position. Place the steering
wheel in the straight ahead position,
drive the vehicle forward, and release
the accelerator pedal. Next, hold down
the clutch pedal (with manual
transmission) or place the selector lever
in the “N” (NEUTRAL) position (with
automatic transmission) and make the
range selection again.
If the low range lamp blinks when you
attempt to make a “4H” <–> “4L”
selection, a “4H” <–> “4L” selection
cannot be made. Stop the vehicle andrelease the accelerator pedal. Next,
hold down the clutch pedal (with
manual transmission) or place the
selector lever in the “N” (NEUTRAL)
position (with automatic transmission)
and make the range selection again.
The ESC function is suspended while
“4L” is selected
indicator lamp is
illuminated while these functions are
suspended. It does not indicate a
problem. When “2H” or “4H” is
selected, this lamp goes out and
function again. Refer to “ESC indicator
lamp, ESC OFF indicator lamp”.
132)
IMPORTANT
129)The “4L” range gives maximum torque
for low-speed driving on steep slopes, as
well as sandy, muddy, and other difficult
surfaces. On vehicles with automatic
transmission, do not exceed speeds of
approximately 70 km/h in “4L” range.
130)Do not drive your vehicle in the “4H”
or “4L” on dry paved roads and highways.
Doing so may result in excessive tyre wear,
increased fuel consumption, and possible
noise generation. It may also increase the
differential oil temperature, which may
damage the drive system. Further, the drive
train will be subjected to excessive loading,
resulting in oil leakage, component seizure,
or other serious problems. On dry paved
roads and highways, drive the vehicle in
“2H” only.
168
STARTING AND DRIVING
Page 171 of 312
131)Do not operate the drive
mode-selector while the rear wheels of the
vehicle are slipping on snow or ice.
132)If a problem is detected in the transfer
system, a safety device will activate. The
2WD/4WD operation indicator blinks (twice
per second), and transfer shifting will
become impossible. Park your vehicle in a
safe place, turn off the engine for a few
moments. Restart the engine. The lamp
should resume normal operation. If the
lamp continue to blink, have the vehicle
checked by a Fiat Dealership as soon as
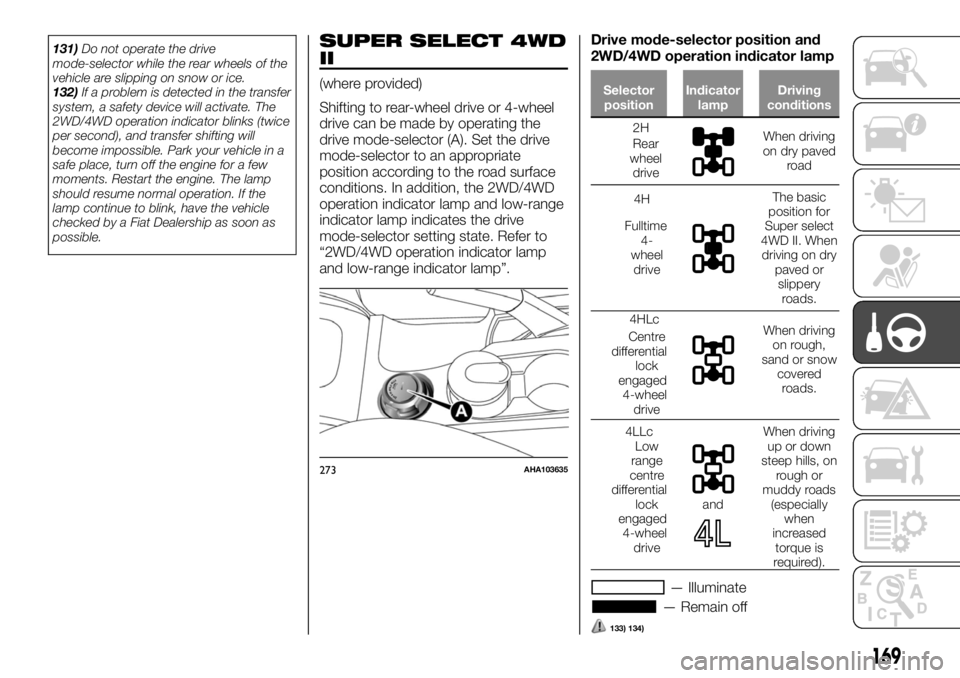
possible.SUPER SELECT 4WD
II
(where provided)
Shifting to rear-wheel drive or 4-wheel
drive can be made by operating the
drive mode-selector (A). Set the drive
mode-selector to an appropriate
position according to the road surface
conditions. In addition, the 2WD/4WD
operation indicator lamp and low-range
indicator lamp indicates the drive
mode-selector setting state. Refer to
“2WD/4WD operation indicator lamp
and low-range indicator lamp”.Drive mode-selector position and
2WD/4WD operation indicator lampSelector
positionIndicator
lampDriving
conditions
2H
Rear
wheel
driveWhen driving
on dry paved
road
4H
Fulltime
4-
wheel
drive
The basic
position for
Super select
4WD II. When
driving on dry
paved or
slippery
roads.
4HLc
Centre
differential
lock
engaged
4-wheel
drive
When driving
on rough,
sand or snow
covered
roads.
4LLc
Low
range
centre
differential
lock
engaged
4-wheel
drive
and
When driving
up or down
steep hills, on
rough or
muddy roads
(especially
when
increased
torque is
required).
— Illuminate
— Remain off
133) 134)
273AHA103635
169
Page 173 of 312
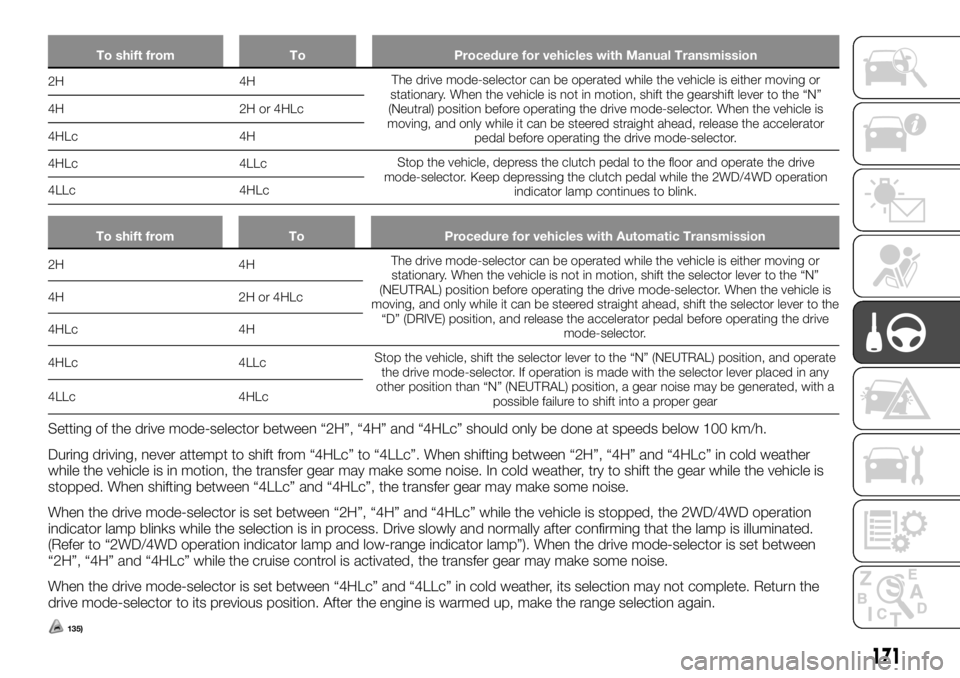
To shift from To Procedure for vehicles with Manual Transmission
2H 4HThe drive mode-selector can be operated while the vehicle is either moving or
stationary. When the vehicle is not in motion, shift the gearshift lever to the “N”
(Neutral) position before operating the drive mode-selector. When the vehicle is
moving, and only while it can be steered straight ahead, release the accelerator
pedal before operating the drive mode-selector. 4H 2H or 4HLc
4HLc 4H
4HLc 4LLcStop the vehicle, depress the clutch pedal to the floor and operate the drive
mode-selector. Keep depressing the clutch pedal while the 2WD/4WD operation
indicator lamp continues to blink. 4LLc 4HLc
To shift from To Procedure for vehicles with Automatic Transmission
2H 4HThe drive mode-selector can be operated while the vehicle is either moving or
stationary. When the vehicle is not in motion, shift the selector lever to the “N”
(NEUTRAL) position before operating the drive mode-selector. When the vehicle is
moving, and only while it can be steered straight ahead, shift the selector lever to the
“D” (DRIVE) position, and release the accelerator pedal before operating the drive
mode-selector. 4H 2H or 4HLc
4HLc 4H
4HLc 4LLcStop the vehicle, shift the selector lever to the “N” (NEUTRAL) position, and operate
the drive mode-selector. If operation is made with the selector lever placed in any
other position than “N” (NEUTRAL) position, a gear noise may be generated, with a
possible failure to shift into a proper gear 4LLc 4HLc
Setting of the drive mode-selector between “2H”, “4H” and “4HLc” should only be done at speeds below 100 km/h.
During driving, never attempt to shift from “4HLc” to “4LLc”. When shifting between “2H”, “4H” and “4HLc” in cold weather
while the vehicle is in motion, the transfer gear may make some noise. In cold weather, try to shift the gear while the vehicle is
stopped. When shifting between “4LLc” and “4HLc”, the transfer gear may make some noise.
When the drive mode-selector is set between “2H”, “4H” and “4HLc” while the vehicle is stopped, the 2WD/4WD operation
indicator lamp blinks while the selection is in process. Drive slowly and normally after confirming that the lamp is illuminated.
(Refer to “2WD/4WD operation indicator lamp and low-range indicator lamp”). When the drive mode-selector is set between
“2H”, “4H” and “4HLc” while the cruise control is activated, the transfer gear may make some noise.
When the drive mode-selector is set between “4HLc” and “4LLc” in cold weather, its selection may not complete. Return the
drive mode-selector to its previous position. After the engine is warmed up, make the range selection again.
135)
171