run flat FIAT FULLBACK 2017 Owner handbook (in English)
[x] Cancel search | Manufacturer: FIAT, Model Year: 2017, Model line: FULLBACK, Model: FIAT FULLBACK 2017Pages: 312, PDF Size: 12.31 MB
Page 35 of 312
27)Before driving, make sure that the rear
gate is securely closed. If the rear gate
opens while driving the vehicle, objects
stored in the cargo area could fall out onto
the road.
28)Once the dead lock system is engaged
it is impossible to open the doors from
inside the vehicle. Therefore, before
engaging the system check that there is no
one left inside. If the remote control battery
is flat, the system can be disengaged only
by inserting the key metal insert in either of
the door locks as described previously: in
this case the device remains active only for
the rear doors.
29)This spring loaded system has
activation forces that were designed for
optimum comfort. Accidental knocks or a
strong gust of wind may release the
springs and close the doors
spontaneously.
30)On vehicles with the rear bumper,
never swing down the rear gate because
the rear gate could be damaged.
31)Never close the rear gate with the link
or wire left unhooked.SEATS
SEAT ADJUSTMENT
Adjust the driver’s seat so that you are
comfortable and that you can reach the
pedals, steering wheel, switches etc.
while retaining a clear field of vision.
32) 33) 34) 35) 36) 37) 38) 39) 40) 41) 42) 43) 44) 45)
10)
FRONT SEATS
Manual type
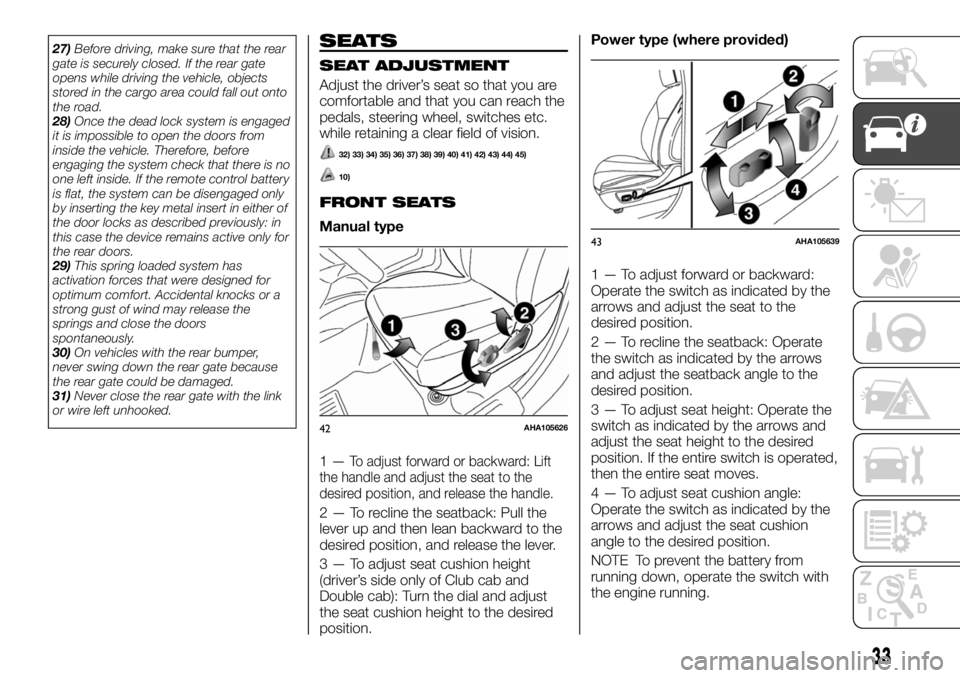
1—
To adjust forward or backward: Lift
the handle and adjust the seat to the
desired position, and release the handle.
2 — To recline the seatback: Pull the
lever up and then lean backward to the
desired position, and release the lever.
3 — To adjust seat cushion height
(driver’s side only of Club cab and
Double cab): Turn the dial and adjust
the seat cushion height to the desired
position.Power type (where provided)
1 — To adjust forward or backward:
Operate the switch as indicated by the
arrows and adjust the seat to the
desired position.
2 — To recline the seatback: Operate
the switch as indicated by the arrows
and adjust the seatback angle to the
desired position.
3 — To adjust seat height: Operate the
switch as indicated by the arrows and
adjust the seat height to the desired
position. If the entire switch is operated,
then the entire seat moves.
4 — To adjust seat cushion angle:
Operate the switch as indicated by the
arrows and adjust the seat cushion
angle to the desired position.
NOTE To prevent the battery from
running down, operate the switch with
the engine running.
42AHA105626
43AHA105639
33
Page 46 of 312
WARNING
56)As the driver's exterior mirror is curved,
it may slightly alter the perception of
distance of the reflected image. Further, the
reflective surface of the lower part of the
exterior mirrors is parabolic to increase the
field of view. The reflected image size is
thus reduced and gives the impression that
the reflected item is further away than it
actually is.
57)Do not attempt to adjust the rear view
mirrors while driving. This can be
dangerous. Always adjust the mirrors
before driving.
58)Your vehicle is equipped with convex
type mirrors. Remind that objects that you
see in the mirror will look smaller and
farther away compared to a normal flat
mirror. Do not use this mirror to estimate
distance of following vehicles when
changing lanes.
59)Do not drive the vehicle with the mirror
folded in. The lack of rearward visibility
normally provided by the mirror could lead
to an accident.
IMPORTANT
20)It is possible to retract and extend the
mirrors by hand. After retracting a mirror
using the mirror retractor switch, however,
you should extend it by using the switch
again, not by hand. If you extended the
mirror by hand after retracting it using the
switch, it would not properly lock in
position. As a result, it could move because
of the wind or vibration while you are
driving, taking away your rearward visibility.
EXTERNAL LIGHTS
COMBINATION
HEADLAMPS AND
DIPPER SWITCH
Headlamps
NOTE Do not leave the lamps on for a
long time while the engine is stationary
(not running). A run-down battery could
result.
NOTE When it rains, or when the
vehicle has been washed, the inside of
the lens sometimes becomes foggy, but
this does not indicate a functional
problem. When the lamp is switched
on, the heat will remove the fog.
However, if water gathers inside the
lamp, we recommend you to have
checked.
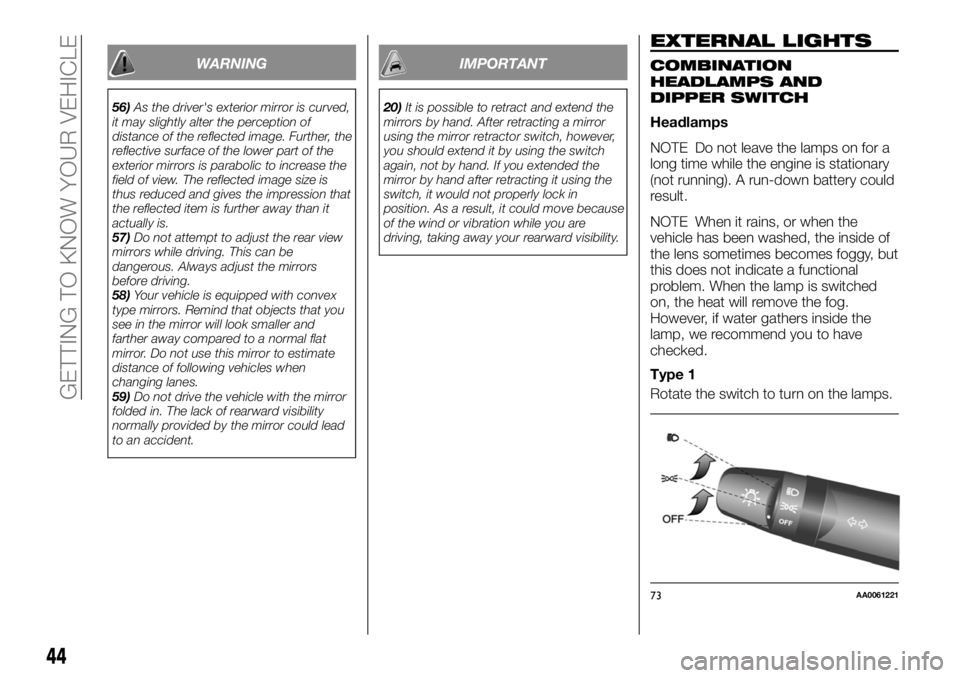
Type 1
Rotate the switch to turn on the lamps.
73AA0061221
44
GETTING TO KNOW YOUR VEHICLE
Page 86 of 312
96)Do not spray water or spill beverages
inside the vehicle. If the switches, wires, or
electrical components become wet, they
could malfunction or cause a vehicle fire. If
you accidentally spill a beverage, wipe up
as much liquid as possible and immediately
consult a Fiat Dealership.
97)Do not put a hanger or any heavy or
pointed object on the coat hook. If the
curtain airbag was activated, any such item
could be propelled away with great force
and could prevent the curtain airbag from
inflating correctly. Hang clothes directly on
the coat hook (without using a hanger).
Make sure there are no heavy or sharp
objects in the pockets of clothes that you
hang on the coat hook.
IMPORTANT
32)When the accessory socket is not in
use, be sure to close the lid, because the
socket might become clogged by foreign
material and be short-circuited.
33)Never leave lighters, canned
carbonated beverage, and spectacles in
the cabin when parking the vehicle in hot
sunshine. The cabin will become extremely
hot, so lighters and other flammable items
may catch fire and unopened drink cans
may rupture. Also, spectacles with plastic
lenses or materials could deform or crack.
34)Put out matches and cigarettes before
they are placed in the ashtray.
35)Always close the ashtray. If left open,
other cigarette butts in the ashtray may be
rekindled.36)Be sure to use a “plug-in” type
accessory operating at 12 V and at 120 W
or less. When using more than one socket
at the same time, make sure that the
electrical accessories are 12 V accessories
and that the total power consumption does
not exceed 120 W.
37)Long use of the electric appliance
without running the engine may run down
the battery.
FUEL SELECTION
Recommended fuel:Cetane number
(EN590) 51 or higher
38) 39) 40) 41)
NOTE For diesel fuel, due to the
separation of paraffin, the fluidity
decreases considerably as the
temperature falls. Because of this fact
there are two kinds of fuel: “summer”
and “winter”. This must be considered
in winter use. Select either of the two
kinds of fuel in accordance with
ambient temperature.
Above -5 °C: “Summer” diesel
Below -5 °C: “Winter” diesel
When travelling abroad, find out in
advance about the fuels served in local
service stations.
Poor-quality diesel fuel can cause
deposits to form in the injector, resulting
in black smoke and rough idling.
If these problems occur, you are
advised to add a cleaning additive to
the diesel fuel when you refuel the
vehicle. The additive will break up and
remove the deposits, thereby returning
the engine to a normal condition.
Be sure to use a FCA GENUINE
DIESEL FUEL SYSTEM CLEANER.
Using an unsuitable additive could
make the engine malfunction. For
details, please contact your Fiat
Dealsership.
84
GETTING TO KNOW YOUR VEHICLE
Page 146 of 312
ECONOMICAL
DRIVING
For economical driving, there are some
technical requirements that have to be
met. The prerequisite for low fuel
consumption is a properly adjusted
engine. In order to achieve longer life of
the vehicle and the most economical
operation, we recommend you to have
the vehicle checked at regular intervals
in accordance with the service
standards.
Fuel economy and generation of
exhaust gas and noise are highly
influenced by personal driving habits as
well as the particular operating
conditions. The following points should
be observed in order to minimize wear
of brakes, tyres and engine as well as
to reduce environmental pollution.
Starting the engine
Avoid sudden acceleration and sudden
starts, as they will increase fuel
consumption.
Shifting
Shift only at an appropriate speed and
engine speed. Always use the highest
shift position possible.
The transfer shift lever or the drive
modeselector should be set to “2H”
when driving 4WD vehicles on normal
roads and express ways to obtain best
possible fuel economy.City traffic
Frequent starting and stopping increases
the average fuel consumption. Use roads
with smooth traffic flow whenever
possible. When driving on congested
roads, avoid use of a low shift position at
high engine speeds.
Idling
The vehicle consumes fuel even during
idling. Avoid extended idling whenever
possible.
Speed
At higher the vehicle speed, more fuel is
consumed. Avoid driving at full speed.
Even a slight release of the accelerator
pedal will save a significant amount of
fuel.
Tyre inflation pressure
Check the tyre inflation pressures at
regular intervals. Low tyre inflation
pressure increases road resistance and
fuel consumption. In addition, low tyre
pressures adversely affect tyre wear
and driving stability.
Cargo loads
Do not drive with unnecessary articles
in the luggage compartment. Especially
during city driving where frequent
starting and stopping is necessary, the
increased weight of the vehicle will
greatly affect fuel consumption. Also
avoid driving with unnecessary luggage
or carriers, etc., on the roof; the
increased air resistance will increase
fuel consumption.Cold engine starting
Starting of a cold engine consumes
more fuel. Unnecessary fuel
consumption is also caused by keeping
a hot engine running. After the engine is
started, commence driving as soon as
possible.
Cooler or air conditioning
The use of the air conditioner will
increase the fuel consumption.
144
STARTING AND DRIVING
Page 160 of 312
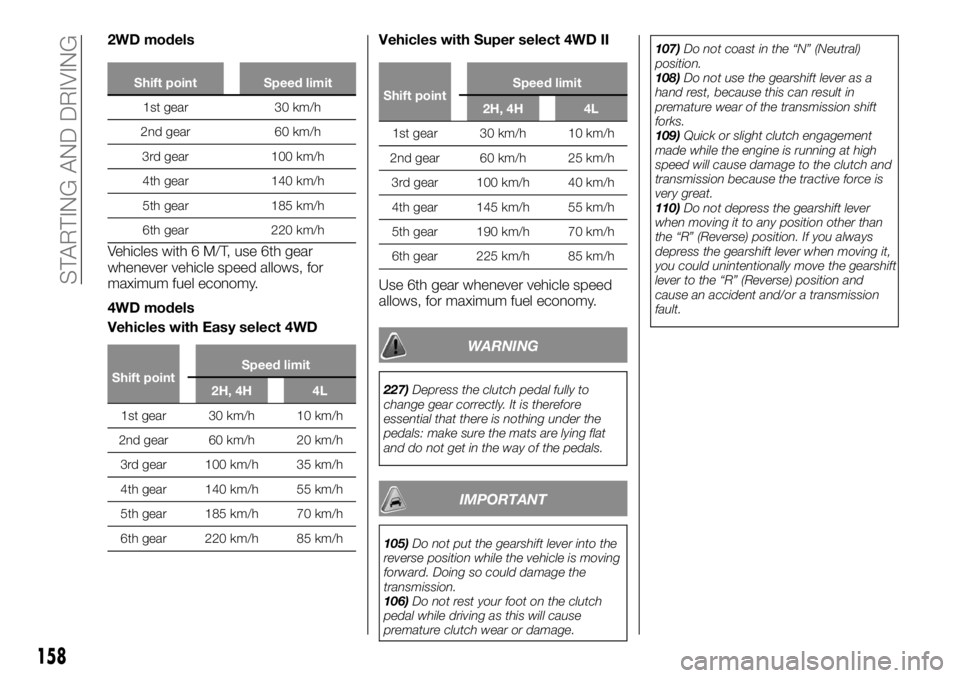
2WD models
Shift point Speed limit
1st gear 30 km/h
2nd gear 60 km/h
3rd gear 100 km/h
4th gear 140 km/h
5th gear 185 km/h
6th gear 220 km/h
Vehicles with 6 M/T, use 6th gear
whenever vehicle speed allows, for
maximum fuel economy.
4WD models
Vehicles with Easy select 4WD
Shift pointSpeed limit
2H, 4H 4L
1st gear 30 km/h 10 km/h
2nd gear 60 km/h 20 km/h
3rd gear 100 km/h 35 km/h
4th gear 140 km/h 55 km/h
5th gear 185 km/h 70 km/h
6th gear 220 km/h 85 km/h
Vehicles with Super select 4WD II
Shift pointSpeed limit
2H, 4H 4L
1st gear 30 km/h 10 km/h
2nd gear 60 km/h 25 km/h
3rd gear 100 km/h 40 km/h
4th gear 145 km/h 55 km/h
5th gear 190 km/h 70 km/h
6th gear 225 km/h 85 km/h
Use 6th gear whenever vehicle speed
allows, for maximum fuel economy.
WARNING
227)Depress the clutch pedal fully to
change gear correctly. It is therefore
essential that there is nothing under the
pedals: make sure the mats are lying flat
and do not get in the way of the pedals.
IMPORTANT
105)Do not put the gearshift lever into the
reverse position while the vehicle is moving
forward. Doing so could damage the
transmission.
106)Do not rest your foot on the clutch
pedal while driving as this will cause
premature clutch wear or damage.107)Do not coast in the “N” (Neutral)
position.
108)Do not use the gearshift lever as a
hand rest, because this can result in
premature wear of the transmission shift
forks.
109)Quick or slight clutch engagement
made while the engine is running at high
speed will cause damage to the clutch and
transmission because the tractive force is
very great.
110)Do not depress the gearshift lever
when moving it to any position other than
the “R” (Reverse) position. If you always
depress the gearshift lever when moving it,
you could unintentionally move the gearshift
lever to the “R” (Reverse) position and
cause an accident and/or a transmission
fault.
158
STARTING AND DRIVING
Page 161 of 312
AUTOMATIC
TRANSMISSION
SPORTS MODE 5A/T
(where provided)
During running-in period or immediately
after reconnection of the battery cable,
there may be a case where gear shifts
are not made smoothly. This does not
indicate a faulty transmission. Gear
shifts will become smooth after the
transmission has been shifted several
times by the electronic control system.
Selector lever operation
The transmission has 5 forward gears
and 1 reverse gear.
The individual gears are selected
automatically, depending on the speed
of the vehicle and the position of the
accelerator pedal.
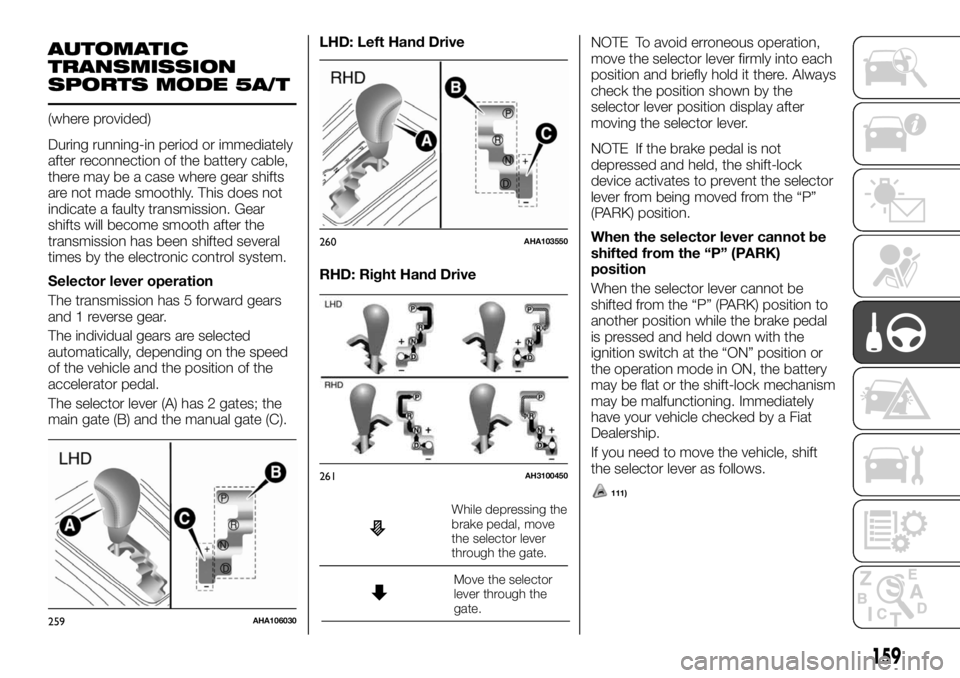
The selector lever (A) has 2 gates; the
main gate (B) and the manual gate (C).LHD: Left Hand Drive
RHD: Right Hand Drive
While depressing the
brake pedal, move
the selector lever
through the gate.
Move the selector
lever through the
gate.
111)
NOTE To avoid erroneous operation,
move the selector lever firmly into each
position and briefly hold it there. Always
check the position shown by the
selector lever position display after
moving the selector lever.
NOTE If the brake pedal is not
depressed and held, the shift-lock
device activates to prevent the selector
lever from being moved from the “P”
(PARK) position.
When the selector lever cannot be
shifted from the “P” (PARK)
position
When the selector lever cannot be
shifted from the “P” (PARK) position to
another position while the brake pedal
is pressed and held down with the
ignition switch at the “ON” position or
the operation mode in ON, the battery
may be flat or the shift-lock mechanism
may be malfunctioning. Immediately
have your vehicle checked by a Fiat
Dealership.
If you need to move the vehicle, shift
the selector lever as follows.
259AHA106030
260AHA103550
261AH3100450
159
Page 183 of 312
WARNING
232)When attempting to rock your vehicle
out of a stuck position, be sure that the
area around the vehicle is clear of people
and physical objects. The rocking motion
may cause the vehicle to suddenly launch
forward or backward, causing injury or
damage to nearby people or objects.
233)Go straight up. Do not try to traverse
across a steep slope.
234)If you begin to lose traction, ease off
the accelerator pedal and gently turn the
steering wheel alternatively left and right to
regain adequate traction again.
235)Avoid snaking down a sharp grade.
Descend the grade as straight as possible.
CAUTIONS ON
HANDLING OF
4 WHEEL DRIVE
VEHICLES
Tyres and wheels
Since the driving torque can be applied
to the 4 wheels, the performance of the
vehicle when operating in 4-wheel drive
is greatly affected by the condition of
the tyres.
Pay close attention to the tyres.
Install specified tyres on all wheels.
Refer to “Tyres and wheels”.
Be sure to the appropriate tyre
inflation pressure according to no cargo
or cargo. Refer to “Tyre inflation
pressures”.
Be sure to fit all 4 tyres and wheels of
the same size and type. When
replacement of any of the tyres or
wheels is necessary, replace all of them.
All tyres should be rotated whenever
the wear difference between the front
and rear tyres is recognizable.
Good vehicle performance cannot be
expected if there is a difference in wear
between tyres. Refer to “Tyre rotation”.
Check the tyre inflation pressure
regularly.
146)
Towing
If towing is necessary, we recommend
you to have it done by a Fiat Dealership
or a commercial tow truck service. In
the following cases, transport the
vehicle using a tow truck.
The engine runs but the vehicle does
not move or abnormal noise is
produced.
Inspection of the vehicle’s underside
reveals that oil or some other fluid is
leaking.
If a wheel gets stuck in a ditch, do not
try to tow the vehicle. Please contact
your Fiat Dealership or a commercial
tow truck service for assistance.
Only when you cannot receive a towing
service from a Fiat Dealership or
commercial tow truck service, tow your
vehicle carefully in accordance with the
instructions given in “Towing”.
181
Page 184 of 312
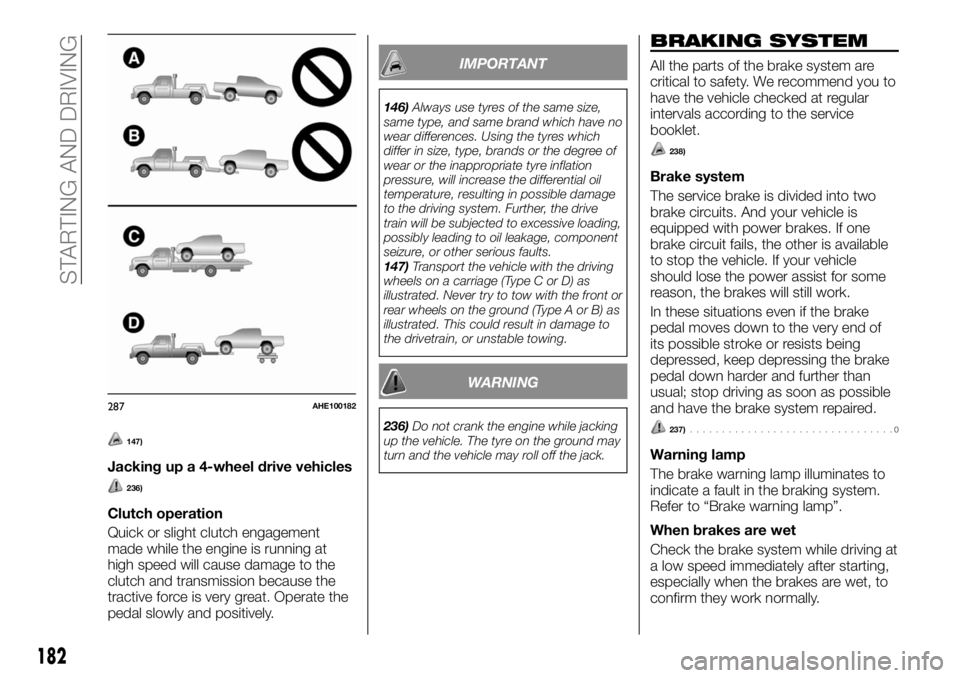
147)
Jacking up a 4-wheel drive vehicles
236)
Clutch operation
Quick or slight clutch engagement
made while the engine is running at
high speed will cause damage to the
clutch and transmission because the
tractive force is very great. Operate the
pedal slowly and positively.
IMPORTANT
146)Always use tyres of the same size,
same type, and same brand which have no
wear differences. Using the tyres which
differ in size, type, brands or the degree of
wear or the inappropriate tyre inflation
pressure, will increase the differential oil
temperature, resulting in possible damage
to the driving system. Further, the drive
train will be subjected to excessive loading,
possibly leading to oil leakage, component
seizure, or other serious faults.
147)Transport the vehicle with the driving
wheels on a carriage (Type C or D) as
illustrated. Never try to tow with the front or
rear wheels on the ground (Type A or B) as
illustrated. This could result in damage to
the drivetrain, or unstable towing.
WARNING
236)Do not crank the engine while jacking
up the vehicle. The tyre on the ground may
turn and the vehicle may roll off the jack.
BRAKING SYSTEM
All the parts of the brake system are
critical to safety. We recommend you to
have the vehicle checked at regular
intervals according to the service
booklet.
238)
Brake system
The service brake is divided into two
brake circuits. And your vehicle is
equipped with power brakes. If one
brake circuit fails, the other is available
to stop the vehicle. If your vehicle
should lose the power assist for some
reason, the brakes will still work.
In these situations even if the brake
pedal moves down to the very end of
its possible stroke or resists being
depressed, keep depressing the brake
pedal down harder and further than
usual; stop driving as soon as possible
and have the brake system repaired.
237)................................0
Warning lamp
The brake warning lamp illuminates to
indicate a fault in the braking system.
Refer to “Brake warning lamp”.
When brakes are wet
Check the brake system while driving at
a low speed immediately after starting,
especially when the brakes are wet, to
confirm they work normally.
287AHE100182
182
STARTING AND DRIVING
Page 223 of 312
NOTE Confirm that the hanger disc is
securely fitted in the wheel disc hole
when the wheel is just lifted off the
ground.
3. After winding up the spare wheel
sufficiently, make sure it is not loose (the
tightening torque should be
approximately 40 Nm (achieved by
applying a force of 200 N at the end of
the wheel nut wrench) then withdraw
the jack handle.
4. Have your damaged tyre repaired as
soon as possible.
315) 316) 317)
To store the tools, jack and jack
handle
Reverse the removing procedure when
storing the jack, jack handle and wheel
nut wrench. Refer to “Tools, jack and
jack handle”.
WARNING
291)Use the jack only to replace wheels
on the vehicle with which it is supplied or
on other vehicles of the same model. Never
use the jack for other purposes, such as
lifting other car models. Never use the jack
to carry out repairs under the vehicle.
Incorrect positioning of the jack may cause
the lifted vehicle to fall. Do not use the jack
for loads higher than those shown on the
label.292)Have the wheel repaired and refitted
as soon as possible. Do not apply grease
to the bolt threads before fitting: they could
come unscrewed.
293)The spare wheel supplied (for
versions/markets, where provided) is
specific for your vehicle. Therefore, it must
not be used on other models. Do not use
spare wheels of other models on your
vehicle. The wheel bolts are specific for
your vehicle: do not use them on different
models and do not use bolts from other
models on your car.
294)Use your hazard lights, warning
triangle, etc. to show that your vehicle is
stationary according to the regulations in
force. Passengers should get out of the
vehicle, particularly if it is heavily loaded,
and wait for the wheel to be changed away
from the traffic. Apply the handbrake. in the
event of a wheel change on a slope or on
unsurfaced roads, put any object as stop
under the wheels.
295)Be sure to apply chocks or blocks to
the correct tyre when jacking up the
vehicle. If the vehicle moves while jacked
up, the jack could slip out of position,
leading to an accident.
296)The pressure should be periodically
checked and maintained at the specified
pressure while the tyre is stowed. Driving
with an insufficient tyre pressure can lead
to an accident. If you have no choice but to
drive with an insufficient tyre pressure,
keep your speed down and inflate the tyre
to the correct pressure as soon as
possible. (Refer to “Tyre inflation
pressures”).297)Set the jack only at the positions
shown here. If the jack is set at a wrong
position, it could dent your vehicle or the
jack might fall over and cause personal
injury.
298)Do not use the jack on a tilted or soft
surface. Otherwise, the jack might slip and
cause personal injury. Always use the jack
on a flat, hard surface. Before setting the
jack, make sure there are no sand or
pebbles under the jack base.
299)Stop jacking up the vehicle as soon
as the tyre is raised off the ground. It is
dangerous to raise the vehicle any higher.
Do not get under your vehicle while using
the jack. Do not bump the raised vehicle or
leave it sitting on the jack for a long time.
Both are very dangerous. Do not use a jack
except the one that came with your
vehicle. The jack should not be used for
any purpose other than to change a tyre.
No one should be in your vehicle when
using the jack. Do not start or run the
engine while your vehicle is on the jack. Do
not turn the raised wheel. The tyres still on
the ground could turn and make your
vehicle fall off the jack.
300)Do not get under your vehicle while
using the jack.
301)Do not bump the raised vehicle or
leave it sitting on the jack for a long time.
Both are very dangerous.
302)Do not use a jack except the one that
came with your vehicle.
303)The jack should not be used for any
purpose other than to change a tyre.
304)No one should be in your vehicle
when using the jack.
305)Do not start or run the engine while
your vehicle is on the jack.
221
Page 228 of 312
174)Never tow an automatic transmission
vehicle with the front wheels up (and the
rear wheels on the ground) (Type B) when
the automatic transmission fluid level is low.
This may cause serious and expensive
damage to the transmission.
175)When the engine is not running, the
brake booster and power steering pump do
not operate. This means higher brake
depression force and higher steering effort
are required. Therefore, vehicle operation is
very difficult.
176)Do not leave the ignition switch in the
“LOCK” position or the operation mode in
OFF. The steering wheel will lock, causing
loss of control.
177)On vehicles with super select 4WD II,
when you are going to tow another vehicle,
set the drive mode-selector to “4H”
position. Selecting “2H” drive may increase
the differential oil temperature, resulting in
possible damage to the driving system.
Further, the drive train will be subjected to
excessive loading possibly leading to oil
leakage, component seizure, or other
serious faults.OPERATION UNDER
ADVERSE DRIVING
CONDITIONS
On a flooded road
Avoid flooded roads. In the event
driving flooded roads, doing so may
cause the following serious damage to
the vehicle.
Engine stalling
Short in electrical components
Engine damage caused by water
immersion
After driving flooded roads, be sure to
have an inspection at a Fiat Dealership
and take the necessary measures or
repair.
When driving in rain, or water-covered
roads, or through a car wash, water
could enter the brake discs, resulting in
temporarily ineffective brakes. In such
cases, lightly depress the brake pedal
to see if the brakes operate properly. If
they do not, lightly depress the pedal
several times while driving in order to
dry the brake pads.
On a wet road
When driving in rain or on a road with
many puddles a layer of water may
form between the tyres and the road
surface. This reduces a tyre’s frictional
resistance on the road, resulting in loss
of steering stability and braking
capability.To cope with this, observe the following
items:
(a) Drive your vehicle at a slow speed.
(b) Do not drive on worn tyres.
(c) Always maintain the specified tyre
inflation pressures.
On a snow-covered or frozen road
When driving on a snow-covered or
frozen road, it is recommended that you
use snow tyres or snow traction device
(tyre chains). Refer to the “Snow tyres”
and “Snow traction device (tyre chains)”
sections.
Avoid high-speed operation, sudden
acceleration, abrupt brake application
and sharp cornering.
Depressing the brake pedal during
travel on snowy or icy roads may cause
tyre slippage and skidding. When
traction between the tyres and the road
is reduced the wheels may skid and the
vehicle cannot readily be brought to a
stop by conventional braking
techniques. Braking will differ,
depending upon whether you have
anti-lock brake system (ABS). If you do
have ABS, brake by pressing the brake
pedal hard, and keeping it pressed. If
you do not have ABS, pump the brake
pedal with short rapid jabs, each time
fully applying and fully releasing for
greatest effect.
Allow extra distance between your
vehicle and the vehicle in front of you,
and avoid sudden braking.
226
IN AN EMERGENCY