technical specifications FIAT FULLBACK 2017 Owner handbook (in English)
[x] Cancel search | Manufacturer: FIAT, Model Year: 2017, Model line: FULLBACK, Model: FIAT FULLBACK 2017Pages: 312, PDF Size: 12.31 MB
Page 9 of 312
GRAPHICAL INDEX
GETTING TO KNOW YOUR VEHICLE
KNOWING THE INSTRUMENT PANEL
SAFETY
STARTING AND DRIVING
IN AN EMERGENCY
SERVICING AND MAINTENANCE
TECHNICAL SPECIFICATIONS
INDEX
Page 224 of 312
306)Do not turn the raised wheel. The
tyres still on the ground could turn and
make your vehicle fall off the jack.
307)Handle the wheel carefully when
changing the tyre, to avoid scratching the
wheel surface.
308)Mount the spare wheel with the valve
stem (J) facing outboard. If you cannot see
the valve stem (J), you have installed the
wheel backwards. Operating the vehicle
with the spare wheel installed backwards
can cause vehicle damage and result in an
accident.
309)Be sure to open the release valve
slowly. If it is opened quickly, the vehicle will
drop abruptly and the jack may come out
of position, causing a serious accident.
310)Never use your foot or a pipe
extension for extra force in the wheel nut
wrench. If you do so, you will tighten the
nut too much.
311)The tyre pressure should be
periodically checked and maintained at the
specified pressure while the tyre is stowed.
312)After changing the tyre and driving the
vehicle about 1,000 km, retighten the
wheel nuts to make sure that they have not
come loose.
313)If the steering wheel vibrates when
driving after changing the tyre, we
recommend you to have the tyres checked
for balance.
314)Do not mix one type of tyre with
another or use a different size from the one
listed. This would cause early wear and
poor handling.315)The spare wheel should always be
securely in position. If a flat tyre is
changed, put the flat tyre in the spare
wheel mounting position with the wheel
outer surface upward, and use the wheel
nut wrench to secure it firmly.
316)Never tamper with the inflation valve.
Never introduce tools of any kind between
rim and tyre. Check tyre and spare wheel
pressure regularly, referring to the values
shown in the "Technical specifications"
section.
317)The moving components of the jack
(screw and joints) can also cause injuries:
do not touch them. If you come into
contact with lubricating grease, clean
yourself thoroughly.
IMPORTANT
163)Avoid using different size tyres from
the one listed and the combined use of
different types of tyres, as this can affect
driving safety.
164)Even if a wheel has the same rim size
and offset as the specified type of wheel,
its shape may prevent it from being fitted
correctly. Consult an authorised Fiat
Dealership before using wheels that you
have.
165)When installing or removing the spare
wheel, please observe the followings. If you
do not follow them, it could result in break
the spare wheel carrier. Do not use the
power tool. Use the wheel nut wrench
stowed on the vehicle. Do not apply a force
of 400 N or more at the end of the wheel
nut wrench.166)Never apply oil to either the wheel
bolts or the nuts or they will tighten too
much.
167)If the release valve is loosened too
much (2 or more turns) in the anticlockwise
direction, the jack’s oil will leak and the jack
cannot be used.
168)Close the release valve slowly when
lowering the vehicle, or the valve may be
damaged.
222
IN AN EMERGENCY
Page 244 of 312
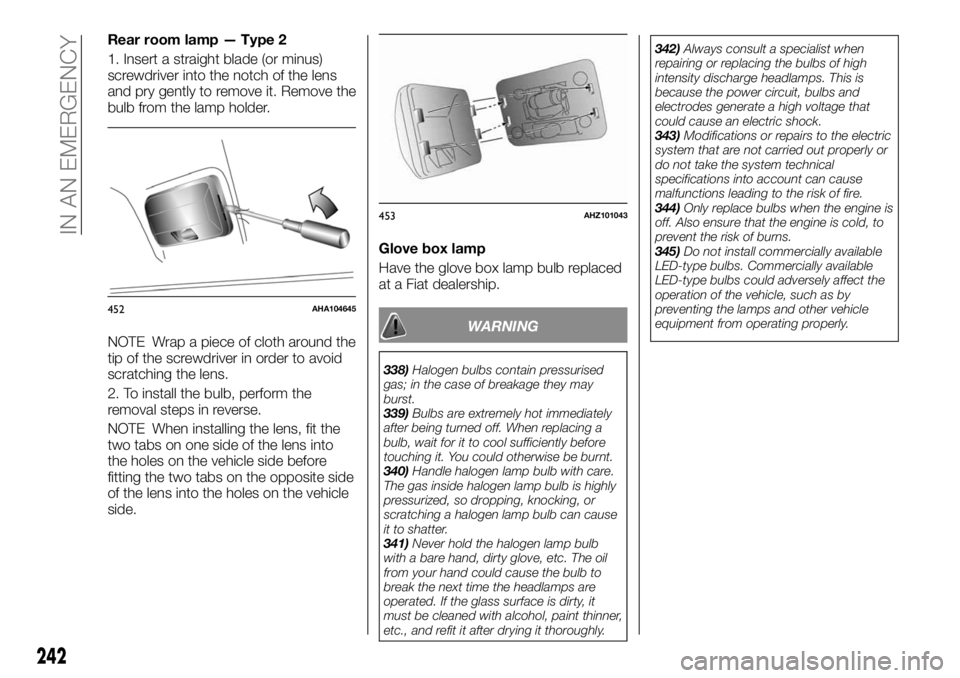
Rear room lamp — Type 2
1. Insert a straight blade (or minus)
screwdriver into the notch of the lens
and pry gently to remove it. Remove the
bulb from the lamp holder.
NOTE Wrap a piece of cloth around the
tip of the screwdriver in order to avoid
scratching the lens.
2. To install the bulb, perform the
removal steps in reverse.
NOTE When installing the lens, fit the
two tabs on one side of the lens into
the holes on the vehicle side before
fitting the two tabs on the opposite side
of the lens into the holes on the vehicle
side.Glove box lamp
Have the glove box lamp bulb replaced
at a Fiat dealership.
WARNING
338)Halogen bulbs contain pressurised
gas; in the case of breakage they may
burst.
339)Bulbs are extremely hot immediately
after being turned off. When replacing a
bulb, wait for it to cool sufficiently before
touching it. You could otherwise be burnt.
340)Handle halogen lamp bulb with care.
The gas inside halogen lamp bulb is highly
pressurized, so dropping, knocking, or
scratching a halogen lamp bulb can cause
it to shatter.
341)Never hold the halogen lamp bulb
with a bare hand, dirty glove, etc. The oil
from your hand could cause the bulb to
break the next time the headlamps are
operated. If the glass surface is dirty, it
must be cleaned with alcohol, paint thinner,
etc., and refit it after drying it thoroughly.342)Always consult a specialist when
repairing or replacing the bulbs of high
intensity discharge headlamps. This is
because the power circuit, bulbs and
electrodes generate a high voltage that
could cause an electric shock.
343)Modifications or repairs to the electric
system that are not carried out properly or
do not take the system technical
specifications into account can cause
malfunctions leading to the risk of fire.
344)Only replace bulbs when the engine is
off. Also ensure that the engine is cold, to
prevent the risk of burns.
345)Do not install commercially available
LED-type bulbs. Commercially available
LED-type bulbs could adversely affect the
operation of the vehicle, such as by
preventing the lamps and other vehicle
equipment from operating properly.
452AHA104645
453AHZ101043
242
IN AN EMERGENCY
Page 255 of 312
On vehicle with DPF, the engine oil
will be increased due to a few of the
fuel gets mixed in the engine oil when
the DPF regenerates to burn away the
PM (particulate matter). However, it
does not indicate a malfunction.
The engine oil level will be increased
due to an amount of the fuel being
mixed in the engine oil when the DPF
regenerates to burn away the PM
(particulate matter). It does not indicate
a malfunction. In the following
conditions, the engine oil level may
increase easily. We recommend you to
have it checked frequently.:
frequent driving at uphill and
downhill;
frequent driving at high altitudes;
frequent and extended idling;
frequent driving through a traffic jam.
NOTE The engine oil will deteriorate
rapidly if the vehicle is subjected to
severe conditions, requiring earlier oil
replacement. Please refer to the
maintenance schedule.
Selection of engine oil
Refer to “Refill Capacities” under
Technical Specifications.
Safety and disposal information for
used engine oil
358) 359) 360)
Protect the environment
It is illegal to pollute drains, water
courses and soil. Use authorized waste
collection facilities, including civic
amenity sites and garages providing
facilities for disposal of used oil and
used oil filters. If in doubt, contact your
local authority for advice on disposal.
WARNING
357)If the engine oil is being topped up,
wait for the engine to cool down before
loosening the filler cap, particularly for
vehicles with aluminium cap (where
provided). WARNING: risk of burns!
358)Prolonged and repeated contact may
cause serious skin diorders, including
dermatitis and cancer.
359)Avoid contact with the skin as far as
possible and wash thoroughly after any
contact.
360)Keep use engine olis out of reach of
children.
ENGINE COOLANT
To check the coolant level
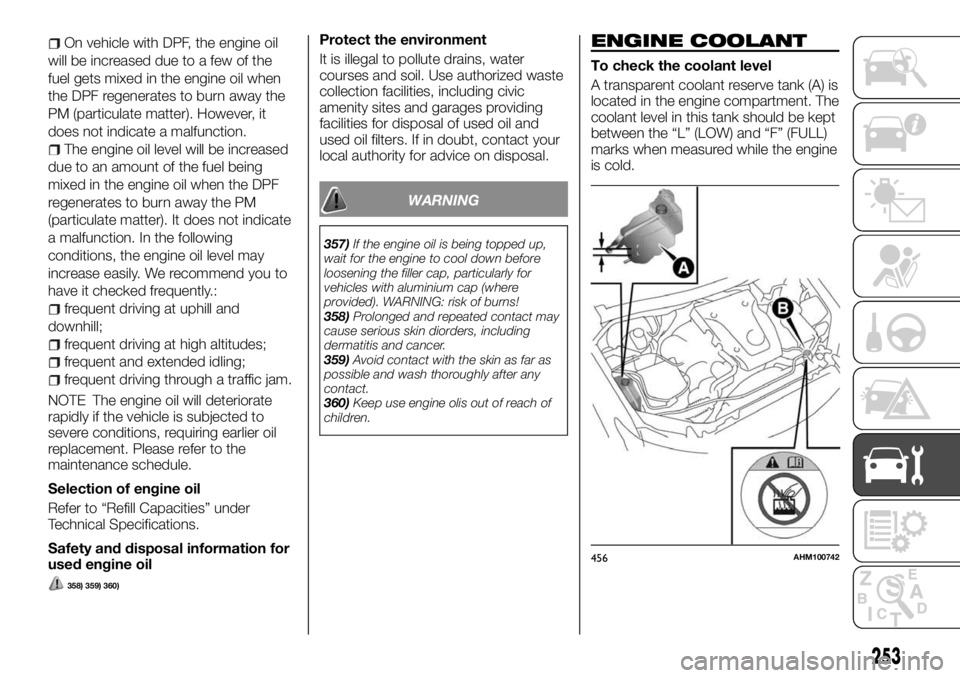
A transparent coolant reserve tank (A) is
located in the engine compartment. The
coolant level in this tank should be kept
between the “L” (LOW) and “F” (FULL)
marks when measured while the engine
is cold.
456AHM100742
253
Page 273 of 312
TECHNICAL SPECIFICATIONS
Everything you may find useful for
understanding how your vehicle is
made and works is contained in this
chapter and illustrated with data, tables
and graphics. For the enthusiasts and
the technician, but also just for those
who want to know every detail of their
vehicle.VEHICLE LABELING..........272
ENGINE SPECIFICATIONS......274
VEHICLE DIMENSIONS........276
VEHICLE PERFORMANCE......282
VEHICLE WEIGHTS..........283
ELECTRICAL SYSTEM.........288
TYRES AND WHEELS.........289
REFILL CAPACITIES..........290
FLUIDS AND LUBRICANTS......293
FUEL CONSUMPTION / CO
2
EMISSION...............296
271
Page 274 of 312
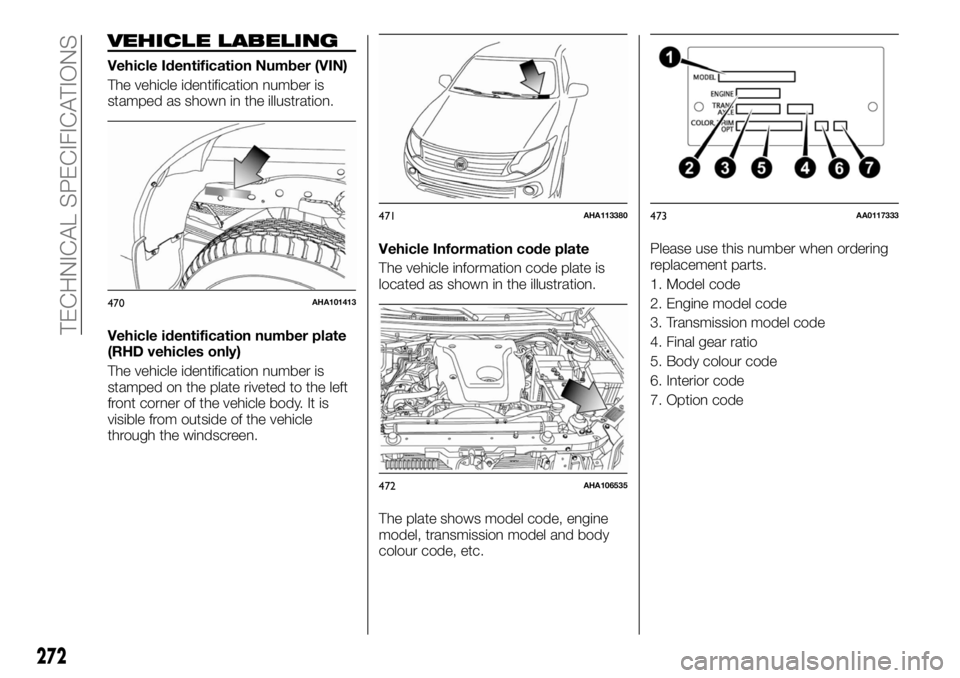
VEHICLE LABELING
Vehicle Identification Number (VIN)
The vehicle identification number is
stamped as shown in the illustration.
Vehicle identification number plate
(RHD vehicles only)
The vehicle identification number is
stamped on the plate riveted to the left
front corner of the vehicle body. It is
visible from outside of the vehicle
through the windscreen.Vehicle Information code plate
The vehicle information code plate is
located as shown in the illustration.
The plate shows model code, engine
model, transmission model and body
colour code, etc.Please use this number when ordering
replacement parts.
1. Model code
2. Engine model code
3. Transmission model code
4. Final gear ratio
5. Body colour code
6. Interior code
7. Option code
470AHA101413
471AHA113380
472AHA106535
473AA0117333
272
TECHNICAL SPECIFICATIONS
Page 276 of 312
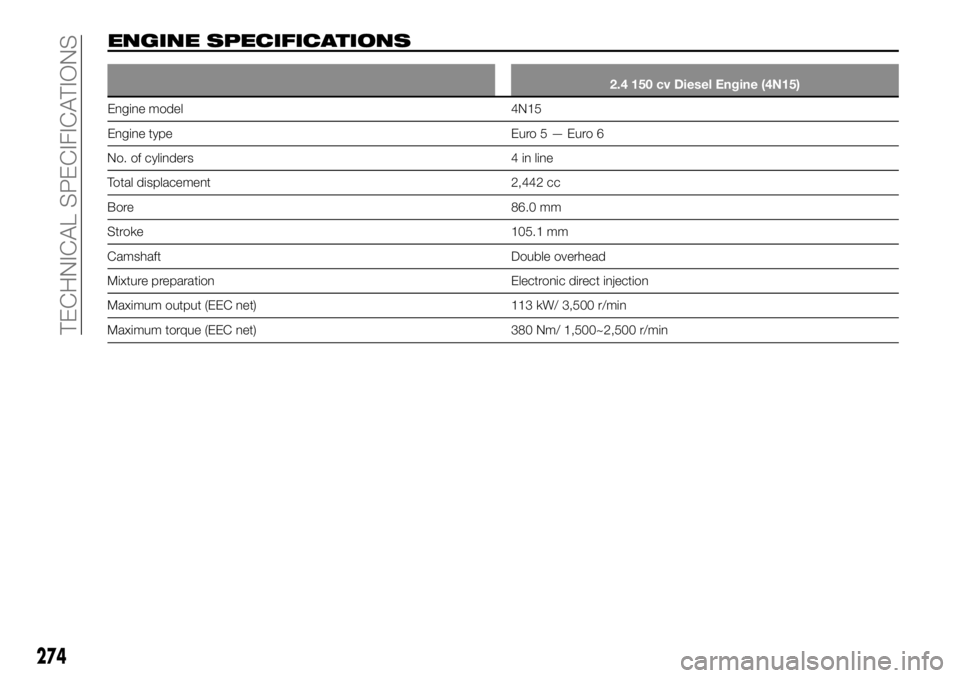
ENGINE SPECIFICATIONS
2.4 150 cv Diesel Engine (4N15)
Engine model 4N15
Engine type Euro5—Euro6
No. of cylinders 4 in line
Total displacement 2,442 cc
Bore 86.0 mm
Stroke 105.1 mm
Camshaft Double overhead
Mixture preparation Electronic direct injection
Maximum output (EEC net) 113 kW/ 3,500 r/min
Maximum torque (EEC net) 380 Nm/ 1,500~2,500 r/min
274
TECHNICAL SPECIFICATIONS
Page 277 of 312
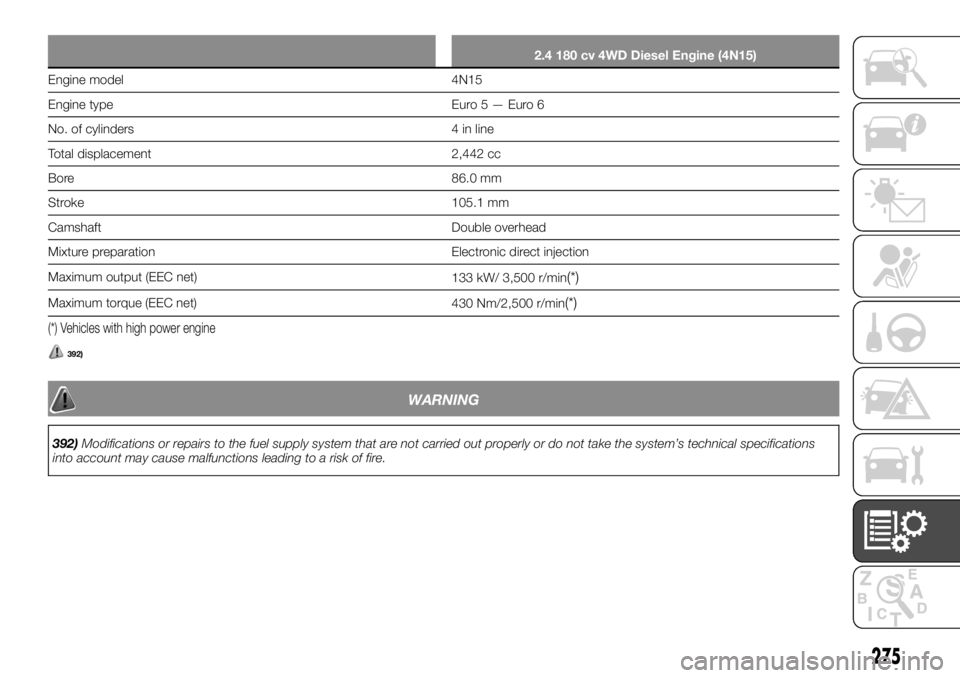
2.4 180 cv 4WD Diesel Engine (4N15)
Engine model 4N15
Engine type Euro5—Euro6
No. of cylinders 4 in line
Total displacement 2,442 cc
Bore 86.0 mm
Stroke 105.1 mm
Camshaft Double overhead
Mixture preparation Electronic direct injection
Maximum output (EEC net)
133 kW/ 3,500 r/min
(*)
Maximum torque (EEC net)
430 Nm/2,500 r/min(*)
(*) Vehicles with high power engine
392)
WARNING
392)Modifications or repairs to the fuel supply system that are not carried out properly or do not take the system’s technical specifications
into account may cause malfunctions leading to a risk of fire.
275
Page 278 of 312
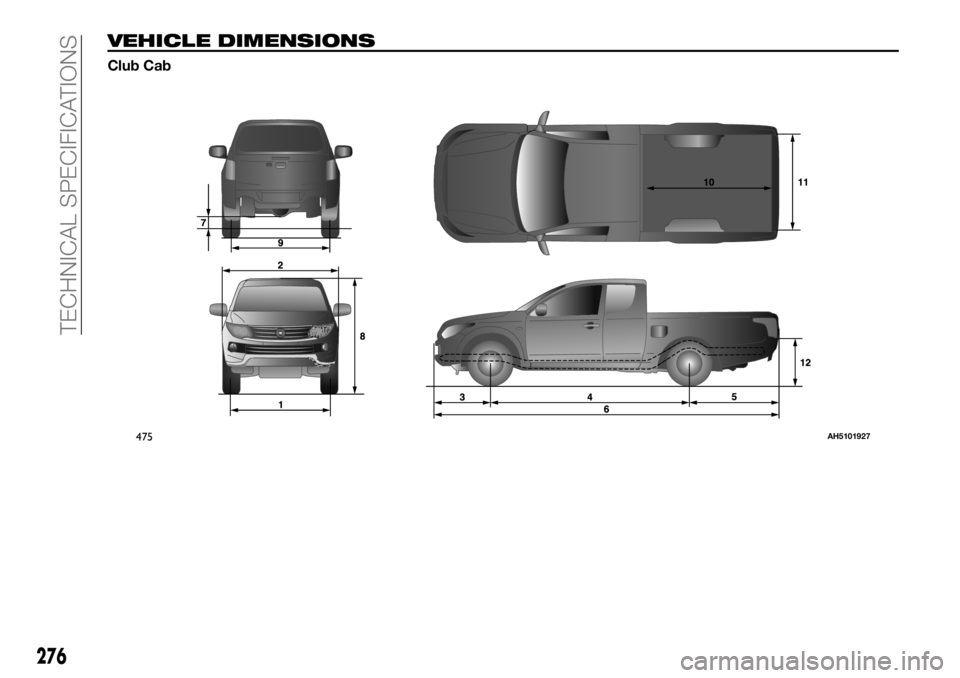
VEHICLE DIMENSIONS
Club Cab
475AH5101927
276
TECHNICAL SPECIFICATIONS
Page 280 of 312
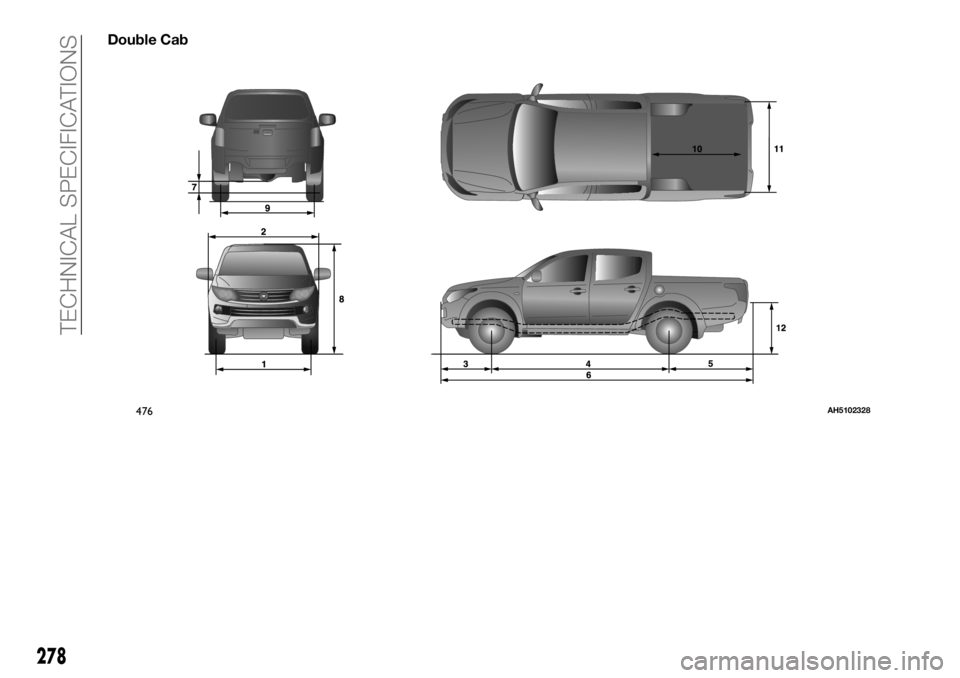
Double Cab
476AH5102328
278
TECHNICAL SPECIFICATIONS