technical specifications FIAT IDEA 2010 1.G Owner's Guide
[x] Cancel search | Manufacturer: FIAT, Model Year: 2010, Model line: IDEA, Model: FIAT IDEA 2010 1.GPages: 210, PDF Size: 4.4 MB
Page 35 of 210
34
SAFETY
STARTING
AND DRIVING
WARNING
LIGHTS AND
MESSAGES
IN AN
EMERGENCY
MAINTENANCE
AND CARE
TECHNICAL
SPECIFICATIONS
ALPHABETICAL
INDEX
DASHBOARD
AND CONTROLS
New mission
The new mission begins after:– “manu-
al” resetting by the user, by pressing the
relevant button;
– “automatic” resetting, when the “Trip
distance” reaches 3999.9 km or 9999.9 km
(according to the type of display) or when
the “Travel time” reaches 99.59 (99 hours
and 59 minutes);
– after disconnecting/reconnecting the
battery.
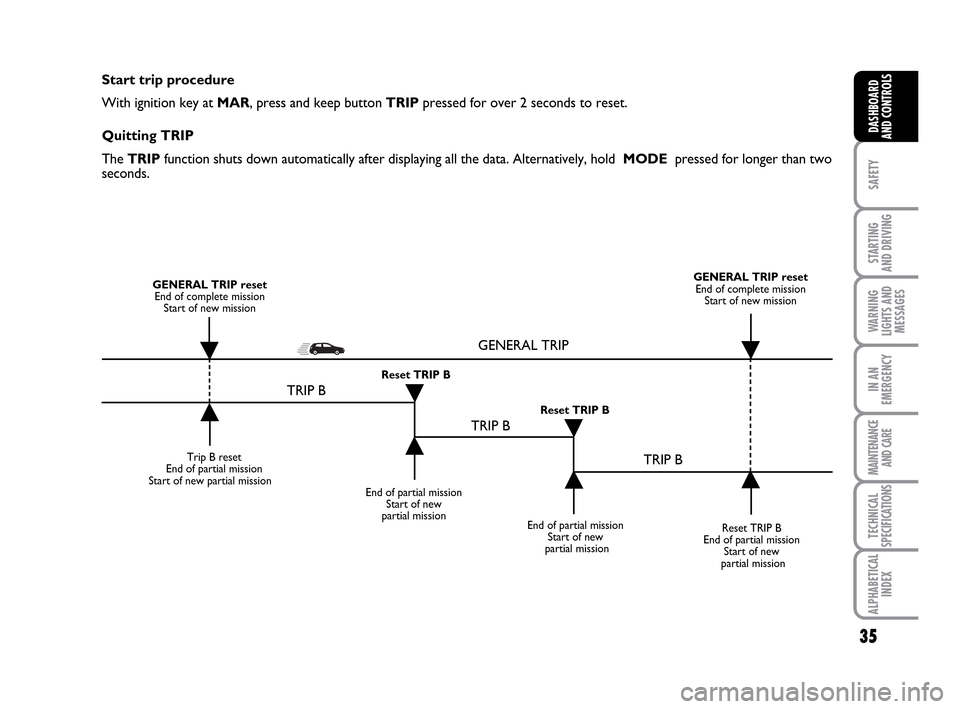
IMPORTANT “General Trip” resets will
reset “Trip B” at the same time, while re-
setting “Trip B” will only reset the val-
ues of the trip B function. Average speed
This shows the car average speed as a
function of the overall time elapsed since
the start of the new mission.Journey time
This value shows the time elapsed since
the start of the new mission.
IMPORTANT If information is not avail-
able, the message “----” will appear instead
of the Trip Computer values. Displaying
of the values will be resumed when nor-
mal operation is restored without reset-
ting the values displayed before the prob-
lem nor starting a new mission.
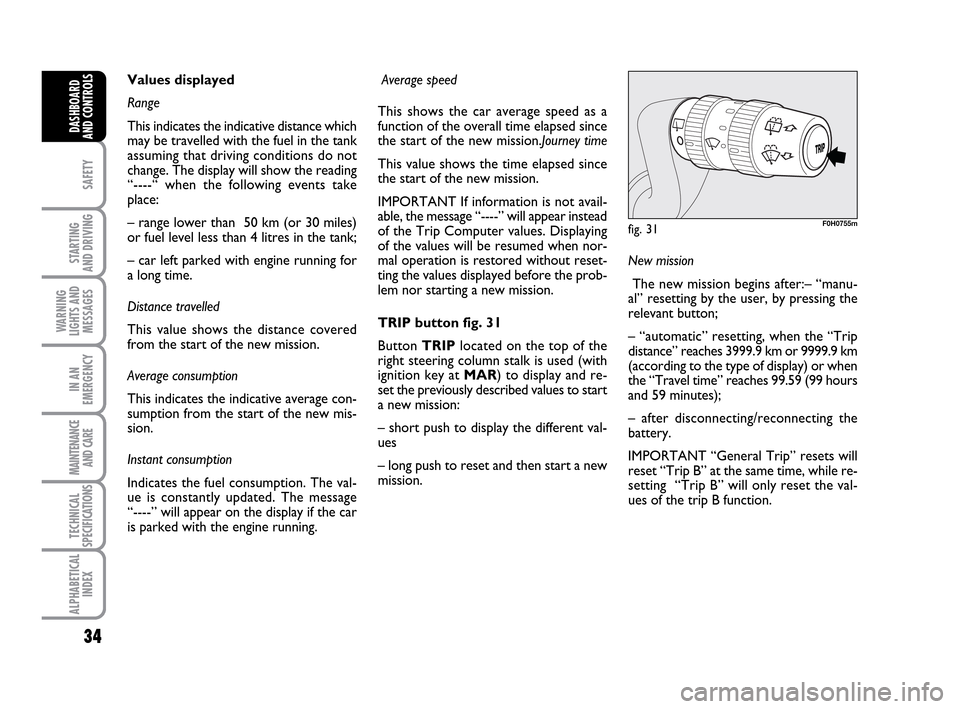
TRIP button fig. 31
Button TRIPlocated on the top of the
right steering column stalk is used (with
ignition key at MAR) to display and re-
set the previously described values to start
a new mission:
– short push to display the different val-
ues
– long push to reset and then start a new
mission. Values displayed
Range
This indicates the indicative distance which
may be travelled with the fuel in the tank
assuming that driving conditions do not
change. The display will show the reading
“----“ when the following events take
place:
– range lower than 50 km (or 30 miles)
or fuel level less than 4 litres in the tank;
– car left parked with engine running for
a long time.
Distance travelled
This value shows the distance covered
from the start of the new mission.
Average consumption
This indicates the indicative average con-
sumption from the start of the new mis-
sion.
Instant consumption
Indicates the fuel consumption. The val-
ue is constantly updated. The message
“----” will appear on the display if the car
is parked with the engine running.
fig. 31F0H0755m
001-035 LUM IDEA GB 2 ed.qxd 19-01-2010 9:14 Pagina 34
Page 36 of 210
35
SAFETY
STARTING
AND DRIVING
WARNING
LIGHTS AND
MESSAGES
IN AN
EMERGENCY
MAINTENANCE
AND CARE
TECHNICAL
SPECIFICATIONS
ALPHABETICAL
INDEX
DASHBOARD
AND CONTROLS
Start trip procedure
With ignition key at MAR, press and keep button TRIPpressed for over 2 seconds to reset.
Quitting TRIP
The TRIP function shuts down automatically after displaying all the data. Alternatively, hold MODE pressed for longer than two
seconds.
Trip B reset
End of partial mission
Start of new partial mission
End of partial mission
Start of new
partial mission
Reset TRIP B
End of partial mission
Start of new
partial mission GENERAL TRIP reset
End of complete mission
Start of new missionGENERAL TRIP reset
End of complete mission
Start of new mission
End of partial mission
Start of new
partial mission Reset TRIP B
Reset TRIP B
TRIP B
TRIP B
TRIP B GENERAL TRIP
˙
˙
˙
˙
˙
˙˙
˙
001-035 LUM IDEA GB 2 ed.qxd 19-01-2010 9:14 Pagina 35
Page 37 of 210
36
SAFETY
STARTING
AND DRIVING
WARNING
LIGHTS AND
MESSAGES
IN AN
EMERGENCY
MAINTENANCE
AND CARE
TECHNICAL
SPECIFICATIONS
ALPHABETICAL
INDEX
DASHBOARD
AND CONTROLS
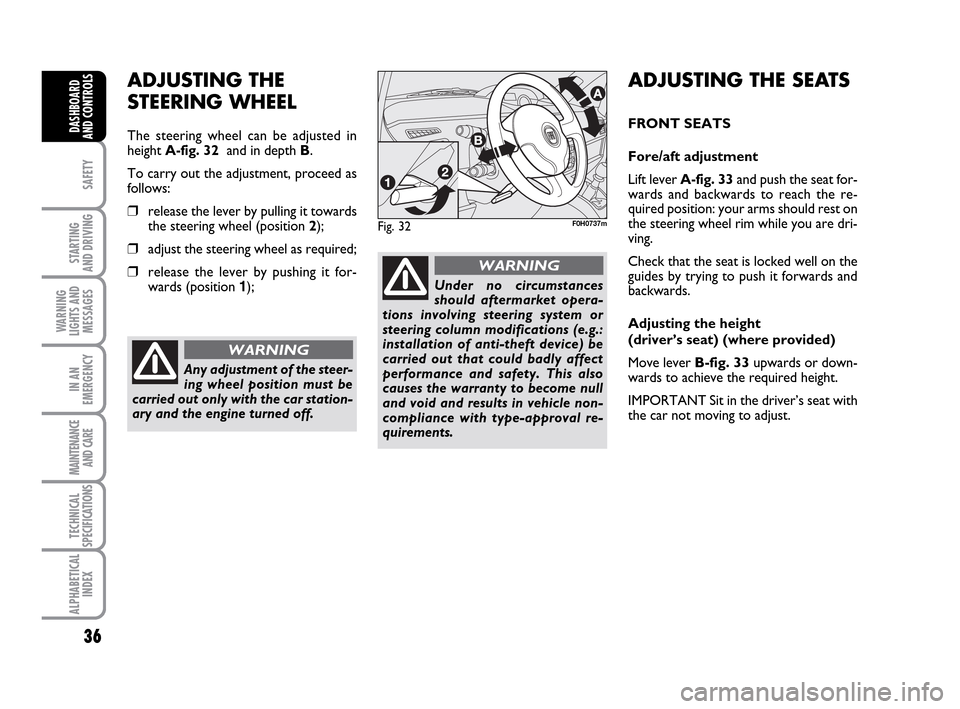
Fig. 32F0H0737m
ADJUSTING THE
STEERING WHEEL
The steering wheel can be adjusted in
height A-fig. 32and in depth B.
To carry out the adjustment, proceed as
follows:
❒release the lever by pulling it towards
the steering wheel (position 2);
❒adjust the steering wheel as required;
❒release the lever by pushing it for-
wards (position 1);
Any adjustment of the steer-
ing wheel position must be
carried out only with the car station-
ary and the engine turned off.
WARNING
Under no circumstances
should aftermarket opera-
tions involving steering system or
steering column modifications (e.g.:
installation of anti-theft device) be
carried out that could badly affect
performance and safety. This also
causes the warranty to become null
and void and results in vehicle non-
compliance with type-approval re-
quirements.
WARNING
ADJUSTING THE SEATS
FRONT SEATS
Fore/aft adjustment
Lift lever A-fig. 33and push the seat for-
wards and backwards to reach the re-
quired position: your arms should rest on
the steering wheel rim while you are dri-
ving.
Check that the seat is locked well on the
guides by trying to push it forwards and
backwards.
Adjusting the height
(driver’s seat) (where provided)
Move lever
B-fig. 33upwards or down-
wards to achieve the required height.
IMPORTANT Sit in the driver’s seat with
the car not moving to adjust.
036-092 LUM IDEA GB 2 ed.qxd 14-01-2010 12:14 Pagina 36
Page 38 of 210
37
SAFETY
STARTING
AND DRIVING
WARNING
LIGHTS AND
MESSAGES
IN AN
EMERGENCY
MAINTENANCE
AND CARE
TECHNICAL
SPECIFICATIONS
ALPHABETICAL
INDEX
DASHBOARD
AND CONTROLS
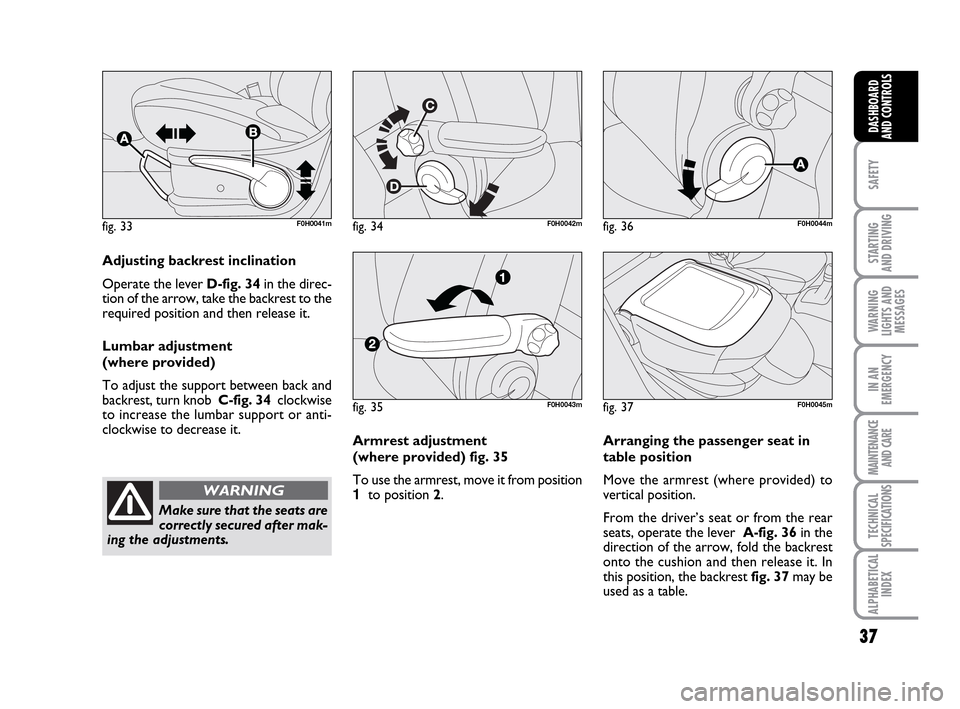
fig. 33F0H0041mfig. 34F0H0042m
Adjusting backrest inclination
Operate the lever D-fig. 34in the direc-
tion of the arrow, take the backrest to the
required position and then release it.
Lumbar adjustment
(where provided)
To adjust the support between back and
backrest, turn knob C-fig. 34clockwise
to increase the lumbar support or anti-
clockwise to decrease it.
Make sure that the seats are
correctly secured after mak-
ing the adjustments.
WARNING
fig. 35F0H0043m
fig. 36F0H0044m
Arranging the passenger seat in
table position
Move the armrest (where provided) to
vertical position.
From the driver’s seat or from the rear
seats, operate the lever A-fig. 36in the
direction of the arrow, fold the backrest
onto the cushion and then release it. In
this position, the backrest fig. 37 may be
used as a table. Armrest adjustment
(where provided) fig. 35
To use the armrest, move it from position
1to position 2.
fig. 37F0H0045m
036-092 LUM IDEA GB 2 ed.qxd 14-01-2010 12:14 Pagina 37
Page 39 of 210
38
SAFETY
STARTING
AND DRIVING
WARNING
LIGHTS AND
MESSAGES
IN AN
EMERGENCY
MAINTENANCE
AND CARE
TECHNICAL
SPECIFICATIONS
ALPHABETICAL
INDEX
DASHBOARD
AND CONTROLS
fig. 38F0H0046m
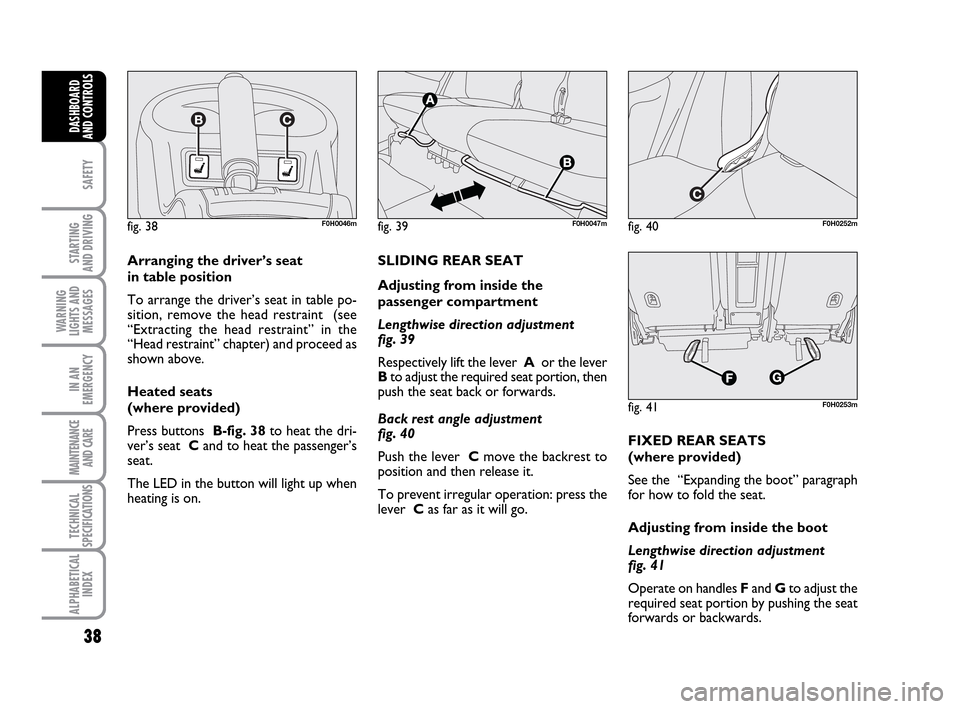
Arranging the driver’s seat
in table position
To arrange the driver’s seat in table po-
sition, remove the head restraint (see
“Extracting the head restraint” in the
“Head restraint” chapter) and proceed as
shown above.
Heated seats
(where provided)
Press buttons B-fig. 38to heat the dri-
ver’s seat Cand to heat the passenger’s
seat.
The LED in the button will light up when
heating is on.SLIDING REAR SEAT
Adjusting from inside the
passenger compartment
Lengthwise direction adjustment
fig. 39
Respectively lift the lever Aor the lever
Bto adjust the required seat portion, then
push the seat back or forwards.
Back rest angle adjustment
fig. 40
Push the lever Cmove the backrest to
position and then release it.
To prevent irregular operation: press the
lever Cas far as it will go.
fig. 39F0H0047mfig. 40F0H0252m
fig. 41F0H0253m
FIXED REAR SEATS
(where provided)
See the “Expanding the boot” paragraph
for how to fold the seat.
Adjusting from inside the boot
Lengthwise direction adjustment
fig. 41
Operate on handles Fand Gto adjust the
required seat portion by pushing the seat
forwards or backwards.
036-092 LUM IDEA GB 2 ed.qxd 14-01-2010 12:14 Pagina 38
Page 40 of 210
39
SAFETY
STARTING
AND DRIVING
WARNING
LIGHTS AND
MESSAGES
IN AN
EMERGENCY
MAINTENANCE
AND CARE
TECHNICAL
SPECIFICATIONS
ALPHABETICAL
INDEX
DASHBOARD
AND CONTROLS
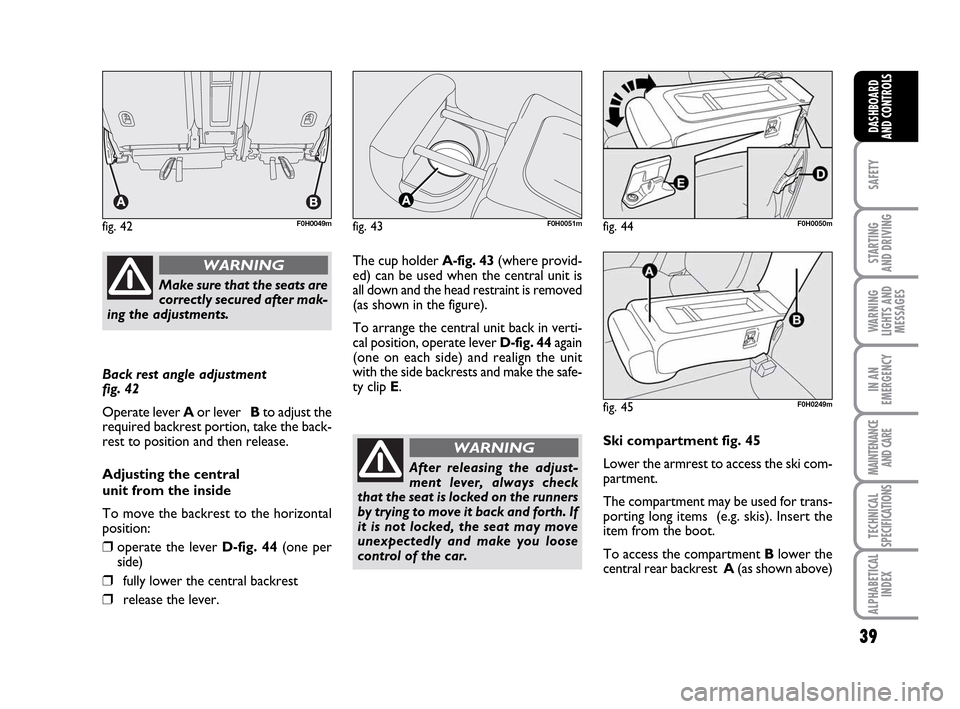
Back rest angle adjustment
fig. 42
Operate lever Aor lever Bto adjust the
required backrest portion, take the back-
rest to position and then release.
Adjusting the central
unit from the inside
To move the backrest to the horizontal
position:
❒operate the lever D-fig. 44 (one per
side)
❒fully lower the central backrest
❒release the lever.The cup holder A-fig. 43(where provid-
ed) can be used when the central unit is
all down and the head restraint is removed
(as shown in the figure).
To arrange the central unit back in verti-
cal position, operate lever D-fig. 44again
(one on each side) and realign the unit
with the side backrests and make the safe-
ty clip E.
fig. 42F0H0049mfig. 43F0H0051mfig. 44F0H0050m
Make sure that the seats are
correctly secured after mak-
ing the adjustments.
WARNING
After releasing the adjust-
ment lever, always check
that the seat is locked on the runners
by trying to move it back and forth. If
it is not locked, the seat may move
unexpectedly and make you loose
control of the car.
WARNINGSki compartment fig. 45
Lower the armrest to access the ski com-
partment.
The compartment may be used for trans-
porting long items (e.g. skis). Insert the
item from the boot.
To access the compartment Blower the
central rear backrest A(as shown above)
fig. 45F0H0249m
036-092 LUM IDEA GB 2 ed.qxd 14-01-2010 12:14 Pagina 39
Page 41 of 210
40
SAFETY
STARTING
AND DRIVING
WARNING
LIGHTS AND
MESSAGES
IN AN
EMERGENCY
MAINTENANCE
AND CARE
TECHNICAL
SPECIFICATIONS
ALPHABETICAL
INDEX
DASHBOARD
AND CONTROLS
For maximum safety, keep
the back of your seat up-
right, lean back into it and make sure
the seat belt fits closely across your
hips.
WARNING
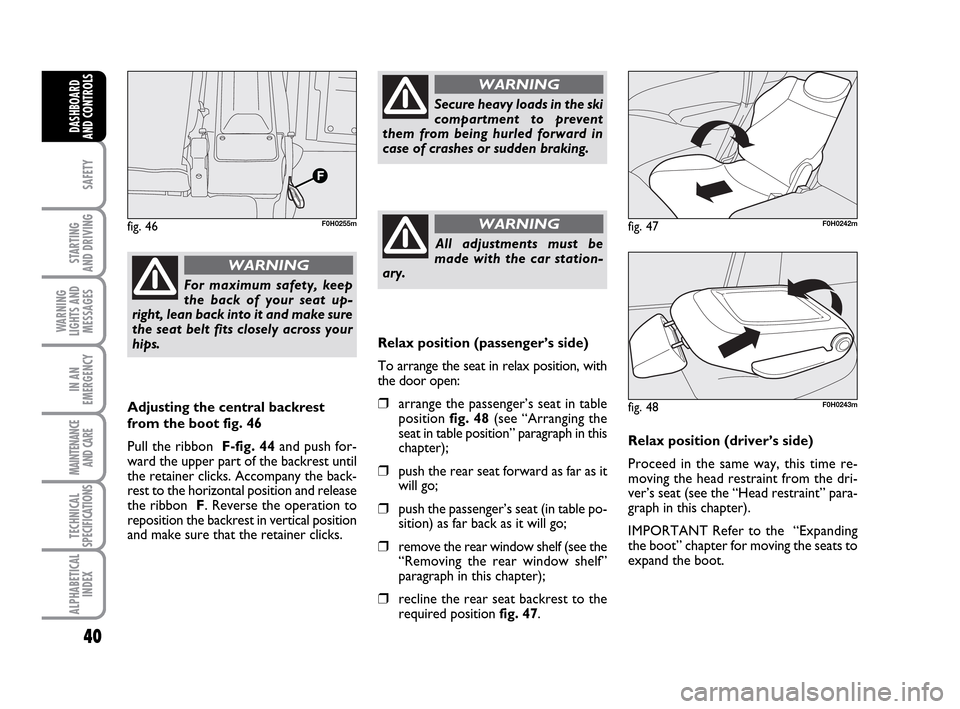
Adjusting the central backrest
from the boot fig. 46
Pull the ribbon F-fig. 44and push for-
ward the upper part of the backrest until
the retainer clicks. Accompany the back-
rest to the horizontal position and release
the ribbon F. Reverse the operation to
reposition the backrest in vertical position
and make sure that the retainer clicks.
Secure heavy loads in the ski
compartment to prevent
them from being hurled forward in
case of crashes or sudden braking.
WARNING
All adjustments must be
made with the car station-
ary.
WARNINGfig. 46F0H0255m
Relax position (passenger’s side)
To arrange the seat in relax position, with
the door open:
❒arrange the passenger’s seat in table
position fig. 48(see “Arranging the
seat in table position” paragraph in this
chapter);
❒push the rear seat forward as far as it
will go;
❒push the passenger’s seat (in table po-
sition) as far back as it will go;
❒remove the rear window shelf (see the
“Removing the rear window shelf”
paragraph in this chapter);
❒recline the rear seat backrest to the
required position fig. 47.Relax position (driver’s side)
Proceed in the same way, this time re-
moving the head restraint from the dri-
ver’s seat (see the “Head restraint” para-
graph in this chapter).
IMPORTANT Refer to the “Expanding
the boot” chapter for moving the seats to
expand the boot.
fig. 47F0H0242m
fig. 48F0H0243m
036-092 LUM IDEA GB 2 ed.qxd 14-01-2010 12:14 Pagina 40
Page 42 of 210
41
SAFETY
STARTING
AND DRIVING
WARNING
LIGHTS AND
MESSAGES
IN AN
EMERGENCY
MAINTENANCE
AND CARE
TECHNICAL
SPECIFICATIONS
ALPHABETICAL
INDEX
DASHBOARD
AND CONTROLS
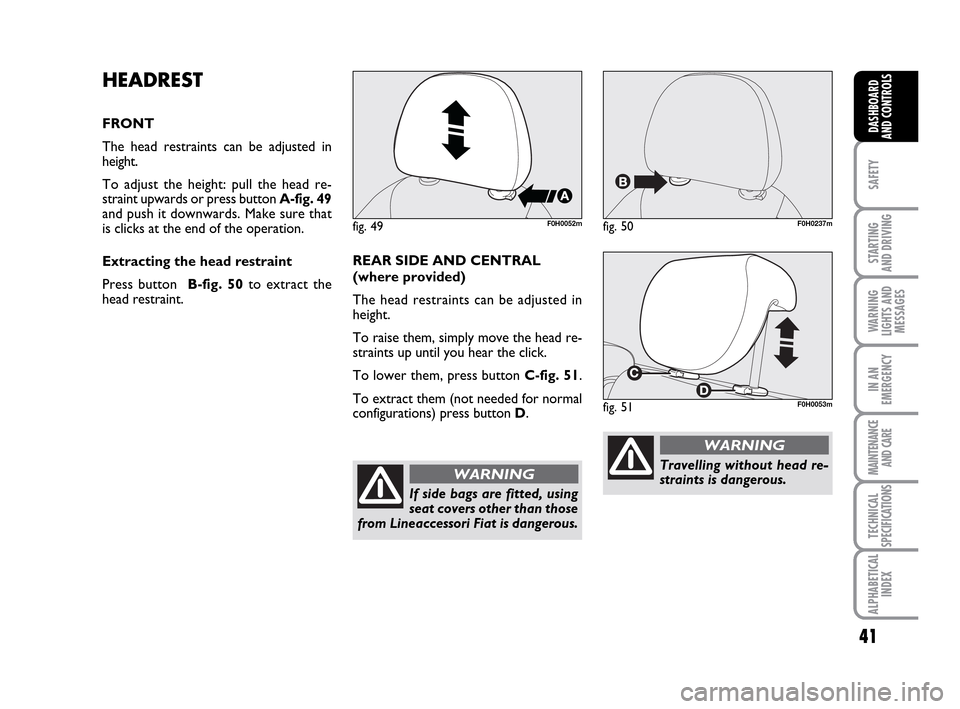
HEADREST
FRONT
The head restraints can be adjusted in
height.
To adjust the height: pull the head re-
straint upwards or press button A-fig. 49
and push it downwards. Make sure that
is clicks at the end of the operation.
Extracting the head restraint
Press button B-fig. 50to extract the
head restraint.
fig. 49F0H0052mfig. 50F0H0237m
fig. 51F0H0053m
REAR SIDE AND CENTRAL
(where provided)
The head restraints can be adjusted in
height.
To raise them, simply move the head re-
straints up until you hear the click.
To lower them, press button C-fig. 51.
To extract them (not needed for normal
configurations) press button D.
If side bags are fitted, using
seat covers other than those
from Lineaccessori Fiat is dangerous.
WARNINGTravelling without head re-
straints is dangerous.
WARNING
036-092 LUM IDEA GB 2 ed.qxd 14-01-2010 12:14 Pagina 41
Page 43 of 210
42
SAFETY
STARTING
AND DRIVING
WARNING
LIGHTS AND
MESSAGES
IN AN
EMERGENCY
MAINTENANCE
AND CARE
TECHNICAL
SPECIFICATIONS
ALPHABETICAL
INDEX
DASHBOARD
AND CONTROLS
The head restraints must be
adjusted so that they sup-
port your head and not your neck.
Only in this way may they perform
their protective action.
WARNING
To optimise head restraint
protective action, adjust the
seat back upright and keep your head
as close as possible to the head re-
straint.
WARNING
To refit the head restraint,
arrange it the right way and
then proceed as for checking that it
is locked.
WARNING
Saddle-shaped rear head re-
straints optimise visibility
and must always be raised it when an
occupant is present.
WARNING
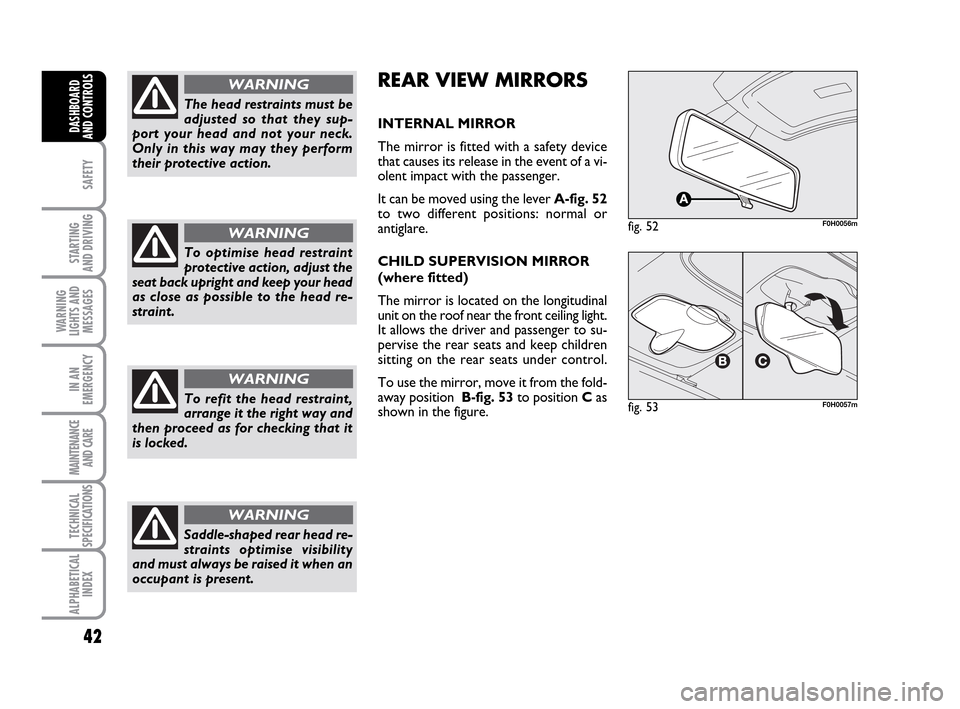
REAR VIEW MIRRORS
INTERNAL MIRROR
The mirror is fitted with a safety device
that causes its release in the event of a vi-
olent impact with the passenger.
It can be moved using the lever A-fig. 52
to two different positions: normal or
antiglare.
CHILD SUPERVISION MIRROR
(where fitted)
The mirror is located on the longitudinal
unit on the roof near the front ceiling light.
It allows the driver and passenger to su-
pervise the rear seats and keep children
sitting on the rear seats under control.
To use the mirror, move it from the fold-
away position B-fig. 53to position Cas
shown in the figure.
fig. 52F0H0056m
fig. 53F0H0057m
036-092 LUM IDEA GB 2 ed.qxd 14-01-2010 12:14 Pagina 42
Page 44 of 210
43
SAFETY
STARTING
AND DRIVING
WARNING
LIGHTS AND
MESSAGES
IN AN
EMERGENCY
MAINTENANCE
AND CARE
TECHNICAL
SPECIFICATIONS
ALPHABETICAL
INDEX
DASHBOARD
AND CONTROLS
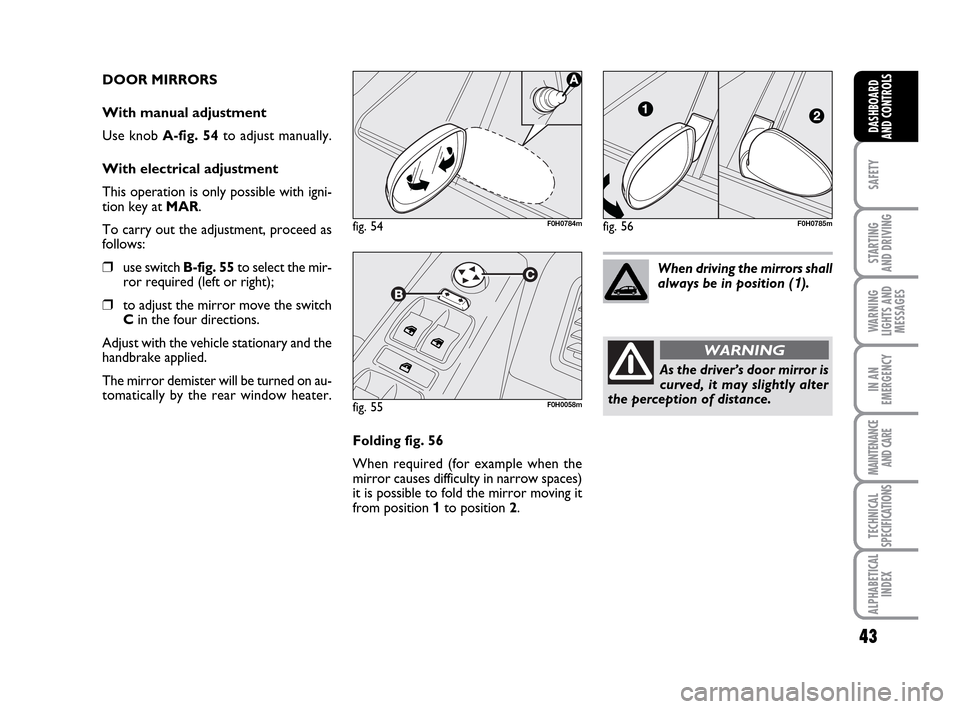
DOOR MIRRORS
With manual adjustment
Use knob A-fig. 54to adjust manually.
With electrical adjustment
This operation is only possible with igni-
tion key at MAR.
To carry out the adjustment, proceed as
follows:
❒use switch B-fig. 55to select the mir-
ror required (left or right);
❒to adjust the mirror move the switch
Cin the four directions.
Adjust with the vehicle stationary and the
handbrake applied.
The mirror demister will be turned on au-
tomatically by the rear window heater.
fig. 55F0H0058m
Folding fig. 56
When required (for example when the
mirror causes difficulty in narrow spaces)
it is possible to fold the mirror moving it
from position 1 to position 2.When driving the mirrors shall
always be in position (
1).
As the driver’s door mirror is
curved, it may slightly alter
the perception of distance.
WARNING
fig. 54F0H0784mfig. 56F0H0785m
036-092 LUM IDEA GB 2 ed.qxd 14-01-2010 12:14 Pagina 43