FIAT QUBO 2010 1.G Owners Manual
Manufacturer: FIAT, Model Year: 2010, Model line: QUBO, Model: FIAT QUBO 2010 1.GPages: 230, PDF Size: 4.38 MB
Page 181 of 230
WHEELS AND TYRES
Check the pressure of each tyre, including the spare,
every two weeks and before long journeys. The
pressure should be checked with the tyre rested and
cold.
It is normal for the pressure to increase when the
vehicle is used; for the correct tyre inflation
pressure, see “Wheels” in the “Technical
specifications” section.
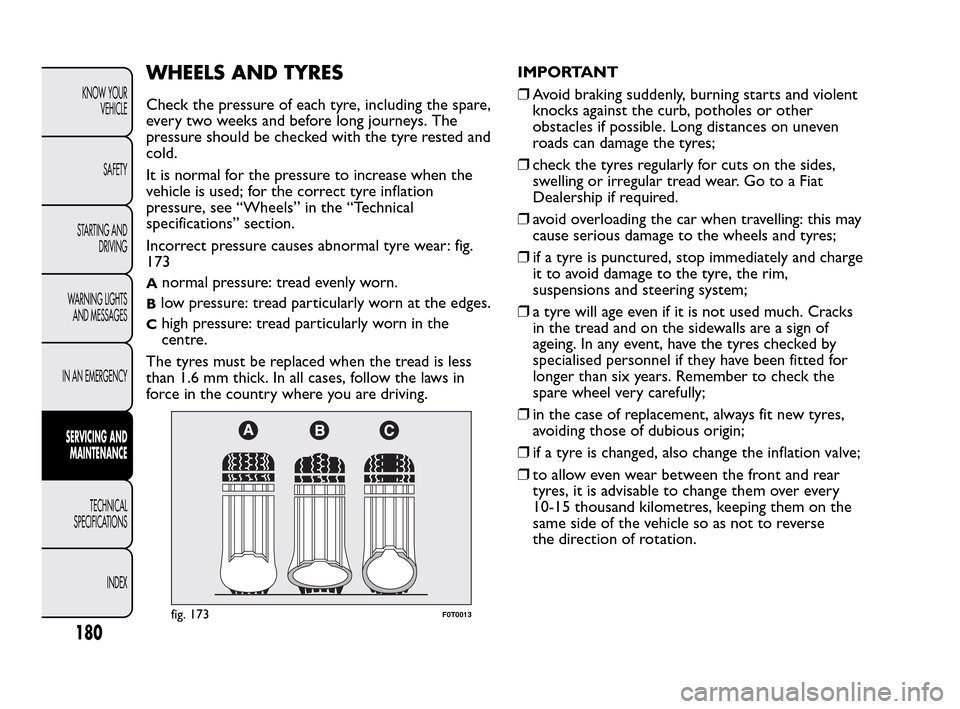
Incorrect pressure causes abnormal tyre wear: fig.
173
Anormal pressure: tread evenly worn.
Blow pressure: tread particularly worn at the edges.
Chigh pressure: tread particularly worn in the
centre.
The tyres must be replaced when the tread is less
than 1.6 mm thick. In all cases, follow the laws in
force in the country where you are driving.IMPORTANT
❒Avoid braking suddenly, burning starts and violent
knocks against the curb, potholes or other
obstacles if possible. Long distances on uneven
roads can damage the tyres;
❒check the tyres regularly for cuts on the sides,
swelling or irregular tread wear. Go to a Fiat
Dealership if required.
❒avoid overloading the car when travelling: this may
cause serious damage to the wheels and tyres;
❒if a tyre is punctured, stop immediately and charge
it to avoid damage to the tyre, the rim,
suspensions and steering system;
❒a tyre will age even if it is not used much. Cracks
in the tread and on the sidewalls are a sign of
ageing. In any event, have the tyres checked by
specialised personnel if they have been fitted for
longer than six years. Remember to check the
spare wheel very carefully;
❒in the case of replacement, always fit new tyres,
avoiding those of dubious origin;
❒if a tyre is changed, also change the inflation valve;
❒to allow even wear between the front and rear
tyres, it is advisable to change them over every
10-15 thousand kilometres, keeping them on the
same side of the vehicle so as not to reverse
the direction of rotation.
fig. 173F0T0013
180
KNOW YOUR
VEHICLE
SAFETY
STARTING AND
DRIVING
WARNING LIGHTS
AND MESSAGES
IN AN EMERGENCY
SERVICING AND
MAINTENANCE
TECHNICAL
SPECIFICA
TIONS
INDEX
Page 182 of 230
WARNING
Remember that the road holding
qu
alities of your vehicle also depend on
the correct inflation pressure of the tyres.
WARNING
Excessively low pressure will cause
o
verheating of the tyre and may cause
severe tyre damage.
WARNING
Do not exchange the tyres from the left
to
the right of the vehicle and vice versa.
WARNING
Do not repaint alloy wheel rims at
temper
atures higher than 150°C.The
mechanical characteristics of the wheels might
be compromised.
RUBBER LINES
Follow the requirements in “Scheduled Servicing
Plan” in this section carefully for brake and fuel
rubber lines.
Ozone, high temperatures and a prolonged lack of
fluid in the system may cause hardening and cracking
of the tubes, which could result in leaks. Careful
inspections are therefore necessary.
181
KNOW YOUR
VEHICLE
SAFETY
STARTING AND
DRIVING
WARNING LIGHTS
AND MESSAGES
IN AN EMERGENCY
SERVICING AND
MAINTENANCE
TECHNICAL
SPECIFICA
TIONS
INDEX
Page 183 of 230
WINDSCREEN/REAR WINDOW
WIPERS
(for versions/markets, where provided)
BLADES
Regularly clean the rubber part using appropriate
products; TUTELA PROFESSIONAL SC 35 is
recommended.
Replace the blades if the rubber edge is misshapen or
worn. In any event, it is advisable to replace them
approximately once a year.
A few simple precautions can reduce the possibility
of damage to the blades:
❒make sure that the rubber part is not stuck to the
windscreen at sub-zero temperatures. Use an
antifreeze product to release it if required;
❒remove any snow from the glass: in addition to
protecting the blades, this prevents the electric
motor from overheating;
❒do not operate the windscreen and rear window
wipers on dry glass.
WARNING
Driving with worn wiper blades is a
ser
ious hazard, because visibility is
reduced in bad weather.Replacing the windscreen wiper blades
Proceed as follows:
❒lift up the windscreen wiper arm and position the
blade so that it forms a 90° angle with the arm;
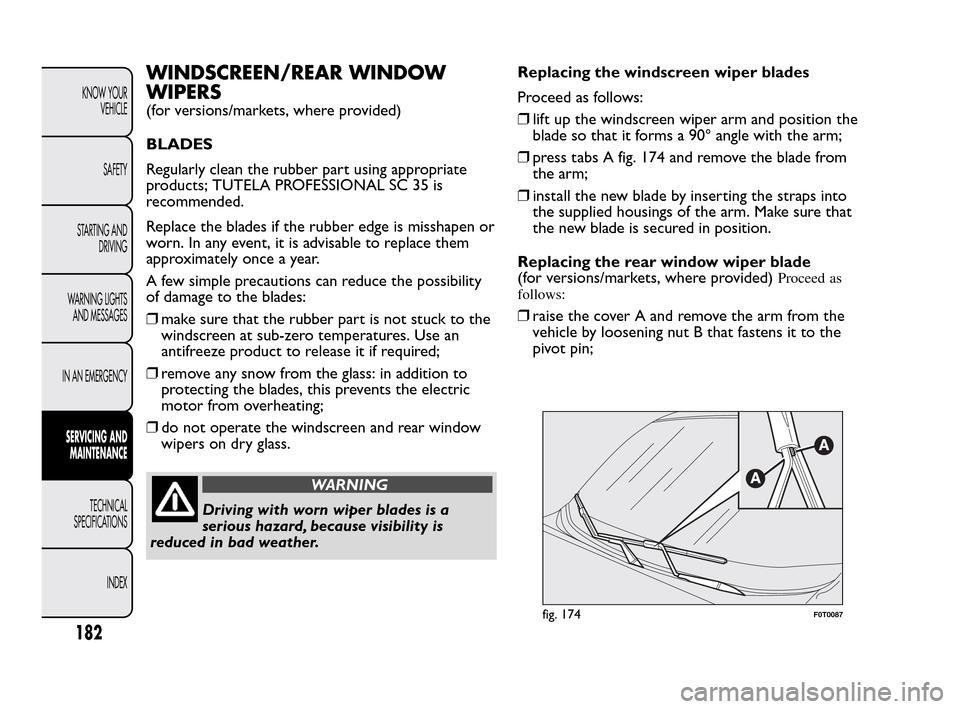
❒press tabs A fig. 174 and remove the blade from
the arm;
❒install the new blade by inserting the straps into
the supplied housings of the arm. Make sure that
the new blade is secured in position.
Replacing the rear window wiper blade
(for versions/markets, where provided)
Proceed as
follows:
❒raise the cover A and remove the arm from the
vehicle by loosening nut B that fastens it to the
pivot pin;
fig. 174F0T0087
182
KNOW YOUR
VEHICLE
SAFETY
STARTING AND
DRIVING
WARNING LIGHTS
AND MESSAGES
IN AN EMERGENCY
SERVICING AND
MAINTENANCE
TECHNICAL
SPECIFICA
TIONS
INDEX
Page 184 of 230
❒correctly position the new arm and tighten the nut
fully;
❒lower the cover.
SPRAY NOZZLES
If the jet is not coming out, firstly check that there is
fluid in the windscreen/rear window reservoir (for
versions/markets where provided) (see “Checking
levels” in this section).
Then check that the nozzle holes are not clogged;
use a needle to unblock them if necessary.
Windscreen (washer)
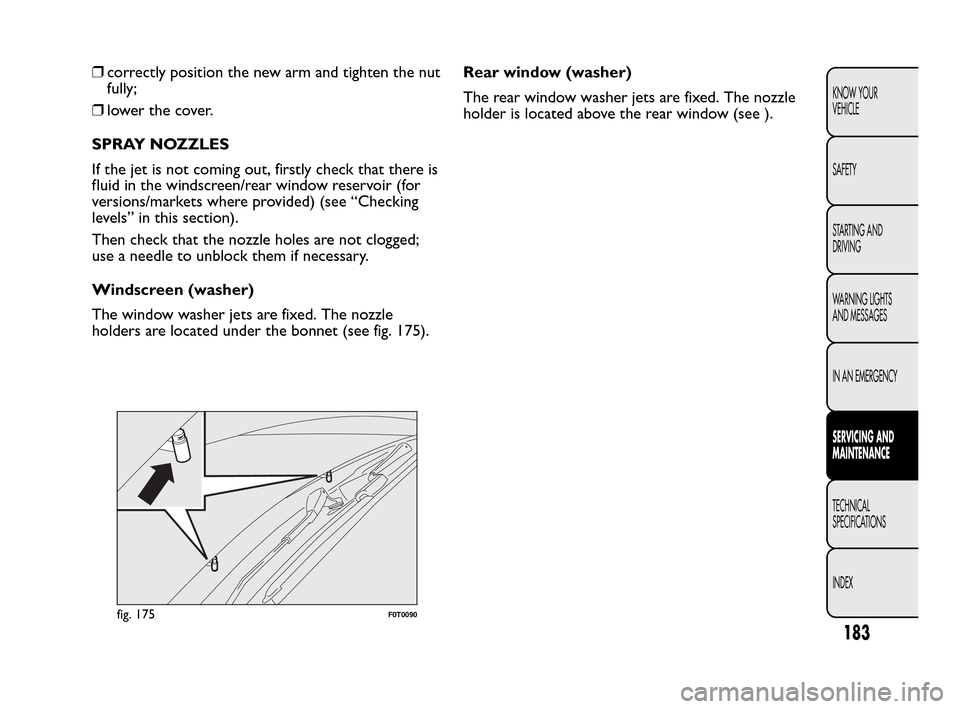
The window washer jets are fixed. The nozzle
holders are located under the bonnet (see fig. 175).Rear window (washer)
The rear window washer jets are fixed. The nozzle
holder is located above the rear window (see ).
fig. 175F0T0090
183
KNOW YOUR
VEHICLE
SAFETY
STARTING AND
DRIVING
WARNING LIGHTS
AND MESSAGES
IN AN EMERGENCY
SERVICING AND
MAINTENANCE
TECHNICAL
SPECIFICA
TIONS
INDEX
Page 185 of 230
BODY
PROTECTION FROM ATMOSPHERIC
ELEMENTS
The main causes of corrosion are the following:
❒atmospheric pollution
❒salty air and humidity (coastal areas, or hot humid
climates)
❒seasonal environment conditions.
The abrasive action of wind-borne atmospheric dust
and sand, as well as mud and gravel raised by other
cars is also not to be underestimated.
Fiat used the best manufacturing technologies on
your vehicle to effectively protect the bodywork
against corrosion.
These are the most important:
❒painting products and systems which give the
vehicle particular resistance to corrosion and
abrasion;
❒use of galvanised (or pre-treated) steel sheets,
with high resistance to corrosion;
❒spraying the underbody, engine compartment,
wheelhouse internal parts and other parts with
highly protective wax products;❒spraying of plastic materials for protective
purposes in the most exposed points: under the
doors, inside the mudguard, along the edges, etc.
❒use of “open” boxed sections to prevent
condensation and pockets of moisture from
triggering rust inside.
VEHICLE BODY AND UNDERBODY
WARRANTY
Your vehicle is covered by warranty against
perforation due to rust of any original element of the
structure or body.
For the general terms of this warranty, refer to your
Warranty Booklet.
ADVICE FOR PRESERVING THE
BODYWORK
Paint
Paintwork does not only serve an aesthetic purpose,
but also protects the underlying sheet metal.
Touch up abrasions and scratches immediately to
prevent the formation of rust. Use only original paint
products for touch-ups (see “Bodywork paint
identification plate” in the “Technical specifications”
section).
Normal care for paintwork consists of washing the
car; how often depends on the conditions and
environment where the car is used.
184
KNOW YOUR
VEHICLE
SAFETY
STARTING AND
DRIVING
WARNING LIGHTS
AND MESSAGES
IN AN EMERGENCY
SERVICING AND
MAINTENANCE
TECHNICAL
SPECIFICA
TIONS
INDEX
Page 186 of 230
For example, it is advisable to wash the vehicle more
often in areas with high atmospheric pollution or if
you are travelling on roads sprinkled with salt.
To wash the vehicle properly, proceed as follows:
❒wash the body using a low pressure jet of water;
❒wipe a sponge with a slightly soapy solution over
the bodywork, frequently rinsing with the sponge;
❒rinse well with water and dry with a jet of air or a
chamois leather.
If you put the vehicle through a car
wash, take heed of the following:
❒remove the antenna from the roof so it does not
get damaged;
❒the car wash should use water added to a soapy
solution;
❒rinse thoroughly to avoid soap marks staying on
the bodywork or less visible parts.
Some car washes with old-style blades
and/or in a poor state of repair can
damage the paintwork, facilitating the
formation of lines that give the paint a dull/misty
appearance, especially on dark colours. If this
happens, lightly polish the paintwork with
appropriate products.
Dry the less visible parts particularly carefully, such
as the door frames, bonnet and the headlight frames,
where water may stagnate more easily. It is a good
idea to leave the vehicle outdoors for a while after
washing it to give water time to evaporate.Do not wash the vehicle after it has been left in the
sun or with the bonnet hot: this may alter the shine
of the paintwork.
Exterior plastic parts should be cleaned in the same
way as the rest of the vehicle. Where possible, do
not park the vehicle under trees; the resinous
substances released by many species give the paint a
dull appearance and increase the possibility of rust.
IMPORTANT Bird droppings should be washed
off immediately and thoroughly as the acid
they contain is particularly aggressive.
Detergents cause water pollution.The
vehicle should be washed in areas
equipped for collecting and purifying the
liquid used in the washing process.
Windows
Use specific detergents to clean the windows. Also
use clean cloths to avoid scratching the glass or
altering the transparency.
IMPORTANT Wipe the rear window gently with a
cloth in the direction of the filaments to avoid
damaging the heating device.
Engine compartment
At the end of each winter, thoroughly wash the
engine compartment, taking care to avoid spraying
the water jet directly onto the electronic control
185
KNOW YOUR
VEHICLE
SAFETY
STARTING AND
DRIVING
WARNING LIGHTS
AND MESSAGES
IN AN EMERGENCY
SERVICING AND
MAINTENANCE
TECHNICAL
SPECIFICA
TIONS
INDEX
Page 187 of 230
units and the relay/fuse box on the left side of the
engine compartment (as you look from behind
the wheel). Have this operation performed at a
specialist garage.
IMPORTANT The washing should take place with the
engine cold and the ignition key in the STOP
position. After the wash, make sure that the various
protective devices (e.g. rubber caps and guards)
have not been removed or damaged.
Front headlights
IMPORTANT Never use aromatic substances (e.g.
petrol) or ketenes (e.g. acetone) for cleaning the
plastic lenses of the front headlights.INTERIORS
Check regularly that water is not trapped under the
mats (from dripping off shoes, umbrellas, etc.) which
could cause the metal to rust.
WARNING
Never use flammable products, such as
pet
roleum ether or modified petrol,
to clean the inside of the vehicle.The
electrostatic charges which are generated by
rubbing during the cleaning operation may
cause a fire.
WARNING
Do not keep aerosol cans in the vehicle:
t
hese could explode. Aerosol cans must
not be exposed to temperatures of more than
50°C.When the vehicle is exposed to sunlight ,
the temperature inside can greatly exceed
this value.
SEATS AND FABRIC PARTS
Remove dust with a soft brush or a vacuum cleaner.
It is advisable to use a damp brush on velvet
upholstery.
Rub the seats with a sponge and a solution of water
and mild soap.
186
KNOW YOUR
VEHICLE
SAFETY
STARTING AND
DRIVING
WARNING LIGHTS
AND MESSAGES
IN AN EMERGENCY
SERVICING AND
MAINTENANCE
TECHNICAL
SPECIFICA
TIONS
INDEX
Page 188 of 230
PLASTIC PARTS
It is advisable to clean interior plastic parts with a
damp cloth and a solution of water and non-abrasive
mild soap. To remove grease and tough stains, use
products designed specifically for cleaning plastics.
These have no solvents and have been designed
so that they do not alter the appearance and colour
of the components.
IMPORTANT Never use spirits or petroleum to
clean the instrument panel glass.REAL LEATHER STEERING WHEEL/GEAR
LEVER KNOB/HANDBRAKE
(for versions/markets, where provided)
These components must be cleaned with mild soap
and water only. Never use alcohol or alcohol-based
products.
Read the product label carefully before using specific
products for cleaning the interiors: make sure the
product does not contain spirits or alcohol-based
substances.
If, when cleaning the windscreen with special
products, window cleaner accidentally drips onto the
leather of the steering wheel/gear lever knob/hand
brake, wipe away immediately and then wash the
affected area with mild soap and water.
IMPORTANT Be careful when installing a steering
wheel locking device not to damage the leather
upholstery.
187
KNOW YOUR
VEHICLE
SAFETY
STARTING AND
DRIVING
WARNING LIGHTS
AND MESSAGES
IN AN EMERGENCY
SERVICING AND
MAINTENANCE
TECHNICAL
SPECIFICA
TIONS
INDEX
Page 189 of 230
TECHNICAL SPECIFICATIONS
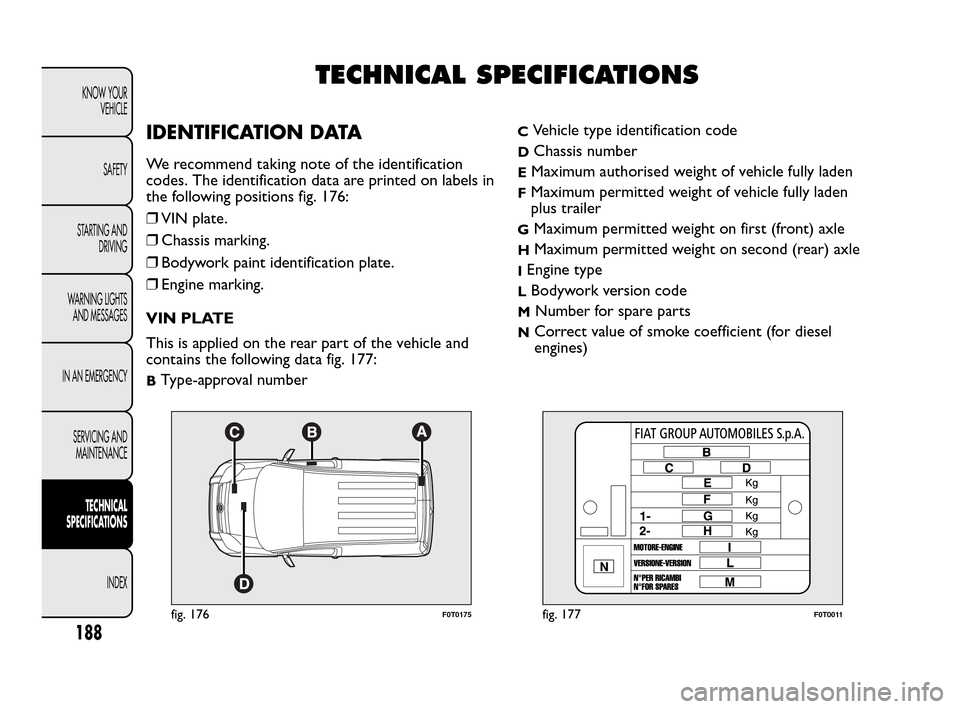
IDENTIFICATION DATA
We recommend taking note of the identification
codes. The identification data are printed on labels in
the following positions fig. 176:
❒VIN plate.
❒Chassis marking.
❒Bodywork paint identification plate.
❒Engine marking.
VIN PLATE
This is applied on the rear part of the vehicle and
contains the following data fig. 177:
BType-approval number
CVehicle type identification code
DChassis number
EMaximum authorised weight of vehicle fully laden
FMaximum permitted weight of vehicle fully laden
plus trailer
GMaximum permitted weight on first (front) axle
HMaximum permitted weight on second (rear) axle
IEngine type
LBodywork version code
MNumber for spare parts
NCorrect value of smoke coefficient (for diesel
engines)
fig. 176F0T0175fig. 177F0T0011
188
KNOW YOUR
VEHICLE
SAFETY
STARTING AND
DRIVING
WARNING LIGHTS
AND MESSAGES
IN AN EMERGENCY
SERVICING AND
MAINTENANCE
TECHNICAL
SPECIFICA
TIONS
INDEX
Page 190 of 230
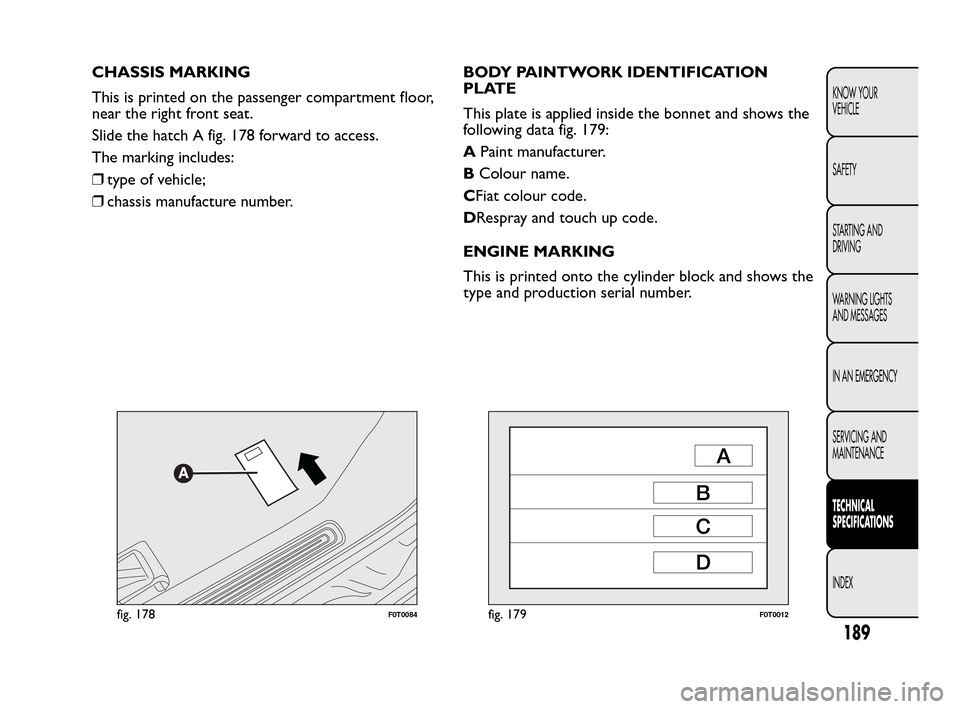
CHASSIS MARKING
This is printed on the passenger compartment floor,
near the right front seat.
Slide the hatch A fig. 178 forward to access.
The marking includes:
❒type of vehicle;
❒chassis manufacture number.BODY PAINTWORK IDENTIFICATION
PLATE
This plate is applied inside the bonnet and shows the
following data fig. 179:
APaint manufacturer.
BColour name.
CFiat colour code.
DRespray and touch up code.
ENGINE MARKING
This is printed onto the cylinder block and shows the
type and production serial number.
fig. 178F0T0084fig. 179F0T0012
189
KNOW YOUR
VEHICLE
SAFETY
STARTING AND
DRIVING
WARNING LIGHTS
AND MESSAGES
IN AN EMERGENCY
SERVICING AND
MAINTENANCE
TECHNICAL
SPECIFICA
TIONS
INDEX