FIAT SEDICI 2009 2.G Owners Manual
Manufacturer: FIAT, Model Year: 2009, Model line: SEDICI, Model: FIAT SEDICI 2009 2.GPages: 270, PDF Size: 3.44 MB
Page 91 of 270
90
Do not attempt to adjust the
display while driving.
If you attempt to adjust the display
while driving, you could lose control
of the vehicle.
WARNING
NOTE
âť’If you push the indicator selector knob
or do not turn the knob for more than
5 seconds while activating the illumi-
nation control, the illumination con-
trol will be canceled automatically and
the display (D) will show the odome-
ter indication.
âť’You can change the brightness when
the position lights or headlights are on
even if the ignition switch is in the
“ACC” or “LOCK” position.
❒When you reconnect the negative (–)
terminal to the battery, the brightness
of the instrument panel lights will be
reinitialized. Readjust the brightness
according to your preference.
NOTE If you select the highest brightness
level when the position lights or headlights
are on, the instrument panel lights are not
dimmed.
Clock (for versions/markets, where
provided)
When the ignition switch is in the “ON”
position, the display (E) shows the time.
80JM039
IMPORTANT Keep track of your odome-
ter reading and check the maintenance
schedule regularly for required services.
Increased wear or damage to certain parts
can result from failure to perform re-
quired services at the proper mileage in-
tervals.
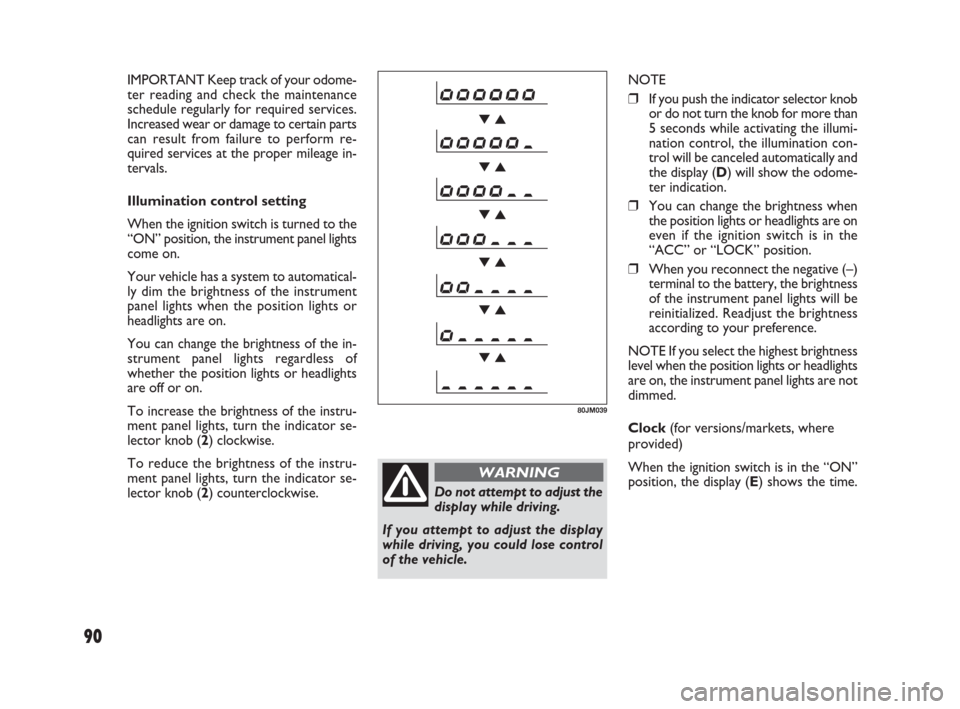
Illumination control setting
When the ignition switch is turned to the
“ON” position, the instrument panel lights
come on.
Your vehicle has a system to automatical-
ly dim the brightness of the instrument
panel lights when the position lights or
headlights are on.
You can change the brightness of the in-
strument panel lights regardless of
whether the position lights or headlights
are off or on.
To increase the brightness of the instru-
ment panel lights, turn the indicator se-
lector knob (2) clockwise.
To reduce the brightness of the instru-
ment panel lights, turn the indicator se-
lector knob (2) counterclockwise.
071-128 SEDICI LUM FL GB 1E 19-06-2009 12:05 Pagina 90
Page 92 of 270
91
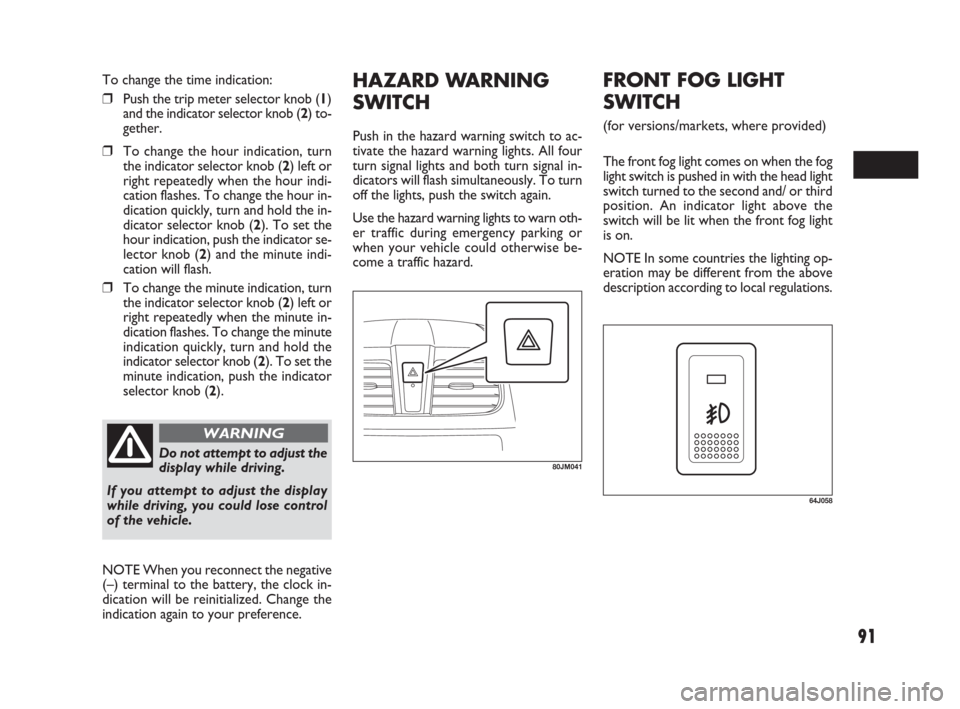
HAZARD WARNING
SWITCH
Push in the hazard warning switch to ac-
tivate the hazard warning lights. All four
turn signal lights and both turn signal in-
dicators will flash simultaneously. To turn
off the lights, push the switch again.
Use the hazard warning lights to warn oth-
er traffic during emergency parking or
when your vehicle could otherwise be-
come a traffic hazard.
80JM041Do not attempt to adjust the
display while driving.
If you attempt to adjust the display
while driving, you could lose control
of the vehicle.
WARNING
To change the time indication:
âť’Push the trip meter selector knob (1)
and the indicator selector knob (2) to-
gether.
âť’To change the hour indication, turn
the indicator selector knob (2) left or
right repeatedly when the hour indi-
cation flashes. To change the hour in-
dication quickly, turn and hold the in-
dicator selector knob (2). To set the
hour indication, push the indicator se-
lector knob (2) and the minute indi-
cation will flash.
âť’To change the minute indication, turn
the indicator selector knob (2) left or
right repeatedly when the minute in-
dication flashes. To change the minute
indication quickly, turn and hold the
indicator selector knob (2). To set the
minute indication, push the indicator
selector knob (2).
NOTE When you reconnect the negative
(–) terminal to the battery, the clock in-
dication will be reinitialized. Change the
indication again to your preference.
64J058
FRONT FOG LIGHT
SWITCH
(for versions/markets, where provided)
The front fog light comes on when the fog
light switch is pushed in with the head light
switch turned to the second and/ or third
position. An indicator light above the
switch will be lit when the front fog light
is on.
NOTE In some countries the lighting op-
eration may be different from the above
description according to local regulations.
071-128 SEDICI LUM FL GB 1E 19-06-2009 12:05 Pagina 91
Page 93 of 270
92
79J177
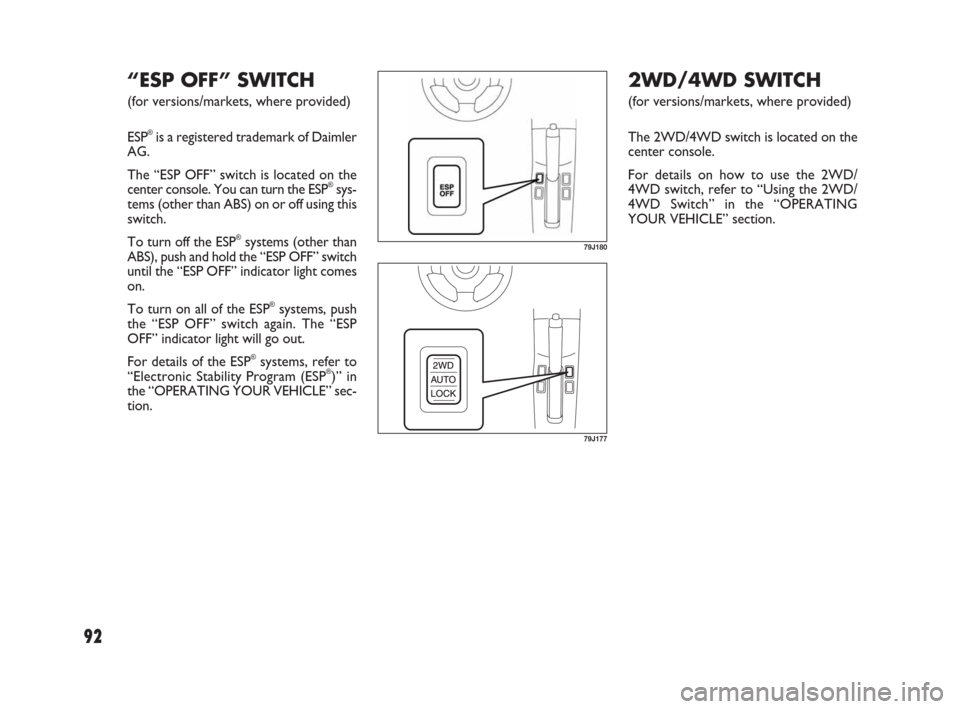
2WD/4WD SWITCH
(for versions/markets, where provided)
The 2WD/4WD switch is located on the
center console.
For details on how to use the 2WD/
4WD switch, refer to “Using the 2WD/
4WD Switch” in the “OPERATING
YOUR VEHICLE” section.
79J180
“ESP OFF” SWITCH
(for versions/markets, where provided)
ESP
®is a registered trademark of Daimler
AG.
The “ESP OFF” switch is located on the
center console. You can turn the ESP
®sys-
tems (other than ABS) on or off using this
switch.
To turn off the ESP
®systems (other than
ABS), push and hold the “ESP OFF” switch
until the “ESP OFF” indicator light comes
on.
To turn on all of the ESP
®systems, push
the “ESP OFF” switch again. The “ESP
OFF” indicator light will go out.
For details of the ESP
®systems, refer to
“Electronic Stability Program (ESP®)” in
the “OPERATING YOUR VEHICLE” sec-
tion.
071-128 SEDICI LUM FL GB 1E 19-06-2009 12:05 Pagina 92
Page 94 of 270
93
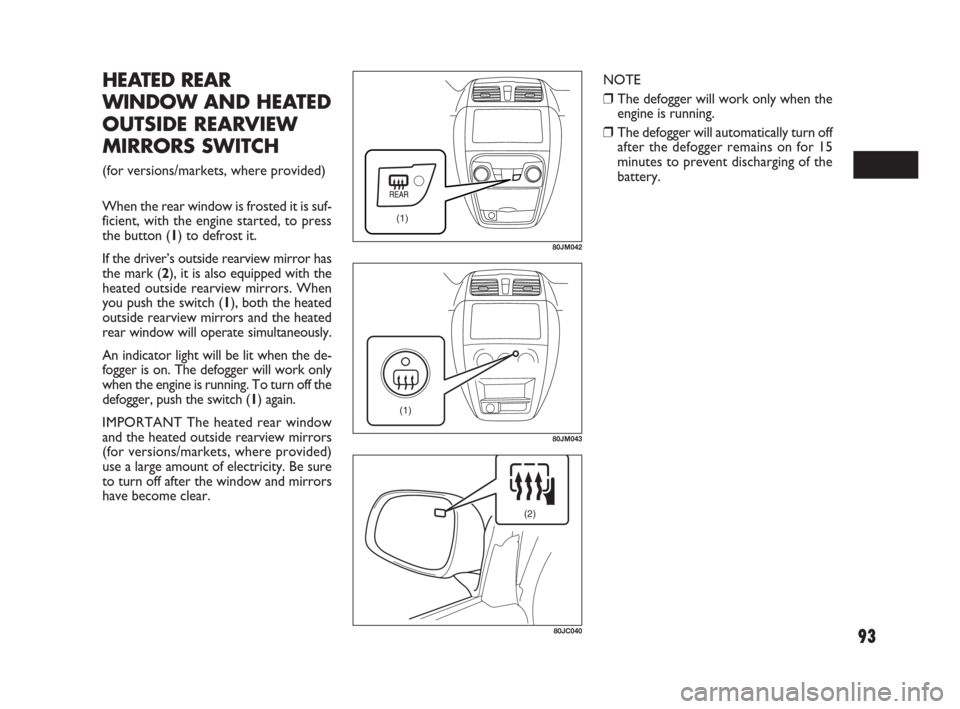
HEATED REAR
WINDOW AND HEATED
OUTSIDE REARVIEW
MIRRORS SWITCH
(for versions/markets, where provided)
When the rear window is frosted it is suf-
ficient, with the engine started, to press
the button (1) to defrost it.
If the driver’s outside rearview mirror has
the mark (2), it is also equipped with the
heated outside rearview mirrors. When
you push the switch (1), both the heated
outside rearview mirrors and the heated
rear window will operate simultaneously.
An indicator light will be lit when the de-
fogger is on. The defogger will work only
when the engine is running. To turn off the
defogger, push the switch (1) again.
IMPORTANT The heated rear window
and the heated outside rearview mirrors
(for versions/markets, where provided)
use a large amount of electricity. Be sure
to turn off after the window and mirrors
have become clear.
(1)
80JM042
(1)
80JM043
NOTE
âť’The defogger will work only when the
engine is running.
âť’The defogger will automatically turn off
after the defogger remains on for 15
minutes to prevent discharging of the
battery.
(2)
80JC040
071-128 SEDICI LUM FL GB 1E 19-06-2009 12:05 Pagina 93
Page 95 of 270
94
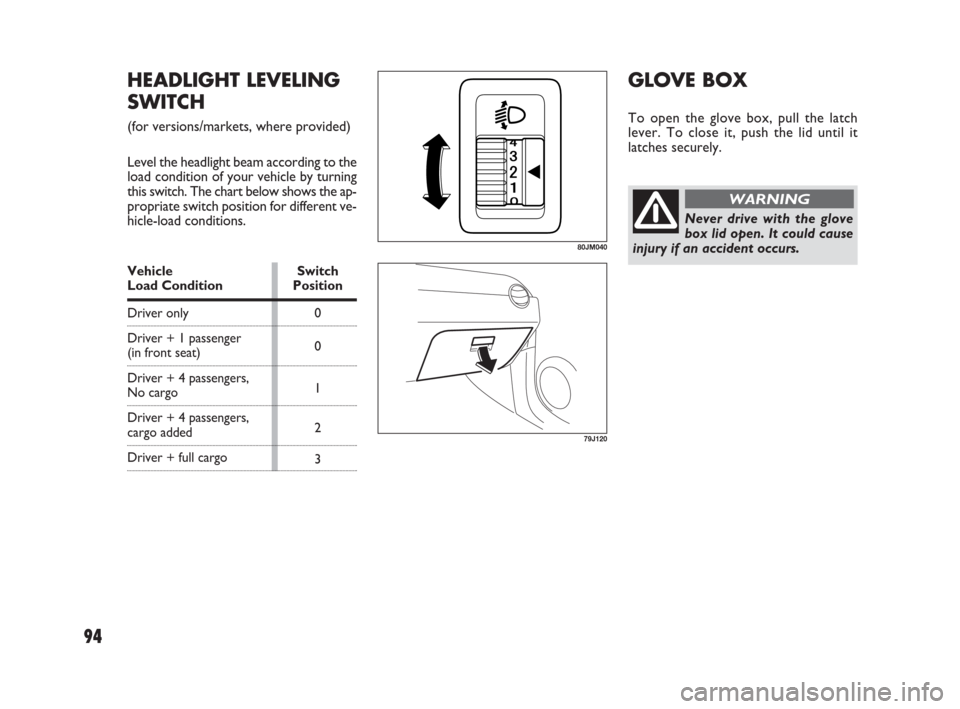
HEADLIGHT LEVELING
SWITCH
(for versions/markets, where provided)
Level the headlight beam according to the
load condition of your vehicle by turning
this switch. The chart below shows the ap-
propriate switch position for different ve-
hicle-load conditions.
Vehicle Load Condition
Driver only
Driver + 1 passenger
(in front seat)
Driver + 4 passengers,
No cargo
Driver + 4 passengers,
cargo added
Driver + full cargoSwitch
Position
0
0
1
2
3
80JM040
GLOVE BOX
To open the glove box, pull the latch
lever. To close it, push the lid until it
latches securely.
Never drive with the glove
box lid open. It could cause
injury if an accident occurs.
WARNING
79J120
071-128 SEDICI LUM FL GB 1E 19-06-2009 12:05 Pagina 94
Page 96 of 270
95
79J045
Front panel ashtray
79J047
Make sure tobacco is fully
extinguished before closing
the ashtrays. Never throw waste in
the ashtrays: it could create a fire
hazard.
WARNING
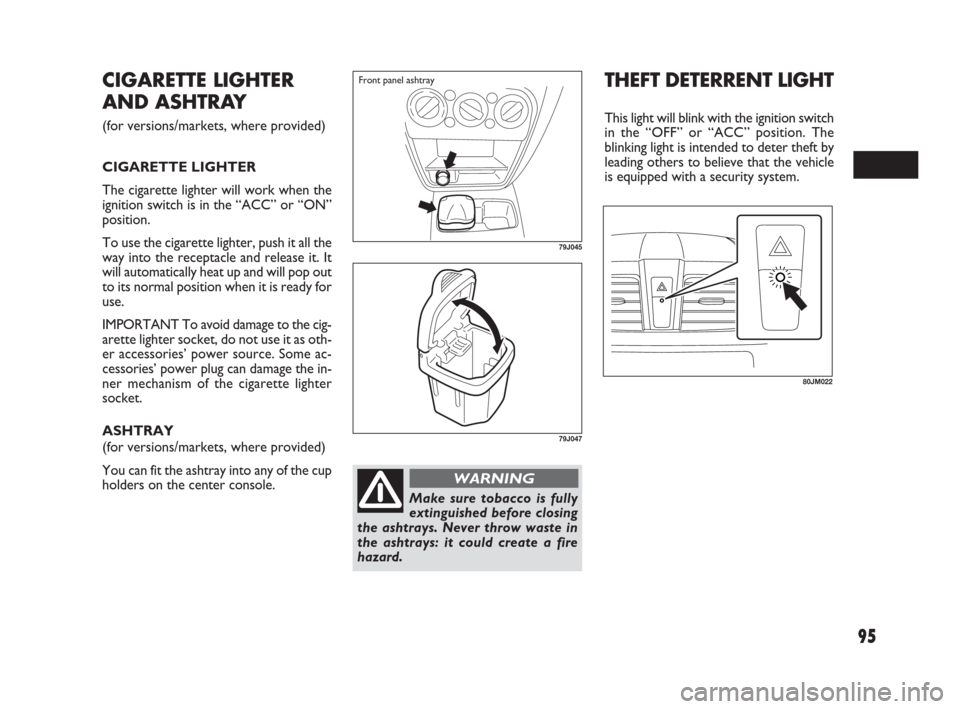
CIGARETTE LIGHTER
AND ASHTRAY
(for versions/markets, where provided)
CIGARETTE LIGHTER
The cigarette lighter will work when the
ignition switch is in the “ACC” or “ON”
position.
To use the cigarette lighter, push it all the
way into the receptacle and release it. It
will automatically heat up and will pop out
to its normal position when it is ready for
use.
IMPORTANT To avoid damage to the cig-
arette lighter socket, do not use it as oth-
er accessories’ power source. Some ac-
cessories’ power plug can damage the in-
ner mechanism of the cigarette lighter
socket.
ASHTRAY
(for versions/markets, where provided)
You can fit the ashtray into any of the cup
holders on the center console.
THEFT DETERRENT LIGHT
This light will blink with the ignition switch
in the “OFF” or “ACC” position. The
blinking light is intended to deter theft by
leading others to believe that the vehicle
is equipped with a security system.
80JM022
071-128 SEDICI LUM FL GB 1E 19-06-2009 12:05 Pagina 95
Page 97 of 270
HEATING AND AIR
CONDITIONING
SYSTEM
There are three types of heating and air
conditioning systems as follows:
âť’Heating System
âť’Manual Heating and Air Conditioning
System
âť’Automatic Heating and Air Condition-
ing System (Climate Control)
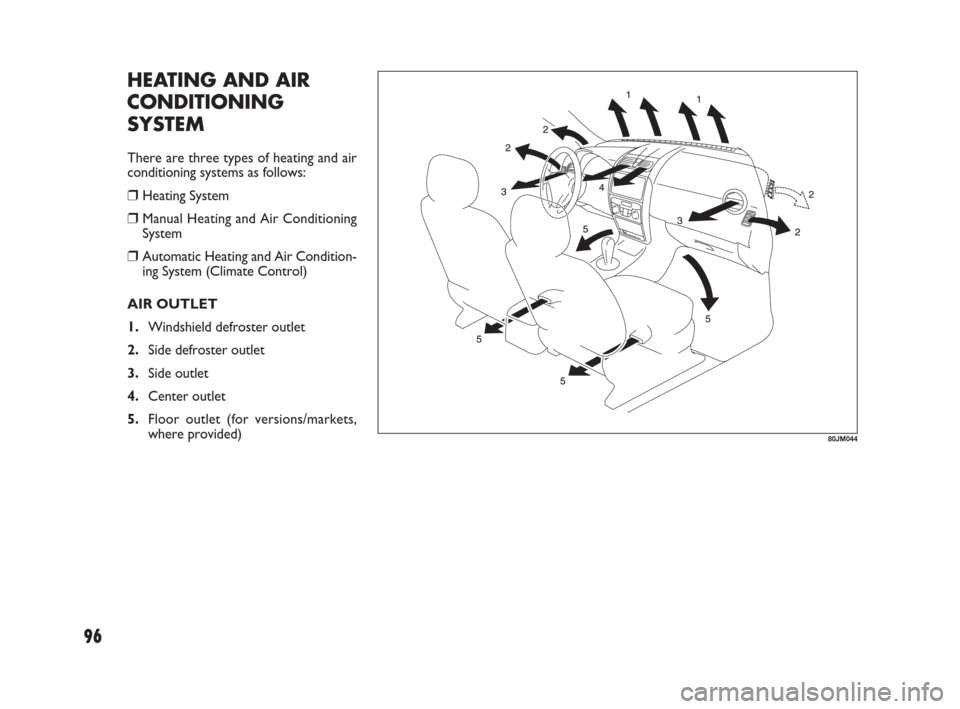
AIR OUTLET
1.Windshield defroster outlet
2.Side defroster outlet
3.Side outlet
4.Center outlet
5.Floor outlet (for versions/markets,
where provided)
80JM044
96
071-128 SEDICI LUM FL GB 1E 19-06-2009 12:05 Pagina 96
Page 98 of 270
97
HEATING SYSTEM
(for versions/markets, where provided)
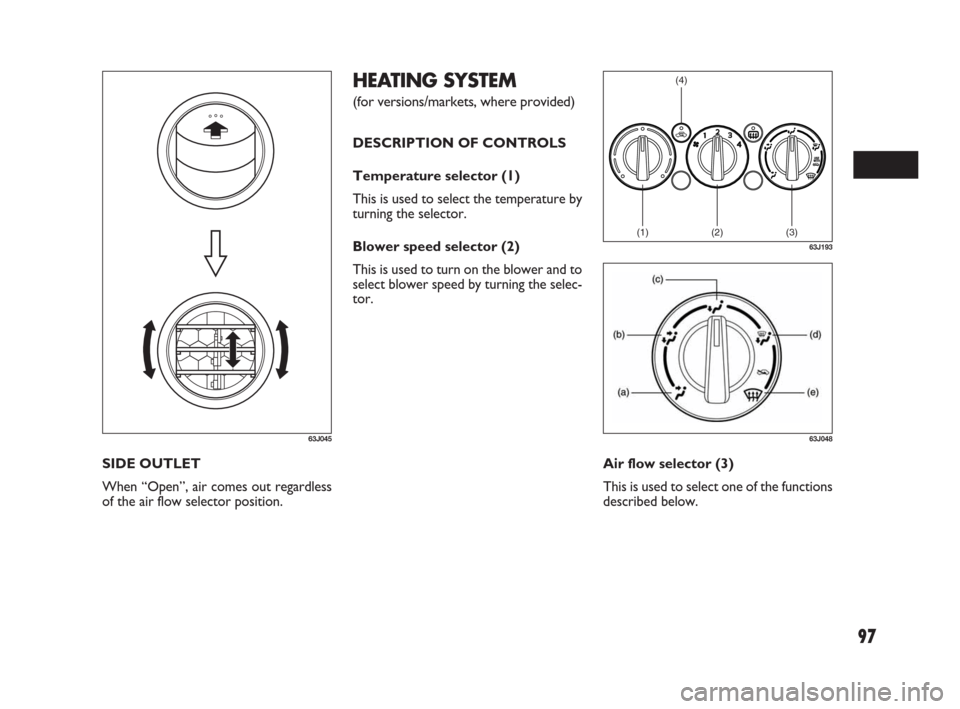
DESCRIPTION OF CONTROLS
Temperature selector (1)
This is used to select the temperature by
turning the selector.
Blower speed selector (2)
This is used to turn on the blower and to
select blower speed by turning the selec-
tor.
Air flow selector (3)
This is used to select one of the functions
described below. SIDE OUTLET
When “Open”, air comes out regardless
of the air flow selector position.
63J045
(1)(2)(3)
(4)
63J193
63J048
071-128 SEDICI LUM FL GB 1E 19-06-2009 12:05 Pagina 97
Page 99 of 270
98
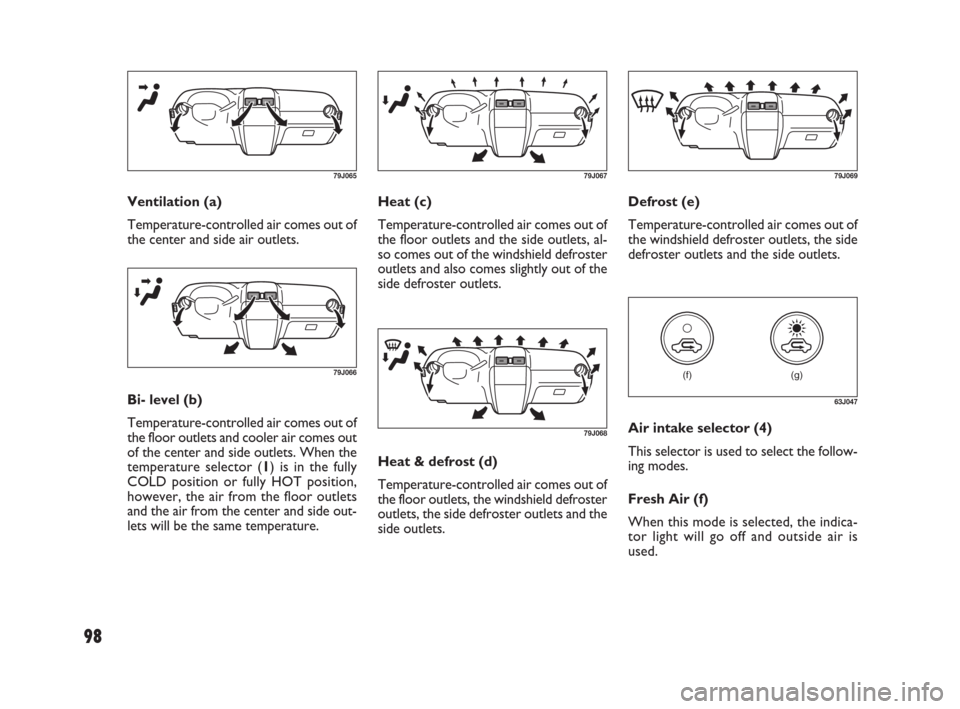
Heat (c)
Temperature-controlled air comes out of
the floor outlets and the side outlets, al-
so comes out of the windshield defroster
outlets and also comes slightly out of the
side defroster outlets.Defrost (e)
Temperature-controlled air comes out of
the windshield defroster outlets, the side
defroster outlets and the side outlets. Ventilation (a)
Temperature-controlled air comes out of
the center and side air outlets.
79J065
79J066
Bi- level (b)
Temperature-controlled air comes out of
the floor outlets and cooler air comes out
of the center and side outlets. When the
temperature selector (1) is in the fully
COLD position or fully HOT position,
however, the air from the floor outlets
and the air from the center and side out-
lets will be the same temperature.
79J067
79J068
Heat & defrost (d)
Temperature-controlled air comes out of
the floor outlets, the windshield defroster
outlets, the side defroster outlets and the
side outlets.
79J069
(g) (f)
63J047
Air intake selector (4)
This selector is used to select the follow-
ing modes.
Fresh Air (f)
When this mode is selected, the indica-
tor light will go off and outside air is
used.
071-128 SEDICI LUM FL GB 1E 19-06-2009 12:05 Pagina 98
Page 100 of 270
99
Forced ventilation
The control settings are the same as for
natural ventilation except you set the
blower speed selector to a position oth-
er than “OFF”.
Normal heating (using outside air)
Select “HEAT” and “FRESH AIR”, the
temperature selector to the desired tem-
perature position and the blower speed
selector to the desired blower speed po-
sition. Setting the blower speed selector
to a higher blower speed position in-
creases heating efficiency.
Quick heating
(using recirculated air)
The control settings are the same as for
normal heating except you select “RE-
CIRCULATED AIR”. If you use this heat-
ing method for an extended period of
time, the air in the vehicle can become
contaminated and the windows can be-
come misty. Therefore, use this method
only for quick heating and change to the
normal heating method as soon as possi-
ble.Head cooled/Feet warmed heating
Select “BI-LEVEL” and “FRESH AIR”, the
temperature selector to the desired tem-
perature position, and the blower speed se-
lector to the desired blower speed posi-
tion. Unless the temperature selector is in
the fully COLD position or fully HOT po-
sition, the air that comes out of the cen-
ter and side outlets will be cooler than the
air that comes out of the floor outlets.
Defrosting/Feet warmed heating
Select “HEAT & DEFROST” and “FRESH
AIR”, the temperature selector to the de-
sired temperature position, and the blow-
er speed selector to HIGH. When the
windshield has become clear, set the
blower speed selector to the desired
blower speed position.
Defrosting
Select “DEFROST” and “FRESH AIR”, the
temperature selector to the desired tem-
perature position (higher temperature
provides more efficient defrosting), and
the blower speed selector to HIGH.
When the windshield has become clear,
set the blower speed selector to the de-
sired blower speed position. Recirculated Air (g)
When this mode is selected, the indicator
light will come on, outside air is shut out
and inside air is recirculated. This mode is
suitable when driving through dusty or
polluted air such as in a tunnel, or when
attempting to quickly cool down the in-
terior.
“FRESH AIR” and “RECIRCULATED AIR”
are switched alternately each time the air
intake selector is pushed.
NOTE If you select “RECIRCULATED
AIR” for an extended period of time, the
air in the vehicle can become contami-
nated. Therefore, you should occasional-
ly select “FRESH AIR”.
SYSTEM OPERATING
INSTRUCTIONS
Natural ventilation
Select “VENTILATION” and “FRESH
AIR”, the temperature selector to the de-
sired temperature position, and the blow-
er speed selector to “OFF”. Fresh air will
flow through the vehicle during driving.
071-128 SEDICI LUM FL GB 1E 19-06-2009 12:05 Pagina 99