FIAT SEDICI 2009 2.G Owners Manual
Manufacturer: FIAT, Model Year: 2009, Model line: SEDICI, Model: FIAT SEDICI 2009 2.GPages: 270, PDF Size: 3.44 MB
Page 191 of 270
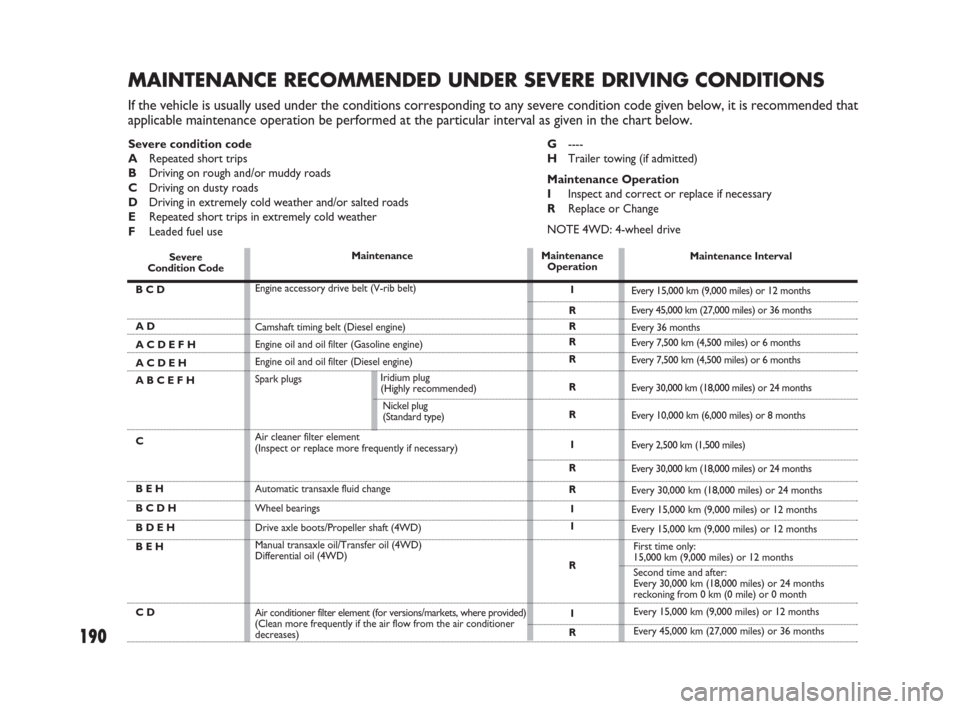
MAINTENANCE RECOMMENDED UNDER SEVERE DRIVING CONDITIONS
If the vehicle is usually used under the conditions corresponding to any severe condition code given below, it is recommended that
applicable maintenance operation be performed at the particular interval as given in the chart below.
190
G----
HTrailer towing (if admitted)
Maintenance Operation
IInspect and correct or replace if necessary
RReplace or Change
NOTE 4WD: 4-wheel drive Severe condition code
ARepeated short trips
BDriving on rough and/or muddy roads
CDriving on dusty roads
DDriving in extremely cold weather and/or salted roads
ERepeated short trips in extremely cold weather
FLeaded fuel use
Severe Condition Code
B C D
A D
A C D E F H
A C D E H
A B C E F H
C
B E H
B C D H
B D E H
B E H
C D
Maintenance Interval
Every 15,000 km (9,000 miles) or 12 months
Every 45,000 km (27,000 miles) or 36 months
Every 36 months
Every 7,500 km (4,500 miles) or 6 months
Every 7,500 km (4,500 miles) or 6 months
Every 30,000 km (18,000 miles) or 24 months
Every 10,000 km (6,000 miles) or 8 months
Every 2,500 km (1,500 miles)
Every 30,000 km (18,000 miles) or 24 months
Every 30,000 km (18,000 miles) or 24 months
Every 15,000 km (9,000 miles) or 12 months
Every 15,000 km (9,000 miles) or 12 months
First time only:
15,000 km (9,000 miles) or 12 months
Second time and after:
Every 30,000 km (18,000 miles) or 24 months
reckoning from 0 km (0 mile) or 0 month
Every 15,000 km (9,000 miles) or 12 months
Every 45,000 km (27,000 miles) or 36 months Maintenance
Engine accessory drive belt (V-rib belt)
Camshaft timing belt (Diesel engine)
Engine oil and oil filter (Gasoline engine)
Engine oil and oil filter (Diesel engine)
Spark plugs
Air cleaner filter element
(Inspect or replace more frequently if necessary)
Automatic transaxle fluid change
Wheel bearings
Drive axle boots/Propeller shaft (4WD)
Manual transaxle oil/Transfer oil (4WD)
Differential oil (4WD)
Air conditioner filter element (for versions/markets, where provided)
(Clean more frequently if the air flow from the air conditioner
decreases)Maintenance
Operation
I
R
R
R
R
R
R
I
R
R
I
I
R
I
R Iridium plug
(Highly recommended)
Nickel plug
(Standard type)
183-230 SEDICI LUM FL GB 1E 19-06-2009 11:00 Pagina 190
Page 192 of 270
191
ENGINE OIL
AND FILTER
OIL SPECIFICATIONS -
GASOLINE ENGINES
Check whether the adopted engine oil is
falling within the following quality classes:
API SL, SM or ACEA A3, recommended
product: SELENIA K SAE 5W-40, Fiat
9.55535-M2 qualification.
OIL SPECIFICATIONS -
DIESEL ENGINES
Check whether the adopted engine oil is
falling within the following quality classes:
API CF or ACEA B4, recommended
product: SELENIA WR SAE 5W-40,
Fiat 9.55535-N2 qualification.
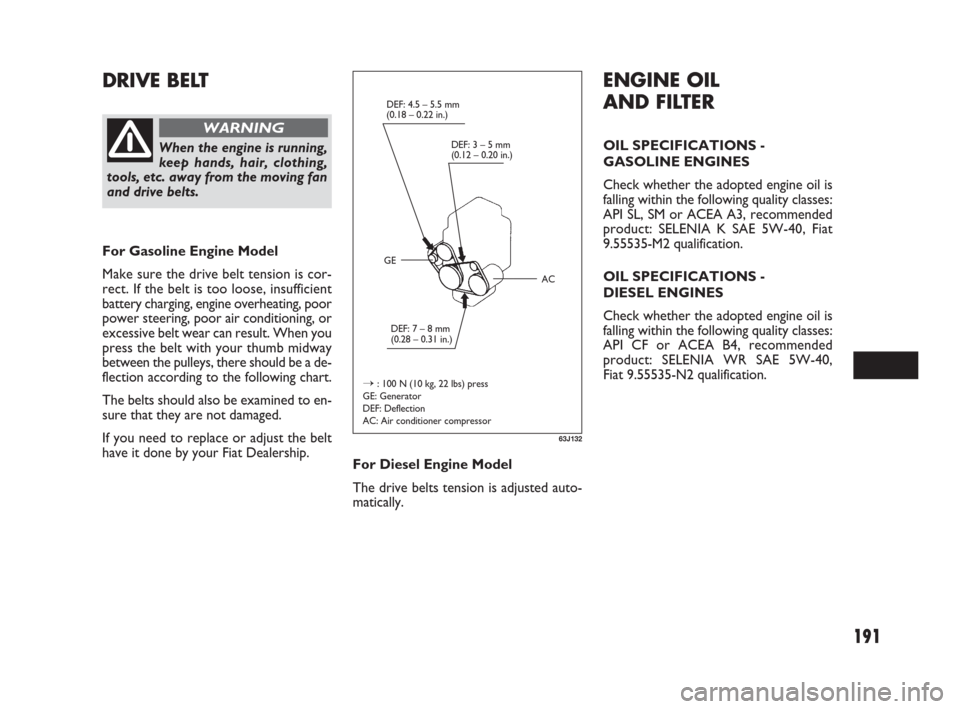
DRIVE BELT
63J132
DEF: 4.5 – 5.5 mm
(0.18 – 0.22 in.)
DEF: 3 – 5 mm
(0.12 – 0.20 in.)
DEF: 7 – 8 mm
(0.28 – 0.31 in.)
AC GE
→: 100 N (10 kg, 22 lbs) press
GE: Generator
DEF: Deflection
AC: Air conditioner compressor
When the engine is running,
keep hands, hair, clothing,
tools, etc. away from the moving fan
and drive belts.
WARNING
For Gasoline Engine Model
Make sure the drive belt tension is cor-
rect. If the belt is too loose, insufficient
battery charging, engine overheating, poor
power steering, poor air conditioning, or
excessive belt wear can result. When you
press the belt with your thumb midway
between the pulleys, there should be a de-
flection according to the following chart.
The belts should also be examined to en-
sure that they are not damaged.
If you need to replace or adjust the belt
have it done by your Fiat Dealership.
For Diesel Engine Model
The drive belts tension is adjusted auto-
matically.
183-230 SEDICI LUM FL GB 1E 19-06-2009 11:00 Pagina 191
Page 193 of 270
192
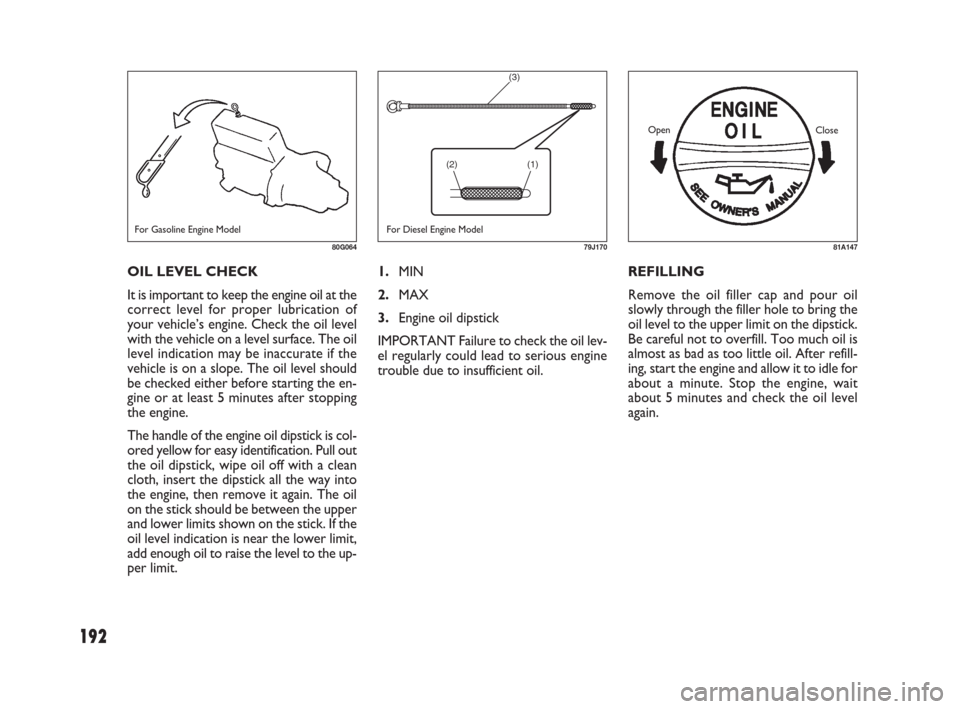
1.MIN
2.MAX
3.Engine oil dipstick
IMPORTANT Failure to check the oil lev-
el regularly could lead to serious engine
trouble due to insufficient oil.REFILLING
Remove the oil filler cap and pour oil
slowly through the filler hole to bring the
oil level to the upper limit on the dipstick.
Be careful not to overfill. Too much oil is
almost as bad as too little oil. After refill-
ing, start the engine and allow it to idle for
about a minute. Stop the engine, wait
about 5 minutes and check the oil level
again. OIL LEVEL CHECK
It is important to keep the engine oil at the
correct level for proper lubrication of
your vehicle’s engine. Check the oil level
with the vehicle on a level surface. The oil
level indication may be inaccurate if the
vehicle is on a slope. The oil level should
be checked either before starting the en-
gine or at least 5 minutes after stopping
the engine.
The handle of the engine oil dipstick is col-
ored yellow for easy identification. Pull out
the oil dipstick, wipe oil off with a clean
cloth, insert the dipstick all the way into
the engine, then remove it again. The oil
on the stick should be between the upper
and lower limits shown on the stick. If the
oil level indication is near the lower limit,
add enough oil to raise the level to the up-
per limit.
80G06481A147
Open
Close
For Gasoline Engine Model
(3)
(2) (1)
79J170
For Diesel Engine Model
183-230 SEDICI LUM FL GB 1E 19-06-2009 11:00 Pagina 192
Page 194 of 270
193
Tightening torque for drain plug
For Gasoline Engine Model:
35 Nm (3.5 kgm, 25.3 lb·ft)
For Diesel Engine Model:
20 Nm (2,0 kgm, 14.4 lb-ft)
❒Reinstall the drain plug and gasket.
Tighten the plug with a wrench to the
specified torque.
NOTE (For Diesel Engine Model)
Whenever the engine oil is changed, the
monitoring system to find the next oil
change stage must be reset whether the
oil pressure light blinks or not. For details
on how to reset the system, ask your Fi-
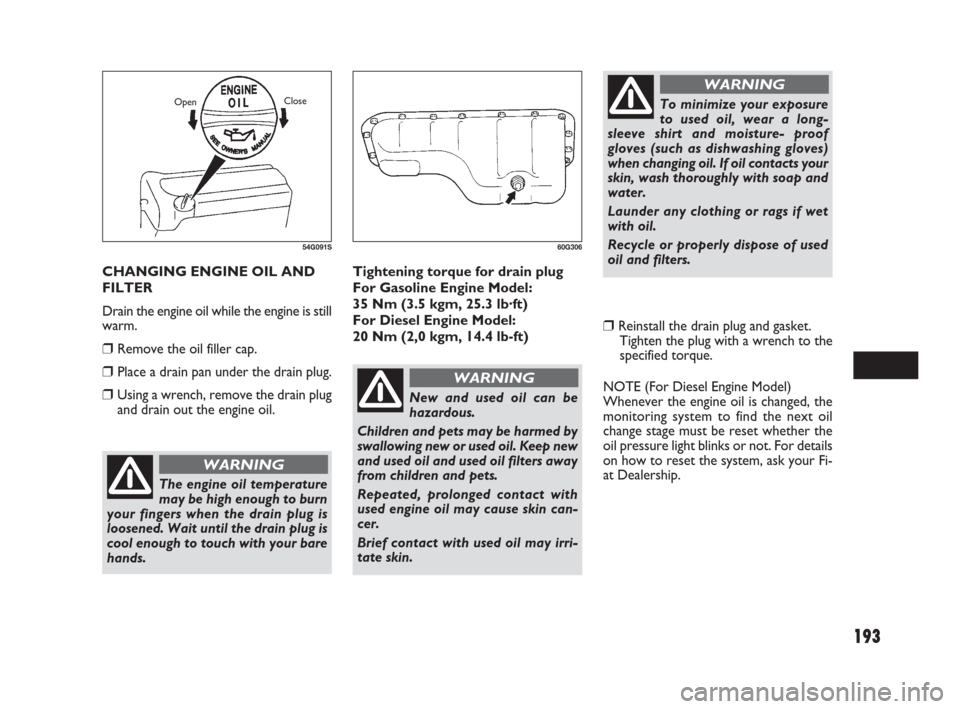
at Dealership. CHANGING ENGINE OIL AND
FILTER
Drain the engine oil while the engine is still
warm.
❒Remove the oil filler cap.
❒Place a drain pan under the drain plug.
❒Using a wrench, remove the drain plug
and drain out the engine oil.
54G091S
OpenClose
The engine oil temperature
may be high enough to burn
your fingers when the drain plug is
loosened. Wait until the drain plug is
cool enough to touch with your bare
hands.
WARNING
60G306
New and used oil can be
hazardous.
Children and pets may be harmed by
swallowing new or used oil. Keep new
and used oil and used oil filters away
from children and pets.
Repeated, prolonged contact with
used engine oil may cause skin can-
cer.
Brief contact with used oil may irri-
tate skin.
WARNING
To minimize your exposure
to used oil, wear a long-
sleeve shirt and moisture- proof
gloves (such as dishwashing gloves)
when changing oil. If oil contacts your
skin, wash thoroughly with soap and
water.
Launder any clothing or rags if wet
with oil.
Recycle or properly dispose of used
oil and filters.
WARNING
183-230 SEDICI LUM FL GB 1E 19-06-2009 11:00 Pagina 193
Page 195 of 270
194
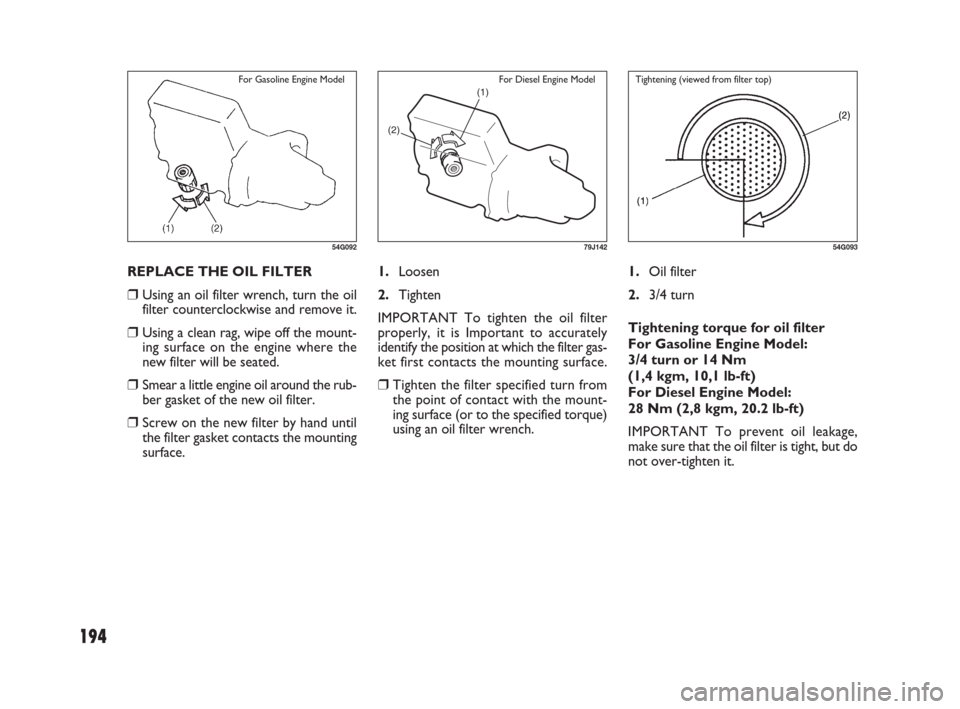
1.Oil filter
2.3/4 turn
Tightening torque for oil filter
For Gasoline Engine Model:
3/4 turn or 14 Nm
(1,4 kgm, 10,1 lb-ft)
For Diesel Engine Model:
28 Nm (2,8 kgm, 20.2 lb-ft)
IMPORTANT To prevent oil leakage,
make sure that the oil filter is tight, but do
not over-tighten it. REPLACE THE OIL FILTER
❒Using an oil filter wrench, turn the oil
filter counterclockwise and remove it.
❒Using a clean rag, wipe off the mount-
ing surface on the engine where the
new filter will be seated.
❒Smear a little engine oil around the rub-
ber gasket of the new oil filter.
❒Screw on the new filter by hand until
the filter gasket contacts the mounting
surface.
54G09254G093
Tightening (viewed from filter top)
1.Loosen
2.Tighten
IMPORTANT To tighten the oil filter
properly, it is Important to accurately
identify the position at which the filter gas-
ket first contacts the mounting surface.
❒Tighten the filter specified turn from
the point of contact with the mount-
ing surface (or to the specified torque)
using an oil filter wrench.
(1)
(2)
79J142
For Gasoline Engine Model For Diesel Engine Model
183-230 SEDICI LUM FL GB 1E 19-06-2009 11:00 Pagina 194
Page 196 of 270
195
Refill with Oil and Check for Leaks
❒Pour oil through the filler hole and in-
stall the filler cap.
For the approximate capacity of the oil,
refer to the “Capacities” item in the
“SPECIFICATIONS” section.
❒Start the engine and look carefully for
leaks at the oil filter and drain plug. Run
the engine at various speeds for at least
5 minutes.
❒Stop the engine and wait about 5 min-
utes. Check the oil level again and add
oil if necessary. Check for leaks again.
IMPORTANT
❒When replacing the oil filter, it is rec-
ommended that you use a genuine
Fiat replacement filter. If you use an af-
termarket filter, make sure it is of
equivalent quality and follow the man-
ufacturer’s instructions.
❒Oil leaks from around the oil filter or
drain plug indicate incorrect installation
or gasket damage. If you find any leaks
or are not sure that the filter has been
properly tightened, have the vehicle in-
spected by your Fiat Dealership.
GEAR OIL
MANUAL TRANSAXLE OIL/
TRANSFER OIL (4WD)/
REAR DIFFERENTIAL OIL (4WD)
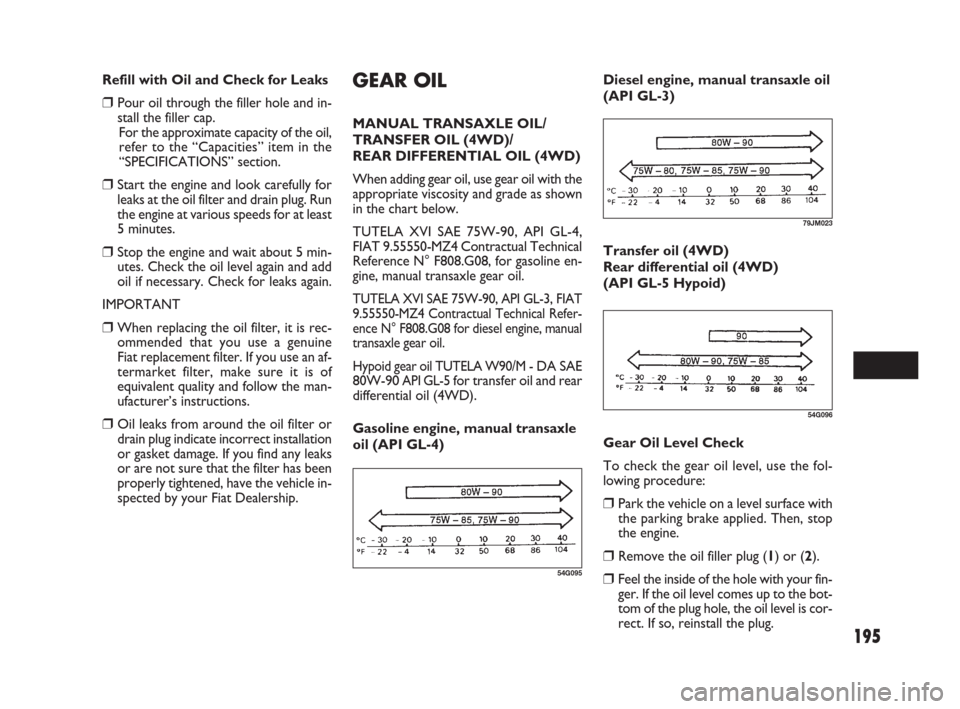
When adding gear oil, use gear oil with the
appropriate viscosity and grade as shown
in the chart below.
TUTELA XVI SAE 75W-90, API GL-4,
FIAT 9.55550-MZ4 Contractual Technical
Reference N° F808.G08, for gasoline en-
gine, manual transaxle gear oil.
TUTELA XVI SAE 75W-90, API GL-3, FIAT
9.55550-MZ4 Contractual Technical Refer-
ence N° F808.G08 for diesel engine, manual
transaxle gear oil.
Hypoid gear oil TUTELA W90/M -
DA SAE
80W-90 API GL-5for transfer oil and rear
differential oil (4WD).
Gasoline engine, manual transaxle
oil (API GL-4)
54G095
54G096
79JM023
Transfer oil (4WD)
Rear differential oil (4WD)
(API GL-5 Hypoid)
Gear Oil Level Check
To check the gear oil level, use the fol-
lowing procedure:
❒Park the vehicle on a level surface with
the parking brake applied. Then, stop
the engine.
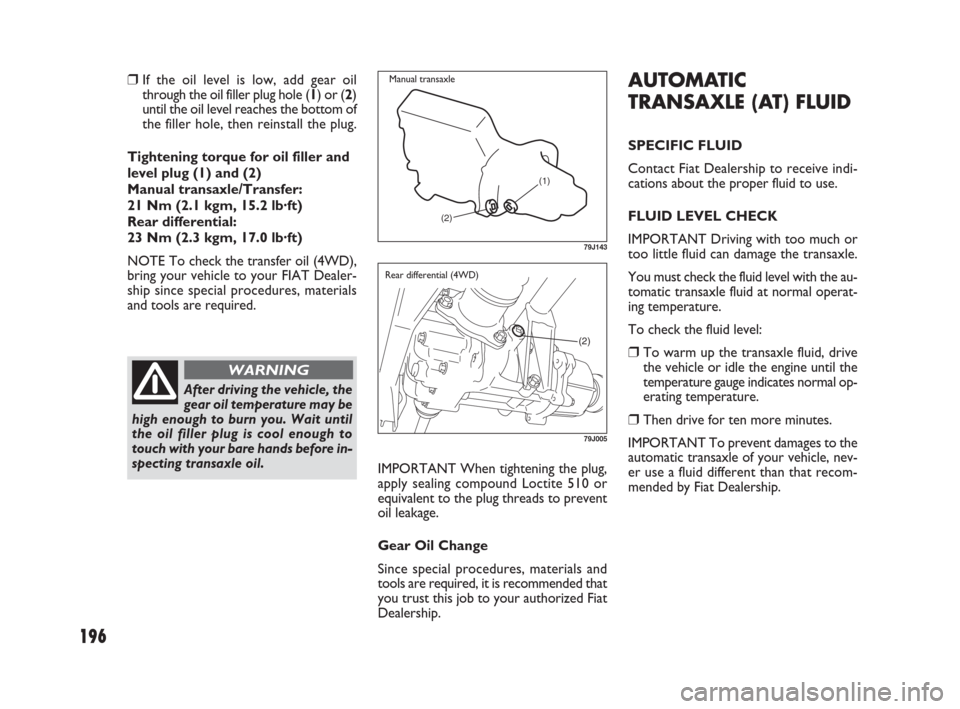
❒Remove the oil filler plug (1) or (2).
❒Feel the inside of the hole with your fin-
ger. If the oil level comes up to the bot-
tom of the plug hole, the oil level is cor-
rect. If so, reinstall the plug. Diesel engine, manual transaxle oil
(API GL-3)
183-230 SEDICI LUM FL GB 1E 19-06-2009 11:00 Pagina 195
Page 197 of 270
196
IMPORTANT When tightening the plug,
apply sealing compound Loctite 510 or
equivalent to the plug threads to prevent
oil leakage.
Gear Oil Change
Since special procedures, materials and
tools are required, it is recommended that
you trust this job to your authorized Fiat
Dealership.
(1)
(2)
79J143
(2)
79J005
Manual transaxle
Rear differential (4WD)
After driving the vehicle, the
gear oil temperature may be
high enough to burn you. Wait until
the oil filler plug is cool enough to
touch with your bare hands before in-
specting transaxle oil.
WARNING
AUTOMATIC
TRANSAXLE (AT) FLUID
SPECIFIC FLUID
Contact Fiat Dealership to receive indi-
cations about the proper fluid to use.
FLUID LEVEL CHECK
IMPORTANT Driving with too much or
too little fluid can damage the transaxle.
You must check the fluid level with the au-
tomatic transaxle fluid at normal operat-
ing temperature.
To check the fluid level:
❒To warm up the transaxle fluid, drive
the vehicle or idle the engine until the
temperature gauge indicates normal op-
erating temperature.
❒Then drive for ten more minutes.
IMPORTANT To prevent damages to the
automatic transaxle of your vehicle, nev-
er use a fluid different than that recom-
mended by Fiat Dealership.
❒If the oil level is low, add gear oil
through the oil filler plug hole (1) or (2)
until the oil level reaches the bottom of
the filler hole, then reinstall the plug.
Tightening torque for oil filler and
level plug (1) and (2)
Manual transaxle/Transfer:
21 Nm (2.1 kgm, 15.2 lb·ft)
Rear differential:
23 Nm (2.3 kgm, 17.0 lb·ft)
NOTE To check the transfer oil (4WD),
bring your vehicle to your FIAT Dealer-
ship since special procedures, materials
and tools are required.
183-230 SEDICI LUM FL GB 1E 19-06-2009 11:00 Pagina 196
Page 198 of 270
197
NOTE Do not check the fluid level if you
have just driven the vehicle for a long time
at high speed, if you have driven in city
traffic in hot weather, or if the vehicle has
been pulling a trailer. Wait until the fluid
cools down (about 30 minutes), or the
fluid level indication will not be correct.
❒Park your vehicle on level ground.
❒Apply the parking brake and then start
the engine in “P” (Park). Let it idle for
two minutes and keep it running during
the fluid level check.
❒With your foot on the brake pedal,
move the gearshift lever through each
range, pausing for about three seconds
in each range. Then move it back to the
“P” (Park) position.
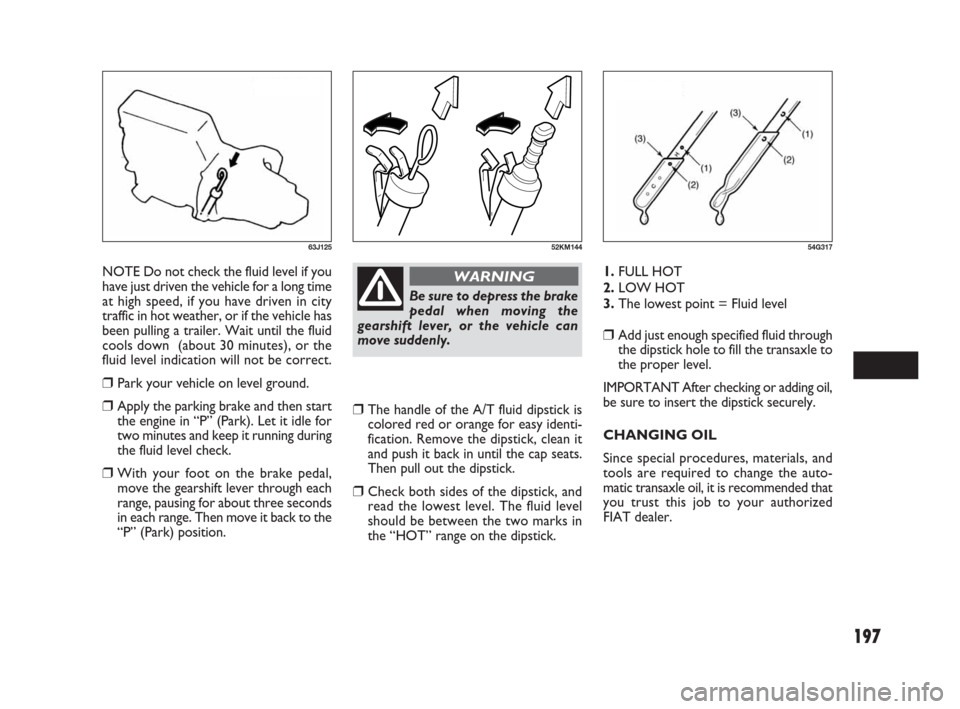
❒The handle of the A/T fluid dipstick is
colored red or orange for easy identi-
fication. Remove the dipstick, clean it
and push it back in until the cap seats.
Then pull out the dipstick.
❒Check both sides of the dipstick, and
read the lowest level. The fluid level
should be between the two marks in
the “HOT” range on the dipstick.1.FULL HOT
2.LOW HOT
3.The lowest point = Fluid level
❒Add just enough specified fluid through
the dipstick hole to fill the transaxle to
the proper level.
IMPORTANT After checking or adding oil,
be sure to insert the dipstick securely.
CHANGING OIL
Since special procedures, materials, and
tools are required to change the auto-
matic transaxle oil, it is recommended that
you trust this job to your authorized
FIAT dealer.
63J12552KM14454G317
Be sure to depress the brake
pedal when moving the
gearshift lever, or the vehicle can
move suddenly.
WARNING
183-230 SEDICI LUM FL GB 1E 19-06-2009 11:00 Pagina 197
Page 199 of 270
198
IMPORTANT
To avoid damaging your cooling system:
❒Always use a high quality ethylene gly-
col base non- silicate type coolant di-
luted with distilled water at the correct
mixture concentration.
❒Make sure that the proper mix is 50/50
coolant to distilled water and in no case
higher than 70/30. Concentrations
greater than 70/30 coolant to distilled
water will cause overheating conditions.
❒Do not use straight coolant nor plain
water.
❒Do not add extra inhibitors or addi-
tives. They may not be compatible with
your cooling system.
❒Do not mix different types of base
coolants. Doing so may result in accel-
erated seal wear and/ or the possibili-
ty of severe overheating and extensive
engine/automatic transaxle damage.
ENGINE COOLANT
SELECTION OF COOLANT
To maintain optimum performance and
durability of your engine, use PARAFLU
UP.
This type of coolant is best for your cool-
ing system as it:
❒Helps maintain proper engine temper-
ature.
❒Gives proper protection against freez-
ing and boiling.
❒Gives proper protection against cor-
rosion and rust.
Failure to use the proper coolant can dam-
age your cooling system. Your authorized
Fiat Dealership can help you select the
proper coolant.
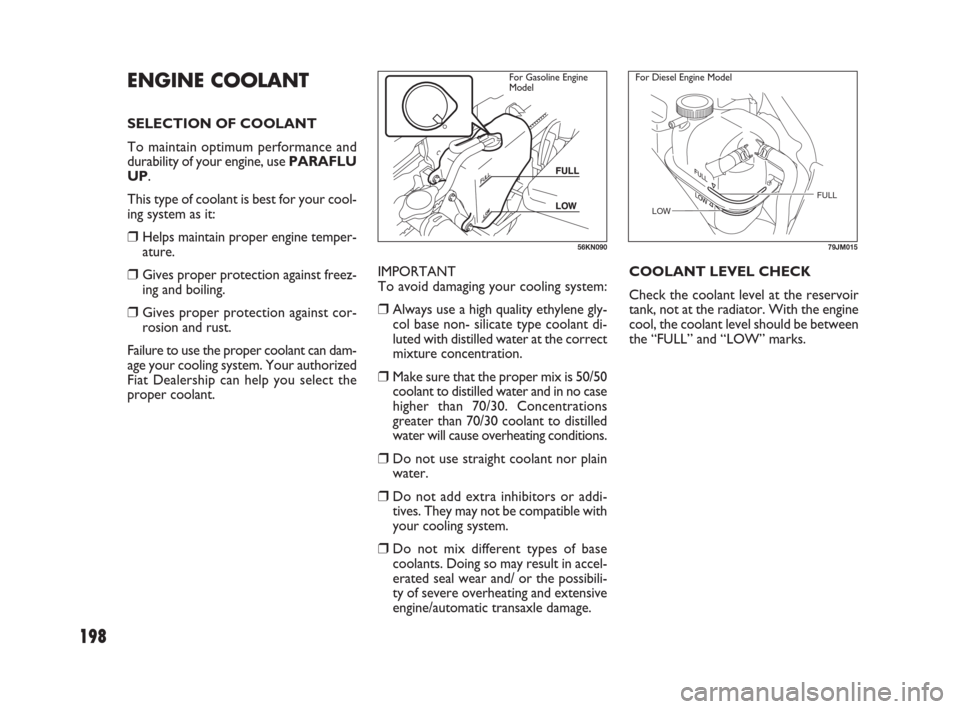
56KN090
For Gasoline Engine
Model
COOLANT LEVEL CHECK
Check the coolant level at the reservoir
tank, not at the radiator. With the engine
cool, the coolant level should be between
the “FULL” and “LOW” marks.
LOWFUL
L FULLFULL
79JM015
For Diesel Engine Model
183-230 SEDICI LUM FL GB 1E 19-06-2009 11:00 Pagina 198
Page 200 of 270
199
ADDING COOLANT
Engine coolant is harmful or
fatal if swallowed or inhaled.
Do not drink antifreeze or coolant so-
lution. If swallowed, do not induce
vomiting. Immediately contact a poi-
son control center or a physician.
Avoid inhaling mist or hot vapors; if
inhaled, remove to fresh air. If
coolant gets in eyes, flush eyes with
water and seek medical attention.
Wash thoroughly after handling. So-
lution can be poisonous to animals.
Keep out of the reach of children and
animals.
WARNINGIMPORTANT
❒The mixture you use should contain
50% concentration of antifreeze.
❒If the lowest ambient temperature in
your area is expected to be –35°C
(–31°F) or below, use higher concen-
trations up to 60% following the in-
structions on the antifreeze container.
❒When putting the cap on the reservoir
tank, line up the arrow on the cap and
the arrow on the tank. Failure to follow
this can result in coolant leakage.
If the coolant level is below the “LOW”
mark, more coolant should be added.
When the engine is cool, remove the de-
gassing tank cap by turning it anticlock-
wise slowly to release any pressure. And
add coolant until the degassing tank level
reaches the “FULL” mark. Never fill the
degassing tank above the “FULL” mark.
It is hazardous to remove the
degassing tank cap for Diesel
engine when the water temperature
is high, because scalding fluid and
steam may be blown out under pres-
sure. Wait until the coolant temper-
ature has lowered before removing
the cap.
WARNING
183-230 SEDICI LUM FL GB 1E 19-06-2009 11:00 Pagina 199