FIAT SEDICI 2009 2.G Owners Manual
Manufacturer: FIAT, Model Year: 2009, Model line: SEDICI, Model: FIAT SEDICI 2009 2.GPages: 270, PDF Size: 3.44 MB
Page 211 of 270
210
IMPORTANT Replacing the original tires
with tires of a different size may result in
false speedometer or odometer readings.
Check with your Fiat Dealership before
purchasing replacement tires that differ in
size from the original tires.
IMPORTANT For 4-wheel drive (4WD)
models, replacing a tire with one of a dif-
ferent size, or using different brands
among the four tires can result in dam-
age to the drive train.
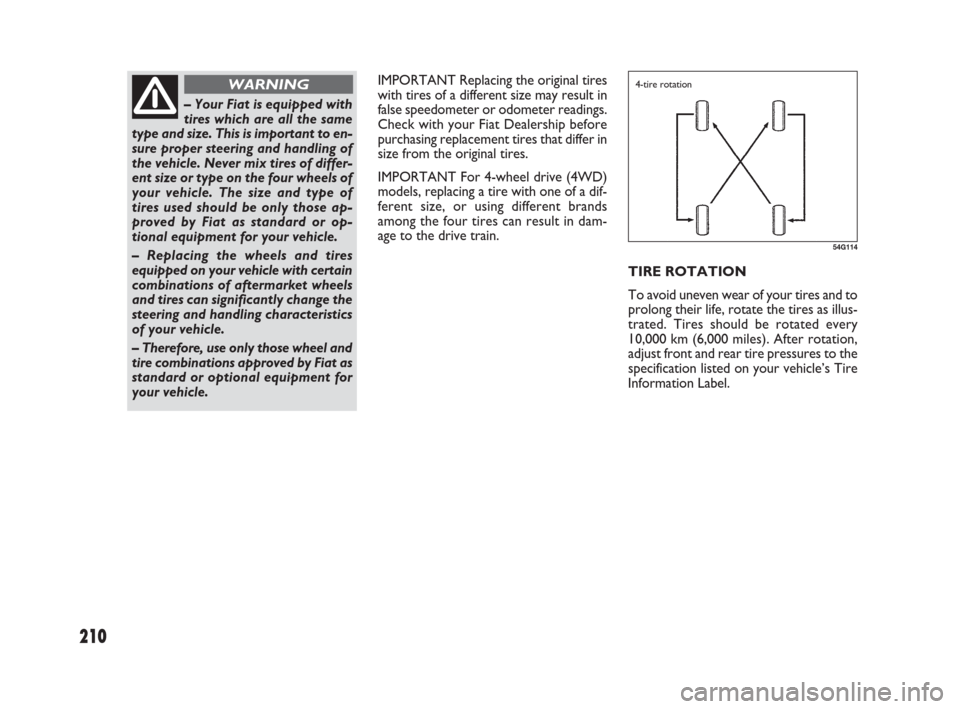
TIRE ROTATION
To avoid uneven wear of your tires and to
prolong their life, rotate the tires as illus-
trated. Tires should be rotated every
10,000 km (6,000 miles). After rotation,
adjust front and rear tire pressures to the
specification listed on your vehicle’s Tire
Information Label.
– Your Fiat is equipped with
tires which are all the same
type and size. This is important to en-
sure proper steering and handling of
the vehicle. Never mix tires of differ-
ent size or type on the four wheels of
your vehicle. The size and type of
tires used should be only those ap-
proved by Fiat as standard or op-
tional equipment for your vehicle.
– Replacing the wheels and tires
equipped on your vehicle with certain
combinations of aftermarket wheels
and tires can significantly change the
steering and handling characteristics
of your vehicle.
– Therefore, use only those wheel and
tire combinations approved by Fiat as
standard or optional equipment for
your vehicle.
WARNING
54G114
4-tire rotation
183-230 SEDICI LUM FL GB 1E 19-06-2009 11:00 Pagina 210
Page 212 of 270
211
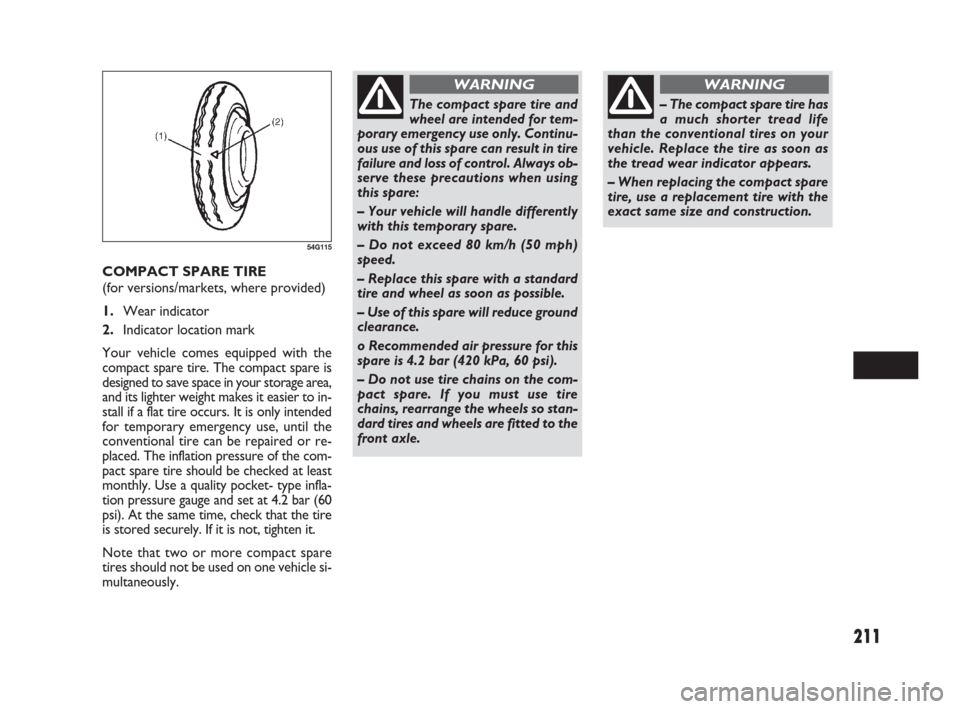
COMPACT SPARE TIRE
(for versions/markets, where provided)
1.Wear indicator
2.Indicator location mark
Your vehicle comes equipped with the
compact spare tire. The compact spare is
designed to save space in your storage area,
and its lighter weight makes it easier to in-
stall if a flat tire occurs. It is only intended
for temporary emergency use, until the
conventional tire can be repaired or re-
placed. The inflation pressure of the com-
pact spare tire should be checked at least
monthly. Use a quality pocket- type infla-
tion pressure gauge and set at 4.2 bar (60
psi). At the same time, check that the tire
is stored securely. If it is not, tighten it.
Note that two or more compact spare
tires should not be used on one vehicle si-
multaneously.
54G115
The compact spare tire and
wheel are intended for tem-
porary emergency use only. Continu-
ous use of this spare can result in tire
failure and loss of control. Always ob-
serve these precautions when using
this spare:
– Your vehicle will handle differently
with this temporary spare.
– Do not exceed 80 km/h (50 mph)
speed.
– Replace this spare with a standard
tire and wheel as soon as possible.
– Use of this spare will reduce ground
clearance.
o Recommended air pressure for this
spare is 4.2 bar (420 kPa, 60 psi).
– Do not use tire chains on the com-
pact spare. If you must use tire
chains, rearrange the wheels so stan-
dard tires and wheels are fitted to the
front axle.
WARNING
– The compact spare tire has
a much shorter tread life
than the conventional tires on your
vehicle. Replace the tire as soon as
the tread wear indicator appears.
– When replacing the compact spare
tire, use a replacement tire with the
exact same size and construction.
WARNING
183-230 SEDICI LUM FL GB 1E 19-06-2009 11:00 Pagina 211
Page 213 of 270
212
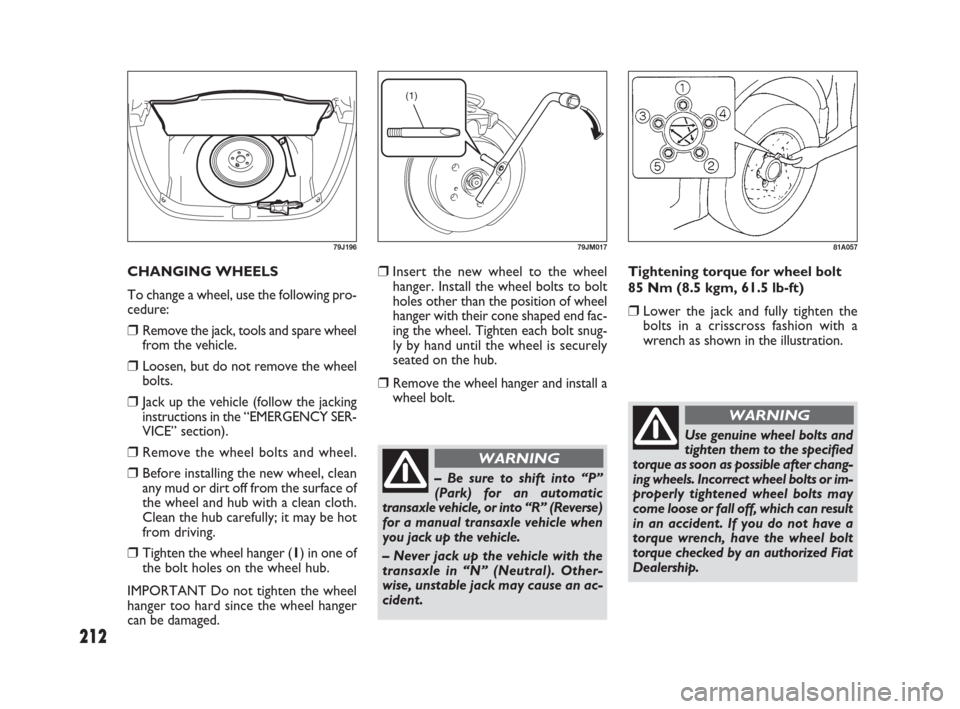
❒Insert the new wheel to the wheel
hanger. Install the wheel bolts to bolt
holes other than the position of wheel
hanger with their cone shaped end fac-
ing the wheel. Tighten each bolt snug-
ly by hand until the wheel is securely
seated on the hub.
❒Remove the wheel hanger and install a
wheel bolt. CHANGING WHEELS
To change a wheel, use the following pro-
cedure:
❒Remove the jack, tools and spare wheel
from the vehicle.
❒Loosen, but do not remove the wheel
bolts.
❒Jack up the vehicle (follow the jacking
instructions in the “EMERGENCY SER-
VICE” section).
❒Remove the wheel bolts and wheel.
❒Before installing the new wheel, clean
any mud or dirt off from the surface of
the wheel and hub with a clean cloth.
Clean the hub carefully; it may be hot
from driving.
❒Tighten the wheel hanger (1) in one of
the bolt holes on the wheel hub.
IMPORTANT Do not tighten the wheel
hanger too hard since the wheel hanger
can be damaged.
79J196
– Be sure to shift into “P”
(Park) for an automatic
transaxle vehicle, or into “R” (Reverse)
for a manual transaxle vehicle when
you jack up the vehicle.
– Never jack up the vehicle with the
transaxle in “N” (Neutral). Other-
wise, unstable jack may cause an ac-
cident.
WARNING
Tightening torque for wheel bolt
85 Nm (8.5 kgm, 61.5 lb-ft)
❒Lower the jack and fully tighten the
bolts in a crisscross fashion with a
wrench as shown in the illustration.
81A057
(1)
79JM017
Use genuine wheel bolts and
tighten them to the specified
torque as soon as possible after chang-
ing wheels. Incorrect wheel bolts or im-
properly tightened wheel bolts may
come loose or fall off, which can result
in an accident. If you do not have a
torque wrench, have the wheel bolt
torque checked by an authorized Fiat
Dealership.
WARNING
183-230 SEDICI LUM FL GB 1E 19-06-2009 11:00 Pagina 212
Page 214 of 270
213
BATTERY
– Batteries produce flam-
mable hydrogen gas. Keep
flames and sparks away from the bat-
tery or an explosion may occur. Nev-
er smoke when working in the vicini-
ty of the battery.
– When checking or servicing the bat-
tery, disconnect the negative cable.
Be careful not to cause a short circuit
by allowing metal objects to contact
the battery posts and the vehicle at
the same time.
– To avoid harm to yourself or dam-
age to your vehicle or battery, follow
the jump starting instructions in the
“EMERGENCY SERVICE” section of
this manual if it is necessary to jump
start your vehicle.
WARNING
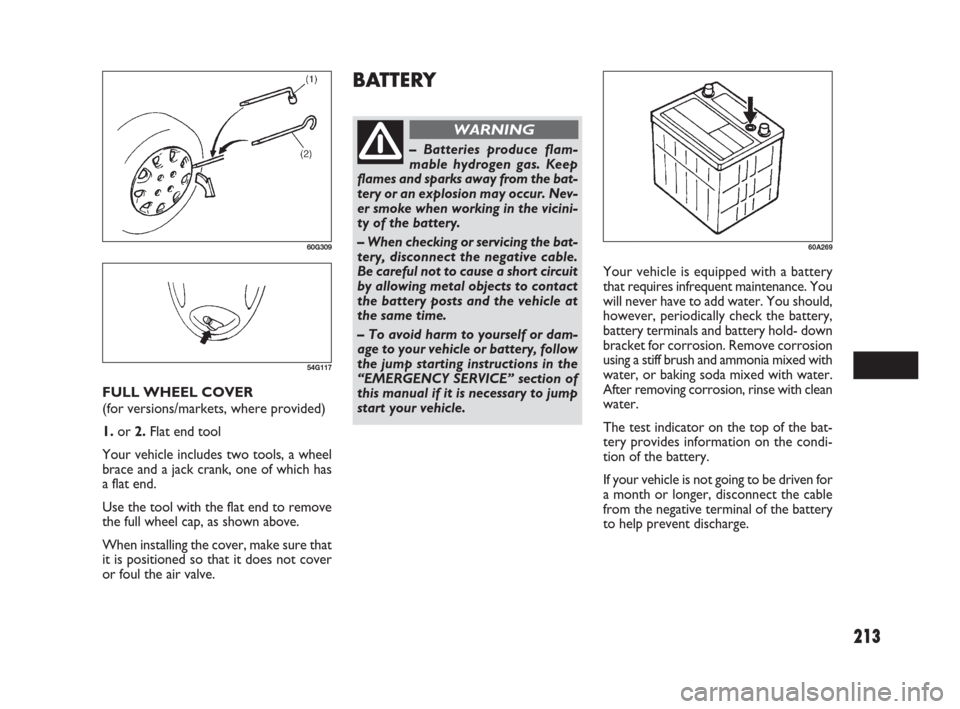
FULL WHEEL COVER
(for versions/markets, where provided)
1.or 2.Flat end tool
Your vehicle includes two tools, a wheel
brace and a jack crank, one of which has
a flat end.
Use the tool with the flat end to remove
the full wheel cap, as shown above.
When installing the cover, make sure that
it is positioned so that it does not cover
or foul the air valve.
60G309
54G117
Your vehicle is equipped with a battery
that requires infrequent maintenance. You
will never have to add water. You should,
however, periodically check the battery,
battery terminals and battery hold- down
bracket for corrosion. Remove corrosion
using a stiff brush and ammonia mixed with
water, or baking soda mixed with water.
After removing corrosion, rinse with clean
water.
The test indicator on the top of the bat-
tery provides information on the condi-
tion of the battery.
If your vehicle is not going to be driven for
a month or longer, disconnect the cable
from the negative terminal of the battery
to help prevent discharge.
60A269
183-230 SEDICI LUM FL GB 1E 19-06-2009 11:00 Pagina 213
Page 215 of 270
214
Batteries contain toxic sub-
stances including sulfuric
acid and lead. They could have po-
tential negative consequences for the
environment and human health. Used
battery must be disposed or recycled
according to the local law and must
not be discarded with ordinary house-
hold trash. Make sure not to tip over
the battery when you remove it from
the vehicle. Otherwise, sulfuric acid
could run out and you might get in-
jury.
WARNING
(1)
(2)
(3)
(4)
51KM039
(1)
(2)
(4)
(3)
51KM041
Pb
(5)
(6)
51KM042
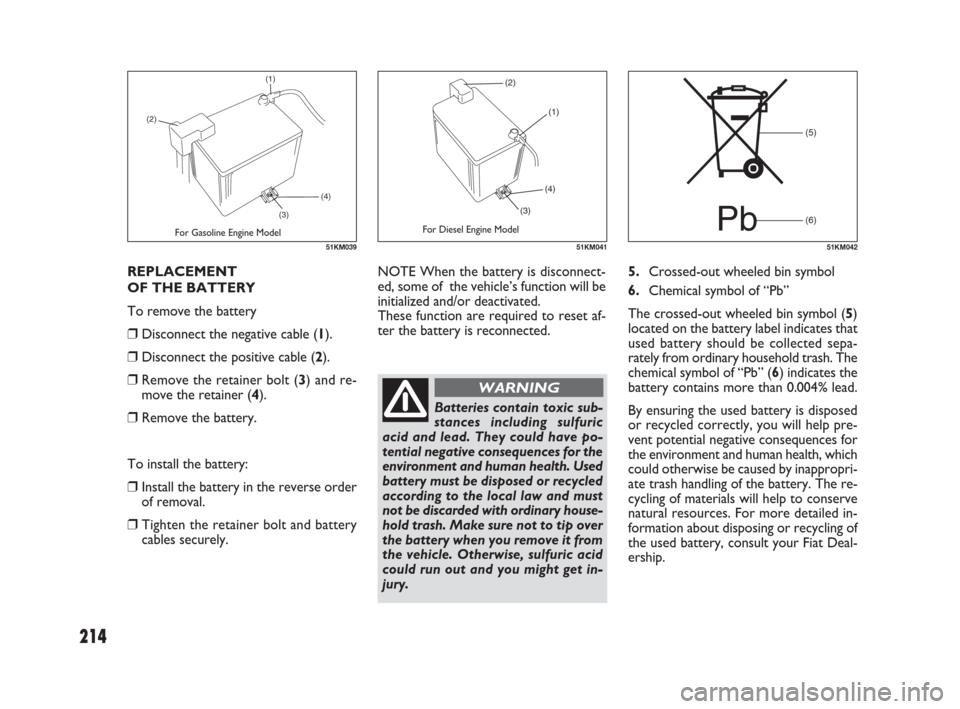
REPLACEMENT
OF THE BATTERY
To remove the battery
❒ Disconnect the negative cable (1).
❒ Disconnect the positive cable (2).
❒ Remove the retainer bolt (3) and re-
move the retainer (4).
❒ Remove the battery.
To install the battery:
❒ Install the battery in the reverse order
of removal.
❒ Tighten the retainer bolt and battery
cables securely.5.Crossed-out wheeled bin symbol
6.Chemical symbol of “Pb”
The crossed-out wheeled bin symbol (5)
located on the battery label indicates that
used battery should be collected sepa-
rately from ordinary household trash. The
chemical symbol of “Pb” (6) indicates the
battery contains more than 0.004% lead.
By ensuring the used battery is disposed
or recycled correctly, you will help pre-
vent potential negative consequences for
the environment and human health, which
could otherwise be caused by inappropri-
ate trash handling of the battery. The re-
cycling of materials will help to conserve
natural resources. For more detailed in-
formation about disposing or recycling of
the used battery, consult your Fiat Deal-
ership. NOTE When the battery is disconnect-
ed, some of the vehicle’s function will be
initialized and/or deactivated.
These function are required to reset af-
ter the battery is reconnected.
For Gasoline Engine ModelFor Diesel Engine Model
183-230 SEDICI LUM FL GB 1E 19-06-2009 11:00 Pagina 214
Page 216 of 270
215
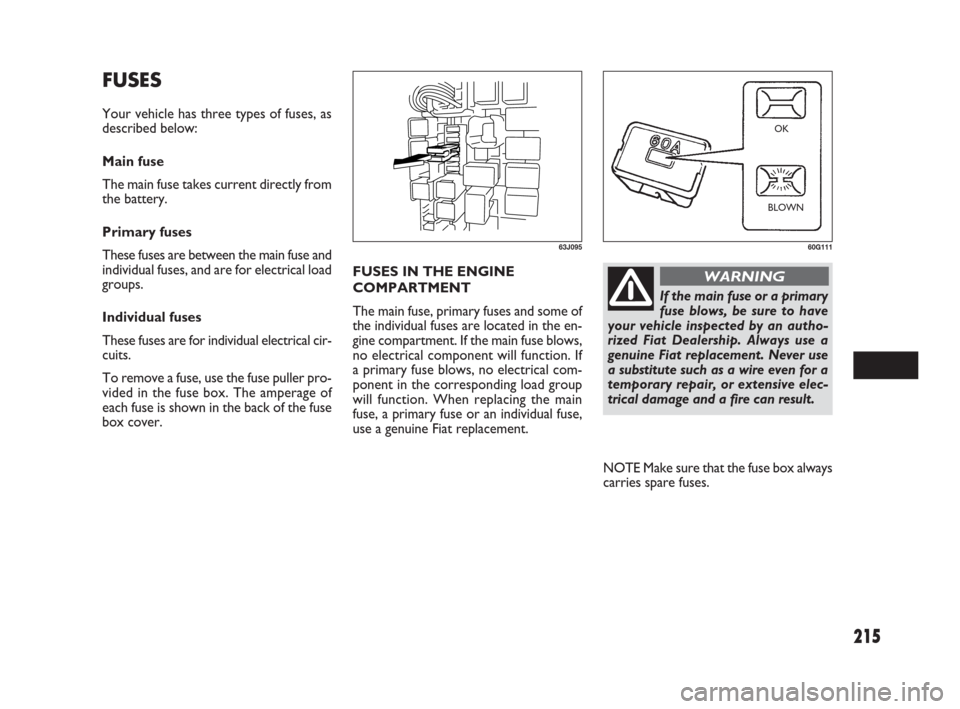
FUSES IN THE ENGINE
COMPARTMENT
The main fuse, primary fuses and some of
the individual fuses are located in the en-
gine compartment. If the main fuse blows,
no electrical component will function. If
a primary fuse blows, no electrical com-
ponent in the corresponding load group
will function. When replacing the main
fuse, a primary fuse or an individual fuse,
use a genuine Fiat replacement.
60G111
OK
BLOWN
If the main fuse or a primary
fuse blows, be sure to have
your vehicle inspected by an autho-
rized Fiat Dealership. Always use a
genuine Fiat replacement. Never use
a substitute such as a wire even for a
temporary repair, or extensive elec-
trical damage and a fire can result.
WARNING
FUSES
Your vehicle has three types of fuses, as
described below:
Main fuse
The main fuse takes current directly from
the battery.
Primary fuses
These fuses are between the main fuse and
individual fuses, and are for electrical load
groups.
Individual fuses
These fuses are for individual electrical cir-
cuits.
To remove a fuse, use the fuse puller pro-
vided in the fuse box. The amperage of
each fuse is shown in the back of the fuse
box cover.
63J095
NOTE Make sure that the fuse box always
carries spare fuses.
183-230 SEDICI LUM FL GB 1E 19-06-2009 11:00 Pagina 215
Page 217 of 270
216
(1) (2)
(3)
(4)
(5)
62J085
(28) (27) (26) (25) (6) (7) (9) (11)
(12) (13) (14) (15) (16) (17) (18) (19)
(24)
(8) (10)
(22) (21)
(23) (20)
79J092
80A
50A
50A
80A
80A
15A
15A
20A
60A
40A
30A
30A
30A
50A
30AAll electric load
Power window, Ignition Wiper, Starter
Tail light, Rear defogger, Door lock, Hazard/
Horn, Dome
Heater, Air compressor, Power steering
Radiator fan, Front fog light, Head light
Head light (Right) fuse
Head light (Left) fuse
Front fog light fuse
Power steering control module fuse
ABS motor fuse
Radiator fan fuse
ABS solenoid fuse
Starting motor fuse
Ignition switch fuse
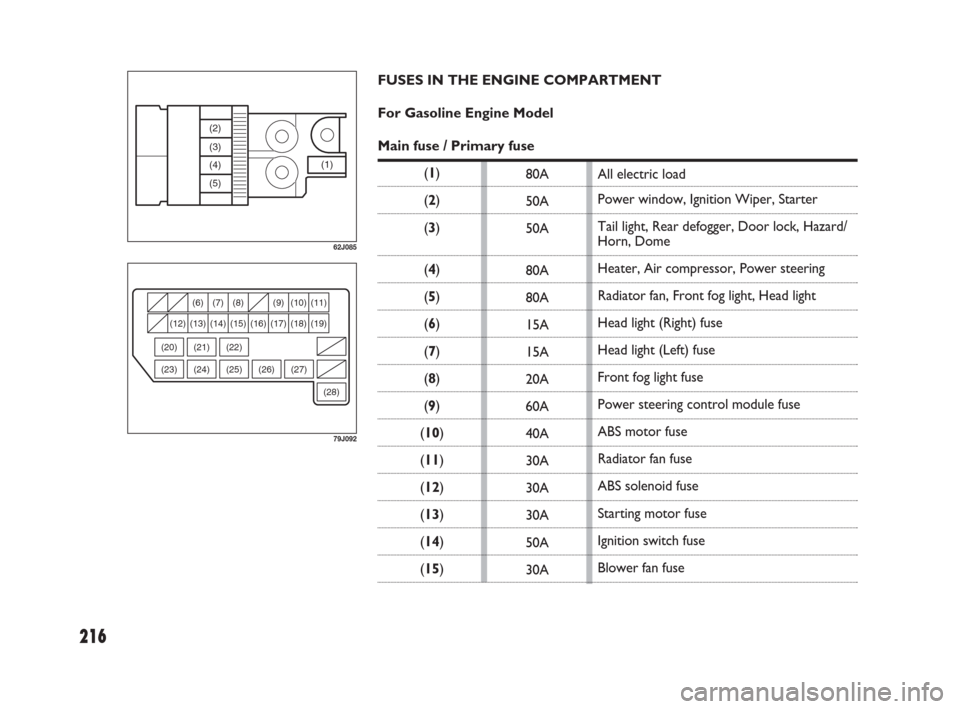
Blower fan fuse FUSES IN THE ENGINE COMPARTMENT
For Gasoline Engine Model
Main fuse / Primary fuse
(1)
(2)
(3)
(4)
(5)
(6)
(7)
(8)
(9)
(10)
(11)
(12)
(13)
(14)
(15)
183-230 SEDICI LUM FL GB 1E 19-06-2009 11:00 Pagina 216
Page 218 of 270
217
20A
15A
15A
15A
–
–
–
–
–
–
–
–
–
–Air compressor fuse
Throttle motor fuse
Automatic transaxle fuse (for versions/markets, where provided)
Fuel injection fuse
Automatic transaxle relay (for versions/markets, where provided)
Air compressor relay
Fuel pump relay
Condenser fan relay
Front fog light relay
Throttle motor relay
FI MAIN
Starting motor relay
Radiator fan relay
Shift lock relay
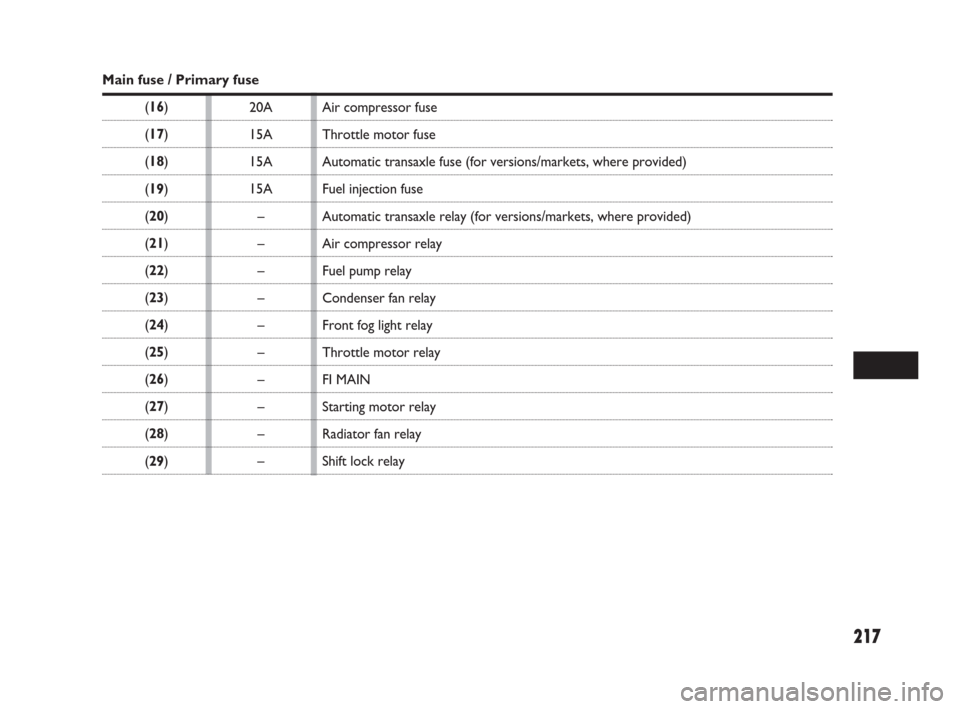
Main fuse / Primary fuse
(16)
(17)
(18)
(19)
(20)
(21)
(22)
(23)
(24)
(25)
(26)
(27)
(28)
(29)
183-230 SEDICI LUM FL GB 1E 19-06-2009 11:00 Pagina 217
Page 219 of 270
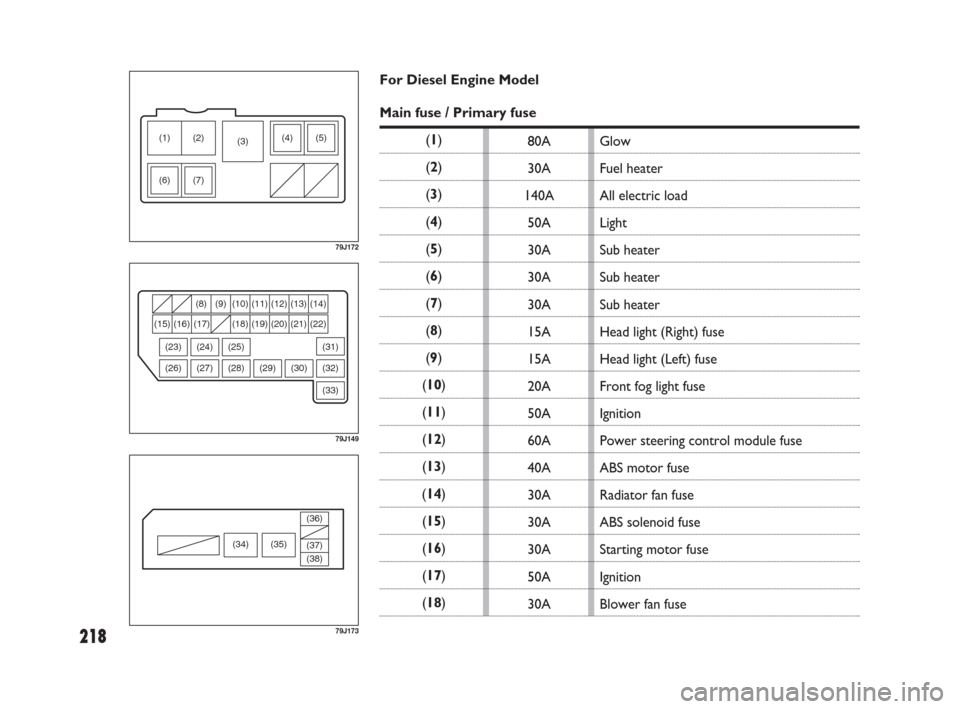
218
(6) (7)(4) (5) (2) (1)
(3)
79J172
(33) (30) (29) (28) (8) (9) (14)
(16) (15) (17) (18) (19) (20) (21) (22)
(27)
(10) (11) (13)(12)
(25) (24)
(26) (23)
(32) (31)
79J149
80A
30A
140A
50A
30A
30A
30A
15A
15A
20A
50A
60A
40A
30A
30A
30A
50A
30A
(34) (35)(36)
(37)
(38)
79J173
Glow
Fuel heater
All electric load
Light
Sub heater
Sub heater
Sub heater
Head light (Right) fuse
Head light (Left) fuse
Front fog light fuse
Ignition
Power steering control module fuse
ABS motor fuse
Radiator fan fuse
ABS solenoid fuse
Starting motor fuse
Ignition
Blower fan fuse For Diesel Engine Model
Main fuse / Primary fuse
(1)
(2)
(3)
(4)
(5)
(6)
(7)
(8)
(9)
(10)
(11)
(12)
(13)
(14)
(15)
(16)
(17)
(18)
183-230 SEDICI LUM FL GB 1E 19-06-2009 11:00 Pagina 218
Page 220 of 270
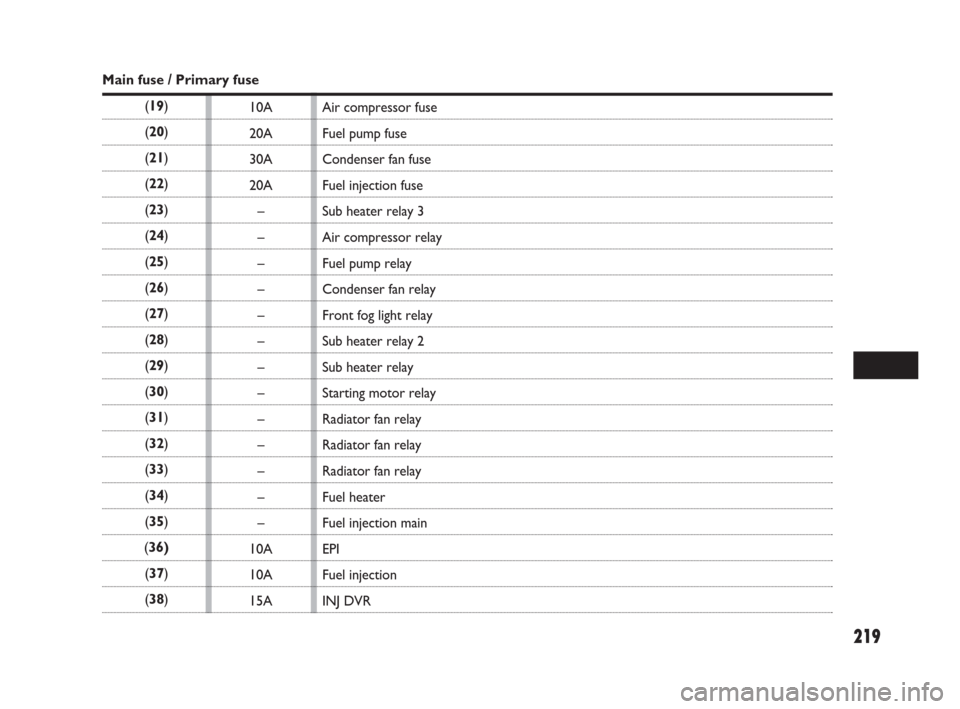
219
10A
20A
30A
20A
–
–
–
–
–
–
–
–
–
–
–
–
–
10A
10A
15A
Main fuse / Primary fuse
(19)
(20)
(21)
(22)
(23)
(24)
(25)
(26)
(27)
(28)
(29)
(30)
(31)
(32)
(33)
(34)
(35)
(36)
(37)
(38)Air compressor fuse
Fuel pump fuse
Condenser fan fuse
Fuel injection fuse
Sub heater relay 3
Air compressor relay
Fuel pump relay
Condenser fan relay
Front fog light relay
Sub heater relay 2
Sub heater relay
Starting motor relay
Radiator fan relay
Radiator fan relay
Radiator fan relay
Fuel heater
Fuel injection main
EPI
Fuel injection
INJ DVR
183-230 SEDICI LUM FL GB 1E 19-06-2009 11:00 Pagina 219