FIAT SEDICI 2009 2.G Owners Manual
Manufacturer: FIAT, Model Year: 2009, Model line: SEDICI, Model: FIAT SEDICI 2009 2.GPages: 270, PDF Size: 3.44 MB
Page 221 of 270
220
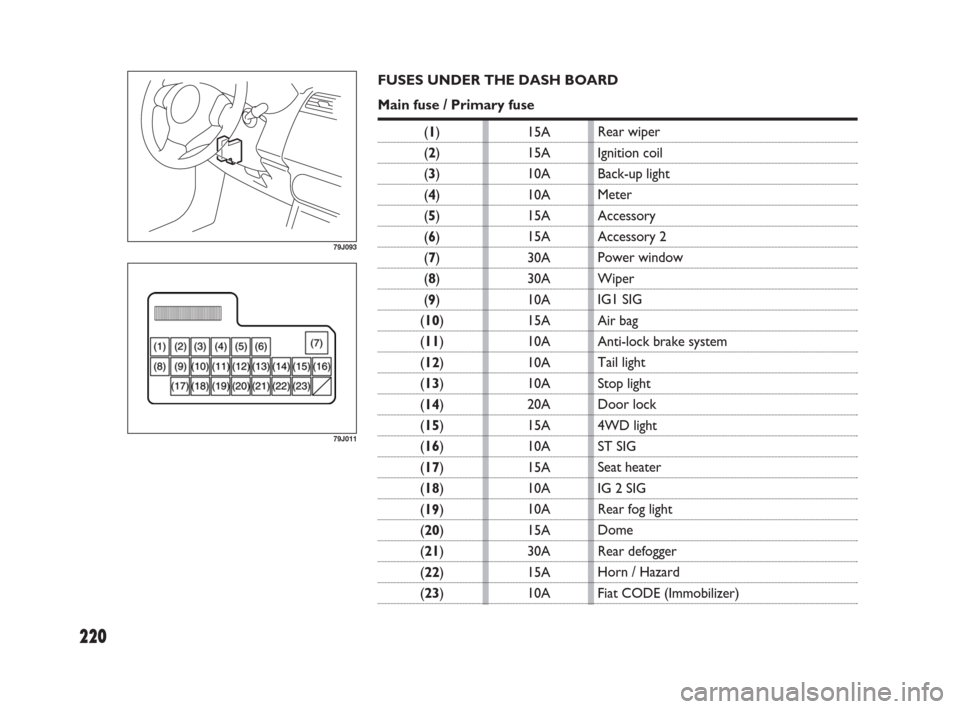
15A
15A
10A
10A
15A
15A
30A
30A
10A
15A
10A
10A
10A
20A
15A
10A
15A
10A
10A
15A
30A
15A
10A
79J093
79J011
Rear wiper
Ignition coil
Back-up light
Meter
Accessory
Accessory 2
Power window
Wiper
IG1 SIG
Air bag
Anti-lock brake system
Tail light
Stop light
Door lock
4WD light
ST SIG
Seat heater
IG 2 SIG
Rear fog light
Dome
Rear defogger
Horn / Hazard
Fiat CODE (Immobilizer) FUSES UNDER THE DASH BOARD
Main fuse / Primary fuse
(1)
(2)
(3)
(4)
(5)
(6)
(7)
(8)
(9)
(10)
(11)
(12)
(13)
(14)
(15)
(16)
(17)
(18)
(19)
(20)
(21)
(22)
(23)
183-230 SEDICI LUM FL GB 1E 19-06-2009 11:00 Pagina 220
Page 222 of 270
221
BULB REPLACEMENT
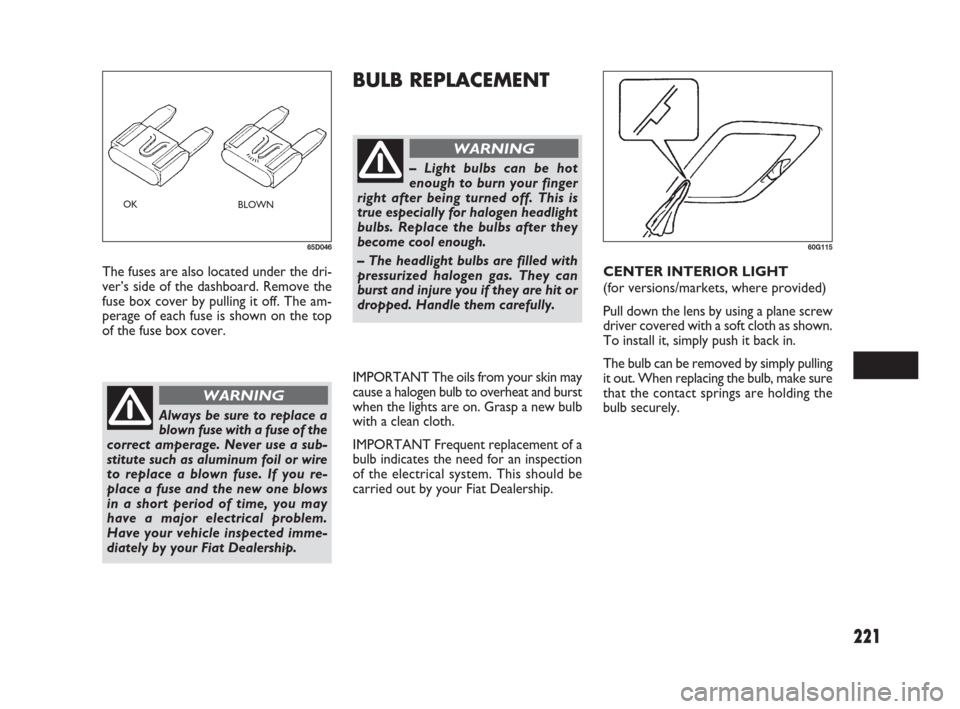
The fuses are also located under the dri-
ver’s side of the dashboard. Remove the
fuse box cover by pulling it off. The am-
perage of each fuse is shown on the top
of the fuse box cover.
Always be sure to replace a
blown fuse with a fuse of the
correct amperage. Never use a sub-
stitute such as aluminum foil or wire
to replace a blown fuse. If you re-
place a fuse and the new one blows
in a short period of time, you may
have a major electrical problem.
Have your vehicle inspected imme-
diately by your Fiat Dealership.
WARNING
65D046
OK
BLOWN
– Light bulbs can be hot
enough to burn your finger
right after being turned off. This is
true especially for halogen headlight
bulbs. Replace the bulbs after they
become cool enough.
– The headlight bulbs are filled with
pressurized halogen gas. They can
burst and injure you if they are hit or
dropped. Handle them carefully.
WARNING
IMPORTANT The oils from your skin may
cause a halogen bulb to overheat and burst
when the lights are on. Grasp a new bulb
with a clean cloth.
IMPORTANT Frequent replacement of a
bulb indicates the need for an inspection
of the electrical system. This should be
carried out by your Fiat Dealership.CENTER INTERIOR LIGHT
(for versions/markets, where provided)
Pull down the lens by using a plane screw
driver covered with a soft cloth as shown.
To install it, simply push it back in.
The bulb can be removed by simply pulling
it out. When replacing the bulb, make sure
that the contact springs are holding the
bulb securely.
60G115
183-230 SEDICI LUM FL GB 1E 19-06-2009 11:00 Pagina 221
Page 223 of 270
222
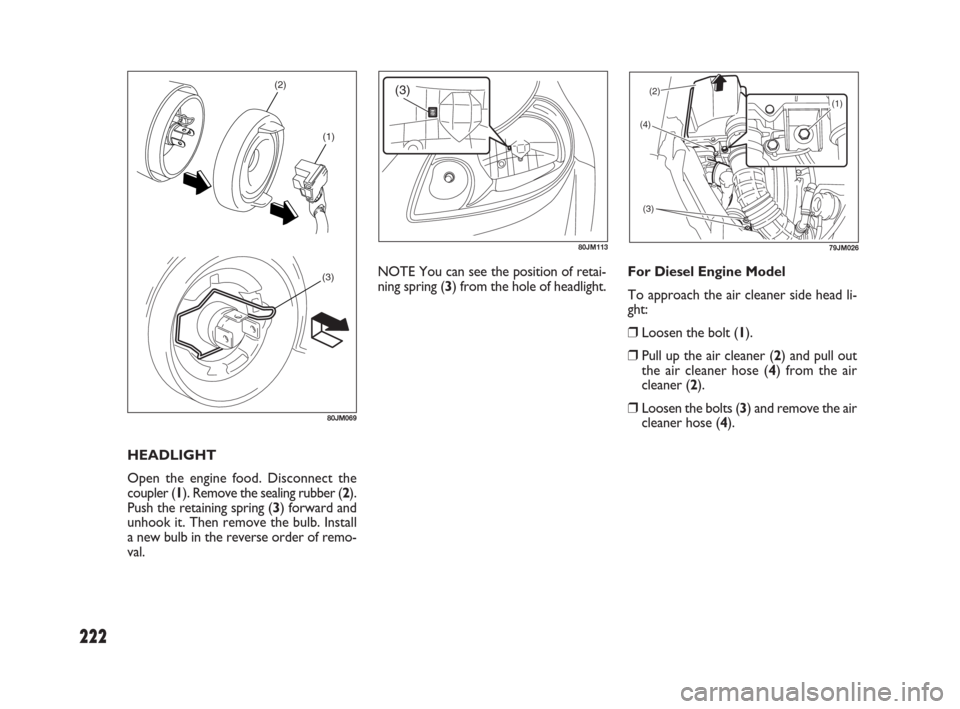
HEADLIGHT
Open the engine food. Disconnect the
coupler (1). Remove the sealing rubber (2).
Push the retaining spring (3) forward and
unhook it. Then remove the bulb. Install
a new bulb in the reverse order of remo-
val.
(2)
(1)
(3)
80JM069
(3)
80JM113
(2)
(4)
(3)
(1)
79JM026
NOTE You can see the position of retai-
ning spring (3) from the hole of headlight.For Diesel Engine Model
To approach the air cleaner side head li-
ght:
❒ Loosen the bolt (1).
❒ Pull up the air cleaner (2) and pull out
the air cleaner hose (4) from the air
cleaner (2).
❒ Loosen the bolts (3) and remove the air
cleaner hose (4).
183-230 SEDICI LUM FL GB 1E 19-06-2009 11:00 Pagina 222
Page 224 of 270
223
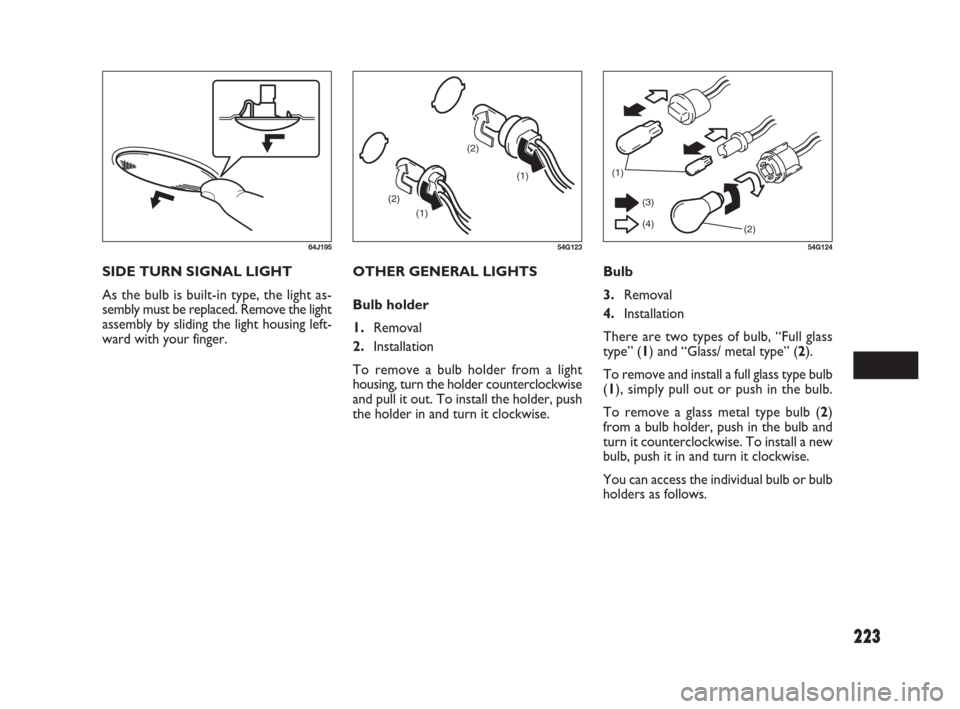
SIDE TURN SIGNAL LIGHT
As the bulb is built-in type, the light as-
sembly must be replaced. Remove the light
assembly by sliding the light housing left-
ward with your finger.
64J195
OTHER GENERAL LIGHTS
Bulb holder
1.Removal
2.Installation
To remove a bulb holder from a light
housing, turn the holder counterclockwise
and pull it out. To install the holder, push
the holder in and turn it clockwise.
(1)
(1) (2)(2)
54G123
(1)
(2) (3)
(4)
54G124
Bulb
3.Removal
4.Installation
There are two types of bulb, “Full glass
type” (1) and “Glass/ metal type” (2).
To remove and install a full glass type bulb
(1), simply pull out or push in the bulb.
To remove a glass metal type bulb (2)
from a bulb holder, push in the bulb and
turn it counterclockwise. To install a new
bulb, push it in and turn it clockwise.
You can access the individual bulb or bulb
holders as follows.
183-230 SEDICI LUM FL GB 1E 19-06-2009 11:00 Pagina 223
Page 225 of 270
224
(1)(2)
80JM123
(1)
(2)
80JM11480JM071
(3)
79JM025
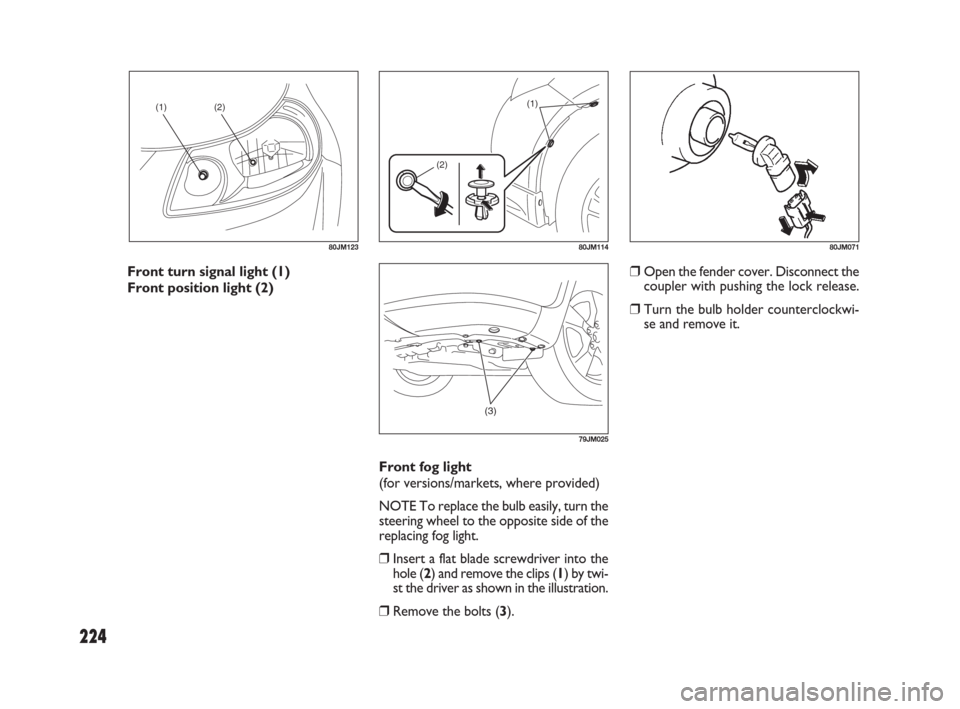
Front turn signal light (1)
Front position light (2)
Front fog light
(for versions/markets, where provided)
NOTE To replace the bulb easily, turn the
steering wheel to the opposite side of the
replacing fog light.
❒ Insert a flat blade screwdriver into the
hole (2) and remove the clips (1) by twi-
st the driver as shown in the illustration.
❒ Remove the bolts (3).❒ Open the fender cover. Disconnect the
coupler with pushing the lock release.
❒ Turn the bulb holder counterclockwi-
se and remove it.
183-230 SEDICI LUM FL GB 1E 19-06-2009 11:00 Pagina 224
Page 226 of 270
225
80JM13180JM068
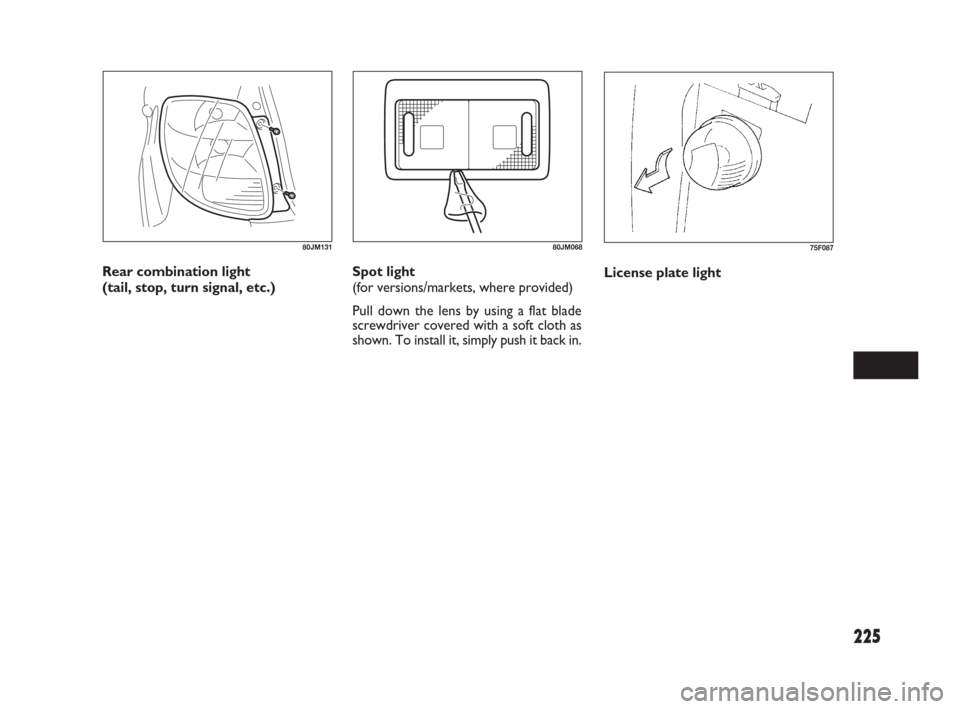
Rear combination light
(tail, stop, turn signal, etc.)Spot light
(for versions/markets, where provided)
Pull down the lens by using a flat blade
screwdriver covered with a soft cloth as
shown. To install it, simply push it back in.
75F087
License plate light
183-230 SEDICI LUM FL GB 1E 19-06-2009 11:00 Pagina 225
Page 227 of 270
226
(2)
63J127
(1)
63J106
(3) (3)(4)
80JM076
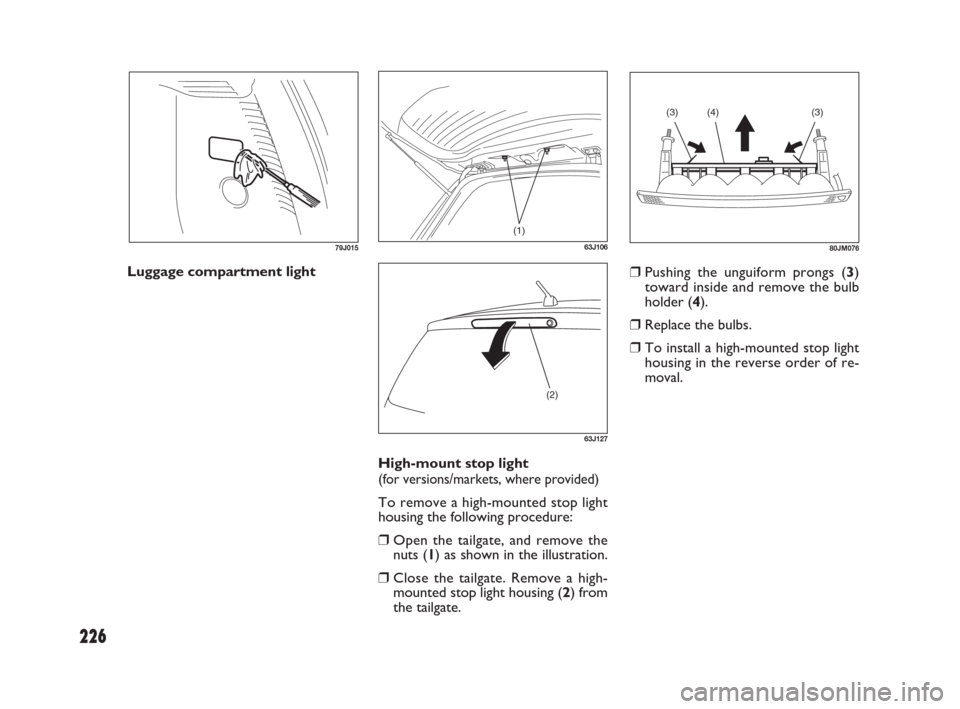
High-mount stop light
(for versions/markets, where provided)
To remove a high-mounted stop light
housing the following procedure:
❒ Open the tailgate, and remove the
nuts (
1) as shown in the illustration.
❒ Close the tailgate. Remove a high-
mounted stop light housing (2) from
the tailgate.❒ Pushing the unguiform prongs (3)
toward inside and remove the bulb
holder (4).
❒ Replace the bulbs.
❒ To install a high-mounted stop light
housing in the reverse order of re-
moval.
79J015
Luggage compartment light
183-230 SEDICI LUM FL GB 1E 19-06-2009 11:00 Pagina 226
Page 228 of 270
227
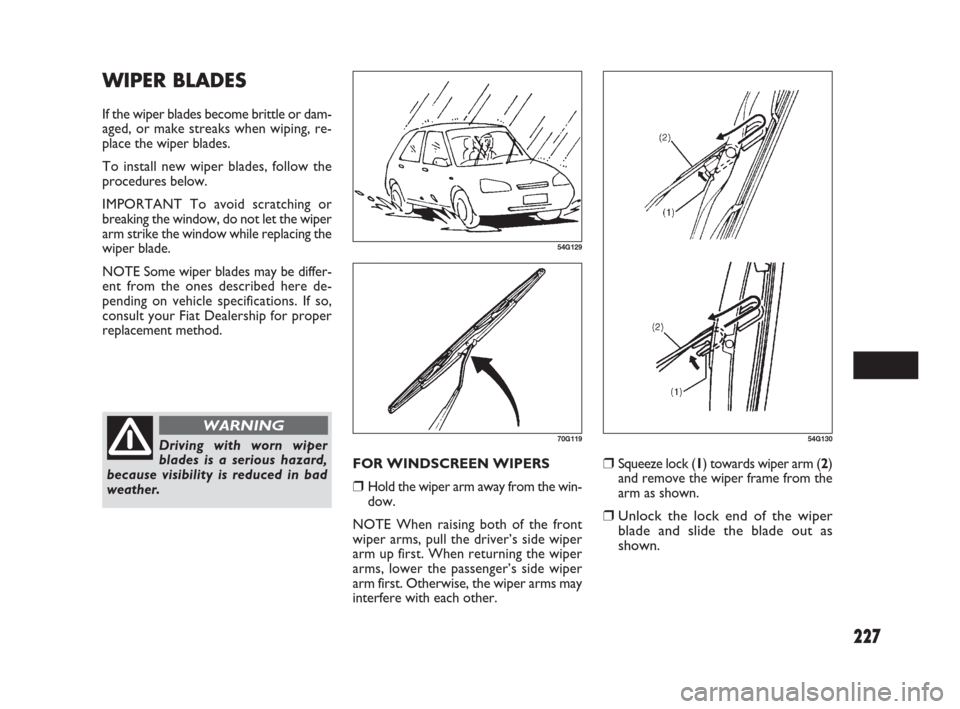
❒Squeeze lock (1) towards wiper arm (2)
and remove the wiper frame from the
arm as shown.
❒Unlock the lock end of the wiper
blade and slide the blade out as
shown.
54G130
WIPER BLADES
If the wiper blades become brittle or dam-
aged, or make streaks when wiping, re-
place the wiper blades.
To install new wiper blades, follow the
procedures below.
IMPORTANT To avoid scratching or
breaking the window, do not let the wiper
arm strike the window while replacing the
wiper blade.
NOTE Some wiper blades may be differ-
ent from the ones described here de-
pending on vehicle specifications. If so,
consult your Fiat Dealership for proper
replacement method.
FOR WINDSCREEN WIPERS
❒Hold the wiper arm away from the win-
dow.
NOTE When raising both of the front
wiper arms, pull the driver’s side wiper
arm up first. When returning the wiper
arms, lower the passenger’s side wiper
arm first. Otherwise, the wiper arms may
interfere with each other.
54G129
Driving with worn wiper
blades is a serious hazard,
because visibility is reduced in bad
weather.
WARNING70G119
183-230 SEDICI LUM FL GB 1E 19-06-2009 11:00 Pagina 227
Page 229 of 270
228
60A260
54G132
54G13365D151
54G134
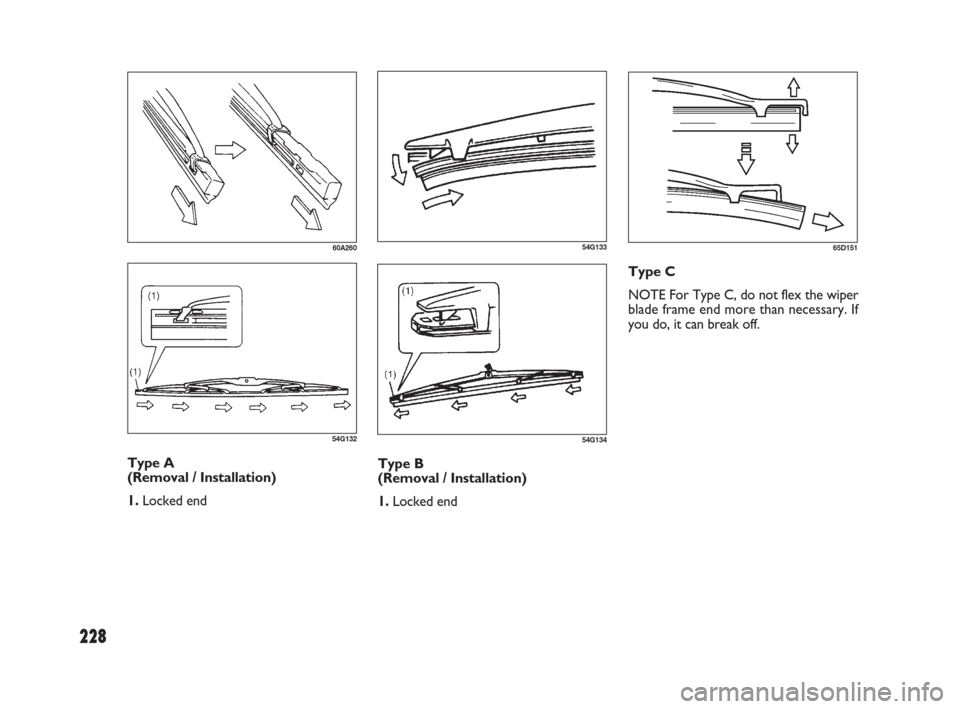
Type A
(Removal / Installation)
1. Locked endType B
(Removal / Installation)
1. Locked endType C
NOTE For Type C, do not flex the wiper
blade frame end more than necessary. If
you do, it can break off.
183-230 SEDICI LUM FL GB 1E 19-06-2009 11:00 Pagina 228
Page 230 of 270
229
54G13565D151
80G146
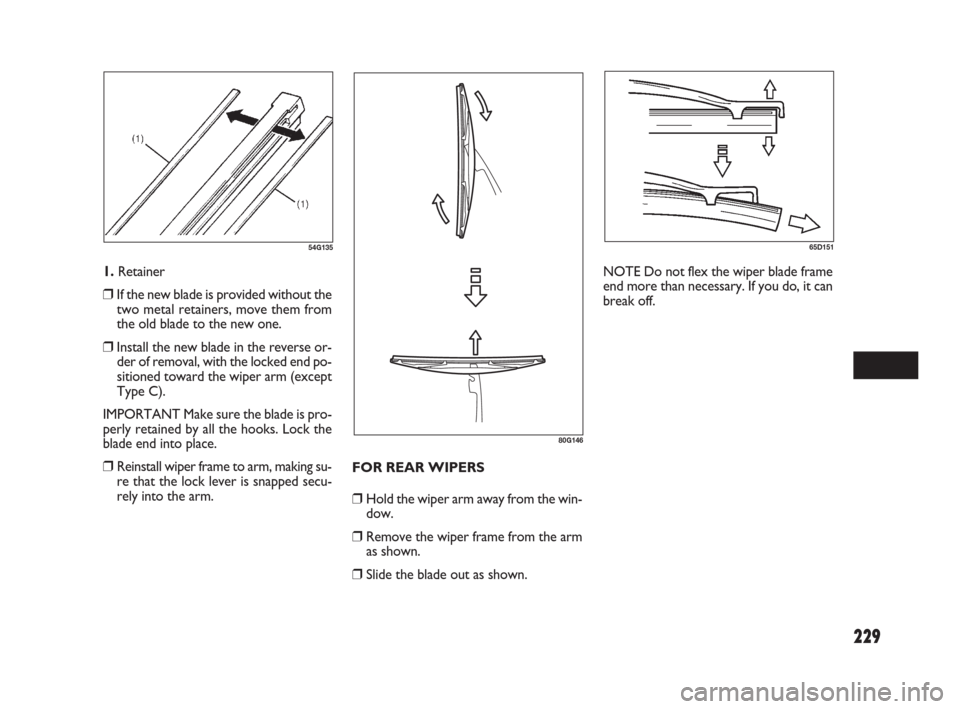
1. Retainer
❒ If the new blade is provided without the
two metal retainers, move them from
the old blade to the new one.
❒ Install the new blade in the reverse or-
der of removal, with the locked end po-
sitioned toward the wiper arm (except
Type C).
IMPORTANT Make sure the blade is pro-
perly retained by all the hooks. Lock the
blade end into place.
❒ Reinstall wiper frame to arm, making su-
re that the lock lever is snapped secu-
rely into the arm.FOR REAR WIPERS
❒ Hold the wiper arm away from the win-
dow.
❒ Remove the wiper frame from the arm
as shown.
❒ Slide the blade out as shown.NOTE Do not flex the wiper blade frame
end more than necessary. If you do, it can
break off.
183-230 SEDICI LUM FL GB 1E 19-06-2009 11:00 Pagina 229