FORD B MAX 2012 1.G Owners Manual
Manufacturer: FORD, Model Year: 2012, Model line: B MAX, Model: FORD B MAX 2012 1.GPages: 256, PDF Size: 19.67 MB
Page 101 of 256
Downloaded from www.Manualslib.com manuals search engine If Your Vehicle Gets Stuck In Mud orSnow
Note:Do not rock your vehicle if the engineis not at normal operating temperature ordamage to the transmission may occur.
Note:Do not rock your vehicle for morethan a minute or damage to thetransmission and tyres may occur, or theengine may overheat.
If your vehicle gets stuck in mud or snow,it may be rocked out by shifting betweenforward and reverse gears, stoppingbetween shifts in a steady pattern. Presslightly on the accelerator in each gear.
Emergency Park Position ReleaseLever
WARNINGS
Do not drive your vehicle until youverify that the brake lamps areworking.
If the parking brake is fully released,but the brake warning lamp remainsilluminated, the brakes may not beworking correctly. See an authoriseddealer.
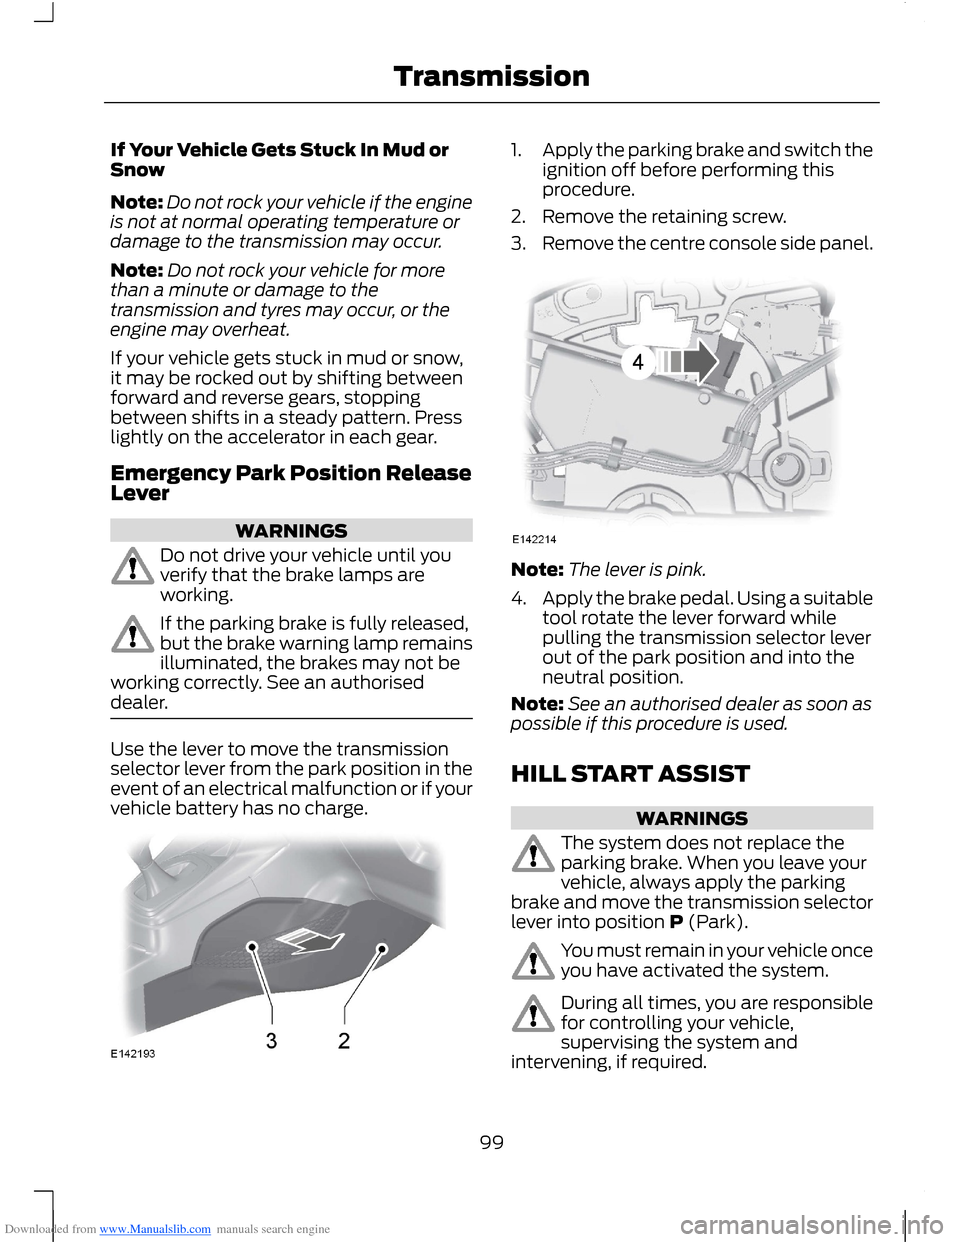
Use the lever to move the transmissionselector lever from the park position in theevent of an electrical malfunction or if yourvehicle battery has no charge.
1.Apply the parking brake and switch theignition off before performing thisprocedure.
2.Remove the retaining screw.
3.Remove the centre console side panel.
Note:The lever is pink.
4.Apply the brake pedal. Using a suitabletool rotate the lever forward whilepulling the transmission selector leverout of the park position and into theneutral position.
Note:See an authorised dealer as soon aspossible if this procedure is used.
HILL START ASSIST
WARNINGS
The system does not replace theparking brake. When you leave yourvehicle, always apply the parkingbrake and move the transmission selectorlever into position P (Park).
You must remain in your vehicle onceyou have activated the system.
During all times, you are responsiblefor controlling your vehicle,supervising the system andintervening, if required.
99Transmission
Page 102 of 256
Downloaded from www.Manualslib.com manuals search engine WARNINGS
If the engine is revved excessively, orif a malfunction is detected, thesystem will be deactivated.
The system makes it easier to pull awaywhen your vehicle is on a slope without theneed to use the parking brake.
When the system is active, your vehicle willremain stationary on the slope for two tothree seconds after you release the brakepedal. This allows you time to move yourfoot from the brake to the acceleratorpedal. The brakes are releasedautomatically once the engine hasdeveloped sufficient drive to prevent yourvehicle from rolling down the slope. Thisis an advantage when pulling away on aslope, (for example from a car park ramp,traffic lights or when reversing uphill intoa parking space).
The system will activate automatically onany slope which can result in significantvehicle rollback.
Using Hill Start Assist
1.Press the brake pedal to bring yourvehicle to a complete standstill. Keepthe brake pedal pressed.
2.If the sensors detect that your vehicleis on a slope, the system will beactivated automatically.
3.When you remove your foot from thebrake pedal, your vehicle will remainon the slope without rolling away forapproximately two or three seconds.This hold time will automatically beextended if you are in the process ofdriving off.
4.Drive off in the normal manner. Thebrakes will be released automatically.
Switching the System On and Off
Note:The system can only be switched onand off for manual transmissions.
Note:Once you have switched off thesystem, it will remain off until you switch iton again.
Your vehicle comes with the systemalready enabled. If desired, you can disablethe feature: See General Information(page 58).
100Transmission
Page 103 of 256
Downloaded from www.Manualslib.com manuals search engine GENERAL INFORMATION
WARNING
The system does not relieve you ofyour responsibility to drive with duecare and attention.
Note:Occasional brake noise is normal. Ifa metal-to-metal, continuous grinding orcontinuous squeal sound is present, thebrake linings may be worn-out. If the vehiclehas continuous vibration or shudder in thesteering wheel while braking, have yourvehicle checked by an authorised dealer.
Note:Brake dust may accumulate on thewheels, even under normal drivingconditions. Some dust is inevitable as thebrakes wear. See Cleaning the AlloyWheels (page 154).
Wet brakes result in reduced brakingefficiency. Gently press the brake pedal afew times when driving from a car wash orstanding water to dry the brakes.
Emergency Brake Assist
Emergency brake assist detects when youbrake heavily by measuring the rate atwhich you press the brake pedal. Itprovides maximum braking efficiency aslong as you press the pedal. Emergencybrake assist can reduce stopping distancesin critical situations.
Anti-lock Brake System
This system helps you maintain steeringcontrol and vehicle stability duringemergency stops by keeping the brakesfrom locking.
HINTS ON DRIVING WITH
ANTI-LOCK BRAKES
Note:When the system is operating, thebrake pedal will pulse and may travelfurther. Maintain pressure on the brakepedal. You may also hear a noise from thesystem. This is normal.
The ABS will not eliminate the risks when:
•you drive too closely to the vehicle infront of you
•your vehicle is aquaplaning
•you take corners too fast
•the road surface is poor.
PARKING BRAKE
Vehicles With AutomaticTransmission
WARNING
Always set the parking brake fullyand leave your vehicle with thetransmission selector lever inposition P.
Note:If you park your vehicle on a hill andfacing uphill move the transmission selectorlever to position P and turn the steeringwheel away from the kerb.
Note:If you park your vehicle on a hill andfacing downhill move the transmissionselector lever to position P and turn thesteering wheel toward the kerb.
Vehicles With ManualTransmission
Note:If you park your vehicle on a hill andfacing uphill select first gear and turn thesteering wheel away from the kerb.
Note:If you park your vehicle on a hill andfacing downhill select reverse gear and turnthe steering wheel toward the kerb.
101Brakes
Page 104 of 256
Downloaded from www.Manualslib.com manuals search engine All Vehicles
Note:Do not press the release button whilepulling the lever up.
To apply the parking brake:
1.Press the foot brake pedal firmly.
2.Pull the parking brake lever up to itsfullest extent.
To release the parking brake:
1.Press the brake pedal firmly.
2.Pull the lever up slightly.
3.Press the release button and push thelever down.
102Brakes
Page 105 of 256
Downloaded from www.Manualslib.com manuals search engine PRINCIPLE OF OPERATION
Electronic Stability Program
WARNING
The system does not relieve you ofyour responsibility to drive with duecare and attention.
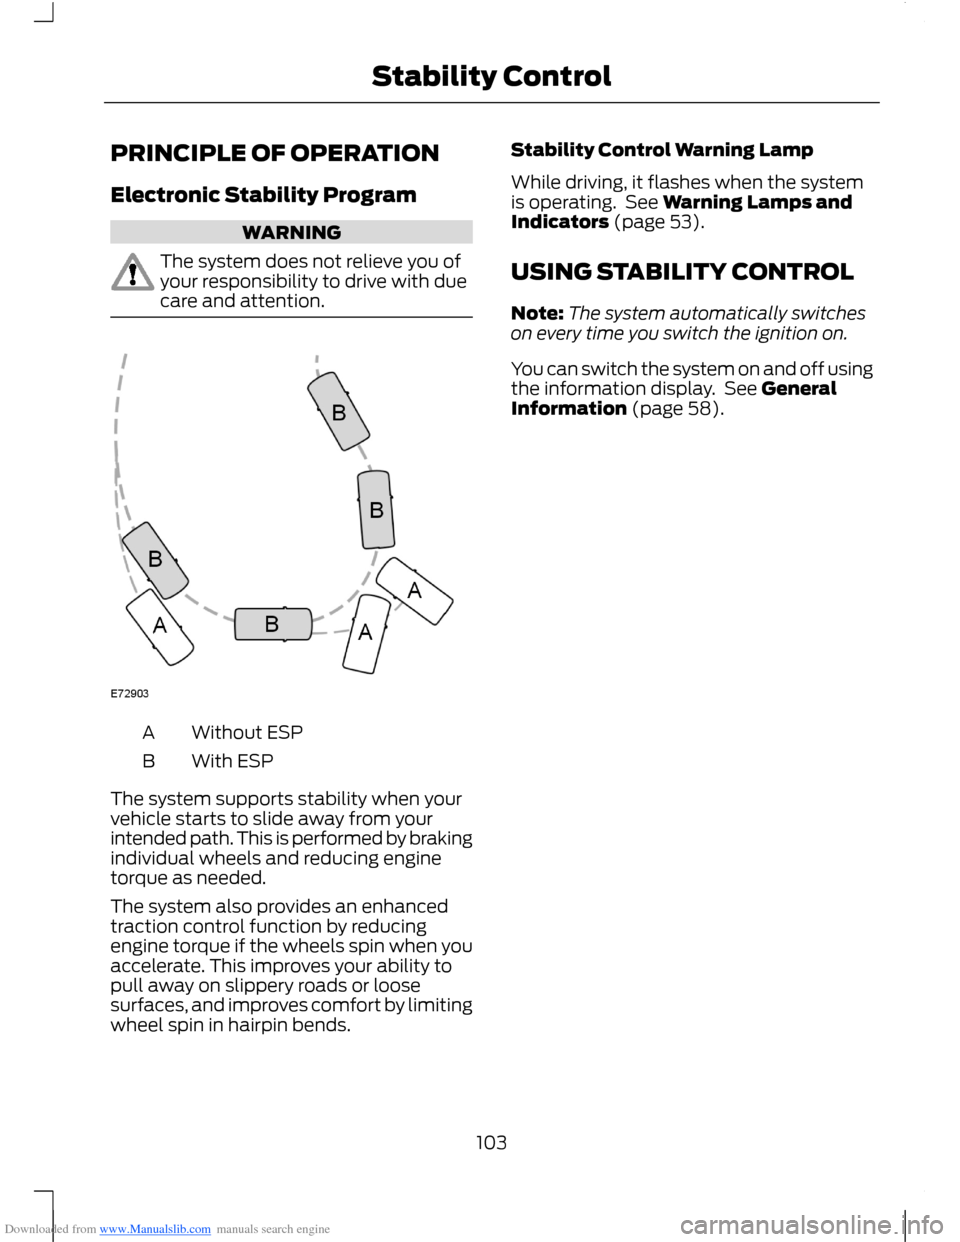
Without ESPA
With ESPB
The system supports stability when yourvehicle starts to slide away from yourintended path. This is performed by brakingindividual wheels and reducing enginetorque as needed.
The system also provides an enhancedtraction control function by reducingengine torque if the wheels spin when youaccelerate. This improves your ability topull away on slippery roads or loosesurfaces, and improves comfort by limitingwheel spin in hairpin bends.
Stability Control Warning Lamp
While driving, it flashes when the systemis operating. See Warning Lamps andIndicators (page 53).
USING STABILITY CONTROL
Note:The system automatically switcheson every time you switch the ignition on.
You can switch the system on and off usingthe information display. See GeneralInformation (page 58).
103Stability Control
Page 106 of 256
Downloaded from www.Manualslib.com manuals search engine PRINCIPLE OF OPERATION
WARNINGS
The system does not relieve you ofyour responsibility to drive with duecare and attention.
If your vehicles has a trailer towmodule not approved by us, thesystem may not correctly detectobstacles.
The sensors may not detect objectsin heavy rain or other conditions thatcause disruptive reflections.
The sensors may not detect objectswith surfaces that absorb ultrasonicwaves.
The system does not detectobstacles moving away from yourvehicle. They will only be detectedshortly after they start to move towardyour vehicle.
Take particular care when reversingwith a tow ball arm or rear fittedaccessories e.g. a bicycle carrier, asthe rear parking aid will only indicate thedistance from the bumper to the obstacle.
If you use a high pressure spray towash your vehicle, only spray thesensors briefly from a distance notless than 8 inches (20 centimetres).
Note:If your vehicle has a tow ball arm, thesystem is switched off automatically whenany trailer lamps (or lighting boards) areconnected to the 13-pin socket via a trailertow module we have approved.
Note:Keep the sensors free from dirt, iceand snow. Do not clean with sharp objects.
Note:The system may emit false tones ifit detects a signal using the same frequencyas the sensors or if your vehicle is fully laden.
Note:The outer sensors may detect theside walls of a garage. If the distancebetween the outer sensor and the side wallremains constant for three seconds, thetone will switch off. As you continue, theinner sensors will detect rearward objects.
PARKING AID
WARNINGS
To help avoid personal injury, readand understand the limitations of thesystem as contained in this section.Sensing is only an aid for some (generallylarge and fixed) objects when moving inreverse on a flat surface at parking speeds.Traffic control systems, inclementweather, air brakes and external motorsand fans may also affect the function ofthe sensing system. This may includereduced performance or a false activation.
To help avoid personal injury, alwaysuse caution when moving in reverseand when using the sensing system.
This system is not designed toprevent contact with small or movingobjects. The system is designed toprovide a warning to assist the driver indetecting large stationary objects to avoiddamaging the vehicle. The system may notdetect smaller objects, particularly thoseclose to the ground.
Certain add-on devices such as largetrailer hitches, bike or surfboard racksand any device that may block thenormal detection zone of the system, maycreate false audible warnings.
Note:Keep the sensors located on thebumper or fascia free from snow, ice andlarge accumulations of dirt. If the sensorsare covered, the system’s accuracy can beaffected. Do not clean the sensors withsharp objects.
104Parking Aids
Page 107 of 256
Downloaded from www.Manualslib.com manuals search engine Note:If your vehicle sustains damage tothe bumper or fascia, leaving it misalignedor bent, the sensing zone may be alteredcausing inaccurate measurement ofobstacles or false alarms.
The system warns you of obstacles withina certain range of the bumper area.
When receiving a detection warning, theradio volume is reduced to apredetermined level. After the warninggoes away, the radio volume returns to theprevious level.
Rear Sensing System
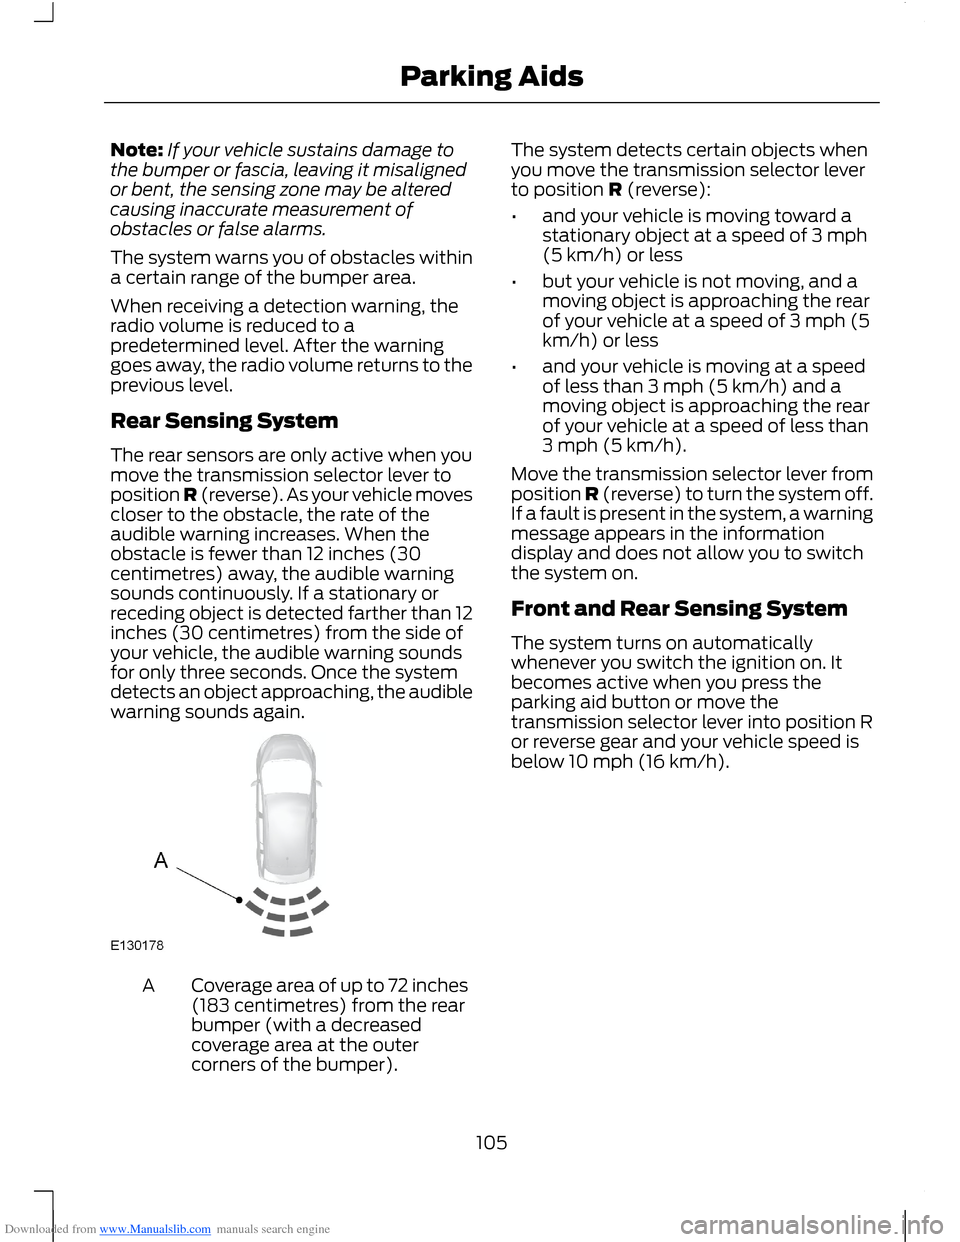
The rear sensors are only active when youmove the transmission selector lever toposition R (reverse). As your vehicle movescloser to the obstacle, the rate of theaudible warning increases. When theobstacle is fewer than 12 inches (30centimetres) away, the audible warningsounds continuously. If a stationary orreceding object is detected farther than 12inches (30 centimetres) from the side ofyour vehicle, the audible warning soundsfor only three seconds. Once the systemdetects an object approaching, the audiblewarning sounds again.
Coverage area of up to 72 inches(183 centimetres) from the rearbumper (with a decreasedcoverage area at the outercorners of the bumper).
A
The system detects certain objects whenyou move the transmission selector leverto position R (reverse):
•and your vehicle is moving toward astationary object at a speed of 3 mph(5 km/h) or less
•but your vehicle is not moving, and amoving object is approaching the rearof your vehicle at a speed of 3 mph (5km/h) or less
•and your vehicle is moving at a speedof less than 3 mph (5 km/h) and amoving object is approaching the rearof your vehicle at a speed of less than3 mph (5 km/h).
Move the transmission selector lever fromposition R (reverse) to turn the system off.If a fault is present in the system, a warningmessage appears in the informationdisplay and does not allow you to switchthe system on.
Front and Rear Sensing System
The system turns on automaticallywhenever you switch the ignition on. Itbecomes active when you press theparking aid button or move thetransmission selector lever into position Ror reverse gear and your vehicle speed isbelow 10 mph (16 km/h).
105Parking Aids
Page 108 of 256
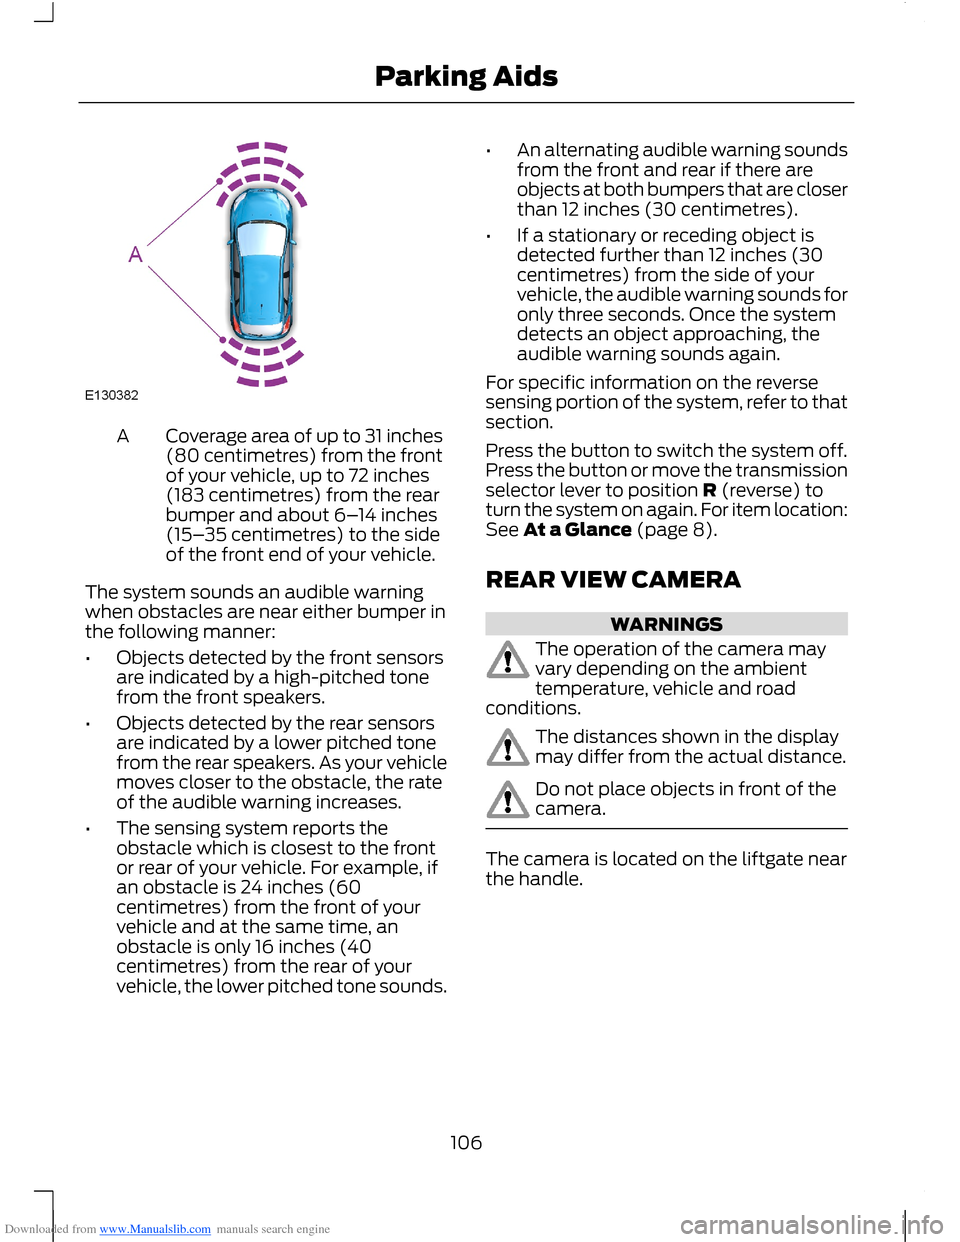
Downloaded from www.Manualslib.com manuals search engine Coverage area of up to 31 inches(80 centimetres) from the frontof your vehicle, up to 72 inches(183 centimetres) from the rearbumper and about 6–14 inches(15–35 centimetres) to the sideof the front end of your vehicle.
A
The system sounds an audible warningwhen obstacles are near either bumper inthe following manner:
•Objects detected by the front sensorsare indicated by a high-pitched tonefrom the front speakers.
•Objects detected by the rear sensorsare indicated by a lower pitched tonefrom the rear speakers. As your vehiclemoves closer to the obstacle, the rateof the audible warning increases.
•The sensing system reports theobstacle which is closest to the frontor rear of your vehicle. For example, ifan obstacle is 24 inches (60centimetres) from the front of yourvehicle and at the same time, anobstacle is only 16 inches (40centimetres) from the rear of yourvehicle, the lower pitched tone sounds.
•An alternating audible warning soundsfrom the front and rear if there areobjects at both bumpers that are closerthan 12 inches (30 centimetres).
•If a stationary or receding object isdetected further than 12 inches (30centimetres) from the side of yourvehicle, the audible warning sounds foronly three seconds. Once the systemdetects an object approaching, theaudible warning sounds again.
For specific information on the reversesensing portion of the system, refer to thatsection.
Press the button to switch the system off.Press the button or move the transmissionselector lever to position R (reverse) toturn the system on again. For item location:See At a Glance (page 8).
REAR VIEW CAMERA
WARNINGS
The operation of the camera mayvary depending on the ambienttemperature, vehicle and roadconditions.
The distances shown in the displaymay differ from the actual distance.
Do not place objects in front of thecamera.
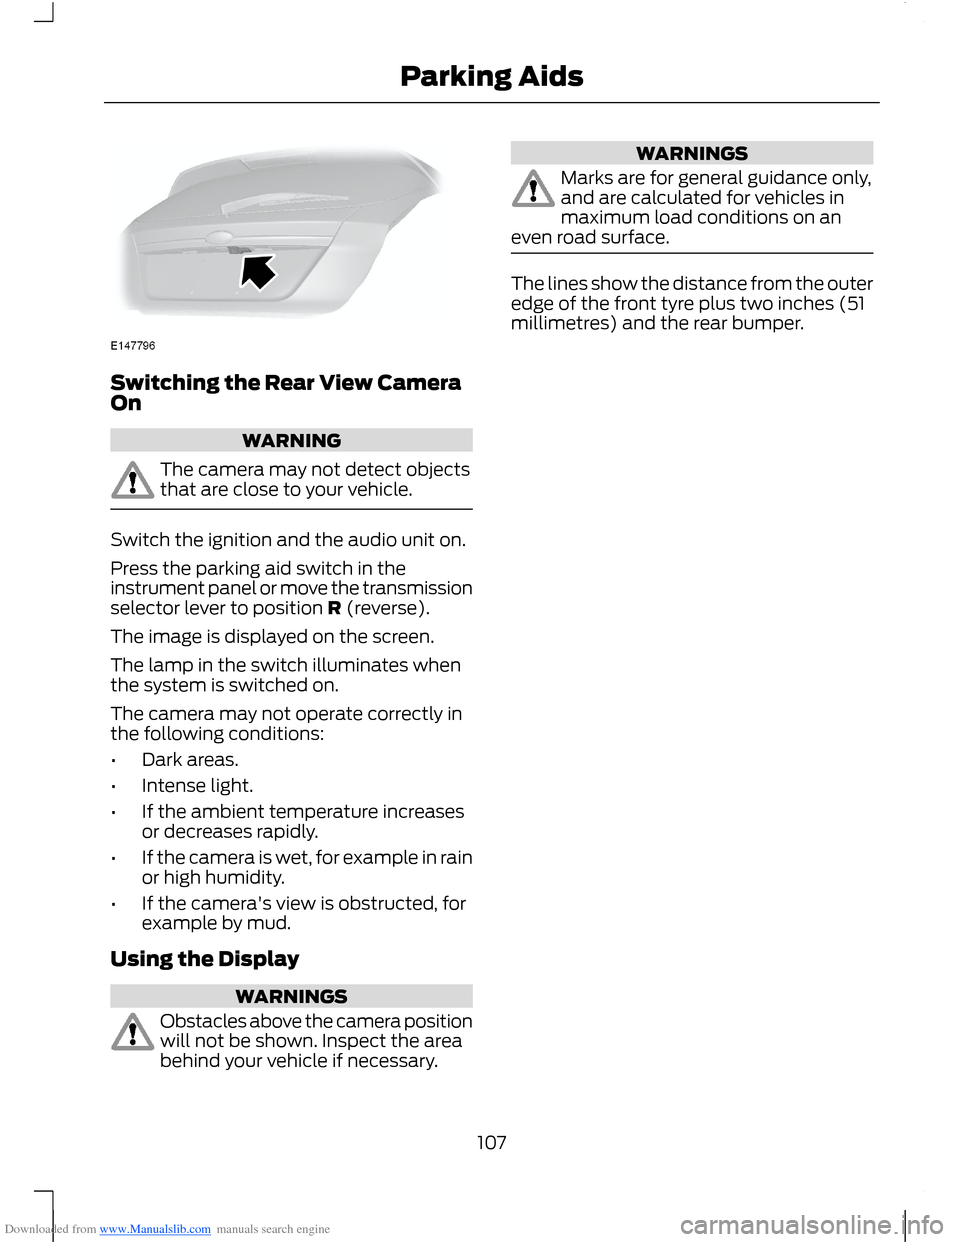
The camera is located on the liftgate nearthe handle.
106Parking Aids
Page 109 of 256
Downloaded from www.Manualslib.com manuals search engine Switching the Rear View CameraOn
WARNING
The camera may not detect objectsthat are close to your vehicle.
Switch the ignition and the audio unit on.
Press the parking aid switch in theinstrument panel or move the transmissionselector lever to position R (reverse).
The image is displayed on the screen.
The lamp in the switch illuminates whenthe system is switched on.
The camera may not operate correctly inthe following conditions:
•Dark areas.
•Intense light.
•If the ambient temperature increasesor decreases rapidly.
•If the camera is wet, for example in rainor high humidity.
•If the camera's view is obstructed, forexample by mud.
Using the Display
WARNINGS
Obstacles above the camera positionwill not be shown. Inspect the areabehind your vehicle if necessary.
WARNINGS
Marks are for general guidance only,and are calculated for vehicles inmaximum load conditions on aneven road surface.
The lines show the distance from the outeredge of the front tyre plus two inches (51millimetres) and the rear bumper.
107Parking Aids
Page 110 of 256
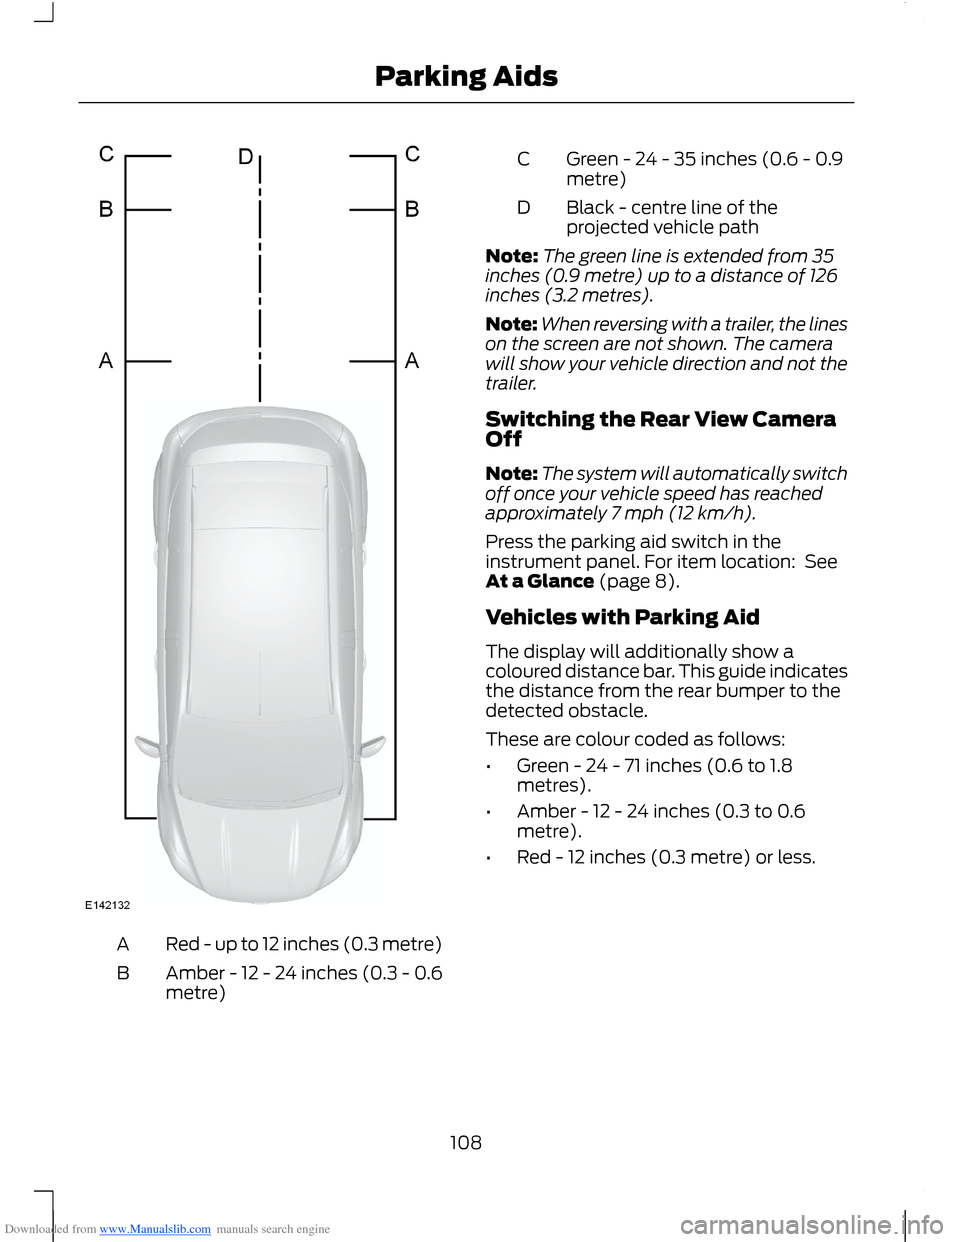
Downloaded from www.Manualslib.com manuals search engine Red - up to 12 inches (0.3 metre)A
Amber - 12 - 24 inches (0.3 - 0.6metre)B
Green - 24 - 35 inches (0.6 - 0.9metre)C
Black - centre line of theprojected vehicle pathD
Note:The green line is extended from 35inches (0.9 metre) up to a distance of 126inches (3.2 metres).
Note:When reversing with a trailer, the lineson the screen are not shown. The camerawill show your vehicle direction and not thetrailer.
Switching the Rear View CameraOff
Note:The system will automatically switchoff once your vehicle speed has reachedapproximately 7 mph (12 km/h).
Press the parking aid switch in theinstrument panel. For item location: SeeAt a Glance (page 8).
Vehicles with Parking Aid
The display will additionally show acoloured distance bar. This guide indicatesthe distance from the rear bumper to thedetected obstacle.
These are colour coded as follows:
•Green - 24 - 71 inches (0.6 to 1.8metres).
•Amber - 12 - 24 inches (0.3 to 0.6metre).
•Red - 12 inches (0.3 metre) or less.
108Parking Aids