display FORD BRONCO 2023 Manual Online
[x] Cancel search | Manufacturer: FORD, Model Year: 2023, Model line: BRONCO, Model: FORD BRONCO 2023Pages: 642, PDF Size: 14.71 MB
Page 351 of 642
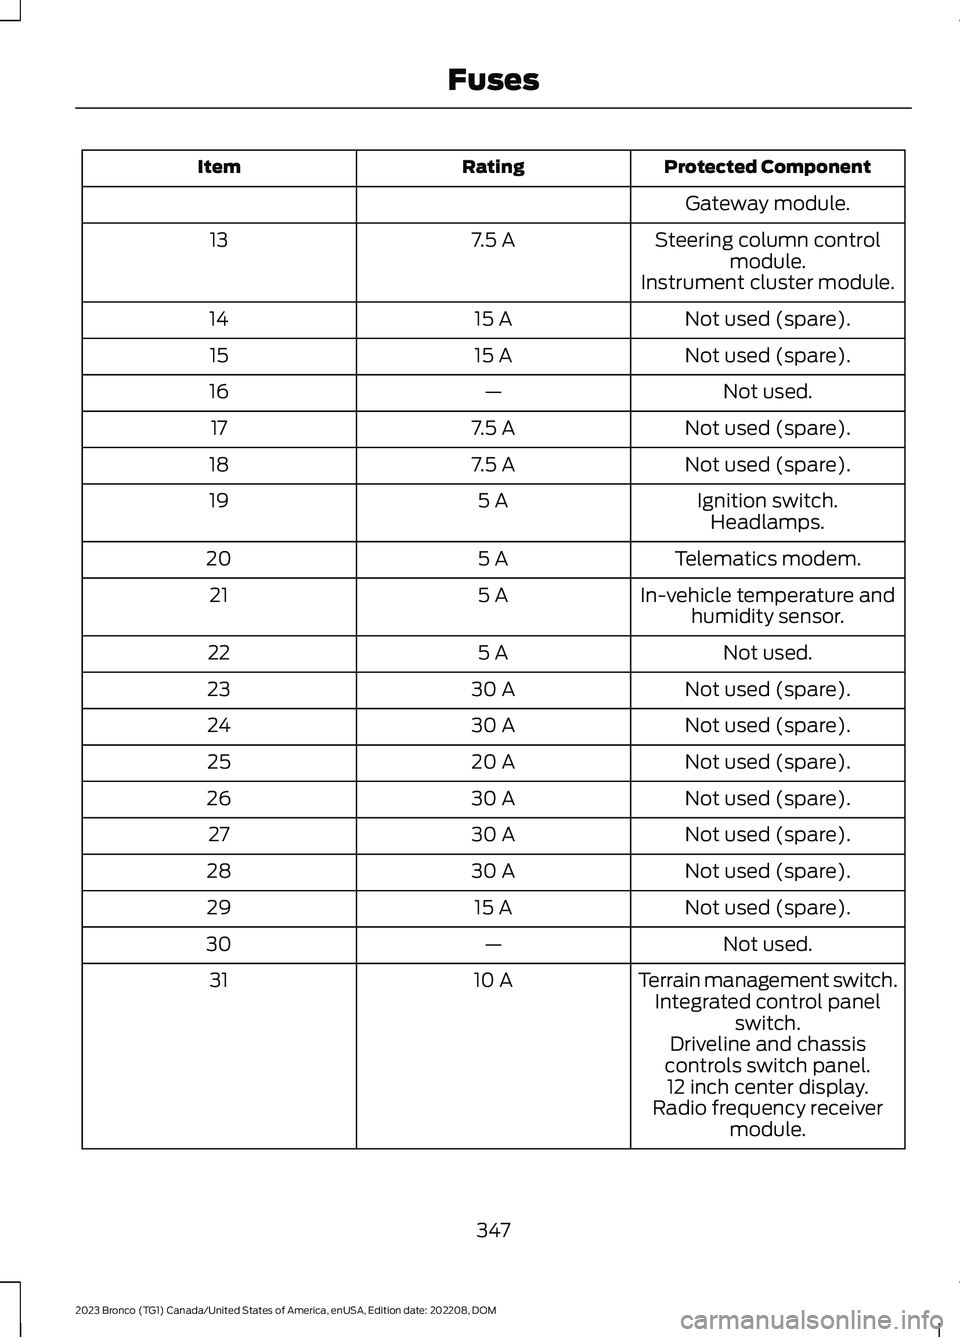
Protected ComponentRatingItem
Gateway module.
Steering column controlmodule.7.5 A13
Instrument cluster module.
Not used (spare).15 A14
Not used (spare).15 A15
Not used.—16
Not used (spare).7.5 A17
Not used (spare).7.5 A18
Ignition switch.5 A19Headlamps.
Telematics modem.5 A20
In-vehicle temperature andhumidity sensor.5 A21
Not used.5 A22
Not used (spare).30 A23
Not used (spare).30 A24
Not used (spare).20 A25
Not used (spare).30 A26
Not used (spare).30 A27
Not used (spare).30 A28
Not used (spare).15 A29
Not used.—30
Terrain management switch.10 A31Integrated control panelswitch.Driveline and chassiscontrols switch panel.12 inch center display.Radio frequency receivermodule.
347
2023 Bronco (TG1) Canada/United States of America, enUSA, Edition date: 202208, DOMFuses
Page 359 of 642
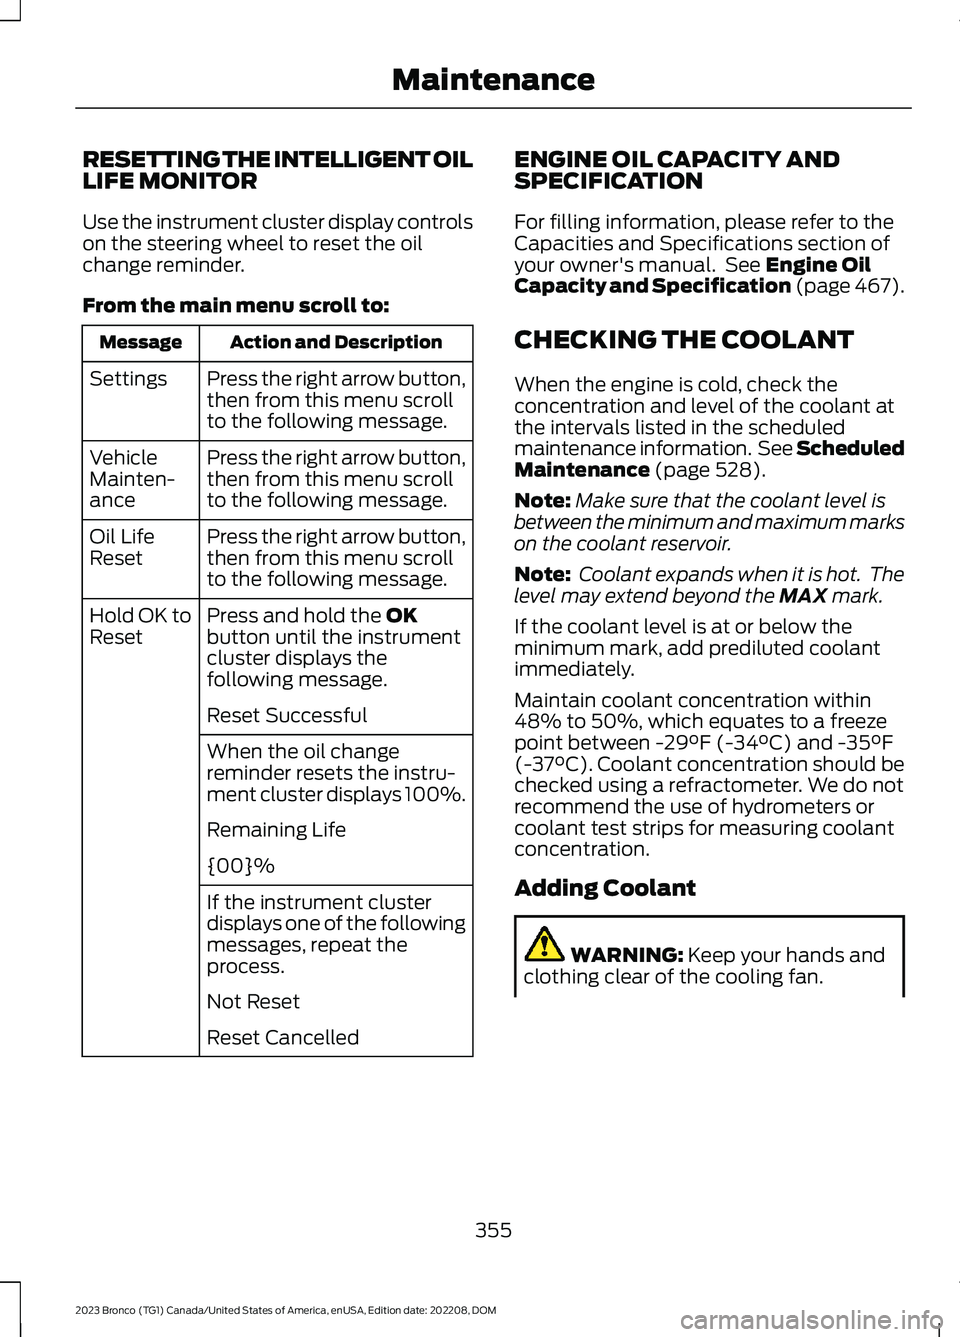
RESETTING THE INTELLIGENT OILLIFE MONITOR
Use the instrument cluster display controlson the steering wheel to reset the oilchange reminder.
From the main menu scroll to:
Action and DescriptionMessage
Press the right arrow button,then from this menu scrollto the following message.
Settings
Press the right arrow button,then from this menu scrollto the following message.
VehicleMainten-ance
Press the right arrow button,then from this menu scrollto the following message.
Oil LifeReset
Press and hold the OKbutton until the instrumentcluster displays thefollowing message.
Hold OK toReset
Reset Successful
When the oil changereminder resets the instru-ment cluster displays 100%.
Remaining Life
{00}%
If the instrument clusterdisplays one of the followingmessages, repeat theprocess.
Not Reset
Reset Cancelled
ENGINE OIL CAPACITY ANDSPECIFICATION
For filling information, please refer to theCapacities and Specifications section ofyour owner's manual. See Engine OilCapacity and Specification (page 467).
CHECKING THE COOLANT
When the engine is cold, check theconcentration and level of the coolant atthe intervals listed in the scheduledmaintenance information. See ScheduledMaintenance (page 528).
Note:Make sure that the coolant level isbetween the minimum and maximum markson the coolant reservoir.
Note: Coolant expands when it is hot. Thelevel may extend beyond the MAX mark.
If the coolant level is at or below theminimum mark, add prediluted coolantimmediately.
Maintain coolant concentration within48% to 50%, which equates to a freezepoint between -29°F (-34°C) and -35°F(-37°C). Coolant concentration should bechecked using a refractometer. We do notrecommend the use of hydrometers orcoolant test strips for measuring coolantconcentration.
Adding Coolant
WARNING: Keep your hands andclothing clear of the cooling fan.
355
2023 Bronco (TG1) Canada/United States of America, enUSA, Edition date: 202208, DOMMaintenance
Page 361 of 642
Water alone, without engine coolant, cancause engine damage from corrosion,overheating or freezing.
Do not use the following as a coolantsubstitute, as they can cause enginedamage from overheating or freezing:
•Alcohol.
•Methanol.
•Brine.
•Any coolant mixed with alcohol ormethanol antifreeze.
Do not add extra inhibitors or additives tothe coolant. These can be harmful andcompromise the corrosion protection ofthe coolant.
Severe Climates
If you drive in extremely cold climates, youmay need to increase the coolantconcentration above 50%.
Note:A coolant concentration of 60%provides improved freeze point protection.Coolant concentrations above 60%decrease the overheat protectioncharacteristics of the coolant and couldcause engine damage.
If you drive in extremely hot climates, youmay need to decrease the coolantconcentration to 40%.
Note:A coolant concentration of 40%provides improved overheat protection.Coolant concentrations below 40%decrease the overheat and corrosionprotection characteristics of the coolant andcould cause engine damage.
Coolant Change
WARNING: Do not dispose ofcoolant in the household refuse or thepublic sewage system. Use an authorizedwaste disposal facility.
Change the coolant at specific mileageintervals. Refer to the scheduledmaintenance information. See NormalScheduled Maintenance (page 531).
Note:Dispose of used coolant in theappropriate manner.
Follow your community's regulations andstandards for recycling and disposing ofautomotive fluids.
Fail-Safe Cooling
Fail-safe cooling allows you to temporarilydrive your vehicle before any incrementalcomponent damage occurs. The fail-safedistance depends on ambienttemperature, vehicle load and terrain.
How Fail-Safe Cooling Works
WARNING: If you continue to driveyour vehicle when the engine isoverheating, the engine could stopwithout warning. Failure to follow thisinstruction could result in the loss ofcontrol of your vehicle.
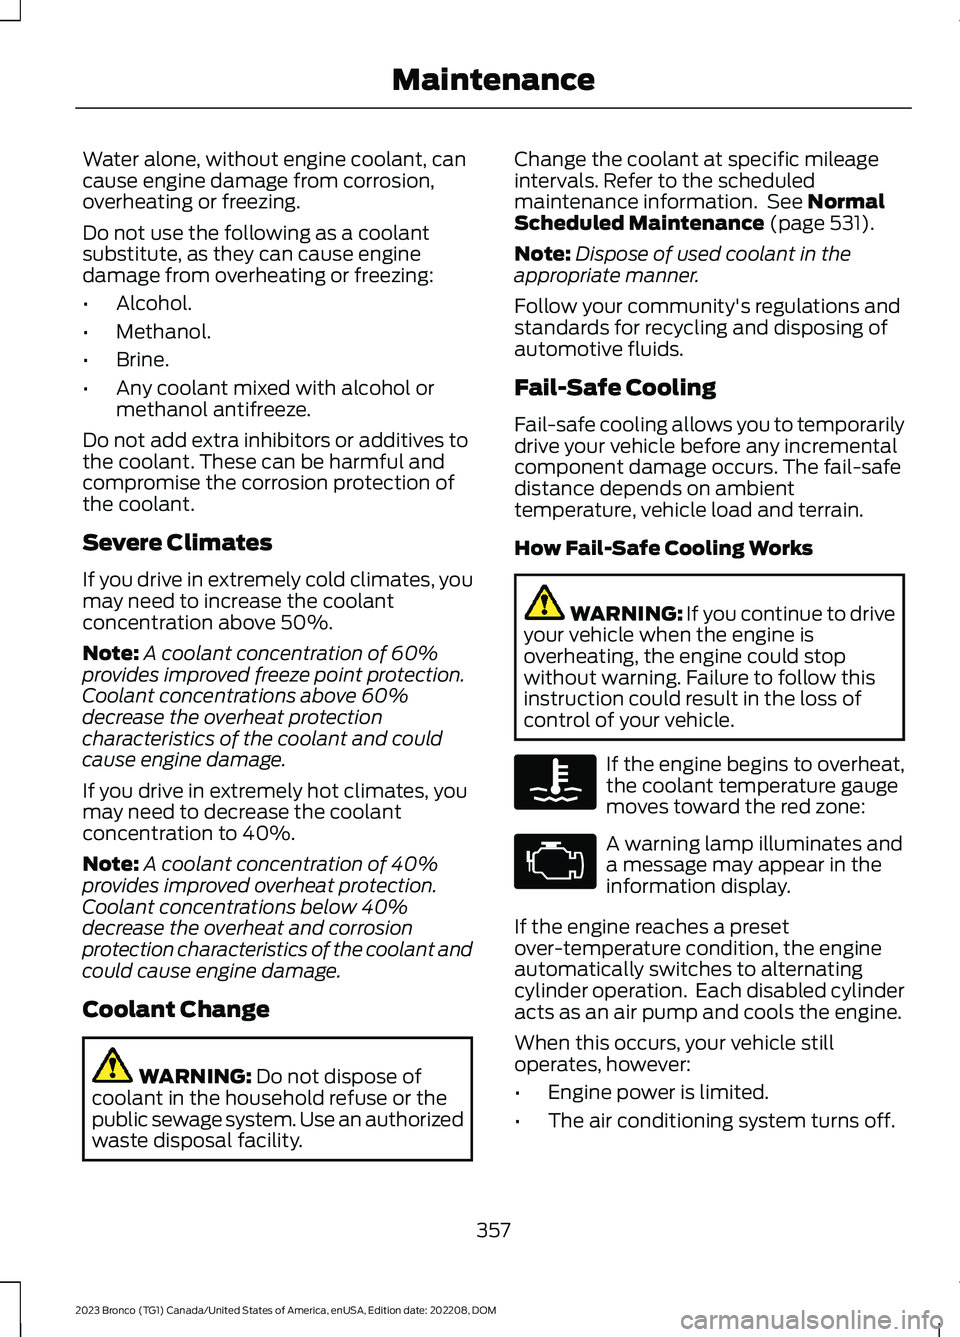
If the engine begins to overheat,the coolant temperature gaugemoves toward the red zone:
A warning lamp illuminates anda message may appear in theinformation display.
If the engine reaches a presetover-temperature condition, the engineautomatically switches to alternatingcylinder operation. Each disabled cylinderacts as an air pump and cools the engine.
When this occurs, your vehicle stilloperates, however:
•Engine power is limited.
•The air conditioning system turns off.
357
2023 Bronco (TG1) Canada/United States of America, enUSA, Edition date: 202208, DOMMaintenanceE103308 E67028
Page 362 of 642
Continued operation increases the enginetemperature, causing the engine tocompletely shut down. Your steering andbraking effort increases in this situation.
When the engine temperature cools, youcan re-start the engine. Have your vehiclechecked as soon as possible to minimizeengine damage.
When Fail-Safe Mode Is Activated
WARNING: Fail-safe mode is foruse during emergencies only. Operateyour vehicle in fail-safe mode only aslong as necessary to bring your vehicleto rest in a safe location and seekimmediate repairs. When in fail-safemode, your vehicle will have limitedpower, will not be able to maintainhigh-speed operation, and maycompletely shut down without warning,potentially losing engine power, powersteering assist, and power brake assist,which may increase the possibility of acrash resulting in serious injury.
WARNING: Do not remove thecoolant reservoir cap when the engine ison or the cooling system is hot. Wait 10minutes for the cooling system to cooldown. Cover the coolant reservoir capwith a thick cloth to prevent thepossibility of scalding and slowly removethe cap. Failure to follow this instructioncould result in personal injury.
Your vehicle has limited engine powerwhen in the fail-safe mode, drive yourvehicle with caution. Your vehicle does notmaintain high-speed operation and theengine could operate poorly.
Remember that the engine is capable ofautomatically shutting down to preventengine damage. In this situation:
1.Pull off the road as soon as safelypossible and switch the engine off.
2.If you are a member of a roadsideassistance program, we recommendthat you contact your roadsideassistance service provider.
3.If this is not possible, wait for a shortperiod of time for the engine to cool.
4.Check the coolant level. If the coolantlevel is at or below the minimum mark,add prediluted coolant immediately.
5.When the engine temperature cools,you can re-start the engine. Have yourvehicle checked as soon as possible tominimize engine damage.
Note:If you continue to drive your vehiclein fail-safe mode without repairing it, youwill damage your engine.
Engine Coolant TemperatureManagement (If Equipped)
WARNING: To reduce the risk ofcrash and injury, be prepared that thevehicle speed may reduce and thevehicle may not be able to acceleratewith full power until the coolanttemperature reduces.
If you tow a trailer with your vehicle, theengine may temporarily reach a highertemperature during severe operatingconditions, for example ascending a longor steep grade in high ambienttemperatures.
At this time, you may notice the coolanttemperature gauge moves toward the redzone and a message may appear in theinformation display.
358
2023 Bronco (TG1) Canada/United States of America, enUSA, Edition date: 202208, DOMMaintenance
Page 363 of 642
You may notice a reduction in vehiclespeed caused by reduced engine power inorder to manage the engine coolanttemperature. Your vehicle may enter thismode if certain high-temperature andhigh-load conditions take place. Theamount of speed reduction depends onvehicle loading, grade and ambienttemperature. If this occurs, there is noneed to stop your vehicle. You cancontinue to drive.
The air conditioning may automaticallyturn on and off during severe operatingconditions to protect the engine fromoverheating. When the coolanttemperature decreases to the normaloperating temperature, the air conditioningturns on.
If the coolant temperature gauge movesfully into the red zone, or if the coolanttemperature warning or service enginesoon messages appear in your informationdisplay, do the following:
1.Stop your vehicle as soon as it is safeto do so. Fully apply the parking brake,shift into park (P) or neutral (N).
2.Leave the engine running until thecoolant temperature gauge needlereturns to the normal position. If thetemperature does not drop afterseveral minutes, follow the remainingsteps.
3.Switch the engine off and wait for it tocool. Check the coolant level.
4.If the coolant level is at or below theminimum mark, add prediluted coolantimmediately.
5.If the coolant level is normal, restartthe engine and continue.
CHANGING THE ENGINE AIR
FILTER - 2.3L ECOBOOST™/
2.7L ECOBOOST™
WARNING: To reduce the risk ofvehicle damage and personal burninjuries, do not start your engine with theair cleaner removed and do not removeit while the engine is running.
Change the air filter element at the properintervals. See Scheduled Maintenance(page 528).
When changing the air filter element, useonly the air filter element listed. SeeCapacities and Specifications (page461).
Note:Failure to use the correct air filterelement could result in severe enginedamage that the vehicle Warranty may notcover.
Note: When servicing the air cleaner, donot allow foreign material to enter the airinduction system. The engine is susceptibleto damage from even small particles.
359
2023 Bronco (TG1) Canada/United States of America, enUSA, Edition date: 202208, DOMMaintenance
Page 366 of 642
WARNING: This vehicle may havemore than one battery. Removing thebattery cables from only one batterydoes not disconnect your vehicleelectrical system. Make sure youdisconnect the battery cables from allbatteries when disconnecting power.Failure to do so may cause seriouspersonal injury or property damage.
WARNING: For vehicles withAuto-Start-Stop the battery requirementis different. You must replace the batterywith one of exactly the samespecification.
WHAT IS THE BATTERYMANAGEMENT SYSTEM
The battery management system monitorsbattery conditions and takes actions toextend battery life.
HOW DOES THE BATTERYMANAGEMENT SYSTEM WORK
If excessive battery drain is detected, thesystem temporarily disables someelectrical systems to protect the battery.
Systems included are:
•Heated rear window.
•Heated seats.
•Climate control.
•Heated steering wheel.
•Audio unit.
•Navigation system.
A message could appear in the informationdisplay to alert you that battery protectionactions are active. This message is only fornotification that an action is taking place,and not intended to indicate an electricalproblem or that the battery requiresreplacement.
BATTERY MANAGEMENT SYSTEMLIMITATIONS
After battery replacement, or in somecases after charging the battery with anexternal charger, the battery managementsystem requires eight hours of vehicle sleeptime to relearn the battery state of charge.During this time, your vehicle must remainfully locked with the ignition switched off.
Note:Prior to relearning the battery stateof charge, the battery management systemcould temporarily disable some electricalsystems.
Electrical Accessory Installation
To make sure the battery managementsystem works correctly, do not connect anelectrical device ground connectiondirectly to the battery negative post. Thiscan cause inaccurate measurements ofthe battery condition and potentialincorrect system operation.
Note:If you add electrical accessories orcomponents to the vehicle, it couldadversely affect battery performance anddurability. This could also affect theperformance of other electrical systems inthe vehicle.
CHANGING THE 12V BATTERY
The battery is in the engine compartment.See Maintenance (page 349).
Your vehicle has a maintenance-freebattery. It does not require additionalwater during service.
If the vehicle battery has a cover, makesure you correctly install it after cleaningor replacing the battery.
362
2023 Bronco (TG1) Canada/United States of America, enUSA, Edition date: 202208, DOMMaintenance
Page 369 of 642
DetailsMessage
The battery management system determines that the 12Vbattery is at a low state of charge. Start the engine to chargethe battery or charge the battery using an aftermarket batterycharger. Always use the vehicle ground point when connectingthe negative cable of the external battery charger. See JumpStarting the Vehicle (page 330). This message clears onceyou restart your vehicle and the battery state of charge hasrecovered. Do not switch on the ignition when a batterycharger is in use to charge the battery.
Battery State of ChargeLow
The battery management system determines that the batteryis at a low state of charge. Turn the ignition off as soon aspossible to protect the battery. This message will clear oncethe vehicle has been started and the battery state of chargehas recovered. Turning off unnecessary electrical loads willallow faster battery state-of-charge recovery.
Turn Power Off To SaveBattery
Displayed when the battery management system detects anextended low-voltage condition. Various vehicle features willbe disabled to help preserve the battery. Turn off as many ofthe electrical loads as soon as possible to improve systemvoltage. If the system voltage has recovered, the disabledfeatures will operate again as normal.
Electrical Power SaverActive Some FeaturesTurned Off See Manual
ADJUSTING THE HEADLAMPS
Vertical Aim Adjustment
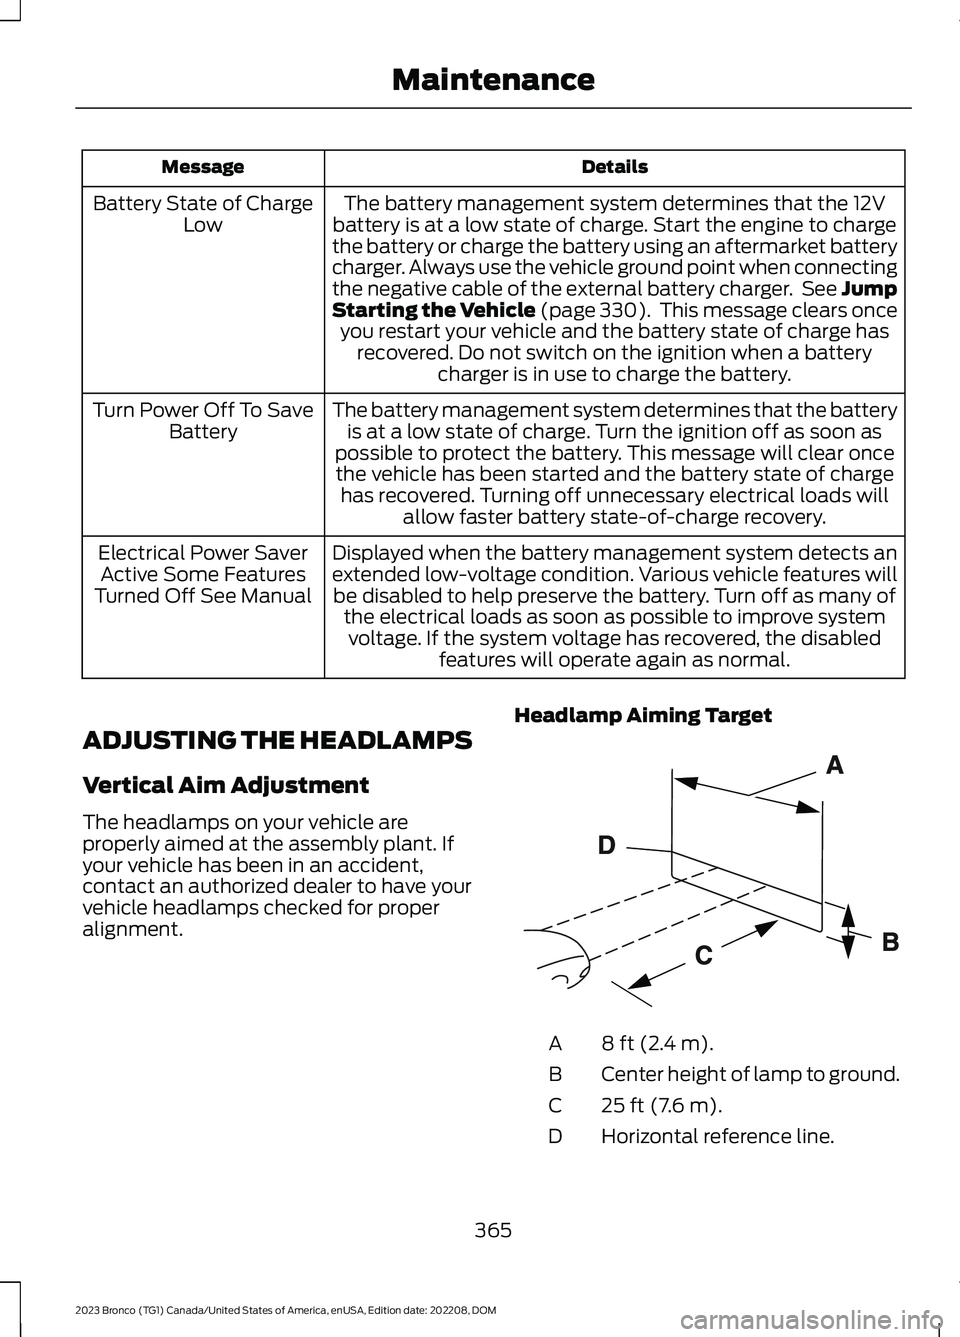
The headlamps on your vehicle areproperly aimed at the assembly plant. Ifyour vehicle has been in an accident,contact an authorized dealer to have yourvehicle headlamps checked for properalignment.
Headlamp Aiming Target
8 ft (2.4 m).A
Center height of lamp to ground.B
25 ft (7.6 m).C
Horizontal reference line.D
365
2023 Bronco (TG1) Canada/United States of America, enUSA, Edition date: 202208, DOMMaintenanceE142592
Page 382 of 642
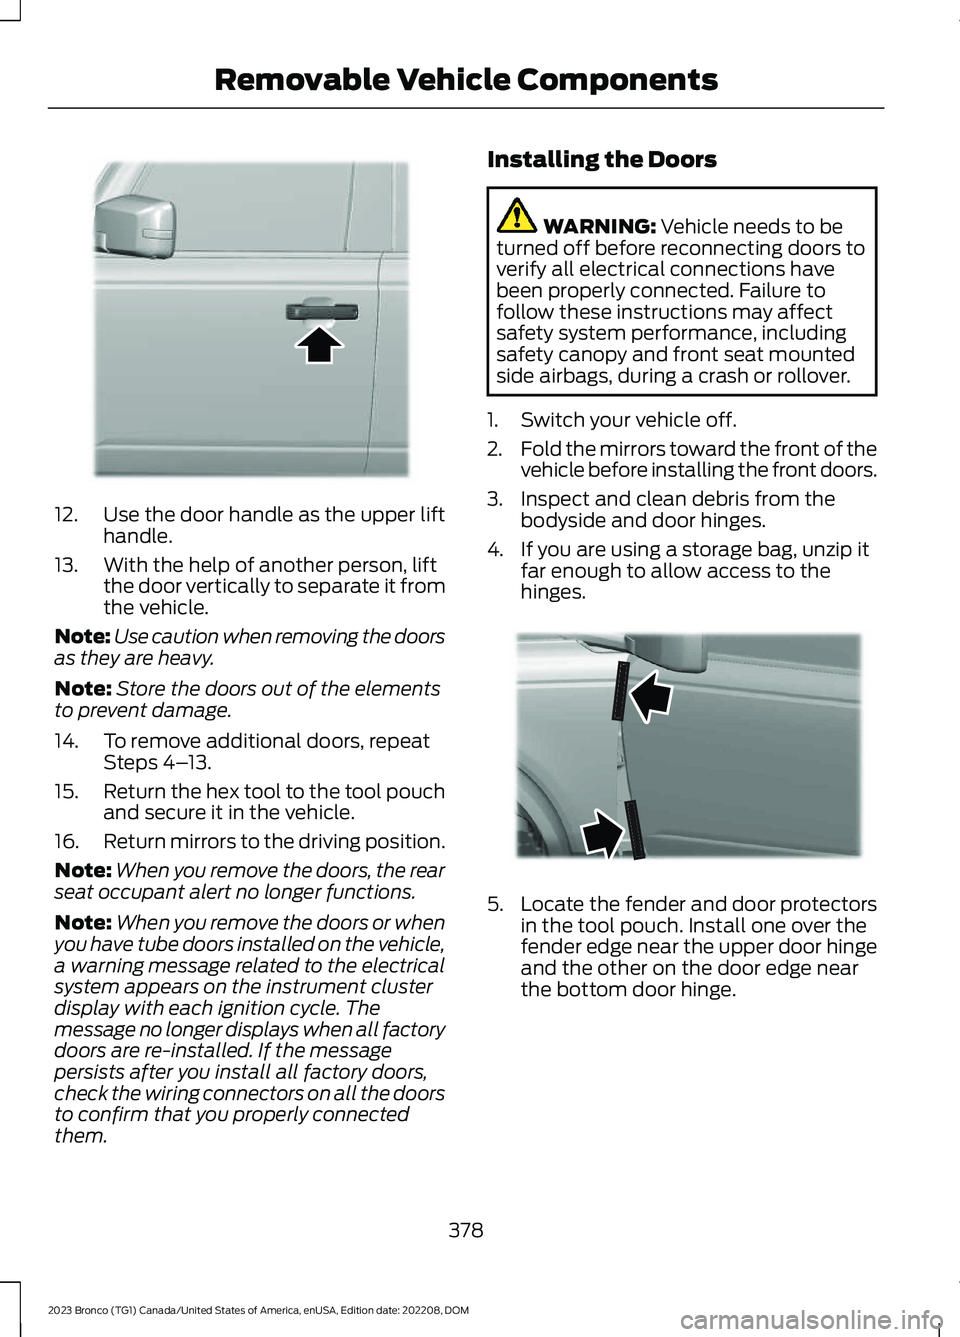
12.Use the door handle as the upper lifthandle.
13.With the help of another person, liftthe door vertically to separate it fromthe vehicle.
Note:Use caution when removing the doorsas they are heavy.
Note:Store the doors out of the elementsto prevent damage.
14.To remove additional doors, repeatSteps 4–13.
15.Return the hex tool to the tool pouchand secure it in the vehicle.
16.Return mirrors to the driving position.
Note:When you remove the doors, the rearseat occupant alert no longer functions.
Note:When you remove the doors or whenyou have tube doors installed on the vehicle,a warning message related to the electricalsystem appears on the instrument clusterdisplay with each ignition cycle. Themessage no longer displays when all factorydoors are re-installed. If the messagepersists after you install all factory doors,check the wiring connectors on all the doorsto confirm that you properly connectedthem.
Installing the Doors
WARNING: Vehicle needs to beturned off before reconnecting doors toverify all electrical connections havebeen properly connected. Failure tofollow these instructions may affectsafety system performance, includingsafety canopy and front seat mountedside airbags, during a crash or rollover.
1.Switch your vehicle off.
2.Fold the mirrors toward the front of thevehicle before installing the front doors.
3.Inspect and clean debris from thebodyside and door hinges.
4.If you are using a storage bag, unzip itfar enough to allow access to thehinges.
5.Locate the fender and door protectorsin the tool pouch. Install one over thefender edge near the upper door hingeand the other on the door edge nearthe bottom door hinge.
378
2023 Bronco (TG1) Canada/United States of America, enUSA, Edition date: 202208, DOMRemovable Vehicle ComponentsE346854 E347604
Page 387 of 642

1.Loosen the upper and lower hingemounting bolts.
2.Add or remove shims as necessary toattain proper latch alignment, startwith no shims.
3.Tighten the upper and lower hingemounting bolts, but do not apply finaltorque.
4.Disengage the latch from the strikerand confirm proper alignment.
5.Tighten the upper and lower hingemounting bolts to 41 lb.ft (55 Nm).
Removing the Doors
WARNING: Removal of doors foroff-road use only. Removing the doorsfrom the vehicle will affect protectionprovided by the doors and may affectsafety system performance, includingsafety canopy and front seat mountedside airbags, during a crash or rollover.
1.Switch your vehicle off.
2.Fold the mirrors completely toward thefront of your vehicle before removingthe front doors.
3.Fully open the door you are removing.
4.Use the provided hex tool to loosenand remove the lower hinge bolt.
5.Loosen and remove the upper hingebolt.
Note:You can store the hinge bolts in thetool pouch zipped pocket, if needed.
6.Lift the door vertically to separate itfrom the vehicle.
Note:Use caution when removing the doorsas they are heavy.
Note:Store the doors in a secure area.
Note:Store the doors out of the elementsto prevent damage.
7.To remove additional doors, repeatSteps 3-6.
8.Return the hex tool to the tool kit andsecure the tool kit in the vehicle’scenter console.
9.Return the mirrors to the drivingposition.
Note:When you remove the doors, the rearseat occupant alert no longer functions.
Note:When you remove the doors or whenyou have tube doors installed on the vehicle,a warning message related to the electricalsystem appears on the instrument clusterdisplay with each ignition cycle. Themessage no longer displays when all factorydoors are re-installed. If the messagepersists after you install all factory doors,check the wiring connectors on all the doorsto confirm that you properly connectedthem.
Cleaning the Tube Doors
We recommend that you wash the tubedoors with mild soap and rinse with astandard pressure water hose. Whilerinsing, avoid spraying water directly ontothe latch mechanism. Dry with a microfibercloth or leave to air dry.
383
2023 Bronco (TG1) Canada/United States of America, enUSA, Edition date: 202208, DOMRemovable Vehicle ComponentsE344781
Page 429 of 642
CLEANING PLASTIC
We recommend that you only use a mildsoap and water solution on a soft cloth.Dry the area with a clean, soft cloth.
CLEANING DISPLAYS ANDSCREENS
We recommend that you only use amicrofiber cloth in a circular motion toclean off the fingerprint or dust.
If dirt or fingerprints are still on the screen,apply a small amount of alcohol to thecloth and try to clean it again.
Note:Do not pour or spray alcohol onto thetouchscreen.
Note: Do not use detergent or any type ofsolvent to clean the touchscreen.
CLEANING FABRIC
WARNING: On vehicles equippedwith seat-mounted airbags, do not usechemical solvents or strong detergents.Such products could contaminate theside airbag system and affectperformance of the side airbag in a crash.
We recommend that you only clean fabricin the following way:
1.Remove dust and loose dirt with avacuum cleaner.
2.Wipe the surface with a soft, dampcloth and a mild soap and watersolution. Dry the area with a clean, softcloth.
3.For additional information andassistance, we recommend that youcontact an authorized dealer.
For heavy stains, spot clean the area. If aring forms on the fabric, clean the entirearea immediately, but do not oversaturateor the ring could set.
CLEANING LEATHER
WARNING: On vehicles equippedwith seat-mounted airbags, do not usechemical solvents or strong detergents.Such products could contaminate theside airbag system and affectperformance of the side airbag in a crash.
We recommend that you only clean theleather surfaces in the following way:
1.Remove dust and loose dirt with avacuum cleaner.
2.Wipe the surface with a soft, dampcloth and a mild soap and watersolution. Dry the area with a clean, softcloth.
3.Make sure the leather is dry, then applya small amount of conditioner to aclean, dry cloth.
4.Rub the conditioner into the leatheruntil it disappears. Allow theconditioner to dry, then repeat theprocess for the entire interior. If a filmappears, wipe it off with a dry, cleancloth.
5.For additional information andassistance, we recommend that youcontact an authorized dealer.
425
2023 Bronco (TG1) Canada/United States of America, enUSA, Edition date: 202208, DOMVehicle Care