FORD CAPRI 1974 Workshop Manual
Manufacturer: FORD, Model Year: 1974, Model line: CAPRI, Model: FORD CAPRI 1974Pages: 205, PDF Size: 43.75 MB
Page 171 of 205
Chapter 10 S usp en sion" and steerin g
c
D
A
E
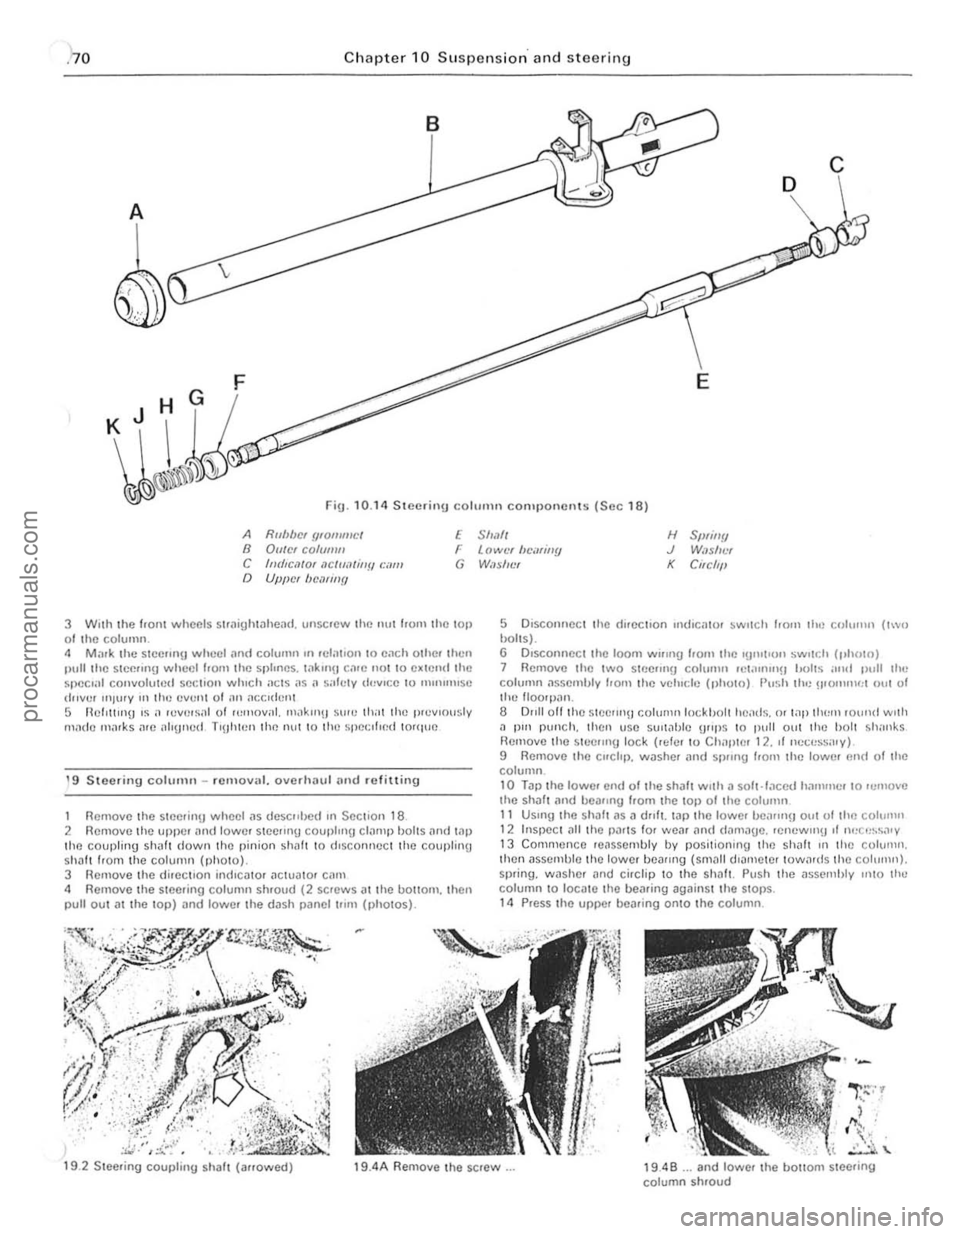
Fig. 10.14 Sleering column componenlS (Sec 18)
A Rllllbcl f/IOIIIIIICt n OutCI CO/U/IIII E Simll H SWill!! J W.n!u :, K Ci,cflfl C fmhC,ltOI ,1Ctuol(iIJ.II C,/11I o Upper f)CMIllf/
F lowt'l /)f:;lIiIlY G W.lslrtH
3 Wilh Ihe iron! wheels sl/aigh13he,ul, unse.ew Ihe nul from Ihe lOP of Ihe column. <1 Mi"k Ihe s!Celinu whecl and column m .eliliion 10 eilch olhe. Ihen 1".11 Ihe SI~"ng wlu • .'ci from thc spllncs. lilk",!! C illC nOI 10 cxtend Ihe ~pcclill convoluled SCC\lon which ;'CIS ilS it Si.rtlly d
dllVCI "'J"'Y II, IIHJ evenl o f 01" lIccldelll 5 nel,!!",\) IS a revClsal (ll "''''(lvill. m;lklllll su'e Ih;11 Ihe Jucvlnu sly mndc marks ... c ilhUned T'\Jhlell Ihe nUllO Ih\! spc,:l1lod torquc
1 9 S leerinu coilimn -remov,,1. overhaul (lnd refitting
1 Remove Ihe Sleer'n\J wheel ilS descllhed III SeCllo n 18-2 Remove Ihe upper and lowe. slee.lI1\J coupllll(l cl;Jmp 1)0115 ;Jnd 131) Ihc coupling sh;Jh down Ihe pinion shah 10 rhSC(lnneCI Ihe cO\lplin\J
sha ri f.om Ihe column (pholo).
3 Remove Ihe direCllon in(hcaIO' aCIUillOI C(lm 4 RemovC Ihe stee.ing column shroud (2 screws
"J . "\/ . ..::..J. \..
19 .2 S leering coupling shall (ar.owed) 19.4A Remove Ihe se,cw ... 19.48 ... and lower the bOllom slecring column shroud
procarmanuals.com
Page 172 of 205
Chapter 10 Suspension and steering 171
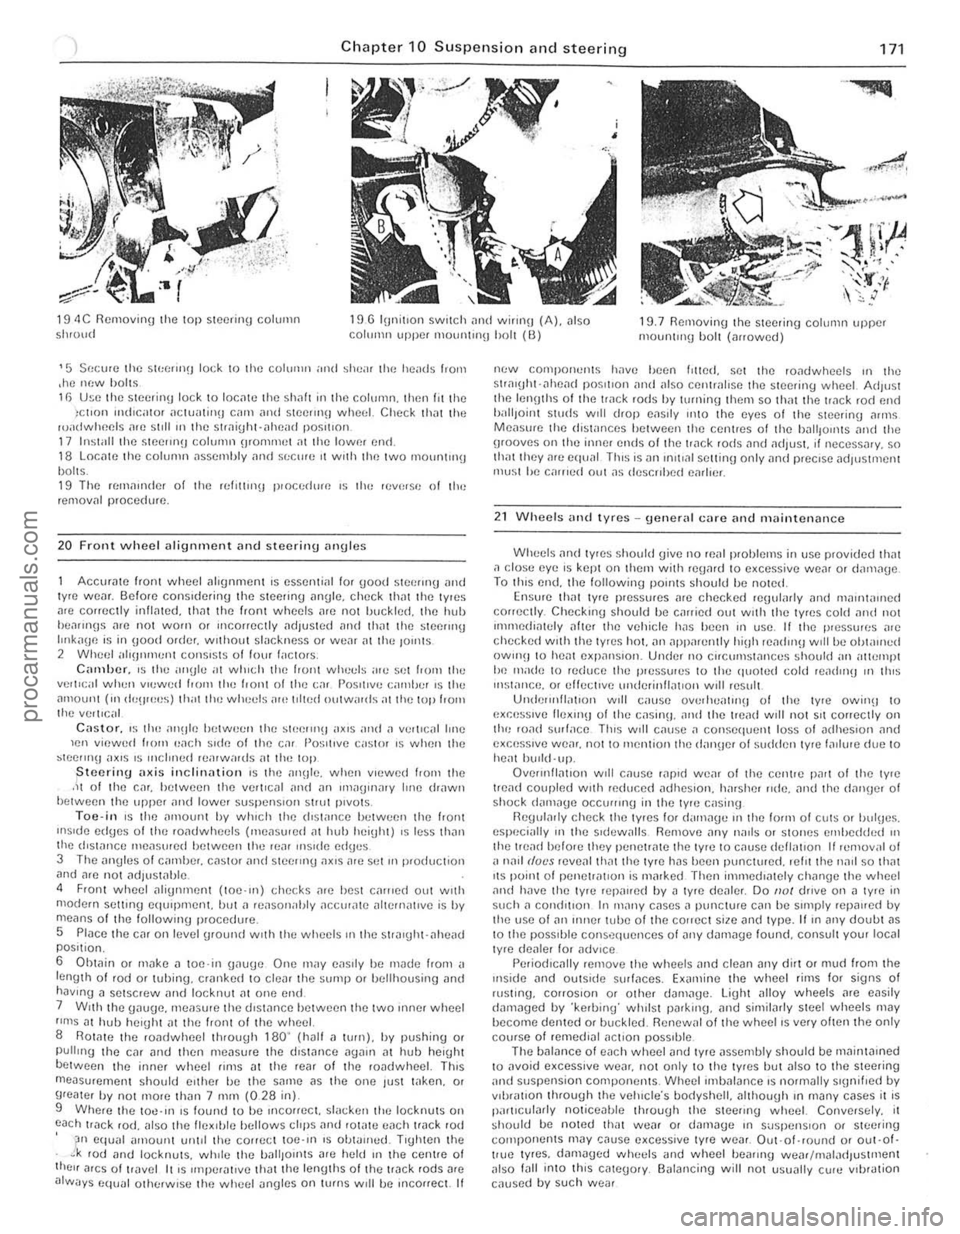
19 4C Removinu the top steering column Shroud 19 G lunitlon SWitch ,1nd wirlllU (A). also COllll'lII upper mOlUllnl!J holt (0) 19.7 Removing the steering column uppcr mounlul(J holt (arrowed)
'5 Secure Ihe SIt:(;(1I1(1 lock 10 Ihe colulIlIl ,lIal ~heil' the h eads I,om ,he m:w holt~ 11) U~e the stecrin\J lock to locate the shaft in Ihe column. then III Ihe )ct,on mdlGltor OICIlJalinn GUll alld Stecrmn wheel. CtlCC~ that Ihe ruadwheels afC st,lIln the 5trai\jht·ahead P05,110l1. 17 Install the Stce!Ul(J column orommet Oil the lowm en(t. 18 LOCille the column assembly ami sr:c",e It wrth the Iwo mOllrlllng bolts. 19 The ((,milliuler of the rellllUI\J proccrl",e ,~ th" reverSI! of lhe removill procedure,
20 F ront wheel alignment and steering ilngles
Accurate front whcel alignment IS essential lor good stoer"'g and lyre WOiJr. Scion) cons,dering the steering angle. check Ihat Ihe tyres
are correctly inflated. tllnt the front wheel s arc nOI IJlJckled. the hub hea"nns arc not worn o r mcorrectly adjusted und thilt the sleflr"'g IlIlkaUfl is in IJood order. wllhout slackness or we,ll at thu Jo,nls
2 WIH;f; 1 "I'!JIununt co"s'st~ 01 loUl I"ctors, C;"lliJcr_ IS the ""Ule "t wilich the front whet:ls ,lie sci from Ihe
verllcal when v'ewud 100'" the IrOnt 01 the c"r 1'0sIt,ve camber 's Ihe .. mount (111 de\J'ee~) th"t til() whucls ,ue toited outwards at the lOp 100'"
thu vert,c;,1
Castor. ,~tho i"'~Jlu between the SIl,erlIlU ,,~,s OIrld.1 v..,'I,e.11 lone len viewud IrOIll p,lch ~,dfl 01 the C,lI 1'0~;llIve castor 's when the ~tcermu ",x,s 'S ",cloned rUiHw,,,ds ill the top jStcerinu ilxis inclin,,{ion 's lhe illl\Jle. when VIewed frOI11 the .It 01 the Cilr. bel ween the verltcal and "n 1Il'''U>I1.1ry hne drawn betwCl)n the upper ilnd lower suspensIon strut p,vots, Toe-i n IS the ilmoUl,t by wh,ch tlte dl5li"'Ce helween the frOrlt
IIlsuJu ed\Je~ 01 the rOildwhecls ('He,lsu1ed m huh heiuht) ,s less thiln lhe d'sWrlCI) ",e
6
Oht"in or m"ke
ne:w components have heen I'lted. set the ro"dwheels ,n the stral\jht·ilheil(f p05otrOn and also cent",lrse the steering wheel. AdJ"st the len\Jths of the track rods hy lllll1ing tltem so th,,! the track rod end IJ,litJoinl studs w,11 drop eils,ly onlO the eyes of the steer inu ilrlllS Measllfe the dislilllces between the centres of the hilllfOllllS illld the grooves on Ihe inner ends of the track rods and ildjust. ,r neceSSilry. so Ihiltthey me equ,ll Thl~ is all lII,t,,,1 sellinlJ only and prec,se ildillstmellt mu~t he carried oul as descrrhed earheL
21 Wheels and lyres -uonNal care and milintenl1nce
Wheels ilild tyre~ shOuld give no reill problems in usc provided thm ,1 close eye IS kept on Ihe", with re\janlto excessive weilr or dilmilge To llns end. the following pOllltS should he noted Ensure thm lyre pressures ",e checked re\Jularly ami ma,ntallled correctly. Checklllg should be c,Hried out woth the tyres cold alld nOI IIlHlledialely alter the vehicle hilS heen "I usc. II the pressures are checked w'th the tyres hOI. iln ap(l,Hently hi\jh readmlJ w,1l be ohw'lled OWlnH to heilt expJnsron. Under n<) Cllcumst
eSpecii\lIy 111 the s,dewalls Remove any na,ls or stones ell\bedded 111 the tread hefore they penetr"te lhe tyre 10 cnuse dcfliltlon If remov,,1 {)i
dilll1i1ged by ·kerbing· wh,lst par king. and simililrly stee l wheels may hecome denIed or buckled, Renewnl of the wheel rs very ohenthe only course of rellled'ill ilct,on poss,ble, The balance 01 each wheel Jnd tyre ilssembly should be mainta,ned to ilvoid excess,ve weilr, not only 10 the tyres but illso to the s teering and suspension components. Wheel imbillilnce 's normilily S'\ln, f,ed by v,i)rilllOn through the veillcle·s bodyshell. illthouUh III many c~ses it IS piullcularly nOliceahle Ihrouoh the steenng whuel. Conversely. it ~hould bc noted thilt weilr o r dilnlaUc 111 suspellS IOll or steer ing components may '.:ause e~ceSSlve tyre wear. Out·of·round or out-of· t!Ue lyres, damaged wheels and wheel !leafing weilf/ nlilladJustntent also lilll into th
,.
:.
procarmanuals.com
Page 173 of 205
Chap te r 1 0 S uspension and steering
Wheel b,ll,lncing may bo carried out wllh the wheel Mher on or off the v eh icle. II b
5ylllptOlll
III(; le pulls t o on!! ~Idll
Slecnl1!l ~trll or h eav y
Excessivc pt;Jy in s!Cerinu
W twd wohhtH ,11111 v,h,nIIOI1
Ty,,~ W(~;II 1lI11,VCn
leg,l ! restri ctions "pply \0 the mixing 0 1 tyre types on a vehicle . Bilsic;lfly this means Ihil a vehicle must nOt have Iy,es of dilleling conStruction on the same axle. Althoug h ;1 is nOI recommended t o mIx tyre type s belween Iront
InCOlfect whcel o1lrUlIlllent WC,II In SIISI)()IlS'On 01 SI(""""! I CO""llOnents Ar.r.uic"t .1""'''!lC 1 0 SUSllf,nSlon o r ~I.w" nu compUll"nts IIlr.Olllll:t lyre p.eSSUlt's
Lack 01 SieIJIIIl!J \J
W orn sleellng Or sus penSIOn 10UliS W en. III couplrnU shllft unlve,sal Joms Worn r,lc k ilnd 1)""On Incorfectly adJuSlcd rack Slrll llC'
RO:Hlwhe els oul 0 1 hnlance flU.ltlwhcels huck led or IhslO,Wd l:iHlhy ur dnmnHed IVII]
Wu,u s tL'f:II"!J Of SUSI""l~IOn JI1I1lI~ WlJnk Shoc k ;.hso'b"r~
'"collee.1 whee l ;' ''UIIIHlllll We: " III suspenSIon Ot st"""lIg C{)I11POIlCntS Ro,'llwhL'Cls out 0 1 halance WIJ;lk shoc k 'lhso.he'5
I
~. -----------------~
灲潣慲浡湵慬献捯m
Page 174 of 205
Chapter 11 Bodywork and fittings
Contents
i'ldIUS\
Specifications
Torque w rench settings Se.llbel ls :
) pillar .\ lIoor .............. ............. .......... _ ._ ..... .. . Openlnu rcar qUilrter glass tougle 10 C pIllar.
Heal"r cOlllrols removill im(1 rchUrn!! lIemcr Willer villve (heilvy dull' he;II'~r) rcrnoval and rel,ttrng I"tc"or m ,,,or -remov,,1 and refrtllng . LOild spnce I"", pifflel -refl1ov~1 and refillmu M,l,nten;mcc bodywork ,1nd underfr;lflle M;r,nICnnnce • upholstery imd C;Hpets Millo r body dilm
NIH
2010 30 35 10 42 4.5
Ib l It
15 to 22 26 1 0 31 33
41
" 38
" 3 4 G 5 23 ,
22 2 3G 39
" 35
33
27 28
" 11
"nd 19 10
----------------------------
.. !i
procarmanuals.com
Page 175 of 205
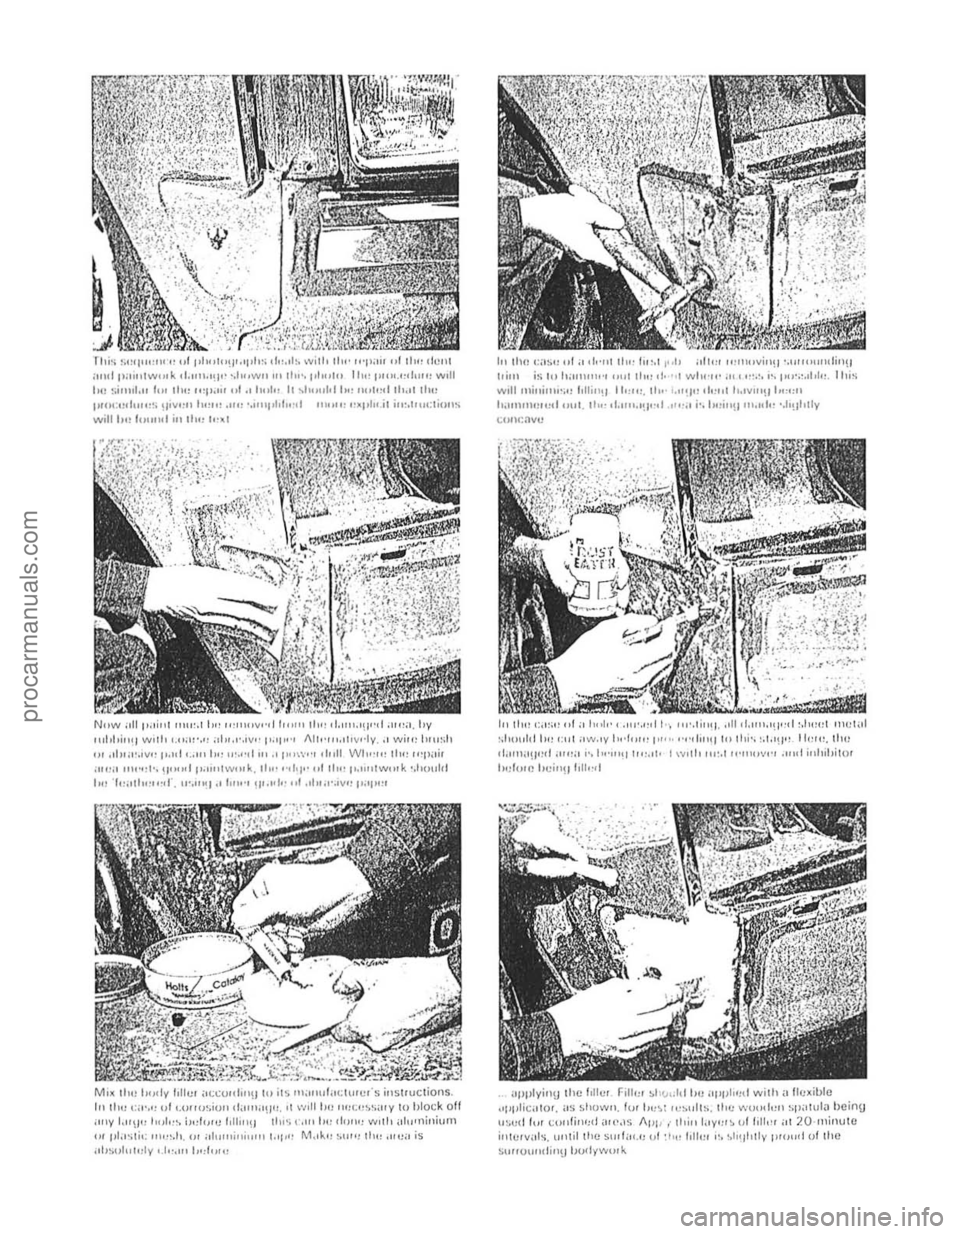
flli .. ""'!"'"'' ",,1 I'[)"'''\I'''P'''; ,[" .. ", with til,· "'1';0" "I til" oI""t , ,, ,,I p:""t"",,\.. 0I.",,.,!!," ·.I",wlI '" rl .... pl,,,t,, Ih" 1"",."01.",, w,1I til' !~""1.,, I", rh" '''I'.''' ,,[., h"l" II ~11",,"r h" ""lo"[ Ih.I1I[)" I'w,;".I0""" 11""'" I""" .• '" ',""1,101,,·,[ """" '·~I,Io<.i1 i,,,.t,,,,;riulls willi", [""".1 i" tI,,, 10·.1
NIIW "II p.,;nl ,n",.' 10" ,,,,,,,,y ,.,, I""" tI,,, 0I"" "'!1"0I .i",;).hv '''hi ,ill,! w"I, 1.1"".." al .... ·.,y,· 1' .. ,,,., Alt.· ... ""y.·lv .. ' wi", ""dl '" "llIlI·.W" p.,<1 < •• '" I", 11· ... 01 '" .. I""V'" 01,,11 WI,,'''' ,II" "'Il";' .".·a II ... "'" !I"'''[ I'.""'W'''~. tI." "01,, .. ,,11101, p.,,,,,,,,,,,1o. '.100,,1<1 II<, '1";111"",,,1". """".1"1"",, !II.""",I .• h':".'Yl! "",,,,,
M, x ,I", I,,,dv loll.." ;n.:c..,,,h"!J til ils m:"'lIlactlHC"S illsr,ucriolls. I" til" ,;,,'," ,,[ ,.(>t"n,iu" (I,,,,,;,!!,,. " ",,11 1m ""o;,,~,,;"y ro hlock ot! ;'''Y I.,,\l" /,,,1,,,. i,,,I,,,tJ 1011"'\1 \1"" ,·. n, I,,, do"" w,,10 al",nini"m '" pl;,·:!i,; """,h. '" ;,I",,,illi,,,,, t •• p" M"~,, M'''' II", ,n,,;, is :,t.~"h",!lV '.1,' ... , 1" ,1 ,,,,,
I" th" ,::oSI! III" oI""t II,,· I""r ".11 :tit", ",,,,,,, .. i"ll ', .. ,,, ,,,,,"i"!1 I,i,,, is 1" 1"",,,,,,·, ,.,,' 11,,,,1,, ,,1 wi"·,,, ,II' ,,,.'. "'1"".",1,10, . II,i .. w,1I mi"i" ... ,,, 1,11'''\1 II""" II,, · I.II~I" ,t",,, ""VII'H 1":0:" h."nm",,,,1 ""t. If", .L.n",!!".! ."'-.' j', IH,j"lI """[,, <,h"lolly l:u,,';llYtJ
I" ,10" ,; .. ::" "t:o h"Io, , """,,01 1, "",';"11 .. ,11 d."",,!!,:d "h",, 1\\"". 1 :,II()I,hll)(, . ;,j[ """tV h,'I",,, I"'" " ,'d,n" '" ,hi,. ,,'''U'' 11" ",.11,,, d,mli'H"d ill'''' ,',1",,,,,, I ,,, .. I' I I'W 10 ",:.r ,,·,,"'v'" ," ,01 ,,,I,,hiIO' h()I"'H hei"!1 1011,·01
1
Page 176 of 205
![FORD CAPRI 1974 Workshop Manual )
-II he dune with;, S"d",,,, pi .. "., " i),,;;;,,;;,,~;;,;,; :;I,',"I;,,:n\(~Il. u~;i"U 11/00 I]ssivO!ly Ii,,,,, (I ad. ~; ,,( W,,1
,Itld dry pal",r. wrapper around" s<ll1di"!J III FORD CAPRI 1974 Workshop Manual )
-II he dune with;, S"d",,,, pi .. "., " i),,;;;,,;;,,~;;,;,; :;I,',"I;,,:n\(~Il. u~;i"U 11/00 I]ssivO!ly Ii,,,,, (I ad. ~; ,,( W,,1
,Itld dry pal",r. wrapper around" s<ll1di"!J III](/img/11/56932/w960_56932-175.png)
)
-II he dune with;, S"d",,,, pi .. "., '" i),,;;;,,;;,,~;;,;,; :;I,',"I;,,:n\(~Il. u~;i"U 11/00' I]ssivO!ly Ii,,,,, (I' ad. ~; ,,( W,,1
,Itld dry pal",r. wrapper' around" s
The tOP coat can now be applic(t. When wurk inu 0,, 1 of doors. pi<;k a (hy. Wi"rn and willd·frce day. EnS\JJH sw'oll"di,,'.) ,"CIIS a,e prowclcd from over-sp,ay. Agililt ... II, ...
,
nll' whol" ",pili, ,"ea {:,i" now he sp,,,yu(1 0' h,ush-pai"le<1 w ith p,i(""" If sp,ayi,,\!. ens"", "djoinilllJ "(CdS ,lie proICcwd from ov,,' ~p,ay, Not!) 111,,1 "II
i
" !j ,
procarmanuals.com
Page 177 of 205
)76 Chapter 11 Bodywork and fitting
General description
The body is of all-s teel welded construction with impact ilbsorbing hont Dnd rear sections . Anli-burSllocks nrc lilted 10 the doors, ilnd the
t ailgDte is supponcd by \J
AI the in1erVills speCIfIed in the Routine M"IIl\cnilnCe section in the front 0 1 the nl
Check underbody protective coatiog 5 W,th the CM supponed on i1xle stilnds. check the cond,tlon 01 the un(lelbody protcctivc coating. i1nd wherc neceSSilry clean
M,,;ntcll
Wily to remove any aCCUIllUI,lted mud whIch WIll retillll mOlslu re
Mats and C
very line culling pils te. Finally, opply wax polish. WhNe the scrotch has penctrDt(ld right through to the metill of the bodywork. causing the mowl \0 rust. iI d ifferent repa ir lechnique is
required. Remove any loosc rus t fronl the bottom 01 the scra tch with a penknile. then apply rUSI inhibiting paint 10 prevent the lormation 01 rust in Ihe future. Using n rubber or nylon appliCiltor fill the scratch with bodystopper paste. II requ ired. this paste Ciln be mixed with cellulose thinners to provide a very thin paste which is ideal for filling narrow scratches. Before t he stopper·paSI(l in the scratch hardens. wrilp il piece 01 smooth COllon rJg i1round the lOp 01 J linger. Dip the finger in cellulose thinners and then quickly sweep it i1CIOSS the surlace of the 5topper-pJste in the scratCh: this will ensure tha t the surfilce 01 the stopper,pilste is slightly hollowed. The scratch can now be p
first wsk is to pull the dent out, untrl t he affected bodywork almost
procarmanuals.com
Page 178 of 205
) Chapter 11 Bodywork and fittin g 17 7
~!t~InS its oriOin,11 sh~flC. There is lillie point in trying to restore the original s hllpe complClC ly, as the me1011 on the darnllged arca will have stretched on impact ilnd cannOl be reshaped fully !O its original contou r, II is belter to bring the level of the dellt up to 11 poin t which is aboul ~ in (3 111111) below the level 01 the surrounding bodywork . In cases whe.e the dent is very shallow anywi'lY. i, is nOI worth trying \0 pull 1 ou t 111 all, II the ull{lersidc 01 the dent is accessible. il can be hammercd oul gently from behind, using a malleI with a wooden or plastic head. WhilSt doing Ihis. hold a suitable block of wood l'flllly a{),111151 the outside 01 the panel 10 absorb the impact from the hammer blowS and thuS Il,event 11 Imge area of the bodywo.k hom being 'belled,ouf, Should tho dem be in a section of tho bodywo.k which has iI double skin or SOI1IIl other filclOr mokil1g It inaccesslhle from behind, a
dllferent technique is cillied lor, Drill severill sm;1U holes through the
mewl II1slde the i1reil (Jilrtlcul,ldy in tho deeper section, Then screw long sel1·tap~ing screws into the holes IllSt suffIcien tly for Ihem to gilln iI good purchase In the mewl. Now the Ilen t C"n he 1)lJlled out by pulllllg on the protruding headS of the screws wllh iI pnll of pliers. The no.t stilgo of the rep,lir is the .emOllill of the PilUlt from the 113Ued meil, and hom nn Inch or so of tho SurroundlilU 'SOUfl(r
Jdywork , Tills is accomplished most oilslly by usil1U a wire brush or ab'~sllle pild on " ,)owe< dflll, ~,lthou9h It Clln he done Just i1S e ively hy hnmf usmg shoots 01 1I1)'i151110 P.l,)C •. To COlll,llete the p
thorelore decide whether to renew the whole polllel (II this IS possihle) or to .ep[lir the affoctod illoa. New body Po1nols arc not ,1S expensive as mos t flCOple think and it is often (Iuicker and mo.e satislacto • .,. to fit" new t)anelthan to auempt to rellair larue n.e,1S 01 corrosion.
RenlOlifl all f,llln\Js hom the .. lIeeted a.o" cxcoptthose which Will
act ~s ,1 uu,(ie t o the oliUllwl shape 01 the (i,lIlla\je(i bodywork (ell hn,1(1lnll1l) ~h.~lIs etc). ThOll, USlnu tin snIps or ~ h"cks
d epreSSion fo r Ih c frllcr pas\(!
'll/lle hrush the aHected Me[l to 'CIilOlle tiro powdery rust from the ,ICO 01 the lelllilllllll!l lIlet,,1 P;lInl thc "flected arc" wllh lUst
IIII"I)ltll1l) p""'t. If the hilck 01 the ,usle.1 me,1 's accesSlhle treolt tillS
" delo.o frlhflU cml t
me sh. or altlflll1l1um t",Joe. AlulIll"'um 0' pl;1strc mesh IS Il.oh"bl.,. lile hest m
Aluminium wpe should be us ed lor slll ;rll 0' vCly narrow holes. Pull a picce oil tho .011 ond tri'" It to tho apIl
ove . the hole, rt C[ln be overlapped II tho thickness of one piece is
i nsufficient. Burnish down the 00ges of tho tapO With the handle 01 "
screwdrillC ' or srmllOf, to ensure that the ",po.s securely auached to the
metal undomeath .
Bodywork rCIJ<1irs -filling a"d re-sprayi"g BefOte uSlIlg thiS Seetion, soe the Sections on denl. doep scratc h.
rust holes "nd gash repai.s . M~ny types of hodyfllfer Me ~val'ahlo, but Uonerally spe~k.ng those nrOpnelOry kits which conlain 0 till of f illor paste and a tube of resin h~fdener Me best for this type of rcp,llf A wide, !ieKilJle pl
hardener carefully (follow the m"kCI's instructions on the pack) othe.wrse thO folic. Will !>tt too rill)luly or tOO Slowly . Using the
"pplicator apply the filler paste to Ihe prcpared area: draw the
applicalOr across the surfaco 01 tho IllIer to achieve the correct contour and to lovel the fillef surface. As soon /1S it contour that approxim"tes 10 thO corrOCt one is achielled, SlOp wo.kinU the pas le - il you carryon too long the pasto will becomc sticky and begin to 'pick up' on tho
app lic"tol. Continue to add thin layels of Iiller paste at twenty· minute intervals until the level of the filler is just pfoud of the surrounding bodywork Once the IllIer has hardened, excess can be removed using a met;!1 plane or IiIe. F.om then on. progressively finer grades of abrasive paper should be used. starling with a 40 grade p.oduction paper and l.nishing With 400 o."de wet·and·dry paper . Always wrap the abrasille p"pcr IIrOUlld a flat rubber, cork. or wooden block -otherwise the surfaco 01 the frller Will nOI be completely flat. DUling the smoothing of the fIller SUI face the wel·and·dry paper shoufd be periodically rinsod in walCr. ThiS will ensure thaI alle.y smooth linish is imparted 10 the frller (It th O flllni SHIIJO. At t!\l S st1lge the 'dont ' shoul(! be surrounded by a ring of bme
mowl, whIch in IUfn Should he encirclod !.Iy the finely 'feathered' edge
0 1 th e good paintwork . Rinse tho repair nrea wilh clean water, until all 01 the dust I>roduced by the rubblllu·down operation has gone. Sp."y the whole .ep.1ir a.oa with" light coat of primer -this will show UI> any ,mpcrfOChons in lhe su.face of the fll1e •. Repai. theso Iml)CdectlOIlS with frosh 1,110' paste or bodySlOpper, and onco mOte
smoOth the sUfl
he call1od out in a w".m, dry, wind loss and dus t free atmosphero. This condition can be created mtllicially II you have access to a large indoor working "reil. but rl you nre lorced to work in the open. you Will have to pick your day lIe.y ca.efully . II you a.e working indoors. dousin\J the
floor in the work mea with water will holp 10 SOllie the dust which would otherwise be in the iltmosphe.e . If the ,epai. mea is con fined to one bod.,. pilllOl, mask off tho SUffoundlflg panels; lhis Will hell) 10 minllllise tho effocts 01 a slight mis,match in lH,lint colou.s Bodywo.k hUUlUS (eU ch.omo strips. door handles Otc) Will "'SO noed to be
"';1sked ot! Use uenume fII
S ilray on t he t op CO"1. "\Jain bUlldmu ull the tluckness by usul9
sOllof1lllhlfl'"ye .s 01 p<111l!. S Ia .t spraying in theCllnlre 01 the .epair mOil and theil, USH\g a clfcular mOllon, work outwards untrlthe whole ropmr
"rea ond al>out 2 inches 01 tho surrounding origmal pallltwork IS COvered Remolle allm"sklng mnteflaf 1010 15 minutes alter spr
Plastic compOllc"ts Wllh the use 01 mo.o and more pl"stic l>ody components by the
vehrcle manufac turers (eg bumpers, spolle.s. and in some cases major
body panels). reCllilcation 01 damago to such items .hilS .t.>e<:0me a
mOller o f eHhor emruSling relhl'r wOtk to a specialist m thiS field, o. renewing complete components Rep"ir by the DIY owner is nOlleillly feaSible owing to Ihe cost of the equipmen t and materials reQui.ed for effecting such repairs. The baSIC technique inllolves making a grOOllo
atong th o hno of the crack in the plastic using a rotary hurr in a pow~r drill. The damnged pal! is then welded hack togeth er by uSing a hot "" gun to heat up nnd luse a pl
polyca.bonate. ABS, poIYllropylene) .
procarmanuals.com
Page 179 of 205
17 8 Chapter 11 B odywork and fitting
If the owner is renewing ~ complete component himself. he will be left with the problem of IlIldmg a sUI1
Major u o d y damage - repair
Where serious danHlge has or.cur",d or la,ue aW
Ir
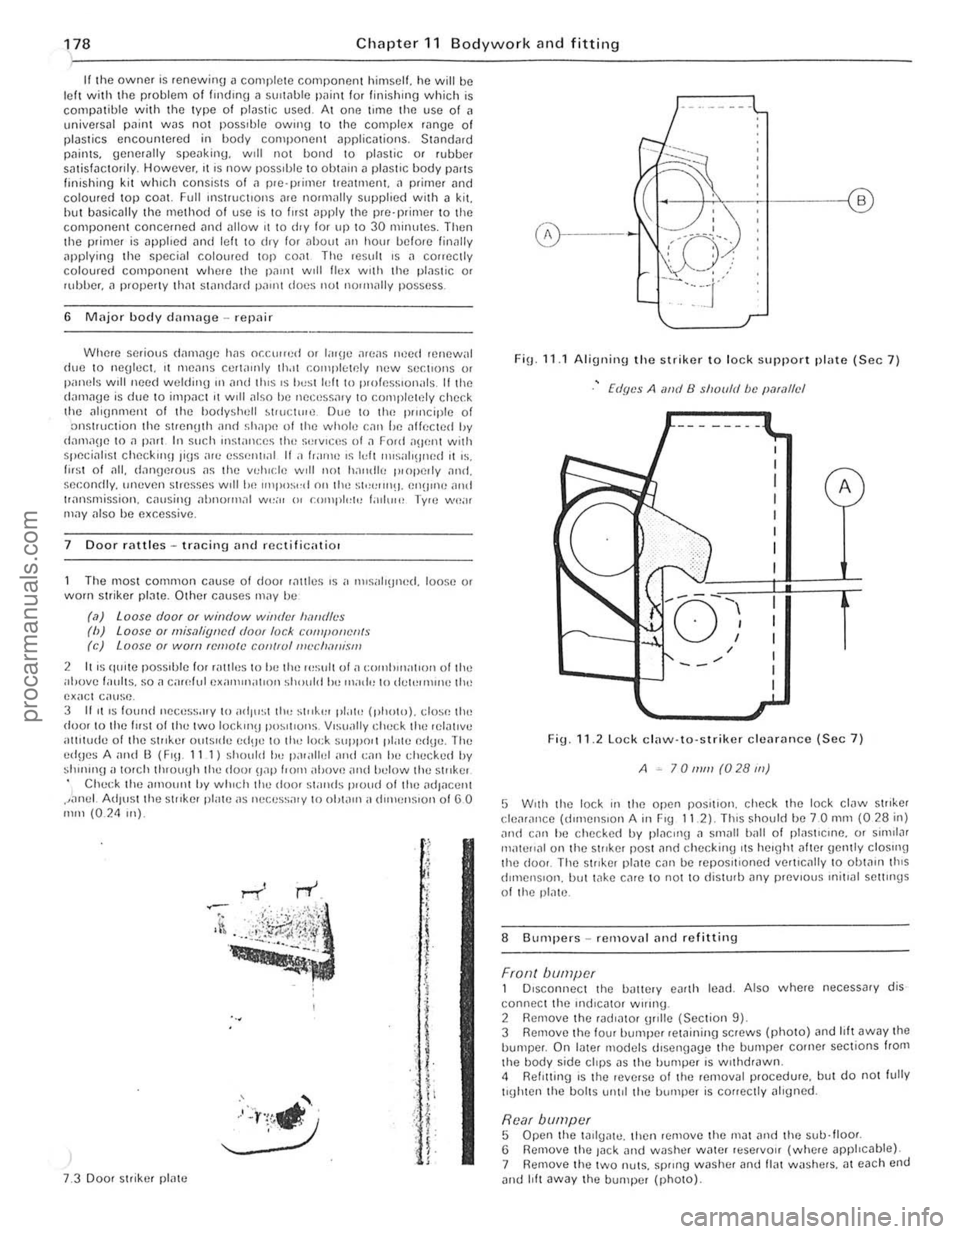
Loose door or window winde, ",,,,dft,!; (Ii) Loose 0' lIIiS.lliUned d(Jo, lock c(lillj/olJC!lJl~ (c) Loose or worn relllOle con/iol ""."/."";",i$III
2 It IS quite possrule 10' r,rllies 10 he the ",suit of" [O,,,lrrllirl,Orl 01 111<.1 atrove laullS. so a c;,r(:/ul <.1xanrrrr;riron should he rn",h, 10 ilCIl'UllU1e III<, exact CillrSf:! 3 If
)
7 .3 Door striker plate
f ,i
j
I
j
I
\:
it
1
(.'----+"<, --'-1 ------<0
00>-----1\.. -~--.
F i!J.1l.1 A lignin!J the s triker 10 lock support plnte (Sec 7)
Edyes A and lJ shoold be 1'.1(.lllel
A
'0- - -- . ,
,'---I.::i.I I ,
--/
F ig 11.2 Lock claw·to·striker cleiHance (Sec 7)
A -70,11111 (028111)
5 Wrlh t he lock in the open positron. check the lock cl
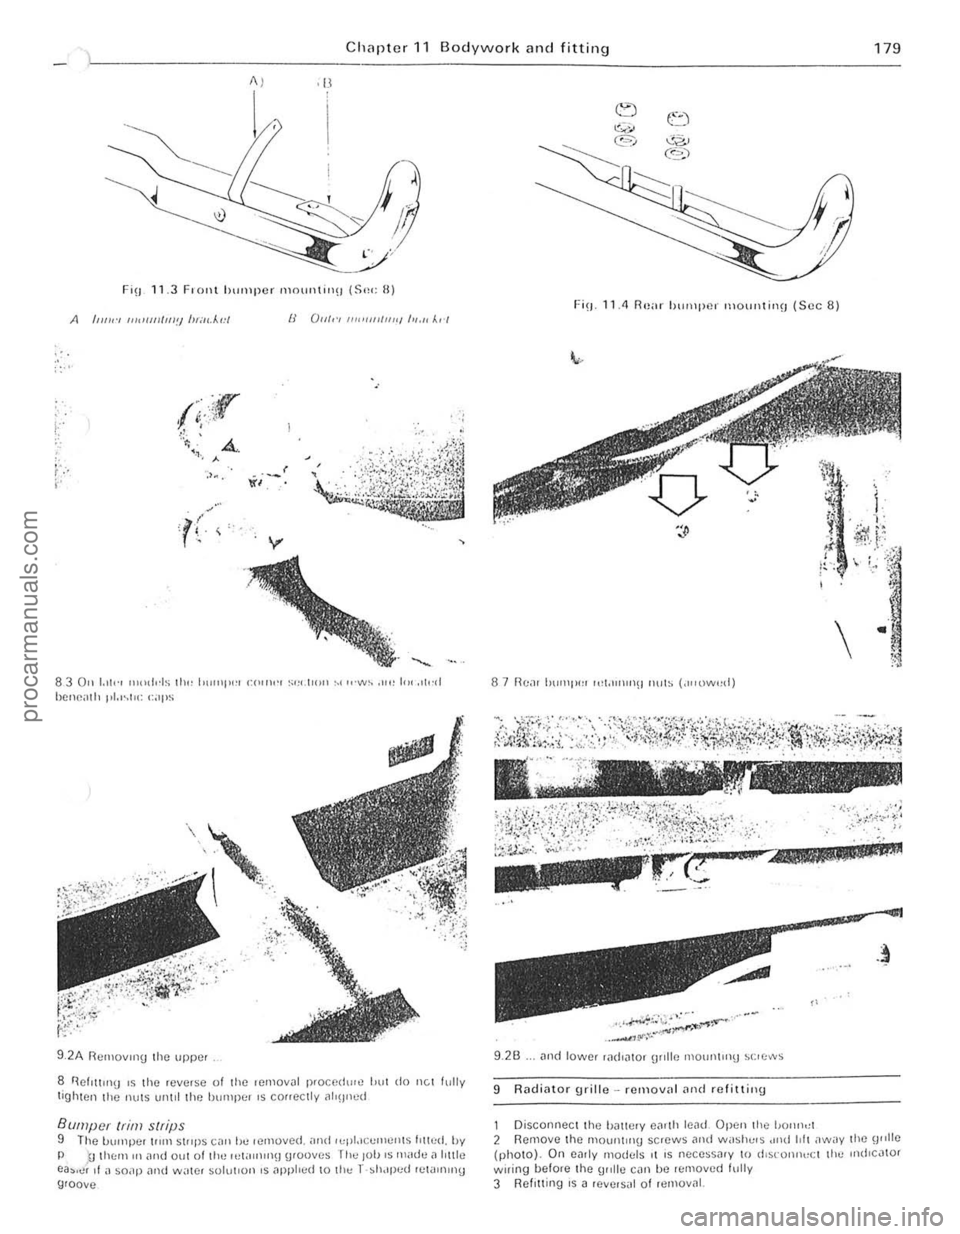
8 Bumper s -removal nnd refitlin g
FrOIll bumpN 1 D,sconnect the u<.rttery earth lend. Also where necessary dis connect the IIldrC
Rear bUll/pel 5 Open the lJ.tgate. Ihen rernOve the mal ilnd the sub·floor. G Remove the Jack ilnd washer water reservOIr (where applrcable) . 7 Remove the two nuts. Sp",l(J wilsher and 11m wilshers.
Page 180 of 205
Clwptcr 11 Bodywork and fitting 179
AI
I
FiO 11.3 F 'Olll humpe r mnlOOlIill!) (S,!,; H)
1 /"'"., '''''"II/III!} /",11./.."/
830" 1.,10" 1I1I"ld~ Ill" 1"""1"" C(I""" ""'.11111' ~'"·W~ ... " 1,".11,,01 IJencalli pl.I'I,,: C:;IP~
g.2A RClllOVII1\j Ihe uppcr
8 i1ef'III1lU IS the ,eve,se of ,he lemov~1 p.oce
Bumper (rim strips 9 The bUlnpei tllm stilPS c~" b" lemoved. iIlHI'l:pl,lCCIIH:OOI$lollcd. hy P '0 lh(:rll,n ~nd oul of Ihe 'l:I;"",nu U'OOVC S Till: )oh IS 1ll,,,Jc a 1o111e ea~'
(2.. (6"") --
Fi! 1 11.' Roar hUIl'pcr ",Olu,lin(l (Sec 5)
87 Ikal I"JIl'p'" "'1.11"""1 nlJt~ (dllllw"d)
.. "
... '~{"';~~...,:r--~'~~
. . _",1'--
"
9 .2B ... and IOWN I,,(I,atOl (lrdlc mOIlIlI"'U ~crcws
9 Radialor grille -removal Dnd refitting
1 Discoilneci th e bmtery eDllh lead Open the 1)01'"'"
•
2 Remove the moun''''1J screws and W,"SI""5 ,,,,d loll "w,IY the 911l1e (photo). On early mod(:ls II IS necessary lO (1'$[01"",<: 1 th" ,nd,cator wiring belore the 11"l le con be rc:move d hilly 3 Reiollin(l IS a revels,11 of removn l.
'I
procarmanuals.com