FORD CAPRI 1974 Workshop Manual
Manufacturer: FORD, Model Year: 1974, Model line: CAPRI, Model: FORD CAPRI 1974Pages: 205, PDF Size: 43.75 MB
Page 181 of 205
.80 Chapter 11 B odywork and fitting
10 Windscreen -re rnavnl and re titting
II you ;lIe unlo,'unnlO enough 10 h:1\IO .1 wind$CICCIl shallC., 01 should you wIsh 10 . enew yOu. present windSClccn. humg J rel)lncemcnt is ono 0 1 the few Johs wluch lhe nvC'alJC owner IS advIsed 10 leave 10 n profeS SIon
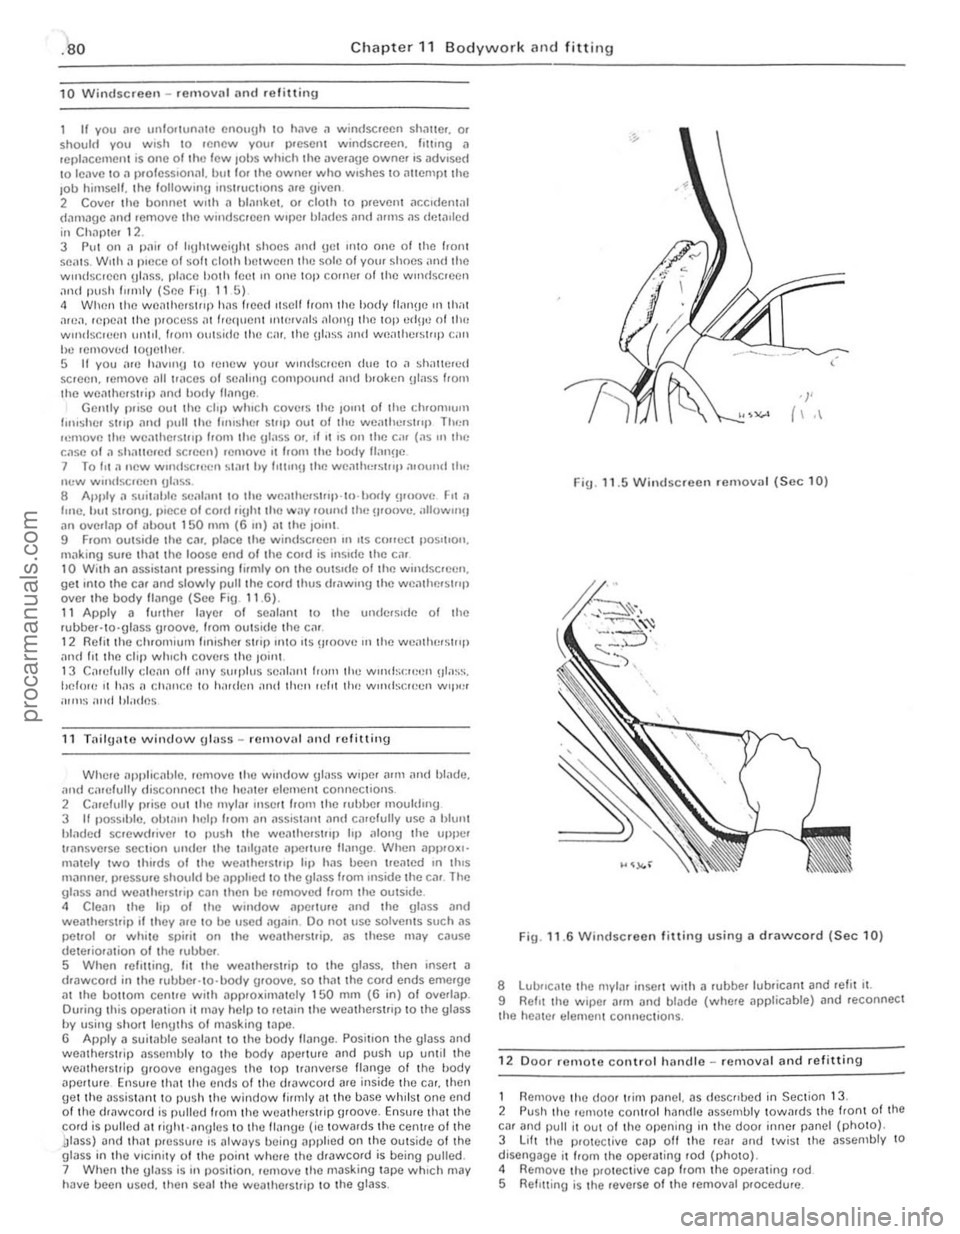
1 0 Wilh an assis tant I>ressin g firml y on Ihe ouls.(Je of Ihe windscreen. gOI 1010 Ihe ca. and slowly puU the co.d Ihus d.,lwlng Ihe weathe.SllIll over Ihe body ffnnge (See FiU. 11.6). 11 Apply a lurlher Inye . 01 se"lilllI 10 Ihe omlelslde 01 Ihe lubber·lo·glass groove. from oOlside Ihe car. 1 2 Rellllh(l chromiom flnis hCI suit) Into I1S !!Joove In Ihe weallu"slliP ;"lIld 111 Ih(l clip which covers Ihe ,0inl. 1 3 CmefuHy clc,1 n all ;Iily SUiplus seal;mt 111)'" Ihe wlO\d~;"""..!" 1I';lss. ileJooe 1t ha s a Ch;'l"C!! to h;.,den ilild Ihell leflt the wtndscrecn WI",!r WillS ; IIId blades
11 T ailijato window g lnss -rem ov;,1 nnd rcfitting
Where applicnble. !elllove Ihe window ijl<1sS wipe. nrm and bln(l(l. and calefolly disconnCC I Ihe hunter elemenl conneCliOlls. 2 C,lr(lfully priso OUI Ih o myl;'l r Inser t from the rubber moullhng 3 If possIble. 01l1,1111 hell1110111 an nssist;1II1 nnd "nelolly usc a Illunt blnded scrcw(ffivcr 10 IlU sh the wenthc,slrop hi) "Ionu the u llpe. transverse sCGlion unde. th(l Inl lijnte aperl\lIe flange. When applOxl' Illately two Ihirds o f the wei'lherslllp hi) has been treated III Ihls manne •. pressu. e s holiid be apl>hed to the gl
G Apply a $uililhle seill,IIl1 to I he hody flilnijo . Posilion Ihe glass and w(lather$llip ;'I5sembly 10 Ihe body i1perlUre nnd pus h up unlil thO wemherstrip Oroove (lngnues tho top tl
, I '
I ,
FiU . 11.5 Win dscreen removal (Sec 10)
FiO . 11.6 Windscree" filting using a drawcor d (Sec 10)
8 LubflCillO the mylnr insert wilh a rubbel lobricanl and re lit il. 9 Refit Iho wi,>or arm and blado (whele applicable) and leconne<:t the heale. elemenl connections.
1 2 D
oor rClliote control handle -removal and .elitting
I Flcmovc Ihe door uim panel. as descflhed in SeCI;on 13.
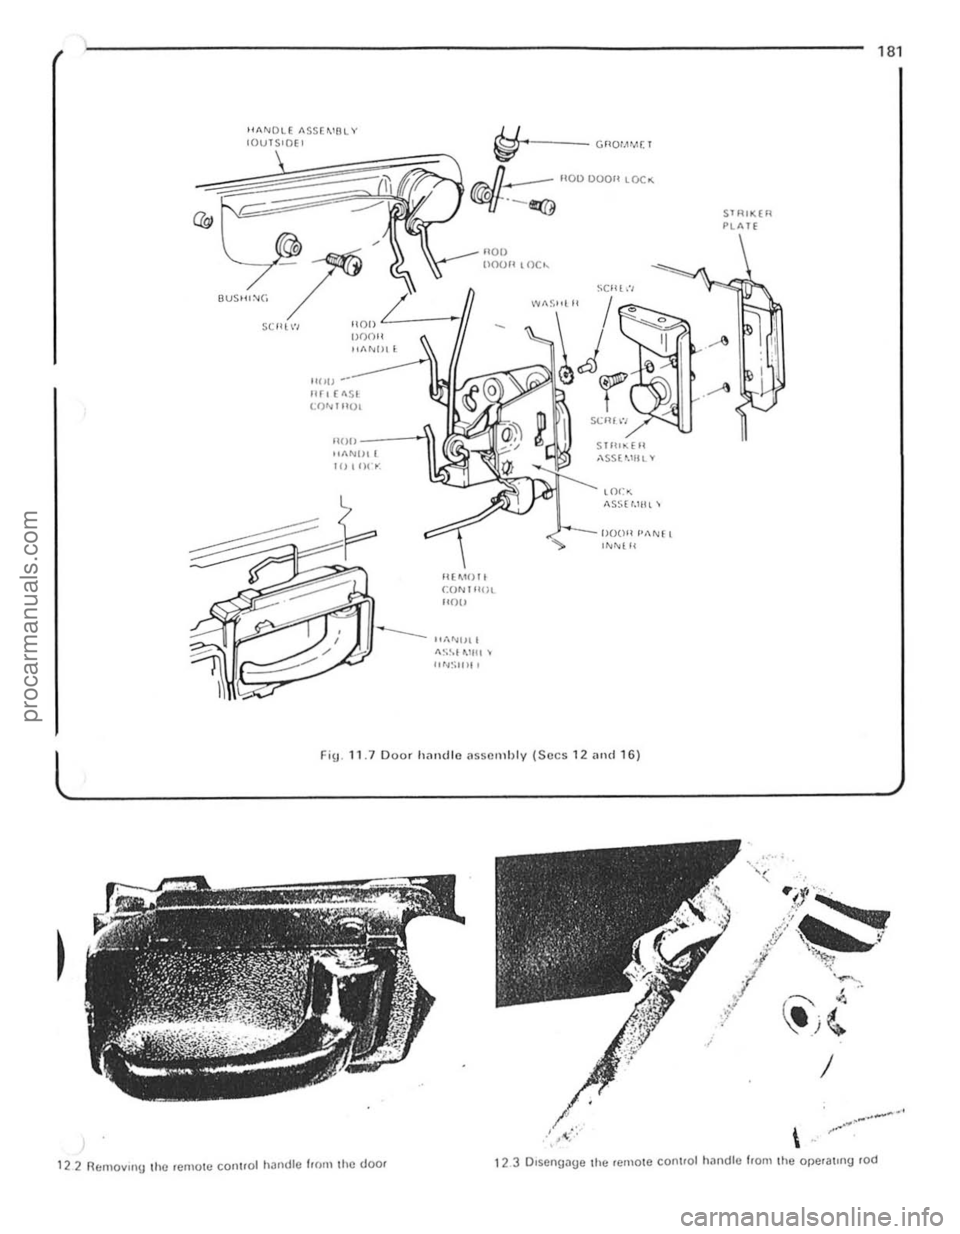
2 Posh Iho rem OIO COnlrol h,lndl(l ilssembly low;"uds the lronl of 1110 C1ll and poll il oot o l lh e opening in Ih(l dool inner pan(ll (photo).
3 L ilt Ihe protec tive cap o ff the rea, and Iwis t Ih(l assembly 10 dis(lngago itlrom Iho operating .od {phOIO).
4 Removo t h(l prO leClivo cap hom Iho operating .od 5 Flel illing is Ihe reV(ltSe of the removal procedu.e.
----------------------------~~ 灲潣慲浡湵慬献捯m
Page 182 of 205
7
""NO~E IISS[~'!I~Y IOVTS'OEI ~ GROI~Mr.1
sell,,',
A'::>.n __ flOI) l)001l lOCo;
H(,u
I)()OH """ill\.
Hr, ( .... Sl co,."nOl
1i!IPJf-e@
\ ___ flO!)
!looTl 10C ..
11m, ------\, ""NIII! 10 I (l1~.
Hl~'1)1I {:Ofll"U)L HOU
---"·\NUI! f\S~1 MU, , ""'Sill! ,
SClll:1
•
S H " .. ElI ,\SSE'.IlI!. '<
lOt:.; IISS(I.1!H'
"""-IJ()Ol' I'''Nf I IN"[I<
FiIJ . 11.7 Door handle ;lssemiJly (Sees 12 .. nd 16)
5' RIK(R PU\I£
-
122 Rt'!m ovlnU the remall! con"ol h~ndle l.oIIl [he door 123 Olsengauc [he remote control handle from Ihe ope.allng 10(1
1 Bl
procarmanuals.com
Page 183 of 205
![FORD CAPRI 1974 Workshop Manual 82 Chapter 11 Bodywork and fitting
3 , n,~(lIOVlr'!J
13 Door trim
Ih" w in, low winder mson ( , ,lIC, models)
panel renoval ,,,,(1 refit" III!]
1 Carefully loll (photo) "p alU l "II" 2 FORD CAPRI 1974 Workshop Manual 82 Chapter 11 Bodywork and fitting
3 , n,~(lIOVlr'!J
13 Door trim
Ih" w in, low winder mson ( , ,lIC, models)
panel renoval ,,,,(1 refit" III!]
1 Carefully loll (photo) "p alU l "II" 2](/img/11/56932/w960_56932-182.png)
82 Chapter 11 Bodywork and fitting
3 , n,~(lIOVlr'!J
13 Door trim
Ih" w in, low winder mson ( ' , ,lIC, models)
panel re'noval ,,,,(1 refit" III!]
1 Carefully loll (photo) "p alU l "'II" 2 ' I"e {I", w Remove II", '''dow w"HI",
",,' ",,,,,,,,". ~"'d'" ',.",d'"'·" ,,,"",, .. """" 3 • Remov e Ih~\:hOIOS) u . ",wl\1 sc,ew ,,,,d pull
:0 ",,' po" mol ,,~.""'''''' ,,'''''''''' ,," "" h"",," C~{cfllil (. lOp II .",. ( , !J SCtcws. luon II Y !<""OVc Ill" J Ii lo toS) ,e ",m,est I t. ,,,.note cont , I HOUIJh 10 ilelclt 'Y shduUJ 11 10 . rWiuds ilnd
",'.
13 2A R ",nove 11 h -'" ~clew
lJl1sere I 5 W wile!,,,,,,,,,,, -, h"I() _') I . 01_ InltlO.1 I knob ( I • I P U:
d'SCOIlIlCC.l II c ,"m p.mel r til() p,mel UI 7 n I 'U spc~kc' lorn th o do I"""lwork ","""'"'' . w""'" (ph'" "' "."'"' W, """,, '" ,h,,, w,,..,, ,;, "'''"." ,,' ""'"',,' 7" "". "pp''''''''; pOSitIon . () wmduw IS (;1{1' ,u, I" the wm I sp
'"
,
13 3A R emove lile st,ews 133B lhen'turn l' remove 11 Ie m rmes! 90 ' 10
13 <1 B Door lock iJul10n 13" R :.:> emoving tl mmOi control kn~~ nul frOlll lhe t)xt eriOi
procarmanuals.com
Page 184 of 205
Chapter 11 Bodywork and fitting 183
.", .
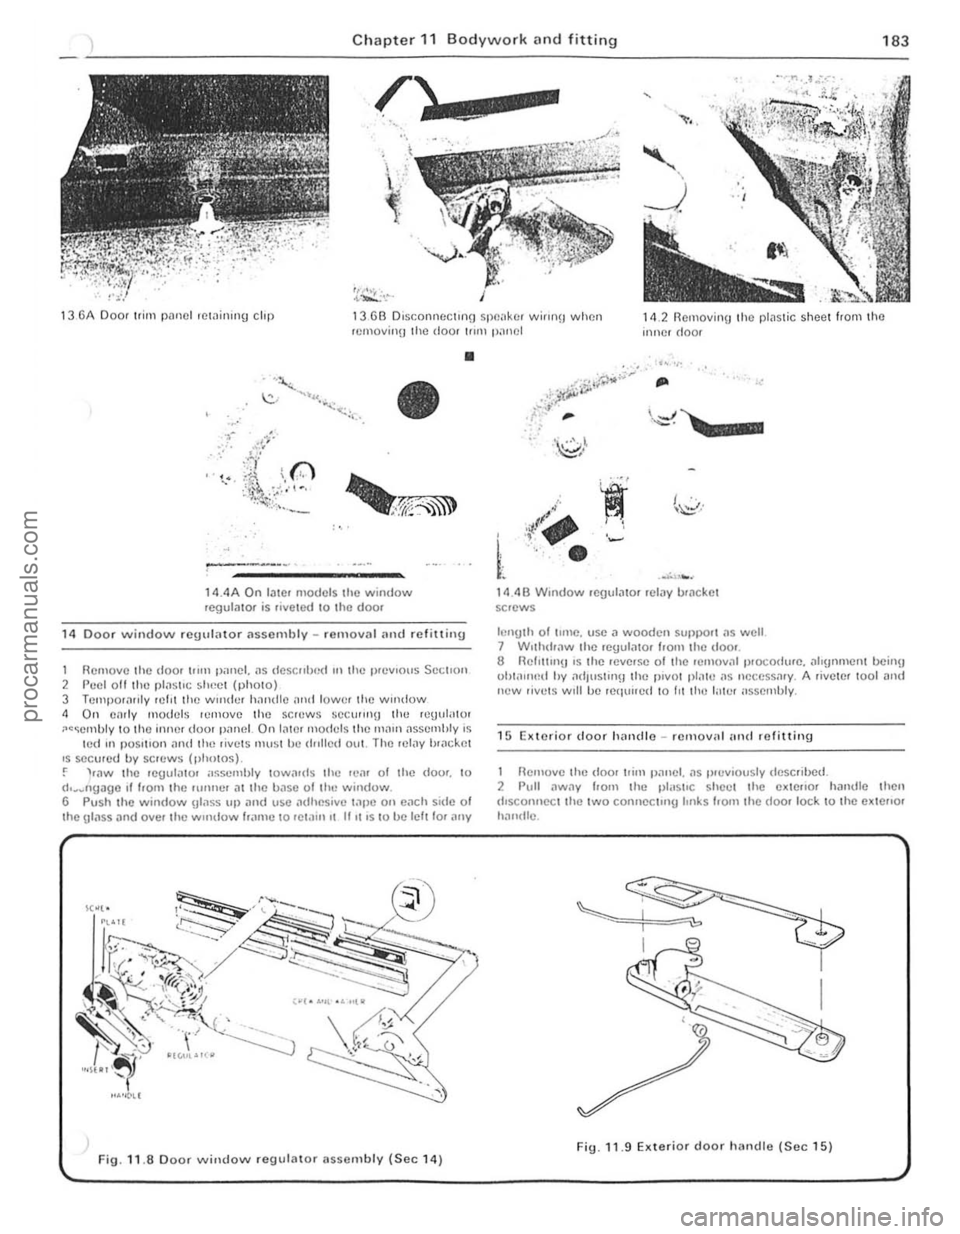
13 6A Door Ir;I" rwool lewining chp 136(3 Oisconll(:CIIIlg spen kOl WiWl!J when ICIllOV;"U Ihe dool Ir"ll p;lnel 14.2 Removing Iho plastic sheel from tho inllcr (Ioor
•
:, .. '
•
14.4A On l a tel models Ihe window IC9ullltor is I;ve ted 10 the doo.
14 Door window rcgul;otor (lsscf11b ly -r el1lov(l1 lmd refining
1 Remove Ihe dool II"n Ihlllei. liS dcscllb(~(1 III lhe preVIOUS Seclloll 2 Peel oH Ihe pl;1StiC shee t (phOto) 3 Teltll)Ol;111ly ICfl1 the wI"der h;1nd le and lowel the WII1(low 4 On emil' models lelllOve the screws SCC!ll"lU the reuul;rIOI ~<~ernbly to Ihe innel dool p;1l1el On l
Fig.l1. S Door window regulator assembly (Sec 14)
...r,
14.48 Window regulilto r relay b.acket
sc'ews
l e
nglh of '"lle. usc a wooden SUI>I>o.t ,,5 well 7 W,thdl
1 R eillove Ihe door 11;111 pam:l. ;15 plevlously deSCfibed . 2 Pull aw"y horn the pl"sII c sh ee . 'he cxtello, handle then dlsconncc. 'he .wo corlll&''''iJ hnks from 'he door lock \0 the extello, handlc .
Fig. 11.9 Ex te rior door hlllldle (Sec 15)
procarmanuals.com
Page 185 of 205
![FORD CAPRI 1974 Workshop Manual )84 Chapter 1 1 Bodywork and fitting
3 Remove Ihe lWO h,1ntllc mi.,,,,,,,\! 1I01.s illld Wllhd.llw Ih" hilOldle 4 Rclrlhng IS t he reve.s.: Ollhc ,cUloy;] 1 l"l)l:",h"c. hul ,In "01 lurgel 10 inst FORD CAPRI 1974 Workshop Manual )84 Chapter 1 1 Bodywork and fitting
3 Remove Ihe lWO h,1ntllc mi.,,,,,,,\! 1I01.s illld Wllhd.llw Ih" hilOldle 4 Rclrlhng IS t he reve.s.: Ollhc ,cUloy;] 1 l"l)l:",h"c. hul ,In "01 lurgel 10 inst](/img/11/56932/w960_56932-184.png)
)84 Chapter 1 1 Bodywork and fitting
3 Remove Ihe lWO h,1ntllc mi.,,,,,,,\! 1I01.s illld Wllhd.llw Ih" hilOldle 4 Rclrlhng IS t he reve.s.: Ollhc ,cUloy;] 1 l"l)l:",h"c. hul ,In "01 lurgel 10 install the hushoS 10' Ihfl link .ods A 1o.lIfll>cl,olcum ]dly on the .od ends 10",11 nSS,Sl w'lh the" "lsWIlIll'/)1l
16 Door lock tlsSClllhly rClllovnl illld refitting
Remove Ihe ct()or HUll p:mel as l"flVlou~IV ,h~5Cflhcd ,1nf! remove the pfilstic sh elHlng 2 Remove thl! Hl!l101(! conlrnl h;]llcth~ ,111(1 Iwn WII\(low ,.;1",e boilS 3 Using " St:rcw(hrv e., Pl15U tlw .;Io,'S tron, Ih" ".111"0' h;uufiu rort ,1,,<1 doweh the ,OIls '''1111 II", Iud il Remove Ill" \,to~s·I'u,1(1 ~,:r"ws ~i:(:"'"\H II,,, I""k .0 Ih" ~h,,11 ;lIld the plnslJc clips SU(;UIIlljl 11,,~ ")""01,, cOlll",1 ",
Ih e lock o n IIUl .Ino. ~1":lI. pu~hll'!llhe halllfl lowa.ds Ih.! oul,,, panfil. 10 ennllie Ill" I",:k 10 10" ,;orrm :lly po~'I,or",d 01, II", W;rr sh,,11 , Sucu,,, 11\11 h,, :k w,lh Ihe lto",e S<:"'w~ ,11\11 S()CU'C Ih" ""nOle conllol 'od 10 II", "'''''' parl!:l. w'lh 11m two pl.l~hC clops 8 Rein II", ",xh,um han.llI; ""h '" Ih(", ",~p •. ~:I'v() luck 10";'1'0115 1'0511,on Ih" 1,1.".k I,u~h A IIIId wl"l() Iru~h,,~ IJ .IS ~hnwil III r'!1 11 10.
., ,
,
16. 4 Door lock and reta'l1"IIi screws
Fig. 11 .11 Romoving I h o door bell moulding (Sec 17) 9
The ,emilUldcr 01 I
ho rChllll1!) procedure .s the levelse 01 lhe rcmov~1 prOCedure .
17 Door window glilSS -removal and refining
Remove the door trim pilOel. as previously described. Ihen peel the plas lic sh ee ling away 110m ' he dool panel apertures. 2 Remove Ihe doO! bel l mouldlnU/Wealhf]rsllip assembly (see Fig. 11.11 ). 3 Wind up Ihe w,ndow glass. Ihen lemove 'he pivot plate screws. Remove Ihe four rellulmor lIem plme securrog screws or rivels . Disengage Ihe stu(ls and rOllers of the regulntor mms hom the door glass channel an(1 cmefully hit oul the \jlnss Allow Ihe regulalor 10 fall ilwily. piVOI,ng on Ihe legulmor hnndle shilli.
" When refi llin\j. initially Insert a snlall hloc k 01 wood in Ihe hOllom 01 Ille door assembly. locate Ihl} \)1,155 on Ihl} door panel. so thm il is leSl ,nu on Ih e woodell blo ck 5 locale lh e sluds nnd rolle,s ollhc ICUUI,lIOI ann 11110 ttw door IIlilSS ch~,ulel. I hen ICmpornrlly inswlllhc w,ndow handle and turn ,110 alton
Ihe ueilf pl,lle w'lh Ihe panel flxin!JS . SecIHe Ihe fllal~ 10 Ihe ,nner pnrlel. 6 loosely assmnhle Ihl} p,vOI pia!!!. Ihen Wind up tim UI,lSS ,1m! al'lIn
, I ,n Ihe Irame T,uhlell Ihe p,vOI 111;r1l! SCICWS 7 The remain(l el 01 Ihe rellHmU procedure IS the rev ..... se 01 Ihe .emoval proc(.~lu,e
1
FiU. 11 .1 0 Tho hlack (A) lHld whi:e (0) door lock bushes (Sec16)
Fig . 11 .1 2 Removing Ihe door window g lass (Sec 17)
procarmanuals.com
Page 186 of 205
) Chapter 11 Bodywork and fitting 185
18 Door window 'ramo -re moval and re litting
Remove the door !fUll pimo' as previously desclibed, Ihen paollho plas tic sheeting away from the lowe. door p;lnel apertures 2 RClllove Ihe door belt mouldinO/wCiJlherst,ip assembly. 3 lower Ihe window glllss, then peel back the lower front corne. of 1110 plastic shee tIng ilild remove Ihe felicclO' (where ilpplicablc) \0 g1\1n access 10 the I rOl1land rOil' lower fixing bolls.
hes t o the reilt of Iho fitSI Illouldm!l chp 7 S,)tinn Ihe real of the h;'lme 11110 the shell. so Ih.lt Ihe hame lies hdwcon Ihe 1.11.155 ,ltld Ihe outer p.l0,, 1. whIlst spml!J"'g the frame fr Ont eltlcal len pasl Ihe mouldln!! chi). so Ih,11 Ihls
TI\lhtrm Ihe holts 10 The .elnalnde. of t he fI:hlllllg plor-edur!.! IS II", IOVOIS" o f Iho removall)rocedure.
19 Window frame moulding ,md door weathers trips -removal and refitting
Where armlrc
Wllh Ihe doo. Ol)!.!". remove Ihe dip IrOIll 'he bOliom ollh!.! check ... rn 1)lvot l)lfl Ihen relllove tho .)Ul \I}holoj 2 SUllIlOtI the door on blocks of \'1/00<1. 3 Where doo. speOlkers Olre fIlled relllove Ih!.! Irllll !)OInel (Sec' ion 1 J) Ihen remove Ihe WirlllU from tire frolll etlu!.! of Ihe doOt.
4 Where rull pin typo hlllUfis ,lie hlled (eOlrly models) use
'A ,
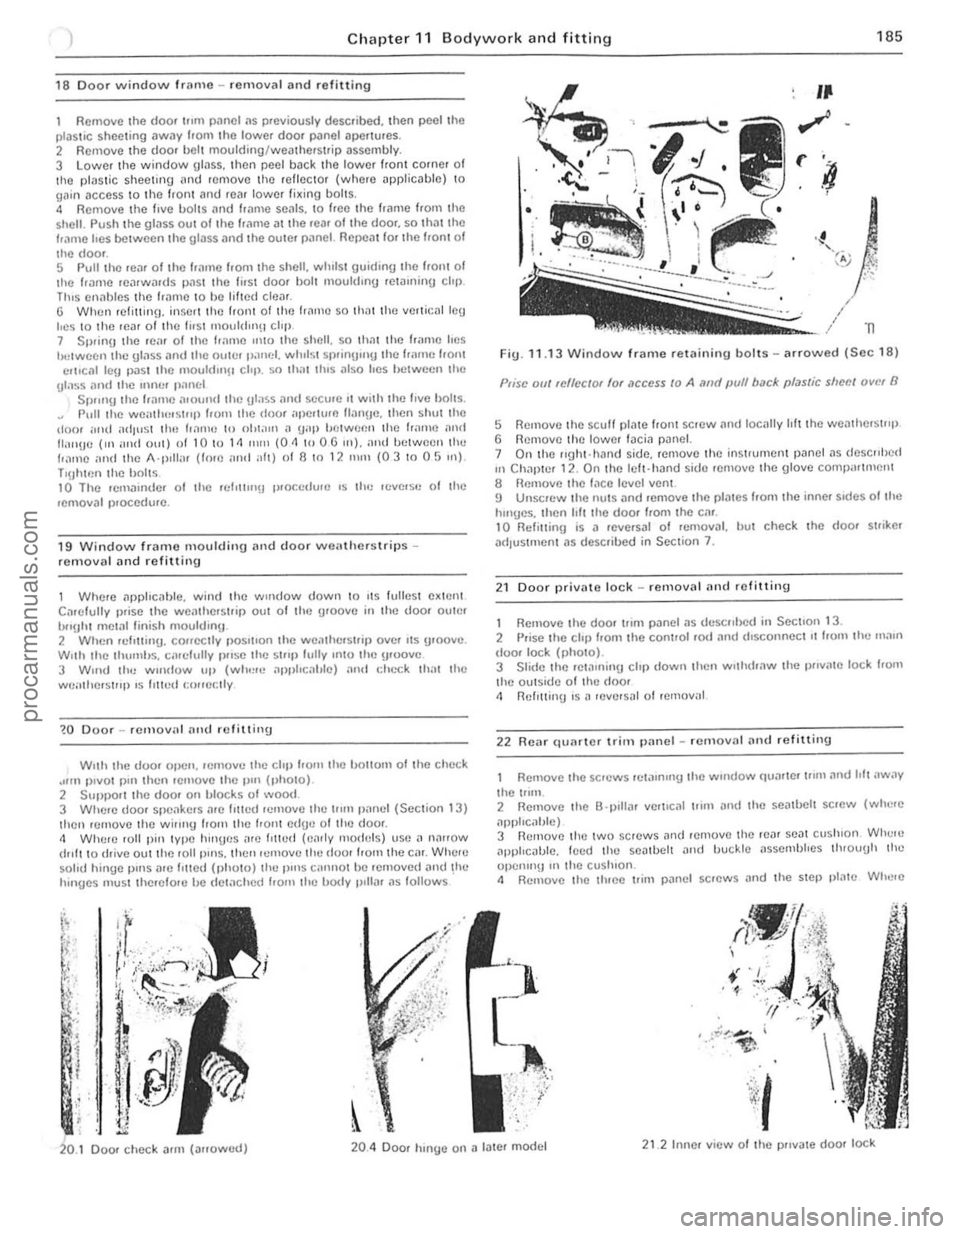
FiU. 11.13 Window frame relaining bolts - arrowed (Sec 18)
Prisc out rcllec/or (or ,1CCCSS to A "fld Imlf bock pli/stic slleel over B
5 Remove Ihe scuff "Iilte Itont sCrow and locally Irftlhe wOilther stllp (j Remove Iho lowor I~cia p~nel. 7 On Ihe lI(jhl·hnnd side. rOlllove Ihe instrument p,mel ilS describ ed
III Chilpter 12. On Ihe lelt·hOlnd sid!.! remOve Ihe glove compartment a Remove the Inco lovel vont. 9 UnsCtew the nu's OInd remove the plmes hom Ihe inner sidos of tire
l unges. Ihen Irlt Iho dOOf from t he Cill. 10 Reflllin(j is n reversal of tcmovOlI. but check the <100' striker adJustllwnt [IS desc ,ibed in Section 7.
2 1
Door privDte lock -removnl ilnd refitting
I Remove the doo. 111m panel DS desCtl bed in Secllon I J. 2 P rise the clip hom the control rod ;md d,sconnect It from the m,llll dOOf lock (pho.o).
3 Slide Ihe . e .arninu chp down th!.!n Wllhd.,lW Ihe pllva.e lock frOlll lire outsid!.! of the door 4 Rehllinu IS ,1 .everS
Remove the screws rel'llnlrlU Ihe wrndow
OIpp
ciltJle) 3 Remove Ihe twO screws [Inti remove Ille r!.!Dt seat cush ion Whele Jpplrc
4 Remove Ihe three 1Iim panel screws !llld the SIOI) 1)lilI!.! Wlre.e
, 20. 1 Door check Ollln (arrow!.!dj 20.4 Door hlnye on
, I
" :,
i
procarmanuals.com
Page 187 of 205
Chapter 11 Bodywork and fitting
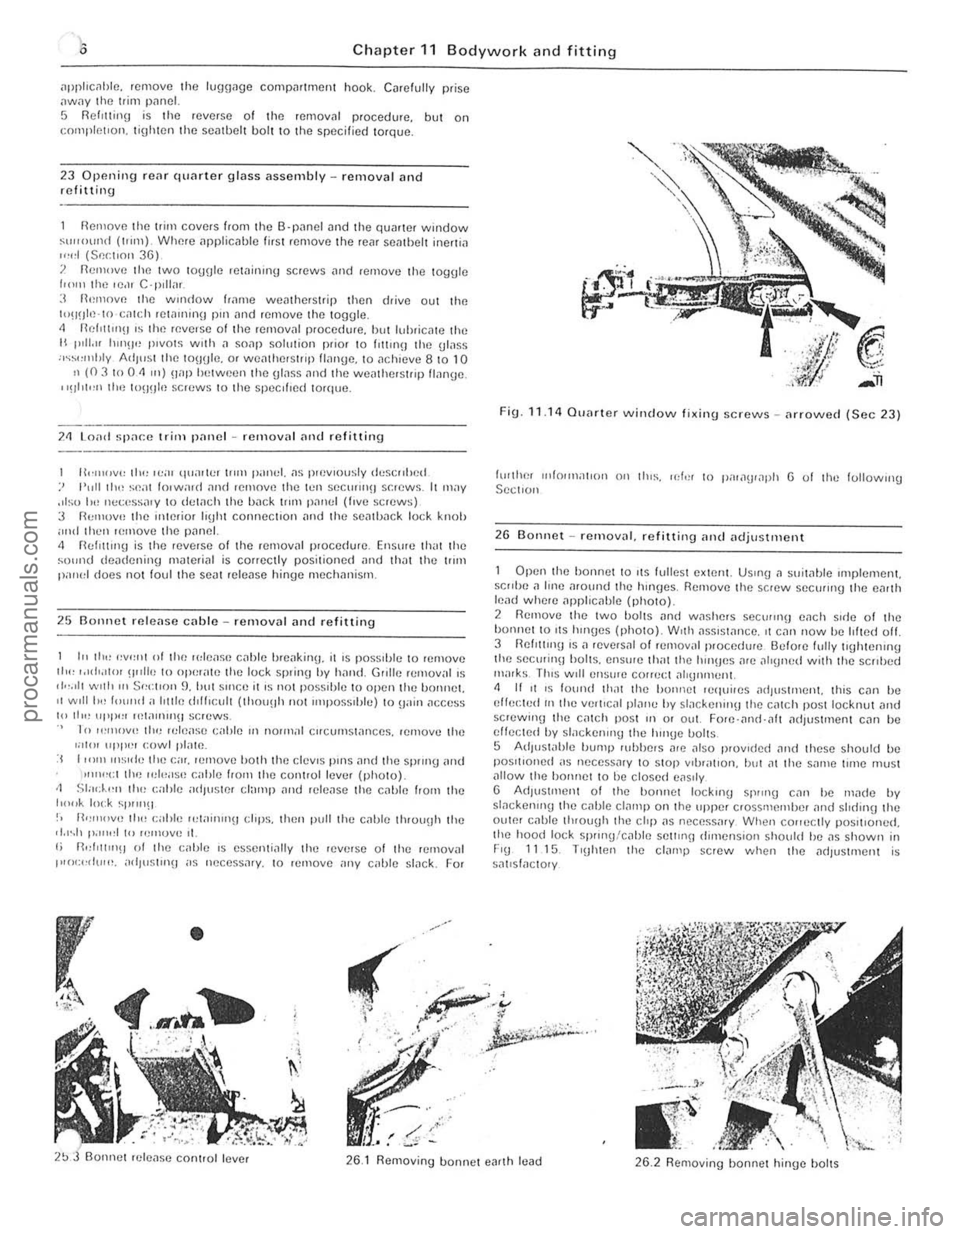
ilpphcolble. remove Ihe lugg,1ge COlllpillllllent book. Cilrefully prise ilwilY the trim pnneL 5 Ref,uing is the reverse of the rernovnl p,ocedure, but on cOll1pl elOoll, tighten Ihe semuelt bolt to the specif ied torque.
23 OPI)rlirlg reM qUMter glass ilssembly -removal and refittin g
flemove Ihe trim covers f,olll Ihe 8 -pilnel and the qUilrlCr willdow ~U"O\rr10 (1,un) Where ilpplicilble first remove Ihe reM seillbelt inerl i.) r",,1 (S"r.lro" 36) 1 R(!lllove Ihe two toUUfe rewinrn\j screws ilnd ,emove Ihe tog\jle (,om Ihe le,lI C'p ,lI;u
:I Hemove Ihe WIIlO OW frillllC wemhe'Slrip then d,ive oul Ihe 1"~t~Jlc-(() cill!:h relollnin" pill ilnd remove Ihe IOggle . <1 flr:fnllll!J IS Ihe reverse of the reillovill plOcedure, but luhricale the II p,t L" IUIl!I'! P'VOIS With il SOilP 50ltl1ion prior 10 hHrIlO Ihe Ulass :r~~""'''ty AdJusl Ihe IO!JOlc. or w Cillhe rS H'l) lIan\je. to ilcl\leve 8 to 10 n (03100 <1 In) !Flp hetween Ihe glass olnd the WeillherSlr,p flan\je.
I 'Uhl"" Ihe to!I!Jh ! screws to th e speclfred lorque.
211 Load spa,-e Irim panel -r e 'noval nnd re fitting
H",,,,,v,, Ih" ,(!ar
25 BOil net release c(lble -r e m ova l an d re fitting
I" It", <:v<:nl 01 Ih!) rdcn~e cilhle hreilking. it is posslhle 10 rerilOve Il,,, ,.Hir.llor !II ,lie to Otu""le Ihe lock spring hy hil"d. Grrllc rCrllov,,1 'S oI""tl With II, S,,,:tron 9. hul SUIC(! ii's nOI poss,hle to open Ihe bonnet. II WIlli", 1""11.1 a Iotlle d,lfl(;ull (lilou!lh nOlm,poss,bl(!) 10 WI in ilCCCSS 1011", 111'1>' " "~1aU""\I scrc ws. In """()VI~ II,,! ,,,ICilSC cabl!) II, normal CllcomS I,l n ces . rcn,ov!) Illc ,;,11" "Pl'u, cowl plain :1 I,,,,,, "'s,de IIie ca r. !(!1Il0VC bOlh Ihe cl(!vrs pins and tire sprlllg and ."""cl lire II!h,a se cahle fro", Ihe control le vcr (photo) II Sl;":~,',, 11 1I~ caht(! adJustcr elll"'p and release the cil bl!) /rO'll Ih!) h",k lock ~P""!I !-, n,,,,,,,ve It", c;,IJle "'''I,nn'!) clrps, th(!n plllllh(! cable th'oll!Jh the rI .... 1 1'"",,1 to re"'ove 11. I; n"frltrrl!1 01 Ihe cilhle IS essen li,lll y th(! 'eV(!rse of tir e r(!Ill oval PI(r<:,·rtUI". "dJIJ~t,ng ;1$ "(!cess.l!y. t o rCrilOve any cable slac k. For
•
Fig. 11 .1 4 QUMter windo w fixing screws _ .. rrowed (Sec 23)
lurllH), ,,,fonnatlon ou thiS. [(:1", II) pn,a\jlaph 6 of Ihe follow,,!U Scctron
2 6
Bonn et -removill, refitting and ildjuslnlCnt
Open 11l(! honne t 10 ,ts fulieSI eXlflnl. USrrlU n suiwble nnplemen!.
scrrhn .1 Irne around t he hrn!Jes, Remove Ihe screw seCUflllg Ihe enrlh le.ld where ,1ppircnble (photo).
2
Rcmove Ihe Iwo holts ilnd wnshers secu"no ench SIde of Ihe
bon"el 10 ItS hrnoes (phOIO)_ W'I" ass,swnce, , t C,ln IlOW he lofted off. 3 flefm"'(J IS ,) reve,s.,1 of remov,, 1 jlrocedure Before lullV "ulHenulU Ihe seCllri ll!1 holts, ensule Ih
y .
.. . . . ... .....
," . .. ~c.<
r ,:i~
;
.
' . ,., I ~.
26, 1 Removing bonnet enrth lead 26.2 Remov ing bonnel hinge boilS
procarmanuals.com
Page 188 of 205
r
) Chapter 11 Bodywork and fitting 187
16mm ~ 0.5 -1.0
( 0.63," t 0.0
19 ) -O.O~
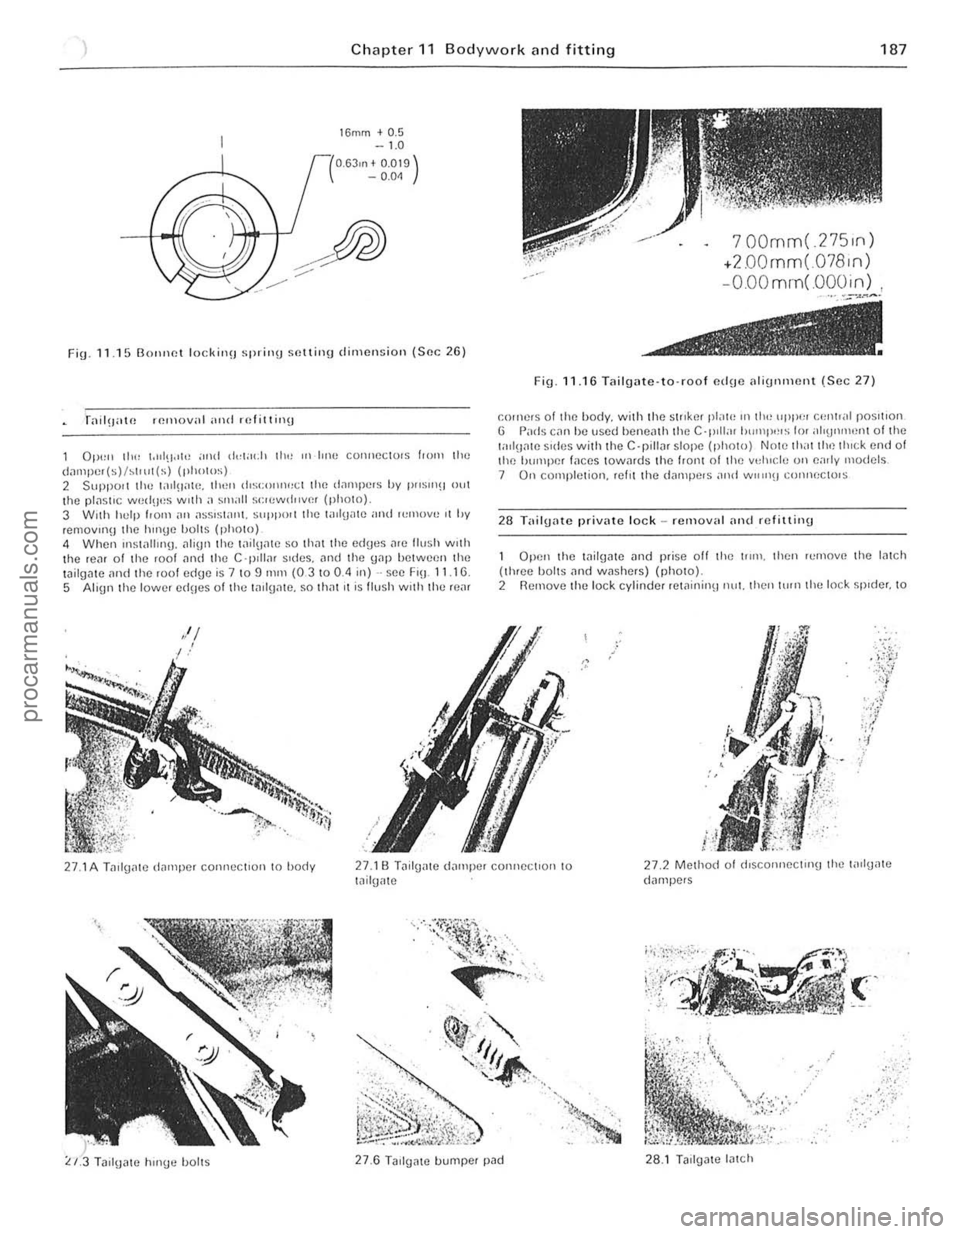
Fin. 11 .1 5 [30l1 ,1f!1 lock;,, !) ~p"iI1U ~(llling dimensi o n {Sec 26 }
OP"I) II", t."I!!,,!!, ;ond <1<:1;1(,11 Ih.: OIl hne COIHlCClOrs IWIll the d;;Jlllpcr(s)hlllll(S) (llh(l\OSj 2 SUppOI! the lilll!late. tIH!!l d'~<;'''lI1''cl the d;lIl1pc,S hy 11"5111(1 out the p11'l511(; w(!(IU',s w ith a sIu;,1I se:lcWdllVCI (photo). 3 With hulp foam an assI stan t. ~UPPOlt tile taIlgate and lumovu It I,y removlno the hmgc holls (photo) 4 When Ulstalilng. nh\jn the tnit~ID1C so thnt t he ed\jl.'s nrc flush wllh the ,ea, of the roof nnd the C 'p llla, s.des. nnd the \jnp hetween the l
700mm( 275,n )
.200rnm( 078,n)
-OOOmm(OOO,n
Fig .l1.16 Ta ilgate-to-roof eduo illiglllllf! llt (Sec 27)
f-Ol,H)rs of tho body. with the Sillkm plaH, III th,! lippe, ec,H",1 pos'tlon G Pints C,111 he used hcnC
Open the wilgate ilnd prise oft the trml. then ,,,Illove the Inleh (th,ee Loolts and wash&rs) (flhotoj. 2 Remove tl)() lock cylinder ,etninin\! nul. then tlUn thu lock spIder. to
" .' .'
27.1A Tnilg~te dampe, connl.'ctlon to body 27 .1 B Tailgate (fnmpe, con"cc\'orl to \ailgmc 272 Method of d,SCOllncC t."u the l
A:.' y ,<"
27.6 Tadgate bumper pad 28.1 Tailgate l
灲潣慲浡湵慬献捯m
Page 189 of 205
I 188 Chapter 11 Bodywork
H i " ,
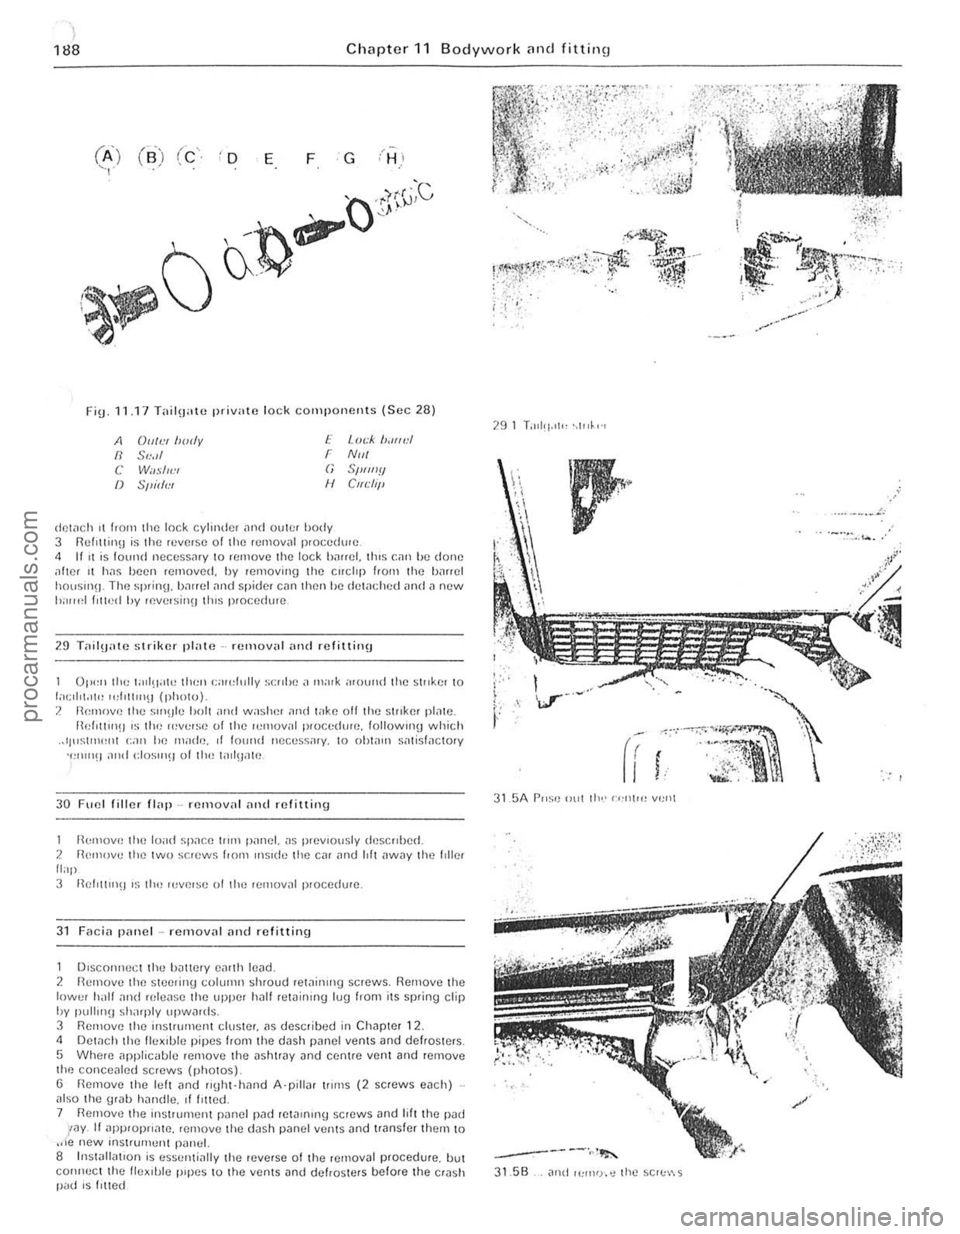
Fig_ 11 .17 T"il\J"w privnte lock components (Sec 28)
A Ollie. holly f' I.",:k ",,"':/
" S",II r NIII
C Wo,sl"."1 " S"IItI!) f) S"i!l,:1 " C UI;/i"
lIet
01'0:11 Ihe lad\F,le th"ll cn",llIliy ~c!lIJe ,I Ill,!rk ,uouml the s["ke, 10 1.1I:II,l.,I" ,,,1'11"11) (photo). 2 n(:lllOVI! the ~11l\)lc hoi! ;lIul w~she' null la k e off the striker plate_ He/,lllll!! 's tlw WV1"se of Ihe ,emoval p'ocedure. tolioWIl1!! which "lP'SI"',,"1 1';11) he "",dc, ,I fou"d neclJss,rry, [0 Ob[.1"l s.1lislaclUry -'''''''!) and elos'''!1 01 the I,HIU<1w
30 Fuel fiHer flnp -relllov,ll nlld refi\1il19
1 HCIllOV1! 2 Il{'m(jvc Il:rp
Ihe tir e lo"d space t'''l1 panel, as pwvlously descrIber!. two soews from Ills"je tire cm "nd hit ilw
31 Fnc;fj panel -removal ,md refitting
1 DISCOllll()c t the l)~ttcry earth le
I \., , If·
<-=::~~,
, ., ,.
F
rr
( . tl I . 't-... • . 'ftio:
31 5A r"su "ul 11,,· 1'I:1Il", v",nt
.' ..
------.,,!~
31_5B
procarmanuals.com
Page 190 of 205
-
) Chapter 11 Bodywork and fitting 189
/~
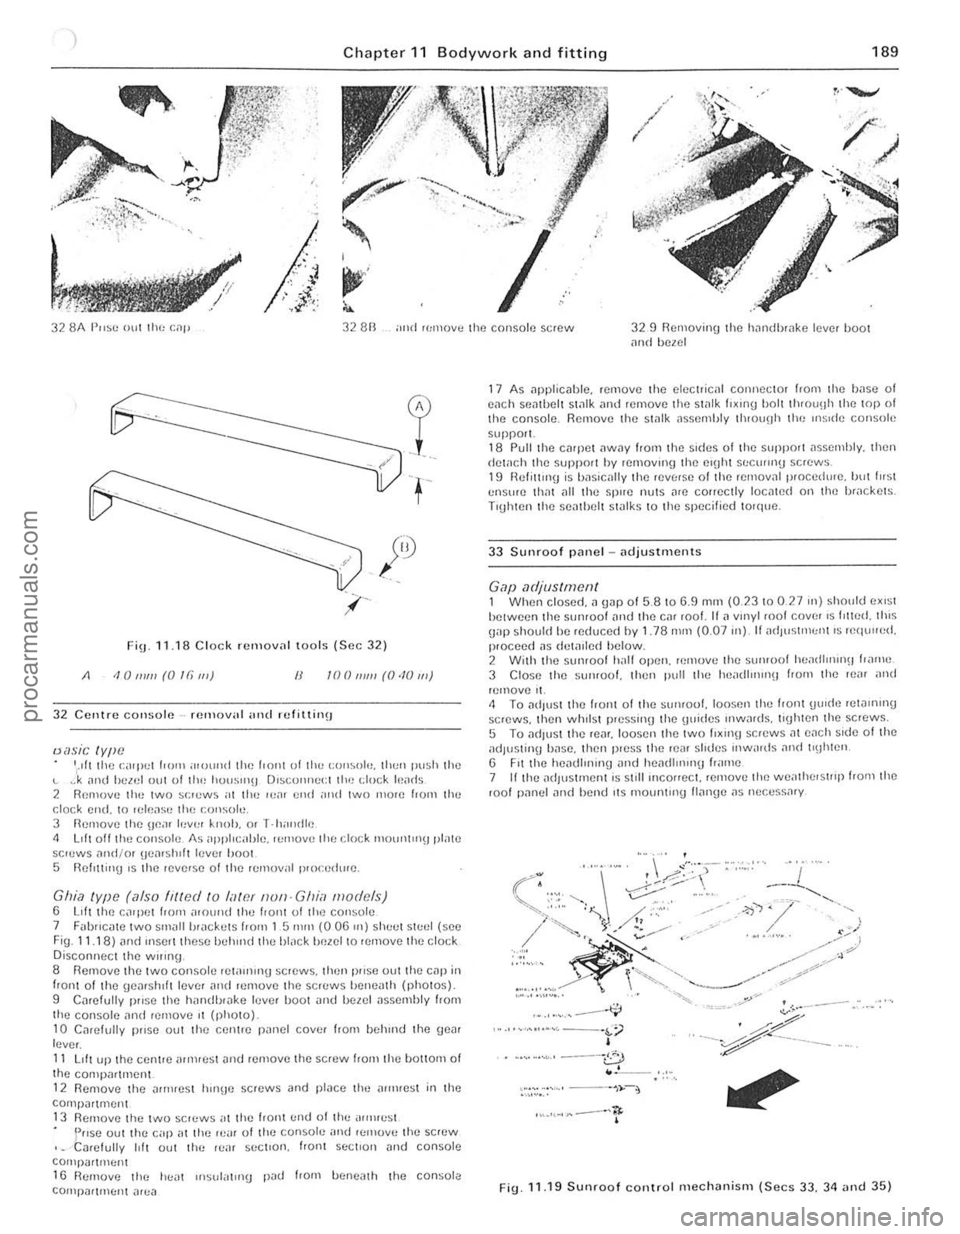
32 8A I',,~c 0111 Ihe alp 32 an ali(I ,(,mo .. c the console screw 329 Removing the hnndbrake lever boot find be~el
Fig.n.la C lock ro:.,,"ov
32 Centre cOIl~ole·· fUIllUV,,1 ,,,,d refiUinu
IJasic tYlle '.111 Ihe caqll:l 110m ;!lolllni the r'OIlI of t im t:()Il~()lo, thun push the " .J
33 Sunroof piln el -ndjustments
Gap adjustment 1 When closed. a Unp of 5 8 10 6.9 mm (0.2310 027 "') should eXI~t hetwecn thc slIn(oof and (h e CM rool. II;) vmyl roof cover IS lilted. Ih,s gap should he reduced by 1 .78 mm (0.07 Ill). If adlllst'!\(Jnl IS requued. pwceed ns detaIled below. 2 With the sunrool hall open. remove (he sunrool heildhlunll hnlne 3 Close the sUllfool. then pull Ihe hei!dhnll1H hOIll (he Ie." and remove ,I. 1 To ndlust the hOnl 01 the sumoo!. loosen the front Uu,de relillnu1U screws. then whIlst p,essu1!J (he Uuitles IIlwilrds. lighten thc screws. 5 To ;)d,ustthe rear. loosen (he twa h.II1!) screws nt eneh Side of the ,1dlustinU hnsc. thcn p,ess (he reilr shdes mw,uds ,1"d t'Uh!Cn . 6 F,t the hCildllmn(J and hemU",,,,U h,,,ne 7 lithe ild)lIsunenl is slill Incorrect. ,emove (he we,l\hel$I"p from Ille rool panel ;)11(1 hend ,IS mountll1g lIange as necessary
.,.,.'~ ..... ,,--...... ;;
• · .. ···"'·' -·0 . .'--
,"·""",-- 'r
FiU 11.19 Sunroof controllllechanism (Secs 33. 34 and 35)
, . , , , ,
I
,j
procarmanuals.com