driver FORD E SERIES 2015 4.G Owner's Guide
[x] Cancel search | Manufacturer: FORD, Model Year: 2015, Model line: E SERIES, Model: FORD E SERIES 2015 4.GPages: 360, PDF Size: 3.28 MB
Page 126 of 360
•Suppose your vehicle has a 1400 lb. (635 kg) cargo and luggage
capacity. You and one of your friends decide to pick up cement from
the local home improvement store to finish that patio you have been
planning for the past 2 years. Measuring the inside of the vehicle with
the rear seat folded down, you have room for 12-100 lb. (45 kg) bags
of cement. Do you have enough load capacity to transport the cement
to your home? If you and your friend each weigh 220 lb. (99 kg), the
calculation would be: 1400 - (2 x 220) - (12 x 100) = 1400 - 440 -
1200 = - 240 lb. No, you do not have enough cargo capacity to carry
that much weight. In metric units, the calculation would be: 635 kg -
(2 x 99 kg) - (12 x 45 kg) = 635 - 198 - 540 = -103 kg. You will need
to reduce the load weight by at least 240 lb. (104 kg). If you remove
3-100 lb. (45 kg) cement bags, then the load calculation would be:
1400 - (2 x 220) - (9 x 100) = 1400 - 440 - 900 = 60 lb. Now you have
the load capacity to transport the cement and your friend home. In
metric units, the calculation would be: 635 kg - (2 x 99 kg) - (9 x
45 kg) = 635 - 198 - 405 = 32 kg.
The above calculations also assume that the loads are positioned in your
vehicle in a manner that does not overload the Front or the Rear Gross
Axle Weight Rating specified for your vehicle on the Safety Compliance
Certification Label. The label shall be affixed to either the door hinge
pillar, door-latch post, or the door edge that meets the door-latch post,
next to the driver’s seating position.
Special Loading Instructions for Owners of Pick-up Trucks and
Utility-type Vehicles
WARNING:Loaded vehicles may handle differently than
unloaded vehicles. Extra precautions, such as slower speeds and
increased stopping distance, should be taken when driving a heavily
loaded vehicle.
Your vehicle can haul more cargo and people than most passenger cars.
Depending upon the type and placement of the load, hauling cargo and
people may raise the center of gravity of the vehicle.
Load Carrying125
2015 Econoline(eco)
Owners Guide gf, 1st Printing, June 2014
USA(fus)
Page 128 of 360
RECOMMENDED TOWING WEIGHTS
Note:Calculate the maximum trailer weight for all cutaway vehicles by
subtracting the weight of your vehicle (including incomplete vehicle
weight and payload, which includes second unit body weight, cargo and
passengers) from the gross combined weight. Otherwise, maximum
trailer weight is 10000 pounds (4536 kilograms).
Note:Do not exceed the trailer weight for your vehicle configuration
listed in the chart below.
Note:Make sure to take into consideration trailer frontal area. Do not
exceed 60 feet
2(5.57 meters2) trailer frontal area.
Note:Exceeding this limitation may significantly reduce the
performance of your towing vehicle. Selecting a trailer with a low
aerodynamic drag and rounded front design helps optimize performance
and fuel economy.
Note:For high altitude operation, reduce the gross combined weight by
2% per 1000 feet (300 meters) starting at the 1000 foot (300 meter)
elevation point.
Note:Certain states require electric trailer brakes for trailers over a
specified weight. Be sure to check state regulations for this specified
weight. The maximum trailer weights listed may be limited to this
specified weight, as your vehicle’s electrical system may not include the
wiring connector needed to use electric trailer brakes.
Your vehicle may tow a trailer provided the maximum trailer weight is
less than or equal to the maximum trailer weight listed for your vehicle
configuration on the following chart.
To calculate the maximum loaded trailer weight for your vehicle:
1. Start with the gross combined weight rating for your vehicle model
and axle ratio. See the following chart.
2. Subtract all of the following that apply to your vehicle:
•Vehicle curb weight
•Hitch hardware weight, such as a draw bar, ball, locks or weight
distributing
•Driver weight
•Passenger(s) weight
•Payload, cargo and luggage weight
•Aftermarket equipment weight.
3. This equals the maximum loaded trailer weight for this combination.
Note:The trailer tongue load figures into the payload for your vehicle.
Reduce the total payload by the final trailer tongue weight.
Towing127
2015 Econoline(eco)
Owners Guide gf, 1st Printing, June 2014
USA(fus)
Page 141 of 360
first. Do not exceed the weight limits specified on the certification label.
Exceeding any vehicle weight rating limitation could result in serious
damage to the vehicle, loss of vehicle control, vehicle rollover or personal
injury.
The van should be operated by an experienced driver. An organization
that owns a 15–passenger van should select one or two experienced
drivers to drive the van on a regular basis. These drivers will gain
valuable experience handling the van. This experience will help make
each trip safer.
The van should be operated at a safe speed which, in some conditions,
may be less than the posted speed limit.
Further, all occupants should be properly restrained. Most people killed
in rollover crashes were unbelted. Occupants can dramatically reduce
their risk of being killed or seriously injured in a rollover crash by simply
using their seat belts. Organizations that own 15–passenger vans should
have a written seat belt use policy. Drivers should be responsible for
enforcing the policy.
Emergency Maneuvers
WARNING:Vehicles with a higher center of gravity such as
utility and four-wheel drive vehicles handle differently than
vehicles with a lower center of gravity. Utility and four-wheel drive
vehicles arenotdesigned for cornering at speeds as high as passenger
cars any more than low-slung sports cars are designed to perform
satisfactorily under off-road conditions. Avoid sharp turns, excessive
speed and abrupt maneuvers in these vehicles. Failure to drive
cautiously could result in an increased risk of loss of vehicle control,
vehicle rollover, personal injury and death.
•In an unavoidable emergency situation where a sudden sharp turn
must be made, remember to avoid “over-driving” your vehicle, i.e.,
turn the steering wheel only as rapidly and as far as required to avoid
the emergency. Excessive steering will result in less vehicle control,
not more. Additionally, smooth variations of the accelerator and/or
brake pedal pressure should be utilized if changes in vehicle speed are
called for. Avoid abrupt steering, acceleration or braking which could
result in an increased risk of loss of vehicle control, vehicle rollover
and/or personal injury. Use all available road surface to return the
vehicle to a safe direction of travel.
•In the event of an emergency stop, avoid skidding the tires and do not
attempt any sharp steering wheel movements.
140Driving Hints
2015 Econoline(eco)
Owners Guide gf, 1st Printing, June 2014
USA(fus)
Page 145 of 360
WARNING:Never place floor mats or any other covering on top
of already installed floor mats. Floor mats should always rest on
top of vehicle carpeting surface and not another floor mat or other
covering. Additional floor mats or any other covering will reduce the
pedal clearance and potentially interfere with pedal operation.
WARNING:Check attachment of floor mats on a regular basis.
Always properly reinstall and secure floor mats that have been
removed for cleaning or replacement.
WARNING:Always make sure that objects cannot fall into the
driver foot well while the vehicle is moving. Objects that are
loose can become trapped under the pedals causing a loss of vehicle
control.
WARNING:Failure to properly follow floor mat installation or
attachment instructions can potentially cause interference with
pedal operation causing a loss of vehicle control.
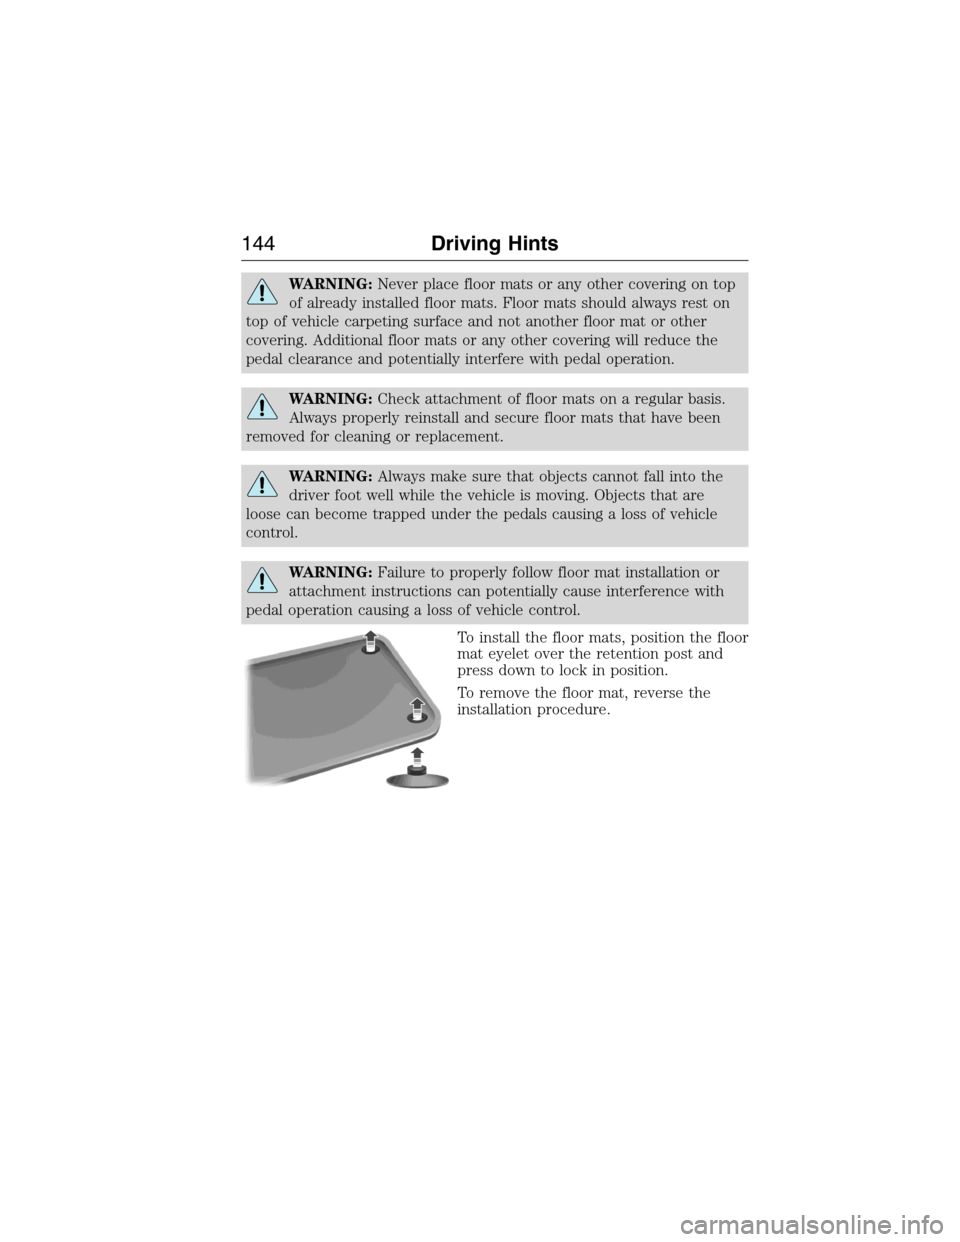
To install the floor mats, position the floor
mat eyelet over the retention post and
press down to lock in position.
To remove the floor mat, reverse the
installation procedure.
144Driving Hints
2015 Econoline(eco)
Owners Guide gf, 1st Printing, June 2014
USA(fus)
Page 195 of 360
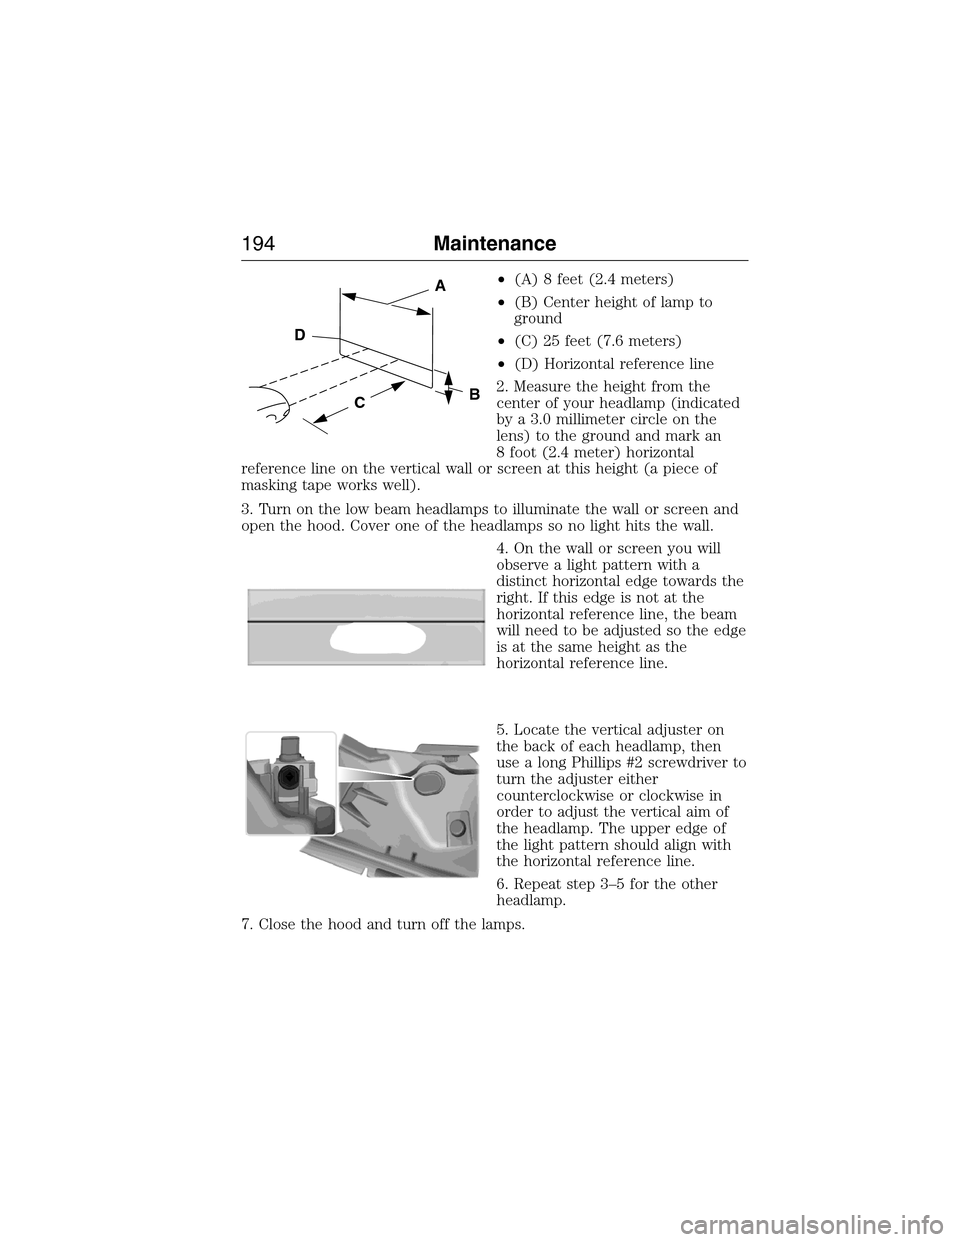
•(A) 8 feet (2.4 meters)
•(B) Center height of lamp to
ground
•(C) 25 feet (7.6 meters)
•(D) Horizontal reference line
2. Measure the height from the
center of your headlamp (indicated
by a 3.0 millimeter circle on the
lens) to the ground and mark an
8 foot (2.4 meter) horizontal
reference line on the vertical wall or screen at this height (a piece of
masking tape works well).
3. Turn on the low beam headlamps to illuminate the wall or screen and
open the hood. Cover one of the headlamps so no light hits the wall.
4. On the wall or screen you will
observe a light pattern with a
distinct horizontal edge towards the
right. If this edge is not at the
horizontal reference line, the beam
will need to be adjusted so the edge
is at the same height as the
horizontal reference line.
5. Locate the vertical adjuster on
the back of each headlamp, then
use a long Phillips #2 screwdriver to
turn the adjuster either
counterclockwise or clockwise in
order to adjust the vertical aim of
the headlamp. The upper edge of
the light pattern should align with
the horizontal reference line.
6. Repeat step 3–5 for the other
headlamp.
7. Close the hood and turn off the lamps.
C
A
B
D
194Maintenance
2015 Econoline(eco)
Owners Guide gf, 1st Printing, June 2014
USA(fus)
Page 204 of 360
Cleaning Plastic Exterior Parts
Use only approved products to clean plastic parts.
•For routine cleaning, use Motorcraft Detail Wash.
•If tar or grease spots are present, use Motorcraft Bug and Tar
Remover.
WAXING
Regular waxing is necessary to protect the paint on your car from the
elements. We recommend that you wash and wax the painted surface
once or twice a year.
When washing and waxing, park your vehicle in a shaded area out of
direct sunlight. Always wash your vehicle before applying wax.
•Use a quality wax that does not contain abrasives.
•Follow the manufacturer’s instructions to apply and remove the wax.
•Apply a small amount of wax in a back-and-forth motion, not in
circles.
•Do not allow wax to come in contact with any non-body (low-gloss
black) colored trim. The wax discolors or stains the parts over time,
such as:
•Bumpers
•Grained door handles
•Side mouldings
•Mirror housings
•Windshield cowl area.
•Do not apply wax to glass areas.
•After waxing, your car’s paint should feel smooth, and be free of
streaks and smudges.
REPAIRING MINOR PAINT DAMAGE
Your authorized dealer has touch-up paint to match your vehicle’s color.
Take your color code (printed on a sticker in the driver’s door jamb) to
an authorized dealer to make sure you get the correct color.
•Before repairing minor paint damage, use a cleaner such as Motorcraft
Bug and Tar Remover to remove particles such as bird droppings, tree
sap, insect deposits, tar spots, road salt and industrial fallout before
repairing paint chips.
•Always read the instructions before using the products.
Vehicle Care203
2015 Econoline(eco)
Owners Guide gf, 1st Printing, June 2014
USA(fus)
Page 207 of 360
CLEANING THE INSTRUMENT PANEL AND INSTRUMENT
CLUSTER LENS
WARNING:Do not use chemical solvents or strong detergents
when cleaning the steering wheel or instrument panel to avoid
contamination of the airbag system.
Note:Follow the same procedure as cleaning leather seats for cleaning
leather instrument panels and leather interior trim surfaces. See
Cleaning Leather Seatsin this chapter.
Clean the instrument panel and cluster lens with a clean, damp, white,
cotton cloth, then use a clean and dry, white, cotton cloth to dry these
areas.
•Avoid cleaners or polishes that increase the gloss of the upper portion
of the instrument panel. The dull finish in this area helps protect the
driver from undesirable windshield reflection.
•Be certain to wash or wipe your hands clean if you have been in
contact with certain products, such as insect repellent and suntan
lotion, in order to avoid possible damage to the interior painted
surfaces.
•Do not use household or glass cleaners as these may damage the
finish of the instrument panel, interior trim and cluster lens.
•Do not allow air fresheners and hand sanitizers to spill on interior
surfaces. If a spill occurs, wipe off immediately. Damage may not be
covered by your warranty.
If a staining liquid like coffee or juice has been spilled on the instrument
panel or on interior trim surfaces, clean as follows:
1. Wipe up spilled liquid using a clean, white, cotton cloth.
2. Use Motorcraft Premium Leather and Vinyl Cleaner or a commercially
available leather cleaning product for automotive interiors. Test any
cleaner or stain remover on an inconspicuous area.
3. Alternatively, wipe the surface with a damp, clean, white, cotton cloth
and a mild soap and water solution. Dry the area with a clean, soft cloth.
4. If necessary, apply more soap and water solution or cleaning product
to a clean, white, cotton cloth and press the cloth onto the soiled area.
Allow this to set at room temperature for 30 minutes.
206Vehicle Care
2015 Econoline(eco)
Owners Guide gf, 1st Printing, June 2014
USA(fus)
Page 216 of 360
•Standard load:A class of P-metric or Metric tires designed to carry a
maximum load at set pressure. For example: For P-metric tires 35 psi
(2.4 bar) or 36 (2.5 bar) depending on tire size and for Metric tires
36 psi (2.5 bar). Increasing the inflation pressure beyond this pressure
will not increase the tire capability.
•Extra load:A class of P-metric or Metric tires designed to carry a
heavier maximum load at 42 psi (2.9 bar). Increasing the inflation
pressure beyond this pressure will not increase the tire’s load-carrying
capability.
•kPa:KiloPascal, a metric unit of air pressure.
•PSI:Pounds per square inch, a standard unit of air pressure.
•Cold tire pressure:The tire pressure when the vehicle has been
stationary and out of direct sunlight for an hour or more and prior to
the vehicle being driven for 1 mile (1.6 kilometers).
•Recommended inflation pressure:The cold inflation pressure found
on the Safety Compliance Certification Label (affixed to either the
door hinge pillar, door-latch post, or the door edge that meets the
door-latch post, next to the driver’s seating position) or Tire Label
located on the B-Pillar or the edge of the driver’s door.
•B-pillar:The structural member at the side of the vehicle behind the
front door.
•Bead area of the tire:Area of the tire next to the rim.
•Sidewall of the tire:Area between the bead area and the tread.
•Tread area of the tire:Area of the perimeter of the tire that
contacts the road when mounted on the vehicle.
•Rim:The metal support (wheel) for a tire or a tire and tube assembly
upon which the tire beads are seated.
INFORMATION CONTAINED ON THE TIRE SIDEWALL
Both U.S. and Canada Federal regulations require tire manufacturers to
place standardized information on the sidewall of all tires. This
information identifies and describes the fundamental characteristics of
the tire and also provides a U.S. DOT Tire Identification Number for
safety standard certification and in case of a recall.
Wheels and Tires215
2015 Econoline(eco)
Owners Guide gf, 1st Printing, June 2014
USA(fus)
Page 219 of 360
J.Tire Ply Composition and Material Used:Indicates the number of
plies or the number of layers of rubber-coated fabric in the tire tread and
sidewall. Tire manufacturers also must indicate the ply materials in the
tire and the sidewall, which include steel, nylon, polyester, and others.
K.Maximum Load:Indicates the maximum load in kilograms and
pounds that can be carried by the tire. See the Safety Compliance
Certification Label (affixed to either the door hinge pillar, door-latch
post, or the door edge that meets the door-latch post, next to the
driver’s seating position), for the correct tire pressure for your vehicle.
L.Treadwear, Traction and Temperature Grades
•Treadwear:The treadwear grade is a comparative rating based on the
wear rate of the tire when tested under controlled conditions on a
specified government test course. For example, a tire graded 150
would wear one and one-half (1
12) times as well on the government
course as a tire graded 100.
•Traction:The traction grades, from highest to lowest, are AA, A, B,
and C. The grades represent the tire’s ability to stop on wet pavement
as measured under controlled conditions on specified government test
surfaces of asphalt and concrete. A tire marked C may have poor
traction performance.
•Temperature:The temperature grades are A (the highest), B and C,
representing the tire’s resistance to the generation of heat and its
ability to dissipate heat when tested under controlled conditions on a
specified indoor laboratory test wheel.
M.Maximum Inflation Pressure:Indicates the tire manufacturer’s
maximum permissible pressure or the pressure at which the maximum
load can be carried by the tire. This pressure is normally higher than the
vehicle manufacturer’s recommended cold inflation pressure, which can
be found on the Safety Compliance Certification Label (affixed to either
the door hinge pillar, door-latch post, or the door edge that meets the
door-latch post, next to the driver’s seating position), or Tire Label which
is located on the B-Pillar or the edge of the driver’s door. The cold
inflation pressure should never be set lower than the recommended
pressure on the vehicle label.
The tire suppliers may have additional markings, notes or warnings, such
as standard load or radial tubeless.
218Wheels and Tires
2015 Econoline(eco)
Owners Guide gf, 1st Printing, June 2014
USA(fus)
Page 222 of 360

Location of the Tire Label
You will find a Tire Label containing tire inflation pressure by tire size
and other important information located on the B-Pillar or the edge of
the driver’s door. See the payload description and graphic in theLoad
Carryingchapter.
INFLATING YOUR TIRES
Safe operation of your vehicle requires that your tires are properly
inflated. Remember that a tire can lose up to half of its air pressure
without appearing flat.
Every day before you drive, check your tires. If one looks lower than the
others, use a tire gauge to check pressure of all tires and adjust if
required.
At least once a month and before long trips, inspect each tire and check
the tire pressure with a tire gauge (including spare, if equipped). Inflate
all tires to the inflation pressure recommended by Ford Motor Company.
WARNING:Under-inflation is the most common cause of tire
failures and may result in severe tire cracking, tread separation
or blowout, with unexpected loss of vehicle control and increased risk
of injury. Under-inflation increases sidewall flexing and rolling
resistance, resulting in heat build-up and internal damage to the tire. It
also may result in unnecessary tire stress, irregular wear, loss of vehicle
control and accidents. A tire can lose up to half of its air pressure and
not appear to be flat!
You are strongly urged to buy a reliable tire pressure gauge, as automatic
service station gauges may be inaccurate. Ford recommends the use of a
digital or dial-type tire pressure gauge rather than a stick-type tire
pressure gauge.
Use the recommended cold inflation pressure for optimum tire
performance and wear. Under-inflation or over-inflation may cause
uneven treadwear patterns.
Always inflate your tires to the Ford recommended inflation pressure
even if it is less than the maximum inflation pressure information found
on the tire. The Ford recommended tire inflation pressure is found on
the Safety Compliance Certification Label (affixed to either the door
hinge pillar, door-latch post, or the door edge that meets the door-latch
post, next to the driver’s seating position), or Tire Label which is located
on the B-Pillar or the edge of the driver’s door. Failure to follow the tire
Wheels and Tires221
2015 Econoline(eco)
Owners Guide gf, 1st Printing, June 2014
USA(fus)