tow FORD EXPEDITION 2015 3.G Owners Manual
[x] Cancel search | Manufacturer: FORD, Model Year: 2015, Model line: EXPEDITION, Model: FORD EXPEDITION 2015 3.GPages: 564, PDF Size: 6.71 MB
Page 6 of 564
Driving Aids 230
Blind Spot Information System (BLIS) with Cross Traffic Alert
(CTA) .............................................230
Steering............................................235
Auto leveling suspension................................236
Load Carrying 237
Roof racks and load carriers.............................237
Vehicle loading.......................................238
Cargo management system..............................244
Towing 248
Trailertowing........................................248
Trailer brake controller-integrated.........................255
Wrecker towing......................................261
Recreational towing...................................262
Driving Hints 265
Economical driving....................................265
Floormats..........................................266
Roadside Emergencies 268
Getting roadside assistance..............................268
Hazard warning flashers................................270
Fuel cut-off switch....................................270
Jump-starting the vehicle...............................271
Customer Assistance 274
Reporting safety defects (U.S. only).......................281
Reporting safety defects (Canada only).....................281
Fuses 282
Changing a fuse......................................282
Fuse specification chart................................282
Table of Contents5
2015 Expedition(exd)
Owners Guide gf, 1st Printing, July 2014
USA(fus)
Page 10 of 564
ABOUT THIS MANUAL
Thank you for choosing Ford. We recommend that you take some time to
get to know your vehicle by reading this manual. The more that you
know about it, the greater the safety and pleasure you will get from
driving it.
WARNING:Always drive with due care and attention when
using and operating the controls and features on your vehicle.
Note:This manual describes product features and options available
throughout the range of available models, sometimes even before they
are generally available. It may describe options not fitted to your vehicle.
Note:Some of the illustrations in this manual may show features as used
in different models, so they may appear different to you on your vehicle.
Note:Always use and operate your vehicle in line with all applicable
laws and regulations.
Note:Pass on this manual when selling your vehicle. It is an integral
part of the vehicle.
This manual may qualify the location of a component as left-hand side or
right-hand side. The side is determined when facing forward in the seat.
A. Right-hand side
B. Left-hand side
Protecting the Environment
You must play your part in protecting the environment. Correct
vehicle usage and the authorized disposal of waste, cleaning
and lubrication materials are significant steps toward this aim.
A
B
Introduction9
2015 Expedition(exd)
Owners Guide gf, 1st Printing, July 2014
USA(fus)
Page 23 of 564
8. Remove remaining slack from the
belt. Force the seat down with extra
weight, for example, by pressing
down or kneeling on the child
restraint while pulling up on the
shoulder belt in order to force slack
from the belt.
This is necessary to remove the remaining slack that will exist once the
extra weight of the child is added to the child restraint. It also helps to
achieve the proper snugness of the child seat to your vehicle.
Sometimes, a slight lean toward the buckle will provide extra help to
remove remaining slack from the belt.
9. Attach the tether strap (if the child seat is equipped). SeeUsing
Tether Strapsin this chapter.
10. Before placing the child in the
seat, forcibly move the seat forward
and back to make sure the seat is
securely held in place.
To check this, grab the seat at the belt path and attempt to move it side
to side and forward and back. There should be no more than 1 inch (2.5
centimeters) of movement for proper installation.
Ford recommends checking with a NHTSA Certified Child Passenger
Safety Technician to make certain the child restraint is properly installed.
In Canada, check with your local St. John Ambulance office for referral
to a Child Passenger Safety Technician.
22Child Safety
2015 Expedition(exd)
Owners Guide gf, 1st Printing, July 2014
USA(fus)
Page 33 of 564
CHILD SEAT POSITIONING
WARNING:Airbags can kill or injure a child in a child seat.
Never place a rear-facing child seat in front of an active airbag. If
you must use a forward-facing child seat in the front seat, move the
vehicle seat upon which the child seat is installed all the way back.
When possible, all children age 12 and under should be properly
restrained in a rear seating position. If all children cannot be seated and
restrained properly in a rear seating position, properly restrain the
largest child in the front seat.
WARNING:Always carefully follow the instructions and
warnings provided by the manufacturer of any child restraint to
determine if the restraint device is appropriate for your child’s size,
height, weight, or age. Follow the child restraint manufacturer’s
instructions and warnings provided for installation and use in
conjunction with the instructions and warnings provided by your
vehicle manufacturer. A safety seat that is improperly installed or
utilized, is inappropriate for your child’s height, age or weight, or does
not properly fit the child, may increase the risk of serious injury or
death.
WARNING:Never let a passenger hold a child on his or her lap
while your vehicle is moving. The passenger cannot protect the
child from injury in a crash, which may result in serious injury or death.
WARNING:Never use pillows, books, or towels to boost a child.
They can slide around and increase the likelihood of injury or
death in a crash.
WARNING:Always restrain an unoccupied child seat or booster
seat. These objects may become projectiles in a crash or sudden
stop, which may increase the risk of serious injury.
32Child Safety
2015 Expedition(exd)
Owners Guide gf, 1st Printing, July 2014
USA(fus)
Page 53 of 564
CRASH SENSORS AND AIRBAG INDICATOR
WARNING:Modifying or adding equipment to the front end of
your vehicle (including frame, bumper, front end body structure
and tow hooks) may affect the performance of the airbag system,
increasing the risk of injury. Do not modify the front end of your
vehicle.
Your vehicle has a collection of crash and occupant sensors which
provide information to the restraints control module. The restraints
control module deploys (activates) the front safety belt pretensioners,
driver airbag, passenger airbag, seat mounted side airbags, and the
Safety Canopy. Based on the type of accident (frontal impact, side
impact or rollover) the restraints control module will deploy the
appropriate safety devices.
The restraints control module also monitors the readiness of the above
safety devices plus the crash and occupant sensors. The readiness of the
safety system is indicated by a warning indicator light in the instrument
cluster or by a backup tone if the warning light is not working. See the
Instrument Clusterchapter. Routine maintenance of the airbag is not
required.
A difficulty with the system is indicated by one or more of the following:
•The readiness light will either flash or stay lit.
•The readiness light will not illuminate immediately after the
ignition is turned on.
•A series of five beeps will be heard. The tone pattern will repeat
periodically until the problem or light are repaired.
If any of these things happen, even intermittently, have the supplemental
restraint system serviced at an authorized dealer immediately. Unless
serviced, the system may not function properly in the event of a crash.
The safety belt pretensioners and the airbag supplemental restraint
system are designed to activate when the vehicle sustains frontal or
sideways deceleration sufficient to cause the restraints control module to
deploy a safety device or when a certain likelihood of a rollover event is
detected by the rollover sensor.
52Supplementary Restraints System
2015 Expedition(exd)
Owners Guide gf, 1st Printing, July 2014
USA(fus)
Page 55 of 564
PRINCIPLE OF OPERATION
The remote control allows you to:
•remotely lock or unlock the vehicle doors
•remotely open the power liftgate (if equipped)
•remotely start or stop the engine (if equipped)
•arm and disarm the anti-theft system (if equipped)
•activate the panic alarm
GENERAL INFORMATION ON RADIO FREQUENCIES
This device complies with part 15 of the FCC Rules and with Industry
Canada license-exempt RSS standard(s). Operation is subject to the
following two conditions: (1) This device may not cause harmful
interference, and (2) This device must accept any interference received,
including interference that may cause undesired operation.
Note:Changes or modifications not expressly approved by the party
responsible for compliance could void the user’s authority to operate the
equipment. The termICbefore the radio certification number only
signifies that Industry Canada technical specifications were met.
The typical operating range for your transmitter is approximately 33 feet
(10 meters). Vehicles with the remote start feature will have a greater
range. A decrease in operating range could be caused by:
•weather conditions
•nearby radio towers
•structures around your vehicle
•other vehicles parked next to your vehicle.
The radio frequency used by your remote control can also be used by
other short-distance radio transmissions, for example amateur radios,
medical equipment, wireless headphones, remote controls and alarm
systems. If the frequencies are jammed, you will not be able to use your
remote control. You can lock and unlock the doors with the key.
Note:Make sure your vehicle is locked before leaving it unattended.
Note:If you are in range, the remote control will operate if you press
any button unintentionally.
54Keys and Remote Control
2015 Expedition(exd)
Owners Guide gf, 1st Printing, July 2014
USA(fus)
Page 81 of 564
Replacement Keys
Note:Your vehicle may come with two integrated keyhead transmitters.
The integrated keyhead transmitter functions as a programmed ignition
key that operates all the locks and starts the vehicle, as well as a remote
control.
If your programmed transmitters or standard SecuriLock coded keys are
lost or stolen and you do not have an extra coded key, you will need to
have your vehicle towed to an authorized dealer. The key codes need to
be erased from your vehicle and new coded keys will need to be
programmed.
Store an extra programmed key away from the vehicle in a safe place to
help prevent any inconveniences. See an authorized dealer to purchase
additional spare or replacement keys.
Programming a Spare Key
Note:A maximum of eight coded keys can be programmed to your
vehicle. Only four of these eight can be integrated keyhead transmitters.
You can program your own integrated keyhead transmitters or standard
SecuriLock coded keys to your vehicle. This procedure will program both
the engine immobilizer key code and the remote entry portion of the
remote control to your vehicle.
Only use integrated keyhead transmitters or standard SecuriLock keys.
You must have two previously programmed coded keys and the new
unprogrammed key readily accessible. See your authorized dealer to have
the spare key programmed if two previously programmed coded keys are
not available.
Read and understand the entire procedure before you begin.
1. Insert the first previously programmed coded key into the ignition.
2. Turn the ignition from off to on. Keep the ignition on for at least three
seconds, but no more than 10 seconds.
3. Turn the ignition off and remove the first coded key from the ignition.
4. After three seconds but within 10 seconds of turning the ignition off,
insert the second previously coded key into the ignition.
5. Turn the ignition from off to on. Keep the ignition on for at least three
seconds, but no more than 10 seconds.
80Security
2015 Expedition(exd)
Owners Guide gf, 1st Printing, July 2014
USA(fus)
Page 82 of 564
6. Turn the ignition off and remove the second previously programmed
coded key from the ignition.
7. After three seconds but within 20 seconds of turning the ignition off
and removing the previously programmed coded key, insert the new
unprogrammed key into the ignition.
8. Turn the ignition from off to on. Keep the ignition on for at least six
seconds.
9. Remove the newly programmed coded key from the ignition.
The key will start the vehicle’s engine and will operate the remote entry
system (if the new key is an integrated keyhead transmitter) if it has
been successfully programmed. The theft indicator light will illuminate
for three seconds and then go out to indicate successful programming.
If the key was not successfully programmed, the theft indicator light may
flash on and off. Wait 20 seconds and repeat Steps 1 through 8. Take
your vehicle to your authorized dealer to have the new key programmed
if you are still unsuccessful.
Wait 20 seconds and then repeat this procedure from Step 1 to program
an additional key.
Intelligent Access Key (if equipped)
Your intelligent access key functions as a programmed key that operates
the driver door lock and activates intelligent access with the push button
start system, or the remote start system. If your programmed intelligent
access transmitters are lost or stolen, and you do not have an extra
coded key, you will need to have your vehicle towed to an authorized
dealer. Your dealer will erase the key codes from your vehicle and
program new coded keys. Store an extra programmed key away from the
vehicle in a safe place to help prevent any inconvenience. See your
authorized dealer to purchase additional spare or replacement keys.
Programming a Spare Intelligent Access Key
See an authorized dealer to have additional keys programmed to your
vehicle.
Security81
2015 Expedition(exd)
Owners Guide gf, 1st Printing, July 2014
USA(fus)
Page 91 of 564
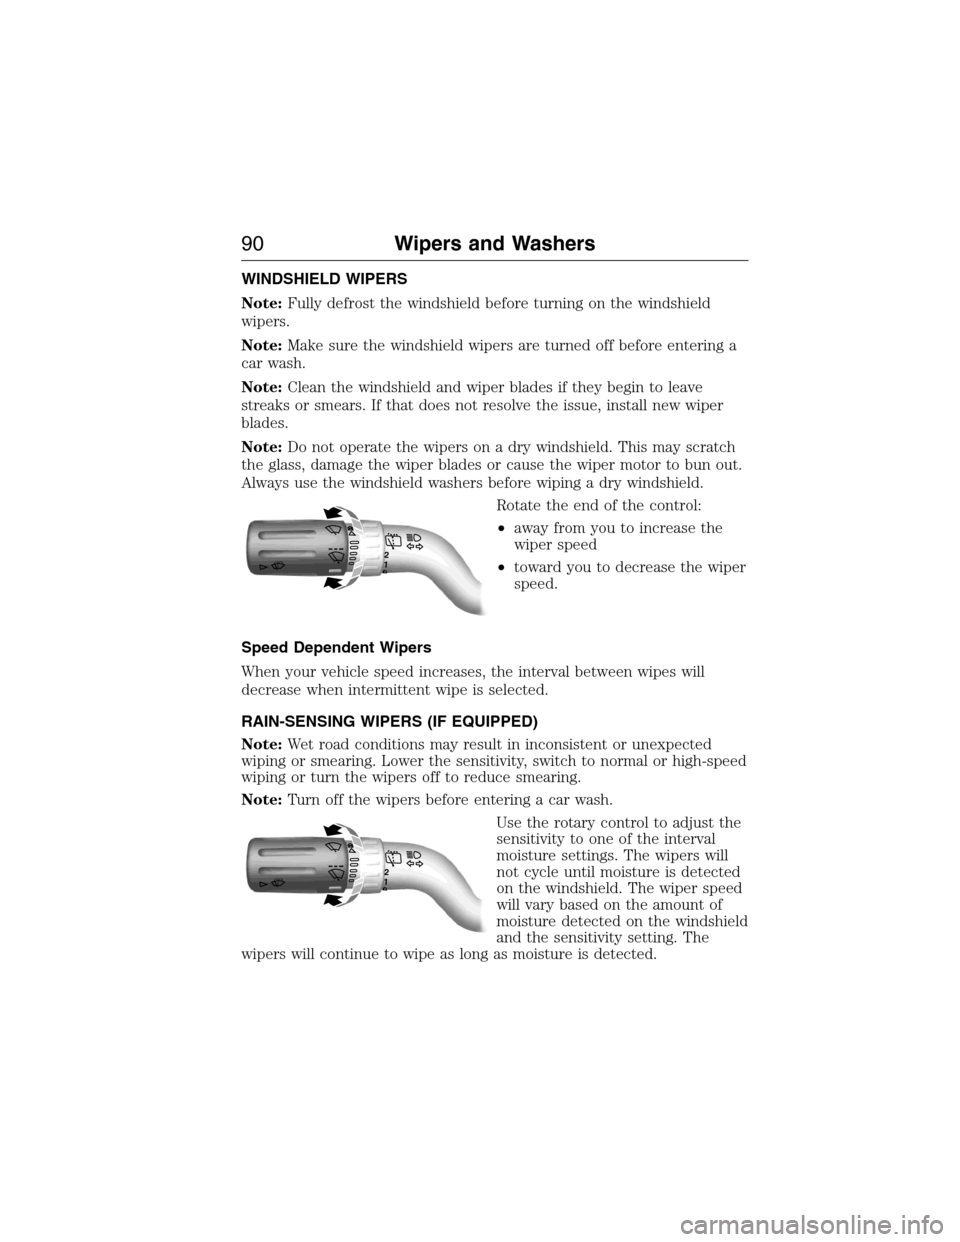
WINDSHIELD WIPERS
Note:Fully defrost the windshield before turning on the windshield
wipers.
Note:Make sure the windshield wipers are turned off before entering a
car wash.
Note:Clean the windshield and wiper blades if they begin to leave
streaks or smears. If that does not resolve the issue, install new wiper
blades.
Note:Do not operate the wipers on a dry windshield. This may scratch
the glass, damage the wiper blades or cause the wiper motor to bun out.
Always use the windshield washers before wiping a dry windshield.
Rotate the end of the control:
•away from you to increase the
wiper speed
•toward you to decrease the wiper
speed.
Speed Dependent Wipers
When your vehicle speed increases, the interval between wipes will
decrease when intermittent wipe is selected.
RAIN-SENSING WIPERS (IF EQUIPPED)
Note:Wet road conditions may result in inconsistent or unexpected
wiping or smearing. Lower the sensitivity, switch to normal or high-speed
wiping or turn the wipers off to reduce smearing.
Note:Turn off the wipers before entering a car wash.
Use the rotary control to adjust the
sensitivity to one of the interval
moisture settings. The wipers will
not cycle until moisture is detected
on the windshield. The wiper speed
will vary based on the amount of
moisture detected on the windshield
and the sensitivity setting. The
wipers will continue to wipe as long as moisture is detected.
12
12
90Wipers and Washers
2015 Expedition(exd)
Owners Guide gf, 1st Printing, July 2014
USA(fus)
Page 93 of 564
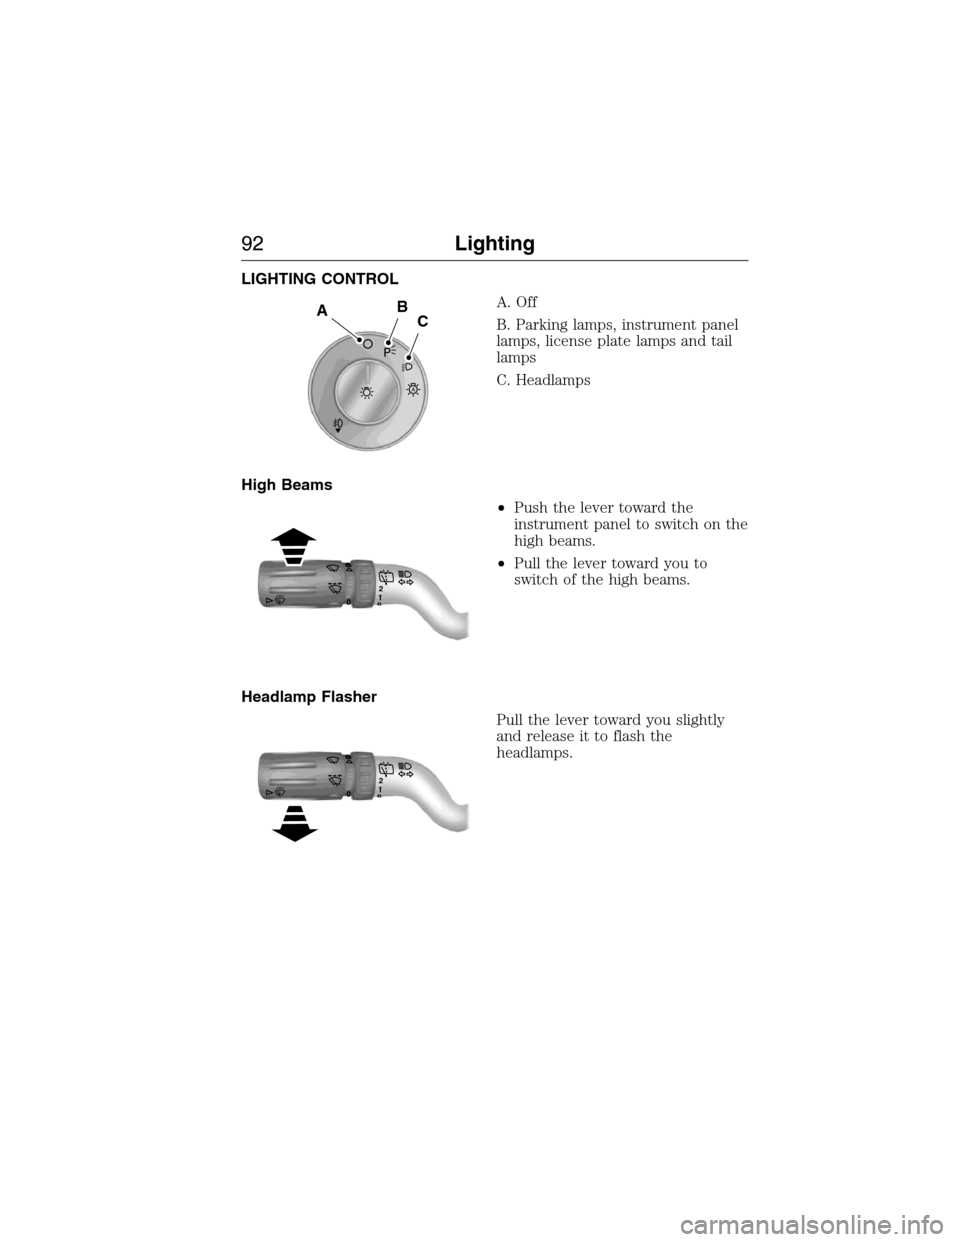
LIGHTING CONTROL
A. Off
B. Parking lamps, instrument panel
lamps, license plate lamps and tail
lamps
C. Headlamps
High Beams
•Push the lever toward the
instrument panel to switch on the
high beams.
•Pull the lever toward you to
switch of the high beams.
Headlamp Flasher
Pull the lever toward you slightly
and release it to flash the
headlamps.
A
ABC
120
120
92Lighting
2015 Expedition(exd)
Owners Guide gf, 1st Printing, July 2014
USA(fus)