FORD F-450 2022 Manual PDF
Manufacturer: FORD, Model Year: 2022, Model line: F-450, Model: FORD F-450 2022Pages: 740, PDF Size: 12.6 MB
Page 71 of 740
•
A connected Bluetooth® enabled
phone must have adequate network
coverage, battery power and signal
strength.
• The vehicle must have battery power
and be located in the U.S., Canada or
in a territory in which 911 is the
emergency number.
Note: If any user sets 911 Assist to on or off,
that setting applies for all paired phones. If
911 Assist is off and the phone connected
to SYNC, an icon displays on the status bar.
Note: Every phone operates differently.
While SYNC 911 Assist works with most
cellular phones, some may have trouble
using this feature.
Privacy Notice
When you switch on 911 Assist, it may
disclose to emergency services that your
vehicle has been in a crash involving the
deployment of an airbag or activation of
the fuel pump shut-off. Certain versions or
updates to 911 Assist may also be capable
of electronically or verbally disclosing to
911 operators your vehicle location or other
details about your vehicle or crash to assist
911 operators to provide the most
appropriate emergency services. If you do
not want to disclose this information, do
not switch the feature on.
EMERGENCY CALL
LIMITATIONS
The SYNC 911 Assist feature only operates
in the U.S., Canada or in a territory in which
911 is the emergency number. The following
are limitations of this feature: •
Your cellular phone or 911 Assist
hardware sustains damage in a crash.
• The vehicle's battery or the SYNC
system has no power.
• The phone(s) thrown from your vehicle
are the ones paired and connected to
the system.
68
2022 Super Duty (TFE) Canada/United States of America, enUSA, Edition date: 202103, First-Printing 911 Assist
Page 72 of 740
REMOTE CONTROL
LIMITATIONS
WARNING: Changes or
modifications not expressively approved
by the party responsible for compliance
could void the user's authority to operate
the equipment. The term "IC:" before the
radio certification number only signifies
that Industry Canada technical
specifications were met.
This device complies with Part 15 of the
FCC Rules and with Industry Canada
license-exempt RSS standard(s).
Operation is subject to the following two
conditions: (1) This device may not cause
harmful interference, and (2) This device
must accept any interference received,
including interference that may cause
undesired operation.
Make sure a valid remote control is within
5 ft (1.5 m)
from the front door handles
and rear of vehicle.
The system may not function if:
• The remote control remains stationary
for about a minute.
• The vehicle battery has no charge.
• The remote control battery has no
charge.
• There is interference causing issues
with the remote control frequencies.
• The remote control is too close to
metal objects or electronic devices, for
example keys or a cell phone.
USING THE REMOTE CONTROL
Use your remote control to access various
vehicle systems.
Note: The buttons on your remote may vary
depending on the vehicle region or options. Unlock Press the button to unlock all
doors. See
Unlocking and
Locking the Doors Using the
Remote Control
(page 83).
Lock Press the button to lock all
doors. See
Unlocking and
Locking the Doors Using the
Remote Control
(page 83).
Remote Start
(If Equipped) Press the button to remote start.
See
Remotely Starting and
Stopping the Vehicle (page
146).
Tailgate
(If Equipped) Press the button to open the
tailgate. See
Opening the
Tailgate Using the Remote
Control
(page 99).
Panic Alarm
(If Equipped) Press the button to sound the
panic alarm. See Sounding the
Panic Alarm
(page 70).
OPENING AND CLOSING THE
FLIP KEY
Opening Your Flip Key
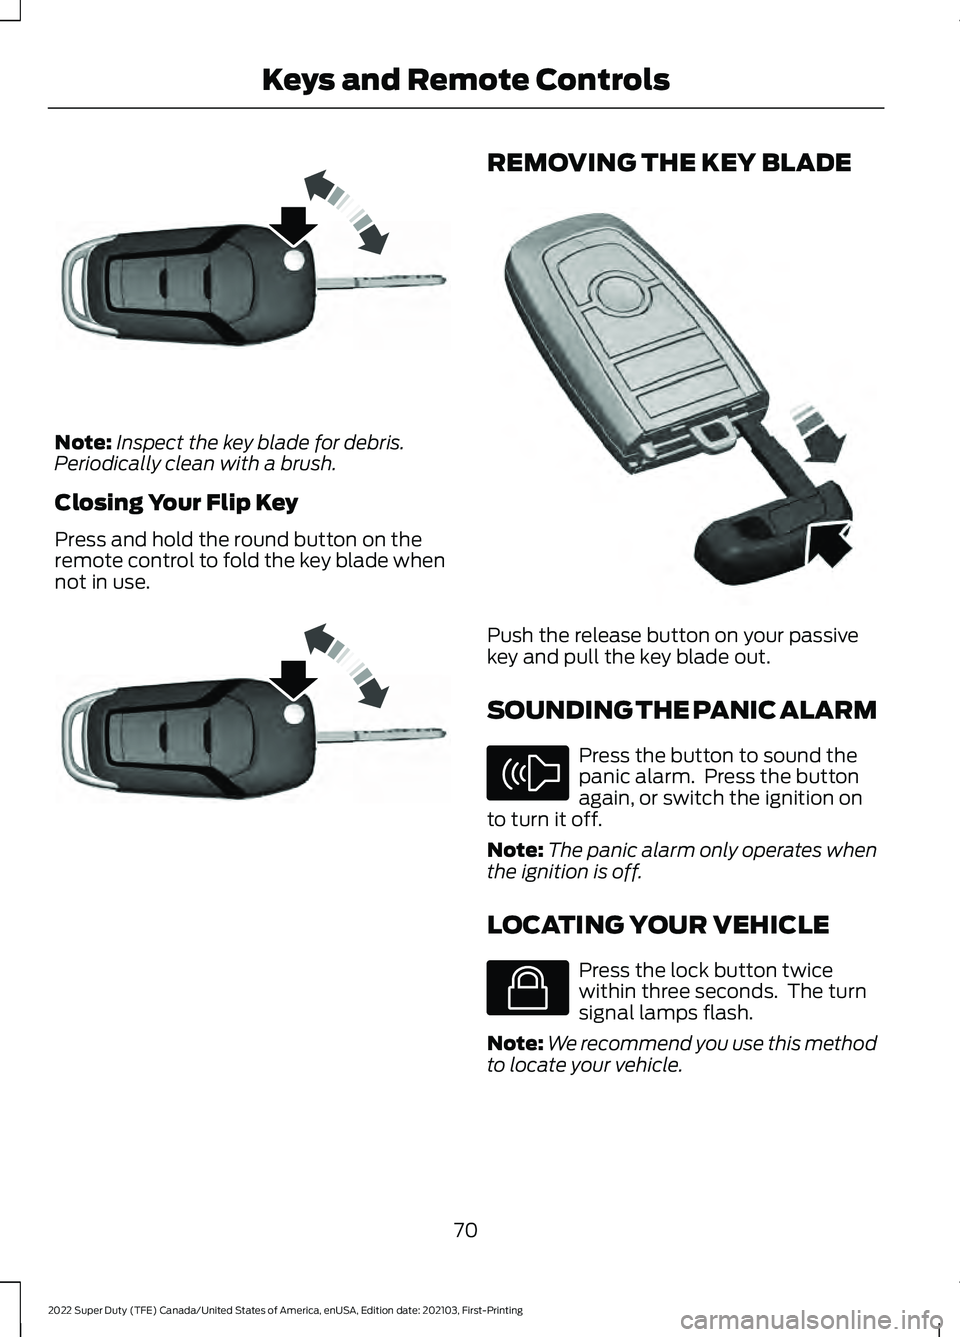
Press the round button on the remote
control to extend the flip key.
69
2022 Super Duty (TFE) Canada/United States of America, enUSA, Edition date: 202103, First-Printing Keys and Remote ControlsE138629 E138623 E138625 E191530 E138624
Page 73 of 740
Note:
Inspect the key blade for debris.
Periodically clean with a brush.
Closing Your Flip Key
Press and hold the round button on the
remote control to fold the key blade when
not in use. REMOVING THE KEY BLADE
Push the release button on your passive
key and pull the key blade out.
SOUNDING THE PANIC ALARM
Press the button to sound the
panic alarm. Press the button
again, or switch the ignition on
to turn it off.
Note: The panic alarm only operates when
the ignition is off.
LOCATING YOUR VEHICLE Press the lock button twice
within three seconds. The turn
signal lamps flash.
Note: We recommend you use this method
to locate your vehicle.
70
2022 Super Duty (TFE) Canada/United States of America, enUSA, Edition date: 202103, First-Printing Keys and Remote ControlsE191532 E191532 E322866 E138624 E138623
Page 74 of 740
CHANGING THE REMOTE
CONTROL BATTERY
WARNING: Keep batteries away
from children to prevent ingestion.
Failure to follow this instruction could
result in personal injury or death. If
ingested, immediately seek medical
attention. WARNING:
If the battery
compartment does not securely close,
stop using the remote control and
replace it as soon as possible. In the
meantime, keep the remote control away
from children. Failure to follow this
instruction could result in personal injury
or death.
The remote control uses one coin-type
3-volt lithium battery CR2450 or
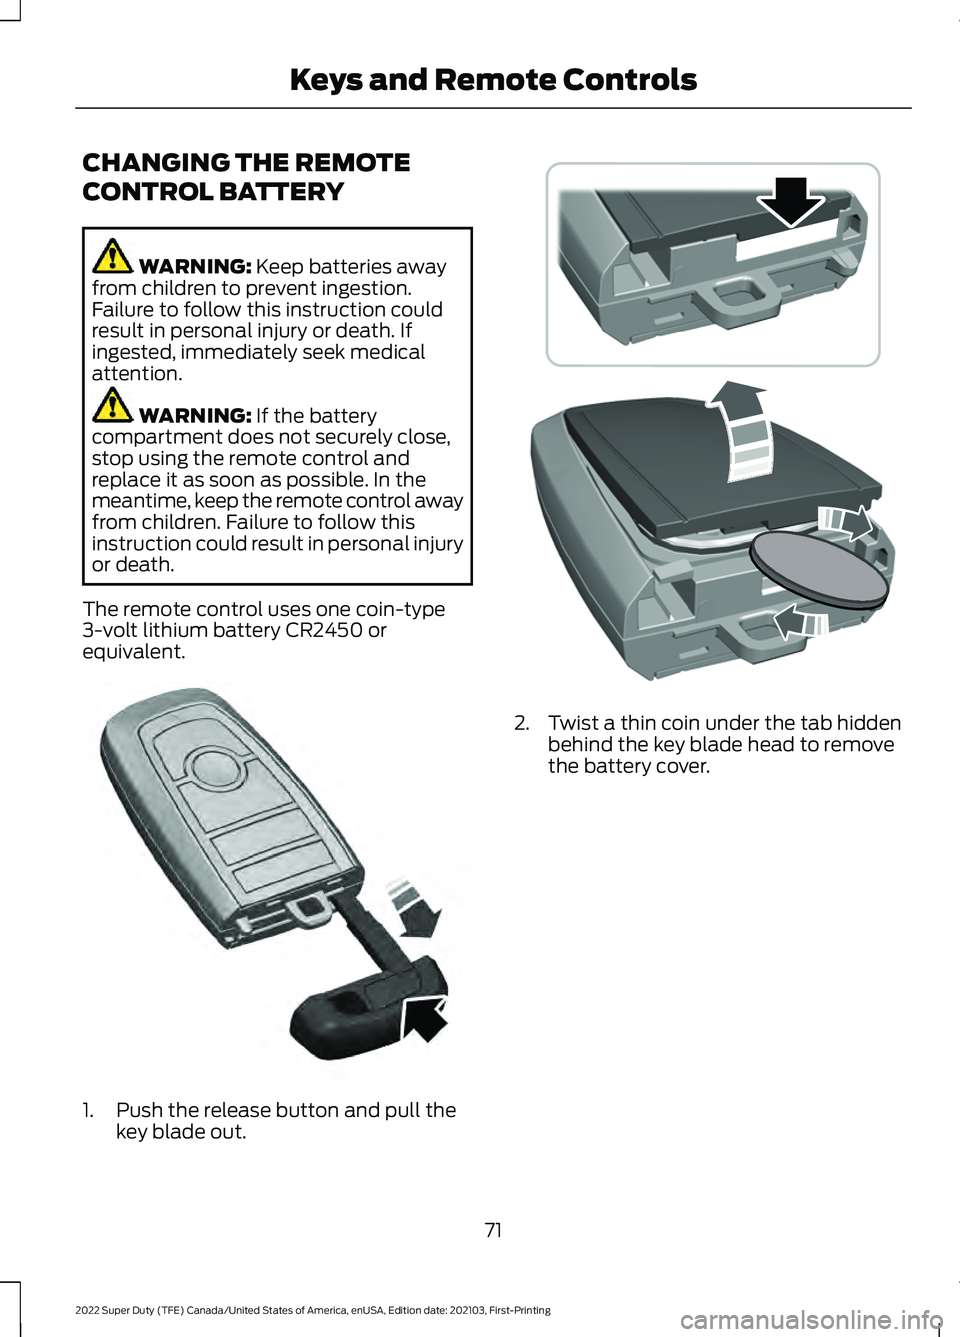
equivalent. 1. Push the release button and pull the
key blade out. 2. Twist a thin coin under the tab hidden
behind the key blade head to remove
the battery cover.
71
2022 Super Duty (TFE) Canada/United States of America, enUSA, Edition date: 202103, First-Printing Keys and Remote ControlsE322866 E303824
Page 75 of 740
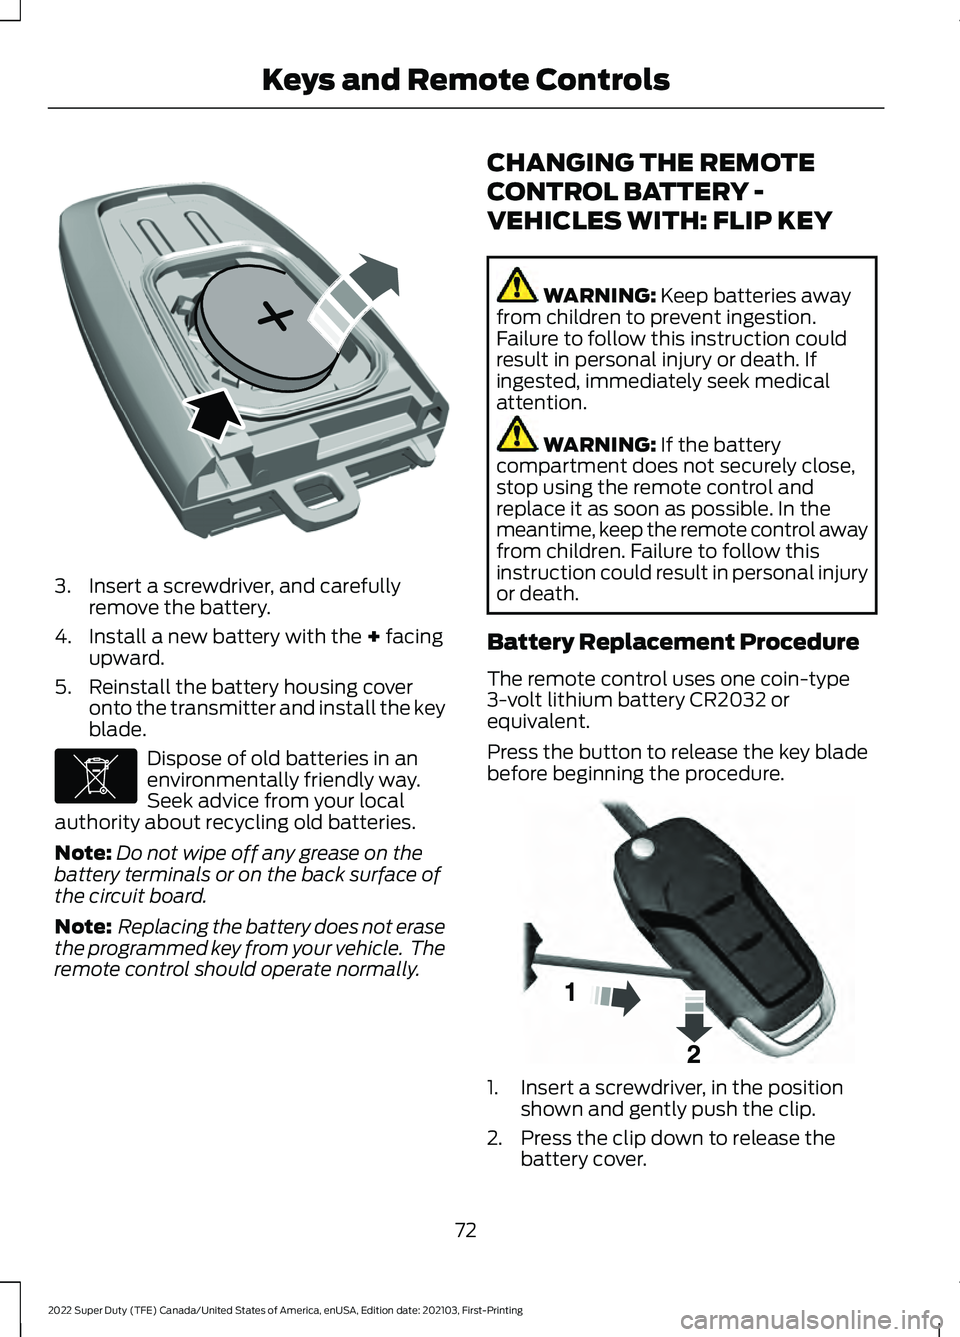
3. Insert a screwdriver, and carefully
remove the battery.
4. Install a new battery with the + facing
upward.
5. Reinstall the battery housing cover onto the transmitter and install the key
blade. Dispose of old batteries in an
environmentally friendly way.
Seek advice from your local
authority about recycling old batteries.
Note: Do not wipe off any grease on the
battery terminals or on the back surface of
the circuit board.
Note: Replacing the battery does not erase
the programmed key from your vehicle. The
remote control should operate normally. CHANGING THE REMOTE
CONTROL BATTERY -
VEHICLES WITH: FLIP KEY WARNING:
Keep batteries away
from children to prevent ingestion.
Failure to follow this instruction could
result in personal injury or death. If
ingested, immediately seek medical
attention. WARNING:
If the battery
compartment does not securely close,
stop using the remote control and
replace it as soon as possible. In the
meantime, keep the remote control away
from children. Failure to follow this
instruction could result in personal injury
or death.
Battery Replacement Procedure
The remote control uses one coin-type
3-volt lithium battery CR2032 or
equivalent.
Press the button to release the key blade
before beginning the procedure. 1. Insert a screwdriver, in the position
shown and gently push the clip.
2. Press the clip down to release the battery cover.
72
2022 Super Duty (TFE) Canada/United States of America, enUSA, Edition date: 202103, First-Printing Keys and Remote ControlsE218402 E107998 E191533
Page 76 of 740
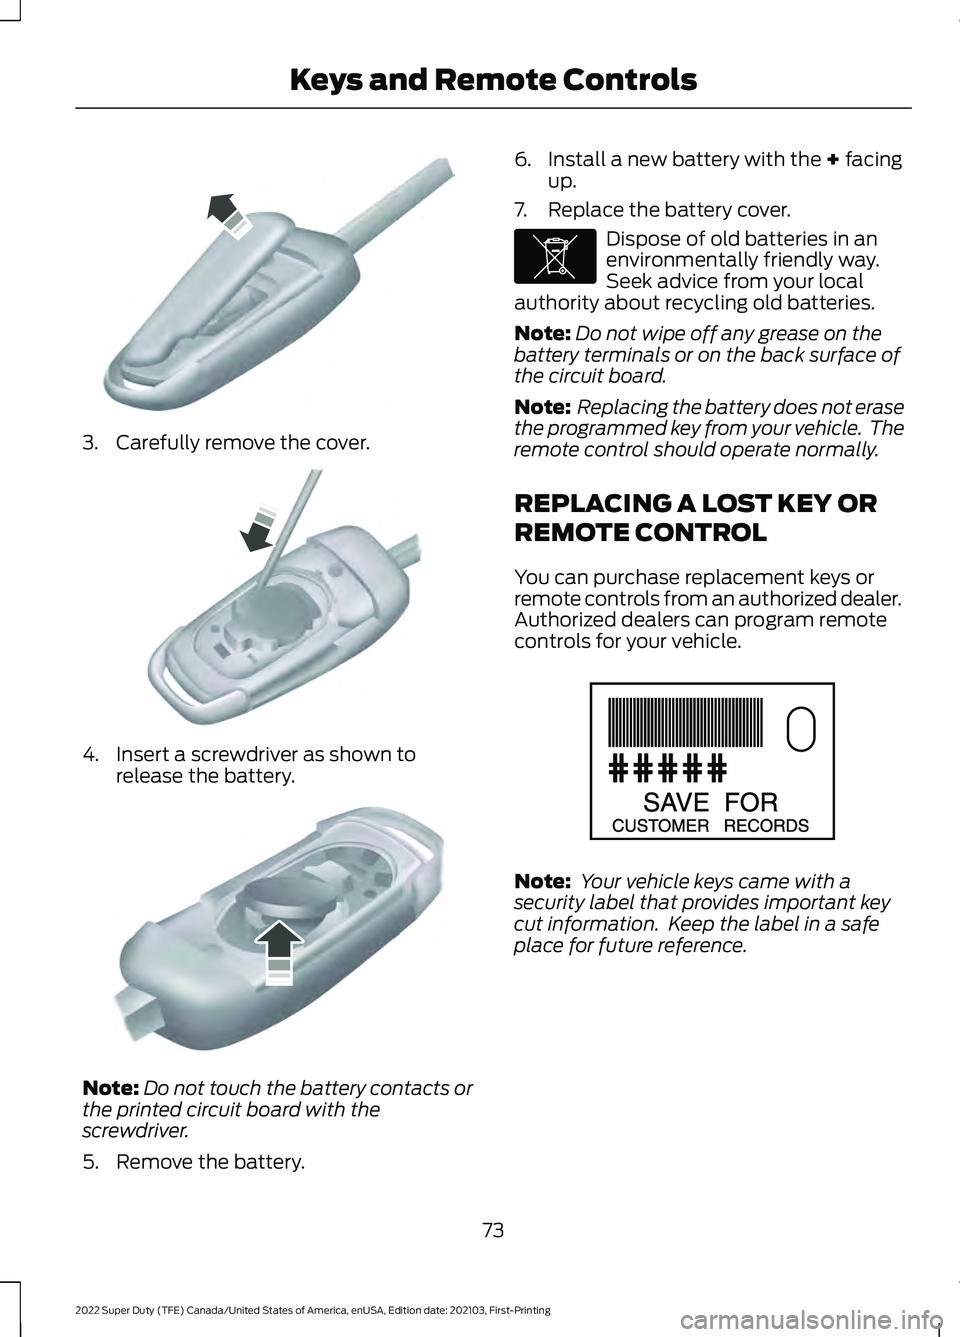
3. Carefully remove the cover.
4. Insert a screwdriver as shown to
release the battery. Note:
Do not touch the battery contacts or
the printed circuit board with the
screwdriver.
5. Remove the battery. 6. Install a new battery with the + facing
up.
7. Replace the battery cover. Dispose of old batteries in an
environmentally friendly way.
Seek advice from your local
authority about recycling old batteries.
Note: Do not wipe off any grease on the
battery terminals or on the back surface of
the circuit board.
Note: Replacing the battery does not erase
the programmed key from your vehicle. The
remote control should operate normally.
REPLACING A LOST KEY OR
REMOTE CONTROL
You can purchase replacement keys or
remote controls from an authorized dealer.
Authorized dealers can program remote
controls for your vehicle. Note:
Your vehicle keys came with a
security label that provides important key
cut information. Keep the label in a safe
place for future reference.
73
2022 Super Duty (TFE) Canada/United States of America, enUSA, Edition date: 202103, First-Printing Keys and Remote ControlsE151799 E151800 E151801 E107998 E151795
Page 77 of 740
PROGRAMMING THE REMOTE
CONTROL
General Information
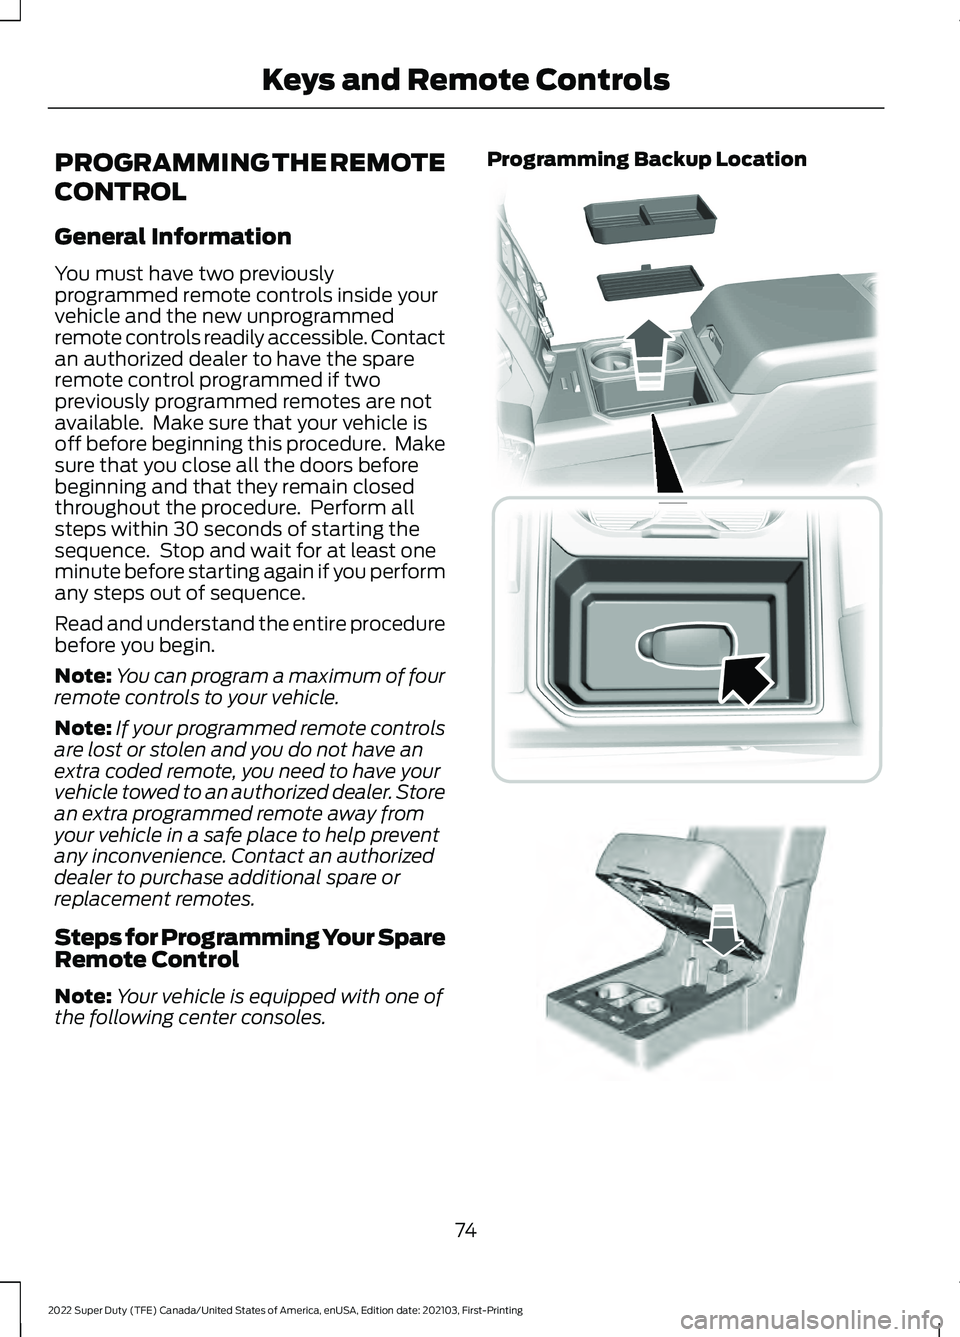
You must have two previously
programmed remote controls inside your
vehicle and the new unprogrammed
remote controls readily accessible. Contact
an authorized dealer to have the spare
remote control programmed if two
previously programmed remotes are not
available. Make sure that your vehicle is
off before beginning this procedure. Make
sure that you close all the doors before
beginning and that they remain closed
throughout the procedure. Perform all
steps within 30 seconds of starting the
sequence. Stop and wait for at least one
minute before starting again if you perform
any steps out of sequence.
Read and understand the entire procedure
before you begin.
Note:
You can program a maximum of four
remote controls to your vehicle.
Note: If your programmed remote controls
are lost or stolen and you do not have an
extra coded remote, you need to have your
vehicle towed to an authorized dealer. Store
an extra programmed remote away from
your vehicle in a safe place to help prevent
any inconvenience. Contact an authorized
dealer to purchase additional spare or
replacement remotes.
Steps for Programming Your Spare
Remote Control
Note: Your vehicle is equipped with one of
the following center consoles. Programming Backup Location
74
2022 Super Duty (TFE) Canada/United States of America, enUSA, Edition date: 202103, First-Printing Keys and Remote Controls E226701 E269950
Page 78 of 740
1. Place the first programmed remote in
the backup slot inside the center
console with your foot off the brake
pedal, press and release the push
button ignition switch.
2. Wait five seconds and then press and release the push button ignition switch
again.
3. Remove the remote control.
4. Within 10 seconds, place a second programmed remote control in the
backup slot. Press and release the
push button ignition switch.
5. Wait five seconds and then press and release the push button ignition switch
again. Keep the ignition on for at least
three seconds, but no more than 10
seconds.
6. Remove the remote control.
7. Place the unprogrammed remote control in the backup slot and press
and release the push button ignition
switch.
Programming is now complete. With your
foot on the brake pedal, press the push
button ignition switch to verify the remote
control functions operate and your vehicle
starts with the new remote control.
If programming was not successful, wait
10 seconds and repeat Steps 1 through 7.
If you are still unsuccessful, take your
vehicle to an authorized dealer.
PROGRAMMING THE REMOTE
CONTROL - VEHICLES WITH:
FLIP KEY
General Information
You can program your own remote control
to your vehicle. This procedure programs
both the engine immobilizer keycode and
the remote entry portion of the remote
control to your vehicle. Only use remote controls with an
integrated mechanical key.
You must have two previously
programmed coded remote controls and
the new un–programmed remote readily
accessible. Contact an authorized dealer
to have the spare remote control
programmed if the two previously
programmed coded remote controls are
not available.
Read and understand the entire procedure
before you begin.
Steps for Programming Your Spare
Remote Control
1.
Insert the first previously programmed
coded key into the ignition.
2. Switch the ignition from off to on. Keep
the ignition on for at least three
seconds, but no more than 10 seconds.
3. Switch the ignition off and remove the
first coded key from the ignition.
4. After three seconds but within 10 seconds of switching the ignition off,
insert the second previously coded key
into the ignition.
5. Switch the ignition from off to on. Keep
the ignition on for at least three
seconds, but no more than 10 seconds.
6. Switch the ignition off and remove the
second previously programmed coded
key from the ignition.
7. After three seconds but within 10 seconds of switching the ignition off
and removing the previously
programmed coded key, insert the new
un–programmed key into the ignition.
8. Switch the ignition from off to on. Keep
the ignition on for at least six seconds
until you hear the door locks cycle.
9. Remove the newly programmed coded
key from the ignition.
75
2022 Super Duty (TFE) Canada/United States of America, enUSA, Edition date: 202103, First-Printing Keys and Remote Controls
Page 79 of 740
The key starts the engine if programming
is successful. You can operate the keyless
remote entry system with the new remote
control with integrated key.
If programming was not successful, wait
20 seconds and repeat Steps 1 through 8.
If you are still unsuccessful, take your
vehicle to an authorized dealer.
Note:
You can program a maximum of six
coded remote controls to your vehicle.
KEYS AND REMOTE CONTROLS – TROUBLESHOOTING
KEYS AND REMOTE CONTROLS – INFORMATION MESSAGES Action
Message
Replace remote control battery.
Key Battery Low Replace
Soon
76
2022 Super Duty (TFE) Canada/United States of America, enUSA, Edition date: 202103, First-Printing Keys and Remote Controls
Page 80 of 740
WHAT IS MYKEY
MyKey allows you to program keys with
restricted driving modes to promote good
driving habits.
MYKEY SETTINGS
NON-CONFIGURABLE MYKEY
SETTINGS
Seatbelt Reminder or Belt-
Minder™
MyKey mutes the audio system until the
front seat passengers buckle the front seat
belts.
Note:
If your vehicle includes an AM/FM
radio or a very basic audio system, then the
radio may not mute.
Satellite Radio (If Equipped)
Some Satellite radio channels have
restricted access to adult radio content.
Early Low Fuel
The low fuel level warning lamp turns on
earlier.
Driving and Parking Aids
You cannot configure settings for parking
aids, blind spot information system, and
cross traffic alert. These systems turn on
when the vehicle turns on, and you cannot
switch them off with a MyKey.
You cannot configure settings for
pre-collision assist and lane keeping. These
systems turn on when the vehicle turns on,
but you can switch them off with a MyKey.
A new destination in the navigation system
can only be set using voice commands
when using a MyKey, and with your vehicle
moving. Note:
MyKey drivers may be able to switch
the lane departure warning feature off, but
this feature turns back on automatically
with every new key cycle.
CONFIGURABLE MYKEY
SETTINGS
You can configure the following settings
after creating a MyKey. See
Creating a
MyKey (page 78).
Speed Limit WARNING:
Do not set MyKey
maximum speed limit to a limit that will
prevent the driver from maintaining a
safe speed considering posted speed
limits and prevailing road conditions. The
driver is always responsible to drive in
accordance with local laws and
prevailing conditions. Failure to do so
could result in accident or injury.
You can set a speed limit for your vehicle.
Warning messages appear in the
information display and a tone sounds if
your vehicle reaches the set speed. You
cannot override the set speed when using
a MyKey.
Speed Minder
You can set a speed reminder for your
vehicle. Warning messages appear in the
information display and a tone sounds if
your vehicle exceeds the set speed.
Audio System Volume Limit
The audio system maximum volume
reduces. A message appears in the
information display if you attempt to
exceed the volume limit. Automatic
volume control turns off.
77
2022 Super Duty (TFE) Canada/United States of America, enUSA, Edition date: 202103, First-Printing MyKey
™