ECU FORD FIESTA 2007 User Guide
[x] Cancel search | Manufacturer: FORD, Model Year: 2007, Model line: FIESTA, Model: FORD FIESTA 2007Pages: 1226, PDF Size: 61.26 MB
Page 155 of 1226
205-04-3 Front Drive Halfshafts 205-04-3
DESCRIPTION AND OPERATION
Front Drive Halfshafts
Drives hafts
Conventional driveshafts are used on the front axle.
For servicing purposes it is important to note that
the inner tripod joints are pressed onto the shaft.
This has made it possible to reduce noise levels
when the vehicle is pulling away from standing.
The outer joint has not been approved for service
repairs, so in the event of a fault it is necessary to
replace the complete shaft and outer joint
assembly. The inner joints are dismantled with the
aid of a puller. The driveshaft needs to be removed
first.
In order to install a new boot on the outer joint, it
is first necessary to remove the driveshaft and then
disassemble the inner joint. A special service kit is
available in service for this purpose, consisting of
the inner and outer boot and the necessary small
parts.
The same amount of grease is used to pack the
inner and outer joints.
- The PAC nut used for securing the driveshaft to ' the wheel hub must not be reused.
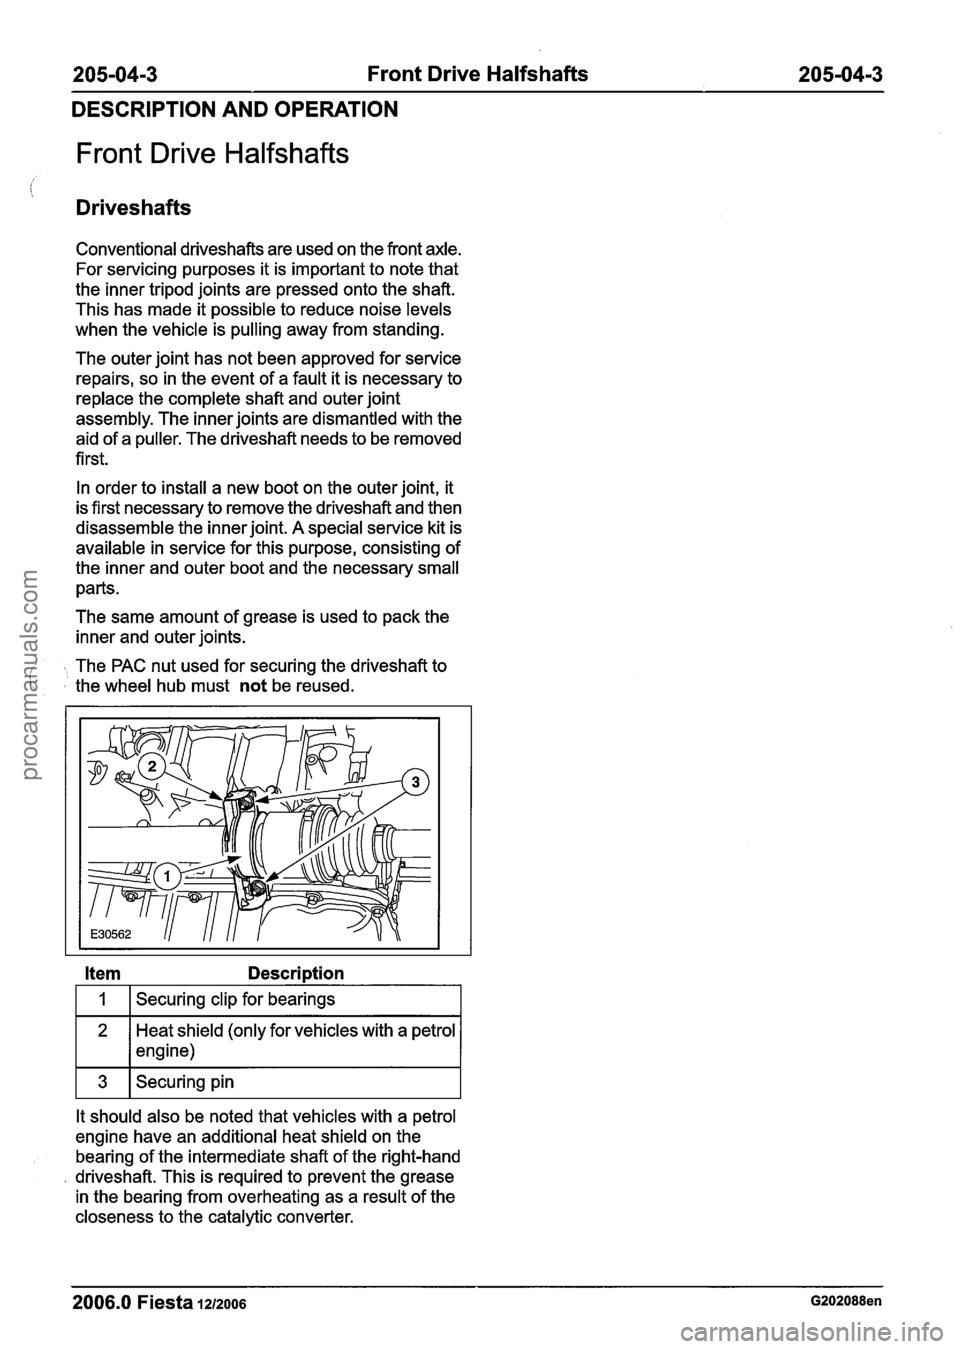
Item Description
I 1 I Securing clip for bearings I
Heat shield (only for vehicles with a petrol
1 * 1 engine)
It should also be noted that vehicles with a petrol
engine have an additional heat shield on the bearing of the intermediate shaft of the right-hand
driveshaft. This is required to prevent the grease
in the bearing from overheating as a result of the
closeness to the catalytic converter.
2006.0 Fiesta 1212006 G202088en
procarmanuals.com
Page 159 of 1226
205-04-7 Front Drive Halfshafts 205-04-7
REMOVAL AND INSTALLATION
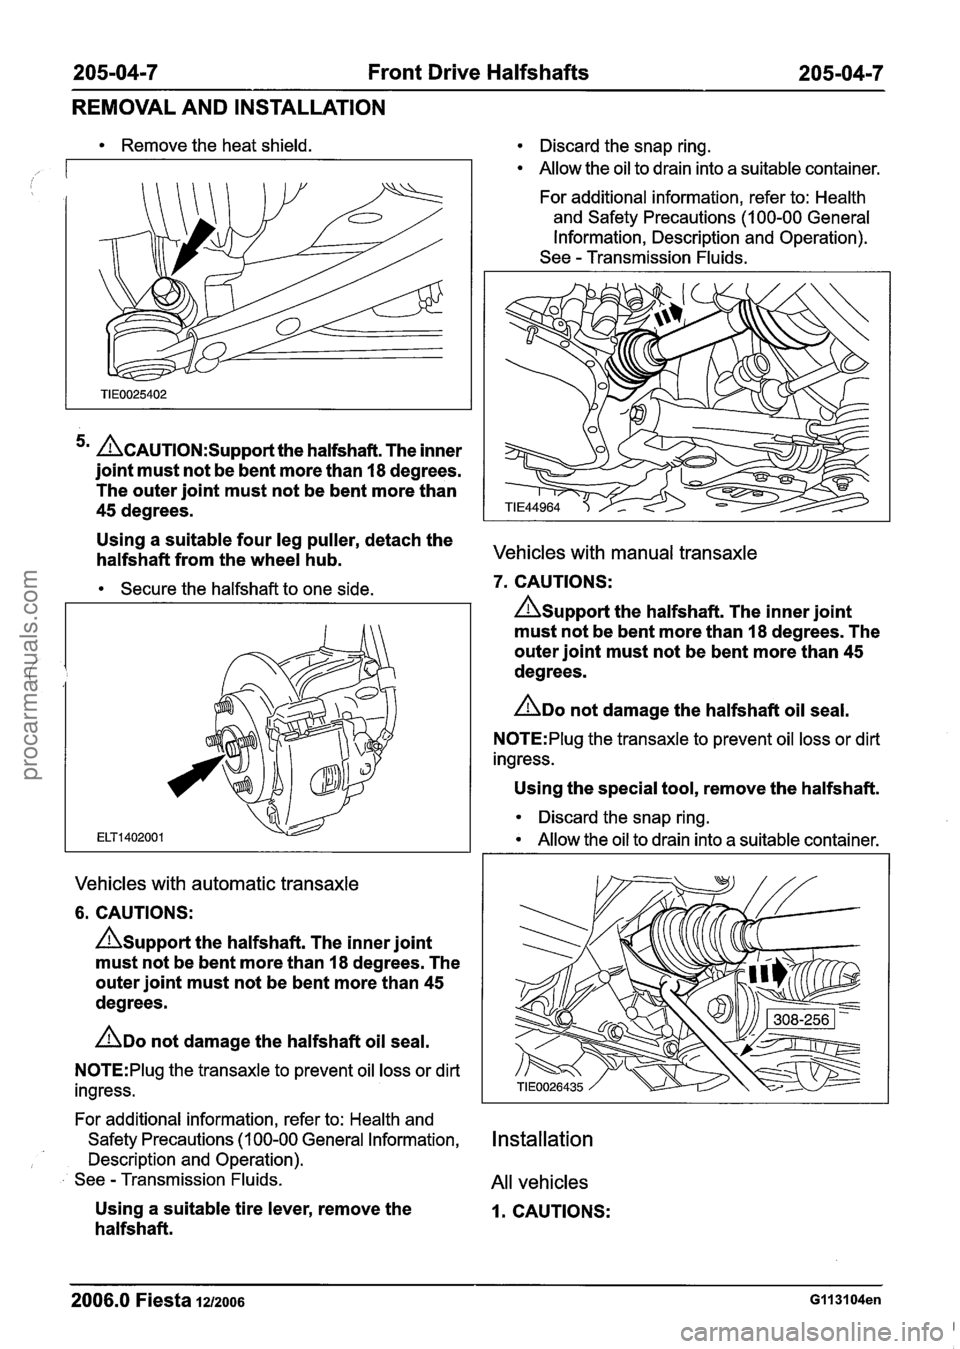
Remove the heat shield.
5m ~~~~~~~~~~~~~~~t the halfshaft. The inner
joint must not be bent more than
18 degrees.
The outer joint must not be bent more than
45 degrees.
Using a suitable four leg puller, detach the
halfshaft from the wheel hub.
Secure the halfshaft to one side.
Vehicles with automatic transaxle
6. CAUTIONS:
A~upport the halfshaft. The inner joint
must not be bent more than
18 degrees. The
outer joint must not be bent more than
45
degrees.
ADO not damage the halfshaft oil seal.
N0TE:Plug the transaxle to prevent oil loss or dirt
ingress.
For additional information, refer to: Health and
Safety Precautions (1 00-00 General Information,
Description and Operation).
See
- Transmission Fluids.
Using a suitable tire lever, remove the
halfs haft.
Discard the snap ring.
Allow the oil to drain into a suitable container.
For additional information, refer to: Health
and Safety Precautions (1 00-00 General
Information, Description and Operation).
See
- Transmission Fluids.
Vehicles with manual transaxle
7. CAUTIONS:
Asupport the halfshaft. The inner joint
must not be bent more than
I8 degrees. The
outer joint must not be bent more than
45
degrees.
ADO not damage the halfshaft oil seal.
N0TE:Plug the transaxle to prevent oil loss or dirt
ingress.
Using the special tool, remove the halfshaft.
Discard the snap ring.
Allow the oil to drain into a suitable container.
Installation
All vehicles
I. CAUTIONS:
2006.0 Fiesta 1212006 GI 131 04en
procarmanuals.com
Page 162 of 1226
205-04-1 0 Front Drive Halfshafts 205-04-1 0
REMOVAL AND INSTALLATION
Front Halfshaft RH(14 321 0)
('
Special Tool(s) 3. Remove the wheel and tire. (.
I I Installer, Halfshaft For additional information, refer to: Wheel
and Tire
(204-04 Wheels and Tires, Removal
and Installation).
4m A~AU~l0N:~rotect the ball joint seal using
a soft cloth to prevent damage.
I I I Detach the lower arm ball joint from the I wheel knuckle.
General Equipment
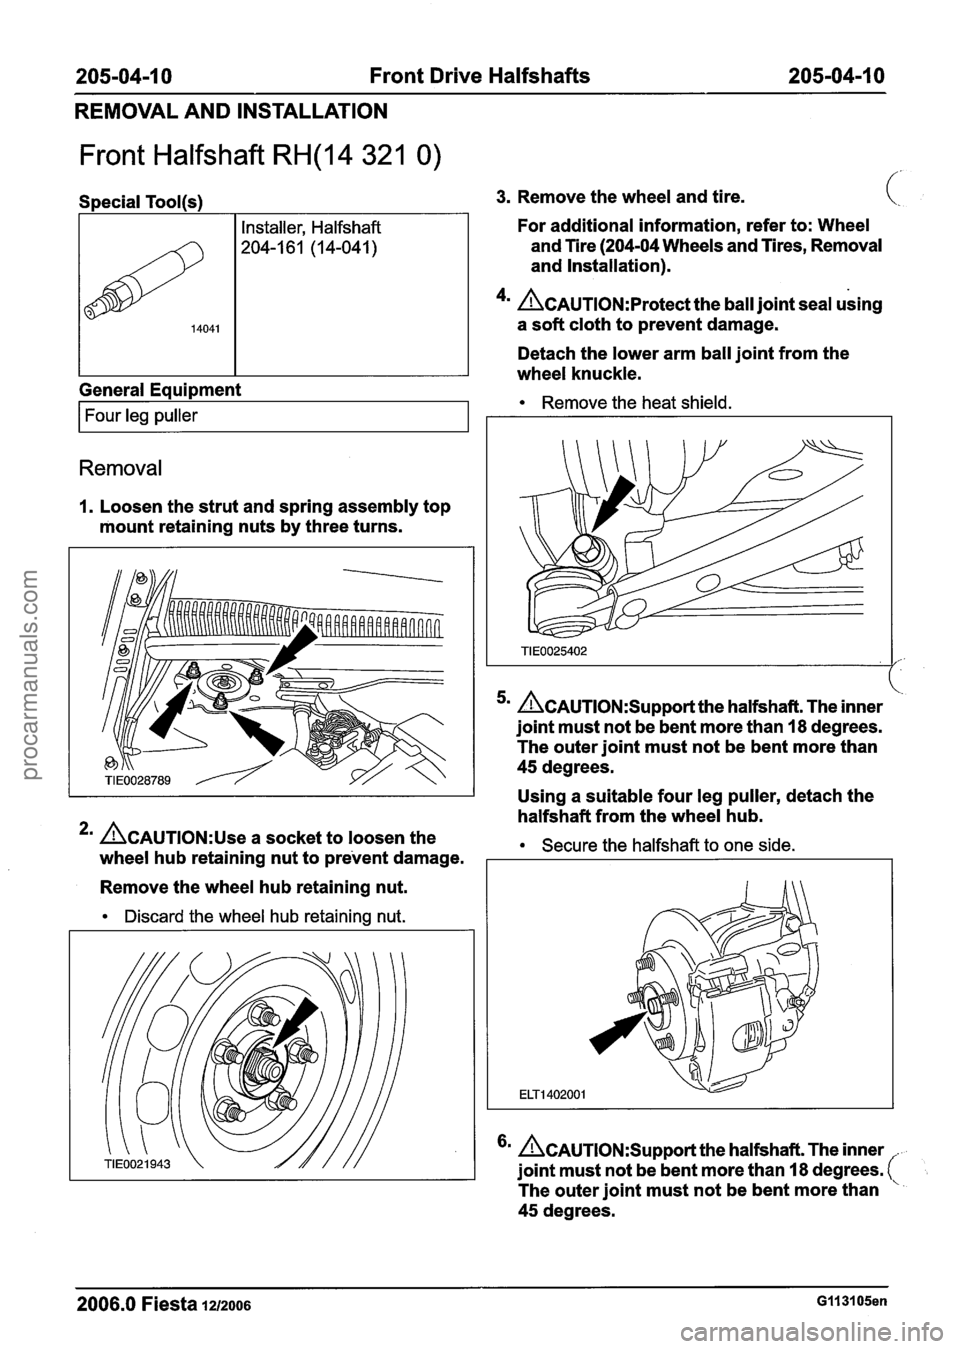
Remove the heat shield.
Four leg puller
Removal
I. Loosen the strut and spring assembly top
mount retaining nuts by three turns.
5m ACAUTION:S~~~~~~ the halfshaft. The inner
joint must not be bent more than
18 degrees.
The outer joint must not be bent more than
45 degrees.
Using a suitable four leg puller, detach the
halfshaft from the wheel hub.
" ~CAUTION:US~ a socket to loosen the Secure the halfshaft to one side. wheel hub retaining nut to prevent damage.
Remove the wheel hub retaining nut.
Discard the wheel hub retaining nut.
6m ACAUTION:S~~~~~~ the halfshaft. The inner .
joint must not be bent more than 18 degrees. (
The outer joint must not be bent more than
45 degrees.
2006.0 Fiesta IZIZOO~ ~1131 05en
procarmanuals.com
Page 167 of 1226
205-04-1 5 Front Drive Halfshafts 205-04-1 5
REMOVAL AND INSTALLATION
Inner Constant Velocity (CV) Joint Boot(l4 336 0)
Special Tool(s)
I I Clamping Tool, Boot I
Remover, BearingIGear
205-3 1 0 (1 5-09 1
A~se vise jaw protectors for all operations
in a vise.
N0TE:Secure the halfshaft in a vise.
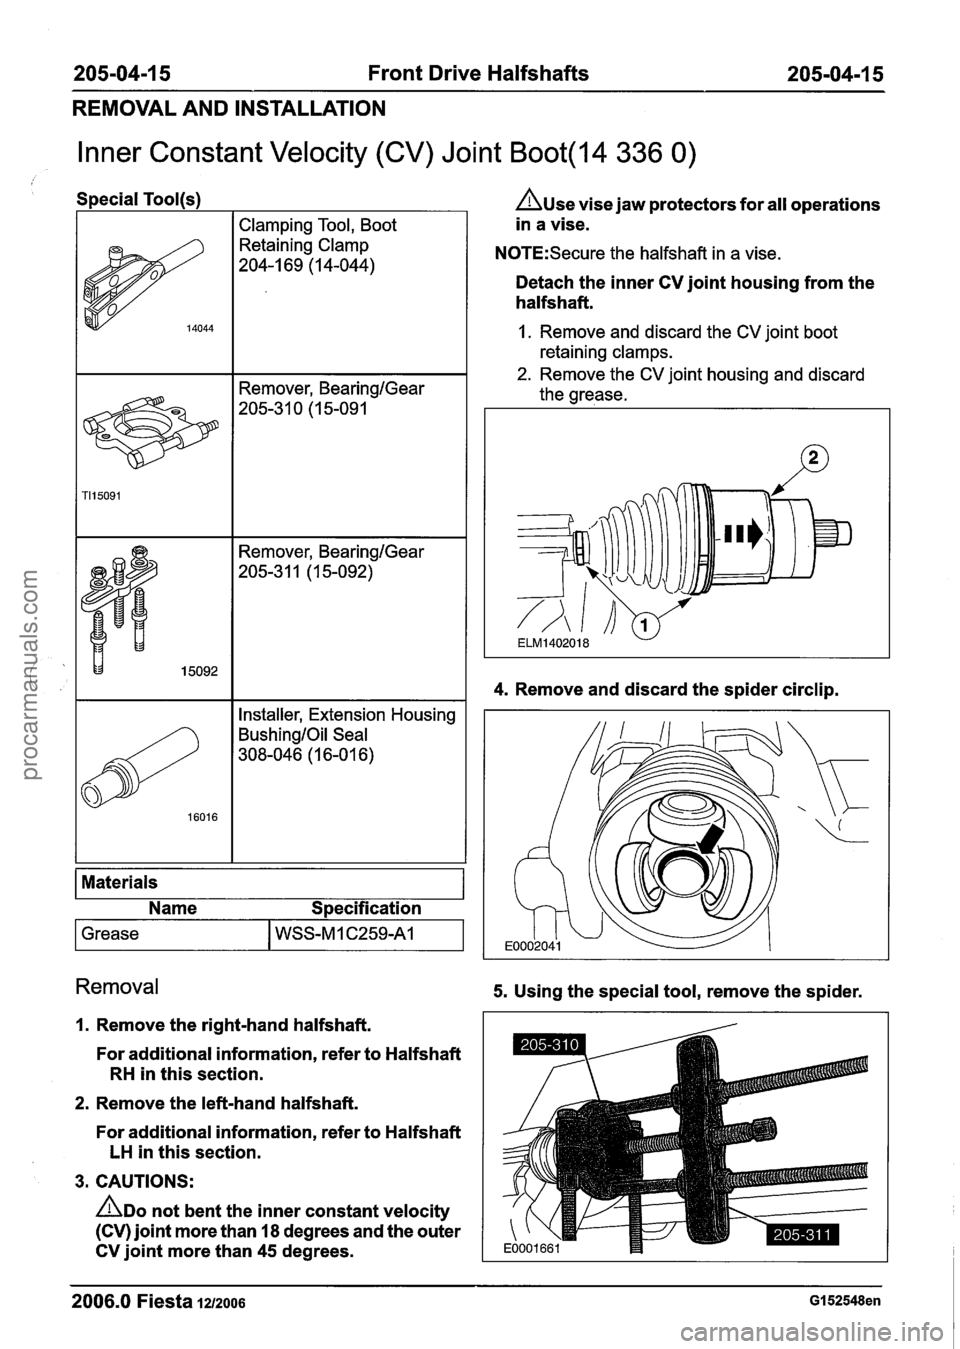
Detach the inner CV joint housing from the
halfshaft.
1. Remove and discard the CV joint boot
retaining clamps.
2. Remove the CV joint housing and discard
the grease.
I I Installer, Extension Housing I
BushingIOil Seal
308-046 (1 6-0 1 6)
Materials
Name Specification
1 Grease I WSS-M 1 C259A1 I
4. Remove and discard the spider circlip.
Removal 5. Using the special tool, remove the spider.
I. Remove the right-hand halfshaft.
For additional information, refer to Halfshaft
RH in this section.
2. Remove the left-hand halfshaft.
For additional information, refer to Halfshaft
LH in this section.
3. CAUTIONS:
ADO not bent the inner constant velocity
(CV) joint more than
18 degrees and the outer
CV joint more than
45 degrees.
2006.0 Fiesta 1212006 GI 52548en
procarmanuals.com
Page 170 of 1226
205-04-1 8 Front Drive Halfshafts 205-04-1 8
REMOVAL AND INSTALLATION
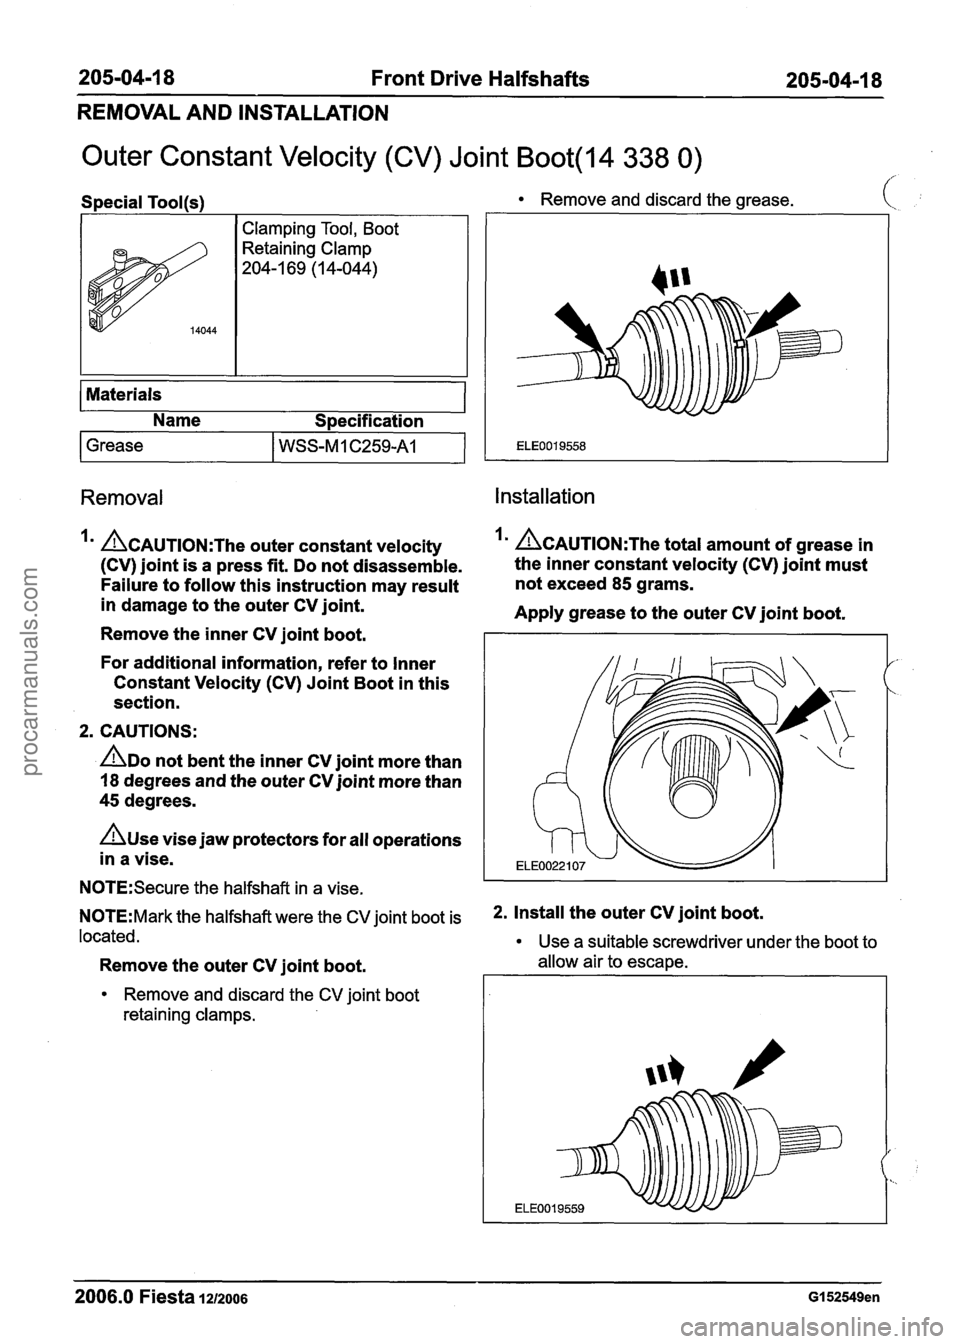
Outer Constant Velocity (CV) Joint Boot(l4 338 0)
Special Tool(~)
I
-
I Clamping Tool, Boot
Retaining Clamp
204-1 69 (1 4-044)
14044
Materials
Name Specification
1 Grease I WSS-MI ~259-v
Remove and discard the grease. I
Removal Installation
&AUTION:The outer constant velocity I' ~CAUTION:T~~ total amount of grease in
(CV) joint is a press fit. Do not disassemble. the
inner constant velocity (CV) joint must
Failure to follow this instruction may result not
exceed
85 grams.
in damage to the outer CV joint.
Apply grease to the outer CV joint boot.
Remove the inner CV joint boot.
For additional information, refer to Inner
Constant Velocity (CV) Joint Boot in this
section.
2. CAUTIONS:
ADO not bent the inner CV joint more than
18 degrees and the outer CV joint more than
45 degrees.
n~se vise jaw protectors for all operations
in a vise.
N0TE:Secure the halfshaft in a vise.
N0TE:Mark the halfshaft were the CV joint boot is *. Install the Outer CV joint boot=
located.
Use a suitable screwdriver under the boot to
Remove the outer CV joint boot. allow air to escape.
Remove and discard the CV joint boot
retaining clamps.
2006.0 Fiesta 1212006 GI 52549en
procarmanuals.com
Page 201 of 1226

206-00-29 Brake System - General Information 206-00-29
DIAGNOSIS AND TESTING
and repair the external leak. If the fluid level drops
and no external leak can be found, check for a
brake master cylinder bore end seal leak.
Brake System Check
Brake Pedal Reserve Check
Where a low brake pedal or the feel of a
bottomed-out condition exists, check for brake
pedal reserve.
1. Operate the engine at idle with the transaxle in
NEUTRAL.
2. Apply the brake pedal lightly three or four times.
3. Allow 15 seconds for vacuum to replenish the
brake booster.
N0TE:This increased resistance may feel like
something has bottomed out.
4. Apply the brake pedal until it stops moving
downward or an increased resistance to the
pedal travel occurs.
5. Hold the brake pedal in the applied position and
raise the engine speed to approximately 2000
rpm.
N0TE:The additional movement of the brake pedal
is the result of the increased engine intake manifold
vacuum which exerts more force on the brake
booster during engine rundown. This means that
additional stroke is available in the brake master
cylinder and the brake system is not bottoming out.
6. Release the accelerator pedal and observe that
the brake pedal moves downward as the engine
returns to idle speed.
Brake Booster Functional Test
lnspect all hoses and connections. All unused
vacuum connectors should be capped. Hoses and
their connections should be correctly secured and
in good condition with no holes and no collapsed 2.
With the transaxle in NEUTRAL, stop the engine
and apply the parking brake. Apply the brake
pedal several times to exhaust all vacuum in
the system.
3. With the engine turned off and all vacuum in the
system exhausted, apply the brake pedal and hold it down. Start the engine. If the vacuum
system is operating, the brake pedal will tend
to move downward under constant foot
pressure. If no motion is felt, the vacuum
booster system is not functioning.
4. Remove the vacuum hose from the brake
booster.
Intake manifold vacuum should be
available at the brake booster end of the hose
with the engine at idle speed and the transaxle
in NEUTRAL. Make sure that all unused vacuum
outlets are correctly capped, hose connectors
are correctly secured and vacuum hoses are in
good condition. When it is established that
manifold vacuum is available to the brake
booster, connector the vacuum hose to the
brake booster and repeat Step
3. If no
downward movement of the brake pedal is felt,
install a new brake booster. REFER to: (206-07
Power Brake Actuation)
Brake Booster
- LHD (Removal and lnstallation),
Brake Booster
- RHD (Removal and lnstallation).
5. Operate the engine a minimum of 10 seconds
at fast idle. Stop the engine and let the vehicle
stand for
10 minutes. Then, apply the brake
pedal with approximately 89
N (20 lb) force. The
pedal feel (brake application) should be the
same as that noted with the engine operating.
If the brake pedal feels hard (no power assist),
install a new vacuum check valve and then
repeat the test. If the brake pedal still feels hard,
install a new brake booster. REFER to: (206-07
Power Brake Actuation)
Brake Booster
- LHD (Removal and Installation),
Brake Booster
- RHD e em oval and installation).
If the brake pedal movement feels spongy, bleed
the brake system. REFER to: (206-00 Brake
System
- General Information)
areas. Inspect the check valve on the brake booster Brake System Bleeding (General Procedures),
for damage. Brake
System Pressure Bleeding (General
Procedures).
Brake Booster Operation Check
Brake Master Cylinder
1. Check the hydraulic brake system for leaks or
low fluid. Usually,
the first and strongest indicator of anything
wrong with the braking system is a feeling through
the brake pedal. In diagnosing the condition of the
brake master cylinder, check pedal feel as
2006.0 Fiesta 1212006 G28494en I
i
procarmanuals.com
Page 251 of 1226
206-05-1 5 Parking Brake and Actuation 206-05-1 5
REMOVAL AND INSTALLATION
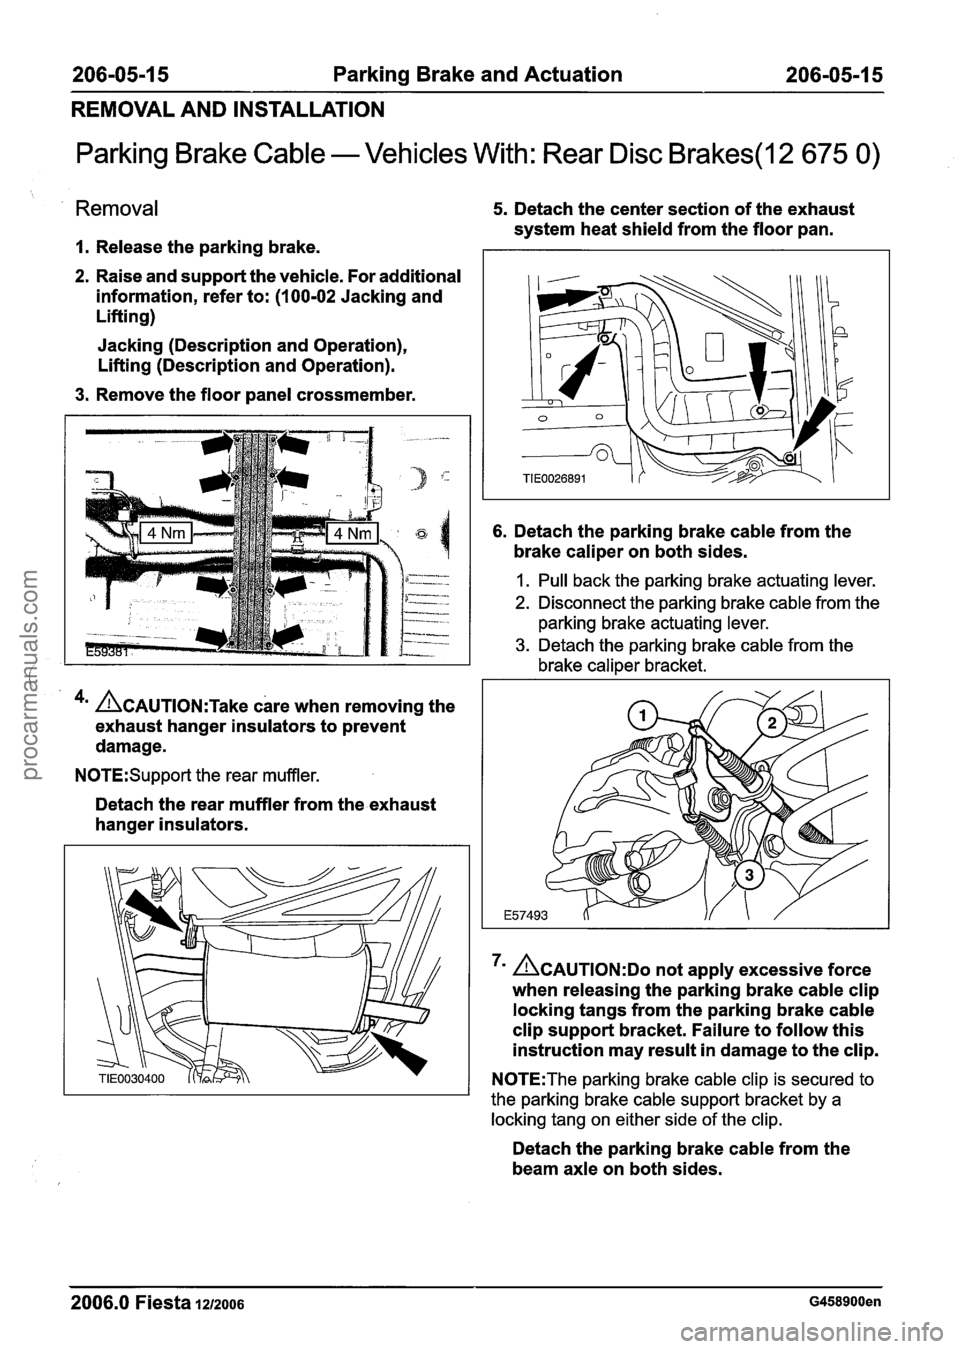
Parking Brake Cable - Vehicles With: Rear Disc Brakes(l2 675 0)
Removal
I. Release the parking brake.
2. Raise and support the vehicle. For additional
information, refer to:
(1 00-02 Jacking and
Lifting)
Jacking (Description and Operation),
Lifting (Description and Operation).
3. Remove the floor panel crossmember.
4m ACAUTION:T~~~ care when removing the
exhaust hanger insulators to prevent
damage.
N0TE:Support the rear muffler.
Detach the rear muffler from the exhaust
hanger insulators.
5. Detach the center section of the exhaust
system heat shield from the floor pan.
6. Detach the parking brake cable from the
brake caliper on both sides.
I. Pull back the parking brake actuating lever.
2. Disconnect the parking brake cable from the
parking brake actuating lever.
3. Detach the parking brake cable from the
brake caliper bracket.
ACAUTION:DO not apply excessive force
when releasing the parking brake cable clip
locking tangs from the parking brake cable
clip support bracket. Failure to follow this
instruction may result in damage to the clip.
N0TE:The parking brake cable clip is secured to
the parking brake cable support bracket by a
locking tang on either side of the clip.
Detach the parking brake cable from the
beam axle on both sides.
2006.0 Fiesta 1212006 G458900en
procarmanuals.com
Page 332 of 1226
211 -00-12 Steering System - General Information 211-00-12
DIAGNOSIS AND TESTING
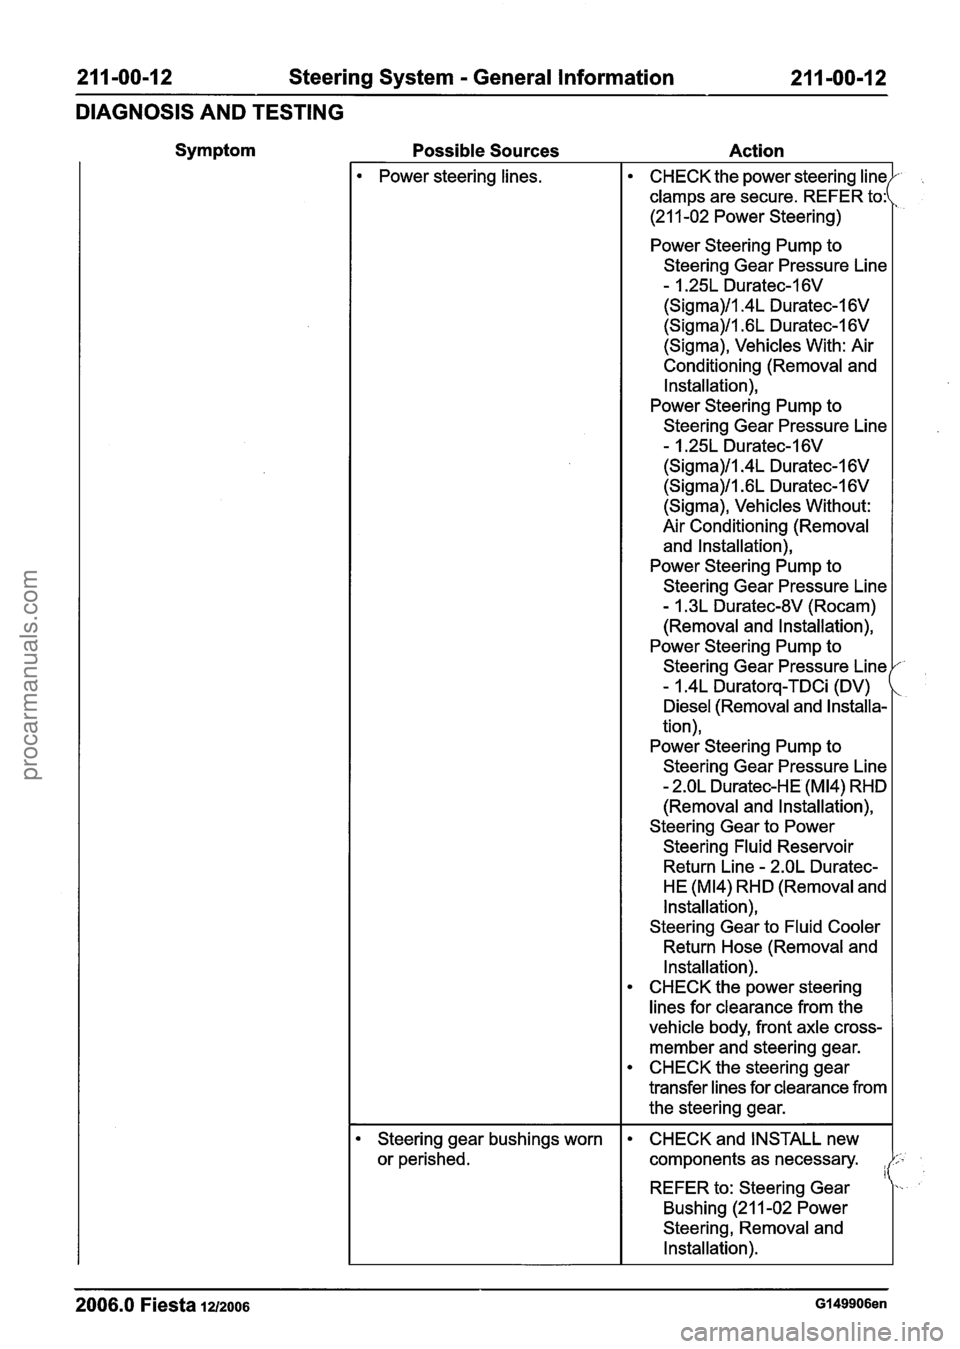
Symptom Possible Sources Action
Power steering lines.
Steering gear bushings worn
or perished.
2006.0 Fiesta 12/2006 Gl49906en
CHECK the power steering lin
clamps are secure. REFER to:
(21 1-02 Power Steering)
Power Steering Pump to
Steering Gear Pressure Line
- 1.25L Duratec-1 6V
(Sigma)/l.4L Duratec-1 6V
(Sigma)/l .6L Duratec-1 6V
(Sigma), Vehicles With: Air
Conditioning
(Removal and
Installation),
Power Steering Pump to
Steering Gear Pressure Line
- 1.25L Duratec-1 6V
(Sigma)/l.4L Duratec-1 6V
(Sigma)/l .6L Duratec-1 6V
(Sigma), Vehicles Without:
Air Conditioning
(Removal
and Installation),
Power Steering Pump to
Steering Gear Pressure Line
- I .3L Duratec-8V (Rocam)
(Removal and Installation),
Power Steering Pump to
Steering Gear Pressure Line
- I .4L Duratorq-TDCi (DV)
Diesel (Removal and Installa-
tion),
Power Steering Pump to
Steering Gear Pressure Line
- 2.OL Duratec-HE (M14) RHD
(Removal and Installation),
Steering Gear to Power
Steering
Fluid Reservoir
Return Line
- 2.OL Duratec-
HE
(M14) RHD (Removal and
Installation),
Steering Gear to Fluid Cooler
Return Hose (Removal and
Installation).
CHECK the power steering
lines for clearance from the
vehicle body, front axle cross-
member and steering gear.
CHECK the steering gear
transfer
lines for clearance from
the steering gear.
CHECK and INSTALL new
components as necessary.
I REFER to: Steering Gear
Bushing (21 1-02 Power
Steering,
Removal and
Installation).
procarmanuals.com
Page 397 of 1226
21 1 -02-49 Power Steering 21 I -02-49
REMOVAL AND INSTALLATION
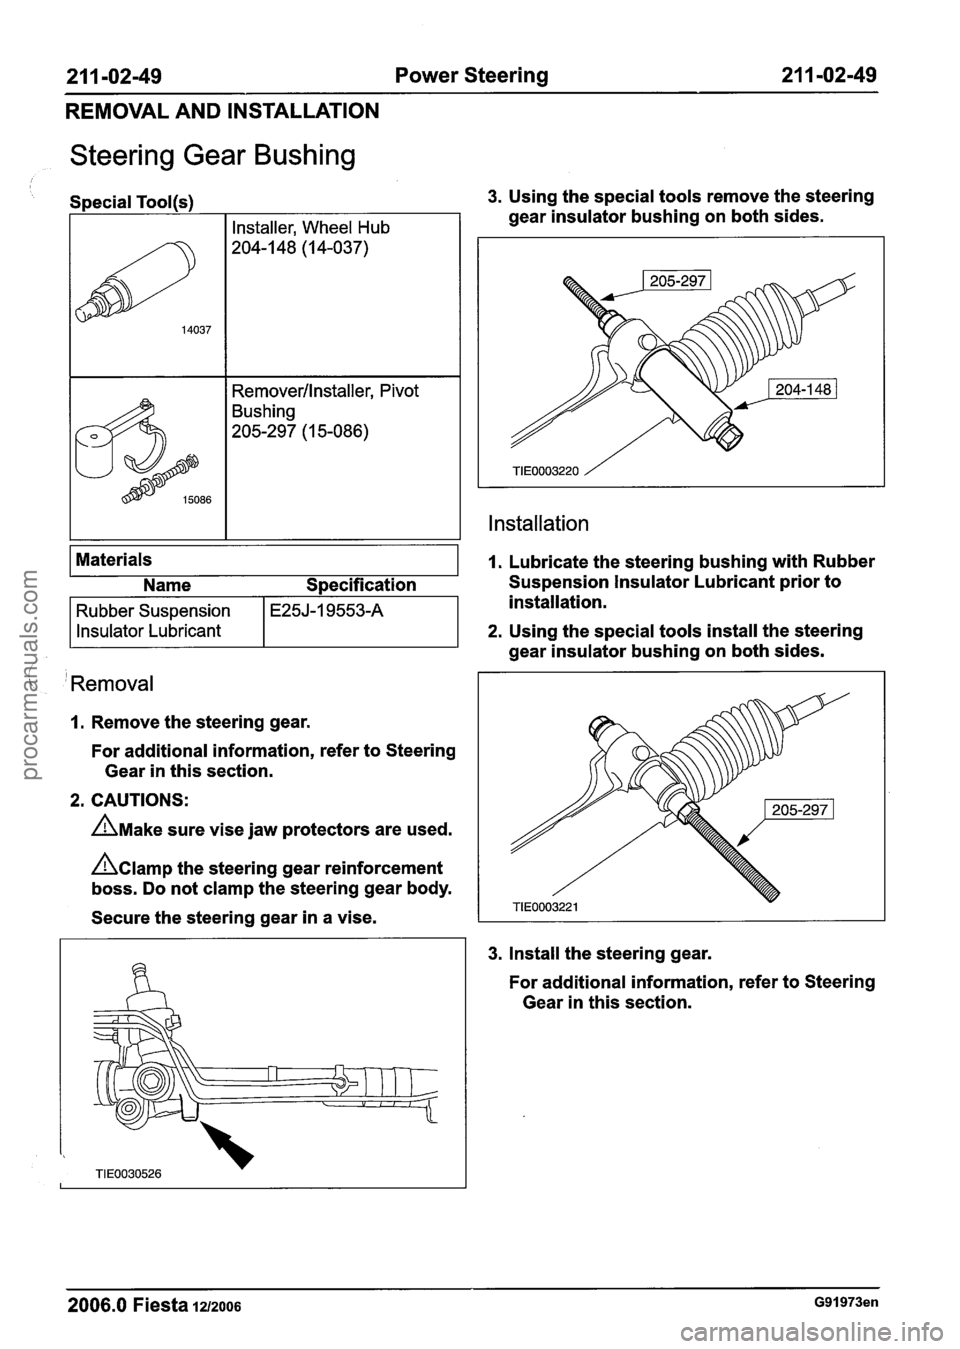
Steering Gear Bushing
/ I
Special Tool(s) 3. Using the special tools remove the steering
( 'Removal
1. Remove the steering gear.
For additional information, refer to Steering
Gear in this section.
2. CAUTIONS:
A~ake sure vise jaw protectors are used.
hamp the steering gear reinforcement
boss. Do not clamp the steering gear body.
Secure the steering gear in a vise.
Materials
3. Install the
steering gear.
gear
insulator bushing on both sides.
Installation
14037
1. Lubricate the steering bushing with Rubber
For additional information, refer to Steering
Gear in this section.
Installer, Wheel Hub
204-1 48 (1 4-037)
Removerllnstaller, Pivot
Bushing
205-297 (1 5-086)
2006.0 Fiesta 1212006 G91973en
Name Specification Suspension Insulator Lubricant prior to
installation.
2. Using the special tools install the steering
Rubber Suspension
Insulator Lubricant
gear insulator bushing on both sides.
E25J-I 9553-A
procarmanuals.com
Page 407 of 1226
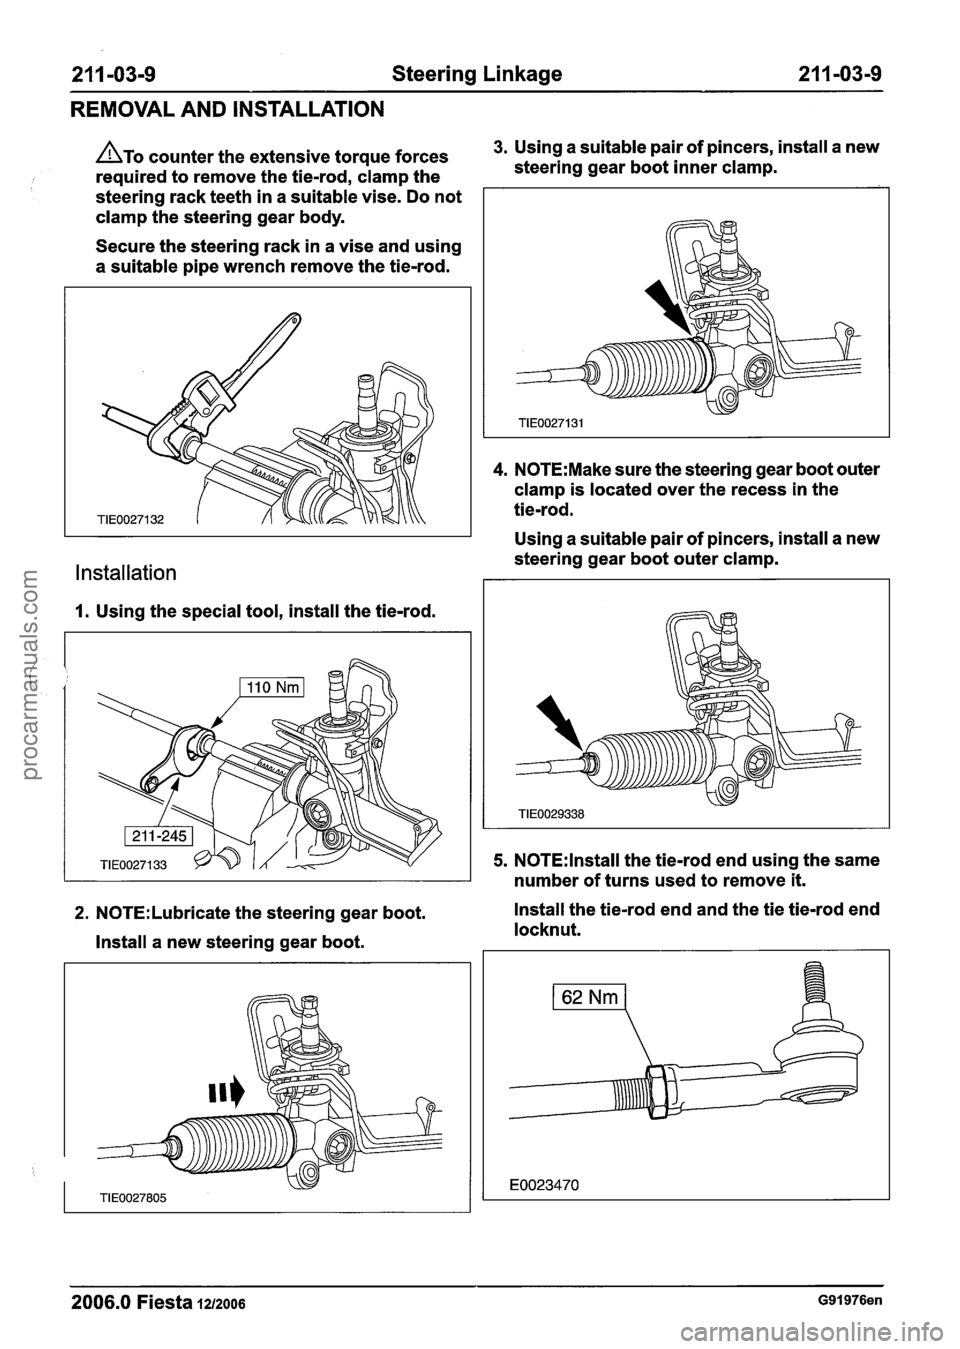
211 -03-9 Steering Linkage 21 1-03-9
REMOVAL AND INSTALLATION
ATO counter the extensive torque forces 3. Using a suitable pair of pincers, install a new
required to remove the tie-rod, clamp the steering
gear boot inner clamp.
steering rack teeth in a suitable vise. Do not
clamp the steering gear body.
Secure the steering rack in a vise and using
a suitable pipe wrench remove the tie-rod.
Installation
1. Using the special tool, install the tie-rod.
4. N0TE:Make sure the steering gear boot outer
clamp is located over the recess in the
tie-rod.
Using a suitable pair of pincers, install a new
steering gear boot outer clamp.
5. N0TE:lnstall the tie-rod end using the same
number of turns used to remove
it.
2. N0TE:Lubricate the steering gear boot. Install the tie-rod end and the
tie tie-rod end
locknut.
Install a new steering gear boot.
2006.0 Fiesta 1212006 G91976en
procarmanuals.com