light FORD FIESTA 2007 Repair Manual
[x] Cancel search | Manufacturer: FORD, Model Year: 2007, Model line: FIESTA, Model: FORD FIESTA 2007Pages: 1226, PDF Size: 61.26 MB
Page 785 of 1226
303-03B-15 Engine Cooling - 2.OL Duratec-HE (M14) 303-03B-15
DIAGNOSIS AND TESTING
A CAUTI0N:lf the ECT sensor output reaches
the
120°C default line under normal cooling
system pressure, internal damage may be
caused to the engine and a diagnostic
trouble code (DTC) will be set in the PCM.
The test should be stopped and the cause
located and corrected. If the cooling
system does not pressurize, the coolant
will boil at
1 OO°C which may also damage
the engine. CARRY
OUT the Coolant
Expansion Tank Cap Pressure Test
Component Test in this section.
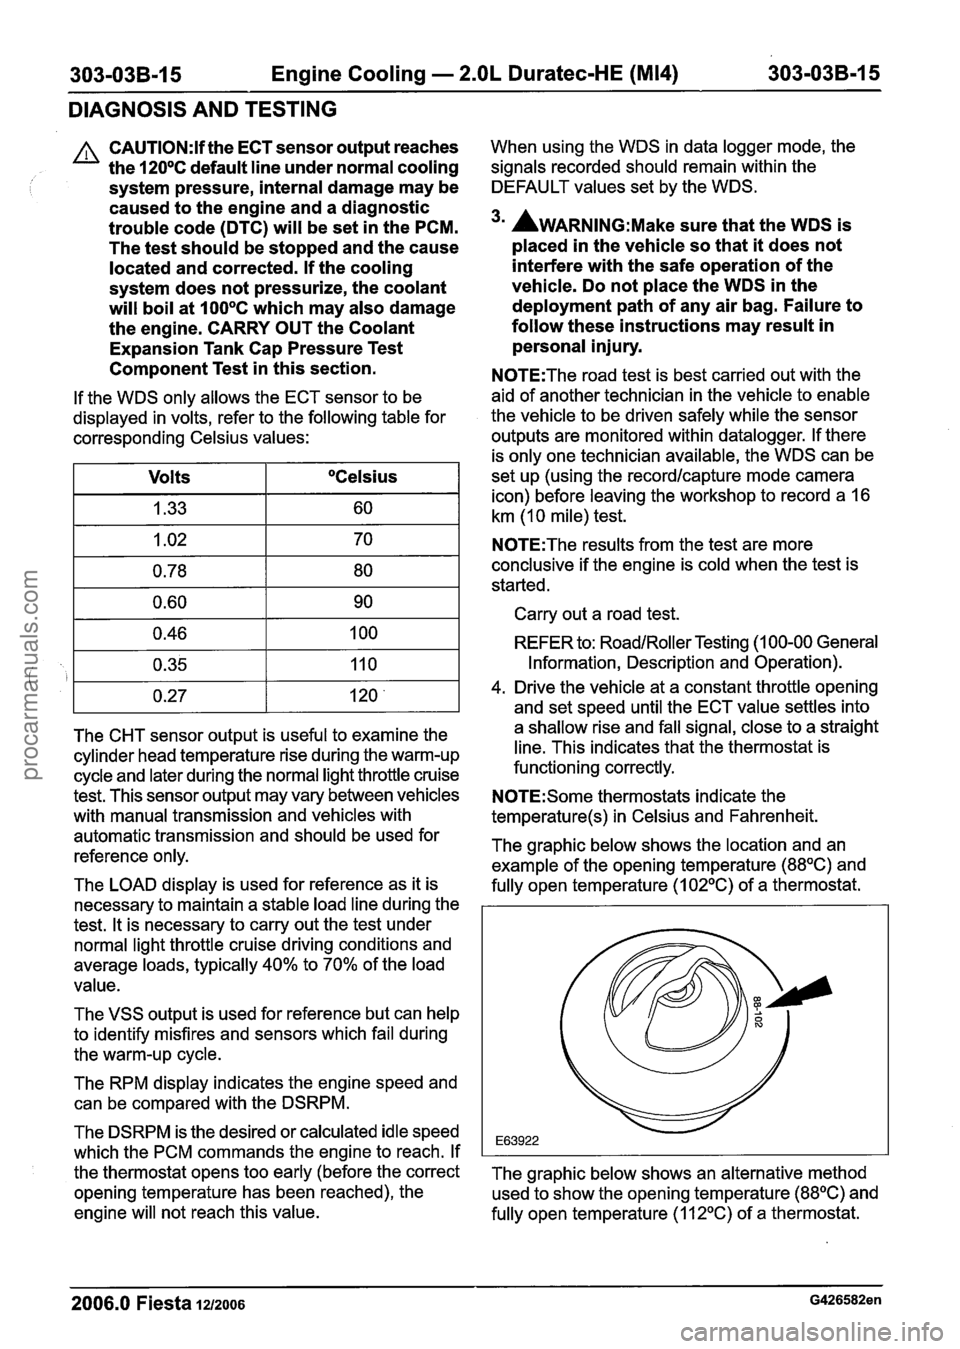
If the WDS only allows the ECT sensor to be
displayed in volts, refer to the following table for
corresponding Celsius values:
The CHT sensor output is useful to examine the
cylinder head temperature rise during the warm-up
cycle and later during the normal light throttle cruise
test. This sensor output may vary between vehicles
with manual transmission and vehicles with automatic transmission and should be used for
reference only.
Volts
1.33
1.02
0.78
0.60
0.46
0.35 0.27
The LOAD display is used for reference as it is
necessary to maintain a stable load line during the
test. It is necessary to carry out the test under
normal light throttle cruise driving conditions and
average loads, typically 40% to 70% of the load
value.
OCelsius
60
70
80
90
100
110
120 '
The VSS output is used for reference but can help
to identify misfires and sensors which fail during
the warm-up cycle.
The RPM display indicates the engine speed and
can be compared with the DSRPM.
The DSRPM is the desired or calculated idle speed
which the PCM commands the engine to reach. If
the thermostat opens too early (before the correct
opening temperature has been reached), the
engine will not reach this value. When
using the WDS in data logger mode, the
signals recorded should remain within the
DEFAULT values set by the WDS.
3m AWARNING:M~~~ sure that the WDS is
placed in the vehicle so that it does not
interfere with the safe operation of the
vehicle. Do not place the WDS in the
deployment path of any air bag. Failure to
follow these instructions may result in personal injury.
N0TE:The road test is best carried out with the
aid of another technician in the vehicle to enable
the vehicle to be driven safely while the sensor
outputs are monitored within datalogger. If there
is only one technician available, the WDS can be
set up (using the
recordlcapture mode camera
icon) before leaving the workshop to record a 16
km (1 0 mile) test.
N0TE:The results from the test are more
conclusive if the engine is cold when the test is
started.
Carry out a road test.
REFER to:
RoadIRoller Testing (1 00-00 General
Information, Description and Operation).
4. Drive the vehicle at a constant throttle opening
and set speed until the ECT value settles into
a shallow rise and fall signal, close to a straight
line. This indicates that the thermostat is
functioning correctly.
N0TE:Some thermostats indicate the
temperature(s) in Celsius and Fahrenheit.
The graphic below shows the location and an
example of the opening temperature
(88OC) and
fully open temperature (1
02OC) of a thermostat.
The graphic below shows an alternative method used to show the opening temperature
(88OC) and
fully open temperature
(112OC) of a thermostat.
2006.0 Fiesta 1212006 G426582en
procarmanuals.com
Page 786 of 1226
303-03B-16 Engine Cooling - 2.OL Duratec-HE (M14) 303-03B-16
DIAGNOSIS AND TESTING
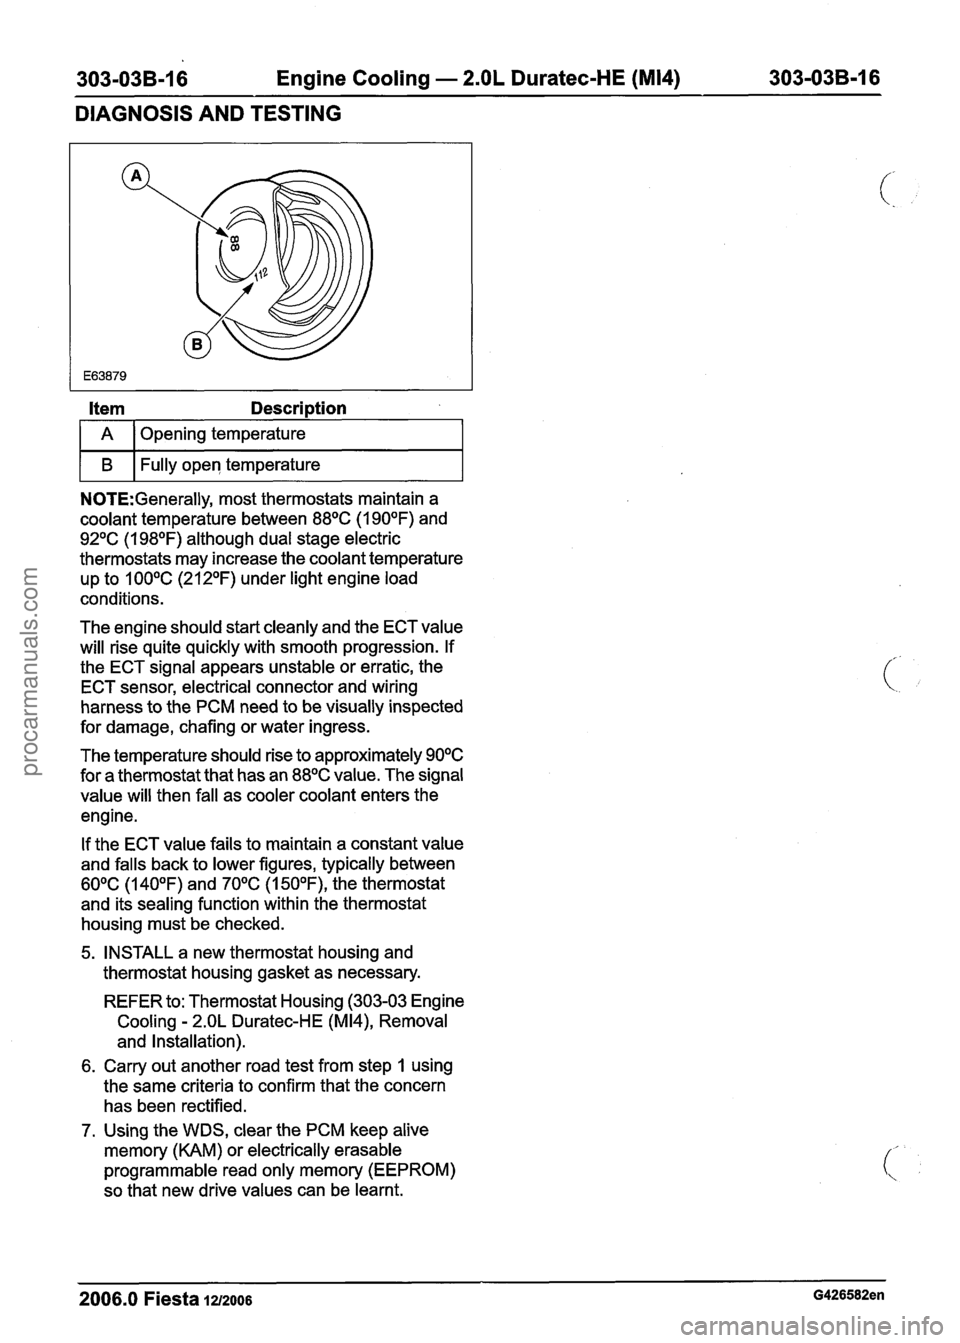
Item Description
I A 1 Opening temperature I
I B I Fully open temperature I
NOTE:Generally, most thermostats maintain a
coolant temperature between
88OC (1 90°F) and
92OC (1 98OF) although dual stage electric
thermostats may increase the coolant temperature
up to
100°C (212OF) under light engine load
conditions.
The engine should start cleanly and the ECT value
will rise quite quickly with smooth progression. If
the ECT signal appears unstable or erratic, the
ECT sensor, electrical connector and wiring
harness to the PCM need to be visually inspected
for damage, chafing or water ingress.
The temperature should rise to approximately
90°C
for a thermostat that has an 88OC value. The signal
value will then fall as cooler coolant enters the
engine.
If the ECT value fails to maintain a constant value
and falls back to lower figures, typically between
60°C (140°F) and 70°C (1 50°F), the thermostat
and its sealing function within the thermostat
housing must be checked.
5, INSTALL a new thermostat housing and
thermostat housing gasket as necessary.
REFER to: Thermostat Housing (303-03 Engine
Cooling
- 2.OL Duratec-HE (M14), Removal
and Installation).
6. Carry out another road test from step 1 using
the same criteria to confirm that the concern
has been rectified.
7. Using the WDS, clear the PCM keep alive
memory (KAM) or electrically erasable
programmable read only memory (EEPROM)
so that new drive values can be learnt.
2006.0 Fiesta 1212006 G426582en
procarmanuals.com
Page 791 of 1226
303-03B-21 Engine Cooling - 2.OL Duratec-HE (M14) 303-03B-21
REMOVAL AND INSTALLATION
Thermostat Housing
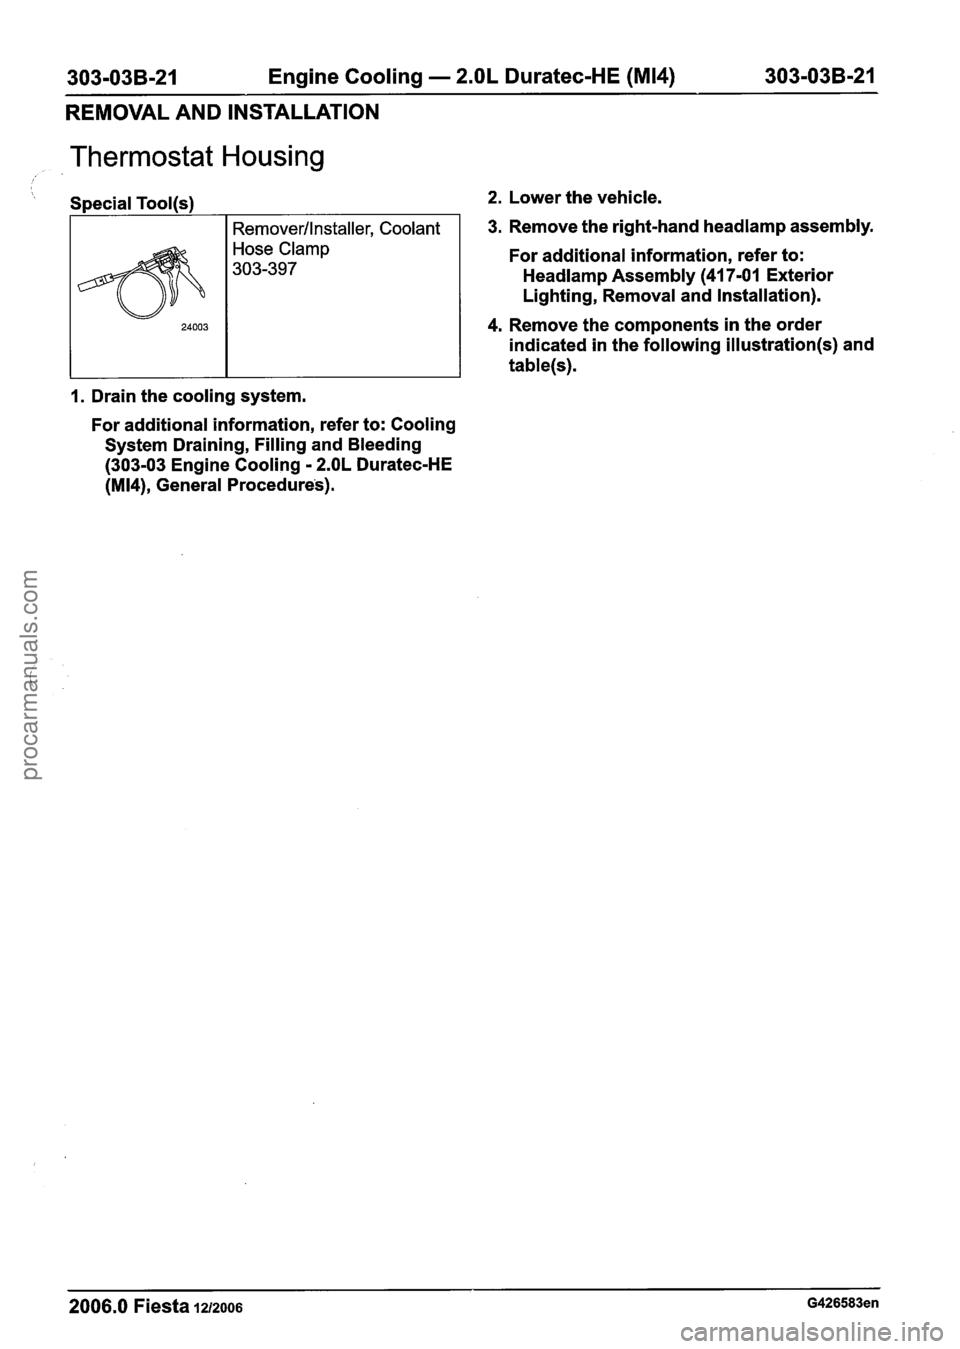
Special Tool(s) 2. Lower the vehicle.
I Remover/lnstaller, Coolant 1 3. Remove the right-hand headlamp assembly.
1. Drain the cooling system.
I
For additional information, refer to: Cooling
System Draining, Filling and Bleeding
(303-03 Engine Cooling
- 2.OL Duratec-HE
(M14), General Procedures).
Hose Clamp
303-397 For additional information, refer to:
Headlamp Assembly (41 7-01 Exterior
Lighting, Removal and Installation).
4. Remove the components in the order
indicated in the following
illustration(s) and
table(s).
2006.0 Fiesta 1212006 G426583en
procarmanuals.com
Page 805 of 1226
Fuel Charging and Controls - 1.25L
Duratec-1 6V (Sigma)llI4L Duratec-1 6V
303-04A-7 (Sigma)llI6L Duratec-1 6V (Sigma) 303-04A-7
REMOVAL AND INSTALLATION
Fuel Injection Supply Manifold(23 450 0)
Removal
WARNINGS:
A Do not smoke or carry lighted tobacco or
open flame of any type when working on
or near any fuel related components.
Highly flammable vapors are always
present and can ignite. Failure to follow
these instructions may result in personal
injury.
A This procedure involves fuel handling. Be
prepared for fuel spillage at all times and
always observe fuel handling precautions.
Failure to follow these instructions may
result in personal injury.
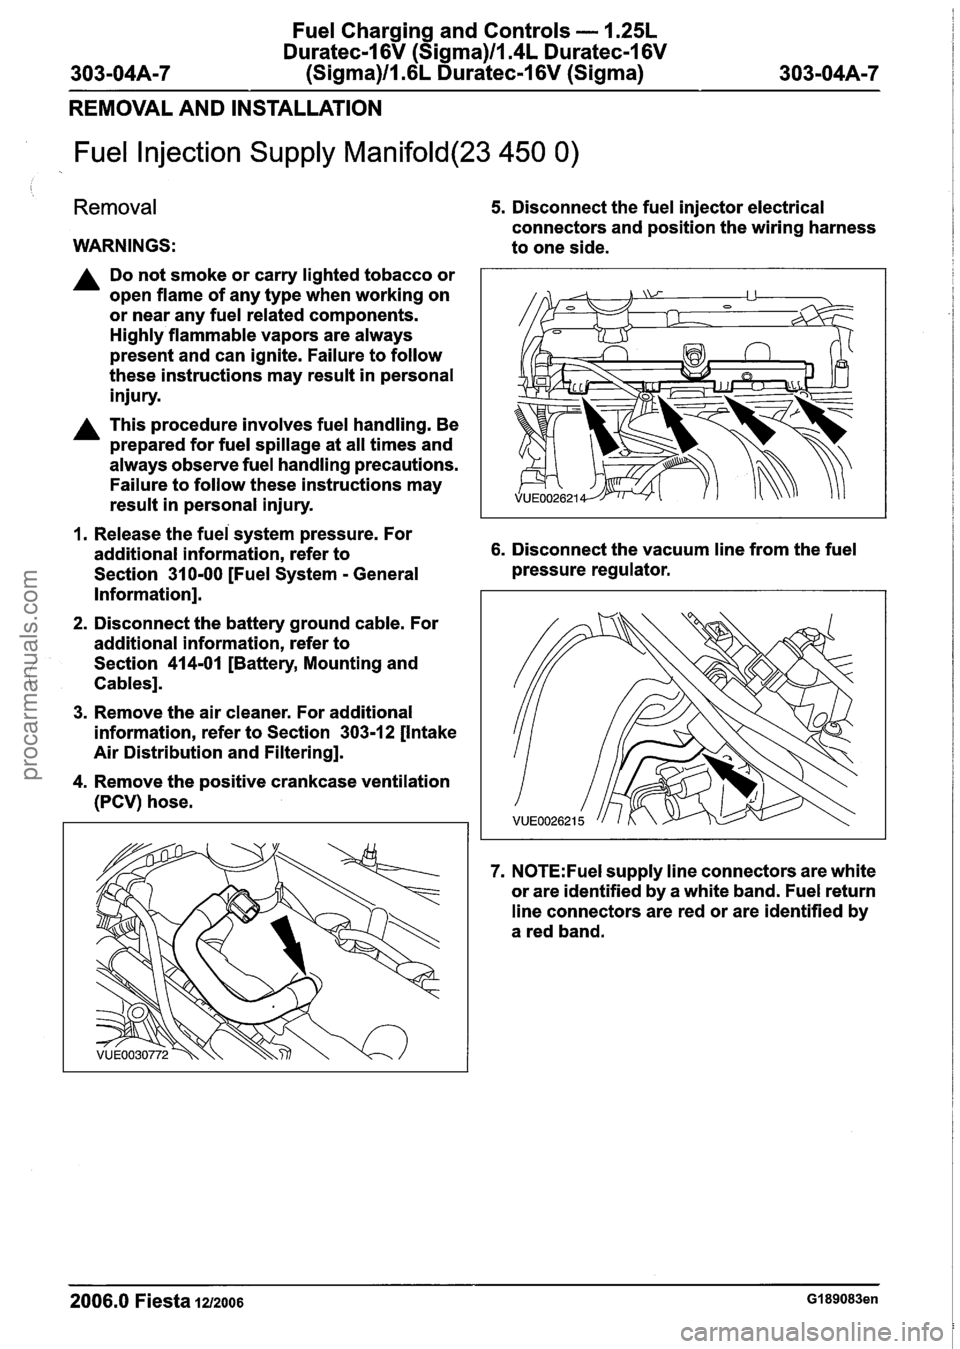
5. Disconnect the fuel injector electrical
connectors and position the wiring harness
to one side.
1. Release the fuei system pressure. For
additional information, refer to 6. Disconnect the vacuum line from the fuel
Section
31 0-00 [Fuel System - General pressure
regulator.
Information].
2. Disconnect the battery ground cable. For
additional information, refer to
Section
414-01 [Battery, Mounting and
Cables].
3. Remove the air cleaner. For additional
information, refer to Section
303-12 [Intake
Air Distribution and Filtering].
4. Remove the positive crankcase ventilation
(PCV) hose.
7. N0TE:Fuel supply line connectors are white
or are identified by a white band. Fuel return
line connectors are red or are identified by
a red band.
2006.0 Fiesta 1212006 GI 89083en
procarmanuals.com
Page 807 of 1226
Fuel Charging and Controls - 1.25L
Duratec-I 6V (Sigma)llI4L Duratec-1 6V
303-04A-9 (Sigma)ll .6L Duratec-1 6V (Sigma) 303-04A-9
REMOVAL AND INSTALLATION
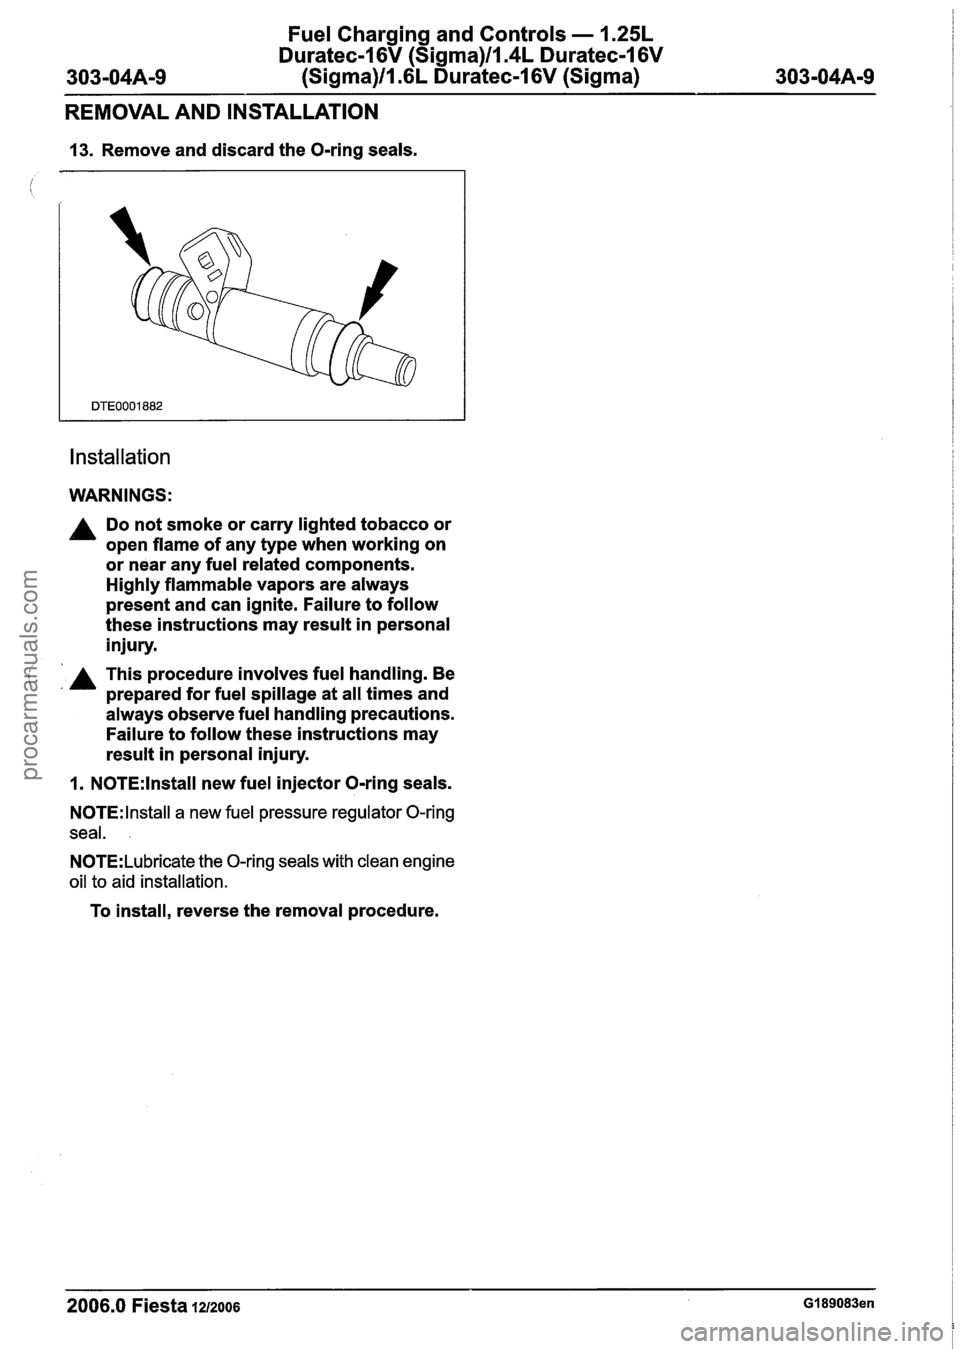
13. Remove and discard the O-ring seals.
Installation
WARNINGS:
A Do not smoke or carry lighted tobacco or
open flame of any type when working on
or near any fuel related components.
Highly flammable vapors are always
present and can ignite. Failure to follow
these instructions may result in personal
injury.
( A This procedure involves fuel handling. Be ' prepared for fuel spillage at all times and
always observe fuel handling precautions.
Failure to follow these instructions may
result in personal injury.
1. N0TE:lnstall new fuel injector O-ring seals.
N0TE:lnstall a new fuel pressure regulator O-ring
seal.
.
N0TE:Lubricate the O-ring seals with clean engine
oil to aid installation.
To install, reverse the removal procedure.
2006.0 Fiesta IZIZOO~ GI 89083en
procarmanuals.com
Page 835 of 1226
Fuel Charging and Controls - 2.OL
303-04B-27 Duratec-HE (M14) 303-04B-27
REMOVAL AND INSTALLATION
Fuel Rail
Materials Name Specification
I Engine Oil - 5W-30 I WSS-~2~91 3-B I
WARNINGS:
A Do not smoke or carry lighted tobacco or
open flame of any type when working on
or near any fuel related components.
Highly flammable vapors are always
present and may ignite. Failure to follow
these instructions may result in personal
injury.
A This procedure involves fuel handling. Be
prepared for fuel spillage at all times and
always observe fuel handling precautions.
Failure to follow these instructions may
result in personal injury.
1. Release the fuel system pressure.
For additional information, refer to: Fuel
System Pressure Release (31 0-00 Fuel
System
- General Information, General
Procedures).
2. Disconnect the battery ground cable.
For additional information, refer to: Battery
Disconnect
(414-01 Battery, Mounting and
Cables, General Procedures).
3. Remove the air cleaner assembly.
For additional information, refer to: Air
Cleaner
- 2.OL Duratec-HE (M14) (303-1 2
intake Air Distribution and Filtering,
Removal and Installation).
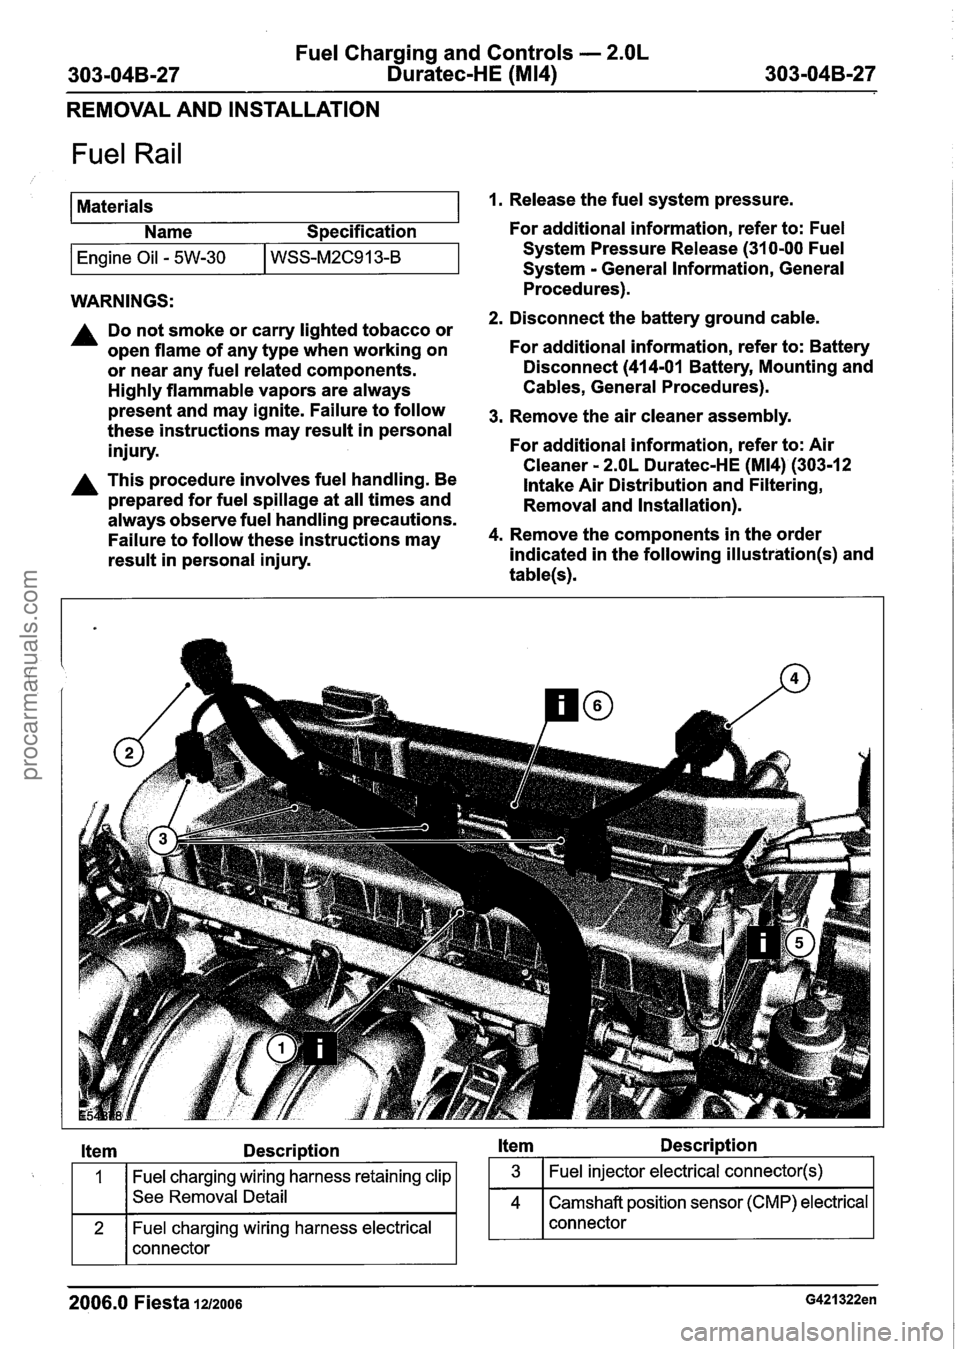
4. Remove the components in the order
indicated in the following
illustration(s) and
table(s).
Item Description Item Description
Fuel charging wiring harness retaining clip
See Removal Detail
Fuel charging wiring harness electrical
connector
2006.0 Fiesta 1212006 G421322en
procarmanuals.com
Page 836 of 1226

Fuel Charging and Controls - 2.OL
Duratec-HE (M14)
REMOVAL AND INSTALLATION
Description Item Description
See Removal Detail
See Removal Detail
Fuel charging wiring harness retaining clip
Item Description I . WARNINGS:
or near any fuel related components.
Highly flammable vapors are always
present and may ignite. Failure to follow
these instructions may result in personal
7
8
I I iniurv.
Fuel rail retaining bolts
Fuel rail A Do not smoke or carry lighted tobacco or
open flame of any type when working on
11
Removal Details
1 12 1 Fuel injectors
Item 1 Fuel charging wiring harness retaining
clip
Fuel injector O-ring seals
See Installation Detail
always observe fuel handling precautions.
1. Detach the fuel charging wiring harness
retaining clip from the intake manifold.
I w
A This procedure involves fuel handling. Be
prepared for fuel spillage at all times and
Failure to follow these instructions may
5. To install, reverse the removal procedure.
result in personal injury.
2006.0 Fiesta 1212006 G421322en
procarmanuals.com
Page 848 of 1226
Accessory Drive
DIAGNOSIS AND TESTING
2. Fraying just starting. Not considered a
concern. No action required.
3. Slight fraying. Not considered a concern. No
action required.
4. High amount of fraying without cord cuts.
INSTALL a new accessory drive belt.
REFER to: Accessory Drive Belt
- 1.3L
Duratec-8V (Rocam) (303-05 Accessory
Drive, Removal and lnstallation)
1 Accessory Drive Belt
- 1.4L Duratec-l6V
(Sigma)ll .6L Duratec-1 6V (Sigma),
Vehicles With: Air Conditioning (303-05
Accessory Drive, Removal and lnstallation)
1 Power Steering Pump Belt
- 1.4L
Duratec-1 6V (Sigma)ll .6L Duratec-1 6V
(Sigma), Vehicles With: Air Conditioning
(303-05 Accessory Drive, Removal and
Installation)
I Accessory Drive Belt - 1.4L Duratec-l6V
(Sigma)ll .6L Duratec-1 6V (Sigma),
Vehicles Without: Air Conditioning (303-05
Accessory Drive, Removal and lnstallation)
I Accessory Drive Belt - 1.4L Duratorq-TDCi
(DV) Diesel (303-05 Accessory Drive,
Removal and lnstallation)
1 Accessory Drive Belt
- 1.6L Duratorq-TDCi
(DV) Diesel (303-05 Accessory Drive,
Removal and lnstallation)
I Accessory Drive Belt - 2.OL Duratec-HE
(M14) (303-05 Accessory Drive, Removal
and lnstallation).
Symptom Chart
Symptom Chart 5.
High amount of fraying with cord cuts.
INSTALL a new accessory drive belt.
f-
REFER to: Accessory Drive Belt - 1.3L (
Duratec-8V (Rocam) (303-05 Accessory
Drive, Removal and lnstallation)
l Accessory Drive Belt - 1.4L Duratec-1 6V
(Sigma)Il.GL Duratec-1 6V (Sigma),
Vehicles With: Air Conditioning (303-05
Accessory Drive, Removal and lnstallation)
I Power Steering Pump Belt - 1.4L
Duratec-1 6V (Sigma)ll.GL Duratec-1 6V
(Sigma), Vehicles With: Air Conditioning
(303-05 Accessory Drive, Removal and
Installation)
I Accessory Drive Belt - 1.4L Duratec-I 6V
(Sigma)ll.GL Duratec-1 6V (Sigma),
Vehicles Without: Air Conditioning (303-05
Accessory Drive, Removal and lnstallation)
I Accessory Drive Belt - 1.4L Duratorq-TDCi
(DV) Diesel (303-05 Accessory Drive,
Removal and lnstallation)
I Accessory Drive Belt - 1.6L Duratorq-TDCi
(DV) Diesel (303-05 Accessory Drive,
Removal and lnstallation)
I Accessory Drive Belt - 2.OL Duratec-HE
(M14) (303-05 Accessory Drive, Removal
and Installation).
Incorrect fitment
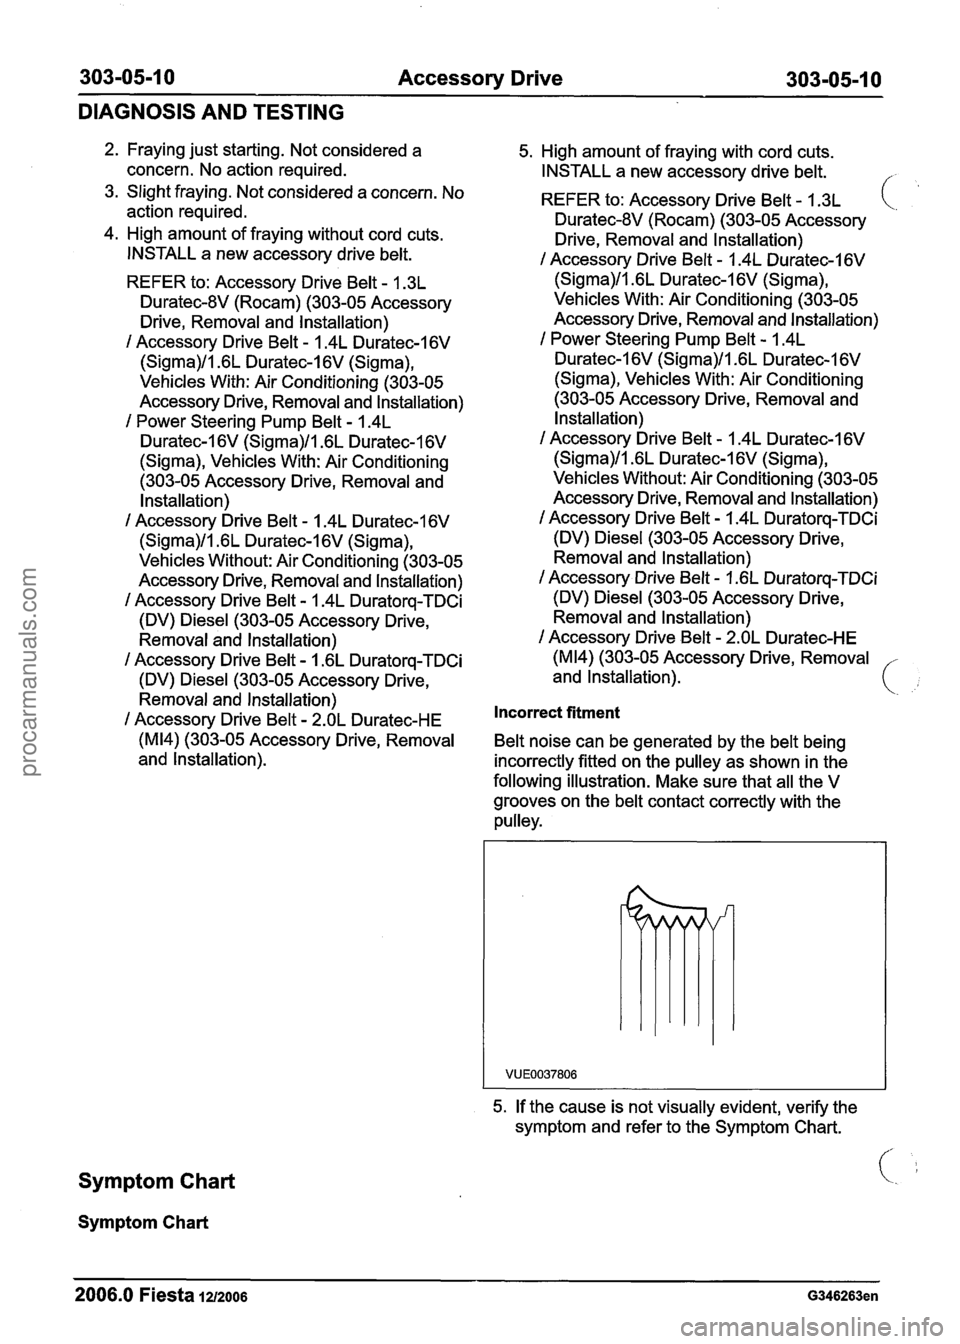
Belt noise can be generated by the belt being
incorrectly fitted on the pulley as shown in the
following illustration. Make sure that all the V
grooves on the belt contact correctly with the
pulley.
5. If the cause is not visually evident, verify the
symptom and refer to the Symptom Chart.
2006.0 Fiesta 1212006 G346263en
procarmanuals.com
Page 922 of 1226
303-1 34 Evaporative Emissions 303-1 3-4
REMOVAL AND INSTALLATION
Evaporative Emission Canister - 1.3L Duratec-8V (Rocam)/l.25L
Duratec-1 6V (Sigma)/l.4L Duratec-I 6V (Sigma)/l .6L
Duratec-1
6V (Sigma)(29 250 0)
c
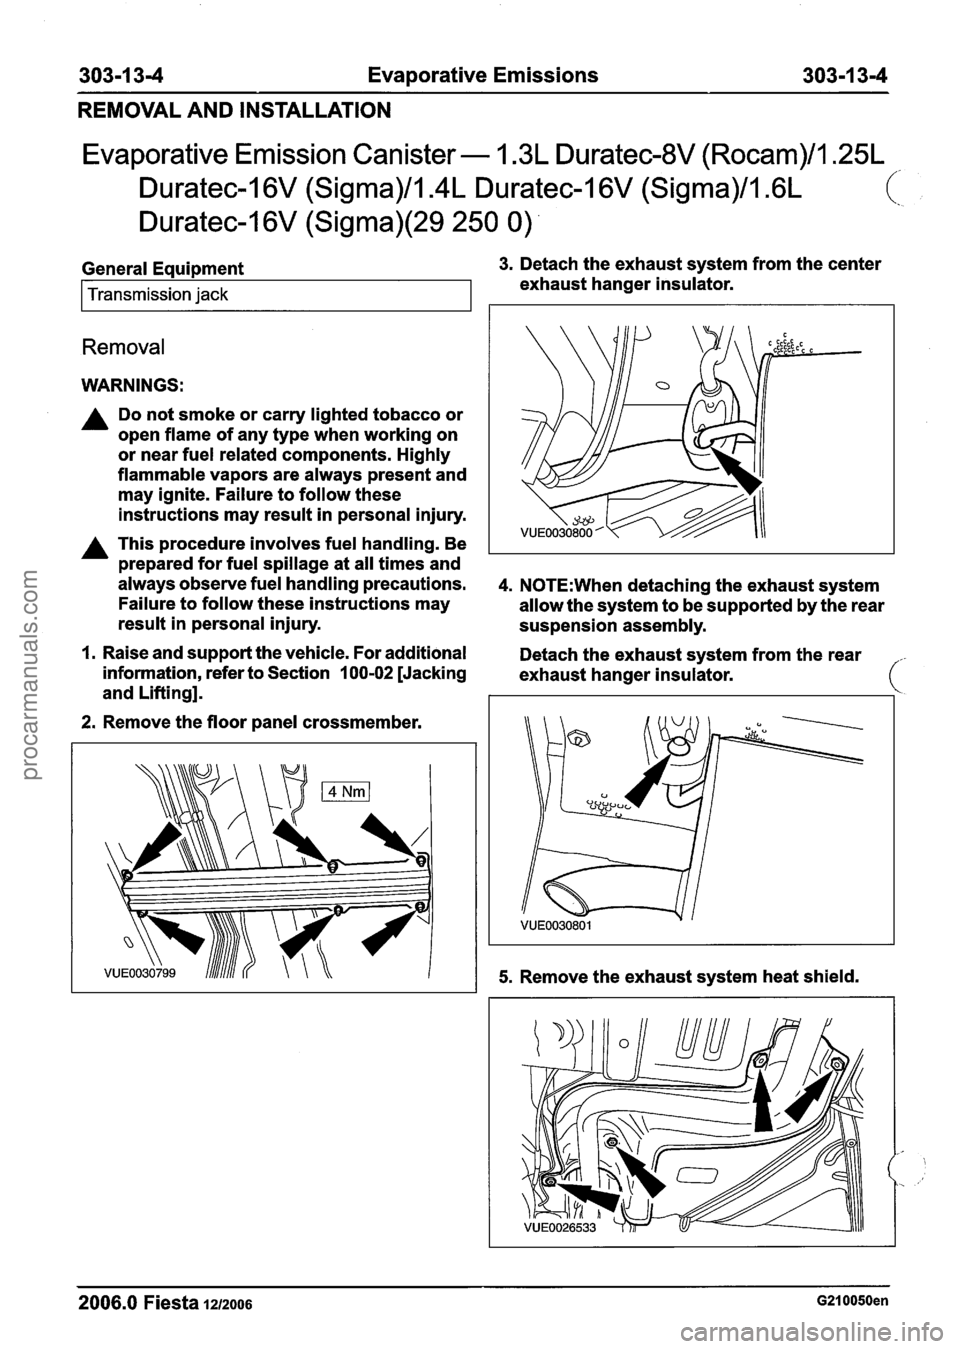
General Equipment 3. Detach the exhaust system from the center
Transmission jack exhaust hanger insulator.
Removal
WARNINGS:
A Do not smoke or carry lighted tobacco or
open flame of any type when working on
or near fuel related components. Highly
flammable vapors are always present and
may ignite. Failure to follow these
instructions may result in personal injury.
A This procedure involves fuel handling. Be
prepared for fuel spillage at all times and
always observe fuel handling precautions.
4. N0TE:When detaching the exhaust system
Failure to follow these instructions may
allow the system to be supported by the rear
result in personal injury.
suspension assembly.
I. Raise and support the vehicle. For additional
Detach the exhaust system from the rear
information, refer to Section
100-02 [Jacking
exhaust hanger insulator.
and Lifting].
2. Remove the floor panel crossmember.
5. Remove the exhaust system heat shield.
-
2006.0 Fiesta 1212006 G210050en
procarmanuals.com
Page 924 of 1226
303-1 3-6 Evaporative Emissions 303-1 3-6
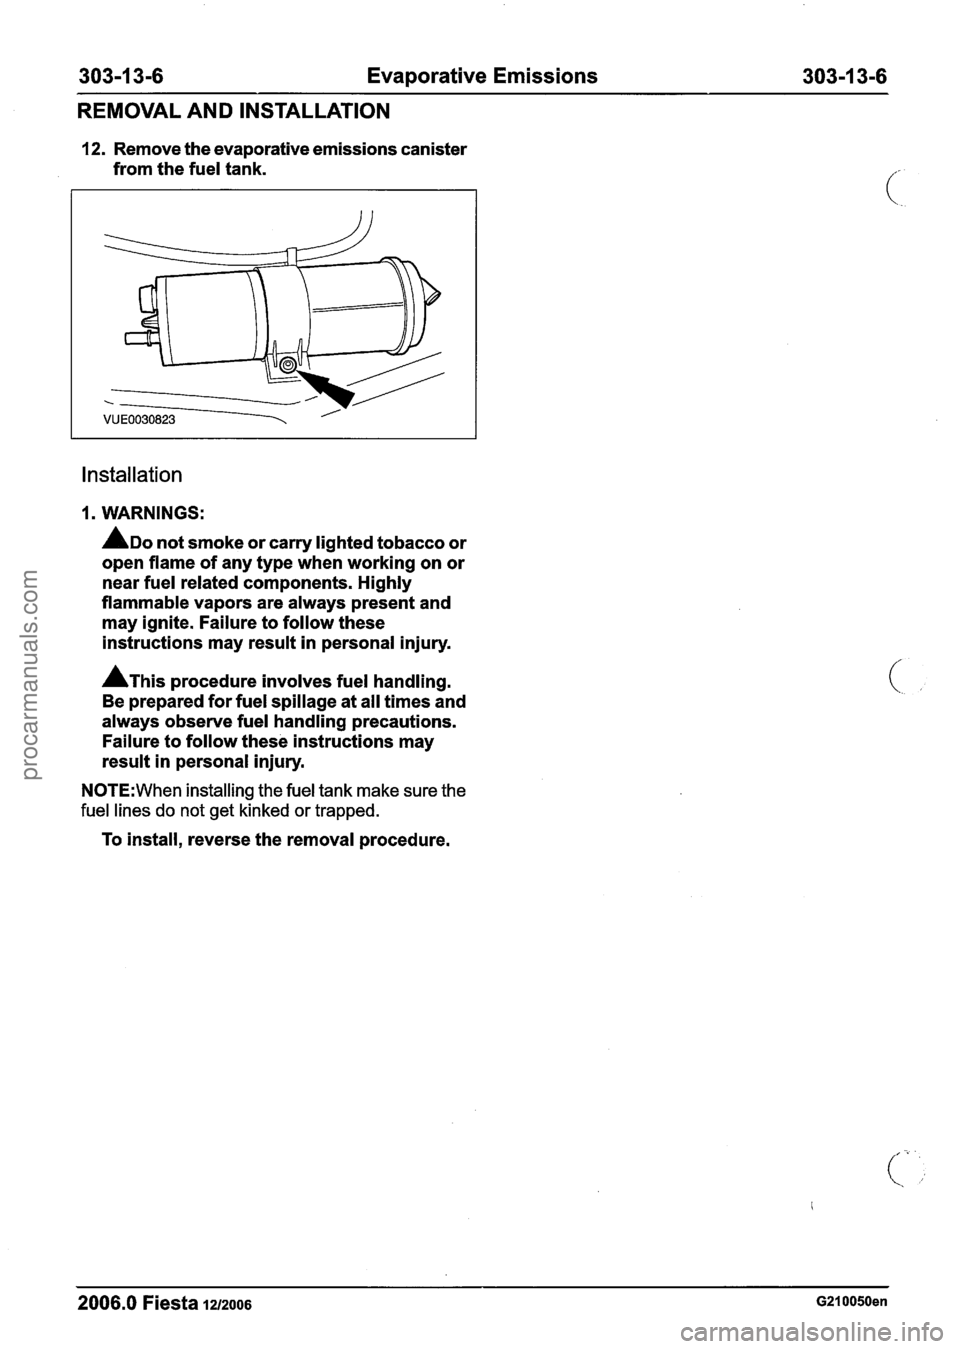
REMOVAL AND INSTALLATION
12. Remove the evaporative emissions canister
from the fuel tank.
Installation
1. WARNINGS:
ADO not smoke or carry lighted tobacco or
open flame of any type when working on or
near fuel related components. Highly
flammable vapors are always present and
may ignite. Failure to follow these
instructions may result in personal injury.
A~his procedure involves fuel handling.
Be prepared for fuel spillage at all times and
always observe fuel handling precautions.
Failure to follow these instructions may
result in personal injury.
N0TE:When installing the fuel tank make sure the
fuel lines do not get kinked or trapped.
To install, reverse the removal procedure.
2006.0 Fiesta 1212006 G210050en
procarmanuals.com