FORD MONDEO 2014 4.G Owners Manual
Manufacturer: FORD, Model Year: 2014, Model line: MONDEO, Model: FORD MONDEO 2014 4.GPages: 446, PDF Size: 29.09 MB
Page 251 of 446
Downloaded from www.Manualslib.com manuals search engine CHANGING THE 12V BATTERY
WARNING
For vehicles with Start-Stop thebattery requirement is different. Youmust replace the battery with one ofexactly the same specification.
The battery is located in the enginecompartment. See Maintenance (page237).
Make sure that you dispose ofold batteries in anenvironmentally friendly way.
Seek advice from your local authorityabout recycling old batteries.
CHECKING THE WIPER
BLADES
Run the tip of your fingers over the edge ofthe blade to check for roughness.
Clean the wiper blades with washer fluidor water applied with a soft sponge orcloth.
CHANGING THE WIPER
BLADES
The wiper arms can be manually movedwhen the ignition is off. This allows for easeof blade replacement and cleaning underthe blades.
Replace wiper blades at least once peryear for optimum performance.
Poor wiper quality can be improved bycleaning the wiper blades and thewindshield.
Changing the Front Wiper Blades
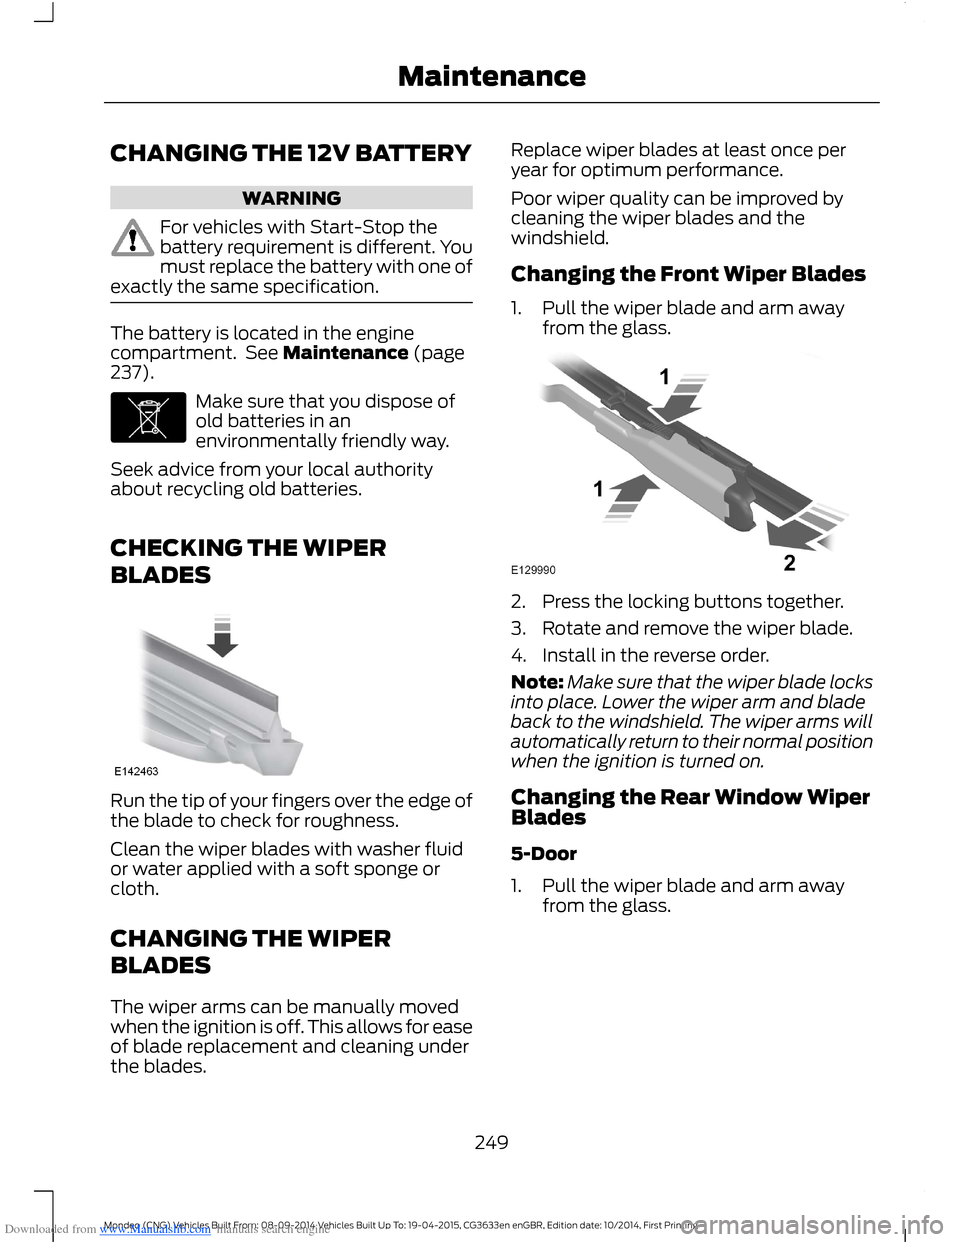
1.Pull the wiper blade and arm awayfrom the glass.
2.Press the locking buttons together.
3.Rotate and remove the wiper blade.
4.Install in the reverse order.
Note:Make sure that the wiper blade locksinto place. Lower the wiper arm and bladeback to the windshield. The wiper arms willautomatically return to their normal positionwhen the ignition is turned on.
Changing the Rear Window WiperBlades
5-Door
1.Pull the wiper blade and arm awayfrom the glass.
249Mondeo (CNG) Vehicles Built From: 08-09-2014 Vehicles Built Up To: 19-04-2015, CG3633en enGBR, Edition date: 10/2014, First PrintingMaintenance
Page 252 of 446
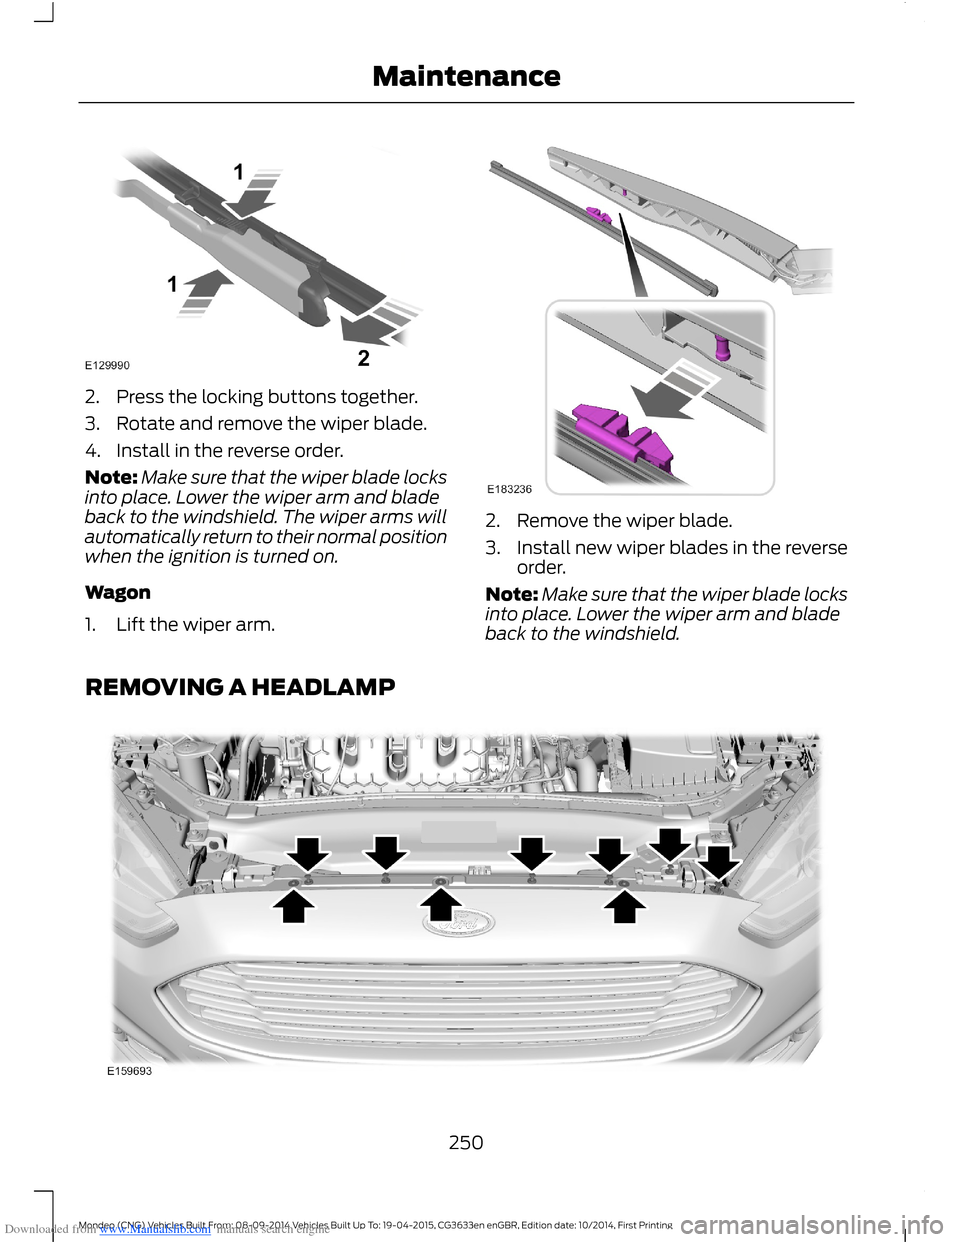
Downloaded from www.Manualslib.com manuals search engine 2.Press the locking buttons together.
3.Rotate and remove the wiper blade.
4.Install in the reverse order.
Note:Make sure that the wiper blade locksinto place. Lower the wiper arm and bladeback to the windshield. The wiper arms willautomatically return to their normal positionwhen the ignition is turned on.
Wagon
1.Lift the wiper arm.
2.Remove the wiper blade.
3.Install new wiper blades in the reverseorder.
Note:Make sure that the wiper blade locksinto place. Lower the wiper arm and bladeback to the windshield.
REMOVING A HEADLAMP
250Mondeo (CNG) Vehicles Built From: 08-09-2014 Vehicles Built Up To: 19-04-2015, CG3633en enGBR, Edition date: 10/2014, First PrintingMaintenance
Page 253 of 446
Downloaded from www.Manualslib.com manuals search engine Note:To remove push pins, use aflat-bladed screwdriver to pull up the centerrelease pin.
1.Make sure the headlamp control is inthe off position and open the hood.
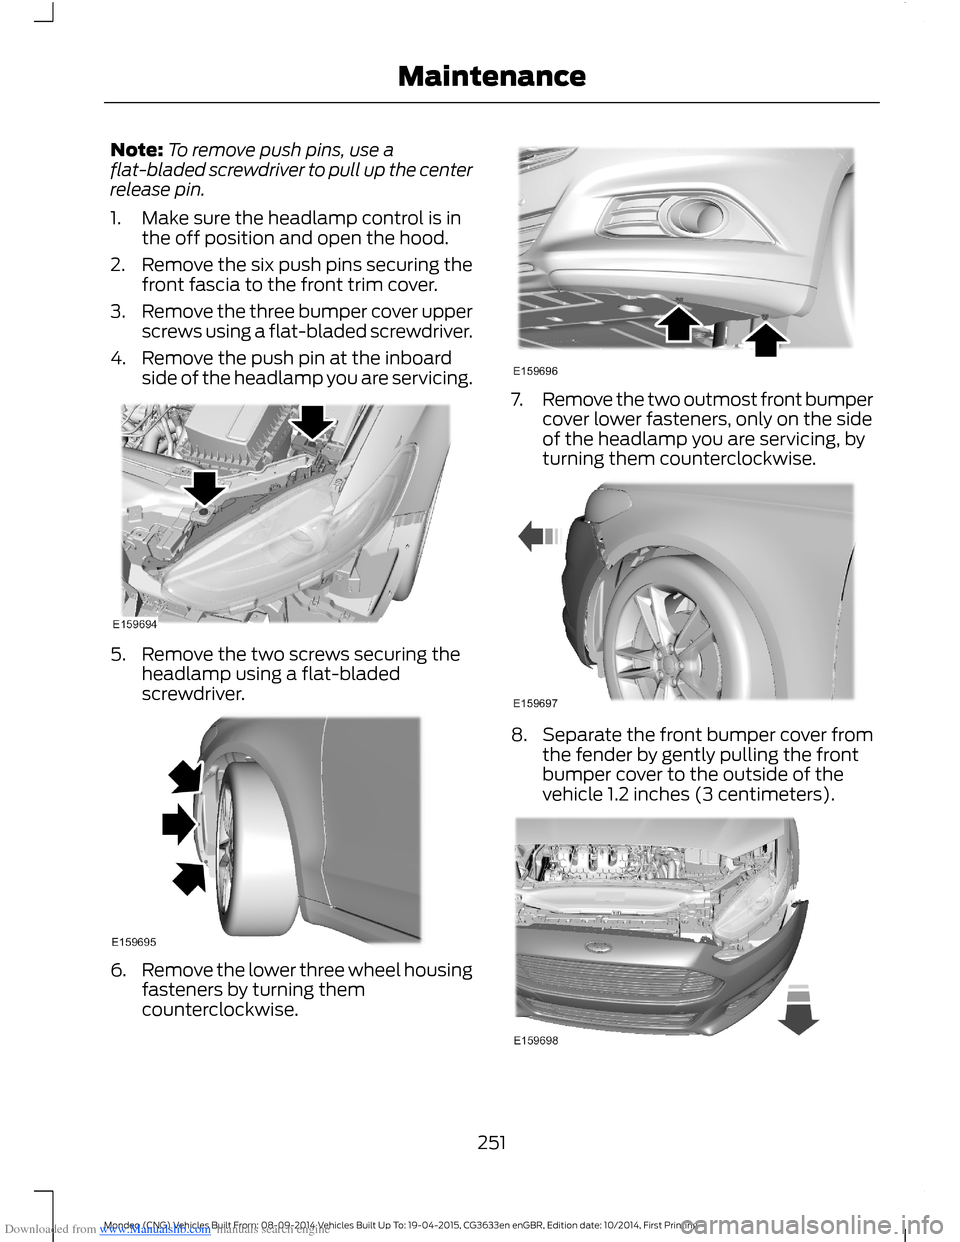
2.Remove the six push pins securing thefront fascia to the front trim cover.
3.Remove the three bumper cover upperscrews using a flat-bladed screwdriver.
4.Remove the push pin at the inboardside of the headlamp you are servicing.
5.Remove the two screws securing theheadlamp using a flat-bladedscrewdriver.
6.Remove the lower three wheel housingfasteners by turning themcounterclockwise.
7.Remove the two outmost front bumpercover lower fasteners, only on the sideof the headlamp you are servicing, byturning them counterclockwise.
8.Separate the front bumper cover fromthe fender by gently pulling the frontbumper cover to the outside of thevehicle 1.2 inches (3 centimeters).
251Mondeo (CNG) Vehicles Built From: 08-09-2014 Vehicles Built Up To: 19-04-2015, CG3633en enGBR, Edition date: 10/2014, First PrintingMaintenance
Page 254 of 446
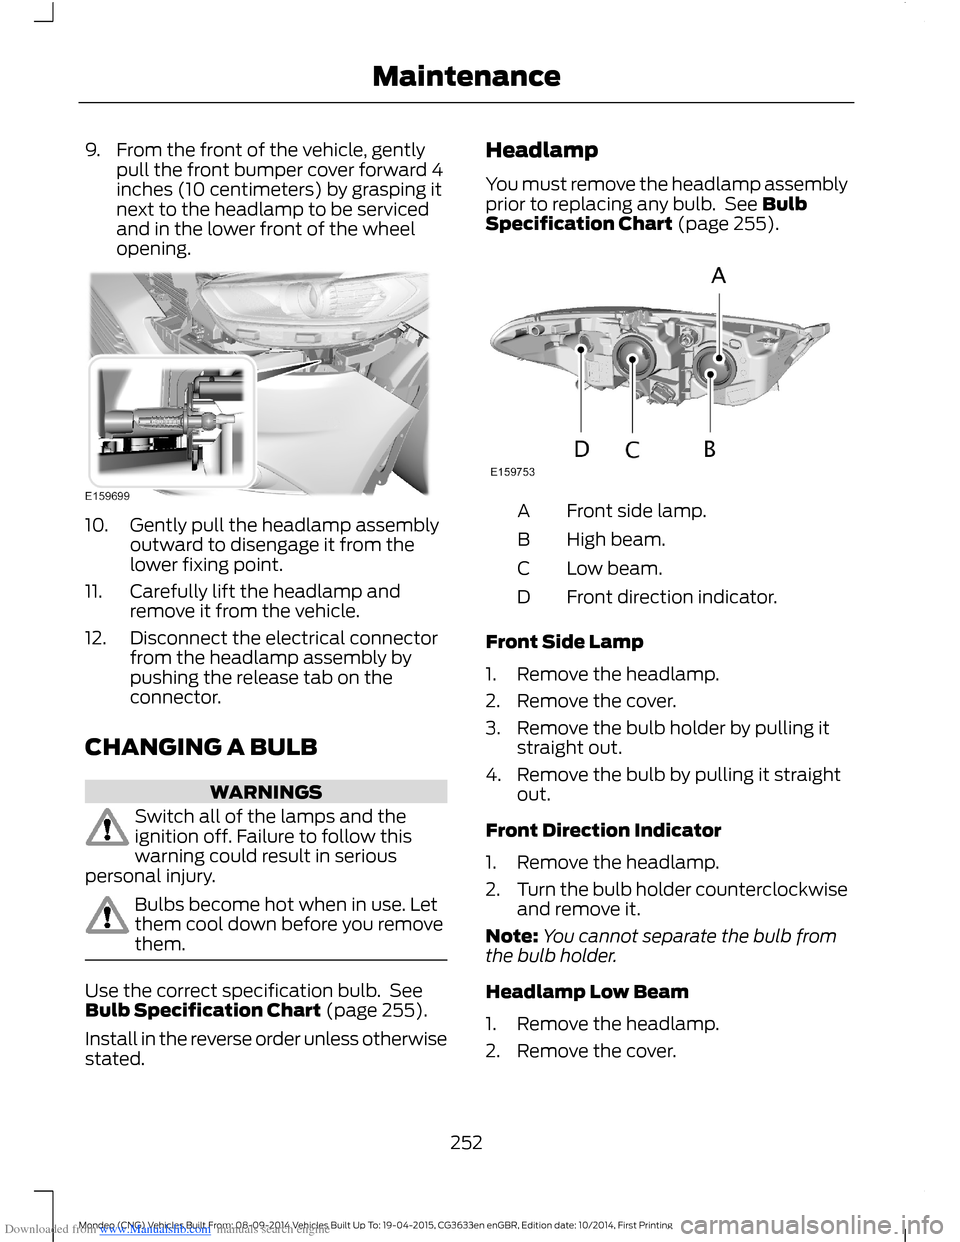
Downloaded from www.Manualslib.com manuals search engine 9.From the front of the vehicle, gentlypull the front bumper cover forward 4inches (10 centimeters) by grasping itnext to the headlamp to be servicedand in the lower front of the wheelopening.
10.Gently pull the headlamp assemblyoutward to disengage it from thelower fixing point.
11.Carefully lift the headlamp andremove it from the vehicle.
12.Disconnect the electrical connectorfrom the headlamp assembly bypushing the release tab on theconnector.
CHANGING A BULB
WARNINGS
Switch all of the lamps and theignition off. Failure to follow thiswarning could result in seriouspersonal injury.
Bulbs become hot when in use. Letthem cool down before you removethem.
Use the correct specification bulb. SeeBulb Specification Chart (page 255).
Install in the reverse order unless otherwisestated.
Headlamp
You must remove the headlamp assemblyprior to replacing any bulb. See BulbSpecification Chart (page 255).
Front side lamp.A
High beam.B
Low beam.C
Front direction indicator.D
Front Side Lamp
1.Remove the headlamp.
2.Remove the cover.
3.Remove the bulb holder by pulling itstraight out.
4.Remove the bulb by pulling it straightout.
Front Direction Indicator
1.Remove the headlamp.
2.Turn the bulb holder counterclockwiseand remove it.
Note:You cannot separate the bulb fromthe bulb holder.
Headlamp Low Beam
1.Remove the headlamp.
2.Remove the cover.
252Mondeo (CNG) Vehicles Built From: 08-09-2014 Vehicles Built Up To: 19-04-2015, CG3633en enGBR, Edition date: 10/2014, First PrintingMaintenance
Page 255 of 446
Downloaded from www.Manualslib.com manuals search engine 3.Turn the bulb holder counterclockwiseand remove it.
4.Disconnect the electrical connector.
Note:Do not touch the bulb glass.
Note:You cannot separate the bulb fromthe bulb holder.
Headlamp High Beam
1.Remove the headlamp.
2.Remove the cover.
3.Turn the bulb holder counterclockwiseand remove it.
4.Disconnect the electrical connector.
Note:Do not touch the bulb glass.
Note:You cannot separate the bulb fromthe bulb holder.
High-Intensity Discharge Headlamps
These lamps operate at a high voltage. Seean authorized dealer if they fail.
LED Lamps
LED lamps are not serviceable items. Seean authorized dealer if they fail.
The following lamps are LED:
•Brake and rear lamps.
•Central high mounted brake lamp.
•Daytime running lamps.
•Rear direction indicators.
•Side direction indicators.
Reverse Lamp
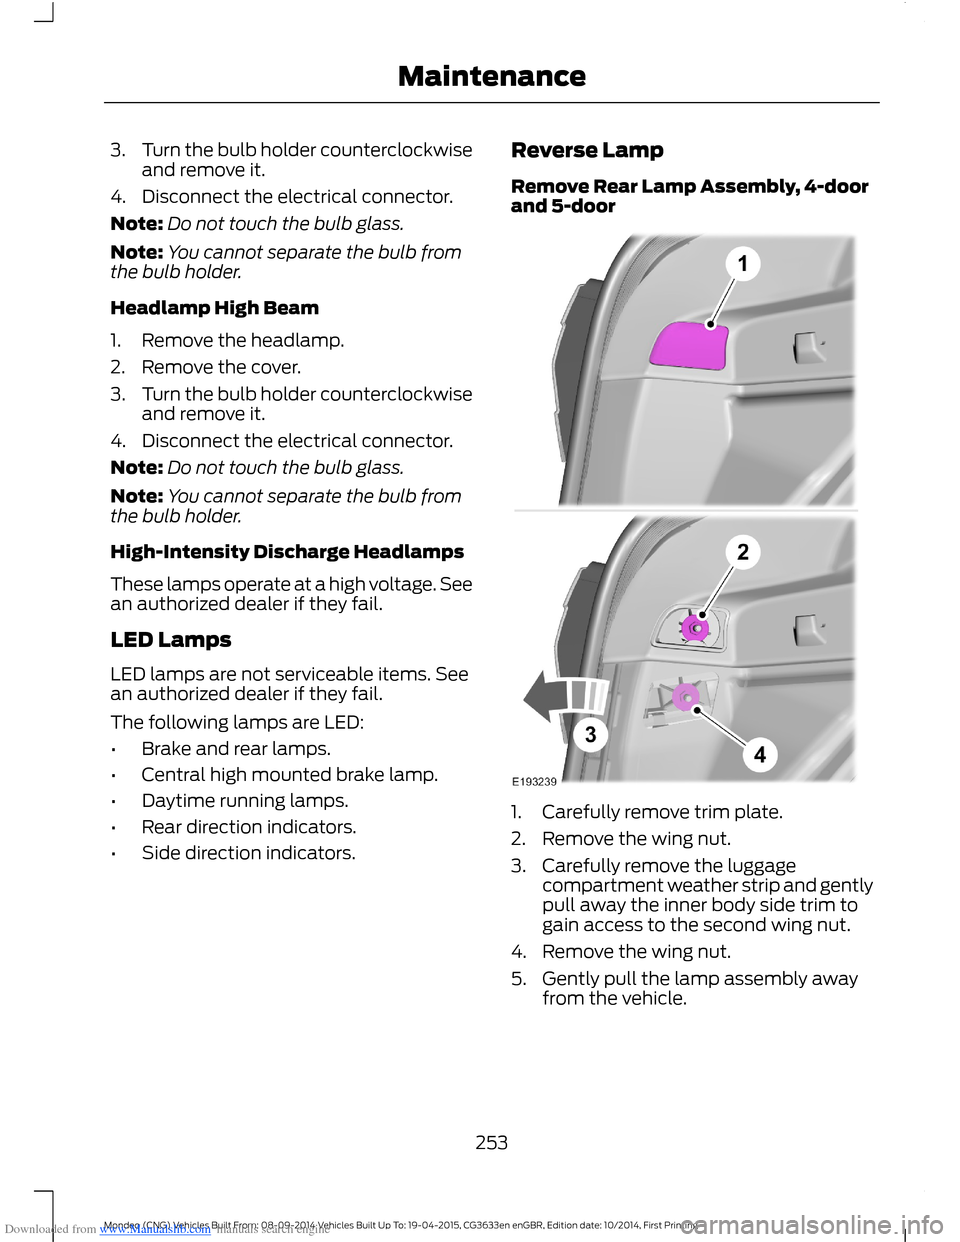
Remove Rear Lamp Assembly, 4-doorand 5-door
1.Carefully remove trim plate.
2.Remove the wing nut.
3.Carefully remove the luggagecompartment weather strip and gentlypull away the inner body side trim togain access to the second wing nut.
4.Remove the wing nut.
5.Gently pull the lamp assembly awayfrom the vehicle.
253Mondeo (CNG) Vehicles Built From: 08-09-2014 Vehicles Built Up To: 19-04-2015, CG3633en enGBR, Edition date: 10/2014, First PrintingMaintenance
Page 256 of 446
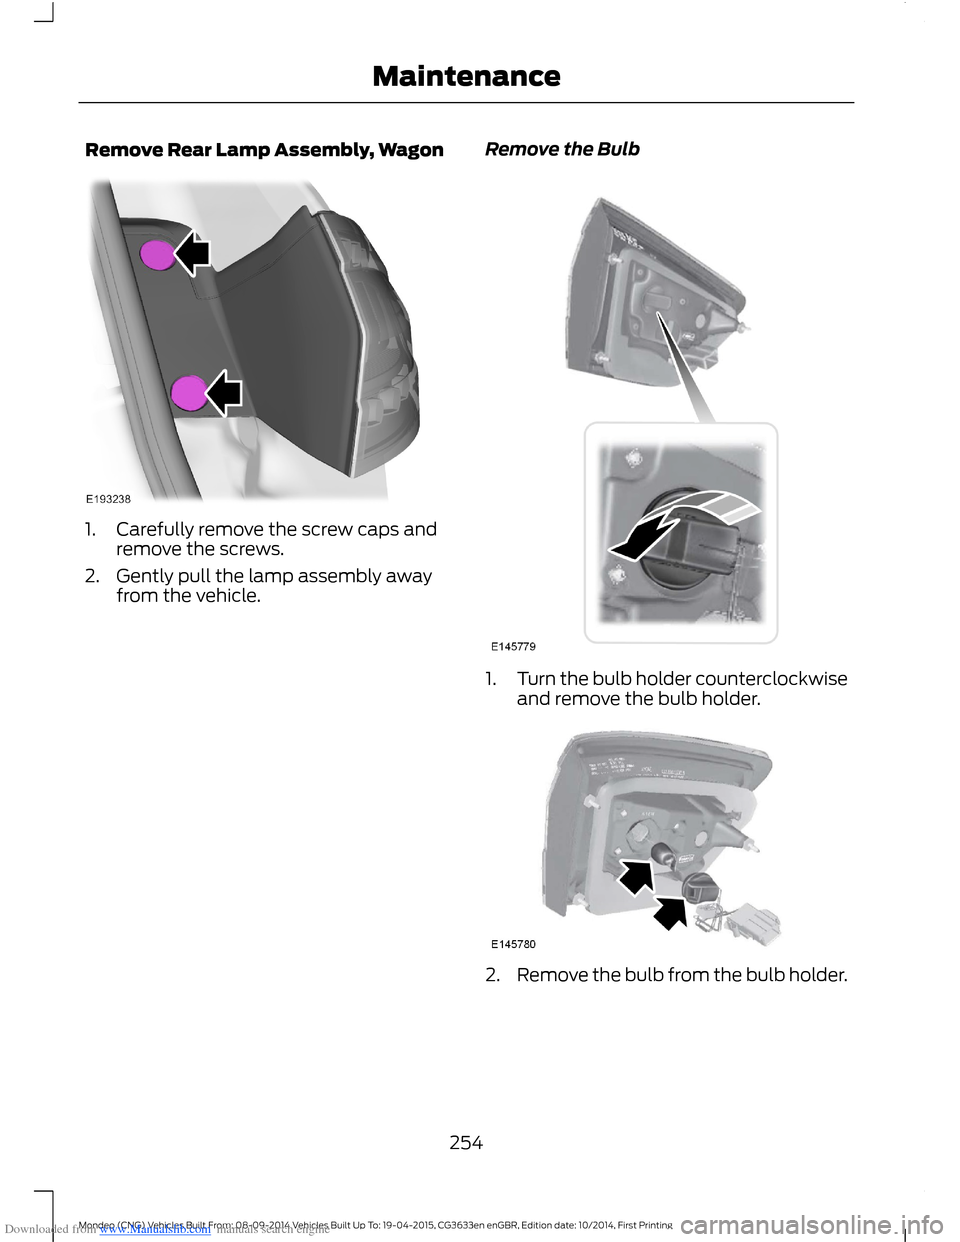
Downloaded from www.Manualslib.com manuals search engine Remove Rear Lamp Assembly, Wagon
1.Carefully remove the screw caps andremove the screws.
2.Gently pull the lamp assembly awayfrom the vehicle.
Remove the Bulb
1.Turn the bulb holder counterclockwiseand remove the bulb holder.
2.Remove the bulb from the bulb holder.
254Mondeo (CNG) Vehicles Built From: 08-09-2014 Vehicles Built Up To: 19-04-2015, CG3633en enGBR, Edition date: 10/2014, First PrintingMaintenance
Page 257 of 446
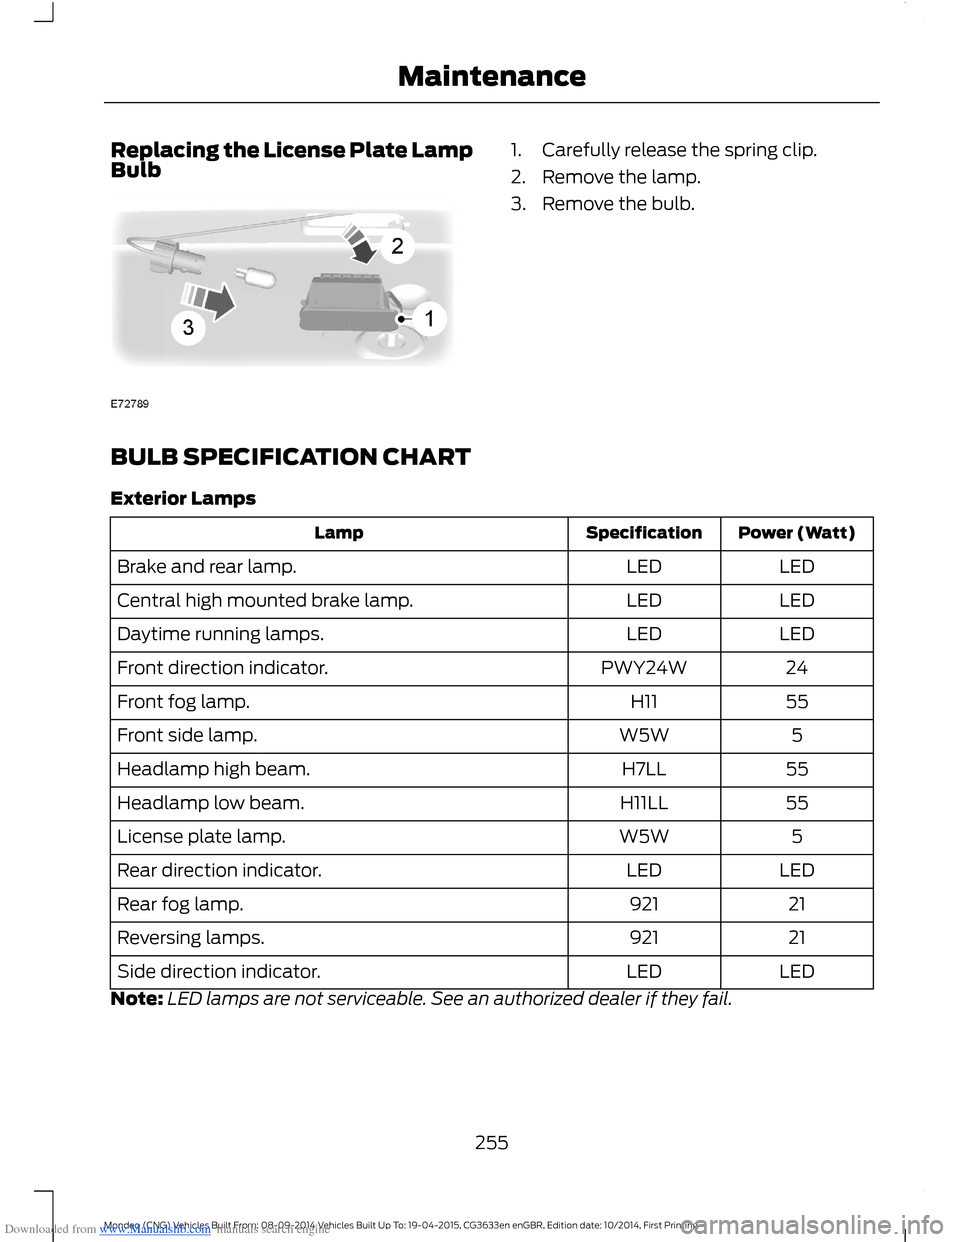
Downloaded from www.Manualslib.com manuals search engine Replacing the License Plate LampBulb1.Carefully release the spring clip.
2.Remove the lamp.
3.Remove the bulb.
BULB SPECIFICATION CHART
Exterior Lamps
Power (Watt)SpecificationLamp
LEDLEDBrake and rear lamp.
LEDLEDCentral high mounted brake lamp.
LEDLEDDaytime running lamps.
24PWY24WFront direction indicator.
55H11Front fog lamp.
5W5WFront side lamp.
55H7LLHeadlamp high beam.
55H11LLHeadlamp low beam.
5W5WLicense plate lamp.
LEDLEDRear direction indicator.
21921Rear fog lamp.
21921Reversing lamps.
LEDLEDSide direction indicator.
Note:LED lamps are not serviceable. See an authorized dealer if they fail.
255Mondeo (CNG) Vehicles Built From: 08-09-2014 Vehicles Built Up To: 19-04-2015, CG3633en enGBR, Edition date: 10/2014, First PrintingMaintenance
Page 258 of 446
Downloaded from www.Manualslib.com manuals search engine Interior Lamps
Power (Watt)SpecificationLamp
LEDLEDInterior lamp.
5W5WLuggage compartment lamp.
LEDLEDMap lamp.
Note:LED lamps are not serviceable. See an authorized dealer if they fail.
256Mondeo (CNG) Vehicles Built From: 08-09-2014 Vehicles Built Up To: 19-04-2015, CG3633en enGBR, Edition date: 10/2014, First PrintingMaintenance
Page 259 of 446
Downloaded from www.Manualslib.com manuals search engine CLEANING THE EXTERIOR
Note:If you use a car wash with a waxingcycle, make sure that you remove the waxfrom the windshield and the wiper blades.
Note:Prior to using a car wash facilitycheck the suitability of it for your vehicle.
Note:Some car washes use water at highpressure. Due to this, water droplets mayenter inside your vehicle and could alsodamage certain parts of your vehicle.
Note:Remove the aerial before using anautomatic car wash.
Note:Switch the heater blower off toprevent contamination of the fresh air filter.
We recommend that you wash your vehiclewith a sponge and lukewarm watercontaining a car shampoo.
Cleaning the Headlamps
Note:Do not scrape the headlamp lensesor use abrasives, alcoholic solvents orchemical solvents to clean them.
Note:Do not wipe the headlamps whenthey are dry.
Cleaning the Rear Window
Note:Do not scrape the inside of the rearwindow or use abrasives or chemicalsolvents to clean it.
Use a clean, lint free cloth or a dampchamois leather to clean the inside of therear window.
Cleaning the Chrome Trim
Note:Do not use abrasives or chemicalsolvents. Use soapy water.
Note:Do not apply cleaning product to hotsurfaces and do not leave cleaning producton chrome surfaces for a period of timeexceeding that which is recommended.
Note:Industrial-strength (heavy-duty)cleaners, or cleaning chemicals, may causedamage over a period of time.
Body Paintwork Preservation
WARNINGS
Do not polish your vehicle in strongsunshine.
Do not allow polish to touch plasticsurfaces. It could be difficult toremove.
Do not apply polish to the windshieldor rear window. This could cause thewipers to become noisy and theymay not clear the window properly.
We recommend that you wax thepaintwork once or twice a year.
CLEANING THE WINDOWS AND
WIPER BLADES
Car wash chemicals and environmentalfallout can result in windshield and wiperblade contamination. Dirty windshield andwipers will result in poor windshield wiperoperation. Keep the windshield and wiperblades clean to maintain windshield wiperperformance.
To clean the windshield and wiper blades:
•Clean the windshield with anon-abrasive glass cleaner.
•For windshields contaminated withtree sap, chemicals, wax or bugs, cleanthe entire windshield using steel wool(no greater than 0000 grade) in acircular motion and rinse with water.
•Clean the wiper blades with isopropylrubbing alcohol or windshield washerconcentrate.
257Mondeo (CNG) Vehicles Built From: 08-09-2014 Vehicles Built Up To: 19-04-2015, CG3633en enGBR, Edition date: 10/2014, First PrintingVehicle Care
Page 260 of 446
Downloaded from www.Manualslib.com manuals search engine Note: Do not use razor blades or othersharp objects to clean or remove decalsfrom the inside of the heated rear window.The vehicle warranty does not coverdamage caused to the heated rear windowgrid lines.
CLEANING THE INTERIOR
Note:Do not allow air fresheners and handsanitizers to spill on interior surfaces. If aspill occurs, wipe off immediately. Damagemay not be covered by your warranty.
Safety Belts
Note:Do not use abrasives, or chemicalsolvents to clean them.
Note:Do not allow moisture to penetratethe safety belt retractor mechanism.
Clean them with interior cleaner or waterapplied with a soft sponge. Let them drynaturally, away from artificial heat.
Instrument Cluster Screens, LCDScreens and Radio Screens
Note:Do not use abrasives, alcoholicsolvents or chemical solvents to clean them.
Rear Windows
Note:Do not use any abrasive materials toclean the interior of the rear windows.
Note:Do not install stickers or labels to theinterior of the rear windows.
REPAIRING MINOR PAINT
DAMAGE
You should repair paintwork damagecaused by stones from the road or minorscratches as soon as possible. A choice ofproducts are available from an authorizeddealer.
Remove particles such as bird droppings,tree sap, insect deposits, tar spots, roadsalt and industrial fallout before repairingpaint chips.
Always read and follow the manufacturer’sinstructions before using the products.
CLEANING THE ALLOY
WHEELS
Note:Do not apply a cleaning chemical towarm or hot wheel rims and covers.
Note:Industrial-strength (heavy-duty)cleaners, or cleaning chemicals, incombination with brush agitation to removebrake dust and dirt, could wear away theclear coat finish over a period of time.
Note:Do not use hydrofluoric acid-basedor high caustic-based wheel cleaners, steelwool, fuels or strong household detergent.
Note:If you intend parking your vehicle foran extended period after cleaning thewheels with a wheel cleaner, drive yourvehicle for a few minutes before doing so.This will reduce the risk of increasedcorrosion of the brake discs, brake pads andlinings.
Note:Some automatic car washes maycause damage to the finish on your wheelrims and covers.
Alloy wheels and wheel covers are coatedwith a clear coat paint finish. To maintaintheir condition we recommend that you:
•Clean them weekly with therecommended wheel and tire cleaner.
•Use a sponge to remove heavydeposits of dirt and brake dustaccumulation.
•Rinse them thoroughly with apressurized stream of water when youhave completed the cleaning process.
258Mondeo (CNG) Vehicles Built From: 08-09-2014 Vehicles Built Up To: 19-04-2015, CG3633en enGBR, Edition date: 10/2014, First PrintingVehicle Care