ESP FORD MUSTANG 1969 Volume One Chassis
[x] Cancel search | Manufacturer: FORD, Model Year: 1969, Model line: MUSTANG, Model: FORD MUSTANG 1969Pages: 413, PDF Size: 75.81 MB
Page 142 of 413
03-07-04
Ford Design Non-Integral Power Steering System
03-07-04
12.
Stop the engine, and check the
control valve and hose connections for
fluid leaks. Correct the cause of any
leaks.
13.
Check the fluid level, and refill
the reservoir if necessary.
14.
With the engine running check
the position of the steering wheel
when the front wheels are in the
straight-ahead position.Do not make
any adjustments until toe-in is
checked.
15.
Keep the engine running, and
check toe-in. If either toe-in or steer-
ing wheel position is not correct make
all necessary adjustments (Part 3-1) at
the spindle connecting rod sleeves.
16.
Check the effort to turn the
wheels in both directions. The effort
should be about equal in both direc-
tions.
POWER CYLINDER
REMOVAL
1.
Disconnect the two fluid lines
from the power cylinder and allow
them to drain into a container.
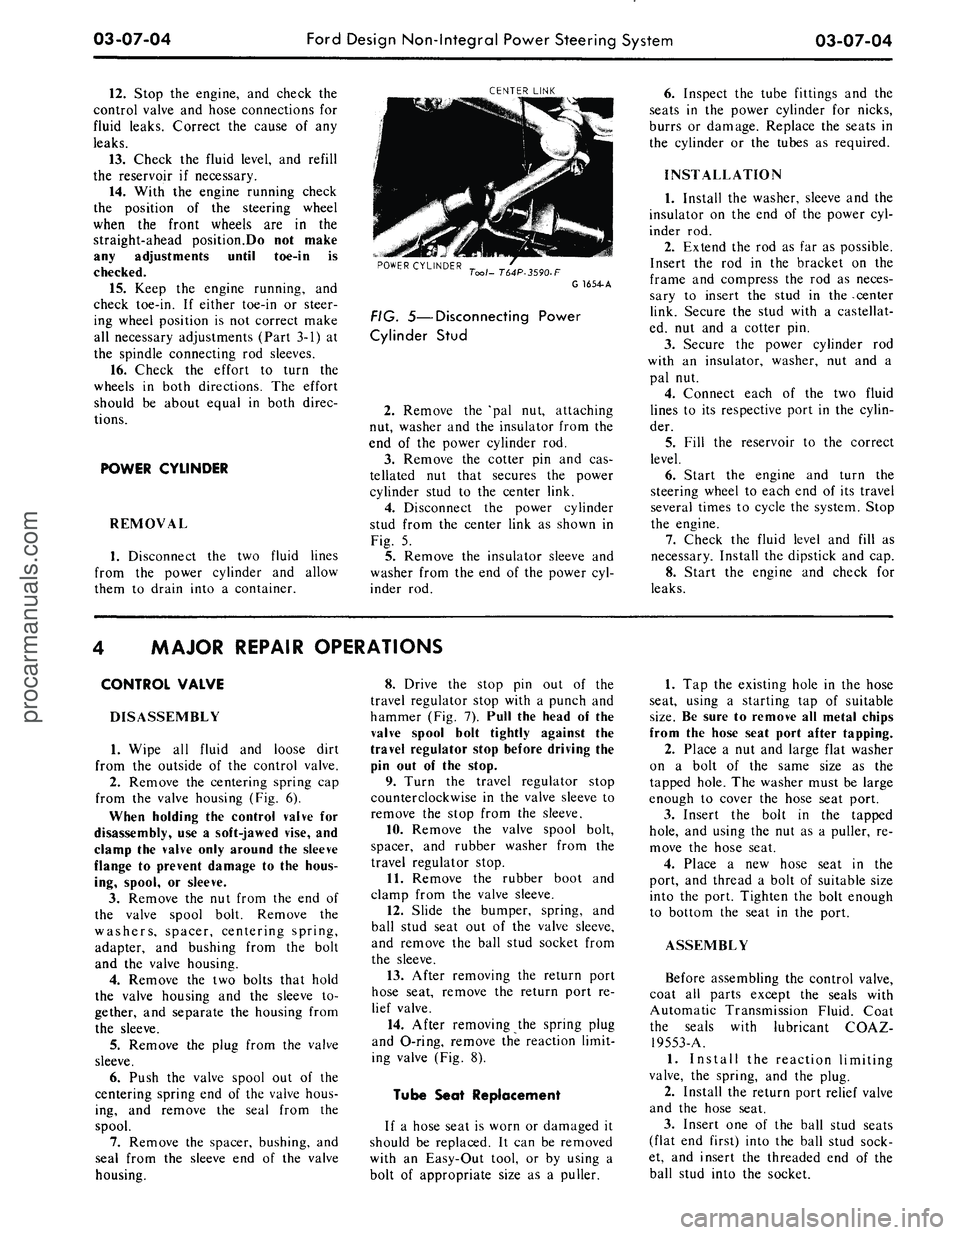
CENTER LINK
POWER CYLINDER
Tool- T64P-3590-F
G 1654-A
FIG. 5—Disconnecting Power
Cylinder Stud
2.
Remove the 'pal nut, attaching
nut, washer and the insulator from the
end of the power cylinder rod.
3.
Remove the cotter pin and cas-
tellated nut that secures the power
cylinder stud to the center link.
4.
Disconnect the power cylinder
stud from the center link as shown in
Fig. 5.
5.
Remove the insulator sleeve and
washer from the end of the power cyl-
inder rod.
6. Inspect the tube fittings and the
seats in the power cylinder for nicks,
burrs or damage. Replace the seats in
the cylinder or the tubes as required.
INSTALLATION
1.
Install the washer, sleeve and the
insulator on the end of the power cyl-
inder rod.
2.
Extend the rod as far as possible.
Insert the rod in the bracket on the
frame and compress the rod as neces-
sary to insert the stud in the -center
link. Secure the stud with a castellat-
ed, nut and a cotter pin.
3.
Secure the power cylinder rod
with an insulator, washer, nut and a
pal nut.
4.
Connect each of the two fluid
lines to its respective port in the cylin-
der.
5.
Fill the reservoir to the correct
level.
6. Start the engine and turn the
steering wheel to each end of its travel
several times to cycle the system. Stop
the engine.
7.
Check the fluid level and fill as
necessary. Install the dipstick and cap.
8. Start the engine and check for
leaks.
MAJOR REPAIR OPERATIONS
CONTROL VALVE
DISASSEMBLY
1.
Wipe all fluid and loose dirt
from the outside of the control valve.
2.
Remove the centering spring cap
from the valve housing (Fig. 6).
When holding the control valve for
disassembly, use a soft-jawed vise, and
clamp the valve only around the sleeve
flange to prevent damage to the hous-
ing, spool, or sleeve.
3.
Remove the nut from the end of
the valve spool bolt. Remove the
washers, spacer, centering spring,
adapter, and bushing from the bolt
and the valve housing.
4.
Remove the two bolts that hold
the valve housing and the sleeve to-
gether, and separate the housing from
the sleeve.
5.
Remove the plug from the valve
sleeve.
6. Push the valve spool out of the
centering spring end of the valve hous-
ing, and remove the seal from the
spool.
7.
Remove the spacer, bushing, and
seal from the sleeve end of the valve
housing.
8. Drive the stop pin out of the
travel regulator stop with a punch and
hammer (Fig. 7). Pull the head of the
valve spool bolt tightly against the
travel regulator stop before driving the
pin out of the stop.
9. Turn the travel regulator stop
counterclockwise in the valve sleeve to
remove the stop from the sleeve.
10.
Remove the valve spool bolt,
spacer, and rubber washer from the
travel regulator stop.
11.
Remove the rubber boot and
clamp from the valve sleeve.
12.
Slide the bumper, spring, and
ball stud seat out of the valve sleeve,
and remove the ball stud socket from
the sleeve.
13.
After removing the return port
hose seat, remove the return port re-
lief valve.
14.
After removing the spring plug
and O-ring, remove the reaction limit-
ing valve (Fig. 8).
Tube Seat Replacement
If a hose seat is worn or damaged it
should be replaced. It can be removed
with an Easy-Out tool, or by using a
bolt of appropriate size as a puller.
1.
Tap the existing hole in the hose
seat, using a starting tap of suitable
size.
Be sure to remove all metal chips
from the hose seat port after tapping.
2.
Place a nut and large flat washer
on a bolt of the same size as the
tapped hole. The washer must be large
enough to cover the hose seat port.
3.
Insert the bolt in the tapped
hole,
and using the nut as a puller, re-
move the hose seat.
4.
Place a new hose seat in the
port, and thread a bolt of suitable size
into the port. Tighten the bolt enough
to bottom the seat in the port.
ASSEMBLY
Before assembling the control valve,
coat all parts except the seals with
Automatic Transmission Fluid. Coat
the seals with lubricant COAZ-
19553-A.
1.
Install the reaction limiting
valve, the spring, and the plug.
2.
Install the return port relief valve
and the hose seat.
3.
Insert one of the ball stud seats
(flat end first) into the ball stud sock-
et, and insert the threaded end of the
ball stud into the socket.procarmanuals.com
Page 153 of 413
03-09-01
Saginaw Design Integral Power Steering Gear
03-09-01
PART 3-9 Saginaw Design
Integral Power Steering Gear
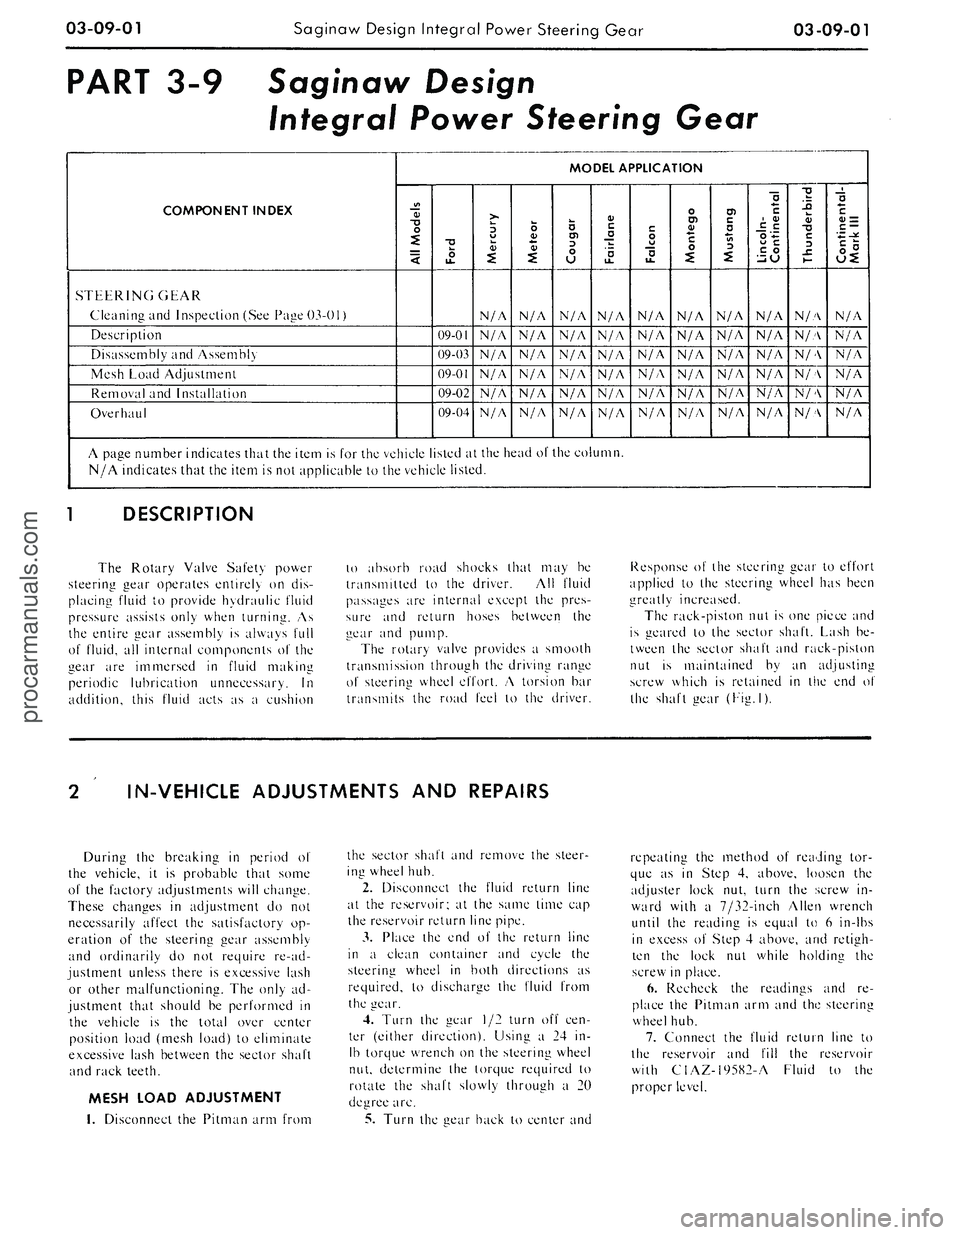
COMPONENT INDEX
STEERING GEAR
Cleaning and Inspection (See Page 03-01)
Description
Disassembly and Assembly
Mesh Load Adjustment
Removal and Installation
Overhaul
MODEL APPLICATION
All
Models
Ford
09-01
09-03
09-01
09-02
09-04
Mercury
N/A
N/A
N/A
N/A
N/A
N/A
Meteor
N/A
N/A
N/A
N/A
N/A
N/A
Cougar
N/A
N/A
N/A
N/A
N/A
N/A
Fairlane
N/A
N/A
N/A
N/A
N/A
N/A
Falcon
N/A
N/A
N/A
N/A
N/A
N/A
Montego
N/A
N/A
N/A
N/A
N/A
N/A
Mustang
N/A
N/A
N/A
N/A
N/A
N/A
Lincoln-
Continental
N/A
N/A
N/A
N/A
N/A
N/A
Thunderbird
N/A
N/A
N/A
N/A
N/\
N/A
Continental-
Mark III
N/A
N/A
N/A
N/A
N/A
N/A
A page number indicates that the item is for the vehicle listed at the head of the column.
N/A indicates that the item is not applicable to the vehicle listed.
DESCRIPTION
The Rotary Valve Safety power
steering gear operates entirely on dis-
placing fluid to provide hydraulic fluid
pressure assists only when turning. As
the entire gear assembly is always full
of fluid, all internal components of the
gear are immersed in fluid making
periodic lubrication unnecessary. In
addition, this fluid acts as a cushion
to absorb road shocks that may be
transmitted to the driver. All fluid
passages are internal except the pres-
sure and return hoses between the
gear and pump.
The rotary valve provides a smooth
transmission through the driving range
of steering wheel effort. A torsion bar
transmits the road feel to the driver.
Response of the steering gear to effort
applied to the steering wheel has been
greatly increased.
The rack-piston nut is one piece and
is geared to the sector shaft. Lash be-
tween the sector shaft and rack-piston
nut is maintained by an adjusting
screw which is retained in the end o\'
the shaft uear (Eiiz.l).
IN-VEHICLE ADJUSTMENTS AND REPAIRS
During the breaking in period of
the vehicle, it is probable that some
of the factory adjustments will change.
These changes in adjustment do not
necessarily affect the satisfactory op-
eration of the steering gear assembly
and ordinarily do not require re-ad-
justment unless there is excessive lash
or other malfunctioning. The only ad-
justment that should be performed in
the vehicle is the total over center
position load (mesh load) to eliminate
excessive lash between the sector shaft
and rack teeth.
MESH LOAD ADJUSTMENT
1.
Disconnect the Pitman arm from
the sector shaft and remove the steer-
ing wheel hub.
2.
Disconnect the fluid return line
at the reservoir; at the same time cap
the reservoir return line pipe.
3.
Place the end of the return line
in a clean container and cycle the
steering wheel in both directions as
required, to discharge the fluid from
the gear.
4.
Turn the gear 1/2 turn off cen-
ter (either direction). Using a 24 in-
lb torque wrench on the steering wheel
nut, determine the torque required to
rotate the shaft slowly through a 20
degree arc.
5.
Turn the sear back to center and
repeating the method of reading tor-
que as in Step 4, above, loosen the
adjuster lock nut, turn the screw in-
ward with a 7/32-inch Allen wrench
until the reading is equal to 6 in-lbs
in excess of Step 4 above, and retigh-
ten the lock nut while holding the
screw in place.
6. Recheck the readings and re-
place the Pitman arm and the steering
wheel hub.
7.
Connect the fluid return line to
the reservoir and fill the reservoir
with C1AZ-I9582-A Fluid to the
proper level.
procarmanuals.com
Page 167 of 413
03-10-06
Ford-Thompson Power Steering Pump
03-10-06
7.
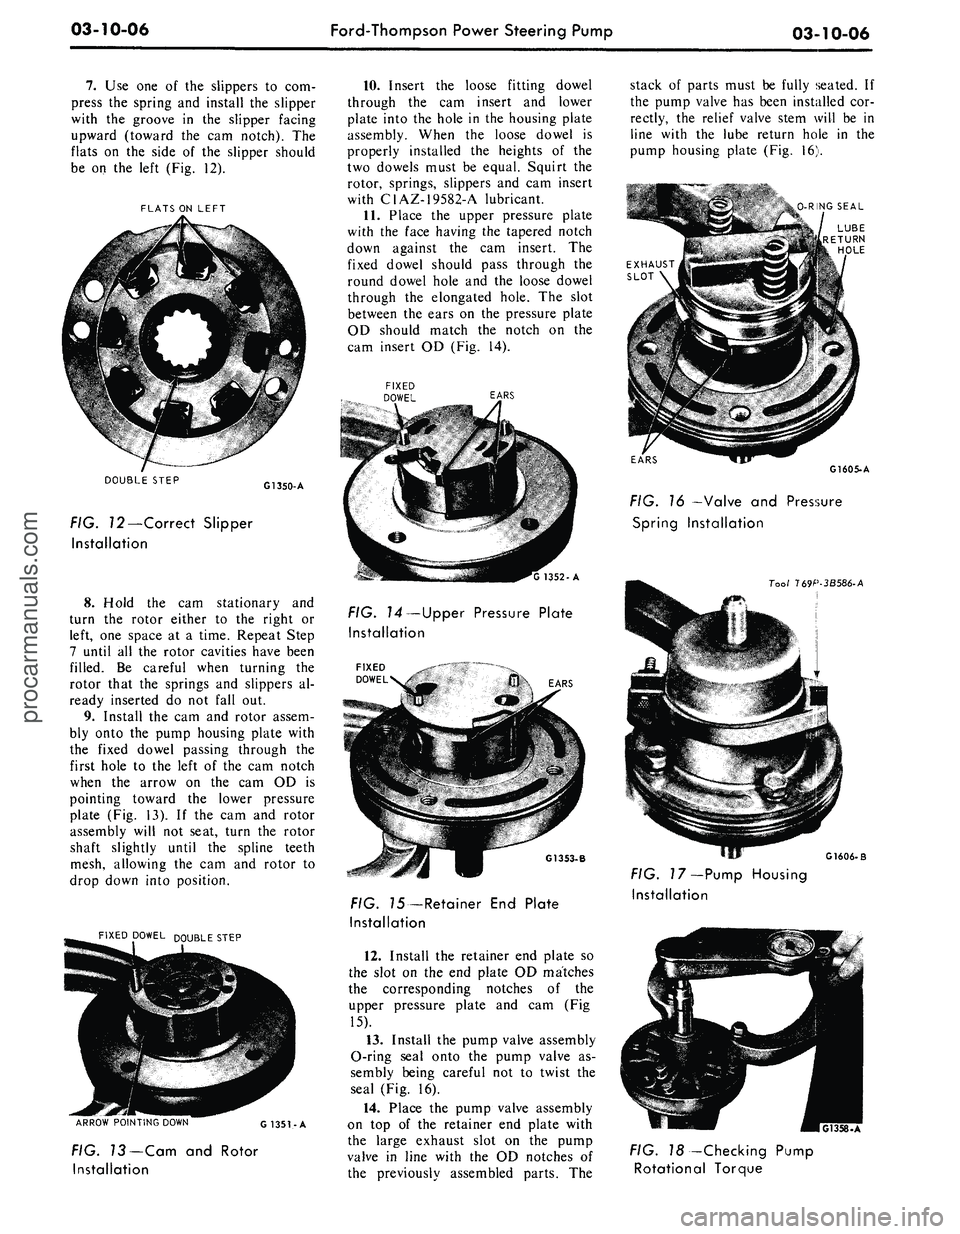
Use one of the slippers to com-
press the spring and install the slipper
with the groove in the slipper facing
upward (toward the cam notch). The
flats on the side of the slipper should
be on the left (Fig. 12).
FLATS ON LEFT
DOUBLE STEP
G1350-A
FIG. 72—Correct Slipper
Installation
8. Hold the cam stationary and
turn the rotor either to the right or
left, one space at a time. Repeat Step
7 until all the rotor cavities have been
filled. Be careful when turning the
rotor that the springs and slippers al-
ready inserted do not fall out.
9. Install the cam and rotor assem-
bly onto the pump housing plate with
the fixed dowel passing through the
first hole to the left of the cam notch
when the arrow on the cam OD is
pointing toward the lower pressure
plate (Fig. 13). If the cam and rotor
assembly will not seat, turn the rotor
shaft slightly until the spline teeth
mesh, allowing the cam and rotor to
drop down into position.
FIXED DOWEL D0|JBLE STEP
ARROW POINTING DOWN
G 1351-A
FIG. 13—Cam and Rotor
Installation
10.
Insert the loose fitting dowel
through the cam insert and lower
plate into the hole in the housing plate
assembly. When the loose dowel is
properly installed the heights of the
two dowels must be equal. Squirt the
rotor, springs, slippers and cam insert
with C1AZ-19582-A lubricant.
11.
Place the upper pressure plate
with the face having the tapered notch
down against the cam insert. The
fixed dowel should pass through the
round dowel hole and the loose dowel
through the elongated hole. The slot
between the ears on the pressure plate
OD should match the notch on the
cam insert OD (Fig. 14).
EARS
'G 1352-A
FIG. 74—Upper Pressure Plate
Installation
\ EARS
G1353-B
FIG. 75—Retainer End Plate
Installation
12.
Install the retainer end plate so
the slot on the end plate OD matches
the corresponding notches of the
upper pressure plate and cam (Fig
15).
13.
Install the pump valve assembly
O-ring seal onto the pump valve as-
sembly being careful not to twist the
seal (Fig. 16).
14.
Place the pump valve assembly
on top of the retainer end plate with
the large exhaust slot on the pump
valve in line with the OD notches of
the previously assembled parts. The
stack of parts must be fully seated. If
the pump valve has been installed cor-
rectly, the relief valve stem will be in
line with the lube return hole in the
pump housing plate (Fig. 16).
O-RING SEAL
EARS
G1605-A
FIG. 16 —Valve and Pressure
Spring Installation
Tool 169P-3B586-A
G1606-B
FIG. 17—Pump Housing
Installation
FIG. 18 -Checking Pump
Rotational Torqueprocarmanuals.com
Page 172 of 413
03-12-01
Wheels
And
Tires
03-12-01
PART
3-12
Wheels
And
Tires
COMPONENT INDEX
FRONT
HUB AND
DRUM ASSEMBLY
Removal
and
Installation
FRONT
HUB AND
ROTOR ASSEMBLY
Removal
and
Installation
FRONT WHEEL ASSEMBLY DESCRIPTION
FRONT WHEEL BEARING ADJUSTMENT
FRONT WHEEL GREASE SEAL
AND
BEARING
Removal, Installation, Repacking
HOISTING INSTRUCTIONS
LIFE GUARD TIRE
Balancing
Correcting Vibration
and
Shake
Description
Repairs
REAR WHEEL ASSEMBLY DESCRIPTION
WHEELS AND TIRES (Conventional)
Removal
and
Installation
MODEL APPLICATION
All
Models
12-07
12-07
12-01
12-02
12-05
12-02
12-01
12-03
Ford
N/A
N/A
N/A
N/A
Mercury
N/A
N/A
N/A
N/A
Meteor
N/A
N/A
N/A
N/A
Cougar
N/A
N/A
N/A
N/A
Fairlane
N/A
N/A
N/A
N/A
Falcon
N/A
N/A
N/A
N/A
Montego
N/A
N/A
N/A
N/A
Mustang
N/A
N/A
N/A
N/A
Lincoln-
Continental
12-03
12-03
12-02
12-08
Thunderbird
12-03
12-03
12-02
12-08
Continental-
Mark
III
12-03
12-03
12-02
12-08
A page number indicates that
the
item
is for the
vehicle listed
at the
head
of the
column.
N/A indicates that
the
item
is not
applicable
to the
vehicle listed.
DESCRIPTION
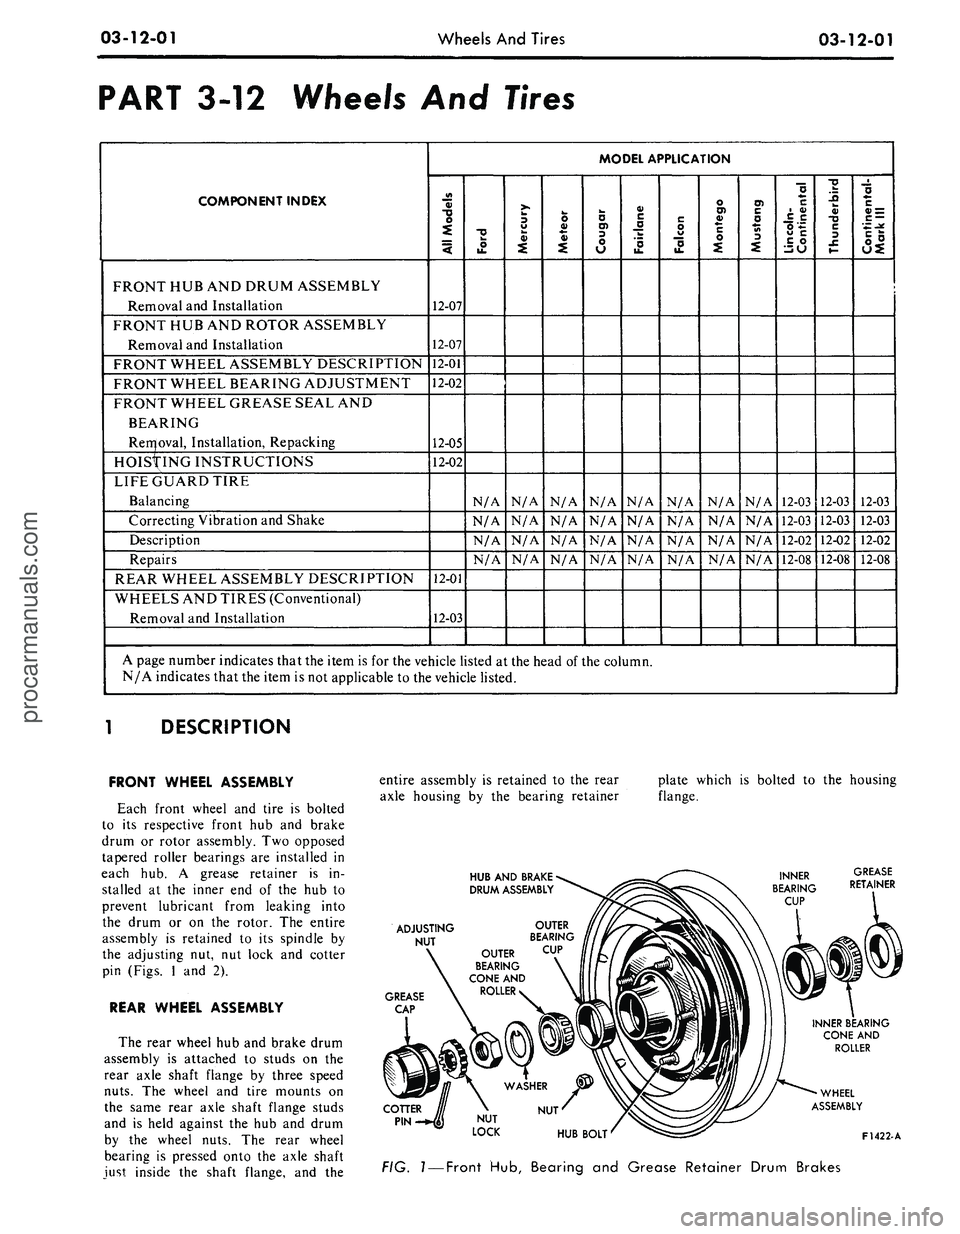
FRONT WHEEL ASSEMBLY
Each front wheel
and
tire
is
bolted
to
its
respective front
hub and
brake
drum
or
rotor assembly.
Two
opposed
tapered roller bearings
are
installed
in
each
hub. A
grease retainer
is in-
stalled
at the
inner
end of the hub to
prevent lubricant from leaking into
the drum
or on the
rotor.
The
entire
assembly
is
retained
to its
spindle
by
the adjusting
nut, nut
lock
and
cotter
pin (Figs.
1 and 2).
REAR WHEEL ASSEMBLY
The rear wheel
hub and
brake drum
assembly
is
attached
to
studs
on the
rear axle shaft flange
by
three speed
nuts.
The
wheel
and
tire mounts
on
the same rear axle shaft flange studs
and
is
held against
the hub and
drum
by
the
wheel nuts.
The
rear wheel
bearing
is
pressed onto
the
axle shaft
just inside
the
shaft flange,
and the
entire assembly
is
retained
to the
rear
axle housing
by the
bearing retainer
HUB
AND
BRAKE
DRUM
ASSEMBLY
plate which
is
bolted
to the
housing
flange.
ADJUSTING
NUT
GREASE
CAP
OUTER
BEARING
OUTER
CUP
BEARING
CONE
AND
ROLLER
NUT
INNER BEARING
CONE
AND
ROLLER
WHEEL
ASSEMBLY
HUB
BOLT'
^£=3^
F1422-A
FIG.
1
—
Front
Hub,
Bearing
and
Grease Retainer Drum Brakes
procarmanuals.com
Page 255 of 413
05-02-01
General Clutch Service
05-02-01
PART
5-2
General Clutch Service
COMPONENT INDEX
MODEL APPLICATION
3
a>
1
o>
il
•U
i
!-
II
CLUTCH DISC
Cleaning and Inspection
02-04
02-04
02-04
02-04
02-04
02-04
02-04
02-04
N/A
N/A
N/A
CHECKING FLYWHEEL HOUSING
ALIGNMENT
02-01
02-01
02-01
02-01
02-01
02-01
02-01
02-01
N/A
N/A
N/A
CORRECTING FLYWHEEL HOUSING
ALIGNMENT
02-03
02-03
02-03
02-03
02-03
02-03
02-03
02-03
N/A
N/A
N/A
PILOT BUSHING
Cleaning and Inspection
02-04
02-04
02-04
02-04
02-04
02-04
02-04
02-04
N/A
N/A
N/A
PRESSURE PLATE AND COVER
Cleaning and Inspection
02-04
02-04
02-04
02-04
02-04
02-04
02-04
02-04
N/A
N/A
N/A
RELEASE BEARING
Cleaning and Inspection
02-04
02-04
02-04
02-04
02-04
02-04
02-04
02-04
N/A
N/A
N/A
A page number indicates that the item is for the vehicle listed at the head of the column.
N/A indicates that the item is not applicable to the vehicle listed.
l
FLYWHEEL HOUSING ALIGNMENT
Alignment of the flywheel housing
bore and rear face with the engine
should be checked as a possible cause
of any of the following troubles- ex-
cessive transmission gear wear, ..ans-
mission jumping out of gear, especial-
ly third gear, drive line vibration, ex-
cessive pilot bushing wear, noisy re-
lease bearing, or excessive clutch spin
time.
INSPECTION
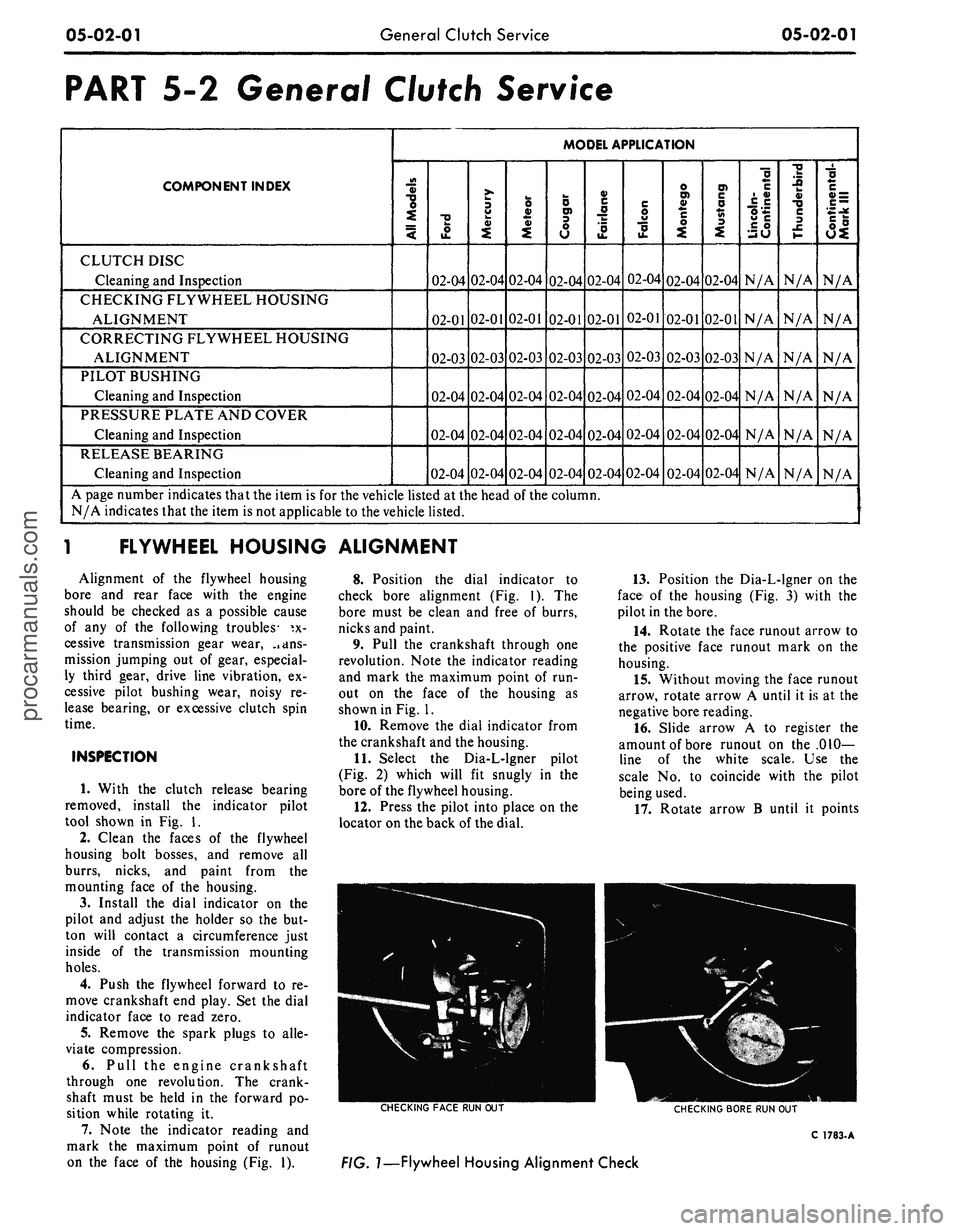
1. With the clutch release bearing
removed, install the indicator pilot
tool shown in Fig. 1.
2.
Clean the faces of the flywheel
housing bolt bosses, and remove all
burrs, nicks, and paint from the
mounting face of the housing.
3.
Install the dial indicator on the
pilot and adjust the holder so the but-
ton will contact a circumference just
inside of the transmission mounting
holes.
4.
Push the flywheel forward to re-
move crankshaft end play. Set the dial
indicator face to read zero.
5.
Remove the spark plugs to alle-
viate compression.
6. Pull the engine crankshaft
through one revolution. The crank-
shaft must be held in the forward po-
sition while rotating it.
7. Note the indicator reading and
mark the maximum point of runout
on the face of the housing (Fig. 1).
8. Position the dial indicator to
check bore alignment (Fig. 1). The
bore must be clean and free of burrs,
nicks and paint.
9. Pull the crankshaft through one
revolution. Note the indicator reading
and mark the maximum point of run-
out on the face of the housing as
shown in Fig. 1.
10.
Remove the dial indicator from
the crankshaft and the housing.
11.
Select the Dia-L-lgner pilot
(Fig. 2) which will fit snugly in the
bore of the flywheel housing.
12.
Press the pilot into place on the
locator on the back of the dial.
13.
Position the Dia-L-lgner on the
face of the housing (Fig. 3) with the
pilot in the bore.
14.
Rotate the face runout arrow to
the positive face runout mark on the
housing.
15.
Without moving the face runout
arrow, rotate arrow A until it is at the
negative bore reading.
16.
Slide arrow A to register the
amount of bore runout on the .010-
line of the white scale. Use the
scale No. to coincide with the pilot
being used.
17.
Rotate arrow B until it points
CHECKING
FACE
RUN OUT
CHECKING
BORE
RUN OUT
C
1783-
A
FIG.
1—Flywheel
Housing Alignment Checkprocarmanuals.com
Page 258 of 413
05-02-04
General Clutch Service
05-02-04
CLEANING AND INSPECTION
RELEASE BEARING
Wipe all oil and dirt off the release
bearing. The bearing is prelubricated
and should not be cleaned with sol-
vent.
Inspect the bearing retainer for
loose spring clips and rivets.
Inspect the release bearing assembly
for burrs which may cause the assem-
bly to drag on the transmission bear-
ing retainer. Any such burrs should be
cleaned up with fine crocus cloth. If
burrs are found, inspect the transmis-
sion input shaft bearing retainer for
evidence of scoring. Any scoring
should be polished out with crocus
cloth. Coat the bearing retainer with a
thin film of lithium-base grease
(C3VY-19586-A). Prior to release
bearing installation, apply a light film
of lithium base grease (C3VY-
19586-A) on both sides of the release
lever fork where it contacts the release
bearing hub and retaining springs.
Apply a light film of lithium base
grease (C3VY-19586-A) plate to the
release bearing surface that contacts
the pressure plate fingers. Carefully
fill the grease groove inside the bear-
ing hub with lithium base grease (no
polyethylene). Clean all excess grease
from the bore of the bearing hub. Ex-
cess grease will be forced onto the
spline by the transmission input shaft
bearing retainer and will contaminate
the clutch disc. Also, care must be
exercised when applying lubricants to
the release bearing, release bearing
hub and the release lever fork to avoid
excessive grease from contaminating
the clutch disc.
Hold the bearing inner race and ro-
tate the outer race while applying
pressure to it. If the bearing rotation
is rough or noisy, replace the bearing.
Most release bearing failures are
caused by improper clutch pedal ad-
justments. If the clutch linkage does
not have enough free travel, the re-
lease bearing will constantly touch the
release fingers and will spin whenever
the engine is running.
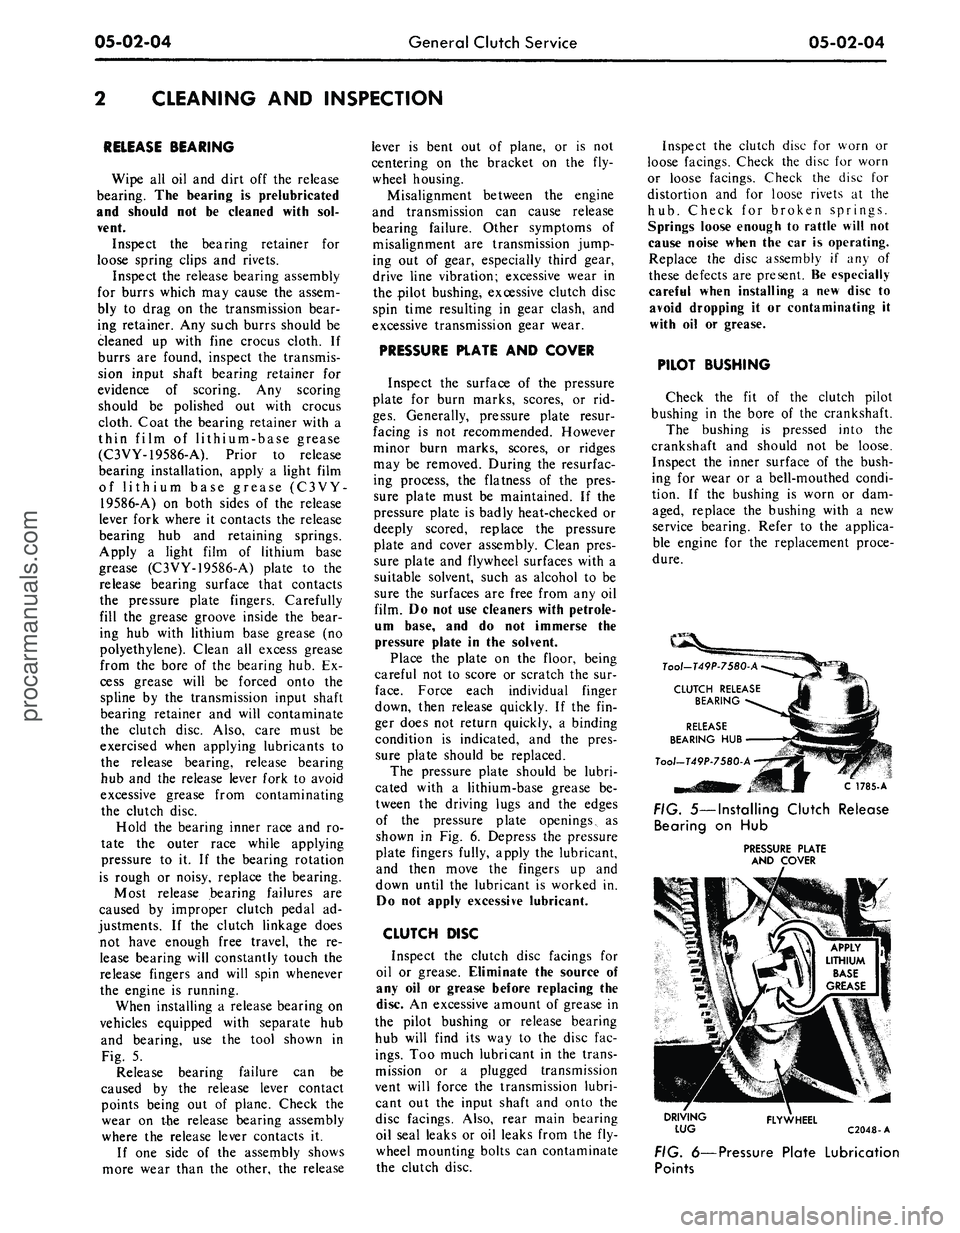
When installing a release bearing on
vehicles equipped with separate hub
and bearing, use the tool shown in
Fig. 5.
Release bearing failure can be
caused by the release lever contact
points being out of plane. Check the
wear on the release bearing assembly
where the release lever contacts it.
If one side of the assembly shows
more wear than the other, the release
lever is bent out of plane, or is not
centering on the bracket on the fly-
wheel housing.
Misalignment between the engine
and transmission can cause release
bearing failure. Other symptoms of
misalignment are transmission jump-
ing out of gear, especially third gear,
drive line vibration; excessive wear in
the pilot bushing, excessive clutch disc
spin time resulting in gear clash, and
excessive transmission gear wear.
PRESSURE PLATE AND COVER
Inspect the surface of the pressure
plate for burn marks, scores, or rid-
ges.
Generally, pressure plate resur-
facing is not recommended. However
minor burn marks, scores, or ridges
may be removed. During the resurfac-
ing process, the flatness of the pres-
sure plate must be maintained. If the
pressure plate is badly heat-checked or
deeply scored, replace the pressure
plate and cover assembly. Clean pres-
sure plate and flywheel surfaces with a
suitable solvent, such as alcohol to be
sure the surfaces are free from any oil
film. Do not use cleaners with petrole-
um base, and do not immerse the
pressure plate in the solvent.
Place the plate on the floor, being
careful not to score or scratch the sur-
face.
Force each individual finger
down, then release quickly. If the fin-
ger does not return quickly, a binding
condition is indicated, and the pres-
sure plate should be replaced.
The pressure plate should be lubri-
cated with a lithium-base grease be-
tween the driving lugs and the edges
of the pressure plate openings, as
shown in Fig. 6. Depress the pressure
plate fingers fully, apply the lubricant,
and then move the fingers up and
down until the lubricant is worked in.
Do not apply excessive lubricant.
CLUTCH DISC
Inspect the clutch disc facings for
oil or grease. Eliminate the source of
any oil or grease before replacing the
disc. An excessive amount of grease in
the pilot bushing or release bearing
hub will find its way to the disc fac-
ings.
Too much lubricant in the trans-
mission or a plugged transmission
vent will force the transmission lubri-
cant out the input shaft and onto the
disc facings. Also, rear main bearing
oil seal leaks or oil leaks from the fly-
wheel mounting bolts can contaminate
the clutch disc.
Inspect the clutch disc for worn or
loose facings. Check the disc for worn
or loose facings. Check the disc for
distortion and for loose rivets at the
hub.
Check for broken springs.
Springs loose enough to rattle will not
cause noise when the car is operating.
Replace the disc assembly if any of
these defects are present. Be especially
careful when installing a new disc to
avoid dropping it or contaminating it
with oil or grease.
PILOT BUSHING
Check the fit of the clutch pilot
bushing in the bore of the crankshaft.
The bushing is pressed into the
crankshaft and should not be loose.
Inspect the inner surface of the bush-
ing for wear or a bell-mouthed condi-
tion. If the bushing is worn or dam-
aged, replace the bushing with a new
service bearing. Refer to the applica-
ble engine for the replacement proce-
dure.
C 1785-A
FIG. 5—Installing Clutch Release
Bearing on Hub
PRESSURE PLATE
AND COVER
DRIVING
LUG
FLYWHEEL
C2048-A
FIG. 6—Pressure Plate Lubrication
Pointsprocarmanuals.com
Page 284 of 413
06-03-05
Ford Design Four-Speed Transmission
06-03-05
DETAIL
4
FORD
AND
MERCURY
DETAIL
5
COUGAR. FAIRLANE,
FALCON,
MONTEGO,
AND MUSTANG
REVERSE SHIFT
RAIL
C1533-B
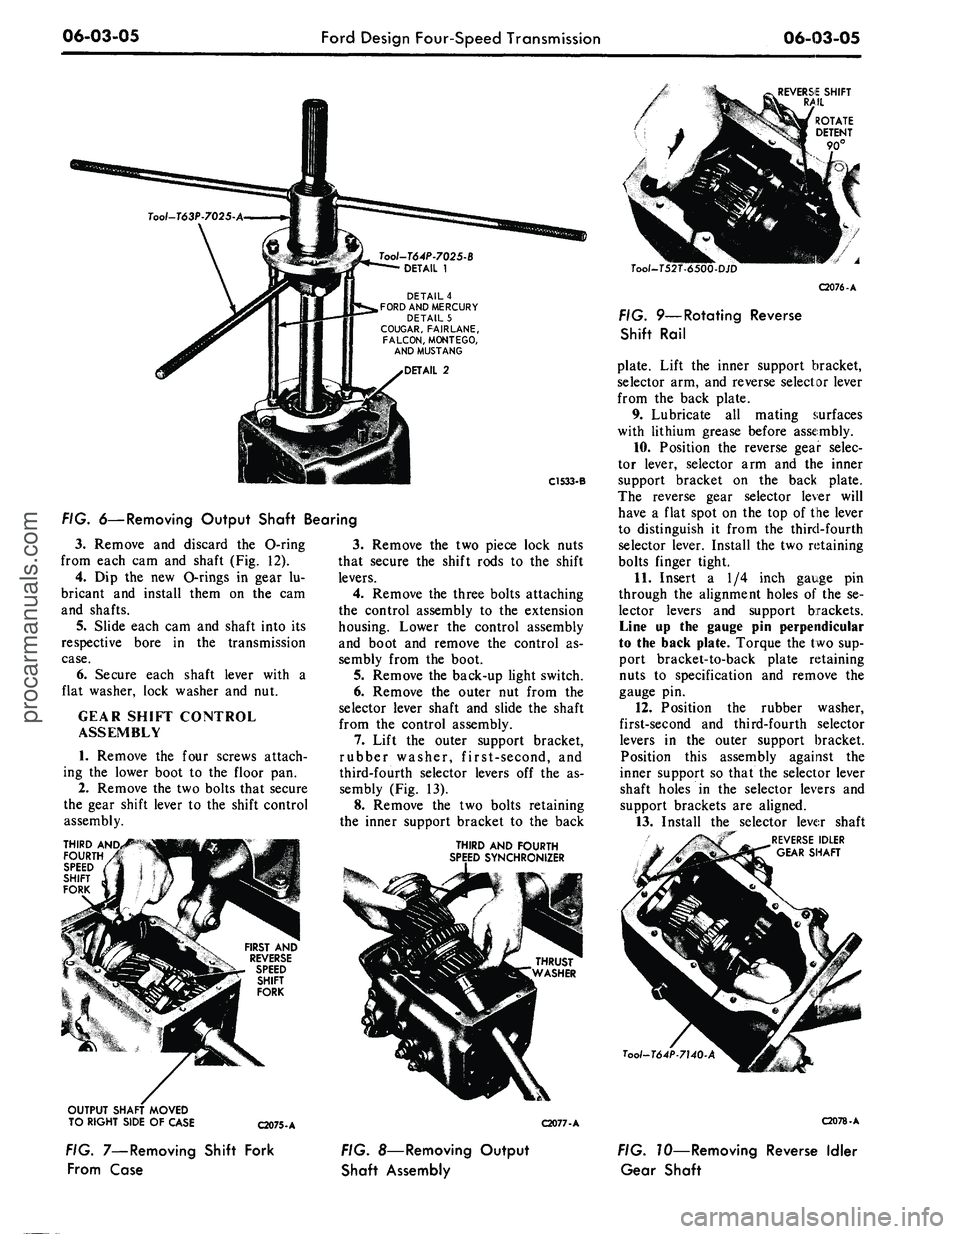
FIG. 6—Removing Output Shaft Bearing
3.
Remove
and
discard
the
O-ring
from each
cam and
shaft (Fig.
12).
4.
Dip the new
Orings
in
gear
lu-
bricant
and
install them
on the cam
and shafts.
5.
Slide each cam
and
shaft into
its
respective bore
in the
transmission
case.
6. Secure each shaft lever with
a
flat washer, lock washer
and nut.
GEAR SHIFT CONTROL
ASSEMBLY
1.
Remove
the
four screws attach-
ing
the
lower boot
to the
floor
pan.
2.
Remove the two bolts that secure
the gear shift lever
to
the shift control
assembly.
THIRD AND,
FOURTH
SPEED
SHIFT
FORK
FIRST
AND
REVERSE
SPEED
SHIFT
FORK
3.
Remove
the two
piece lock nuts
that secure
the
shift rods
to the
shift
levers.
4.
Remove
the
three bolts attaching
the control assembly
to the
extension
housing. Lower
the
control assembly
and boot
and
remove
the
control
as-
sembly from
the
boot.
5.
Remove the back-up light switch.
6. Remove
the
outer
nut
from
the
selector lever shaft
and
slide
the
shaft
from
the
control assembly.
7.
Lift
the
outer support bracket,
rubber washer, first-second,
and
third-fourth selector levers
off the as-
sembly (Fig.
13).
8. Remove
the two
bolts retaining
the inner support bracket
to the
back
THIRD
AND
FOURTH
SPEED SYNCHRONIZER
OUTPUT SHAFT MOVED
TO RIGHT SIDE
OF
CASE
C2075-A
C2077-A
Tool-T52T-
C2076-A
FIG. 9—Rotating Reverse
Shift Rail
plate. Lift
the
inner support bracket,
selector arm, and reverse selector lever
from
the
back plate.
9. Lubricate
all
mating surfaces
with lithium grease before assembly.
10.
Position
the
reverse gear selec-
tor lever, selector
arm and the
inner
support bracket
on the
back plate.
The reverse gear selector lever will
have
a
flat spot
on the
top
of
the lever
to distinguish
it
from
the
third-fourth
selector lever. Install the two retaining
bolts finger tight.
11.
Insert
a 1/4
inch gauge
pin
through
the
alignment holes
of the se-
lector levers
and
support brackets.
Line
up the
gauge
pin
perpendicular
to the back plate. Torque the two sup-
port bracket-to-back plate retaining
nuts
to
specification
and
remove
the
gauge
pin.
12.
Position
the
rubber washer,
first-second
and
third-fourth selector
levers
in the
outer support bracket.
Position this assembly against
the
inner support
so
that the selector lever
shaft holes
in the
selector levers
and
support brackets
are
aligned.
13.
Install
the
selector lever shaft
"~ REVERSE IDLER
GEAR SHAFT
Tool-T64P-7140
C2078-A
FIG. 7—Removing Shift Fork
From Case
FIG. 8—Removing Output
Shaft Assembly
FIG. TO—Removing Reverse Idler
Gear Shaftprocarmanuals.com
Page 287 of 413
06-03-08
Ford Design Four-Speed Transmission
06-03-08
ROLLER BEARINGS
SNAP RINGS
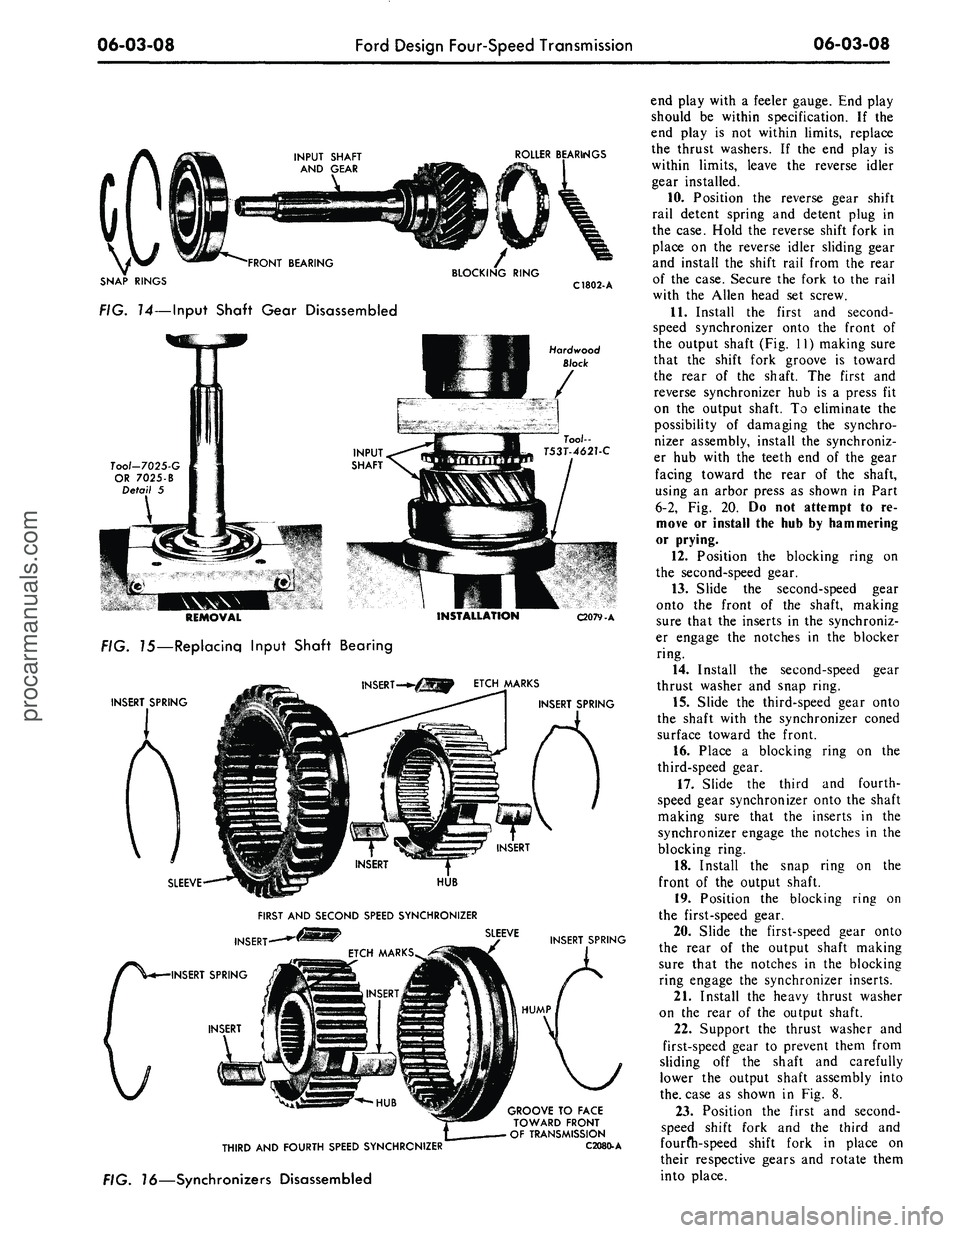
FIG. 14—Input Shaft Gear Disassembled
C1802-
A
Hardwood
Block
Tool-7025-G
OR
7025-B
Detail
5
REMOVAL
FIG. 15—Replacing Input Shaft Bearing
INSERT SPRING
INSTALLATION
ETCH MARKS
C2079-A
INSERT SPRING
SLEEVE
HUB
FIRST AND SECOND SPEED SYNCHRONIZER
INSERT
INSERT SPRING
INSERT
SLEEVE
INSERT SPRING
HUMP
THIRD
AND
FOURTH SPEED SYNCHRONIZER
FIG. 16—Synchronizers Disassembled
GROOVE
TO
FACE
TOWARD FRONT
OF TRANSMISSION
C2080.A
end play with
a
feeler gauge. End play
should
be
within specification.
If the
end play
is not
within limits, replace
the thrust washers.
If the end
play
is
within limits, leave
the
reverse idler
gear installed.
10.
Position
the
reverse gear shift
rail detent spring
and
detent plug
in
the case. Hold
the
reverse shift fork
in
place
on the
reverse idler sliding gear
and install
the
shift rail from
the
rear
of
the
case. Secure
the
fork
to the
rail
with
the
Allen head
set
screw.
11.
Install
the
first
and
second-
speed synchronizer onto
the
front
of
the output shaft (Fig.
11)
making sure
that
the
shift fork groove
is
toward
the rear
of the
shaft.
The
first
and
reverse synchronizer
hub is a
press
fit
on
the
output shaft.
To
eliminate
the
possibility
of
damaging
the
synchro-
nizer assembly, install
the
synchroniz-
er
hub
with
the
teeth
end of the
gear
facing toward
the
rear
of the
shaft,
using
an
arbor press
as
shown
in
Part
6-2,
Fig. 20. Do not
attempt
to re-
move
or
install
the
hub
by
hammering
or prying.
12.
Position
the
blocking ring
on
the second-speed gear.
13.
Slide
the
second-speed gear
onto
the
front
of the
shaft, making
sure that
the
inserts
in the
synchroniz-
er engage
the
notches
in the
blocker
ring.
14.
Install
the
second-speed gear
thrust washer
and
snap ring.
15.
Slide
the
third-speed gear onto
the shaft with
the
synchronizer coned
surface toward
the
front.
16.
Place
a
blocking ring
on the
third-speed gear.
17.
Slide
the
third
and
fourth-
speed gear synchronizer onto
the
shaft
making sure that
the
inserts
in the
synchronizer engage
the
notches
in the
blocking ring.
18.
Install
the
snap ring
on the
front
of the
output shaft.
19.
Position
the
blocking ring
on
the first-speed gear.
20.
Slide
the
first-speed gear onto
the rear
of the
output shaft making
sure that
the
notches
in the
blocking
ring engage
the
synchronizer inserts.
21.
Install
the
heavy thrust washer
on
the
rear
of the
output shaft.
22.
Support
the
thrust washer
and
first-speed gear
to
prevent them from
sliding
off the
shaft
and
carefully
lower
the
output shaft assembly into
the.
case
as
shown
in Fig. 8.
23.
Position
the
first
and
second-
speed shift fork
and the
third
and
fourfh-speed shift fork
in
place
on
their respective gears
and
rotate them
into place.procarmanuals.com
Page 306 of 413
07-01-15
General Transmission Service
07-01-15
GOVERNOR
DRIVE BALL
POCKET
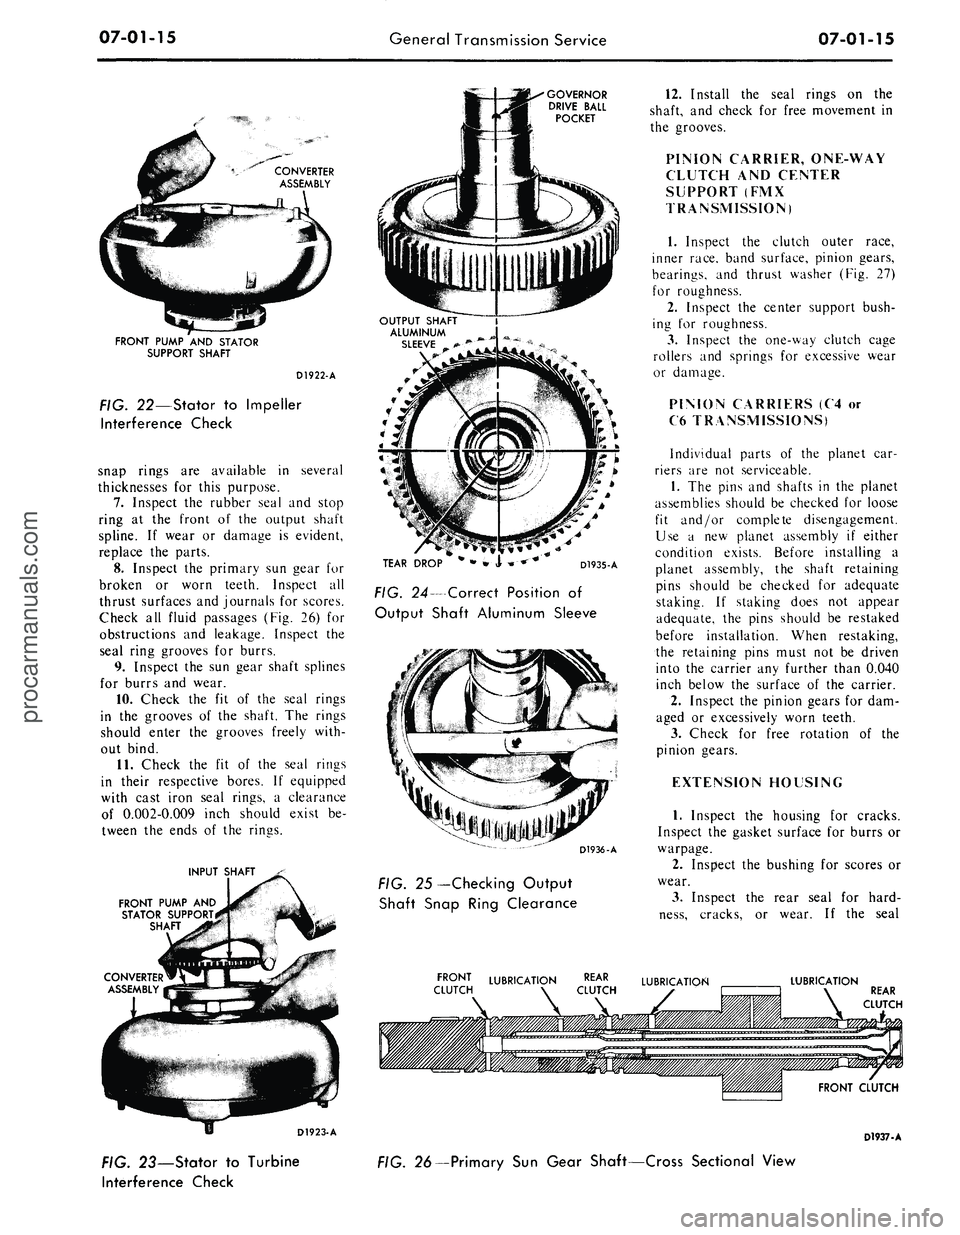
FRONT PUMP AND STATOR
SUPPORT SHAFT
D1922-A
FIG. 22—Stator to Impeller
Interference Check
snap rings are available in several
thicknesses for this purpose.
7.
Inspect the rubber seal and stop
ring at the front of the output shaft
spline. If wear or damage is evident,
replace the parts.
8. Inspect the primary sun gear for
broken or worn teeth. Inspect all
thrust surfaces and journals for scores.
Check all fluid passages (Fig. 26) for
obstructions and leakage. Inspect the
seal ring grooves for burrs.
9. Inspect the sun gear shaft splines
for burrs and wear.
10.
Check the fit of the seal rings
in the grooves of the shaft. The rings
should enter the grooves freely with-
out bind.
11.
Check the fit of the seal rings
in their respective bores. If equipped
with cast iron seal rings, a clearance
of 0.002-0.009 inch should exist be-
tween the ends of the rings.
INPUT SHAFT
FRONT PUMP AND
STATOR SUPPORT
SHAFT
CONVERTER
ASSEMBLY
D1923-A
TEAR DROP
D1935-A
FIG. 24—Correct Position of
Output Shaft Aluminum Sleeve
D1936-A
FIG. 25—Checking Output
Shaft Snap Ring Clearance
12.
Install the seal rings on the
shaft, and check for free movement in
the grooves.
PINION CARRIER, ONE-WAY
CLUTCH AND CENTER
SUPPORT (FMX
TRANSMISSION)
1.
Inspect the clutch outer race,
inner race, band surface, pinion gears,
bearings, and thrust washer (Fig. 27)
for roughness.
2.
Inspect the center support bush-
ing for roughness.
3.
Inspect the one-way clutch cage
rollers and springs for excessive wear
or damage.
PINION CARRIERS (C4 or
C6 TRANSMISSIONS)
Individual parts of the planet car-
riers are not serviceable.
1.
The pins and shafts in the planet
assemblies should be checked for loose
fit and/or complete disengagement.
Use a new planet assembly if either
condition exists. Before installing a
planet assembly, the shaft retaining
pins should be checked for adequate
staking. If staking does not appear
adequate, the pins should be restaked
before installation. When restaking,
the retaining pins must not be driven
into the carrier any further than 0.040
inch below the surface of the carrier.
2.
Inspect the pinion gears for dam-
aged or excessively worn teeth.
3.
Check for free rotation of the
pinion gears.
EXTENSION HOUSING
1.
Inspect the housing for cracks.
Inspect the gasket surface for burrs or
warpage.
2.
Inspect the bushing for scores or
wear.
3.
Inspect the rear seal for hard-
ness,
cracks, or wear. If the seal
FRONT LUBRICATION REAR LUBRICATION
CLUTCH \ CLUTCH
LUBRICATION
FRONT CLUTCH
D1937-A
FIG. 23—Stator to Turbine
Interference Check
FIG. 26—Primary Sun Gear Shaft—Cross Sectional Viewprocarmanuals.com
Page 308 of 413
07-01-17
General Transmission Service
07-01-17
PRESSURE REGULATOR
(FMX TRANSMISSION)
1.
Inspect the regulator body and
cover mating surface for burrs.
2.
Check all fluid passages for ob-
structions.
3.
Inspect the control pressure and
converter pressure valves and bores for
burrs and scores. Remove all burrs
carefully with crocus cloth.
4.
Check free movement of the
valves in their bores. The valves
should fall freely into the bores when
both the valve and bore are dry.
5.
Inspect the valve springs and
spacers for distortion.
CONTROL VALVE BODY
1.
Clean all parts thoroughly in
clean solvent, and then blow them dry
with moisture-free compressed air.
2.
Inspect all valve and plug bores
for scores. Check all fluid passages for
obstructions. Inspect the check valve
for free movement. Inspect all mating
surfaces for burrs or distortion. In-
spect all plugs and valves for burrs
and scores. Crocus cloth can be used
to polish valves and plugs if care is
taken to avoid rounding the sharp
edges of the valves and plugs.
3.
Inspect all springs for distortion.
Check all valves and plugs for free
movement in their respective bores.
Valves and plugs, when dry, must fall
from their own weight in their respec-
tive bores.
4.
Roll the manual valve on a flat
surface to check it for a bent condi-
tion.
GOVERNOR
1.
Inspect the governor valves and
bores for scores. Minor scores may be
removed from the valves with crocus
cloth. Replace the governor if the
valves or body is deeply scored.
2.
Check for free movement of the
valves in the bores. The valves should
slide freely of their own weight in the
bores when dry. Inspect fluid passages
in the valve body and counterweight
for obstructions. All fluid passages
must be clean.
3.
Inspect the mating surfaces of
the governor body and governor dis-
tributor (C4 or C6 Automatic) for
burrs and distortion. Mating surfaces
must be smooth and flat.
4.
Check the mating surface of the
governor valve and the counterweight
on a FMX transmission for burrs or
scratches.
5.
When cleaning the governor as-
sembly (C4 Automatic), the oil screen
should be removed from the collector
body and thoroughly blown out with
compressed air.
FRONT SERVO (FMX)
AND INTERMEDIATE
SERVO (C4 AND C6
AUTOMATIC)
1.
Inspect the servo bore for cracks
and the piston bore and the servo pis-
ton stem for scores. Check fluid pas-
sages for obstructions. Replace seals
that are damaged.
2.
On an FMX transmission, check
the actuating lever for free movement,
and inspect it for wear. If necessary to
replace the actuating lever or shaft,
remove the retaining pin and push the
shaft out of the bracket.
Inspect the adjusting screw threads
and the threads in the lever for dam-
age.
3.
Check the servo spring and servo
band strut(s) for distortion.
4.
Inspect the cover seal and gasket
cover sealing surface for defects.
REAR SERVO (FMX)
AND LOW-REVERSE SERVO
(C4 TRANSMISSION)
1.
Inspect the servo body for cracks
and the piston bore for scores.
2.
Check the fluid passages for ob-
structions.
3.
Inspect the band and the struts
for distortion. Inspect the band ends
for cracks.
4.
Inspect the servo spring for dis-
tortion.
5.
Inspect the band lining for exces-
sive wear and bonding to the metal
band.
6. On an FMX transmission, check
the servo body to case mating surface
for burrs. Check the accumulator pis-
ton and the check valve for freedom
of movement. Check the actuating
lever socket for scores.
7.
Replace seals that are damaged.
CASE
Inspect the case for cracks and
stripped threads. Inspect the gasket
surfaces and mating surfaces for
burrs.
Check the vent for obstructions,
and check all fluid passages for ob-
structions and leakage (Figs. 10, 11
and 12).
Inspect the case bushing for scores.
Check all parking linkage parts for
wear or damage.
ONE-WAY CLUTCH
1.
Inspect the outer and inner races
for scores or damaged surface area
where the rollers contact the races. If
the outer race on the C6 transmission
is damaged, the low-reverse clutch hub
must be replaced.
2.
Inspect the rollers and springs
for excessive wear or damage.
3.
Inspect the spring and roller case
for bent or damaged spring retainers.procarmanuals.com