section 18 FORD MUSTANG 1969 Volume One Chassis
[x] Cancel search | Manufacturer: FORD, Model Year: 1969, Model line: MUSTANG, Model: FORD MUSTANG 1969Pages: 413, PDF Size: 75.81 MB
Page 238 of 413
04-04-07
Rear Axle — Ford Light-Duty (WER)
04-04-07
RUNOUT CHECK
E 1573-A
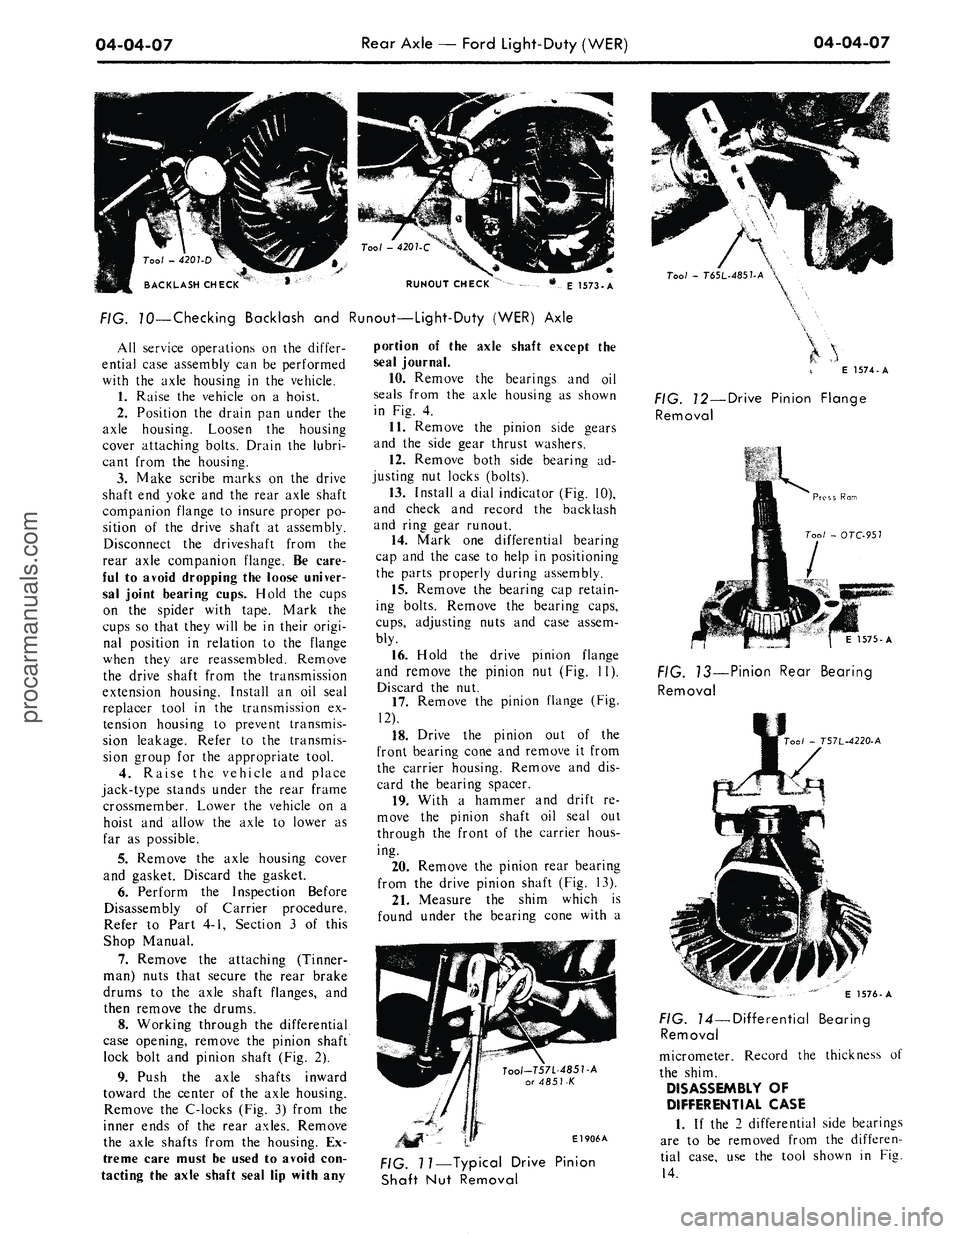
FIG. 70—Checking Backlash and Runout—Light-Duty (WER) Axle
All service operations on the differ-
ential case assembly can be performed
with the axle housing in the vehicle.
1.
Raise the vehicle on a hoist.
2.
Position the drain pan under the
axle housing. Loosen the housing
cover attaching bolts. Drain the lubri-
cant from the housing.
3.
Make scribe marks on the drive
shaft end yoke and the rear axle shaft
companion flange to insure proper po-
sition of the drive shaft at assembly.
Disconnect the driveshaft from the
rear axle companion flange. Be care-
ful to avoid dropping the loose univer-
sal joint bearing cups. Hold the cups
on the spider with tape. Mark the
cups so that they will be in their origi-
nal position in relation to the flange
when they are reassembled. Remove
the drive shaft from the transmission
extension housing. Install an oil seal
replacer tool in the transmission ex-
tension housing to prevent transmis-
sion leakage. Refer to the transmis-
sion group for the appropriate tool.
4.
Raise the vehicle and place
jack-type stands under the rear frame
crossmember. Lower the vehicle on a
hoist and allow the axle to lower as
far as possible.
5.
Remove the axle housing cover
and gasket. Discard the gasket.
6. Perform the Inspection Before
Disassembly of Carrier procedure.
Refer to Part 4-1, Section 3 of this
Shop Manual.
7.
Remove the attaching (Tinner-
man) nuts that secure the rear brake
drums to the axle shaft flanges, and
then remove the drums.
8. Working through the differential
case opening, remove the pinion shaft
lock bolt and pinion shaft (Fig. 2).
9. Push the axle shafts inward
toward the center of the axle housing.
Remove the C-locks (Fig. 3) from the
inner ends of the rear axles. Remove
the axle shafts from the housing. Ex-
treme care must be used to avoid con-
tacting the axle shaft seal lip with any
portion of the axle shaft except the
seal journal.
10.
Remove the bearings and oil
seals from the axle housing as shown
in Fig. 4.
11.
Remove the pinion side gears
and the side gear thrust washers.
12.
Remove both side bearing ad-
justing nut locks (bolts).
13.
Install a dial indicator (Fig. 10),
and check and record the backlash
and ring gear runout.
14.
Mark one differential bearing
cap and the case to help in positioning
the parts properly during assembly.
15.
Remove the bearing cap retain-
ing bolts. Remove the bearing caps,
cups,
adjusting nuts and case assem-
bly.
16.
Hold the drive pinion flange
and remove the pinion nut (Fig. 11).
Discard the nut.
17.
Remove the pinion flange (Fig.
12).
18.
Drive the pinion out of the
front bearing cone and remove it from
the carrier housing. Remove and dis-
card the bearing spacer.
19.
With a hammer and drift re-
move the pinion shaft oil seal out
through the front of the carrier hous-
ing.
20.
Remove the pinion rear bearing
from the drive pinion shaft (Fig. 13).
21.
Measure the shim which is
found under the bearing cone with a
Tool-T57L-485T-A
or 4851-K
El 906A
Tool
-
T6SL-485UA
\
E 1574-A
FIG. 12—Drive Pinion Flange
Removal
1575-A
FIG. 13—Pinion Rear Bearing
Removal
00/
- T57L-4220-A
FIG. 11—Typical Drive Pinion
Shaft Nut Removal
E 1576-A
FIG. 14—Differential Bearing
Removal
micrometer. Record the thickness of
the shim.
DISASSEMBLY OF
DIFFERENTIAL CASE
1.
If the 2 differential side bearings
are to be removed from the differen-
tial case, use the tool shown in Fig.
14.procarmanuals.com
Page 239 of 413
04-04-08
Rear Axle — Ford Light-Duty (WER)
04-04-08
E 1577-A
75—Pinion Bearing
Cup
Installation—Typical
2.
Remove
the
bolts that attach
the
ring gear
to the
differential case. Press
the ring gear from
the
case
or tap it
off with
a
soft-faced hammer.
PARTS REPAIR
OR
REPLACEMENT
Clean
and
inspect
all the
parts
as
outlined
in
Cleaning
and
Inspection,
Part 4-1, Section
3 of
this Shop
Man-
ual.
Before assembling
the
carrier,
re-
pair
or
replace
all
parts
as
indicated
by
the
inspection.
The
principle
re-
placement operations
are
covered
in
the following procedures.
All
other
re-
pair
or
replacement operations
are
performed during
the
Cleaning
and
Inspection, Part 4-1, Section
3
opera-
tions noted above,
or
during
the as-
sembly
in
this section.
PINION BEARING CUPS
Do
not
remove
the
pinion bearing
cups from
the
carrier casting unless
the cups
are
worn
or
damaged.
If
the
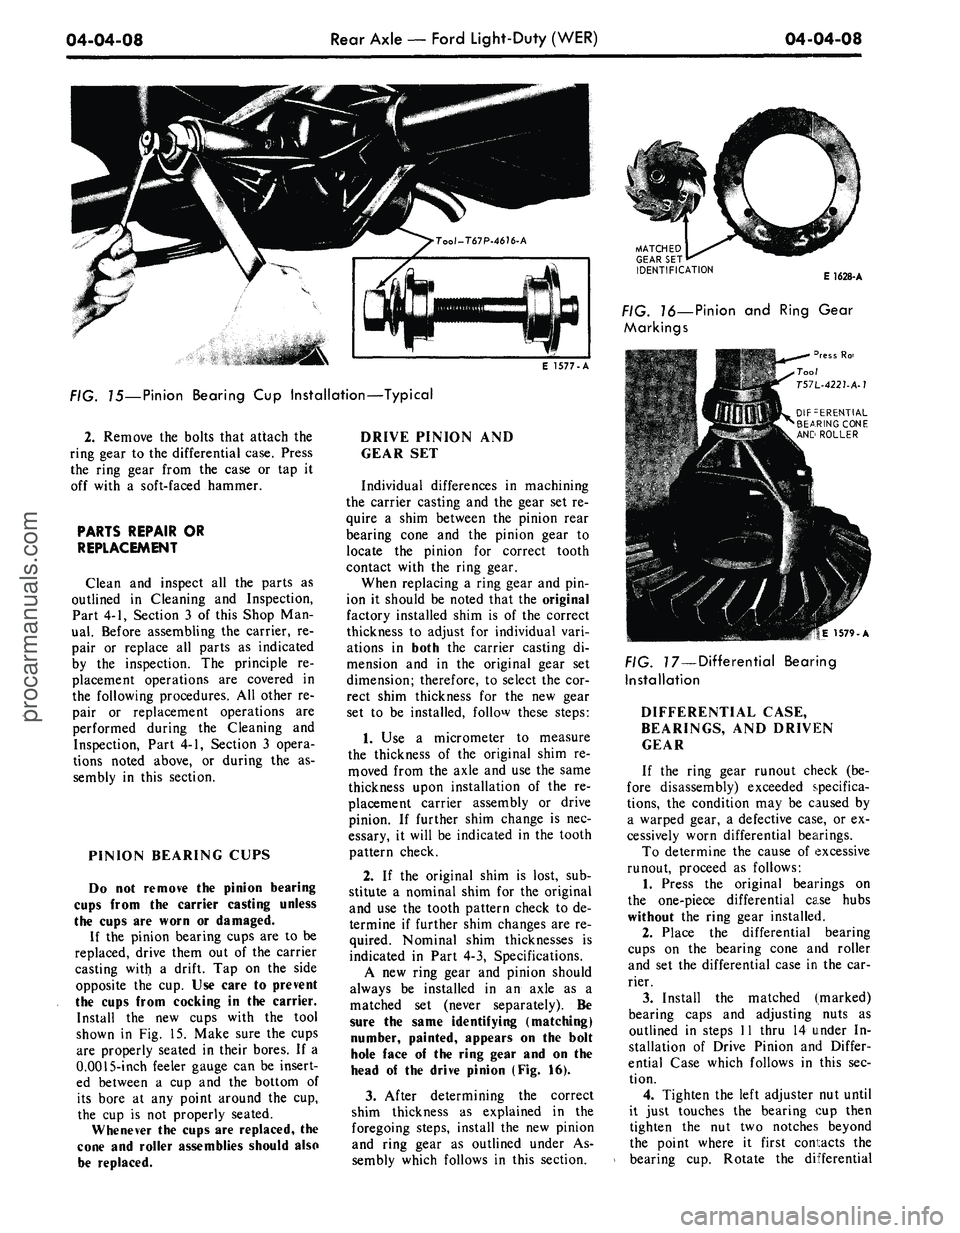
pinion bearing cups
are to be
replaced, drive them
out of the
carrier
casting with
a
drift.
Tap on the
side
opposite
the cup. Use
care
to
prevent
the cups from cocking
in the
carrier.
Install
the new
cups with
the
tool
shown
in Fig. 15.
Make sure
the
cups
are properly seated
in
their bores.
If a
0.0015-inch feeler gauge
can be
insert-
ed between
a cup and the
bottom
of
its bore
at any
point around
the cup,
the
cup is not
properly seated.
Whenever
the
cups
are
replaced,
the
cone
and
roller assemblies should also
be replaced.
DRIVE PINION
AND
GEAR
SET
Individual differences
in
machining
the carrier casting
and the
gear
set re-
quire
a
shim between
the
pinion rear
bearing cone
and the
pinion gear
to
locate
the
pinion
for
correct tooth
contact with
the
ring gear.
When replacing
a
ring gear
and pin-
ion
it
should
be
noted that
the
original
factory installed shim
is of the
correct
thickness
to
adjust
for
individual vari-
ations
in
both
the
carrier casting
di-
mension
and in the
original gear
set
dimension; therefore,
to
select
the cor-
rect shim thickness
for the new
gear
set
to be
installed, follow these steps:
1.
Use a
micrometer
to
measure
the thickness
of the
original shim
re-
moved from
the
axle
and use the
same
thickness upon installation
of the re-
placement carrier assembly
or
drive
pinion.
If
further shim change
is nec-
essary,
it
will
be
indicated
in the
tooth
pattern check.
2.
If the
original shim
is
lost,
sub-
stitute
a
nominal shim
for the
original
and
use the
tooth pattern check
to de-
termine
if
further shim changes
are re-
quired. Nominal shim thicknesses
is
indicated
in
Part
4-3,
Specifications.
A
new
ring gear
and
pinion should
always
be
installed
in an
axle
as a
matched
set
(never separately).
Be
sure
the
same identifying (matching)
number, painted, appears
on the
bolt
hole face
of the
ring gear
and on the
head
of the
drive pinion
(Fig. 16).
3.
After determining
the
correct
shim thickness
as
explained
in the
foregoing steps, install
the new
pinion
and ring gear
as
outlined under
As-
sembly which follows
in
this section.
MATCHED
GEAR
SET
IDENTIFICATION
E 1628-A
. ?6—Pinion
and
Ring Gear
Markings
3ress
Ro-
Tool
T57L-4221-A-1
DIFFERENTIAL
BEARING CONE
ANC ROLLER
|E 1579-A
PIG. 77—Differential Bearing
Installation
DIFFERENTIAL CASE,
BEARINGS,
AND
DRIVEN
GEAR
If
the
ring gear runout check
(be-
fore disassembly) exceeded specifica-
tions,
the
condition
may be
caused
by
a warped gear,
a
defective case,
or ex-
cessively worn differential bearings.
To determine
the
cause
of
excessive
runout, proceed
as
follows:
1.
Press
the
original bearings
on
the one-piece differential case hubs
without
the
ring gear installed.
2.
Place
the
differential bearing
cups
on the
bearing cone
and
roller
and
set the
differential case
in the car-
rier.
3.
Install
the
matched (marked)
bearing caps
and
adjusting nuts
as
outlined
in
steps
11
thru
14
under
In-
stallation
of
Drive Pinion
and
Differ-
ential Case which follows
in
this
sec-
tion.
4.
Tighten
the
left adjuster
nut
until
it just touches
the
bearing
cup
then
tighten
the nut two
notches beyond
the point where
it
first contacts
the
bearing
cup.
Rotate
the
differentialprocarmanuals.com
Page 241 of 413
04-04-10
Rear Axle — Ford Light-Duty (WER)
04-04-10
the differential case and ring gear as-
sembly in the carrier without regard
to the matching of any particular gear
teeth.
12.
Slide the case assembly along
the bores until a slight amount of
backlash is felt between the gear teeth.
Hold the differential case in place.
13.
Set the adjusting nuts in the
bores so that they just contact the
bearing cups.
14.
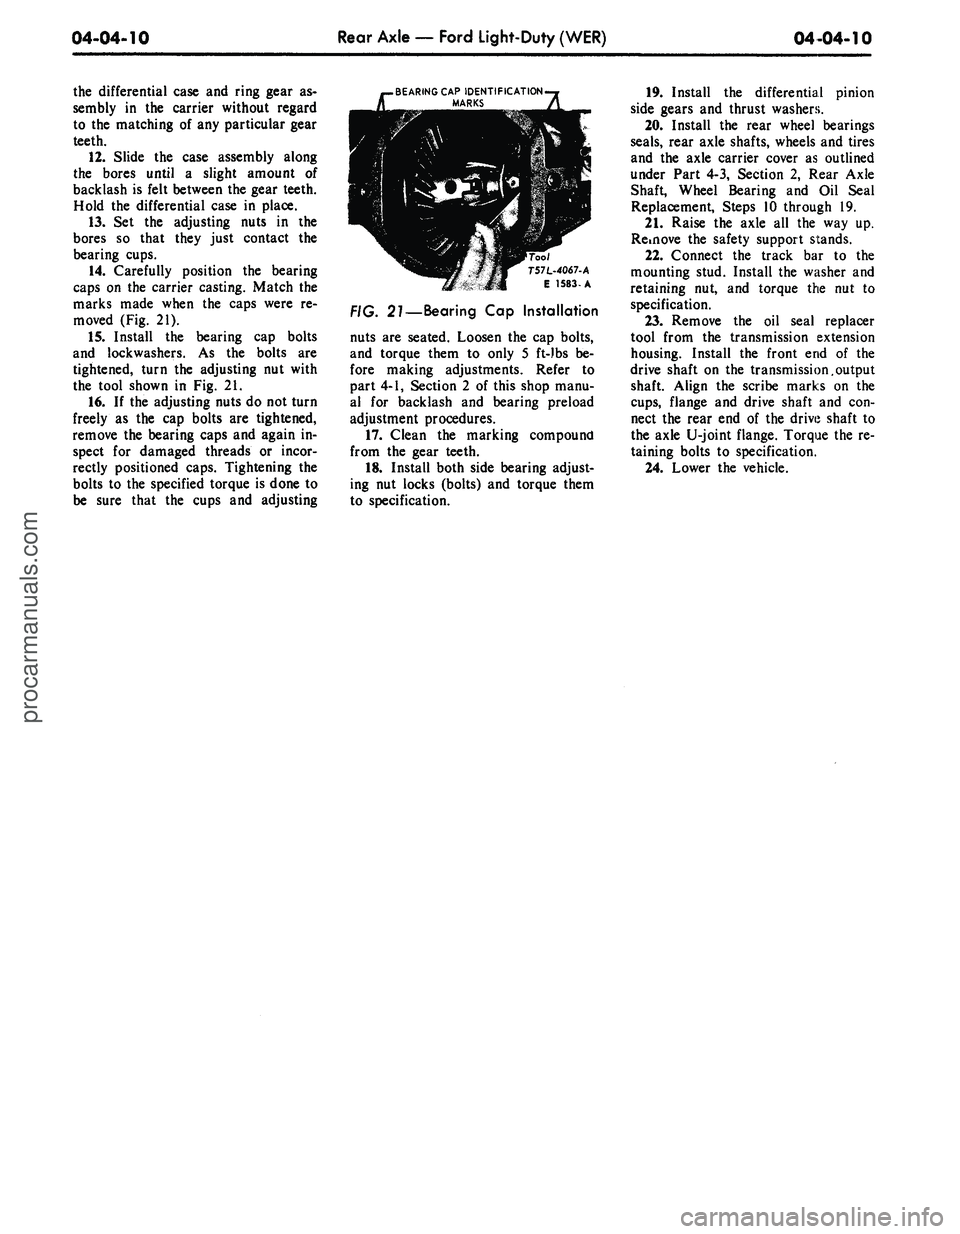
Carefully position the bearing
caps on the carrier casting. Match the
marks made when the caps were re-
moved (Fig. 21).
15.
Install the bearing cap bolts
and lockwashers. As the bolts are
tightened, turn the adjusting nut with
the tool shown in Fig. 21.
16.
If the adjusting nuts do not turn
freely as the cap bolts are tightened,
remove the bearing caps and again in-
spect for damaged threads or incor-
rectly positioned caps. Tightening the
bolts to the specified torque is done to
be sure that the cups and adjusting
.BEARING CAP IDENTIFICATION-j
MARKS
A
T57L-4067-A
E 1583-A
27—Bearing Cap Installation
nuts are seated. Loosen the cap bolts,
and torque them to only 5 ft-)bs be-
fore making adjustments. Refer to
part 4-1, Section 2 of this shop manu-
al for backlash and bearing preload
adjustment procedures.
17.
Clean the marking compound
from the gear teeth.
18.
Install both side bearing adjust-
ing nut locks (bolts) and torque them
to specification.
19.
Install the differential pinion
side gears and thrust washers.
20.
Install the rear wheel bearings
seals,
rear axle shafts, wheels and tires
and the axle carrier cover as outlined
under Part 4-3, Section 2, Rear Axle
Shaft, Wheel Bearing and Oil Seal
Replacement, Steps 10 through 19.
21.
Raise the axle all the way up.
Rdnove the safety support stands.
22.
Connect the track bar to the
mounting stud. Install the washer and
retaining nut, and torque the nut to
specification.
23.
Remove the oil seal replacer
tool from the transmission extension
housing. Install the front end of the
drive shaft on the transmission.output
shaft. Align the scribe marks on the
cups,
flange and drive shaft and con-
nect the rear end of the drive shaft to
the axle U-joint flange. Torque the re-
taining bolts to specification.
24.
Lower the vehicle.procarmanuals.com
Page 263 of 413
05-03-05
Clutch
05-03-05
4.
Remove the bolt that secures the
left air vent control cable bracket to
the instrument panel. Position the
control cable to one side.
5.
Remove the retaining clip and
flat washer from the clutch pedal
shaft. Then, remove the shaft, bush-
ing, clutch pedal and brake pedal
from the support.
6. Remove the bushings from the
pedal shaft, and transfer the pedal
pad.
7.
Lubricate the clutch pedal shaft
bushings and position them on the
shaft. Then, position the brake pedal
and clutch pedal in the pedal support.
8. Install the flat washer and re-
taining clip on the pedal shaft.
9. Position the assist spring to the
pedal and bracket. Pry the bracket
forward and install the lower bolt.
Torque the bolts to specifications.
10.
Position the master cylinder
push rod, bushing, and washers on the
brake pedal and secure with a retain-
ing clip.
11.
Connect the equalizer rod to
the clutch pedal and secure it in place
with a retaining clip.
12.
Position the air vent control
cable bracket to the instrument panel
and secure with the attaching bolt.
13.
Adjust the clutch pedal free
travel.
EQUALIZER BAR AND/OR
BUSHING REMOVAL AND
INSTALLATION
FORD, MERCURY
AND METEOR
1.
Raise the vehicle and disconnect
the clutch pedal-to-equalizer rod at
the equalizer bar (Fig. 1).
2.
Disconnect the return spring and
retaining spring at the release lever.
Separate the release lever rod from
the release lever.
3.
Remove the equalizer bar frame
bracket from the frame.
4.
Remove the equalizer bar from
the pivot on the flywheel housing.
5.
Remove the wire clip to replace
the outer bushing and the snap ring
from the inner pivot stud to replace
the inner bushing.
6. Position the flat washer, felt
washer and bushing on the inner and
outer pivots. Secure these parts with
the snap ring.
7.
Position the equalizer bar on the
inner pivot and bolt the equalizer bar
frame bracket to the frame. Torque
the attaching bolts to specification.
8. Install the clutch release rod, re-
turn spring and retaining spring.
9. Connect the clutch pedal rod to
the equalizer bar.
10.
Adjust the clutch pedal free
travel.
MUSTANG, COUGAR,
MONTEGO, FALCON,
FAIRLANE (EXCEPT
MONTEGO AND FAIRLANE
WITH 390 V-8)
1.
Disconnect the clutch pedal
equalizer rod at the equalizer bar
(Figs.
2 and 3).
2.
Raise the vehicle and disconnect
the release lever, return spring at the
lever.
3.
Remove the equalizer bar outer
bracket and bushing assembly.
4.
Remove the release rod from the
equalizer bar, and then remove the
equalizer bar. Remove the bushing
and washers from the inner mounting
stud.
5.
Position the equalizer bar, wash-
ers,
inner bushing, and retainer on the
inner stud.
6. After positioning the outer bush-
ing, install the outer bracket (with the
equalizer bar in place).
7.
Connect the release rod and the
release lever return spring.
8. Lower the vehicle. Connect the
clutch pedal equalizer rod to the
equalizer baY and secure with the re-
taining pin.
9. Adjust the clutch pedal free trav-
el as required.
MONTEGO AND
FAIRLANE—390 V-8
1.
Disconnect the clutch pedal
equalizer rod at the equalizer bar (Fig.
2).
2.
Raise the vehicle and disconnect
the return spring at the release lever.
Disconnect the release lever rod from
the equalizer lever.
3.
Remove the equalizer bar center
bolt.
4.
Separate the equalizer bar and
remove both sections from the vehicle.
5.
Remove the bolts retaining the
equalizer bar inner bracket to the fly-
wheel housing and remove the bracket
and bushing assembly.
6. Remove the equalizer bar outer
bracket and bushing assembly.
7.
Remove the snap ring, bushing,
and felt washer from each bracket as-
sembly.
8. Position a felt washer, and bush-
ing on each bracket assembly and se-
cure with the snap ring.
9. Install the outer bracket and
bushing assembly to the frame (Fig.
2).
Torque the bracket attaching bolts
to specifications.
10.
Position the outer section of the
equalizer bar on the outer bracket
pivot.
11.
Connect the two sections of the
equalizer bar. Insert the inner bracket
pivot into the equalizer bar and install
the assembly to the flywheel housing.
Torque the attaching bolts to specifi-
cations.
12.
Install the equalizer bar center
bolt and torque to specifications.
Make sure that both ends of the
equalizer bar are against the felt
washers.
13.
Connect the release rod and the
release lever return spring.
14.
Adjust the clutch pedal free
travel.
15.
Lower the vehicle. Connect the
clutch pedal equalizer rod to the
equalizer bar and secure with the re-
taining clip.
16.
Check the free travel at the
pedal for conformance to specifica-
tions.
Readjust if necessary.
REMOVAL AND INSTALLATION
CLUTCH REMOVAL
1.
Raise the vehicle on a hoist.
2.
Disconnect the drive shaft from
the rear U-joint flange. Then, slide the
drive shaft off the transmission output
shaft. Insert the appropriate tool over
the output shaft and into the extension
housing oil seal.
3.
Disconnect the speedometer
cable from the extension housing.
4.
Disconnect the gear shift rods
from the transmission. If the vehicle is
equipped with a four-speed transmis-
sion, remove the bolts that secure the
four-speed transmission, disconnect
the front brake cable from the cross-
member and remove the crossmem-
member from the vehicle.
5.
Remove the bolts that attach the
transmission to the flywheel housing.
6. Move the transmission rearward
until the input shaft clears the fly-
wheel housing, then remove it from
the vehicle.
7.
Disconnect the clutch release
lever retaining spring from the release
lever.procarmanuals.com
Page 271 of 413
06-02-02
Ford Design Three Speed Transmission
06-02-02
DESCRIPTION
DESCRIPTION
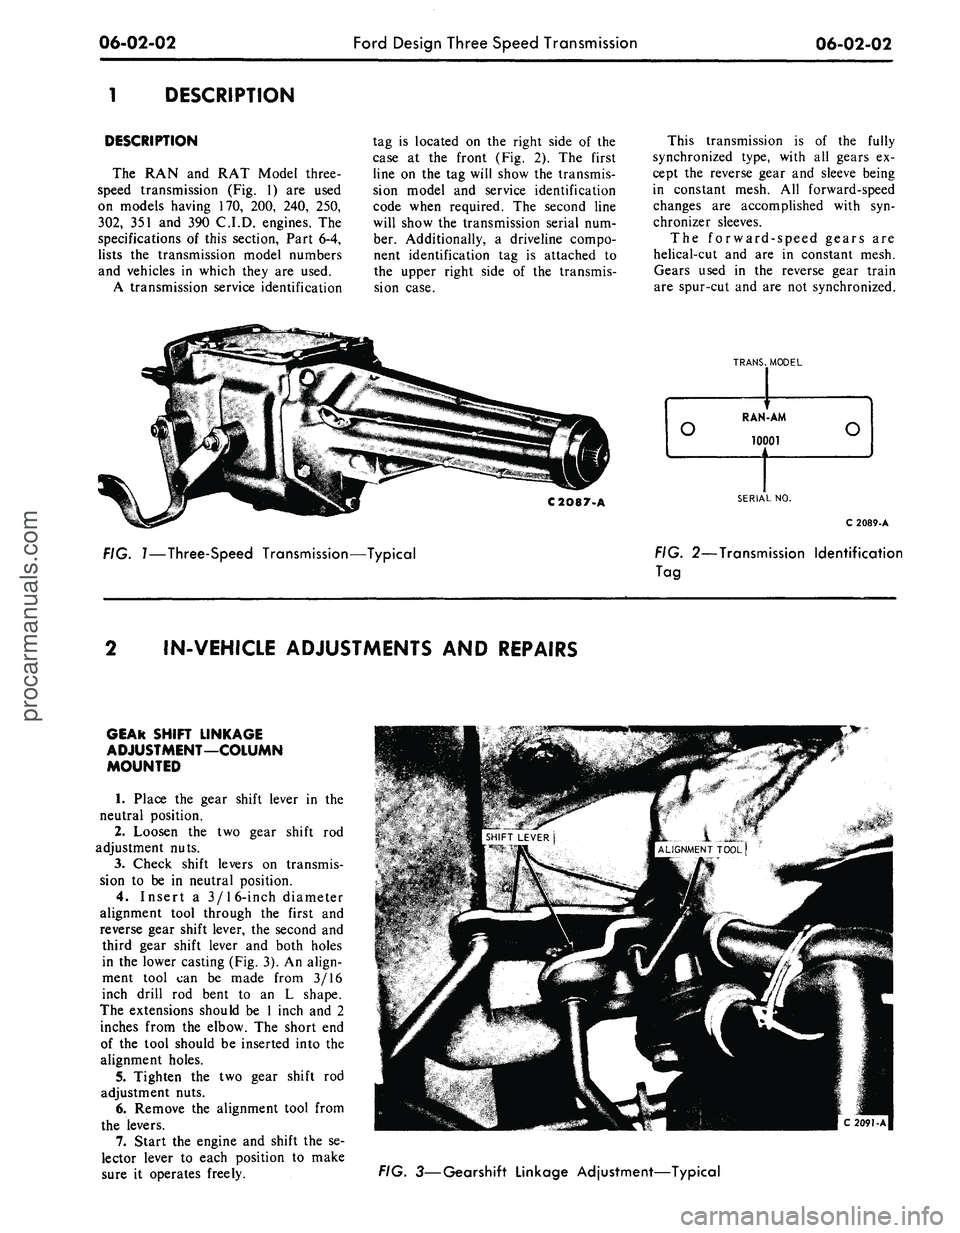
The RAN and RAT Model three-
speed transmission (Fig. 1) are used
on models having 170, 200, 240, 250,
302,
351 and 390 C.I.D. engines. The
specifications of this section, Part 6-4,
lists the transmission model numbers
and vehicles in which they are used.
A transmission service identification
tag is located on the right side of the
case at the front (Fig. 2). The first
line on the tag will show the transmis-
sion model and service identification
code when required. The second line
will show the transmission serial num-
ber. Additionally, a driveline compo-
nent identification tag is attached to
the upper right side of the transmis-
sion case.
This transmission is of the fully
synchronized type, with all gears ex-
cept the reverse gear and sleeve being
in constant mesh. All forward-speed
changes are accomplished with syn-
chronizer sleeves.
The forward-speed gears are
helical-cut and are in constant mesh.
Gears used in the reverse gear train
are spur-cut and are not synchronized.
C2O87-A
FIG.
1—Three-Speed
Transmission—Typical
TRANS.
MODEL
SERIAL
NO.
C 2089-A
FIG.
2—Transmission
Identification
Tag
IN-VEHICLE ADJUSTMENTS
AND
REPAIRS
GEAR SHIFT LINKAGE
ADJUSTMENT—COLUMN
MOUNTED
1. Place the gear shift lever in the
neutral position.
2.
Loosen the two gear shift rod
adjustment nuts.
3.
Check shift levers on transmis-
sion to be in neutral position.
4.
Insert a 3/16-inch diameter
alignment tool through the first and
reverse gear shift lever, the second and
third gear shift lever and both holes
in the lower casting (Fig. 3). An align-
ment tool can be made from 3/16
inch drill rod bent to an L shape.
The extensions should be 1 inch and 2
inches from the elbow. The short end
of the tool should be inserted into the
alignment holes.
5.
Tighten the two gear shift rod
adjustment nuts.
6. Remove the alignment tool from
the levers.
7.
Start the engine and shift the se-
lector lever to each position to make
sure it operates freely.
FIG.
3—Gearshift
Linkage Adjustment—Typicalprocarmanuals.com
Page 281 of 413
06-03-02
Ford Design Four-Speed Transmission
06-03-02
1 DESCRIPTION
DESCRIPTION
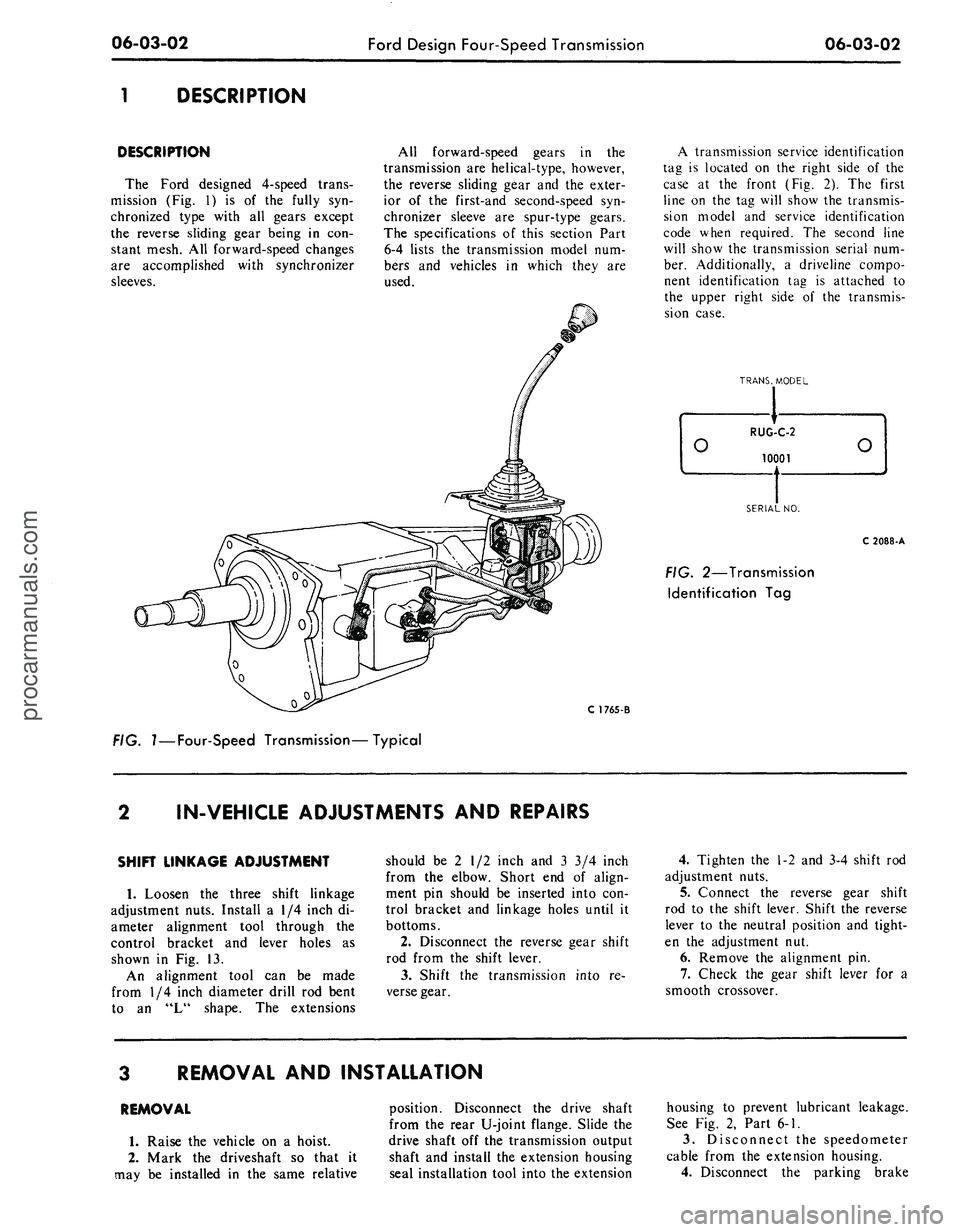
The Ford designed 4-speed trans-
mission
(Fig. 1) is of the
fully
syn-
chronized type with
all
gears except
the reverse sliding gear being
in con-
stant mesh.
All
forward-speed changes
are accomplished with synchronizer
sleeves.
All forward-speed gears
in the
transmission
are
helical-type, however,
the reverse sliding gear
and the
exter-
ior
of the
first-and second-speed
syn-
chronizer sleeve
are
spur-type gears.
The specifications
of
this section Part
6-4 lists
the
transmission model
num-
bers
and
vehicles
in
which they
are
used.
C 1765-B
FIG. 7—Four-Speed Transmission—Typical
A transmission service identification
tag
is
located
on the
right side
of the
case
at the
front
(Fig. 2). The
first
line
on the tag
will show
the
transmis-
sion model
and
service identification
code when required.
The
second line
will show
the
transmission serial
num-
ber. Additionally,
a
driveline compo-
nent identification
tag is
attached
to
the upper right side
of the
transmis-
sion case.
TRANS.
MODEL
O
RUG-C-2
10001
O
SERIAL NO.
C 2088-A
FIG. 2—Transmission
Identification
Tag
IN-VEHICLE ADJUSTMENTS
AND
REPAIRS
SHIFT LINKAGE ADJUSTMENT
1.
Loosen
the
three shift linkage
adjustment nuts. Install
a 1/4
inch
di-
ameter alignment tool through
the
control bracket
and
lever holes
as
shown
in Fig. 13.
An alignment tool
can be
made
from
1/4
inch diameter drill
rod
bent
to
an "L"
shape.
The
extensions
should
be 2 1/2
inch
and 3 3/4
inch
from
the
elbow. Short
end of
align-
ment
pin
should
be
inserted into
con-
trol bracket
and
linkage holes until
it
bottoms.
2.
Disconnect
the
reverse gear shift
rod from
the
shift lever.
3.
Shift
the
transmission into
re-
verse gear.
4.
Tighten
the 1-2 and 3-4
shift
rod
adjustment nuts.
5.
Connect
the
reverse gear shift
rod
to the
shift lever. Shift
the
reverse
lever
to the
neutral position
and
tight-
en
the
adjustment
nut.
6. Remove
the
alignment
pin.
7.
Check
the
gear shift lever
for a
smooth crossover.
REMOVAL
AND
INSTALLATION
REMOVAL
1.
Raise
the
vehicle
on a
hoist.
2.
Mark
the
driveshaft
so
that
it
may
be
installed
in the
same relative
position. Disconnect
the
drive shaft
from
the
rear U-joint flange. Slide
the
drive shaft
off the
transmission output
shaft
and
install
the
extension housing
seal installation tool into the extension
housing
to
prevent lubricant leakage.
See
Fig. 2,
Part
6-1.
3.
Disconnect
the
speedometer
cable from
the
extension housing.
4.
Disconnect
the
parking brakeprocarmanuals.com
Page 285 of 413
06-03-06
Ford Design Four-Speed Transmission
06-03-06
BEARING
7C
SPEEDOMETER
DRIVE GEAR
172
OUTPUT
SHAFT
SEAL
SNAP RING 7Aon
SPEEDOMETER GEAR
DRIVE BALL
353351•S
BLOCKING RING
7107
FIRST AND SECOND
SPEED SYNCHRONIZER
7124
SECOND SPEED GEAR
7102
THIRD AND FOURTH
SPEED SYNCHRONIZER
•7124
SNAP RING - 7109
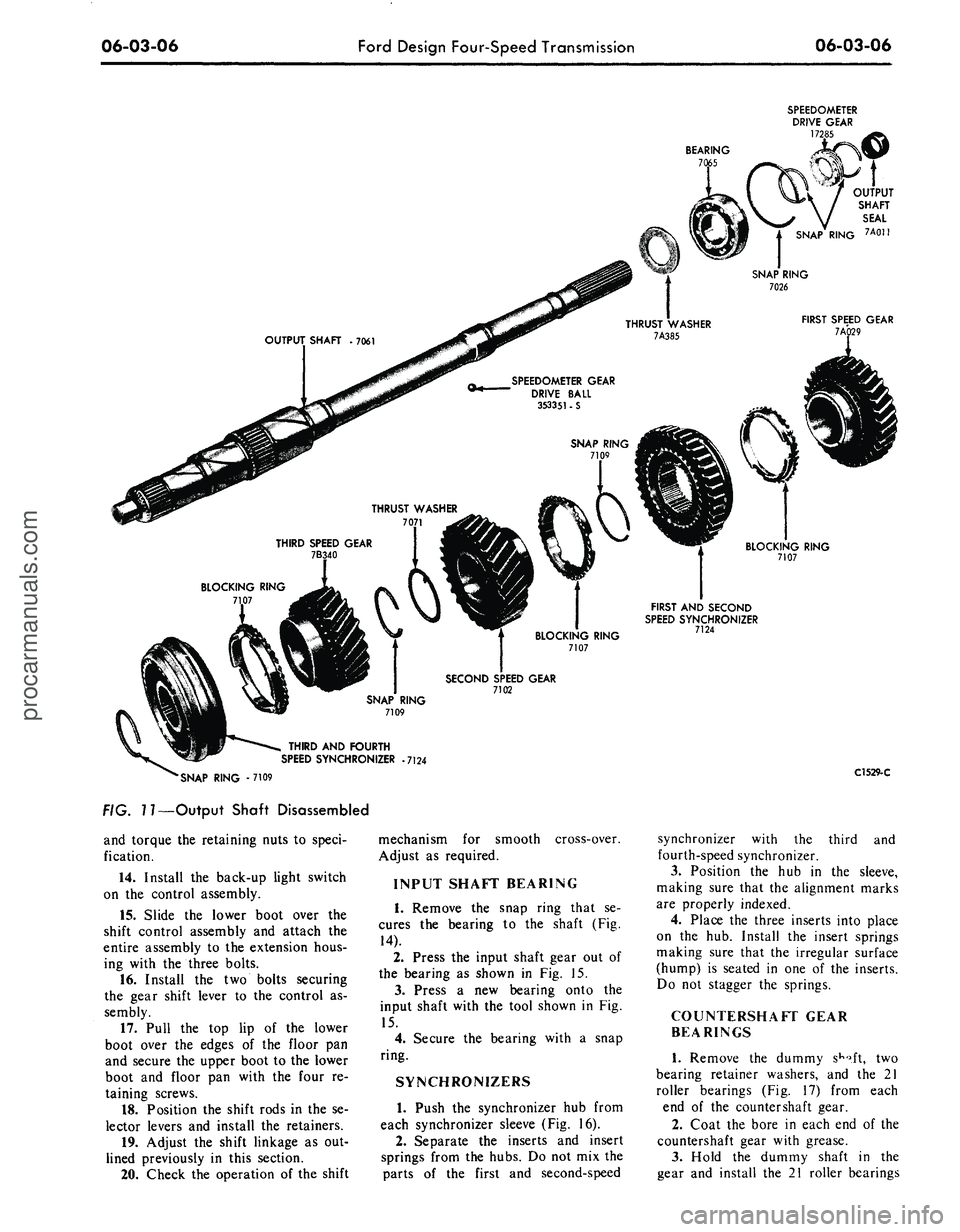
FIG.
7
7—Output Shaft Disassembled
and torque the retaining nuts to speci-
fication.
14.
Install the back-up light switch
on the control assembly.
15.
Slide the lower boot over the
shift control assembly and attach the
entire assembly to the extension hous-
ing with the three bolts.
16.
Install the two bolts securing
the gear shift lever to the control as-
sembly.
17.
Pull the top lip of the lower
boot over the edges of the floor pan
and secure the upper boot to the lower
boot and floor pan with the four re-
taining screws.
18.
Position the shift rods in the se-
lector levers and install the retainers.
19.
Adjust the shift linkage as out-
lined previously in this section.
20.
Check the operation of the shift
mechanism for smooth
Adjust as required.
cross-over.
INPUT SHAFT BEARING
1.
Remove the snap ring that se-
cures the bearing to the shaft (Fig.
14).
2.
Press the input shaft gear out of
the bearing as shown in Fig. 15.
3.
Press a new bearing onto the
input shaft with the tool shown in Fig.
15.
4.
Secure the bearing with a snap
ring.
SYNCHRONIZERS
1.
Push the synchronizer hub from
each synchronizer sleeve (Fig. 16).
2.
Separate the inserts and insert
springs from the hubs. Do not mix the
parts of the first and second-speed
C1529-C
synchronizer with the third and
fourth-speed synchronizer.
3.
Position the hub in the sleeve,
making sure that the alignment marks
are properly indexed.
4.
Place the three inserts into place
on the hub. Install the insert springs
making sure that the irregular surface
(hump) is seated in one of the inserts.
Do not stagger the springs.
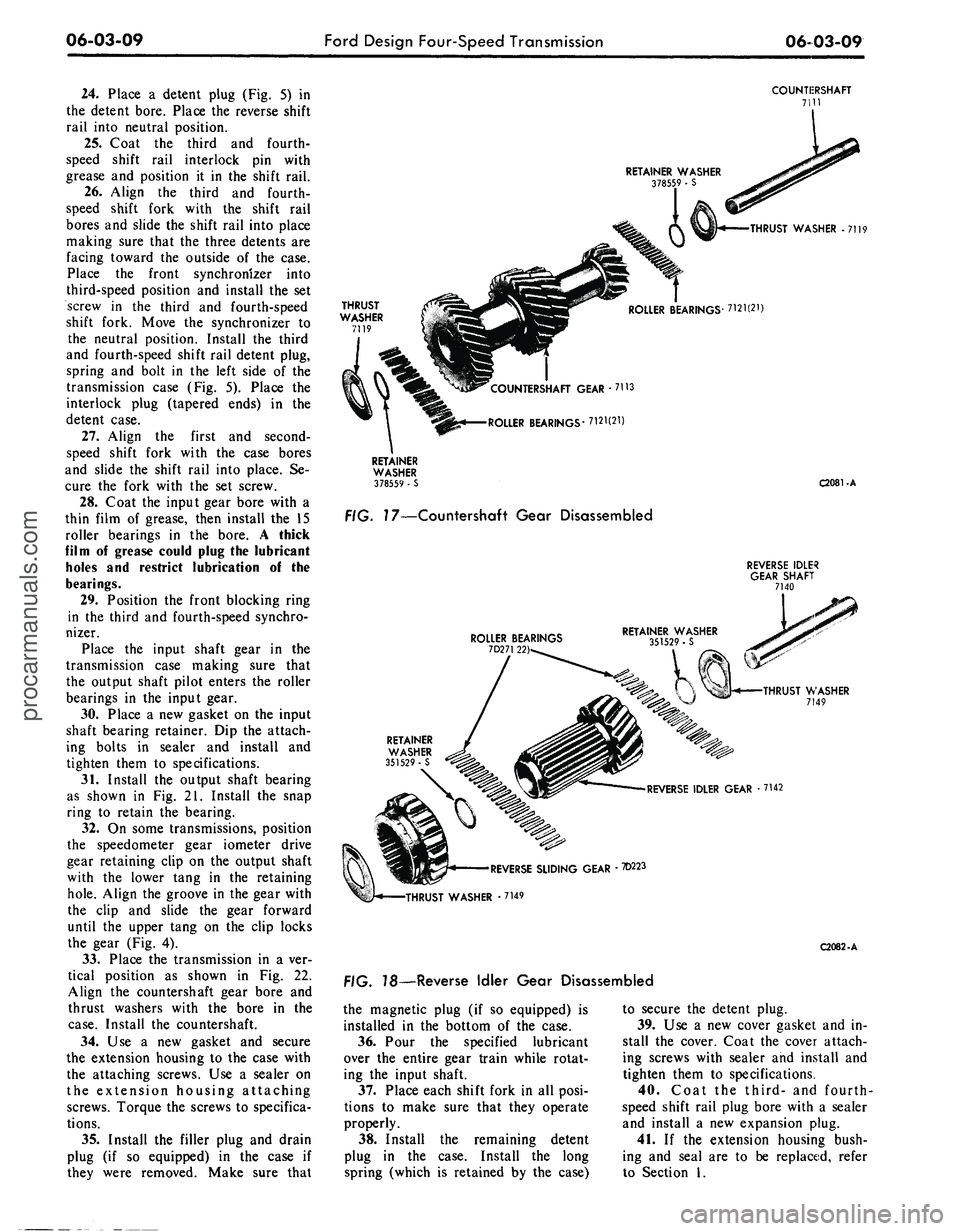
COUNTERSHAFT GEAR
BEARINGS
1.
Remove the dummy
sKo.ft,
two
bearing retainer washers, and the 21
roller bearings (Fig. 17) from each
end of the countershaft gear.
2.
Coat the bore in each end of the
countershaft gear with grease.
3.
Hold the dummy shaft in the
gear and install the 21 roller bearingsprocarmanuals.com
Page 288 of 413
06-03-09
Ford Design Four-Speed Transmission
06-03-09
24.
Place a detent plug (Fig. 5) in
the detent bore. Place the reverse shift
rail into neutral position.
25.
Coat the third and fourth-
speed shift rail interlock pin with
grease and position it in the shift rail.
26.
Align the third and fourth-
speed shift fork with the shift rail
bores and slide the shift rail into place
making sure that the three detents are
facing toward the outside of the case.
Place the front synchronizer into
third-speed position and install the set
screw in the third and fourth-speed
shift fork. Move the synchronizer to
the neutral position. Install the third
and fourth-speed shift rail detent plug,
spring and bolt in the left side of the
transmission case (Fig. 5). Place the
interlock plug (tapered ends) in the
detent case.
27.
Align the first and second-
speed shift fork with the case bores
and slide the shift rail into place. Se-
cure the fork with the set screw.
28.
Coat the input gear bore with a
thin film of grease, then install the 15
roller bearings in the bore. A thick
film of grease could plug the lubricant
holes and restrict lubrication of the
bearings.
29.
Position the front blocking ring
in the third and fourth-speed synchro-
nizer.
Place the input shaft gear in the
transmission case making sure that
the output shaft pilot enters the roller
bearings in the input gear.
30.
Place a new gasket on the input
shaft bearing retainer. Dip the attach-
ing bolts in sealer and install and
tighten them to specifications.
31.
Install the output shaft bearing
as shown in Fig. 21. Install the snap
ring to retain the bearing.
32.
On some transmissions, position
the speedometer gear iometer drive
gear retaining clip on the output shaft
with the lower tang in the retaining
hole.
Align the groove in the gear with
the clip and slide the gear forward
until the upper tang on the clip locks
the gear (Fig. 4).
33.
Place the transmission in a ver-
tical position as shown in Fig. 22.
Align the countershaft gear bore and
thrust washers with the bore in the
case.
Install the countershaft.
34.
Use a new gasket and secure
the extension housing to the case with
the attaching screws. Use a sealer on
the extension housing attaching
screws. Torque the screws to specifica-
tions.
35.
Install the filler plug and drain
plug (if so equipped) in the case if
they were removed. Make sure that
COUNTIERSHAFT
7111
RETAINER WASHER
378559 • S
THRUST WASHER -7119
THRUST
WASHER
7119
ROLLER BEARINGS- 7121(21)
COUNTERSHAFT GEAR - 7113
ROLLER BEARINGS'7121(21)
RETAINER
WASHER
378559 • S
FIG. 17—Countershaft Gear Disassembled
C2081-A
REVERSE IDLER
GEAR SHAFT
7140
ROLLER BEARINGS
7D271 22)
THRUST WASHER
7149
RETAINER
WASHER
351529 - S
REVERSE IDLER GEAR -7142
'REVERSE SLIDING GEAR • 7D223
•THRUST WASHER • 7149
FIG. 78—Reverse Idler Gear Disassembled
C2082-A
the magnetic plug (if so equipped) is
installed in the bottom of the case.
36.
Pour the specified lubricant
over the entire gear train while rotat-
ing the input shaft.
37.
Place each shift fork in all posi-
tions to make sure that they operate
properly.
38.
Install the remaining detent
plug in the case. Install the long
spring (which is retained by the case)
to secure the detent plug.
39.
Use a new cover gasket and in-
stall the cover. Coat the cover attach-
ing screws with sealer and install and
tighten them to specifications.
40.
Coat the third- and fourth-
speed shift rail plug bore with a sealer
and install a new expansion plug.
41.
If the extension housing bush-
ing and seal are to be replaced, refer
to Section 1.procarmanuals.com
Page 295 of 413
07-01-04
General Transmission Service
07-01-04
taching bolts to the proper torque. If
necessary, replace the gasket.
Check the fluid filler tube connec-
tion at the transmission case or pan.
If leakage is found here, install a new
O-ring or tighten the fitting to the
specified torque.
Check the fluid lines and fittings
between the transmission and the
cooler in the radiator tank for loose-
ness,
wear, or damage. If leakage can-
not be stopped by tightening a fitting,
replace the damaged parts.
Check the engine coolant in the ra-
diator. If transmission fluid is present
in the coolant, the cooler in the radia-
tor is probably leaking.
The cooler can be further checked
for leaks by disconnecting the lines
from the cooler fittings and applying
50-75 psi air pressure to the fittings.
Remove the radiator cap to relieve the
pressure build at the exterior of the oil
cooler tank. If the cooler is leaking
and will not hold this pressure the
cooler must be replaced. Cooler re-
placement is described in the Cooling
System Section of Group 11.
If leakage is found at either the
downshift control lever shaft or the
manual lever shaft, replace either or
both seals.
Inspect the pipe plug on the left
side of the transmission case at the
front. If the plug shows leakage, tor-
que the plug to specifications. If tight-
ening does not stop the leaks, replace
the plug. On a C6 transmission, a TV
pressure plug is also provided on the
right rear side of the case.
When converter drain plugs leak,
remove drain plugs with a six-point
wrench. Coat the threads with FoMo-
Co Perfect Seal Sealing Compound or
its equivalent, and install the plugs.
Torque the drain plugs to specifica-
tion. Fluid leakage from the converter
housing may be caused by engine oil
leaking past the rear main bearing or
from oil gallery plugs, or power steer-
ing oil leakage from steering system.
Be sure to determine the exact cause
of the leak before repair procedures
are started.
Oil-soluble aniline or fluorescent dyes
premixed at the rate of 1/2 teaspoon
of dye powder to 1/2 pint of transmis-
sion fluid have proved helpful in locat-
ing the source of the fluid leakage.
Such dyes may be used to determine
whether an engine oil or transmission
fluid leak is present or if the fluid in
the oil cooler leaks into the engine
coolant system. A black light, how-
ever, must be used with the fluorescent
dye solution.
DISHED OR
FLAT WASHER
" O.D.,
a" STEEL PLATE
5/8"X \W,
DRILL TO SUIT
HEX. HEAD SCREW
3/8"-24 X Vl
HEX. NUT W—
24
WELD
TOGETHER
WING
NUT
>/2"_13
THREAD
CHAIN,
10"
LONG
RUBBER PLUG
1
Vi" DIA. X 2"
LONG Vl"
HOLE THRU
APPROXIMATELY
40 DUROMETER
FLAT WASHER
Vs" O.D.
PLUG
VALVE
STANDARD BOLT
W-13
X 4Vl"
LONG SQUARE
THREAD
END
REMOVE HEAD
AND WELD
TO
WASHER
STANDARD 1/8" FITTING-87971-S FOR
RETAPPED DRAIN PLUG THREADS-USE
1/4" OVERSIZE FITTING-87973-S
D 1067-B
WELD TOGETHER
SECURELY—MUST
NOT LEAK
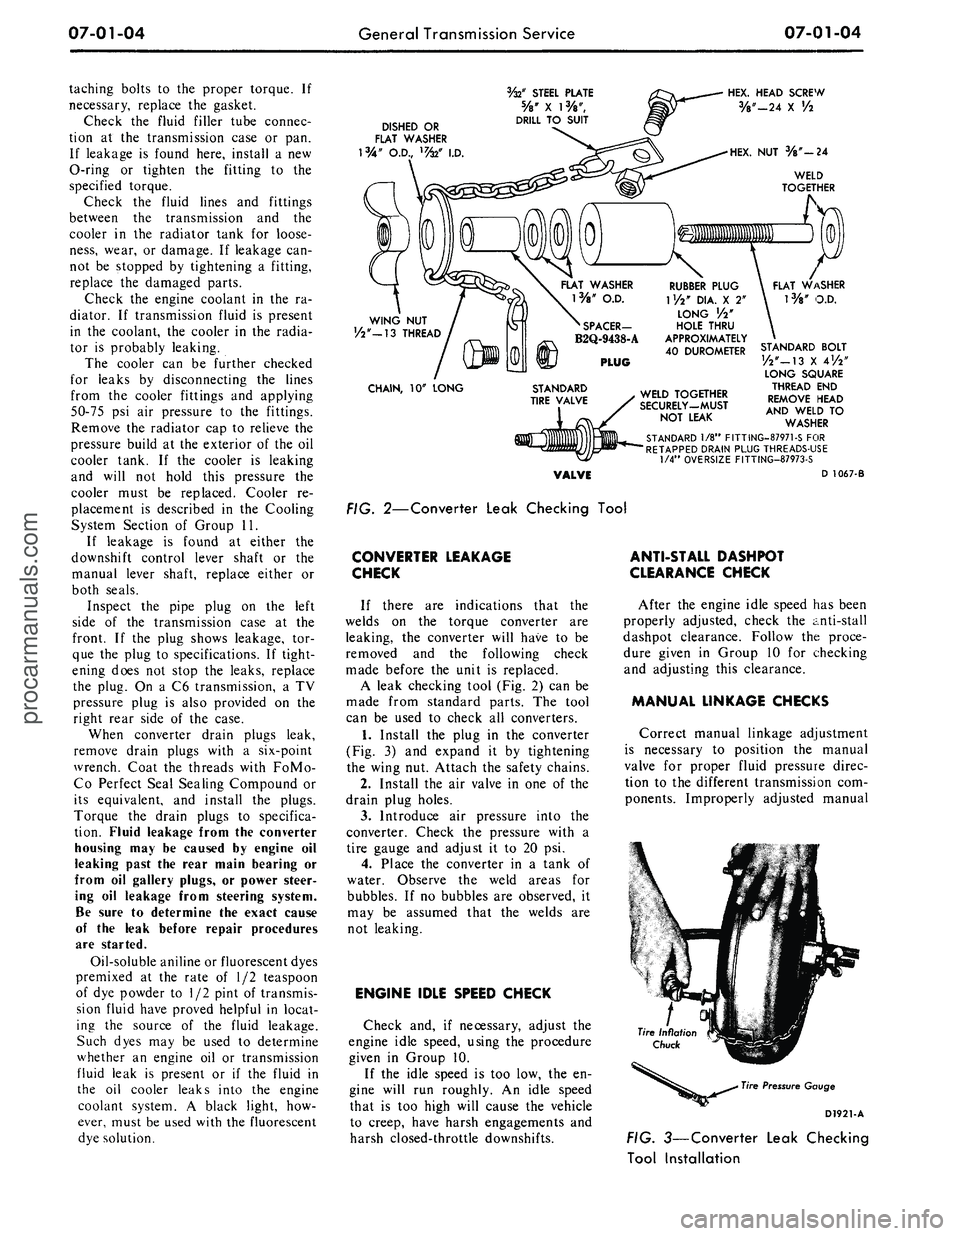
FIG. 2—Converter Leak Checking Tool
CONVERTER LEAKAGE
CHECK
If there are indications that the
welds on the torque converter are
leaking, the converter will have to be
removed and the following check
made before the unit is replaced.
A leak checking tool (Fig. 2) can be
made from standard parts. The tool
can be used to check all converters.
1.
Install the plug in the converter
(Fig. 3) and expand it by tightening
the wing nut. Attach the safety chains.
2.
Install the air valve in one of the
drain plug holes.
3.
Introduce air pressure into the
converter. Check the pressure with a
tire gauge and adjust it to 20 psi.
4.
Place the converter in a tank of
water. Observe the weld areas for
bubbles. If no bubbles are observed, it
may be assumed that the welds are
not leaking.
ENGINE IDLE SPEED CHECK
Check and, if necessary, adjust the
engine idle speed, using the procedure
given in Group 10.
If the idle speed is too low, the en-
gine will run roughly. An idle speed
that is too high will cause the vehicle
to creep, have harsh engagements and
harsh closed-throttle downshifts.
ANTI-STALL DASHPOT
CLEARANCE CHECK
After the engine idle speed has been
properly adjusted, check the anti-stall
dashpot clearance. Follow the proce-
dure given in Group 10 for checking
and adjusting this clearance.
MANUAL LINKAGE CHECKS
Correct manual linkage adjustment
is necessary to position the manual
valve for proper fluid pressure direc-
tion to the different transmission com-
ponents. Improperly adjusted manual
Tire Pressure Gauge
D1921-A
FIG. 3—Converter Leak Checking
Tool Installationprocarmanuals.com
Page 297 of 413
07-01-06
General Transmission Service
07-01-06
MAKE MARK HERE
BELLOWS INTACT
BELLOWS FAILED
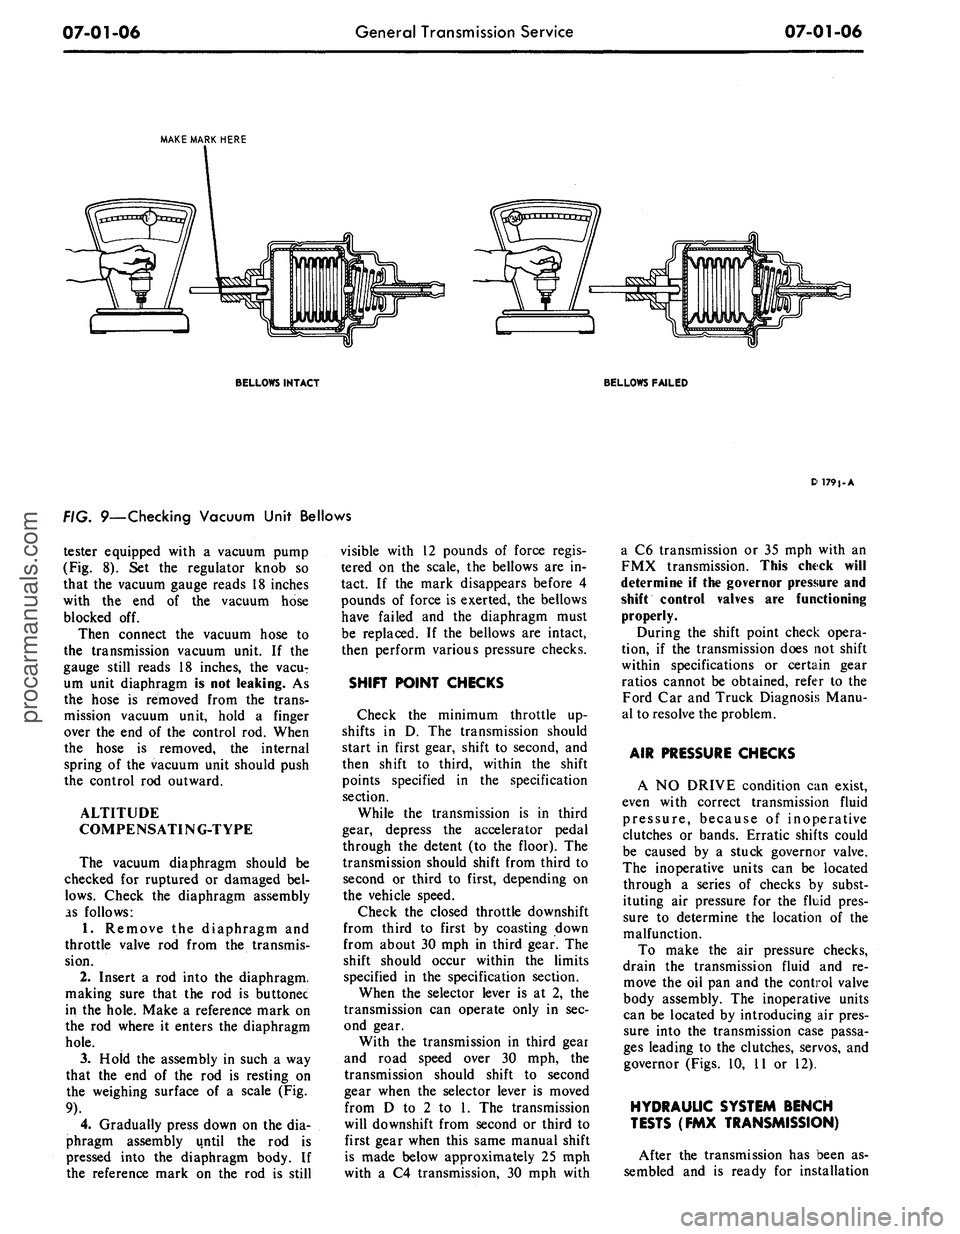
FIG. 9—Checking Vacuum Unit Bellows
tester equipped with a vacuum pump
(Fig. 8). Set the regulator knob so
that the vacuum gauge reads 18 inches
with the end of the vacuum hose
blocked off.
Then connect the vacuum hose to
the transmission vacuum unit. If the
gauge still reads 18 inches, the vacuT
urn unit diaphragm is not leaking. As
the hose is removed from the trans-
mission vacuum unit, hold a finger
over the end of the control rod. When
the hose is removed, the internal
spring of the vacuum unit should push
the control rod outward.
ALTITUDE
COMPENSATING-TYPE
The vacuum diaphragm should be
checked for ruptured or damaged bel-
lows.
Check the diaphragm assembly
as follows:
1.
Remove the diaphragm and
throttle valve rod from the transmis-
sion.
2.
Insert a rod into the diaphragm,
making sure that the rod is buttonec
in the hole. Make a reference mark on
the rod where it enters the diaphragm
hole.
3.
Hold the assembly in such a way
that the end of the rod is resting on
the weighing surface of a scale (Fig.
9).
4.
Gradually press down on the dia-
phragm assembly until the rod is
pressed into the diaphragm body. If
the reference mark on the rod is still
visible with 12 pounds of force regis-
tered on the scale, the bellows are in-
tact. If the mark disappears before 4
pounds of force is exerted, the bellows
have failed and the diaphragm must
be replaced. If the bellows are intact,
then perform various pressure checks.
SHIFT POINT CHECKS
Check the minimum throttle up-
shifts in D. The transmission should
start in first gear, shift to second, and
then shift to third, within the shift
points specified in the specification
section.
While the transmission is in third
gear, depress the accelerator pedal
through the detent (to the floor). The
transmission should shift from third to
second or third to first, depending on
the vehicle speed.
Check the closed throttle downshift
from third to first by coasting down
from about 30 mph in third gear. The
shift should occur within the limits
specified in the specification section.
When the selector lever is at 2, the
transmission can operate only in sec-
ond gear.
With the transmission in third gear
and road speed over 30 mph, the
transmission should shift to second
gear when the selector lever is moved
from D to 2 to 1. The transmission
will downshift from second or third to
first gear when this same manual shift
is made below approximately 25 mph
with a C4 transmission, 30 mph with
D 1791.A
a C6 transmission or 35 mph with an
FMX transmission. This check will
determine if the governor pressure and
shift control valves are functioning
properly.
During the shift point check opera-
tion, if the transmission does not shift
within specifications or certain gear
ratios cannot be obtained, refer to the
Ford Car and Truck Diagnosis Manu-
al to resolve the problem.
AIR PRESSURE CHECKS
A NO DRIVE condition can exist,
even with correct transmission fluid
pressure, because of inoperative
clutches or bands. Erratic shifts could
be caused by a stuck governor valve.
The inoperative units can be located
through a series of checks by subst-
ituting air pressure for the fluid pres-
sure to determine the location of the
malfunction.
To make the air pressure checks,
drain the transmission fluid and re-
move the oil pan and the control valve
body assembly. The inoperative units
can be located by introducing air pres-
sure into the transmission case passa-
ges leading to the clutches, servos, and
governor (Figs. 10, 11 or 12).
HYDRAULIC SYSTEM BENCH
TESTS (FMX TRANSMISSION)
After the transmission has been as-
sembled and is ready for installationprocarmanuals.com