bolt pattern FORD MUSTANG 1969 Volume One Chassis
[x] Cancel search | Manufacturer: FORD, Model Year: 1969, Model line: MUSTANG, Model: FORD MUSTANG 1969Pages: 413, PDF Size: 75.81 MB
Page 194 of 413
04-01-07
General Axle Service
04-01-07
Tool-4201-
C
Tool-6565 USED WITH BRACKET
FROM Too/^*207-C
FLANGE
E1743-A
procedure under Backlash and Differ-
ential Bearing Preload Adjustments.
If the tooth pattern indicates a change
in shim thickness, follow the proce-
dure under Pinion Location.
REMOVABLE CARRIER
TYPE AXLE
The shim location for the removable
carrier type axle is between the pinion
retainer and the carrier (Fig. 13).
When adjusting this type carrier re-
ducing shim thickness will move the
pinion toward the ring gear; increas-
ing shim thickness will move the pi-
nion away from the ring gear (Fig.
13).
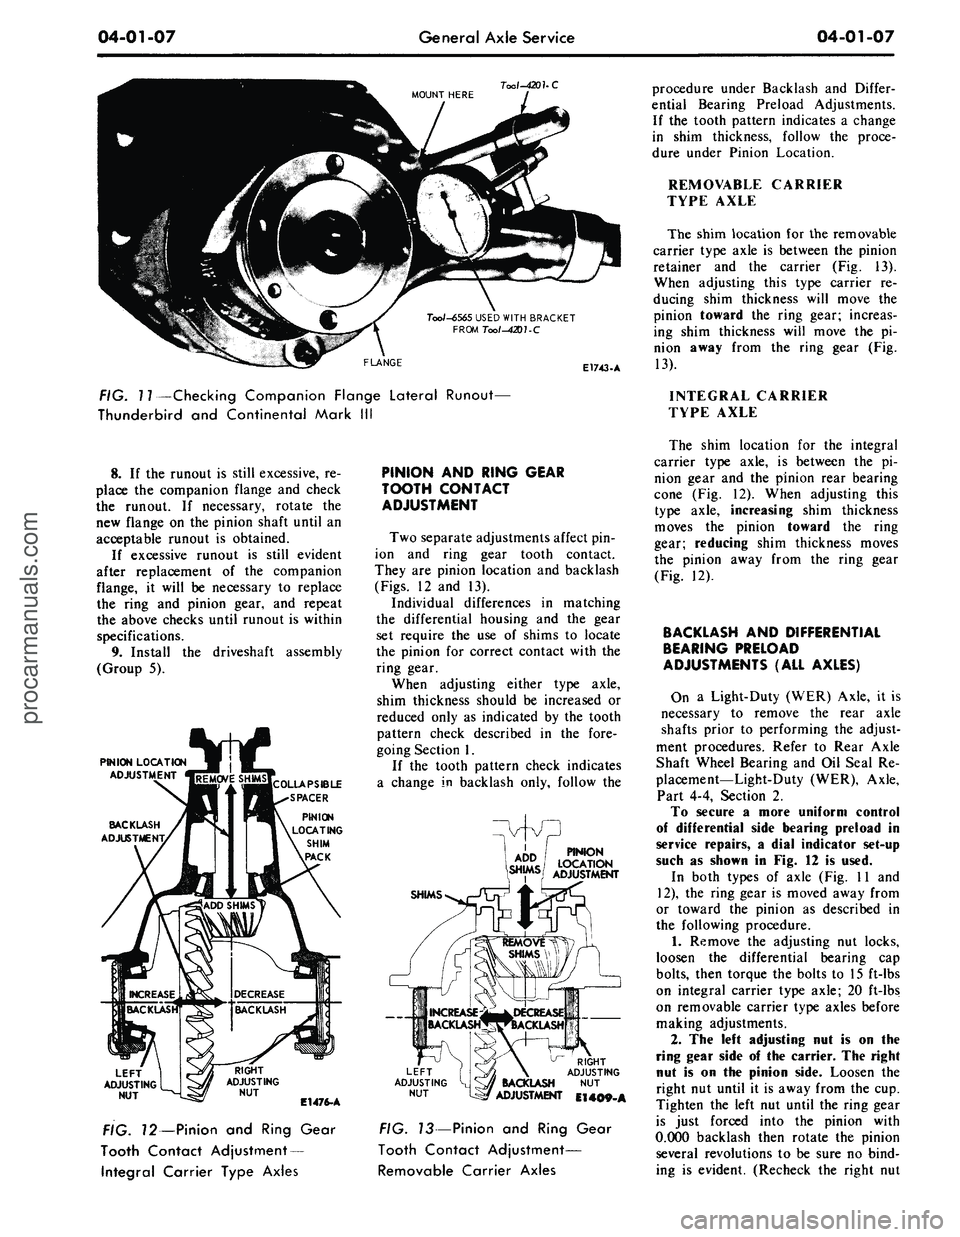
FIG. 11—Checking Companion Flange Lateral Runout—
Thunderbird and Continental Mark III
INTEGRAL CARRIER
TYPE AXLE
8. If the runout is still excessive, re-
place the companion flange and check
the runout. If necessary, rotate the
new flange on the pinion shaft until an
acceptable runout is obtained.
If excessive runout is still evident
after replacement of the companion
flange, it will be necessary to replace
the ring and pinion gear, and repeat
the above checks until runout is within
specifications.
9. Install the driveshaft assembly
(Group 5).
PINION LOCATION
ADJUSTMENT
BACKLASH
ADJUSTMENT,
LEFT
ADJUSTING
NUT
E1476-A
FIG. 12—Pinion and Ring Gear
Tooth Contact Adjustment
—
Integral Carrier Type Axles
PINION AND RING GEAR
TOOTH CONTACT
ADJUSTMENT
Two separate adjustments affect pin-
ion and ring gear tooth contact.
They are pinion location and backlash
(Figs.
12 and 13).
Individual differences in matching
the differential housing and the gear
set require the use of shims to locate
the pinion for correct contact with the
ring gear.
When adjusting either type axle,
shim thickness should be increased or
reduced only as indicated by the tooth
pattern check described in the fore-
going Section 1.
If the tooth pattern check indicates
a change in backlash only, follow the
PINION
LOCATION
ADJUSTMENT
SHIMS
LEFT
ADJUSTING
NUT
RIGHT
ADJUSTING
BACKLASH NUT
ADJUSTMENT El 409-A
FIG. 13—Pinion and Ring Gear
Tooth Contact Adjustment—
Removable Carrier Axles
The shim location for the integral
carrier type axle, is between the pi-
nion gear and the pinion rear bearing
cone (Fig. 12). When adjusting this
type axle, increasing shim thickness
moves the pinion toward the ring
gear; reducing shim thickness moves
the pinion away from the ring gear
(Fig. 12).
BACKLASH AND DIFFERENTIAL
BEARING PRELOAD
ADJUSTMENTS (ALL AXLES)
On a Light-Duty (WER) Axle, it is
necessary to remove the rear axle
shafts prior to performing the adjust-
ment procedures. Refer to Rear Axle
Shaft Wheel Bearing and Oil Seal Re-
placement—Light-Duty (WER), Axle,
Part 4-4, Section 2.
To secure a more uniform control
of differential side bearing preload in
service repairs, a dial indicator set-up
such as shown in Fig. 12 is used.
In both types of axle (Fig. 11 and
12),
the ring gear is moved away from
or toward the pinion as described in
the following procedure.
1.
Remove the adjusting nut locks,
loosen the differential bearing cap
bolts,
then torque the bolts to 15 ft-lbs
on integral carrier type axle; 20 ft-lbs
on removable carrier type axles before
making adjustments.
2.
The left adjusting nut is on the
ring gear side of the carrier. The right
nut is on the pinion side. Loosen the
right nut until it is away from the cup.
Tighten the left nut until the ring gear
is just forced into the pinion with
0.000 backlash then rotate the pinion
several revolutions to be sure no bind-
ing is evident. (Recheck the right nutprocarmanuals.com
Page 195 of 413
04-01-08
General Axle Service
04 01-08
Too/-T57L-4067-A
E 1595-A
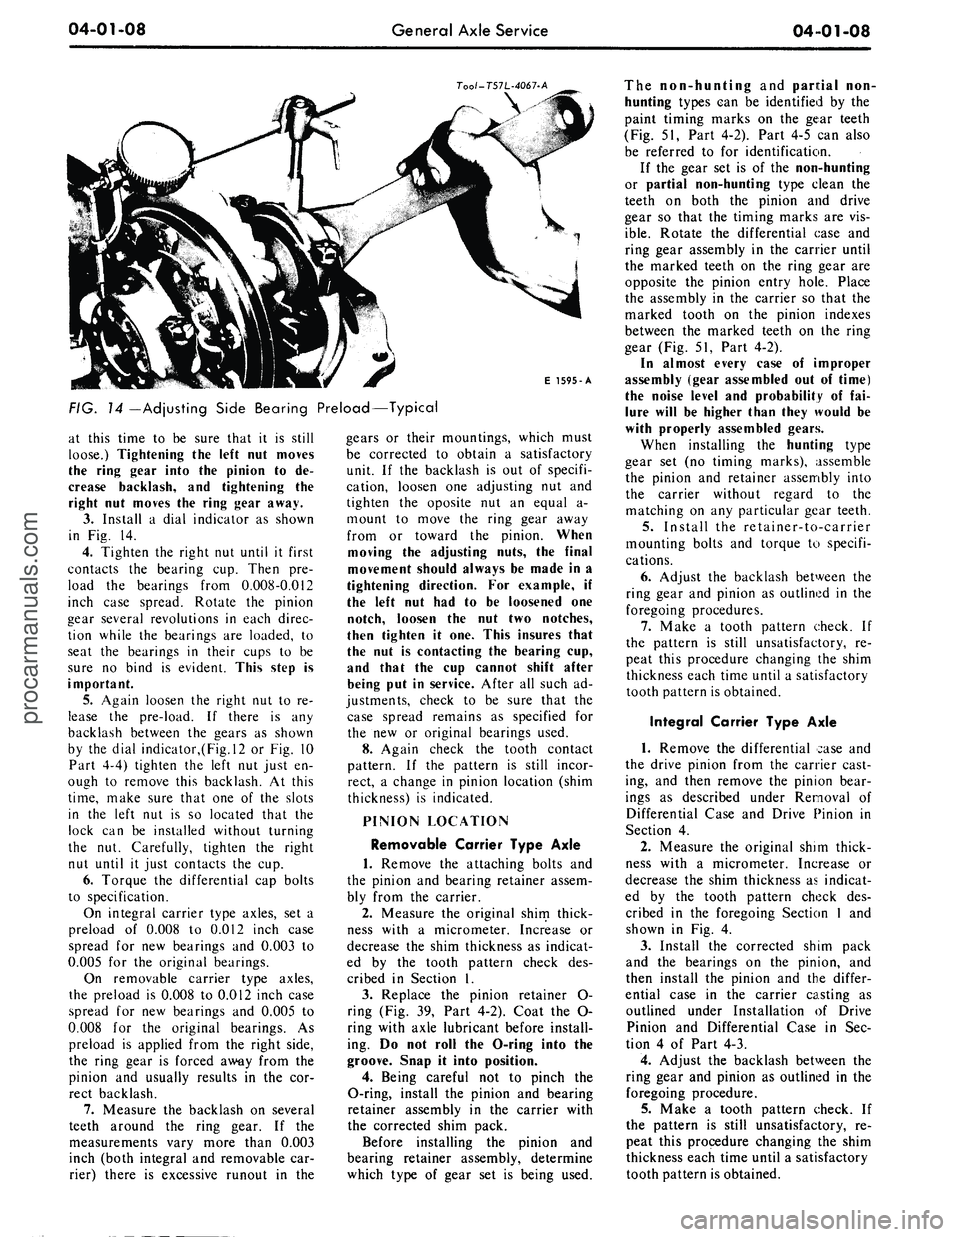
FIG.
14
—Adjusting Side Bearing Preload—Typical
at this time to be sure that it is still
loose.) Tightening the left nut moves
the ring gear into the pinion to de-
crease backlash, and tightening the
right nut moves the ring gear away.
3.
Install a dial indicator as shown
in Fig. 14.
4.
Tighten the right nut until it first
contacts the bearing cup. Then pre-
load the bearings from 0.008-0.012
inch case spread. Rotate the pinion
gear several revolutions in each direc-
tion while the bearings are loaded, to
seat the bearings in their cups to be
sure no bind is evident. This step is
important.
5. Again loosen the right nut to re-
lease the pre-load. If there is any
backlash between the gears as shown
by the dial indicator,(Fig.l2 or Fig. 10
Part 4-4) tighten the left nut just en-
ough to remove this backlash. At this
time,
make sure that one of the slots
in the left nut is so located that the
lock can be installed without turning
the nut. Carefully, tighten the right
nut until it just contacts the cup.
6. Torque the differential cap bolts
to specification.
On integral carrier type axles, set a
preload of 0.008 to 0.012 inch case
spread for new bearings and 0.003 to
0.005 for the original bearings.
On removable carrier type axles,
the preload is 0.008 to 0.012 inch case
spread for new bearings and 0.005 to
0.008 for the original bearings. As
preload is applied from the right side,
the ring gear is forced away from the
pinion and usually results in the cor-
rect backlash.
7.
Measure the backlash on several
teeth around the ring gear. If the
measurements vary more than 0.003
inch (both integral and removable car-
rier) there is excessive runout in the
gears or their mountings, which must
be corrected to obtain a satisfactory
unit. If the backlash is out of specifi-
cation, loosen one adjusting nut and
tighten the oposite nut an equal a-
mount to move the ring gear away
from or toward the pinion. When
moving the adjusting nuts, the final
movement should always be made in a
tightening direction. For example, if
the left nut had to be loosened one
notch, loosen the nut two notches,
then tighten it one. This insures that
the nut is contacting the bearing cup,
and that the cup cannot shift after
being put in service. After all such ad-
justments, check to be sure that the
case spread remains as specified for
the new or original bearings used.
8. Again check the tooth contact
pattern. If the pattern is still incor-
rect, a change in pinion location (shim
thickness) is indicated.
PINION LOCATION
Removable Carrier Type Axle
1.
Remove the attaching bolts and
the pinion and bearing retainer assem-
bly from the carrier.
2.
Measure the original shim thick-
ness with a micrometer. Increase or
decrease the shim thickness as indicat-
ed by the tooth pattern check des-
cribed in Section 1.
3.
Replace the pinion retainer O-
ring (Fig. 39, Part 4-2). Coat the O-
ring with axle lubricant before install-
ing. Do not roll the O-ring into the
groove. Snap it into position.
4.
Being careful not to pinch the
O-ring, install the pinion and bearing
retainer assembly in the carrier with
the corrected shim pack.
Before installing the pinion and
bearing retainer assembly, determine
which type of gear set is being used.
The non-hunting and pantial non-
hunting types can be identified by the
paint timing marks on the gear teeth
(Fig. 51, Part 4-2). Part 4-5 can also
be referred to for identification.
If the gear set is of the non-hunting
or partial non-hunting type clean the
teeth on both the pinion and drive
gear so that the timing marks are vis-
ible.
Rotate the differential case and
ring gear assembly in the carrier until
the marked teeth on the ring gear are
opposite the pinion entry hole. Place
the assembly in the carrier so that the
marked tooth on the pinion indexes
between the marked teeth on the ring
gear (Fig. 51, Part 4-2).
In almost every case of improper
assembly (gear assembled out of time)
the noise level and probability of fai-
lure will be higher than they would be
with properly assembled gears.
When installing the hunting type
gear set (no timing marks), assemble
the pinion and retainer assembly into
the carrier without regard to the
matching on any particular gear teeth.
5.
Install the retainer-to-carrier
mounting bolts and torque to specifi-
cations.
6. Adjust the backlash between the
ring gear and pinion as outlined in the
foregoing procedures.
7.
Make a tooth pattern check. If
the pattern is still unsatisfactory, re-
peat this procedure changing the shim
thickness each time until a satisfactory
tooth pattern is obtained.
Integral Carrier Type Axle
1.
Remove the differential case and
the drive pinion from the carrier cast-
ing, and then remove the pinion bear-
ings as described under Removal of
Differential Case and Drive Pinion in
Section 4.
2.
Measure the original shim thick-
ness with a micrometer. Increase or
decrease the shim thickness as indicat-
ed by the tooth pattern check des-
cribed in the foregoing Section 1 and
shown in Fig. 4.
3.
Install the corrected shim pack
and the bearings on the pinion, and
then install the pinion and the differ-
ential case in the carrier casting as
outlined under Installation of Drive
Pinion and Differential Case in Sec-
tion 4 of Part 4-3.
4.
Adjust the backlash between the
ring gear and pinion as outlined in the
foregoing procedure.
5.
Make a tooth pattern check. If
the pattern is still unsatisfactory, re-
peat this procedure changing the shim
thickness each time until a satisfactory
tooth pattern is obtained.procarmanuals.com
Page 196 of 413
04-01-09
General Axle Service
04-01-09
CLEANING AND INSPECTION
INSPECTION BEFORE
DISASSEMBLY OF CARRIER
(ALL AXLES)
The differential case or carrier
should be inspected before any parts
are removed from it. These inspec-
tions can help to find the cause of the
trouble and to determine the correc-
tions needed.
Mount the carrier in the holding
fixture shown in Fig. 15. Wipe the lu-
bricant from the internal working
parts,
and visually inspect the parts
for wear or damage.
Tool-T57L-500-A
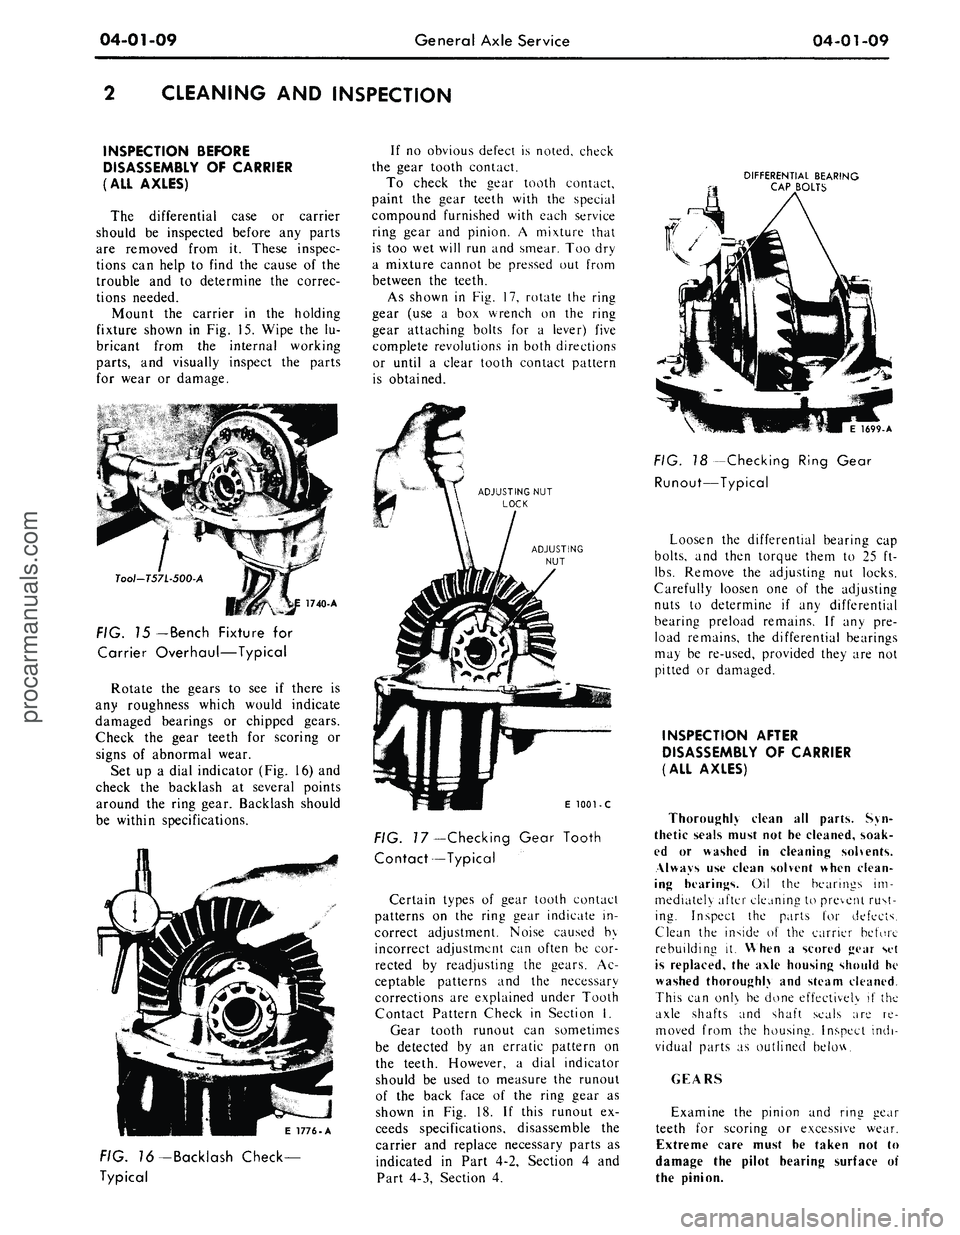
FIG. 15
— Bench
Fixture for
Carrier Overhaul—Typical
Rotate the gears to see if there is
any roughness which would indicate
damaged bearings or chipped gears.
Check the gear teeth for scoring or
signs of abnormal wear.
Set up a dial indicator (Fig. 16) and
check the backlash at several points
around the ring gear. Backlash should
be within specifications.
If no obvious defect is noted, check
the gear tooth contact.
To check the gear tooth contact,
paint the gear teeth with the special
compound furnished with each service
ring gear and pinion. A mixture that
is too wet will run and smear. Too dry
a mixture cannot be pressed out from
between the teeth.
As shown in Fig. 17, rotate the ring
gear (use a box wrench on the ring
gear attaching bolts for a lever) five
complete revolutions in both directions
or until a clear tooth contact pattern
is obtained.
DIFFERENTIAL BEARING
CAP BOLTS
E 1776-A
FIG. 76-Backlash Check-
Typical
E
1001 - C
FIG.
7
7—Checking Gear Tooth
Contact—Typical
Certain types of gear tooth contact
patterns on the ring gear indicate in-
correct adjustment. Noise caused by
incorrect adjustment can often be cor-
rected by readjusting the gears. Ac-
ceptable patterns and the necessary
corrections are explained under Tooth
Contact Pattern Check in Section I.
Gear tooth runout can sometimes
be detected by an erratic pattern on
the teeth. However, a dial indicator
should be used to measure the runout
of the back face of the ring gear as
shown in Fig. 18. If this runout ex-
ceeds specifications, disassemble the
carrier and replace necessary parts as
indicated in Part 4-2, Section 4 and
Part 4-3, Section 4.
1699-A
FIG. 18 -Checking Ring Gear
Runout—Typical
Loosen the differential bearing cap
bolts,
and then torque them to 25 ft-
lbs.
Remove the adjusting nut locks.
Carefully loosen one of the adjusting
nuts to determine if any differential
bearing preload remains. If any pre-
load remains, the differential bearings
may be re-used, provided they are not
pitted or damaged.
INSPECTION AFTER
DISASSEMBLY OF CARRIER
(ALL AXLES)
Thoroughly clean all parts. Syn-
thetic seals must not he cleaned, soak-
ed or washed in cleaning solvents.
Always use clean solvent when clean-
ing hearings. Oil the bearings im-
mediately after cleaning to prevent rust-
ing. Inspect the parts for defects.
Clean the inside of the carrier before
rebuilding it. When a scored gear set
is replaced, the axle housing should he
washed thoroughly and steam cleaned.
This can onl\ be done effectively if the
axle shafts and shaft seals are re-
moved from the housing. Inspect indi-
vidual parts as outlined below.
GEARS
Examine the pinion and ring gear
teeth for scoring or excessive wear.
Extreme care must he taken not to
damage the pilot hearing surface of
the pinion.procarmanuals.com
Page 213 of 413
04-02-16
Rear Axle — Removable Carrier Type
04-02-16
Tool~T53L-200-A
Tool-T57L-4625-A
or 4625-K
E 1725-A
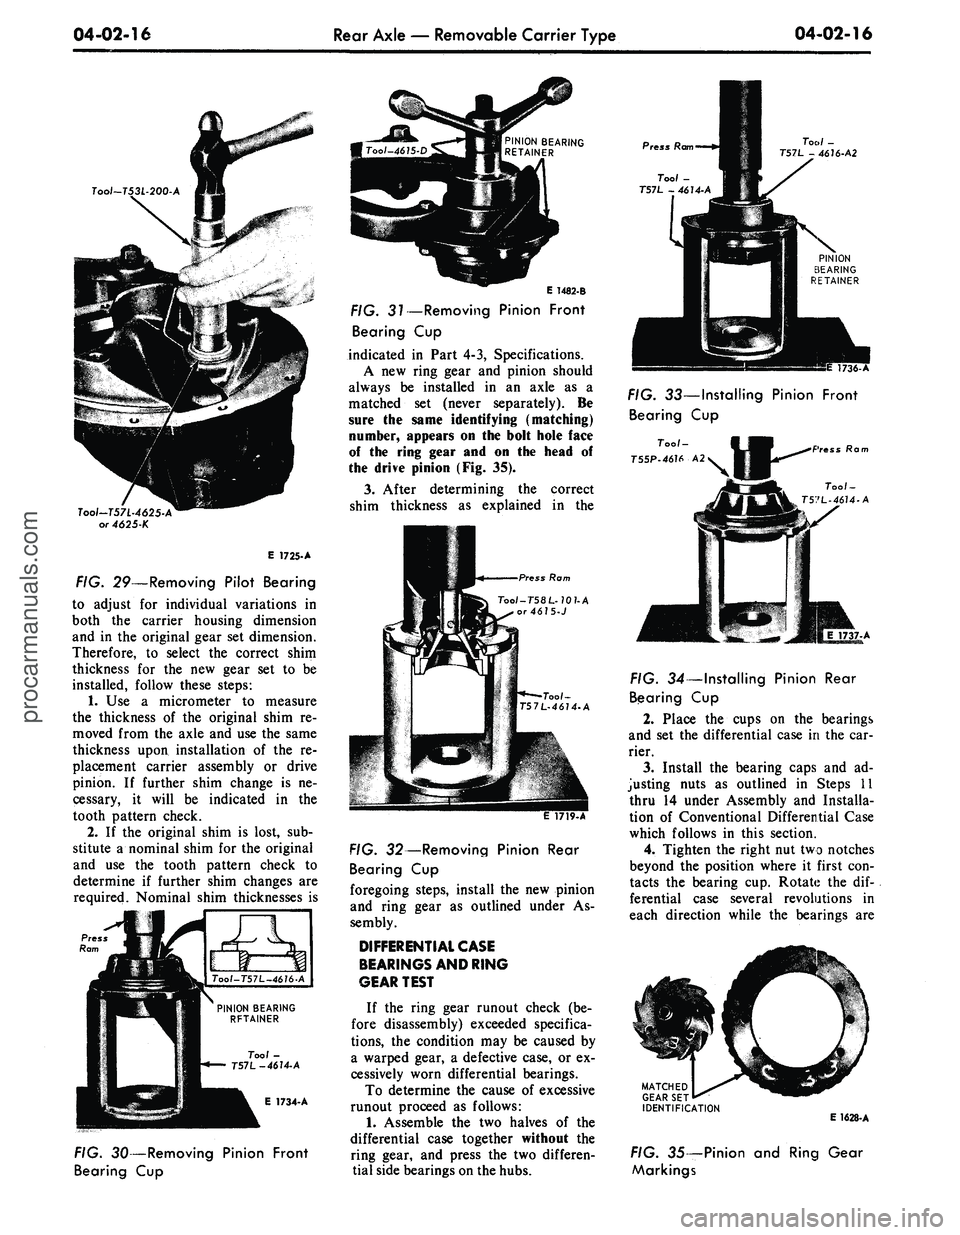
FIG. 29—Removing Pilot Bearing
to adjust for individual variations in
both the carrier housing dimension
and in the original gear set dimension.
Therefore, to select the correct shim
thickness for the new gear set to be
installed, follow these steps:
1.
Use a micrometer to measure
the thickness of the original shim re-
moved from the axle and use the same
thickness upon installation of the re-
placement carrier assembly or drive
pinion. If further shim change is ne-
cessary, it will be indicated in the
tooth pattern check.
2.
If the original shim is lost, sub-
stitute a nominal shim for the original
and use the tooth pattern check to
determine if further shim changes are
required. Nominal shim thicknesses is
E 1734-A
PINION BEARING
RETAINER
E 1482-B
FIG. 31—Removing Pinion Front
Bearing Cup
indicated in Part 4-3, Specifications.
A new ring gear and pinion should
always be installed in an axle as a
matched set (never separately). Be
sure the same identifying (matching)
number, appears on the bolt hole face
of the ring gear and on the head of
the drive pinion (Fig. 35).
3.
After determining the correct
shim thickness as explained in the
ss
Rom
Too/-T58L-70?-A
or4675-J
FIG. 30—Removing Pinion Front
Bearing Cup
FIG. 32—Removing Pinion Rear
Bearing Cup
foregoing steps, install the new pinion
and ring gear as outlined under As-
sembly.
DIFFERENTIAL
CASE
BEARINGS
AND
RING
GEAR
TEST
If the ring gear runout check (be-
fore disassembly) exceeded specifica-
tions,
the condition may be caused by
a warped gear, a defective case, or ex-
cessively worn differential bearings.
To determine the cause of excessive
runout proceed as follows:
1.
Assemble the two halves of the
differential case together without the
ring gear, and press the two differen-
tial side bearings on the hubs.
Press Ram
Tool -
T57L - 4614-A
Tool -
T57L - 4676-A2
1736-/
FIG. 33—Installing Pinion Front
Bearing Cup
too;-
IB .
T55P-46U
A2V •H"^^
\
Press Ram
Tool-
T57L-46U-A
FIG. 34—Installing Pinion Rear
Bearing Cup
2.
Place the cups on the bearings
and set the differential case in the car-
rier.
3.
Install the bearing caps and ad-
justing nuts as outlined in Steps 11
thru 14 under Assembly and Installa-
tion of Conventional Differential Case
which follows in this section.
4.
Tighten the right nut two notches
beyond the position where it first con-
tacts the bearing cup. Rotate the dif-
ferential case several revolutions in
each direction while the bearings are
MATCHED
GEAR SET
IDENTIFICATION
E 1628-A
FIG. 35— Pinion and Ring Gear
Markingsprocarmanuals.com
Page 217 of 413
04-02-20
Rear Axle — Removable Carrier Type
0402-20
THRUST WASHER
E1175-B
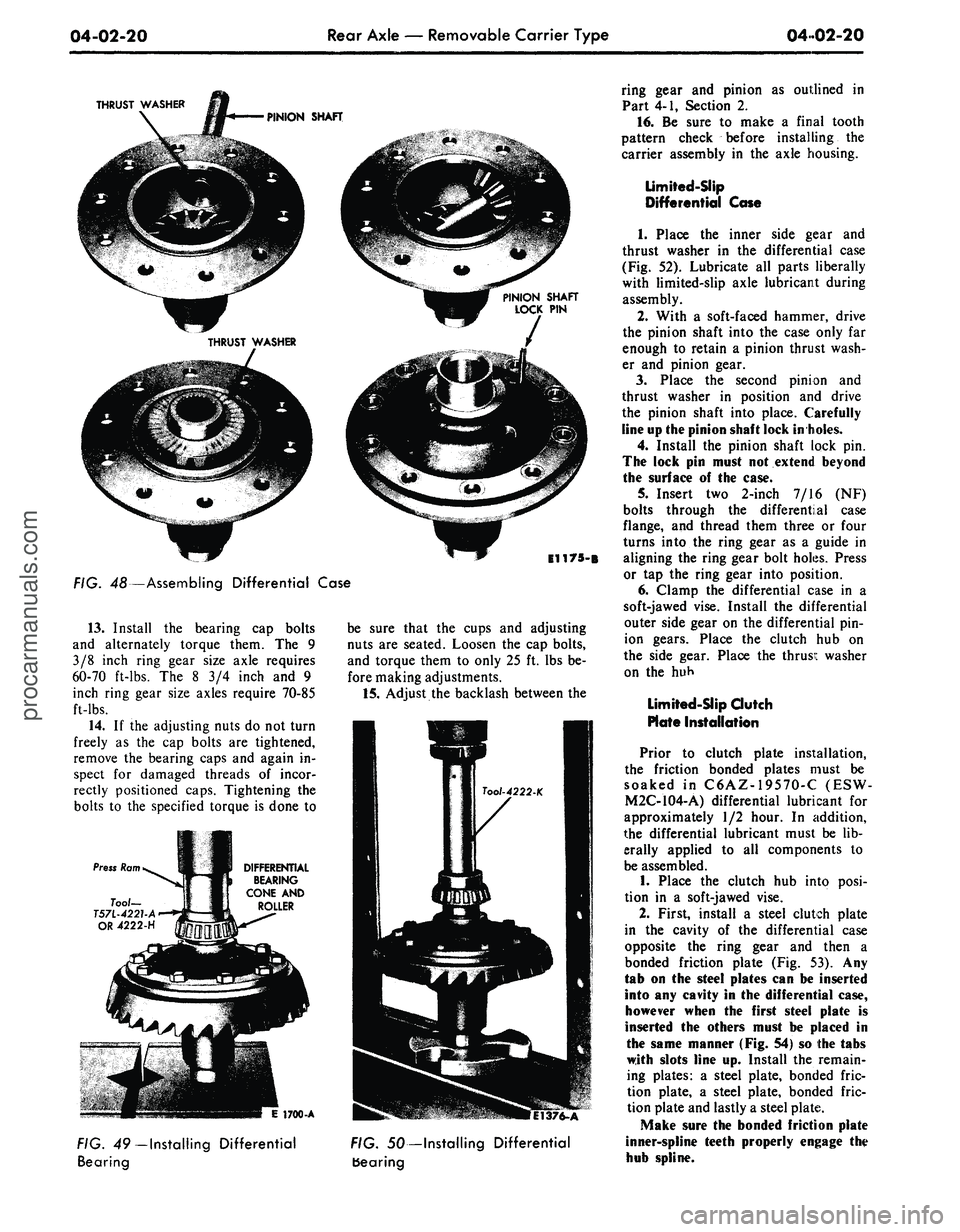
FIG. 48—Assembling Differential Case
13.
Install the bearing cap bolts
and alternately torque them. The 9
3/8 inch ring gear size axle requires
60-70 ft-lbs. The 8 3/4 inch and 9
inch ring gear size axles require 70-85
ft-lbs.
14.
If the adjusting nuts do not turn
freely as the cap bolts are tightened,
remove the bearing caps and again in-
spect for damaged threads of incor-
rectly positioned caps. Tightening the
bolts to the specified torque is done to
be sure that the cups and adjusting
nuts are seated. Loosen the cap bolts,
and torque them to only 25 ft. lbs be-
fore making adjustments.
15.
Adjust the backlash between the
DIFFERENTIAL
BEARING
CONE AND
ROLLER
E 1700-A
FIG. 49—
Installing
Differential
Bearing
1376-A
FIG. 50—Installing Differential
bearing
ring gear and pinion as outlined in
Part 4-1, Section 2.
16.
Be sure to make a final tooth
pattern check before installing the
carrier assembly in the axle housing.
Limited-Slip
Differential Case
1.
Place the inner side gear and
thrust washer in the differential case
(Fig. 52). Lubricate all parts liberally
with limited-slip axle lubricant during
assembly.
2.
With a soft-faced hammer, drive
the pinion shaft into the case only far
enough to retain a pinion thrust wash-
er and pinion gear.
3.
Place the second pinion and
thrust washer in position and drive
the pinion shaft into place. Carefully
line up the pinion shaft lock in holes.
4.
Install the pinion shaft lock pin.
The lock pin must not extend beyond
the surface of the case.
5. Insert two 2-inch 7/16 (NF)
bolts through the differential case
flange, and thread them three or four
turns into the ring gear as a guide in
aligning the ring gear bolt holes. Press
or tap the ring gear into position.
6. Clamp the differential case in a
soft-jawed vise. Install the differential
outer side gear on the differential pin-
ion gears. Place the clutch hub on
the side gear. Place the thrusi: washer
on the huh
Limited-Slip dutch
Plate Installation
Prior to clutch plate installation,
the friction bonded plates must be
soaked in C6AZ-19570-C (ESW-
M2C-104-A) differential lubricant for
approximately 1/2 hour. In addition,
the differential lubricant must be lib-
erally applied to all components to
be assembled.
1.
Place the clutch hub into posi-
tion in a soft-jawed vise.
2.
First, install a steel clutch plate
in the cavity of the differential case
opposite the ring gear and then a
bonded friction plate (Fig. 53). Any
tab on the steel plates can be inserted
into any cavity in the differential case,
however when the first steel plate is
inserted the others must be placed in
the same manner (Fig. 54) so the tabs
with slots line up. Install the remain-
ing plates: a steel plate, bonded fric-
tion plate, a steel plate, bonded fric-
tion plate and lastly a steel plate.
Make sure the bonded friction plate
inner-spline teeth properly engage the
hub spline.procarmanuals.com
Page 229 of 413
04-03-09
Rear Axles — Integral Carrier Type
04-03-09
E1914A
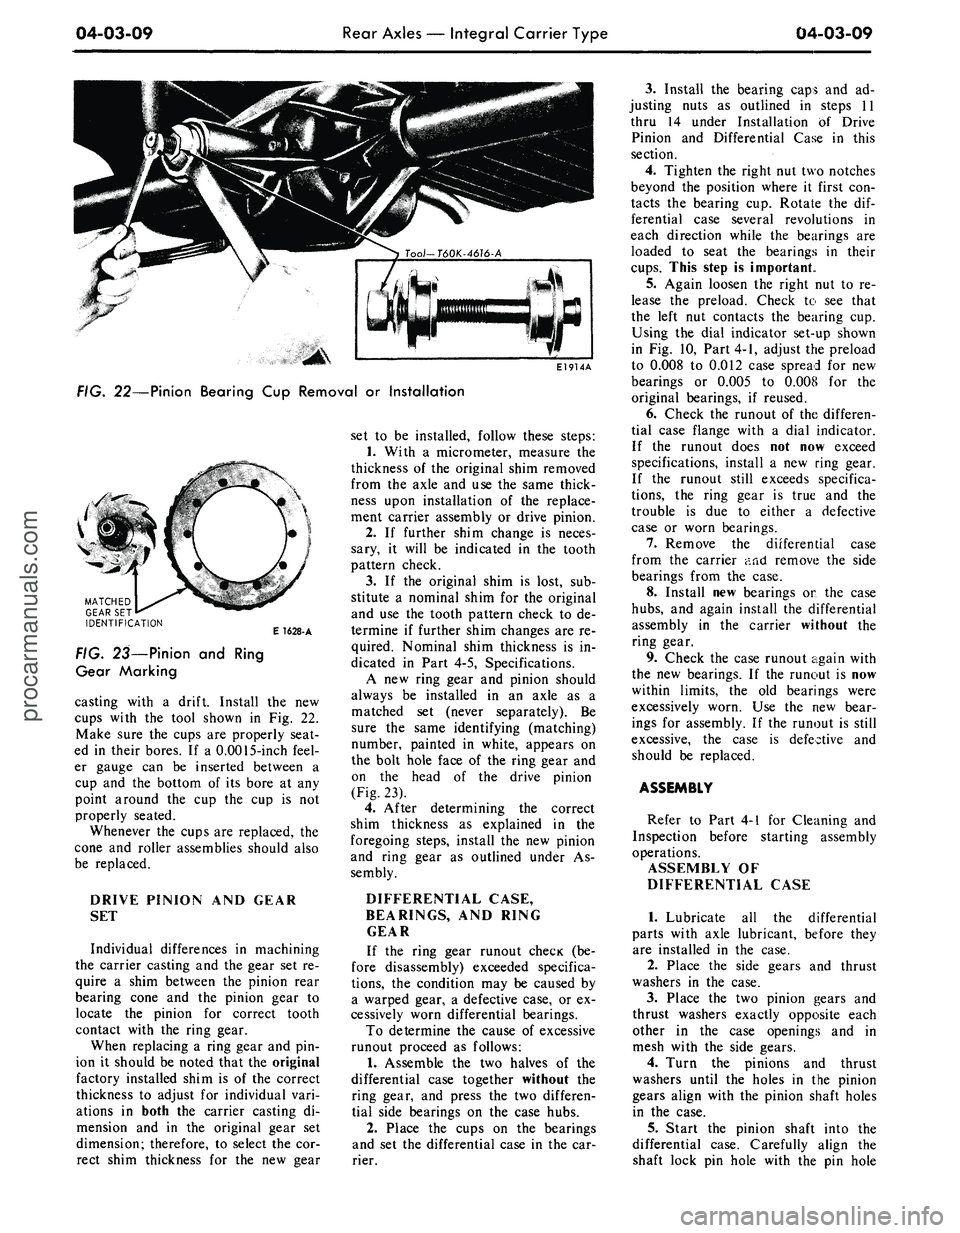
FIG. 22—Pinion Bearing Cup Removal or Installation
\
MATCHED
GEAR SET
IDENTIFICATION
E 1628-A
FIG. 23—Pinion and Ring
Gear Marking
casting with a drift. Install the new
cups with the tool shown in Fig. 22.
Make sure the cups are properly seat-
ed in their bores. If a 0.0015-inch feel-
er gauge can be inserted between a
cup and the bottom of its bore at any
point around the cup the cup is not
properly seated.
Whenever the cups are replaced, the
cone and roller assemblies should also
be replaced.
DRIVE PINION AND GEAR
SET
Individual differences in machining
the carrier casting and the gear set re-
quire a shim between the pinion rear
bearing cone and the pinion gear to
locate the pinion for correct tooth
contact with the ring gear.
When replacing a ring gear and pin-
ion it should be noted that the original
factory installed shim is of the correct
thickness to adjust for individual vari-
ations in both the carrier casting di-
mension and in the original gear set
dimension; therefore, to select the cor-
rect shim thickness for the new gear
set to be installed, follow these steps:
1.
With a micrometer, measure the
thickness of the original shim removed
from the axle and use the same thick-
ness upon installation of the replace-
ment carrier assembly or drive pinion.
2.
If further shim change is neces-
sary, it will be indicated in the tooth
pattern check.
3.
If the original shim is lost, sub-
stitute a nominal shim for the original
and use the tooth pattern check to de-
termine if further shim changes are re-
quired. Nominal shim thickness is in-
dicated in Part 4-5, Specifications.
A new ring gear and pinion should
always be installed in an axle as a
matched set (never separately). Be
sure the same identifying (matching)
number, painted in white, appears on
the bolt hole face of the ring gear and
on the head of the drive pinion
(Fig. 23).
4.
After determining the correct
shim thickness as explained in the
foregoing steps, install the new pinion
and ring gear as outlined under As-
sembly.
DIFFERENTIAL CASE,
BEARINGS, AND RING
GEAR
If the ring gear runout checK (be-
fore disassembly) exceeded specifica-
tions,
the condition may be caused by
a warped gear, a defective case, or ex-
cessively worn differential bearings.
To determine the cause of excessive
runout proceed as follows:
1.
Assemble the two halves of the
differential case together without the
ring gear, and press the two differen-
tial side bearings on the case hubs.
2.
Place the cups on the bearings
and set the differential case in the car-
rier.
3.
Install the bearing caps and ad-
justing nuts as outlined in steps 11
thru 14 under Installation of Drive
Pinion and Differential Case in this
section.
4.
Tighten the right nut two notches
beyond the position where it first con-
tacts the bearing cup. Rotate the dif-
ferential case several revolutions in
each direction while the bearings are
loaded to seat the bearings in their
cups.
This step is important.,
5.
Again loosen the right nut to re-
lease the preload. Check to see that
the left nut contacts the bearing cup.
Using the dial indicator set-up shown
in Fig. 10, Part 4-1, adjust the preload
to 0.008 to 0.012 case spread for new
bearings or 0.005 to 0.008 for the
original bearings, if reused.
6. Check the runout of the differen-
tial case flange with a dial indicator.
If the runout does not now exceed
specifications, install a new ring gear.
If the runout still exceeds specifica-
tions,
the ring gear is true and the
trouble is due to either a defective
case or worn bearings.
7.
Remove the differential case
from the carrier and remove the side
bearings from the case.
8. Install new bearings on the case
hubs,
and again install the differential
assembly in the carrier without the
ring gear.
9. Check the case runout again with
the new bearings. If the runout is now
within limits, the old bearings were
excessively worn. Use the new bear-
ings for assembly. If the runout is still
excessive, the case is defective and
should be replaced.
ASSEMBLY
Refer to Part 4-1 for Cleaning and
Inspection before starting assembly
operations.
ASSEMBLY OF
DIFFERENTIAL CASE
1.
Lubricate all the differential
parts with axle lubricant, before they
are installed in the case.
2.
Place the side gears and thrust
washers in the case.
3.
Place the two pinion gears and
thrust washers exactly opposite each
other in the case openings and in
mesh with the side gears.
4.
Turn the pinions and thrust
washers until the holes in the pinion
gears align with the pinion shaft holes
in the case.
5.
Start the pinion shaft into the
differential case. Carefully align the
shaft lock pin hole with the pin holeprocarmanuals.com
Page 239 of 413
04-04-08
Rear Axle — Ford Light-Duty (WER)
04-04-08
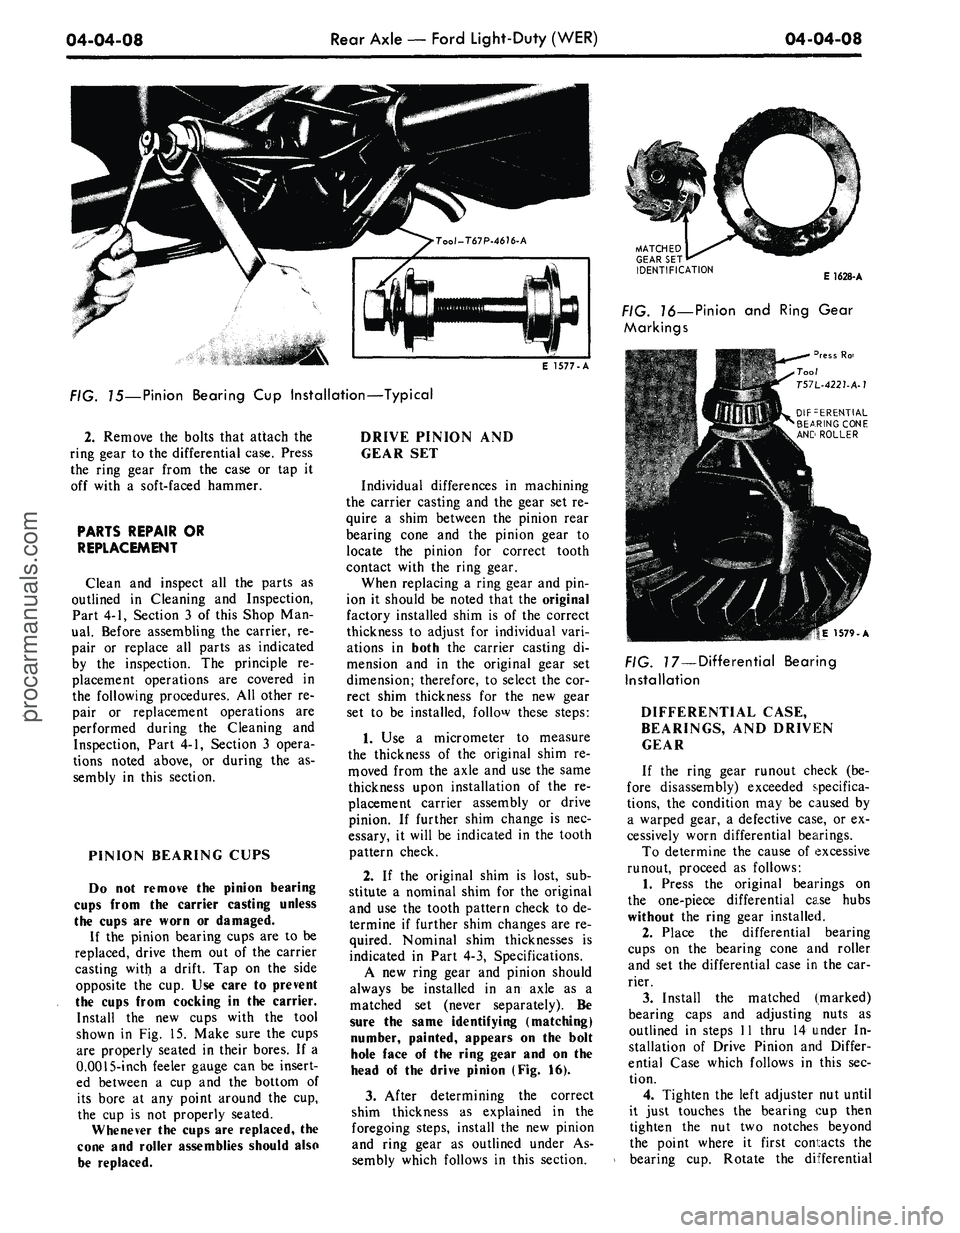
E 1577-A
75—Pinion Bearing
Cup
Installation—Typical
2.
Remove
the
bolts that attach
the
ring gear
to the
differential case. Press
the ring gear from
the
case
or tap it
off with
a
soft-faced hammer.
PARTS REPAIR
OR
REPLACEMENT
Clean
and
inspect
all the
parts
as
outlined
in
Cleaning
and
Inspection,
Part 4-1, Section
3 of
this Shop
Man-
ual.
Before assembling
the
carrier,
re-
pair
or
replace
all
parts
as
indicated
by
the
inspection.
The
principle
re-
placement operations
are
covered
in
the following procedures.
All
other
re-
pair
or
replacement operations
are
performed during
the
Cleaning
and
Inspection, Part 4-1, Section
3
opera-
tions noted above,
or
during
the as-
sembly
in
this section.
PINION BEARING CUPS
Do
not
remove
the
pinion bearing
cups from
the
carrier casting unless
the cups
are
worn
or
damaged.
If
the
pinion bearing cups
are to be
replaced, drive them
out of the
carrier
casting with
a
drift.
Tap on the
side
opposite
the cup. Use
care
to
prevent
the cups from cocking
in the
carrier.
Install
the new
cups with
the
tool
shown
in Fig. 15.
Make sure
the
cups
are properly seated
in
their bores.
If a
0.0015-inch feeler gauge
can be
insert-
ed between
a cup and the
bottom
of
its bore
at any
point around
the cup,
the
cup is not
properly seated.
Whenever
the
cups
are
replaced,
the
cone
and
roller assemblies should also
be replaced.
DRIVE PINION
AND
GEAR
SET
Individual differences
in
machining
the carrier casting
and the
gear
set re-
quire
a
shim between
the
pinion rear
bearing cone
and the
pinion gear
to
locate
the
pinion
for
correct tooth
contact with
the
ring gear.
When replacing
a
ring gear
and pin-
ion
it
should
be
noted that
the
original
factory installed shim
is of the
correct
thickness
to
adjust
for
individual vari-
ations
in
both
the
carrier casting
di-
mension
and in the
original gear
set
dimension; therefore,
to
select
the cor-
rect shim thickness
for the new
gear
set
to be
installed, follow these steps:
1.
Use a
micrometer
to
measure
the thickness
of the
original shim
re-
moved from
the
axle
and use the
same
thickness upon installation
of the re-
placement carrier assembly
or
drive
pinion.
If
further shim change
is nec-
essary,
it
will
be
indicated
in the
tooth
pattern check.
2.
If the
original shim
is
lost,
sub-
stitute
a
nominal shim
for the
original
and
use the
tooth pattern check
to de-
termine
if
further shim changes
are re-
quired. Nominal shim thicknesses
is
indicated
in
Part
4-3,
Specifications.
A
new
ring gear
and
pinion should
always
be
installed
in an
axle
as a
matched
set
(never separately).
Be
sure
the
same identifying (matching)
number, painted, appears
on the
bolt
hole face
of the
ring gear
and on the
head
of the
drive pinion
(Fig. 16).
3.
After determining
the
correct
shim thickness
as
explained
in the
foregoing steps, install
the new
pinion
and ring gear
as
outlined under
As-
sembly which follows
in
this section.
MATCHED
GEAR
SET
IDENTIFICATION
E 1628-A
. ?6—Pinion
and
Ring Gear
Markings
3ress
Ro-
Tool
T57L-4221-A-1
DIFFERENTIAL
BEARING CONE
ANC ROLLER
|E 1579-A
PIG. 77—Differential Bearing
Installation
DIFFERENTIAL CASE,
BEARINGS,
AND
DRIVEN
GEAR
If
the
ring gear runout check
(be-
fore disassembly) exceeded specifica-
tions,
the
condition
may be
caused
by
a warped gear,
a
defective case,
or ex-
cessively worn differential bearings.
To determine
the
cause
of
excessive
runout, proceed
as
follows:
1.
Press
the
original bearings
on
the one-piece differential case hubs
without
the
ring gear installed.
2.
Place
the
differential bearing
cups
on the
bearing cone
and
roller
and
set the
differential case
in the car-
rier.
3.
Install
the
matched (marked)
bearing caps
and
adjusting nuts
as
outlined
in
steps
11
thru
14
under
In-
stallation
of
Drive Pinion
and
Differ-
ential Case which follows
in
this
sec-
tion.
4.
Tighten
the
left adjuster
nut
until
it just touches
the
bearing
cup
then
tighten
the nut two
notches beyond
the point where
it
first contacts
the
bearing
cup.
Rotate
the
differentialprocarmanuals.com