power steering fluid FORD MUSTANG 1969 Volume One Chassis
[x] Cancel search | Manufacturer: FORD, Model Year: 1969, Model line: MUSTANG, Model: FORD MUSTANG 1969Pages: 413, PDF Size: 75.81 MB
Page 13 of 413
02-01-02
Brakes
02*01-02
STEERING
WHEEL RIW
TOEBOARD
OR
DASH
METAL
CHECKING
POINTS
STEERING
COLUMN-
STEEL
MEASURING TAPE
VEHICLE
FORD,
MERCURY AND METEOR
FORD,
MERCURY AND METEOR
FORD,
MERCURY AND METEOR
FORD,
MERCURY AND METEOR
FAIRLANE,
MONTEGO AND FALCON
FAIRLANE,
MONTEGO AND FALCON
MUSTANG
AND COUGAR
MUSTANG
AND COUGAR
THUNDERBIRD
CONTINENTAL
MARK III
LINCOLN
CONTINENTAL
TYPE
NON-POWER
DRUM
POWER
DRUM & DISC
NON-POWER
DISC
POLICE
POWER DISC
NON-POWER
DRUM
POWER
DISC
NON-POWER
DRUM
POWER
DISC
POWER
DISC
POWER
DISC
POWER
DISC
PEDAL
FREE
HEIGHT-A
8.09-7.17
6.18-5.99
8.65-7.82
7.58-6.72
8.13-6.91
7.25-5.71
7.49-6.43
6.25-5.56
PEDAL
FREE
HEIGHT-B"
5.96-5.04
5.96-5.04
6.50-5.50
PEDAL
TRAVEL-C
3.10
3.27
2.18
3.27
2.90
2.35
2.58
1.75
3.00
3.00
2.25
NOTE:AgB
DIMENSION TO BE MEASURED TO SHEET METAL
C
DIMENSION TO BE MEASURED PARALLEL TO THE VERTICAL CENTERLINE OF THE
STEERING
COLUMN WITH A 50 POUND LOAD APPLIED TO THE CENTERLINE OF THE
BRAKE
PEDAL PAD. (CHECKS ON POWER BRAKE VEHICLES MADE WITH ENGINE RUNNING
H1630-A
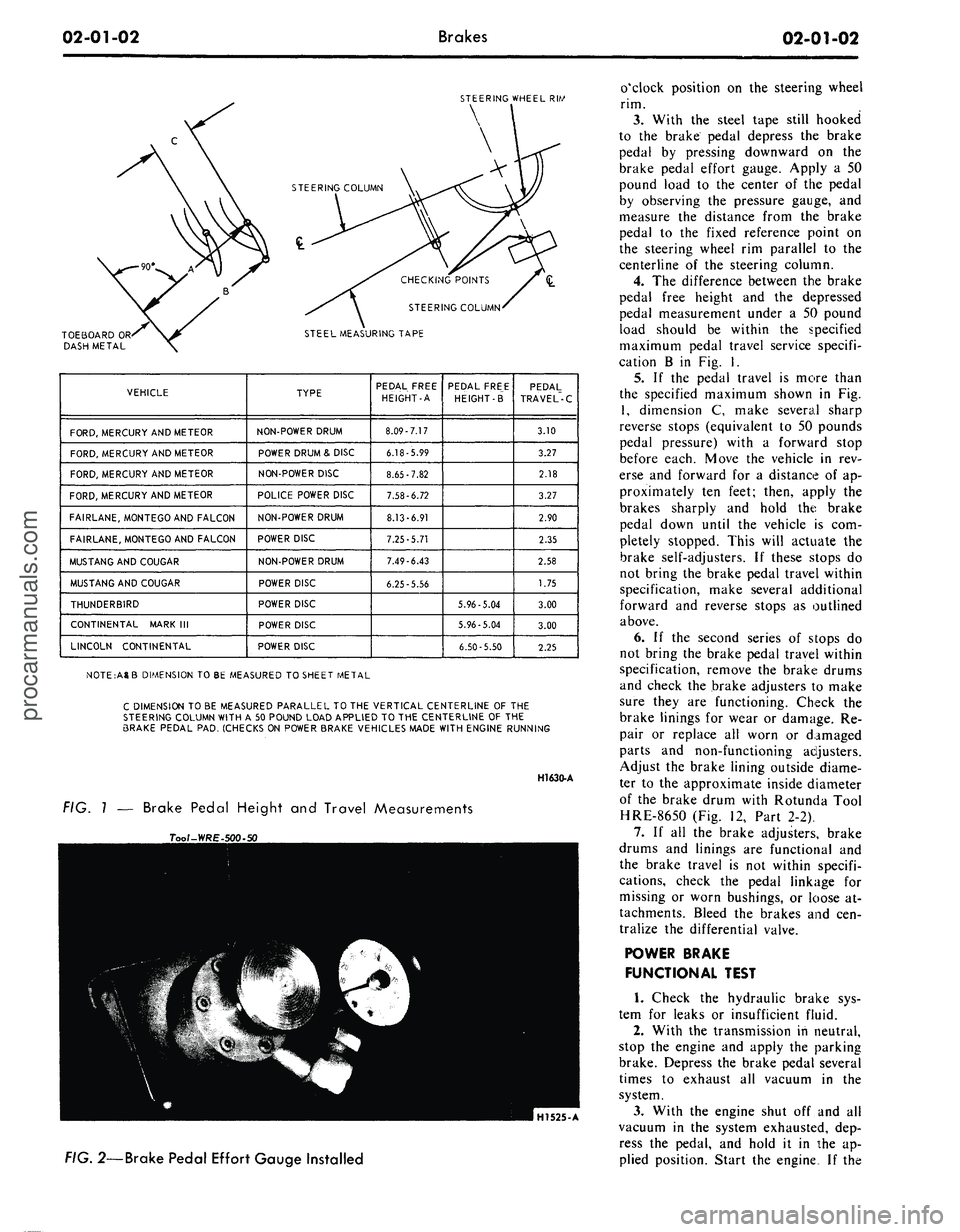
FIG. 1 — Brake Pedal Height and Travel Measurements
Tool-WRE-l
HI525-A
FIG.
2—Brake Pedal Effort Gauge Installed
o'clock position on the steering wheel
rim.
3.
With the steel tape still hooked
to the brake pedal depress the brake
pedal by pressing downward on the
brake pedal effort gauge. Apply a 50
pound load to the center of the pedal
by observing the pressure gauge, and
measure the distance from the brake
pedal to the fixed reference point on
the steering wheel rim parallel to the
centerline of the steering column.
4.
The difference between the brake
pedal free height and the depressed
pedal measurement under a 50 pound
load should be within the specified
maximum pedal travel service specifi-
cation B in Fig. I.
5.
If the pedal travel is more than
the specified maximum shown in Fig.
1,
dimension C, make several sharp
reverse stops (equivalent to 50 pounds
pedal pressure) with a forward stop
before each. Move the vehicle in rev-
erse and forward for a distance of ap-
proximately ten feet; then, apply the
brakes sharply and hold the brake
pedal down until the vehicle is com-
pletely stopped. This will actuate the
brake self-adjusters. If these stops do
not bring the brake pedal travel within
specification, make several additional
forward and reverse stops as outlined
above.
6. If the second series of stops do
not bring the brake pedal travel within
specification, remove the brake drums
and check the brake adjusters to make
sure they are functioning. Check the
brake linings for wear or damage. Re-
pair or replace all worn or damaged
parts and non-functioning adjusters.
Adjust the brake lining outside diame-
ter to the approximate inside diameter
of the brake drum with Rotunda Tool
HRE-8650 (Fig. 12, Part 2-2).
7.
If all the brake adjusters, brake
drums and linings are functional and
the brake travel is not within specifi-
cations, check the pedal linkage for
missing or worn bushings, or loose at-
tachments. Bleed the brakes and cen-
tralize the differential valve.
POWER BRAKE
FUNCTIONAL TEST
1.
Check the hydraulic brake sys-
tem for leaks or insufficient fluid.
2.
With the transmission in neutral,
stop the engine and apply the parking
brake. Depress the brake pedal several
times to exhaust all vacuum in the
system.
3.
With the engine shut off and all
vacuum in the system exhausted, dep-
ress the pedal, and hold it in the ap-
plied position. Start the engine If theprocarmanuals.com
Page 67 of 413
03-01-02
Suspension — Steering, Wheels And Tires — General Service
03-01-02
1 TESTING
POWER STEERING-
PRELIMINARY TESTS
The following preliminary checks
should always be made before per-
forming any operations.
AIR BLEEDING
Air in the power steering system
(shown by bubbles in the fluid) should
be bled. After making sure that the
reservoir is filled to specification (the
fluid must be at normal operating
temperature when the check is made),
turn the steering wheel through its full
travel three or four times. Do not hold
the wheels against their stops. Re-
check the fluid level.
CHECK FLUID LEVEL
Run the engine until the fluid is at
normal operating temperature. Then
turn the steering wheel all the way to
the left and right several times, and
shut off the engine.
Check the fluid level in the power
steering reservoir. The level must show
on the cross hatching between the bot-
tom of the dipstick and the full mark
(Fig. 1). If the level is low, add
enough automatic transmission fluid
C1AZ-19582-A to raise the level to
the F mark on the dipstick. Do not
overfill the reservoir.
CHECK PUMP BELT
If the pump belt is broken, glazed,
or worn, replace it with a new belt.
Use only the specified type of belt.
Refer to Part 3-13 for belt adjustment
procedure.
CHECK FOR FLUID
LEAKS
With the engine idling, turn the
steering wheel from stop to stop sever-
al times. Check all possible leakage
points. Tighten all loose fittings, and
replace any damaged lines or defective
seats.
CHECK TURNING EFFORT
With the front wheels properly al-
igned and tire pressures correct, check
the effort required to turn the steering
wheel.
G 1508- A
FIG.
1—Power
Steering Pump
Dipstick
1.
With the vehicle on dry concrete,
set the parking brakes.
2.
With the engine warmed up and
running at idle speed, turn the steering
wheel to the left and right several
times to warm the fluid.
3.
Attach a pull scale to the rim of
the steering wheel. Measure the pull
required to turn the wheel one com-
plete revolution in each direction. The
effort required to rotate the steering
wheel should not exceed specifications
given in Part 3-13.
POWER STEERING PUMP FLOW
AND PRESSURE TESTS—
EXCEPT LINCOLN CONTINENTAL
AND CONTINENTAL MARK III
The power steering flow and pres-
sure tests will show whether the pump,
steering gear or power assist control
RETURN LINE
POWER
STEERING PUMP
Sr
valve is causing the trouble. Steps out-
lined below should be followed to de-
termine the cause of the trouble.
PUMP FLOW TEST
1.
Depending on the equipment
present on the vehicle (air condition-
ing, power brakes, standard transmis-
sion),
one of the following options
may be used to connect the pump
pressure and return hoses to the test
tool (T56L-3361O-D and T68L-
33610-A):
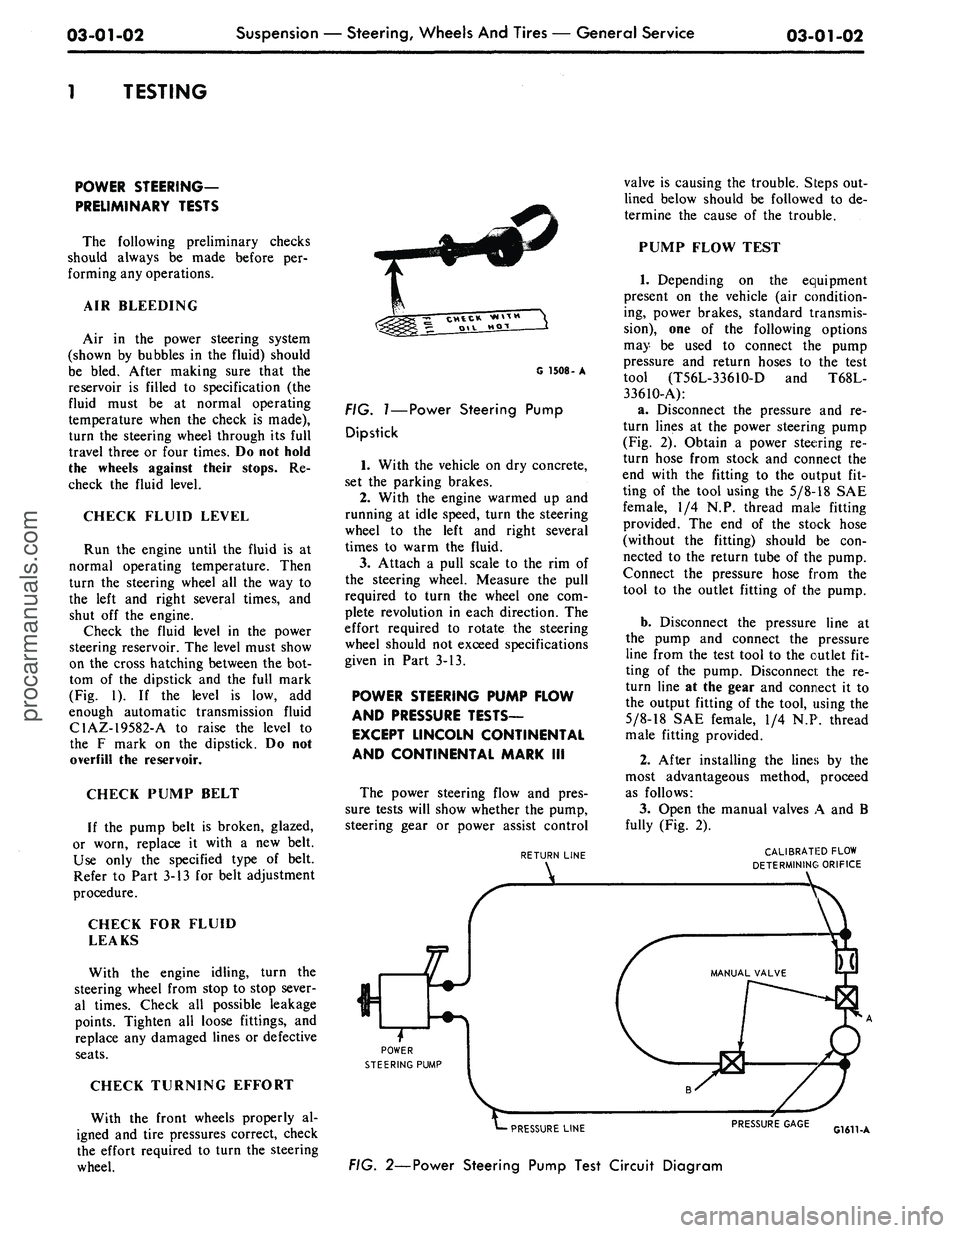
a. Disconnect the pressure and re-
turn lines at the power steering pump
(Fig. 2). Obtain a power steering re-
turn hose from stock and connect the
end with the fitting to the output fit-
ting of the tool using the
5/8-18
SAE
female, 1/4 N.P. thread male fitting
provided. The end of the stock hose
(without the fitting) should be con-
nected to the return tube of the pump.
Connect the pressure hose from the
tool to the outlet fitting of the pump.
b.
Disconnect the pressure line at
the pump and connect the pressure
line from the test tool to the outlet fit-
ting of the pump. Disconnect the re-
turn line at the gear and connect it to
the output fitting of the tool, using the
5/8-18
SAE female, 1/4 N.P. thread
male fitting provided.
2.
After installing the lines by the
most advantageous method, proceed
as follows:
3.
Open the manual valves A and B
fully (Fig. 2).
CALIBRATED FLOW
DETERMINING ORIFICE
PRESSURE LINE
FIG. 2—Power Steering Pump Test Circuit Diagram
PRESSURE GAGE
G1611-Aprocarmanuals.com
Page 68 of 413
03-01-03
Suspension — Steering, Wheels And Tires — General Service
03-01-03
4.
Connect a tachometer, start the
engine and operate it at idle speed
until the reservoir fluid temperature
reaches 165 to 175. This temperature
must be maintained throughout the
test. Valve B may be partially closed
to create a back pressure up to 350
psi to hasten the temperature rise. The
reservoir fluid must be at the proper
level.
5.
With the engine operating at rec-
ommended idle rpm and fluid temper-
ature noted in Step 4, close the manu-
al valve B. The minimum acceptable
pressure reading is 620 psi.
6. If the pressure gauge reading is
below the minimum specification, the
pump is at fault and should be re-
paired with necessary parts.
7.
If the reading is at or above the
minimum specification, the pump flow
is normal. Open manual valve B and
proceed to the Pump Fluid Pressure
Test.
PUMP FLUID
PRESSURE TEST
1.
Keep the lines and tools con-
nected as in the Pump Flow Test.
2.
With manual valves A and B
opened fully, operate the engine at
recommended idle speed (Fig. 2).
Close manual valve A, then manual
valve B. Do not keep both valves
closed for more than 5 seconds as this
would abnormally increase the fluid
temperature and cause undue pump
and/or gear wear.
3.
With the valves fully closed, the
pressure gauge should read 1000 psi
minimum for Ford, Mercury, Meteor
or Thunderbird and 750 psi minimum
for Cougar, Fairlane, Falcon, Monte-
go or Mustang.
4.
If the pressure gauge reading is
below the minimum specification, the
pump is at fault and should be re-
paired with necessary parts.
5.
If the pressure gauge reading is
at or above the minimum specifica-
tions,
the pump is normal and the
power steering gear or power assist
control valve is at fault.
FLUID PRESSURE TEST-
LINCOLN CONTINENTAL AND
CONTINENTAL MARK III
The pressure testing gauge set, tool
T56L-33610-D, requires modification
to make it adaptable for installation
in the power steering hydraulic sys-
tem. The parts required and the modi-
fication procedure are as follows:
OWER STEERING
PRESSURE LINE
INVERTED FLARE
CONNECTOR
%* TUBE x VA" PIPE
FLARED FEMALE COUPW
%' TUBE x VA" PIPE
G1544.A
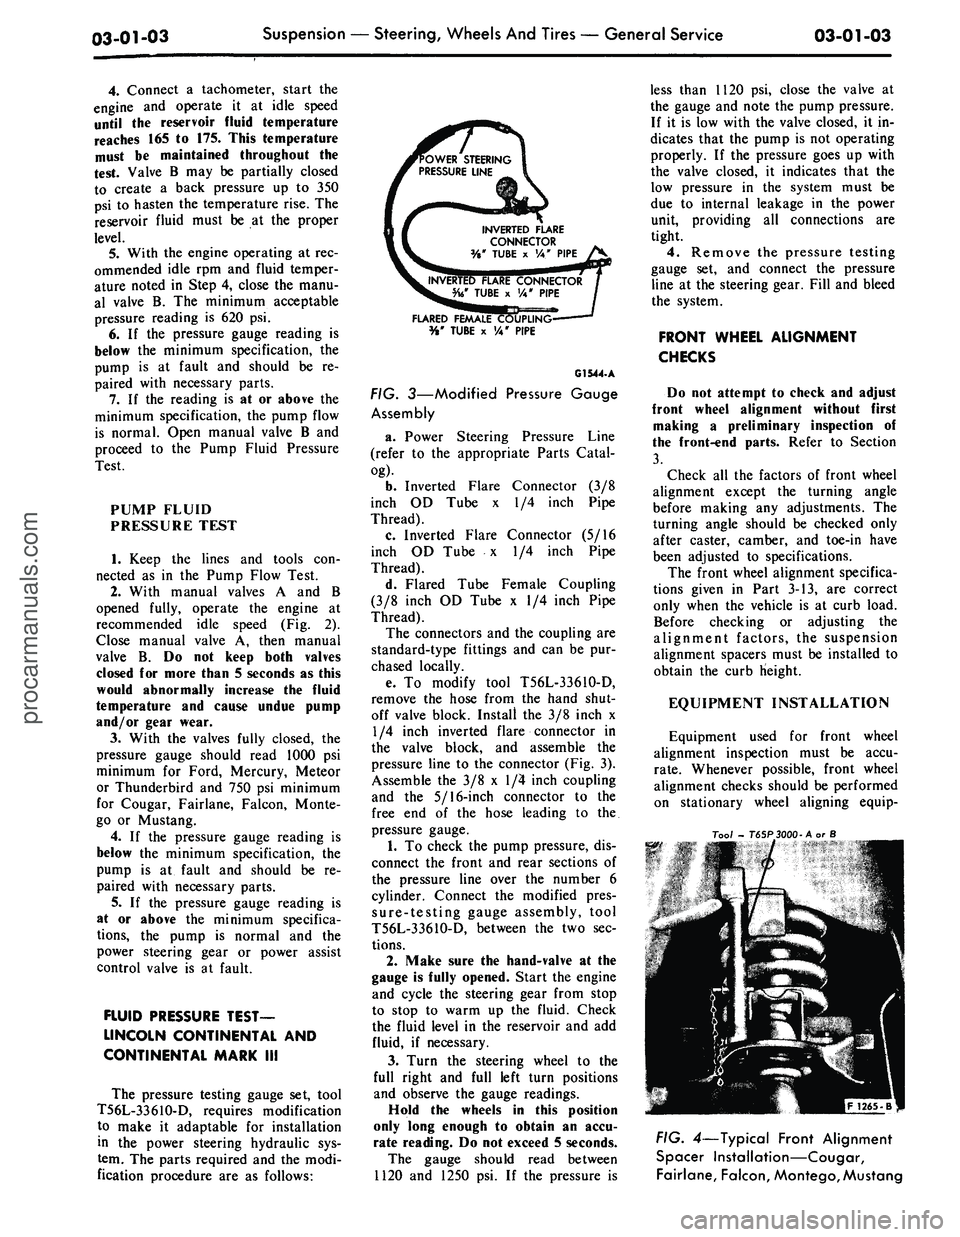
FIG. 3—Modified Pressure Gauge
Assembly
a. Power Steering Pressure Line
(refer to the appropriate Parts Catal-
og).
b.
Inverted Flare Connector (3/8
inch OD Tube x 1/4 inch Pipe
Thread).
c. Inverted Flare Connector (5/16
inch OD Tube x 1/4 inch Pipe
Thread).
d. Flared Tube Female Coupling
(3/8 inch OD Tube x 1/4 inch Pipe
Thread).
The connectors and the coupling are
standard-type fittings and can be pur-
chased locally.
e. To modify tool T56L-33610-D,
remove the hose from the hand shut-
off valve block. Install the 3/8 inch x
1/4 inch inverted flare connector in
the valve block, and assemble the
pressure line to the connector (Fig. 3).
Assemble the 3/8 x 1/4 inch coupling
and the 5/16-inch connector to the
free end of the hose leading to the.
pressure gauge.
1.
To check the pump pressure, dis-
connect the front and rear sections of
the pressure line over the number 6
cylinder. Connect the modified pres-
sure-testing gauge assembly, tool
T56L-3361O-D, between the two sec-
tions.
2.
Make sure the hand-valve at the
gauge is fully opened. Start the engine
and cycle the steering gear from stop
to stop to warm up the fluid. Check
the fluid level in the reservoir and add
fluid, if necessary.
3.
Turn the steering wheel to the
full right and full left turn positions
and observe the gauge readings.
Hold the wheels in this position
only long enough to obtain an accu-
rate reading. Do not exceed 5 seconds.
The gauge should read between
1120 and 1250 psi. If the pressure is
less than 1120 psi, close the valve at
the gauge and note the pump pressure.
If it is low with the valve closed, it in-
dicates that the pump is not operating
properly. If the pressure goes up with
the valve closed, it indicates that the
low pressure in the system must be
due to internal leakage in the power
unit, providing all connections are
tight.
4.
Remove the pressure testing
gauge set, and connect the pressure
line at the steering gear. Fill and bleed
the system.
FRONT WHEEL ALIGNMENT
CHECKS
Do not attempt to check and adjust
front wheel alignment without first
making a preliminary inspection of
the front-end parts. Refer to Section
3.
Check all the factors of front wheel
alignment except the turning angle
before making any adjustments. The
turning angle should be checked only
after caster, camber, and toe-in have
been adjusted to specifications.
The front wheel alignment specifica-
tions given in Part 3-13, are correct
only when the vehicle is at curb load.
Before checking or adjusting the
alignment factors, the suspension
alignment spacers must be installed to
obtain the curb Height.
EQUIPMENT INSTALLATION
Equipment used for front wheel
alignment inspection must be accu-
rate.
Whenever possible, front wheel
alignment checks should be performed
on stationary wheel aligning equip-
Too/
- T65P3000-A or S
FIG. 4—Typical Front Alignment
Spacer Installation—Cougar,
Fairlane, Falcon,
Montego,
Mustangprocarmanuals.com
Page 74 of 413
03-01-09
Suspension — Steering, Wheels And Tires — General Service
03-01-09
the reading exceeds specifications
(Part 3-13), replace the upper ball
joint.
LOWER BALL JOINT
INSPECTION
Ford,
Mercury, Meteor,
Thunderbird, Lincoln Continental
and Continental Mark III
1.
Raise the vehicle and place
jacks under the lower arms as shown
in Fig. 12. This will unload the lower
ball joints.
2.
Adjust the wheel bearings as des-
cribed in Part 3-12.
3.
Attach a dial indicator to the
lower arm and position the indicator
so that the plunger rests against the
inner side of the wheel rim adjacent to
the lower ball joint.
4.
Grasp the tire at the top and
bottom and slowly move the tire in
and out (Fig. 19). Note the reading
(radial play) on the dial indicator. If
the reading exceeds specifications
(Part 3-13), replace the lower ball
joint.
Cougar, Fairlane, Falcon,
Montego, Mustang
1.
Raise the vehicle on a frame
contact hoist or by floor jacks placed
beneath the underbody until the wheel
falls to the full down position.
2.
Ask an assistant to grasp the
lower edge of the tire and move the
wheel in and out.
3.
As the wheel is being moved in
and out, observe the lower end of the
spindle and the lower arm.
4.
Any movement between the
lower end of the spindle and the lower
arm indicates ball joint wear and loss
of preload. If any such movement is
observed, replace the lower arm.
During the foregoing check, the
upper ball joint will be unloaded and
may move. Disregard all such move-
ment of the upper ball joint. Also, do
not mistake loose wheel bearings for a
worn ball joint.
POWER STEERING GEAR
CLEANING
Disassembly and assembly of the
steering gear and. the sub-assemblies
must be made on a clean workbench.
As in repairing any hydraulically op-
erated unit, cleanliness is of utmost
importance. The bench, tools, and
parts must be kept clean at all times.
Thoroughly clean the exterior of the
unit with a suitable solvent and, when
necessary drain as much of the hy-
draulic fluid as possible. Handle all
parts very carefully to avoid nicks,
burrs,
scratches and dirt, which could
make the parts unfit for use.
Do not clean, wash or soak seals in
cleaning solvent.
INSPECTION
1.
Check the sector shaft contact
surface in the cover for wear. If worn,
replace the cover.
2.
Inspect the input shaft bearing
for cracked races and the balls for
looseness, wear, pitting, end play or
other damage. Check the fit of the
bearing on the input shaft. Replace
the bearing, if required.
3.
Inspect the valve housing for
wear, scoring or burrs.
4.
Inspect the tube seats in the
pressure and return ports in the valve
body for nicks, etc. If necessary, re-
move and replace.
5.
Check the sector shaft contact
surface in the housing for wear. If
worn, replace the bushing or the hous-
ing.
6. Check all fluid passages for ob-
struction or leakage.
7.
Inspect the steering gear housing
for cracks, stripped threads, and mat-
ing surfaces for burrs. Inspect the pis-
ton bore of the housing for scoring or
wear. If necessary, replace the hous-
ing.
8. Check the input shaft bearing
after installation to be sure that it ro-
tates freely.
9. If the valve spool is not free in
the valve housing, check for burrs at
the outward edges of the working
lands in the housing and remove with
a hard stone. Check the valve spool
for burrs and if burrs are found, stone
the valve in a radial direction only.
Check for freedom of the valve again.
10.
Check the piston rack teeth and
sector shaft teeth for nicks and burrs.
FLUSHING THE POWER
STEERING SYSTEM—ALL EXCEPT
LINCOLN CONTINENTAL AND
CONTINENTAL MARK III
Should it be necessary to replace an
inoperative power steering pump, the
need for flushing the steering system
is required when installing the new
pump.
1.
Remove the power steering pump
and remove the pulley as outlined in
Part 3-10.
2.
Install the pulley on a new
pump. Install the pump and connect
only the pressure hose to the pump
(Part 3-10).
3.
Place the fluid return line in a
suitable container and plug the reser-
voir return pipe.
4.
Fill the reservoir with lubricant
(C1AZ-19582-A).
5.
Disconnect the coil wire to pre-
vent the engine from starting and raise
the front wheels off the ground.
6. While approximately two quarts
of steering gear fluid are being poured
into the reservoir, turn the engine over
using the ignition key, at the same
time cycle the steering wheel from
stop to stop.
7.
As soon as all of the lubricant
has been poured in, turn off the igni-
tion key, and attach the coil wire.
8. Remove the plug from the reser-
voir return pipe, and attach the return
hose to the reservoir.
9. Check the reservoir fluid level; if
low, add fluid to the proper level. Do
not overfill.
10.
Lower the vehicle.
11.
Start the engine and cycle the
steering from stop to stop to expel
any trapped air from the system.
POWER STEERING PUMP—ALL
EXCEPT LINCOLN
CONTINENTAL AND
CONTINENTAL MARK III
CLEANING
Wash all parts (except seals) in a
Naptha or Chlorinated-type solvent
and dry with compressed air.
Punch or Rod
RELIEF VALVE PLUNGER
G1607-A
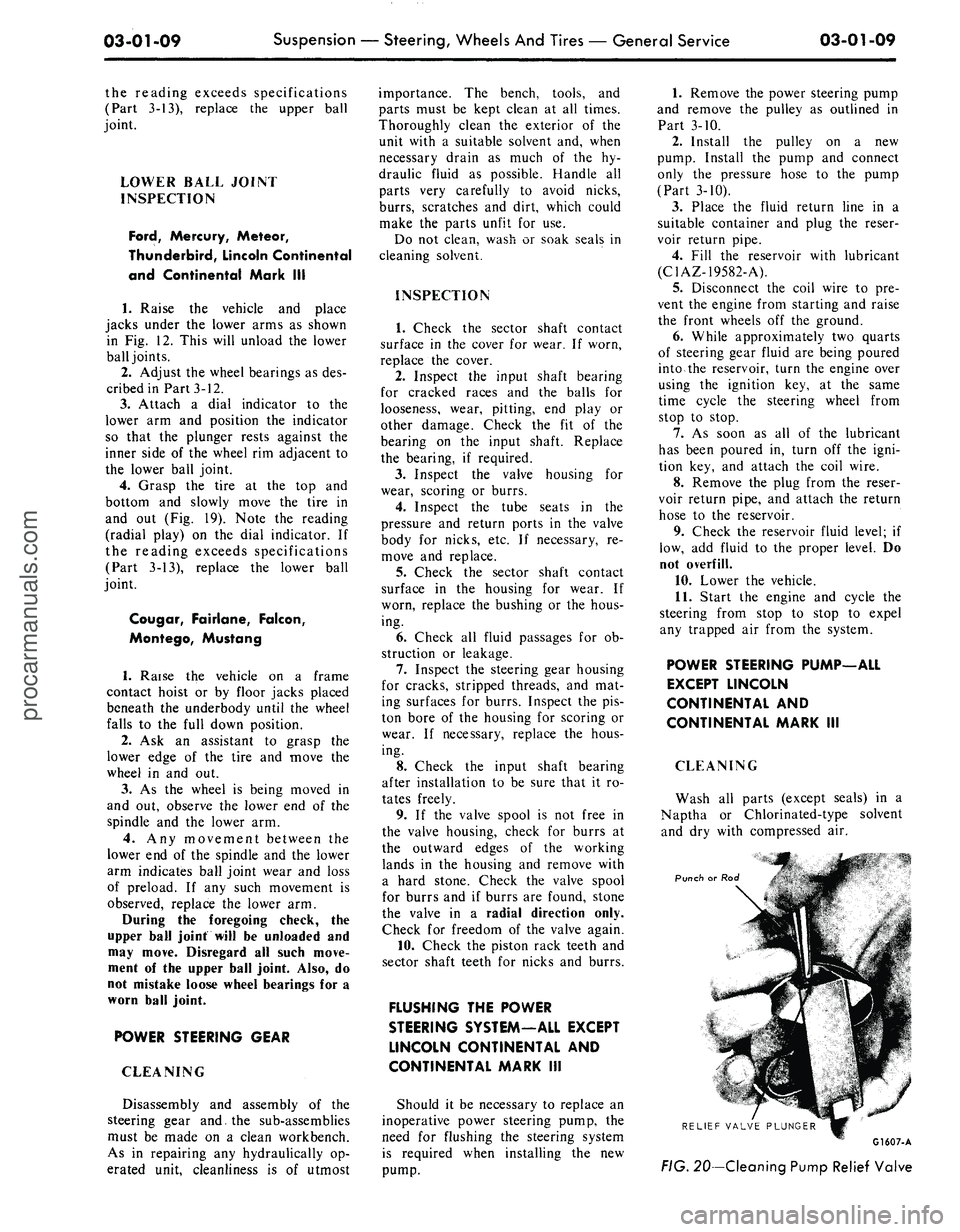
FIG.
20—Cleaning Pump Relief Valveprocarmanuals.com
Page 75 of 413
03-01-10
Suspension — Steering, Wheels And Tires — General Service
03-01-10
The following procedure should be
followed when cleaning the relief valve
which is a part of the pump valve as-
sembly.
1.
Using a punch or rod of suitable
diameter, apply an even pressure in a
straight line to the tip of the relief
valve pin (Fig. 20). Depress the valve
two or three times to exhaust the oil
which is trapped in the assembly. Do
not hammer on the valve pin or hous-
ing.
2.
Submerge the assembly in a con-
tainer of clean solvent. Again applying
an even pressure to the tip of the relief
valve pin, (a sudden strong force could
push the pin through the relief valve
spool) move the valve in and out sev-
eral times, thereby thoroughly flushing
the assembly. Pressure created within
the valve bore when the valve is moved
inward should force the cleaning fluid
out through the sensing orifice. If this
does not occur, the sensing orifice
should be cleaned with a piece of wire.
The valve must move freely and even-
ly. If the pin is bent or damaged, or if
the valve binds, the pump valve must
be replaced.
INSPECTION
The following describes the compo-
nents of the power steering pump
which must be replaced regardless of
condition and how to determine when
other components should be replaced.
The outlet fitting hex nut may be
reused if the corners of the hex are
not rounded. The housing bolts may
be reused if the threads are not dam-
aged.
All gaskets and seals must be re-
placed with new components except
the rotor shaft seal which should be
reused unless it was leaking.
The reservoir assembly may be
reused if the reservoir seal and gasket
areas are not damaged (dents, scratch-
es,
etc.). The soldered joints of the re-
turn and fill tubes must not be loose
or bent. Be sure to check for a broken
baffle.
The housing or housing assembly
may be reused if there is no damage
(scratches, etc.) at reservoir gasket,
outlet fitting or cover seal areas.
If the outlet fitting is damaged, the
pump housing must be replaced. The
pressure plate springs may be reused
providing they are not bent, broken or
have not taken a set.
Do not reuse the retainer end plate
if it is burred or damaged. The upper
pressure plate may be reused if there
is no scoring on the wear surface. It is
acceptable to polish the phosphate
coating.
The rotor and cam assembly can be
reused if there is no wear other than
the removal of the phosphate coating
on the cam contour. Do not disas-
semble the rotor and cam assembly.
Push the rotor part way out the cam
insert taking care not to let the slip-
pers and springs fall out. Check the
cam ID for scoring and burning.
Check the rotor faces and OD for
scoring and chipping. Do not attempt
to repair or refinish the lower and
upper pressure plates, cam or rotor
assembly. When wear or burning is
encountered, replace, them with new
components.
Install a new rotor and cam assem-
bly if the slippers are worn. Replace
the springs if they are bent or broken.
Polishing the phosphate coating of the
slipper sealing surface is permissable.
The rotor shaft can be reused if the
front and rear thrust faces, the bush-
ing diameter and the shaft seal diame-
ter are not excessively worn or scored.
The housing plate and bushing as-
sembly may be reused if all of the
threaded holes are not damaged
beyond repair and the bushing diame-
ter is not scored or worn .0005 inch
over the maximum dimension of .6897
inch. Threaded holes can be repaired
by drilling out the damaged threads
and installing a helicoil insert. If the
bushing is scored or excessively worn,
a new plate and bushing assembly
must be installed.
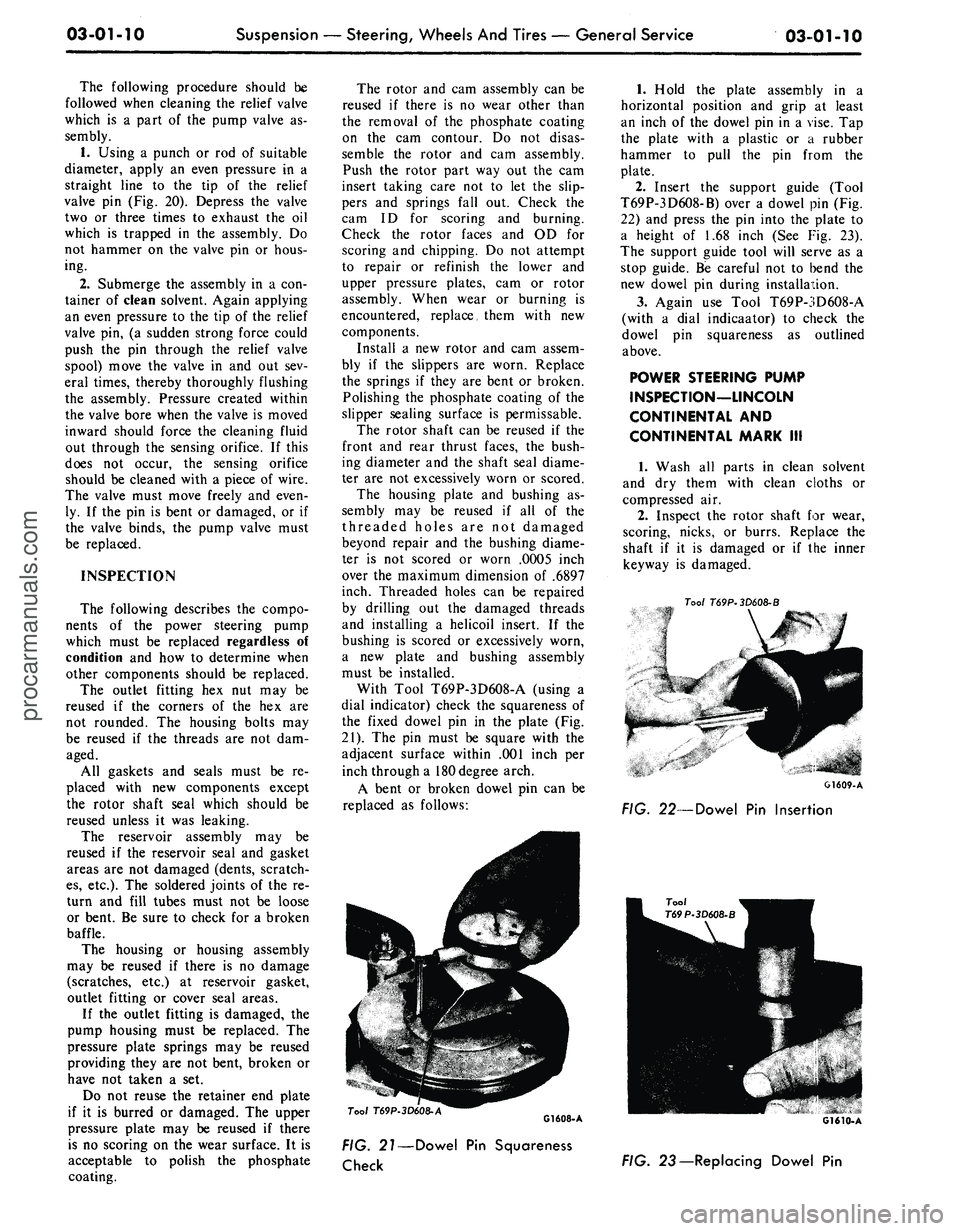
With Tool T69P-3D608-A (using a
dial indicator) check the squareness of
the fixed dowel pin in the plate (Fig.
21).
The pin must be square with the
adjacent surface within .001 inch per
inch through a 180 degree arch.
A bent or broken dowel pin can be
replaced as follows:
1.
Hold the plate assembly in a
horizontal position and grip at least
an inch of the dowel pin in a vise. Tap
the plate with a plastic or a rubber
hammer to pull the pin from the
plate.
2.
Insert the support guide (Tool
T69P-3D608-B) over a dowel pin (Fig.
22) and press the pin into the plate to
a height of 1.68 inch (See Fig. 23).
The support guide tool will serve as a
stop guide. Be careful not to bend the
new dowel pin during installation.
3.
Again use Tool T69P-3D608-A
(with a dial indicaator) to check the
dowel pin squareness as outlined
above.
POWER STEERING PUMP
INSPECTION—LINCOLN
CONTINENTAL AND
CONTINENTAL MARK III
1.
Wash all parts in clean solvent
and dry them with clean cloths or
compressed air.
2.
Inspect the rotor shaft for wear,
scoring, nicks, or burrs. Replace the
shaft if it is damaged or if the inner
keyway is damaged.
Tool
T69P-3D608-B
G1609-A
FIG. 22—Dowel Pin Insertion
Tool
T69P-3D608-A
G1608-A
FIG. 21—Dowel Pin Squareness
Check
FIG. 23 — Replacing Dowel Pinprocarmanuals.com
Page 139 of 413
03-07-01
Ford Design Non-Integral Power Steering System
03-07-01
PART
3-7
Ford Design Non-Integral Power
Steering System
COMPONENT INDEX
CONTROL VALVE
Disassembly
and
Overhaul
Removal
and
Installation
CONTROL VALVE CENTERING SPRING
Adjustment
CONTROL VALVE
TO
POWER STEERING
CYLINDER HOSE
Removal
and
Installation
HOISTING INSTRUCTIONS
POWER CYLINDER
Removal
and
Installation
POWER CYLINDER SEAL
Removal
and
Installation
POWER STEERING PUMP CLEANING
AND INSPECTION
(See
Part 03-01)
Removal
and
Installation
POWER STEERING PUMP
TO
CONTROL
VALVE HOSE
Removal
and
Installation
STEERING GEAR
Cleaning
and
Inspection
(See Part 03-01)
MODEL APPLICATION
All
Models
Ford
N/A
N/A
N/A
N/A
N/A
N/A
N/A
N/A
N/A
Mercury
N/A
N/A
N/A
N/A
N/A
N/A
N/A
N/A
N/A
Meteor
N/A
N/A
N/A
N/A
N/A
N/A
N/A
N/A
N/A
Cougar
N/A
N/A
N/A
N/A
N/A
N/A
N/A
N/A
N/A
Fairlane
07-04
07-03
07-02
07-02
07-02
07-04
07-06
07-03
07-02
Falcon
07-04
07-03
07-02
07-02
07-02
07-04
07-06
07-03
07-02
Montego
07-04
07-03
07-02
07-02
07-02
07-04
07-06
07-03
07-02
Mustang
07-04
07-03
07-02
07-02
07-02
07-04
07-06
07-03
07-02
Lincoln-
Continental
07-04
07-03
07-02
07-02
07-02
07-04
07-06
07-03
07-02
Thunderbird
N/A
N/A
N/A
N/A
N/A
N/A
N/A
N/A
N/A
Continental-
Mark
III
N/A
N/A
N/A
N/A
N/A
N/A
N/A
N/A
N/A
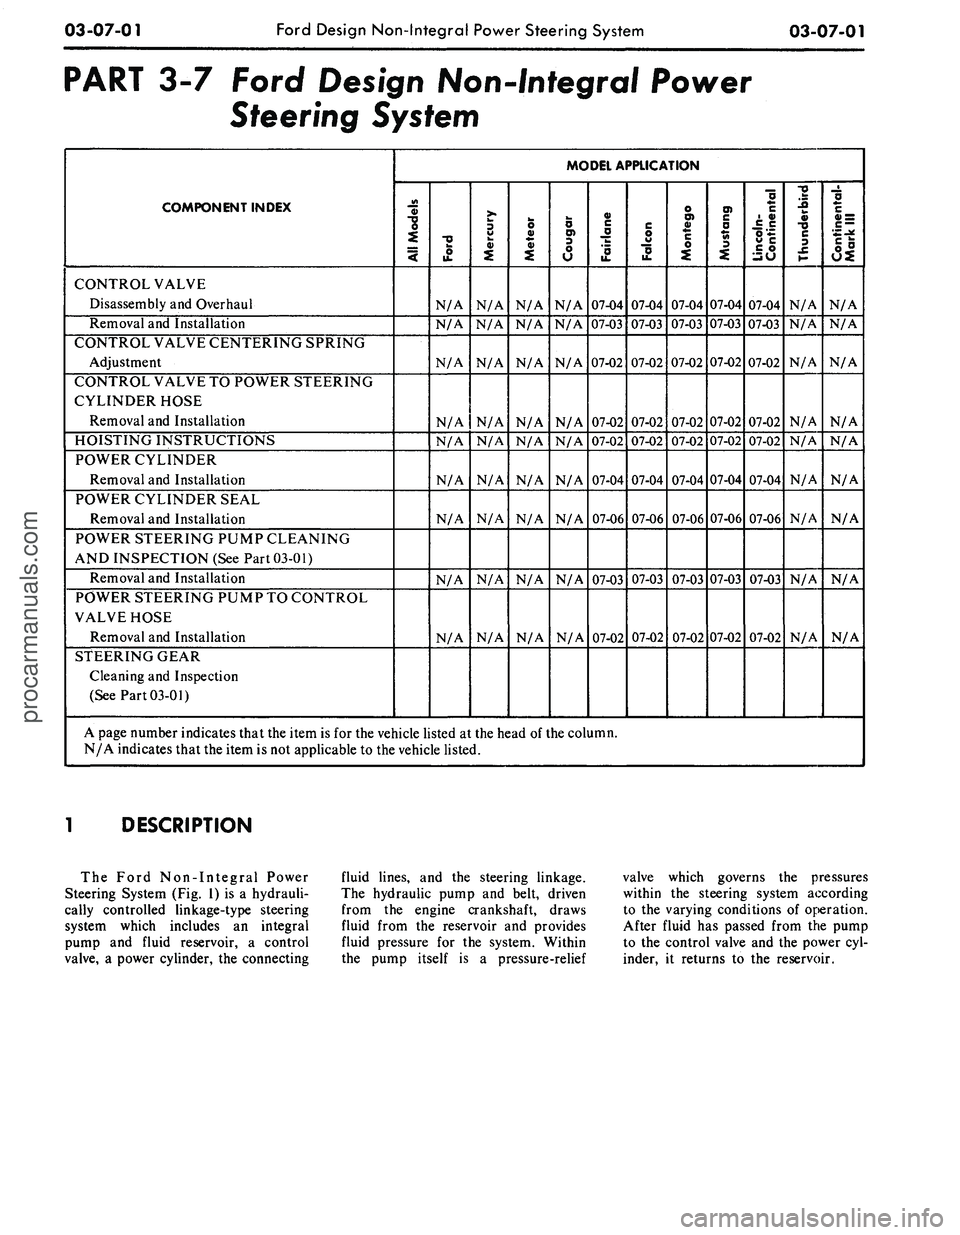
A page number indicates that
the
item
is for the
vehicle listed
at the
head
of the
column.
N/A indicates that
the
item
is not
applicable
to the
vehicle listed.
DESCRIPTION
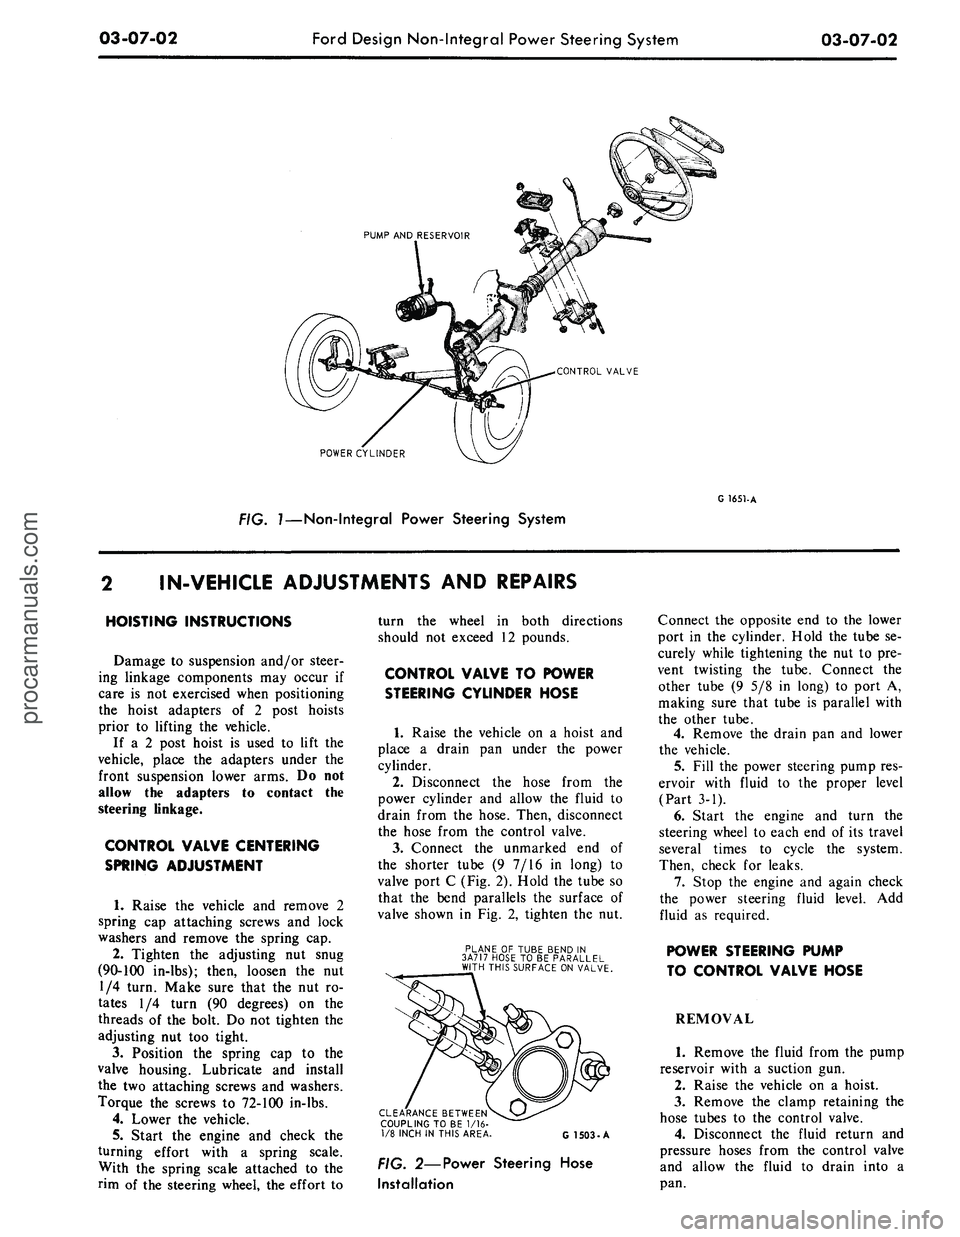
The Ford Non-Integral Power
Steering System
(Fig. 1) is a
hydrauli-
cally controlled linkage-type steering
system which includes
an
integral
pump
and
fluid reservoir,
a
control
valve,
a
power cylinder,
the
connecting
fluid lines,
and the
steering linkage.
The hydraulic pump
and
belt, driven
from
the
engine crankshaft, draws
fluid from
the
reservoir
and
provides
fluid pressure
for the
system. Within
the pump itself
is a
pressure-relief
valve which governs
the
pressures
within
the
steering system according
to
the
varying conditions
of
operation.
After fluid
has
passed from
the
pump
to
the
control valve
and the
power
cyl-
inder,
it
returns
to the
reservoir.
procarmanuals.com
Page 140 of 413
03-07-02
Ford Design Non-Integral Power Steering System
03-07-02
PUMP AND RESERVOIR
CONTROL VALVE
POWER CYLINDER
FIG. 7—Non-Integral Power Steering System
G 1651-A
IN-VEHICLE ADJUSTMENTS
AND
REPAIRS
HOISTING INSTRUCTIONS
Damage
to
suspension and/or steer-
ing linkage components
may
occur
if
care
is not
exercised when positioning
the hoist adapters
of 2
post hoists
prior
to
lifting
the
vehicle.
If
a 2
post hoist
is
used
to
lift
the
vehicle, place
the
adapters under
the
front suspension lower arms.
Do not
allow
the
adapters
to
contact
the
steering linkage.
CONTROL VALVE CENTERING
SPRING ADJUSTMENT
1.
Raise
the
vehicle
and
remove
2
spring
cap
attaching screws
and
lock
washers
and
remove
the
spring
cap.
2.
Tighten
the
adjusting
nut
snug
(90-100 in-lbs); then, loosen
the nut
1/4 turn. Make sure that
the nut ro-
tates
1/4
turn
(90
degrees)
on the
threads
of the
bolt.
Do not
tighten
the
adjusting
nut too
tight.
3.
Position
the
spring
cap to the
valve housing. Lubricate
and
install
the
two
attaching screws
and
washers.
Torque
the
screws
to
72-100 in-lbs.
4.
Lower
the
vehicle.
5.
Start
the
engine
and
check
the
turning effort with
a
spring scale.
With
the
spring scale attached
to the
rim
of the
steering wheel,
the
effort
to
turn
the
wheel
in
both directions
should
not
exceed
12
pounds.
CONTROL VALVE
TO
POWER
STEERING CYLINDER HOSE
1.
Raise
the
vehicle
on a
hoist
and
place
a
drain
pan
under
the
power
cylinder.
2.
Disconnect
the
hose from
the
power cylinder
and
allow
the
fluid
to
drain from
the
hose. Then, disconnect
the hose from
the
control valve.
3.
Connect
the
unmarked
end of
the shorter tube
(9 7/16 in
long)
to
valve port
C
(Fig. 2). Hold
the
tube
so
that
the
bend parallels
the
surface
of
valve shown
in Fig. 2,
tighten
the nut.
PLANE
OF
TUBE BEND
IN
3A717 HOSE
TO BE
PARALLEL
WITH THIS SURFACE ON VALVE.
CLEARANCE BETWEEN
COUPLING TO
BE 1/16-
1/8 INCH
IN
THIS AREA
G 1503-A
FIG. 2—Power Steering Hose
Installation
Connect
the
opposite
end to the
lower
port
in the
cylinder. Hold
the
tube
se-
curely while tightening
the nut to pre-
vent twisting
the
tube. Connect
the
other tube
(9 5/8 in
long)
to
port
A,
making sure that tube
is
parallel with
the other tube.
4.
Remove
the
drain
pan and
lower
the vehicle.
5.
Fill
the
power steering pump res-
ervoir with fluid
to the
proper level
(Part
3-1).
6. Start
the
engine
and
turn
the
steering wheel
to
each
end of its
travel
several times
to
cycle
the
system.
Then, check
for
leaks.
7.
Stop
the
engine
and
again check
the power steering fluid level.
Add
fluid
as
required.
POWER STEERING PUMP
TO CONTROL VALVE HOSE
REMOVAL
1.
Remove
the
fluid from
the
pump
reservoir with
a
suction
gun.
2.
Raise
the
vehicle
on a
hoist.
3.
Remove
the
clamp retaining
the
hose tubes
to the
control valve.
4.
Disconnect
the
fluid return
and
pressure hoses from
the
control valve
and allow
the
fluid
to
drain into
a
pan.procarmanuals.com
Page 141 of 413
03-07-03
Ford Design Non-Integral Power Steering System
03-07-03
5.
Lower the vehicle and disconnect
the fluid return hose from the reser-
voir.
6. Disconnect the fluid pressure
hose from the pump outlet fitting.
7.
Remove 1 bolt attaching the
hoses,
insulator, and the retainer to
the frame side rail and remove the
hoses,
and the insulator and retainer
as an assembly from the vehicle.
8. Remove the pressure and return
hoses from the retainer and insulator.
INSTALLATION
1.
Install the pressure and return
hoses in the insulator and retainer.
Paint stripe on pressure hose must be
aligned with slot in insulator. Paint or
tape band on return hose must be cen-
tered in insulator. Position the assem-
bly to the frame side rail and install
the attaching bolt.
2.
Place a hose clamp on the fluid
return hose and install the hose on the
power steering pump reservoir return
fitting.
3.
Torque the pump outlet fitting to
specification (Part 3-13). Then, con-
nect the pressure hose to the outlet fit-
ting and torque the fitting to specifica-
tion.
4.
Raise the vehicle and connect the
pressure and return lines to the con-
trol valve.
5.
Install the clamp to retain the
hose tubes to the control valve.
6. Lower the vehicle and fill the
power steering pump reservoir with
fluid, C1AZ-19582-A, to the proper
level (Part 3-1).
7.
Start the engine and turn the
steering wheel to each end of its travel
several times to cycle the system.
Then, check for fluid leaks.
8. Stop the engine and again check
the power steering fluid level (Part
3-1). Add fluid as required.
REMOVAL AND INSTALLATION
HOISTING INSTRUCTIONS
Damage to suspension and/or steer-
ing linkage components may occur if
care is not exercised when positioning
the hoist adapters of 2 post hoists
prior to lifting the vehicle.
If a 2 post hoist is used to lift the
vehicle, place the adapters under the
front suspension lower arms. Do not
allow the adapters to contact the
steering linkage.
STEERING GEAR
Refer to Group 3-6, Section 3 for
detailed instructions.
POWER STEERING PUMP
Refer to Group 3-10, Section 3 for
detailed instructions.
POWER STEERING CONTROL
VALVE
REMOVAL
1.
Disconnect the 4 fluid line fit-
tings at the control valve, and drain
the fluid from the lines. Turn the front
wheels to the left and right several
times to force all the fluid from the
system.
2.
Loosen the clamping nut and
bolt at the right end of the sleeve.
3.
Remove the roll pin from the
steering arm-to-idler arm rod -through
the slot in the sleeve.
4.
Remove the control valve ball
stud nut.
5.
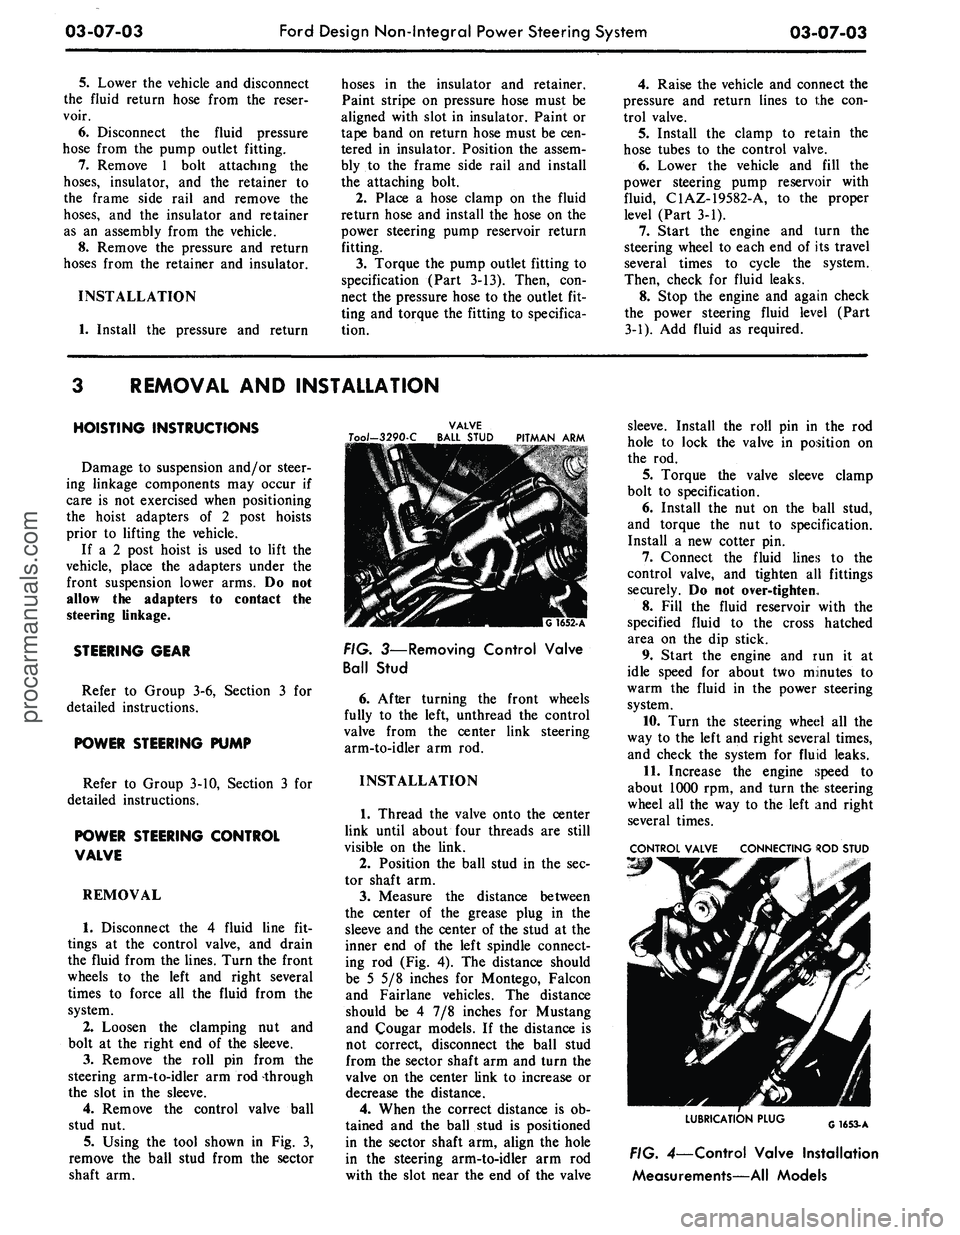
Using the tool shown in Fig. 3,
remove the ball stud from the sector
shaft arm.
VALVE
Too/-3290-C BALL STUD PITMAN ARM
FIG. 3—Removing Control Valve
Ball Stud
6. After turning the front wheels
fully to the left, unthread the control
valve from the center link steering
arm-to-idler arm rod.
INSTALLATION
1.
Thread the valve onto the center
link until about four threads are still
visible on the link.
2.
Position the ball stud in the sec-
tor shaft arm.
3.
Measure the distance between
the center of the grease plug in the
sleeve and the center of the stud at the
inner end of the left spindle connect-
ing rod (Fig. 4). The distance should
be 5 5/8 inches for Montego, Falcon
and Fairlane vehicles. The distance
should be 4 7/8 inches for Mustang
and Cougar models. If the distance is
not correct, disconnect the ball stud
from the sector shaft arm and turn the
valve on the center link to increase or
decrease the distance.
4.
When the correct distance is ob-
tained and the ball stud is positioned
in the sector shaft arm, align the hole
in the steering arm-to-idler arm rod
with the slot near the end of the valve
sleeve. Install the roll pin in the rod
hole to lock the valve in position on
the rod.
5.
Torque the valve sleeve clamp
bolt to specification.
6. Install the nut on the ball stud,
and torque the nut to specification.
Install a new cotter pin.
7.
Connect the fluid lines to the
control valve, and tighten all fittings
securely. Do not over-tighten.
8. Fill the fluid reservoir with the
specified fluid to the cross hatched
area on the dip stick.
9. Start the engine and run it at
idle speed for about two minutes to
warm the fluid in the power steering
system.
10.
Turn the steering wheel all the
way to the left and right several times,
and check the system for fluid leaks.
11.
Increase the engine speed to
about 1000 rpm, and turn the steering
wheel all the way to the left and right
several times.
CONTROL VALVE CONNECTING ROD STUD
LUBRICATION PLUG
G1653-A
FIG. 4—Control Valve Installation
Measurements—All Modelsprocarmanuals.com
Page 142 of 413
03-07-04
Ford Design Non-Integral Power Steering System
03-07-04
12.
Stop the engine, and check the
control valve and hose connections for
fluid leaks. Correct the cause of any
leaks.
13.
Check the fluid level, and refill
the reservoir if necessary.
14.
With the engine running check
the position of the steering wheel
when the front wheels are in the
straight-ahead position.Do not make
any adjustments until toe-in is
checked.
15.
Keep the engine running, and
check toe-in. If either toe-in or steer-
ing wheel position is not correct make
all necessary adjustments (Part 3-1) at
the spindle connecting rod sleeves.
16.
Check the effort to turn the
wheels in both directions. The effort
should be about equal in both direc-
tions.
POWER CYLINDER
REMOVAL
1.
Disconnect the two fluid lines
from the power cylinder and allow
them to drain into a container.
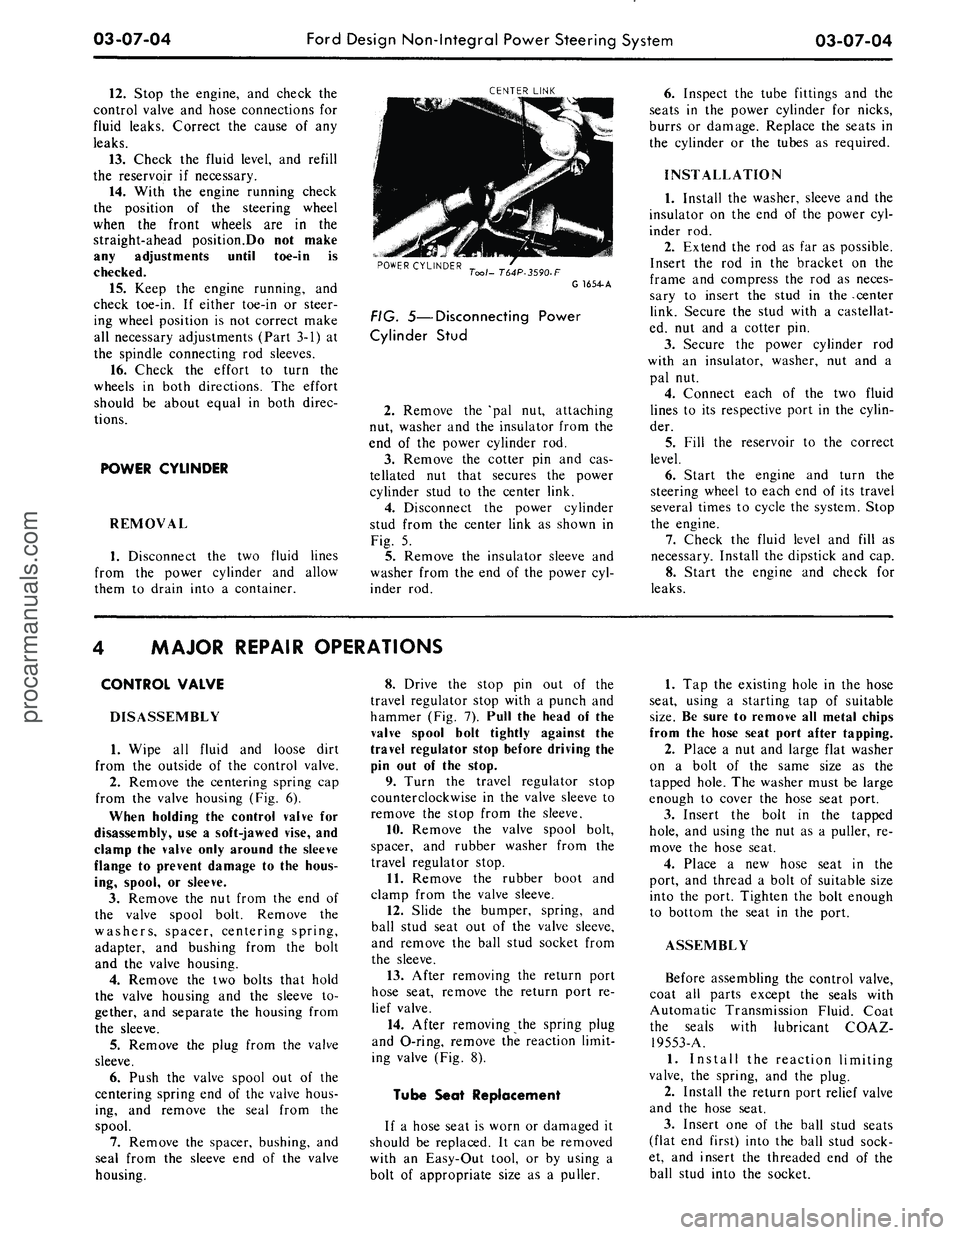
CENTER LINK
POWER CYLINDER
Tool- T64P-3590-F
G 1654-A
FIG. 5—Disconnecting Power
Cylinder Stud
2.
Remove the 'pal nut, attaching
nut, washer and the insulator from the
end of the power cylinder rod.
3.
Remove the cotter pin and cas-
tellated nut that secures the power
cylinder stud to the center link.
4.
Disconnect the power cylinder
stud from the center link as shown in
Fig. 5.
5.
Remove the insulator sleeve and
washer from the end of the power cyl-
inder rod.
6. Inspect the tube fittings and the
seats in the power cylinder for nicks,
burrs or damage. Replace the seats in
the cylinder or the tubes as required.
INSTALLATION
1.
Install the washer, sleeve and the
insulator on the end of the power cyl-
inder rod.
2.
Extend the rod as far as possible.
Insert the rod in the bracket on the
frame and compress the rod as neces-
sary to insert the stud in the -center
link. Secure the stud with a castellat-
ed, nut and a cotter pin.
3.
Secure the power cylinder rod
with an insulator, washer, nut and a
pal nut.
4.
Connect each of the two fluid
lines to its respective port in the cylin-
der.
5.
Fill the reservoir to the correct
level.
6. Start the engine and turn the
steering wheel to each end of its travel
several times to cycle the system. Stop
the engine.
7.
Check the fluid level and fill as
necessary. Install the dipstick and cap.
8. Start the engine and check for
leaks.
MAJOR REPAIR OPERATIONS
CONTROL VALVE
DISASSEMBLY
1.
Wipe all fluid and loose dirt
from the outside of the control valve.
2.
Remove the centering spring cap
from the valve housing (Fig. 6).
When holding the control valve for
disassembly, use a soft-jawed vise, and
clamp the valve only around the sleeve
flange to prevent damage to the hous-
ing, spool, or sleeve.
3.
Remove the nut from the end of
the valve spool bolt. Remove the
washers, spacer, centering spring,
adapter, and bushing from the bolt
and the valve housing.
4.
Remove the two bolts that hold
the valve housing and the sleeve to-
gether, and separate the housing from
the sleeve.
5.
Remove the plug from the valve
sleeve.
6. Push the valve spool out of the
centering spring end of the valve hous-
ing, and remove the seal from the
spool.
7.
Remove the spacer, bushing, and
seal from the sleeve end of the valve
housing.
8. Drive the stop pin out of the
travel regulator stop with a punch and
hammer (Fig. 7). Pull the head of the
valve spool bolt tightly against the
travel regulator stop before driving the
pin out of the stop.
9. Turn the travel regulator stop
counterclockwise in the valve sleeve to
remove the stop from the sleeve.
10.
Remove the valve spool bolt,
spacer, and rubber washer from the
travel regulator stop.
11.
Remove the rubber boot and
clamp from the valve sleeve.
12.
Slide the bumper, spring, and
ball stud seat out of the valve sleeve,
and remove the ball stud socket from
the sleeve.
13.
After removing the return port
hose seat, remove the return port re-
lief valve.
14.
After removing the spring plug
and O-ring, remove the reaction limit-
ing valve (Fig. 8).
Tube Seat Replacement
If a hose seat is worn or damaged it
should be replaced. It can be removed
with an Easy-Out tool, or by using a
bolt of appropriate size as a puller.
1.
Tap the existing hole in the hose
seat, using a starting tap of suitable
size.
Be sure to remove all metal chips
from the hose seat port after tapping.
2.
Place a nut and large flat washer
on a bolt of the same size as the
tapped hole. The washer must be large
enough to cover the hose seat port.
3.
Insert the bolt in the tapped
hole,
and using the nut as a puller, re-
move the hose seat.
4.
Place a new hose seat in the
port, and thread a bolt of suitable size
into the port. Tighten the bolt enough
to bottom the seat in the port.
ASSEMBLY
Before assembling the control valve,
coat all parts except the seals with
Automatic Transmission Fluid. Coat
the seals with lubricant COAZ-
19553-A.
1.
Install the reaction limiting
valve, the spring, and the plug.
2.
Install the return port relief valve
and the hose seat.
3.
Insert one of the ball stud seats
(flat end first) into the ball stud sock-
et, and insert the threaded end of the
ball stud into the socket.procarmanuals.com
Page 145 of 413
03-08-01
Ford Design Integral Power Steering Gear
03-08-01
PART
3-8
Ford Design Integral Power
Steering Gear
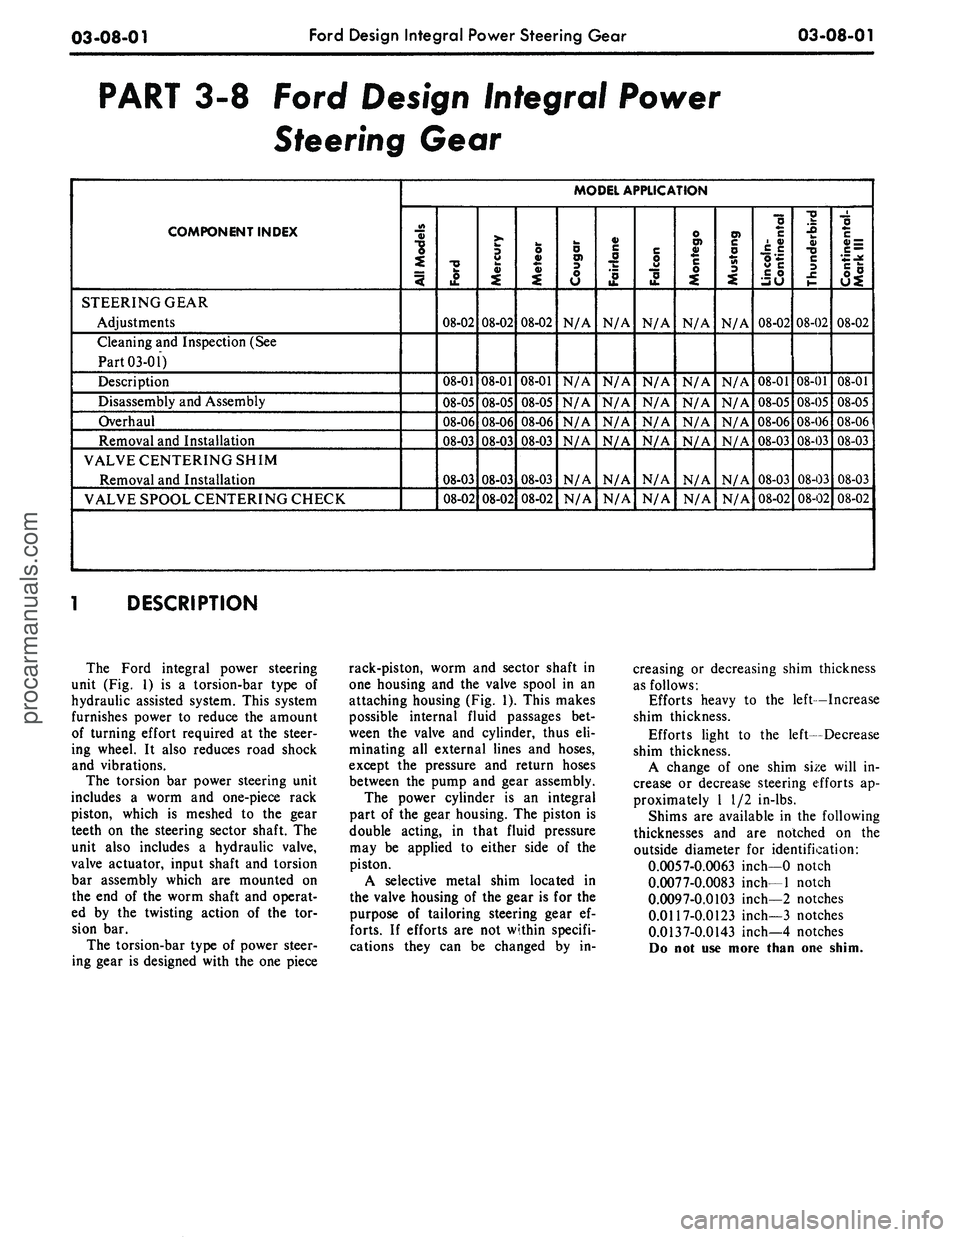
COMPONENT INDEX
STEERING GEAR
Adjustments
Cleaning
and
Inspection
(See
Part 03-01)
Description
Disassembly
and
Assembly
Overhaul
Removal
and
Installation
VALVE CENTERING SHIM
Removal
and
Installation
VALVE SPOOL CENTERING CHECK
MODEL APPLICATION
All Models
Ford
08-02
08-01
08-05
08-06
08-03
08-03
08-02
Mercury
08-02
08-01
08-05
08-06
08-03
08-03
08-02
Meteor
08-02
08-01
08-05
08-06
08-03
08-03
08-02
Cougar
N/A
N/A
N/A
N/A
N/A
N/A
N/A
Fairlane
N/A
N/A
N/A
N/A
N/A
N/A
N/A
Falcon
N/A
N/A
N/A
N/A
N/A
N/A
N/A
Montego
N/A
N/A
N/A
N/A
N/A
N/A
N/A
Mustang
N/A
N/A
N/A
N/A
N/A
N/A
N/A
Lincoln-
Continental
08-02
08-01
08-05
08-06
08-03
08-03
08-02
Thunderbird
08-02
08-01
08-05
08-06
08-03
08-03
08-02
Continental-
Mark
III
08-02
08-01
08-05
08-06
08-03
08-03
08-02
DESCRIPTION
The Ford integral power steering
unit
(Fig. 1) is a
torsion-bar type
of
hydraulic assisted system. This system
furnishes power
to
reduce
the
amount
of turning effort required
at the
steer-
ing wheel.
It
also reduces road shock
and vibrations.
The torsion
bar
power steering unit
includes
a
worm
and
one-piece rack
piston, which
is
meshed
to the
gear
teeth
on the
steering sector shaft.
The
unit also includes
a
hydraulic valve,
valve actuator, input shaft
and
torsion
bar assembly which
are
mounted
on
the
end of the
worm shaft
and
operat-
ed
by the
twisting action
of the tor-
sion
bar.
The torsion-bar type
of
power steer-
ing gear
is
designed with
the one
piece
rack-piston, worm
and
sector shaft
in
one housing
and the
valve spool
in an
attaching housing
(Fig. 1).
This makes
possible internal fluid passages
bet-
ween
the
valve
and
cylinder, thus
eli-
minating
all
external lines
and
hoses,
except
the
pressure
and
return hoses
between
the
pump
and
gear assembly.
The power cylinder
is an
integral
part
of the
gear housing.
The
piston
is
double acting,
in
that fluid pressure
may
be
applied
to
either side
of the
piston.
A selective metal shim located
in
the valve housing
of the
gear
is for the
purpose
of
tailoring steering gear
ef-
forts.
If
efforts
are not
within specifi-
cations they
can be
changed
by in-
creasing
or
decreasing shim thickness
as follows:
Efforts heavy
to the
left—Increase
shim thickness.
Efforts light
to the
left—Decrease
shim thickness.
A change
of one
shim size will
in-
crease
or
decrease steering efforts
ap-
proximately
1 1/2
in-lbs.
Shims
are
available
in the
following
thicknesses
and are
notched
on the
outside diameter
for
identification:
0.0057-0.0063 inch—0 notch
0.0077-0.0083 inch—1 notch
0.0097-0.0103 inch—2 notches
0.0117-0.0123 inch—3 notches
0.0137-0.0143 inch—4 notches
Do
not use
more than
one
shim.
procarmanuals.com