FORD SUPER DUTY 2023 Owners Manual
Manufacturer: FORD, Model Year: 2023, Model line: SUPER DUTY, Model: FORD SUPER DUTY 2023Pages: 738, PDF Size: 18.49 MB
Page 391 of 738
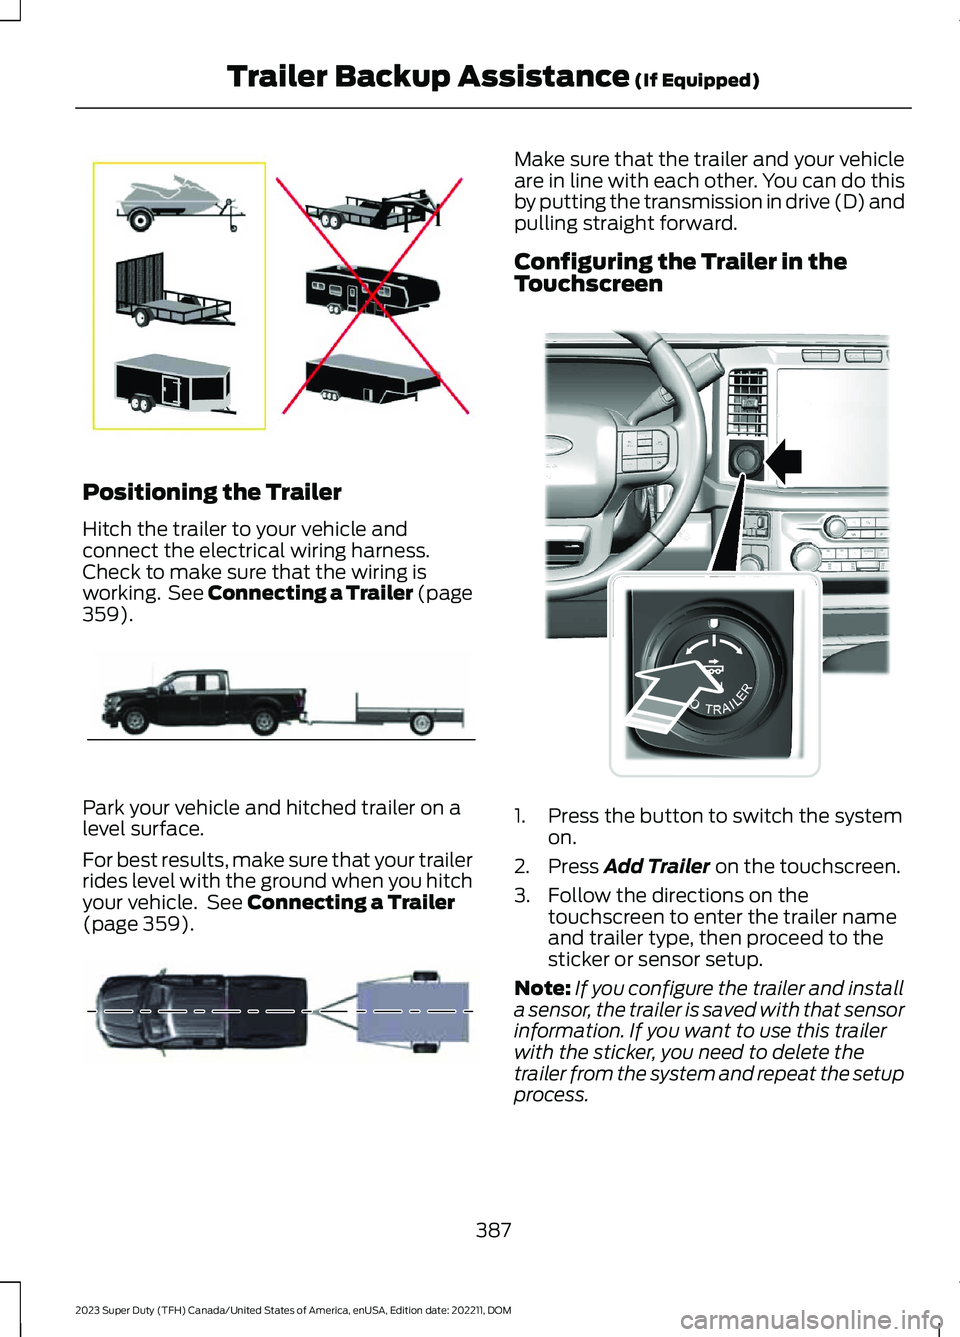
Positioning the Trailer
Hitch the trailer to your vehicle andconnect the electrical wiring harness.Check to make sure that the wiring isworking. See Connecting a Trailer (page359).
Park your vehicle and hitched trailer on alevel surface.
For best results, make sure that your trailerrides level with the ground when you hitchyour vehicle. See Connecting a Trailer(page 359).
Make sure that the trailer and your vehicleare in line with each other. You can do thisby putting the transmission in drive (D) andpulling straight forward.
Configuring the Trailer in theTouchscreen
1.Press the button to switch the systemon.
2.Press Add Trailer on the touchscreen.
3.Follow the directions on thetouchscreen to enter the trailer nameand trailer type, then proceed to thesticker or sensor setup.
Note:If you configure the trailer and installa sensor, the trailer is saved with that sensorinformation. If you want to use this trailerwith the sticker, you need to delete thetrailer from the system and repeat the setupprocess.
387
2023 Super Duty (TFH) Canada/United States of America, enUSA, Edition date: 202211, DOMTrailer Backup Assistance (If Equipped)E209766 E209759 E209760 E373857
Page 392 of 738
Note:Your vehicle has two options for thetrailer reversing aid setup. If your vehiclecame with a trailer sensor kit or if a messagedisplays to install a sensor, follow the sensorinstallation instructions. See Trailer SensorInstallation (page 388). If your vehicle didnot come with a trailer sensor kit, follow thesticker installation instructions. SeeApplying the Trailer Reversing Aid Sticker(page 388).
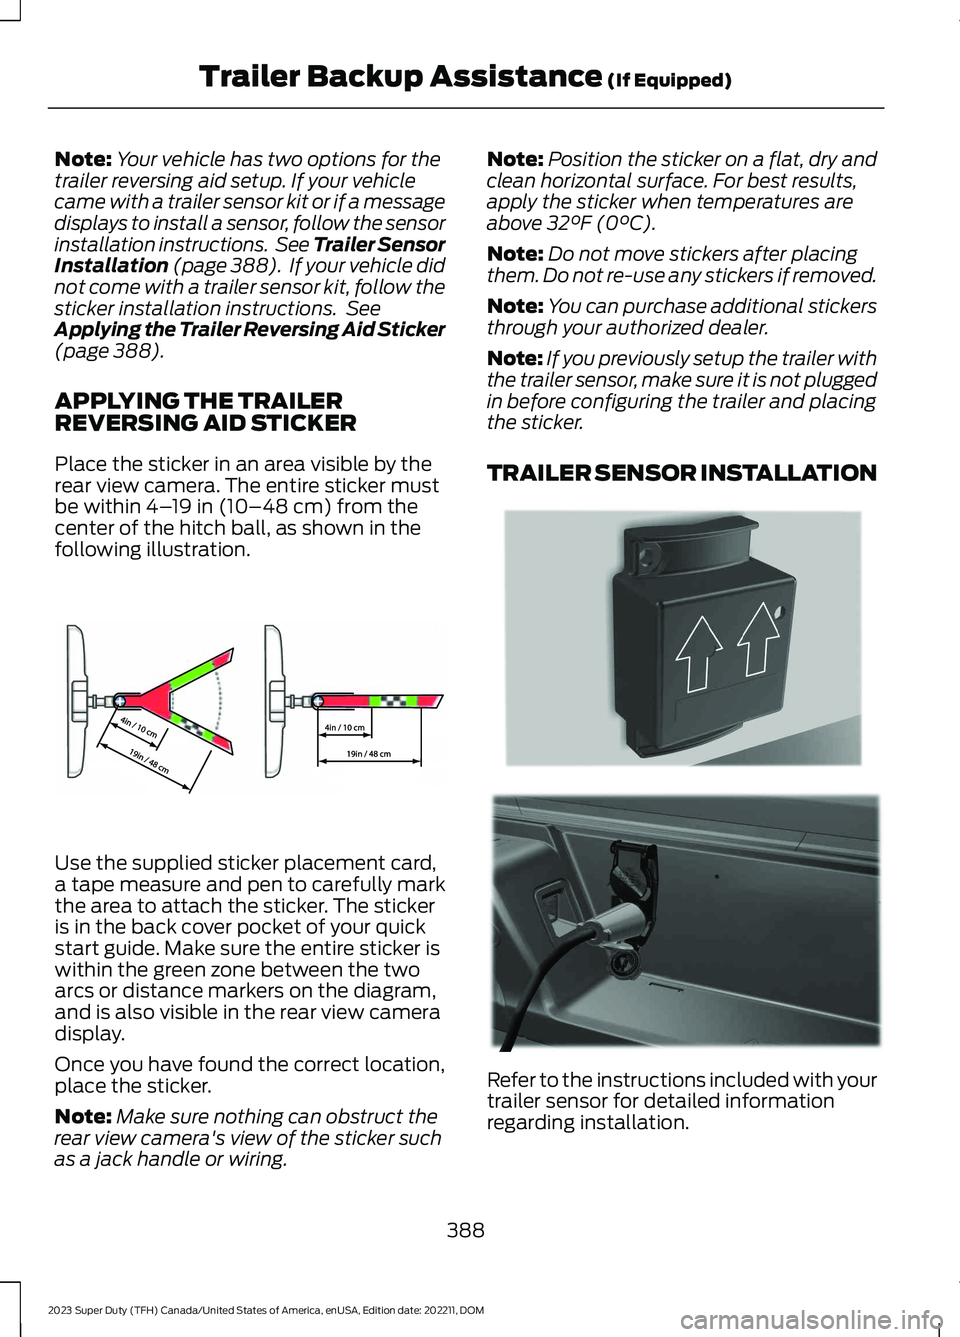
APPLYING THE TRAILERREVERSING AID STICKER
Place the sticker in an area visible by therear view camera. The entire sticker mustbe within 4–19 in (10–48 cm) from thecenter of the hitch ball, as shown in thefollowing illustration.
Use the supplied sticker placement card,a tape measure and pen to carefully markthe area to attach the sticker. The stickeris in the back cover pocket of your quickstart guide. Make sure the entire sticker iswithin the green zone between the twoarcs or distance markers on the diagram,and is also visible in the rear view cameradisplay.
Once you have found the correct location,place the sticker.
Note:Make sure nothing can obstruct therear view camera's view of the sticker suchas a jack handle or wiring.
Note:Position the sticker on a flat, dry andclean horizontal surface. For best results,apply the sticker when temperatures areabove 32°F (0°C).
Note:Do not move stickers after placingthem. Do not re-use any stickers if removed.
Note:You can purchase additional stickersthrough your authorized dealer.
Note:If you previously setup the trailer withthe trailer sensor, make sure it is not pluggedin before configuring the trailer and placingthe sticker.
TRAILER SENSOR INSTALLATION
Refer to the instructions included with yourtrailer sensor for detailed informationregarding installation.
388
2023 Super Duty (TFH) Canada/United States of America, enUSA, Edition date: 202211, DOMTrailer Backup Assistance (If Equipped)E333148 E315959 E335221
Page 393 of 738
Note:Make sure the arrows on the sensorhousing are facing up. Mount the sensor toa vertical part of the trailer that pivots whenyou turn your vehicle. Do not mount to astationary surface such as the truck side ofthe trailer hitch.
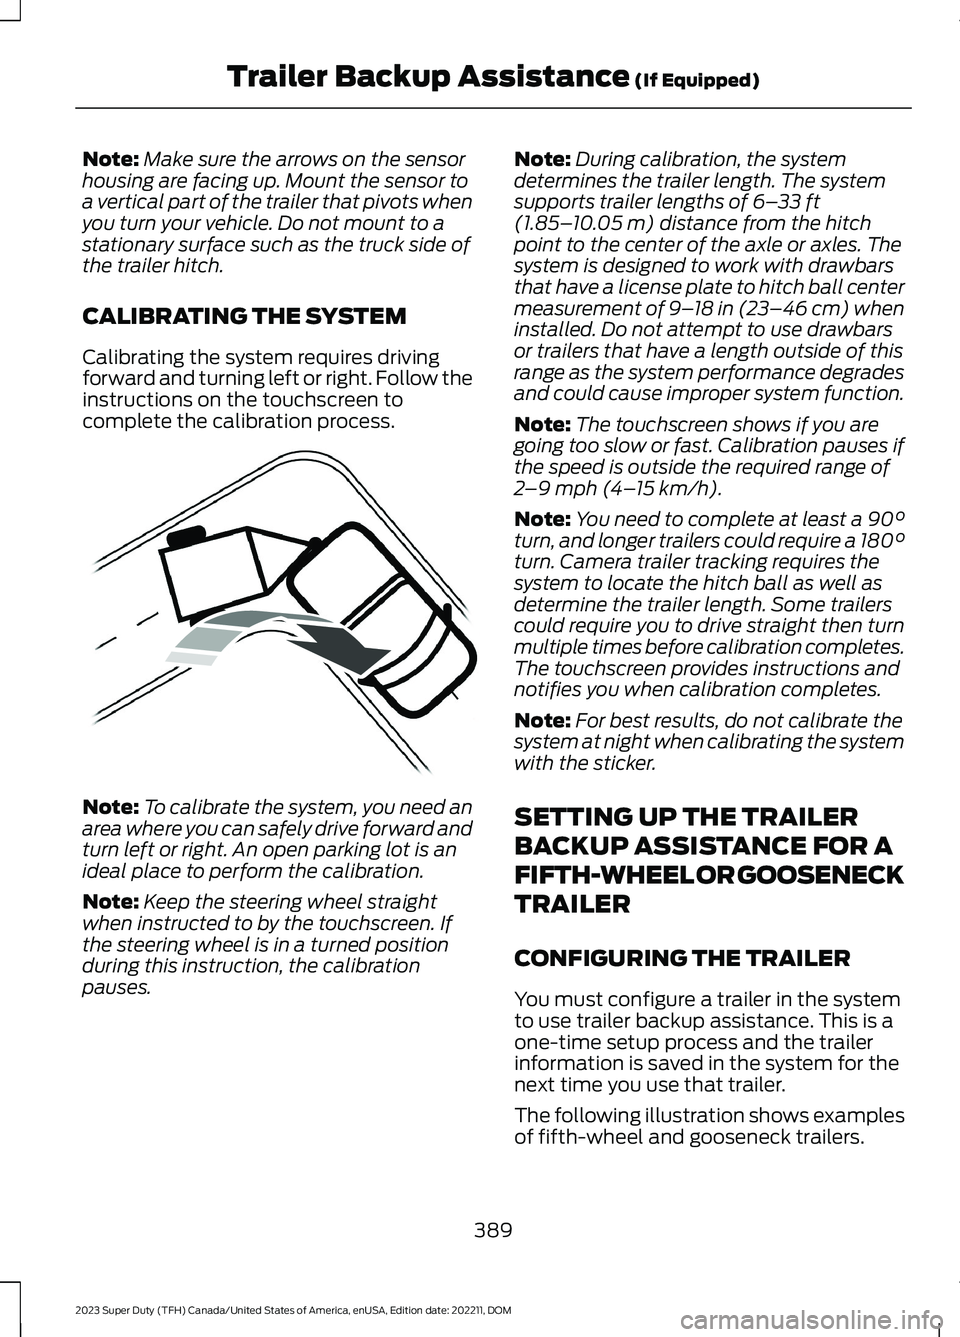
CALIBRATING THE SYSTEM
Calibrating the system requires drivingforward and turning left or right. Follow theinstructions on the touchscreen tocomplete the calibration process.
Note:To calibrate the system, you need anarea where you can safely drive forward andturn left or right. An open parking lot is anideal place to perform the calibration.
Note:Keep the steering wheel straightwhen instructed to by the touchscreen. Ifthe steering wheel is in a turned positionduring this instruction, the calibrationpauses.
Note:During calibration, the systemdetermines the trailer length. The systemsupports trailer lengths of 6–33 ft(1.85–10.05 m) distance from the hitchpoint to the center of the axle or axles. Thesystem is designed to work with drawbarsthat have a license plate to hitch ball centermeasurement of 9–18 in (23–46 cm) wheninstalled. Do not attempt to use drawbarsor trailers that have a length outside of thisrange as the system performance degradesand could cause improper system function.
Note:The touchscreen shows if you aregoing too slow or fast. Calibration pauses ifthe speed is outside the required range of2–9 mph (4–15 km/h).
Note:You need to complete at least a 90°turn, and longer trailers could require a 180°turn. Camera trailer tracking requires thesystem to locate the hitch ball as well asdetermine the trailer length. Some trailerscould require you to drive straight then turnmultiple times before calibration completes.The touchscreen provides instructions andnotifies you when calibration completes.
Note:For best results, do not calibrate thesystem at night when calibrating the systemwith the sticker.
SETTING UP THE TRAILER
BACKUP ASSISTANCE FOR A
FIFTH-WHEEL OR GOOSENECK
TRAILER
CONFIGURING THE TRAILER
You must configure a trailer in the systemto use trailer backup assistance. This is aone-time setup process and the trailerinformation is saved in the system for thenext time you use that trailer.
The following illustration shows examplesof fifth-wheel and gooseneck trailers.
389
2023 Super Duty (TFH) Canada/United States of America, enUSA, Edition date: 202211, DOMTrailer Backup Assistance (If Equipped)E352329
Page 394 of 738
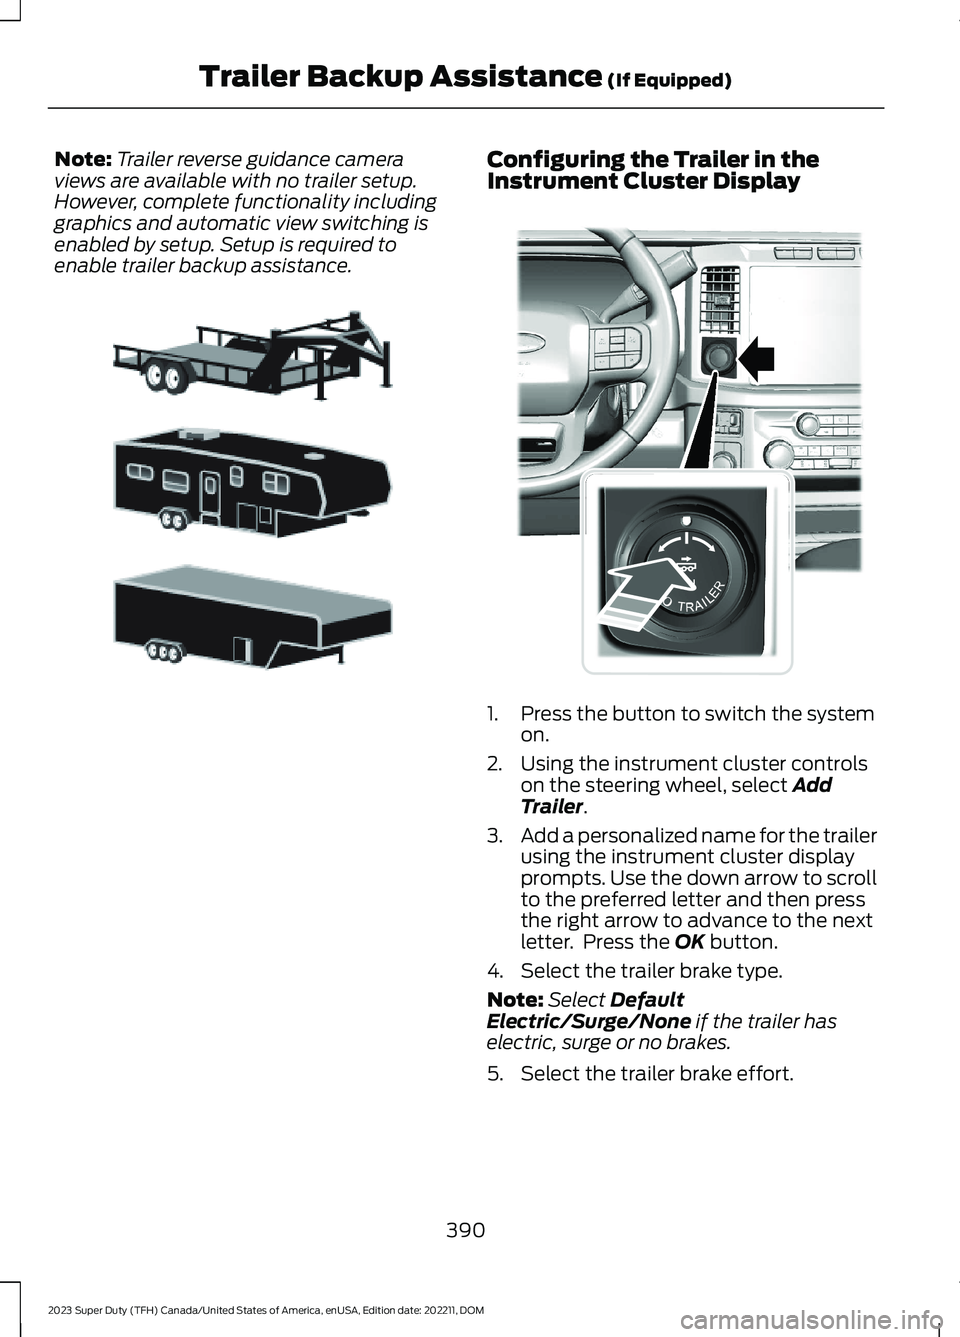
Note:Trailer reverse guidance cameraviews are available with no trailer setup.However, complete functionality includinggraphics and automatic view switching isenabled by setup. Setup is required toenable trailer backup assistance.
Configuring the Trailer in theInstrument Cluster Display
1.Press the button to switch the systemon.
2.Using the instrument cluster controlson the steering wheel, select AddTrailer.
3.Add a personalized name for the trailerusing the instrument cluster displayprompts. Use the down arrow to scrollto the preferred letter and then pressthe right arrow to advance to the nextletter. Press the OK button.
4.Select the trailer brake type.
Note:Select DefaultElectric/Surge/None if the trailer haselectric, surge or no brakes.
5.Select the trailer brake effort.
390
2023 Super Duty (TFH) Canada/United States of America, enUSA, Edition date: 202211, DOMTrailer Backup Assistance (If Equipped)E311877 E373857
Page 395 of 738
Note:The default value is Low and is therecommended setting for most trailers.Select a different setting if your trailer'sbrakes require more initial voltage, or youprefer more aggressive trailer braking.
6.Select the trailer type.
Note:The system could prompt you tosetup Trailer Blind Spot before continuingthe setup process.
7.Select whether you want to add thefeature.
TRAILER SENSOR INSTALLATION
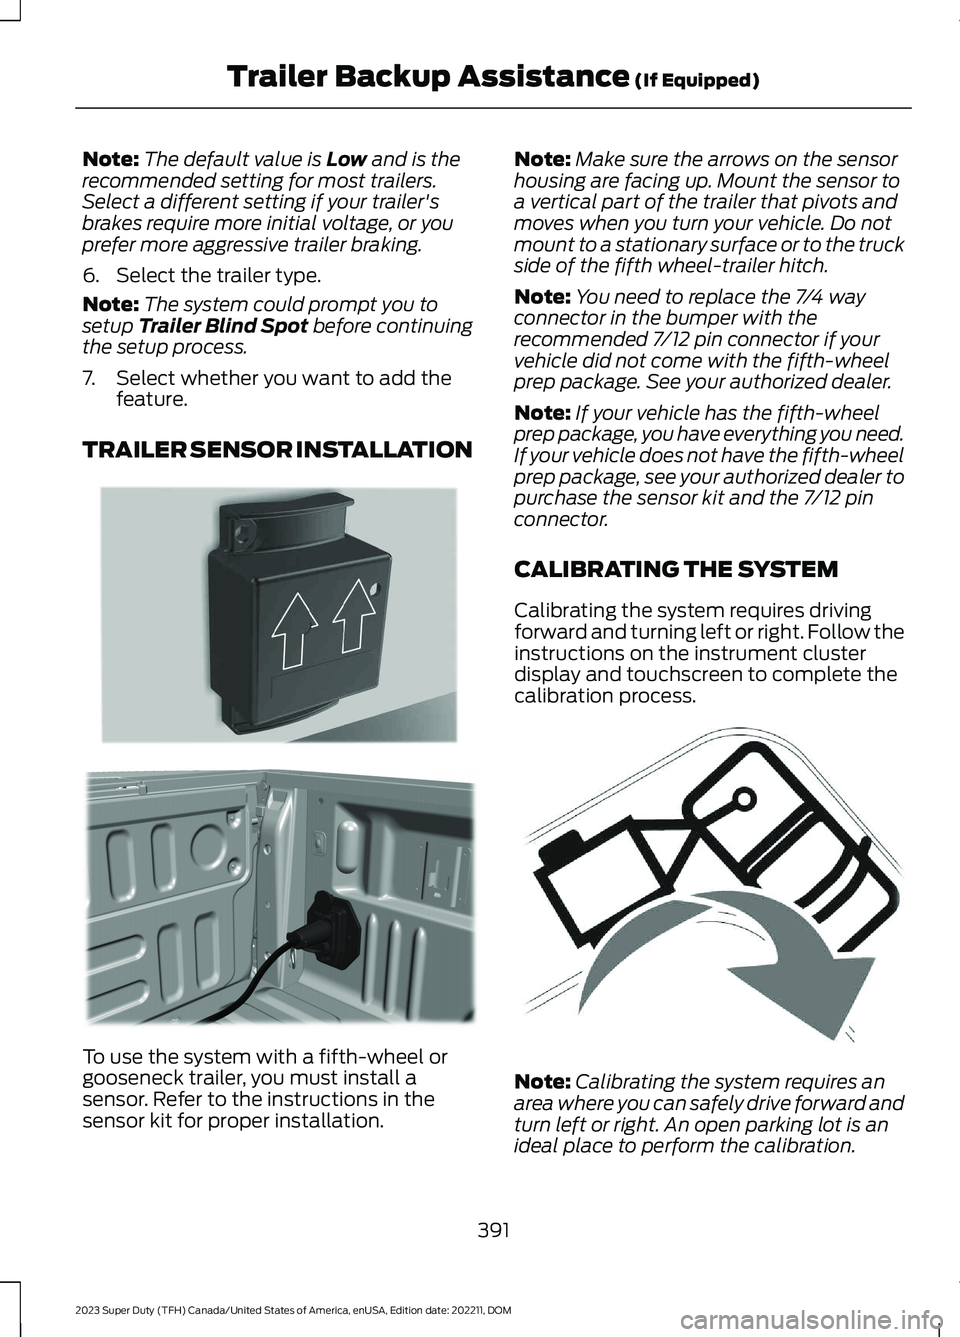
To use the system with a fifth-wheel orgooseneck trailer, you must install asensor. Refer to the instructions in thesensor kit for proper installation.
Note:Make sure the arrows on the sensorhousing are facing up. Mount the sensor toa vertical part of the trailer that pivots andmoves when you turn your vehicle. Do notmount to a stationary surface or to the truckside of the fifth wheel-trailer hitch.
Note:You need to replace the 7/4 wayconnector in the bumper with therecommended 7/12 pin connector if yourvehicle did not come with the fifth-wheelprep package. See your authorized dealer.
Note:If your vehicle has the fifth-wheelprep package, you have everything you need.If your vehicle does not have the fifth-wheelprep package, see your authorized dealer topurchase the sensor kit and the 7/12 pinconnector.
CALIBRATING THE SYSTEM
Calibrating the system requires drivingforward and turning left or right. Follow theinstructions on the instrument clusterdisplay and touchscreen to complete thecalibration process.
Note:Calibrating the system requires anarea where you can safely drive forward andturn left or right. An open parking lot is anideal place to perform the calibration.
391
2023 Super Duty (TFH) Canada/United States of America, enUSA, Edition date: 202211, DOMTrailer Backup Assistance (If Equipped)E315959 E316145 E346605
Page 396 of 738
Note:Keep the steering wheel straightwhen instructed to by the instrument clusterdisplay and touchscreen. If the steeringwheel is in a turned position during thisinstruction, the calibration pauses.
Note:During calibration, the systemdetermines the trailer length. The systemsupports trailer lengths of 10–39 ft(3–11.94 m) distance from the hitch pointto the center of the axle or axles.
Note:The instrument cluster displays andtouchscreen shows if you are going too slowor fast. Calibration pauses if the speed isoutside the required range of 2–16 mph(4–25 km/h).
Note:You need to complete at least a 90°turn, and longer trailers could require a 180°turn.
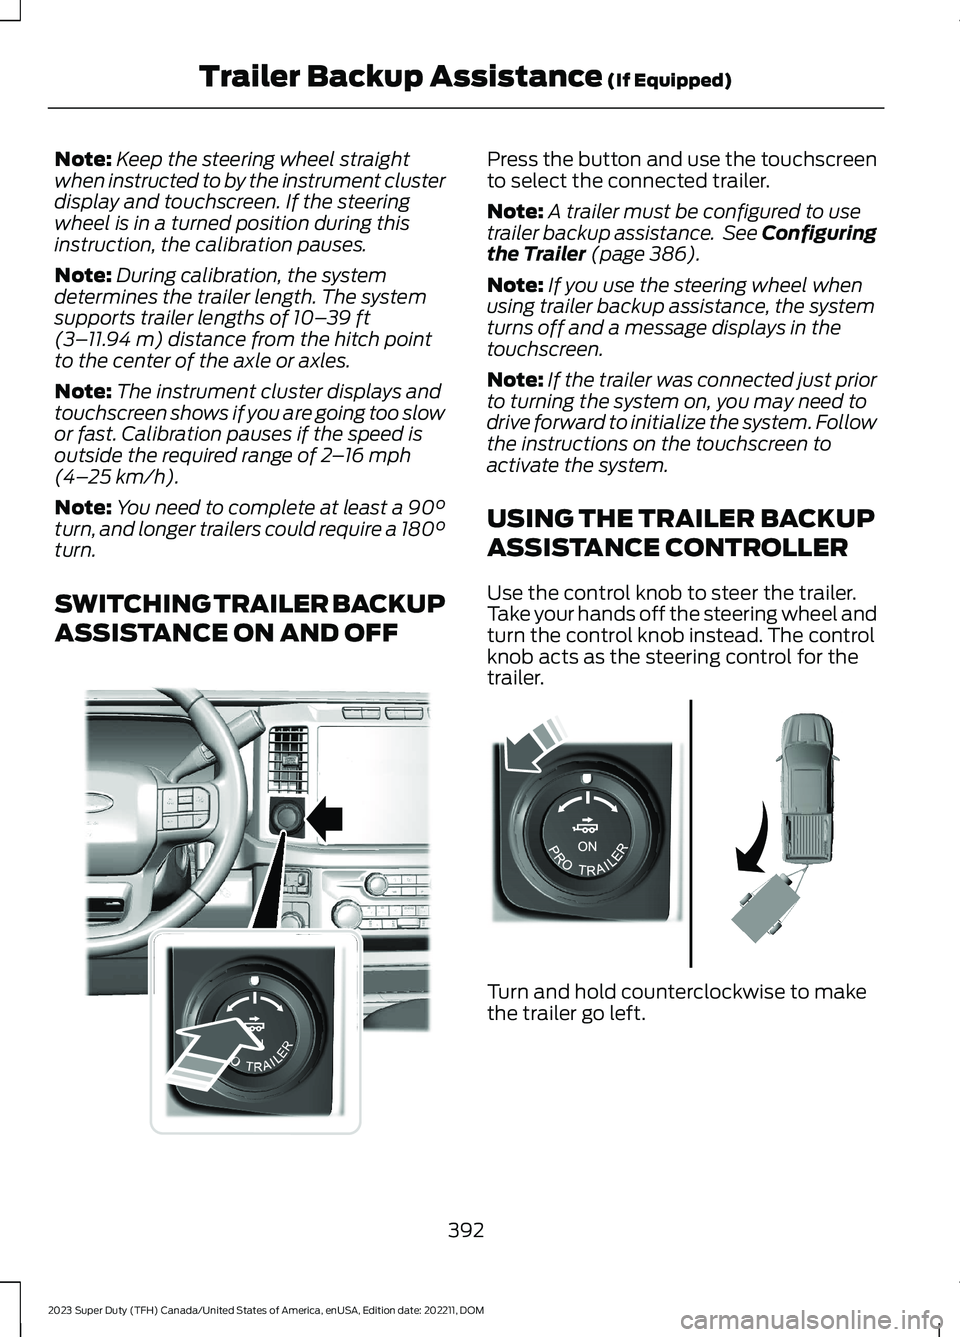
SWITCHING TRAILER BACKUP
ASSISTANCE ON AND OFF
Press the button and use the touchscreento select the connected trailer.
Note:A trailer must be configured to usetrailer backup assistance. See Configuringthe Trailer (page 386).
Note:If you use the steering wheel whenusing trailer backup assistance, the systemturns off and a message displays in thetouchscreen.
Note:If the trailer was connected just priorto turning the system on, you may need todrive forward to initialize the system. Followthe instructions on the touchscreen toactivate the system.
USING THE TRAILER BACKUP
ASSISTANCE CONTROLLER
Use the control knob to steer the trailer.Take your hands off the steering wheel andturn the control knob instead. The controlknob acts as the steering control for thetrailer.
Turn and hold counterclockwise to makethe trailer go left.
392
2023 Super Duty (TFH) Canada/United States of America, enUSA, Edition date: 202211, DOMTrailer Backup Assistance (If Equipped)E373857 E313025
Page 397 of 738
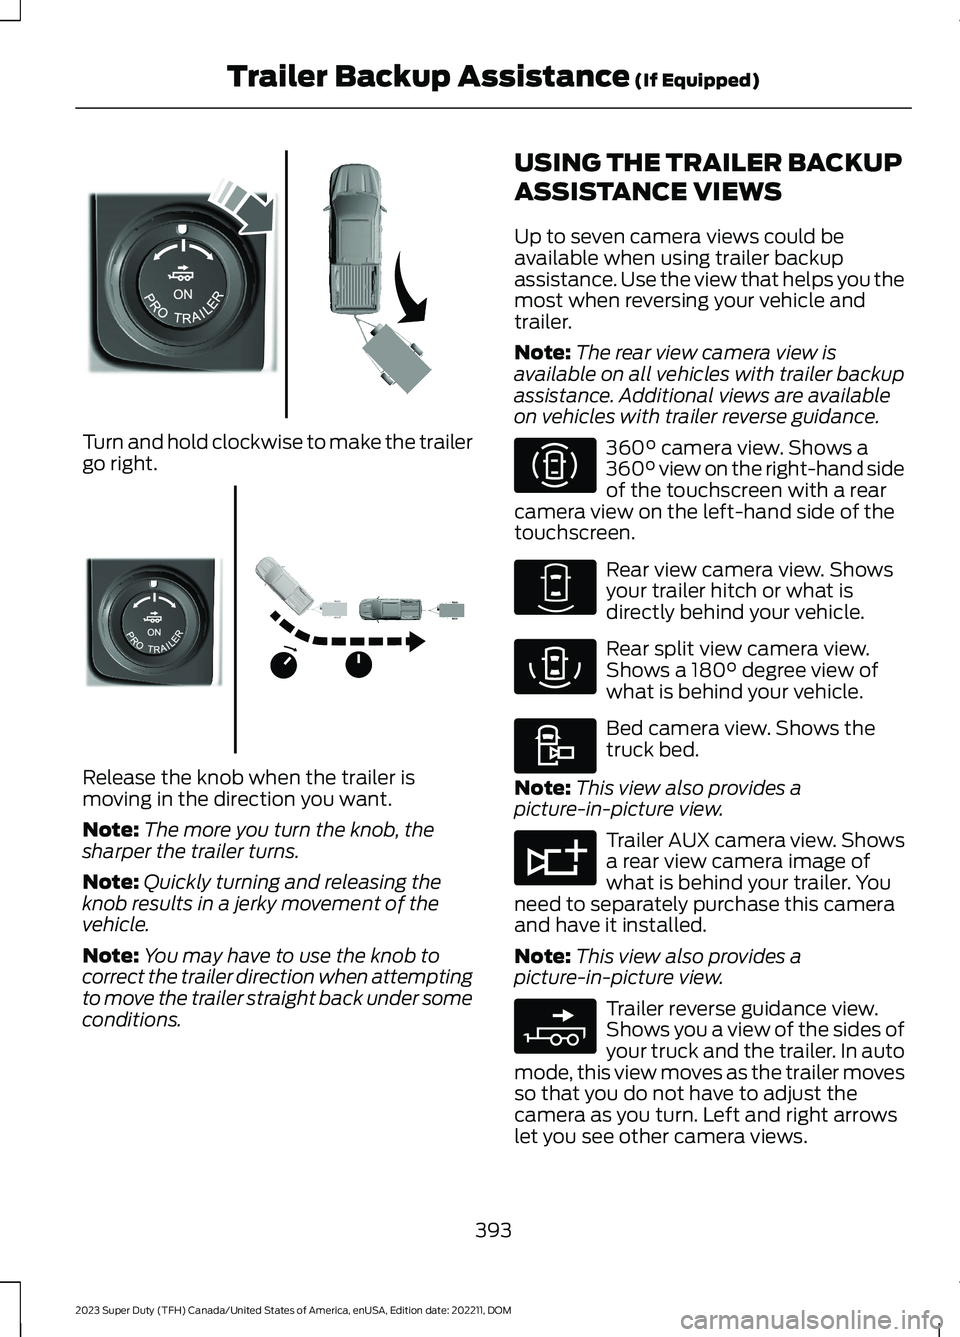
Turn and hold clockwise to make the trailergo right.
Release the knob when the trailer ismoving in the direction you want.
Note:The more you turn the knob, thesharper the trailer turns.
Note:Quickly turning and releasing theknob results in a jerky movement of thevehicle.
Note:You may have to use the knob tocorrect the trailer direction when attemptingto move the trailer straight back under someconditions.
USING THE TRAILER BACKUP
ASSISTANCE VIEWS
Up to seven camera views could beavailable when using trailer backupassistance. Use the view that helps you themost when reversing your vehicle andtrailer.
Note:The rear view camera view isavailable on all vehicles with trailer backupassistance. Additional views are availableon vehicles with trailer reverse guidance.
360° camera view. Shows a360° view on the right-hand sideof the touchscreen with a rearcamera view on the left-hand side of thetouchscreen.
Rear view camera view. Showsyour trailer hitch or what isdirectly behind your vehicle.
Rear split view camera view.Shows a 180° degree view ofwhat is behind your vehicle.
Bed camera view. Shows thetruck bed.
Note:This view also provides apicture-in-picture view.
Trailer AUX camera view. Showsa rear view camera image ofwhat is behind your trailer. Youneed to separately purchase this cameraand have it installed.
Note:This view also provides apicture-in-picture view.
Trailer reverse guidance view.Shows you a view of the sides ofyour truck and the trailer. In automode, this view moves as the trailer movesso that you do not have to adjust thecamera as you turn. Left and right arrowslet you see other camera views.
393
2023 Super Duty (TFH) Canada/United States of America, enUSA, Edition date: 202211, DOMTrailer Backup Assistance (If Equipped)E313026 E313027 E310996 E310967 E310974 E310995 E311776 E310965
Page 398 of 738
Picture-in-picture view. Showsa main view and a secondaryview when in bed camera viewor trailer AUX camera view.
Note:If you have a 8 in (20 cm)touchscreen, picture-in-picture is off bydefault. Press the picture-in-picture icon onthe touchscreen to switch picture-in-pictureview on and off.
Note:If you have a 12 in (30 cm)touchscreen, picture-in-picture is on bydefault and you cannot switch it off.
Swap. Press to swap betweenpicture-in-picture views.
Auto. Press to return to autoview.
Note:Auto is the default setting.
Hitch Angle Graphic
The hitch angle graphic shows a smallrepresentation of your truck and trailer withvisual feedback to help you monitor thetrailer. The graphic shows two differentcolored lines for the trailer hitch angle. Ablack line shows you where your trailer isin relation to your vehicle. The white linerepresents the amount the trailer can turnbased on knob input.
The graphic shows a yellow and red zonefor the hitch angle to warn you of a highangle condition that could require you topull forward to reduce the hitch angle. Theangle limits for each zone vary based onthe trailer length.
The yellow zone indicates you areapproaching the maximum controllabletrailer angle for the system. When thetrailer enters this zone, it is more difficultto reduce the trailer turn when backing up.It may be necessary to put your vehicleback into drive (D) and pull forward to getthe truck and trailer back to an in-lineposition.
The red zone indicates you have exceededthe maximum controllable trailer angle forthe system. Immediately stop reversing.Put your vehicle into drive (D) and pullforward until the trailer is no longer in thered zone.
Setting the Trailer Angle Limit
1.Press Features on the touchscreen.
2.Press Towing.
3.Press Manage trailers.
4.Press Pro Trailer Backup Assist.
5.Press Trailer Angle Limit.
6.Press a setting.
Normal Control Angle
Default setting. This provides a balancedlimit that returns from a turn to straightbacking with minimal change to the trailerdirection.
Max Control Angle
Increases the trailer angle limit close to themaximum controllable angle to allowsharper turns but also causes more changein the trailer direction when straighteningout from a turn.
394
2023 Super Duty (TFH) Canada/United States of America, enUSA, Edition date: 202211, DOMTrailer Backup Assistance (If Equipped)E351663 E351662 E315644
Page 399 of 738
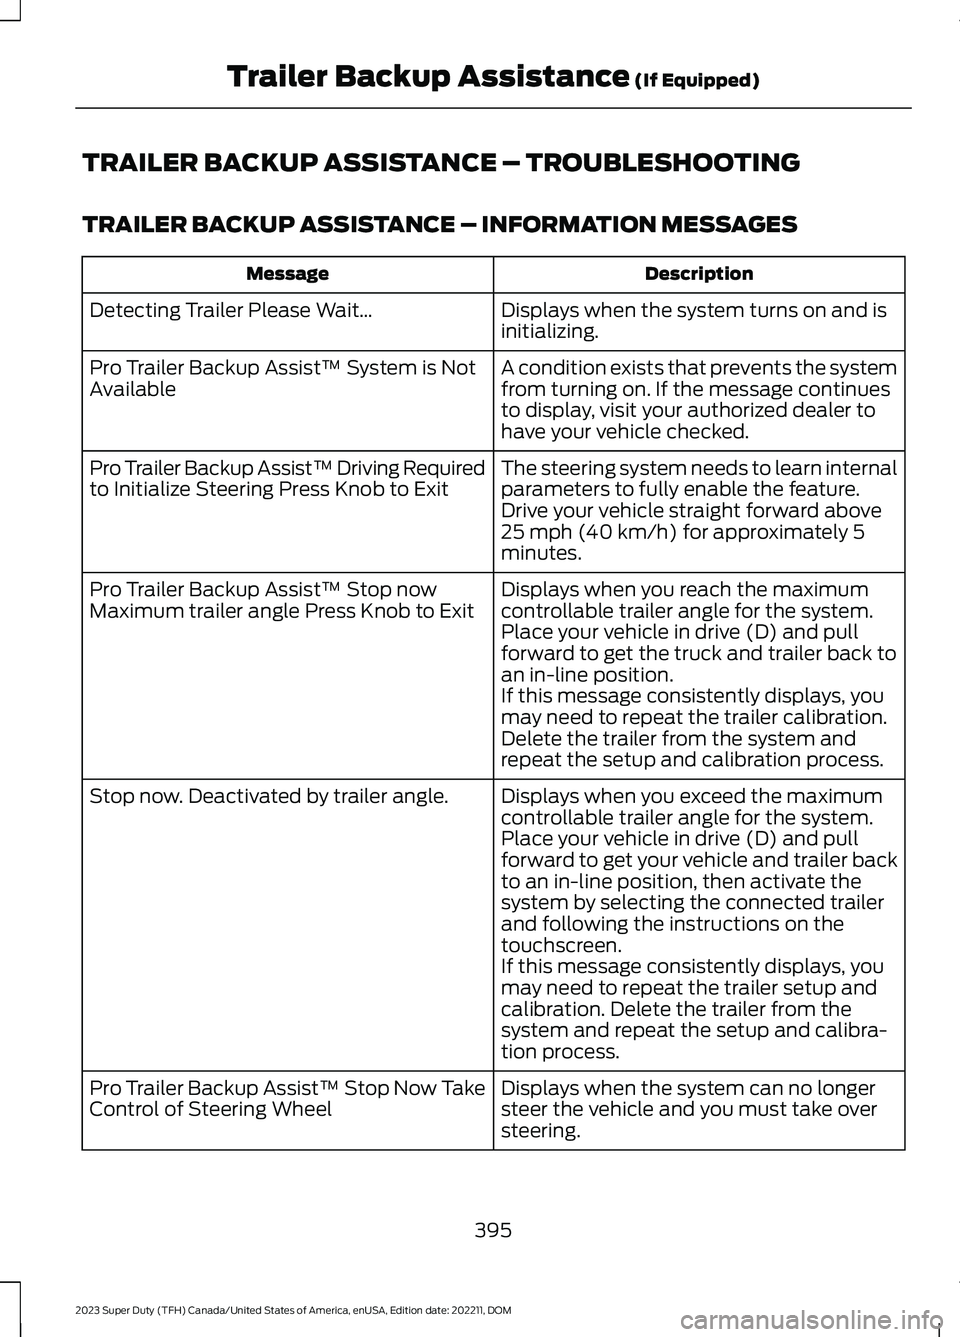
TRAILER BACKUP ASSISTANCE – TROUBLESHOOTING
TRAILER BACKUP ASSISTANCE – INFORMATION MESSAGES
DescriptionMessage
Displays when the system turns on and isinitializing.Detecting Trailer Please Wait…
A condition exists that prevents the systemfrom turning on. If the message continuesto display, visit your authorized dealer tohave your vehicle checked.
Pro Trailer Backup Assist™ System is NotAvailable
The steering system needs to learn internalparameters to fully enable the feature.Drive your vehicle straight forward above25 mph (40 km/h) for approximately 5minutes.
Pro Trailer Backup Assist™ Driving Requiredto Initialize Steering Press Knob to Exit
Displays when you reach the maximumcontrollable trailer angle for the system.Place your vehicle in drive (D) and pullforward to get the truck and trailer back toan in-line position.
Pro Trailer Backup Assist™ Stop nowMaximum trailer angle Press Knob to Exit
If this message consistently displays, youmay need to repeat the trailer calibration.Delete the trailer from the system andrepeat the setup and calibration process.
Displays when you exceed the maximumcontrollable trailer angle for the system.Place your vehicle in drive (D) and pullforward to get your vehicle and trailer backto an in-line position, then activate thesystem by selecting the connected trailerand following the instructions on thetouchscreen.
Stop now. Deactivated by trailer angle.
If this message consistently displays, youmay need to repeat the trailer setup andcalibration. Delete the trailer from thesystem and repeat the setup and calibra-tion process.
Displays when the system can no longersteer the vehicle and you must take oversteering.
Pro Trailer Backup Assist™ Stop Now TakeControl of Steering Wheel
395
2023 Super Duty (TFH) Canada/United States of America, enUSA, Edition date: 202211, DOMTrailer Backup Assistance (If Equipped)
Page 400 of 738
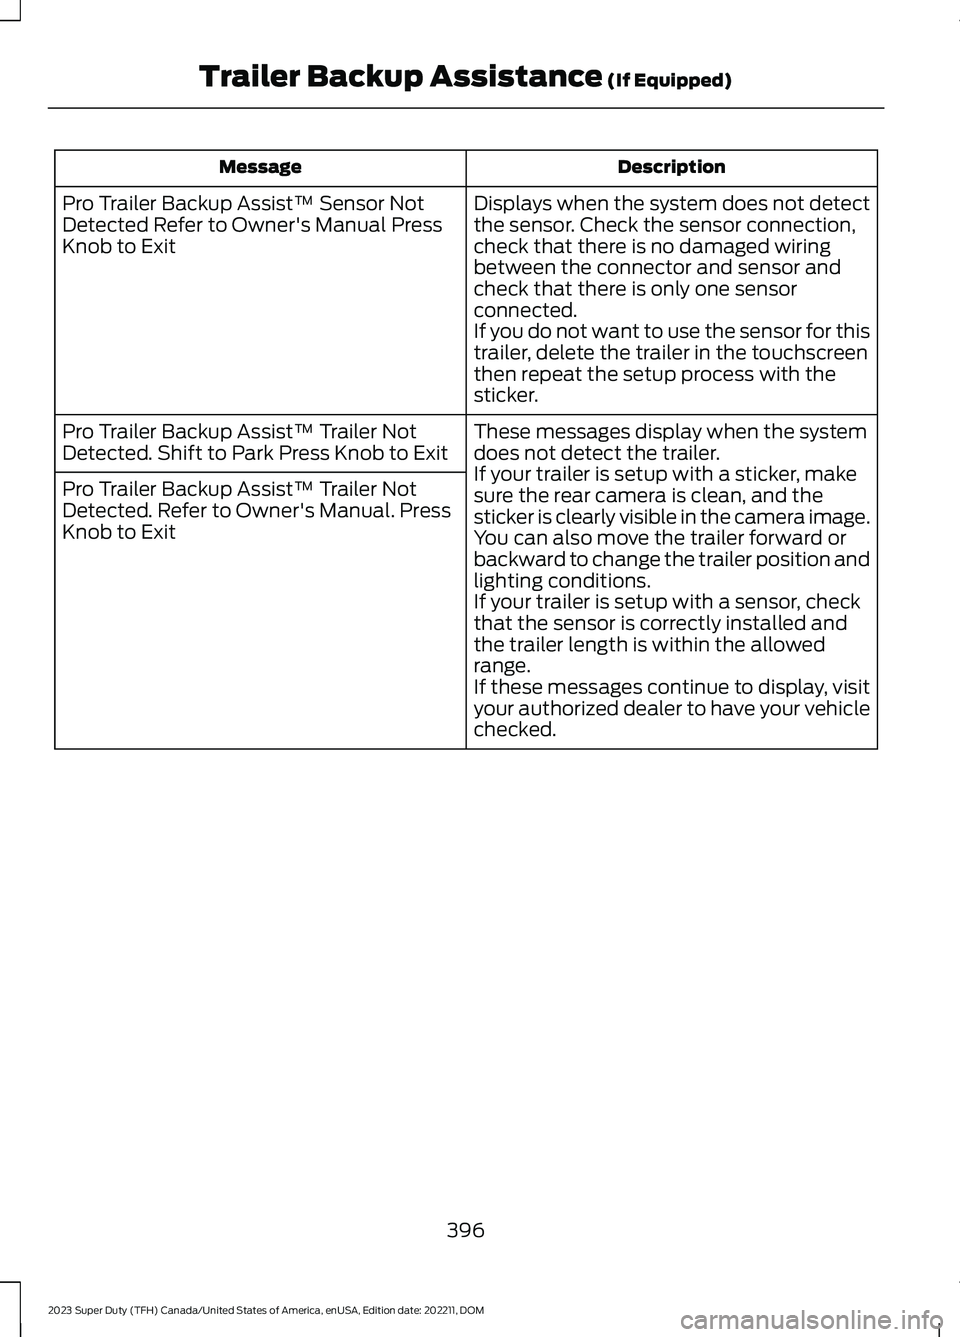
DescriptionMessage
Displays when the system does not detectthe sensor. Check the sensor connection,check that there is no damaged wiringbetween the connector and sensor andcheck that there is only one sensorconnected.If you do not want to use the sensor for thistrailer, delete the trailer in the touchscreenthen repeat the setup process with thesticker.
Pro Trailer Backup Assist™ Sensor NotDetected Refer to Owner's Manual PressKnob to Exit
These messages display when the systemdoes not detect the trailer.If your trailer is setup with a sticker, makesure the rear camera is clean, and thesticker is clearly visible in the camera image.You can also move the trailer forward orbackward to change the trailer position andlighting conditions.If your trailer is setup with a sensor, checkthat the sensor is correctly installed andthe trailer length is within the allowedrange.If these messages continue to display, visityour authorized dealer to have your vehiclechecked.
Pro Trailer Backup Assist™ Trailer NotDetected. Shift to Park Press Knob to Exit
Pro Trailer Backup Assist™ Trailer NotDetected. Refer to Owner's Manual. PressKnob to Exit
396
2023 Super Duty (TFH) Canada/United States of America, enUSA, Edition date: 202211, DOMTrailer Backup Assistance (If Equipped)