fuel GEELY CK 2008 User Guide
[x] Cancel search | Manufacturer: GEELY, Model Year: 2008, Model line: CK, Model: GEELY CK 2008Pages: 392, PDF Size: 38.86 MB
Page 50 of 392
43Section 3 Fuel Injector Replacement1. Check fuel for ejection.
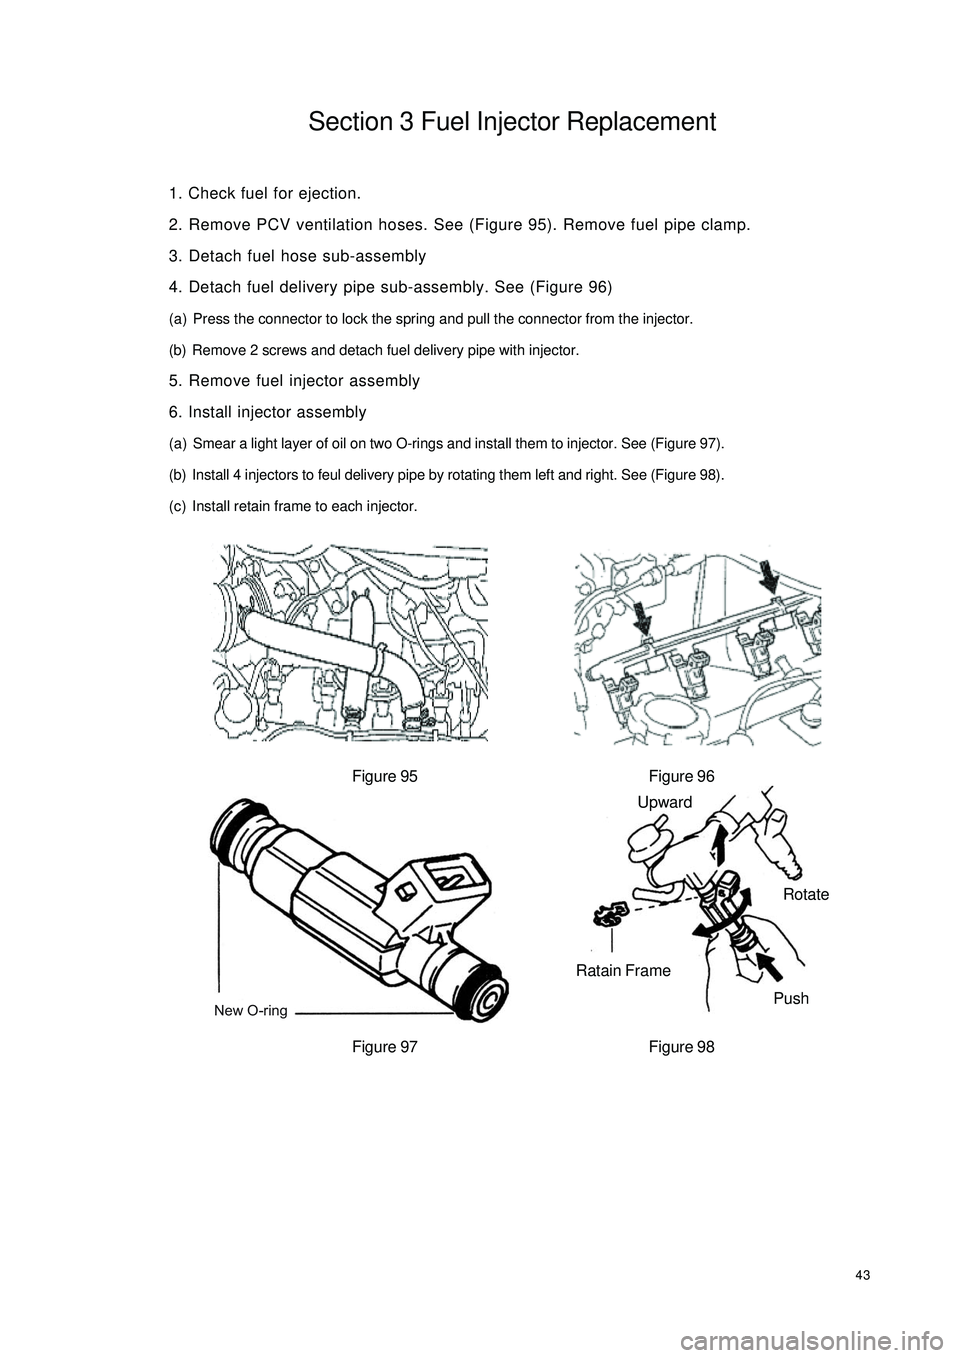
2. Remove PCV ventilation hoses. See (Figure 95). Remove fuel pipe clamp.
3. Detach fuel hose sub-assembly
4. Detach fuel delivery pipe sub-assembly. See (Figure 96)
(a) Press the connector to lock the spring and pull the connector from the injector.
(b) Remove 2 screws and detach fuel delivery pipe with injector.
5. Remove fuel injector assembly
6. Install injector assembly
(a) Smear a light layer of oil on two O-rings and install them to injector. See (Figure 97).
(b) Install 4 injectors to feul delivery pipe by rotating them left and right. See (Figure 98).
(c) Install retain frame to each injector.
Figure 95 Figure 96
Figure 97 Figure 98New O-ringUpward
Ratain Frame
PushRotate
Page 51 of 392
447. Install fuel delivery pipe sub-assembly
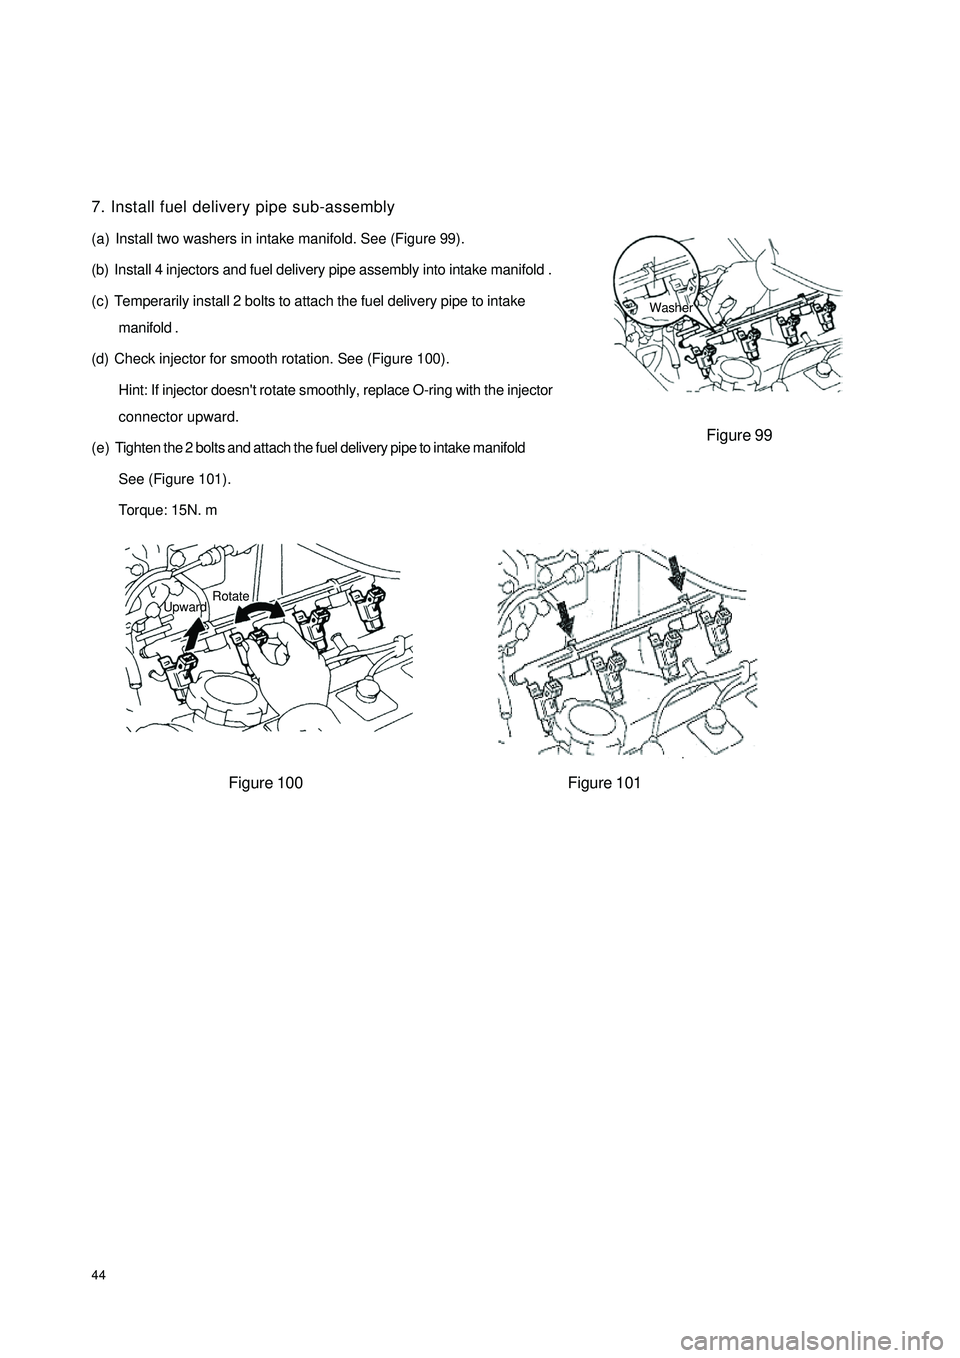
(a) Install two washers in intake manifold. See (Figure 99).
(b) Install 4 injectors and fuel delivery pipe assembly into intake manifold .
(c) Temperarily install 2 bolts to attach the fuel delivery pipe to intake
manifold .
(d) Check injector for smooth rotation. See (Figure 100).
Hint: If injector doesn't rotate smoothly, replace O-ring with the injector
connector upward.
(e) Tighten the 2 bolts and attach the fuel delivery pipe to intake manifold
See (Figure 101).
Torque: 15N. m
Figure 100 Figure 101Figure 99 Washer
Rotate
Upward
Page 52 of 392
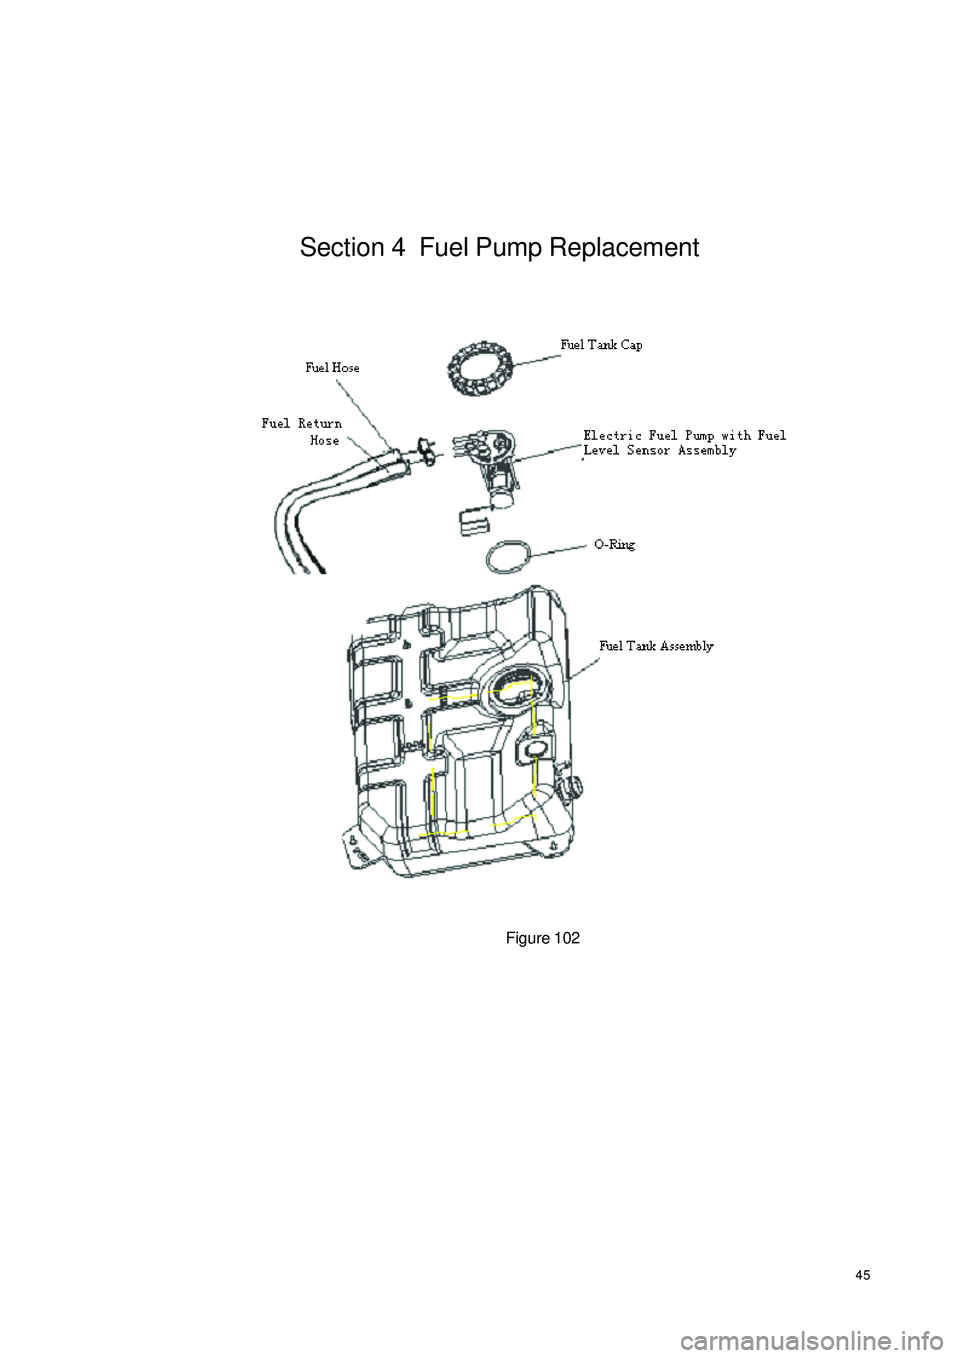
45Section 4 Fuel Pump ReplacementFigure 102
Page 53 of 392
461. Avoid fuel ejection
2. Disconnect fuel tank hose
3. Disconnect fuel tank return hose
4. Disconnect fuel tank gas exhaust hose
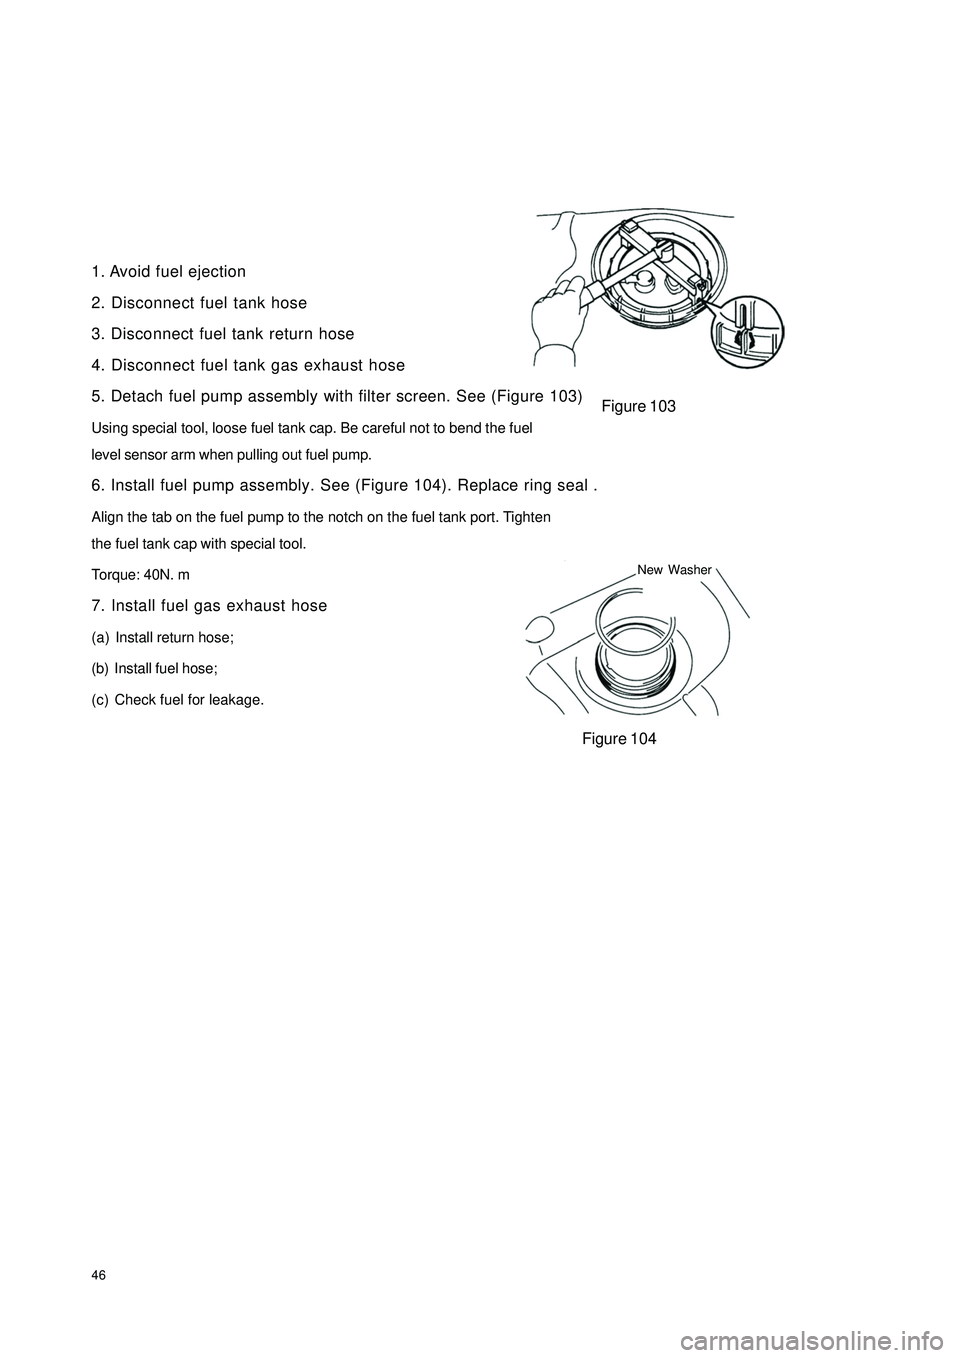
5. Detach fuel pump assembly with filter screen. See (Figure 103)
Using special tool, loose fuel tank cap. Be careful not to bend the fuel
level sensor arm when pulling out fuel pump.
6. Install fuel pump assembly. See (Figure 104). Replace ring seal .
Align the tab on the fuel pump to the notch on the fuel tank port. Tighten
the fuel tank cap with special tool.
Torque: 40N. m
7. Install fuel gas exhaust hose
(a) Install return hose;
(b) Install fuel hose;
(c) Check fuel for leakage.Figure 103
Figure 104New Washer
Page 54 of 392
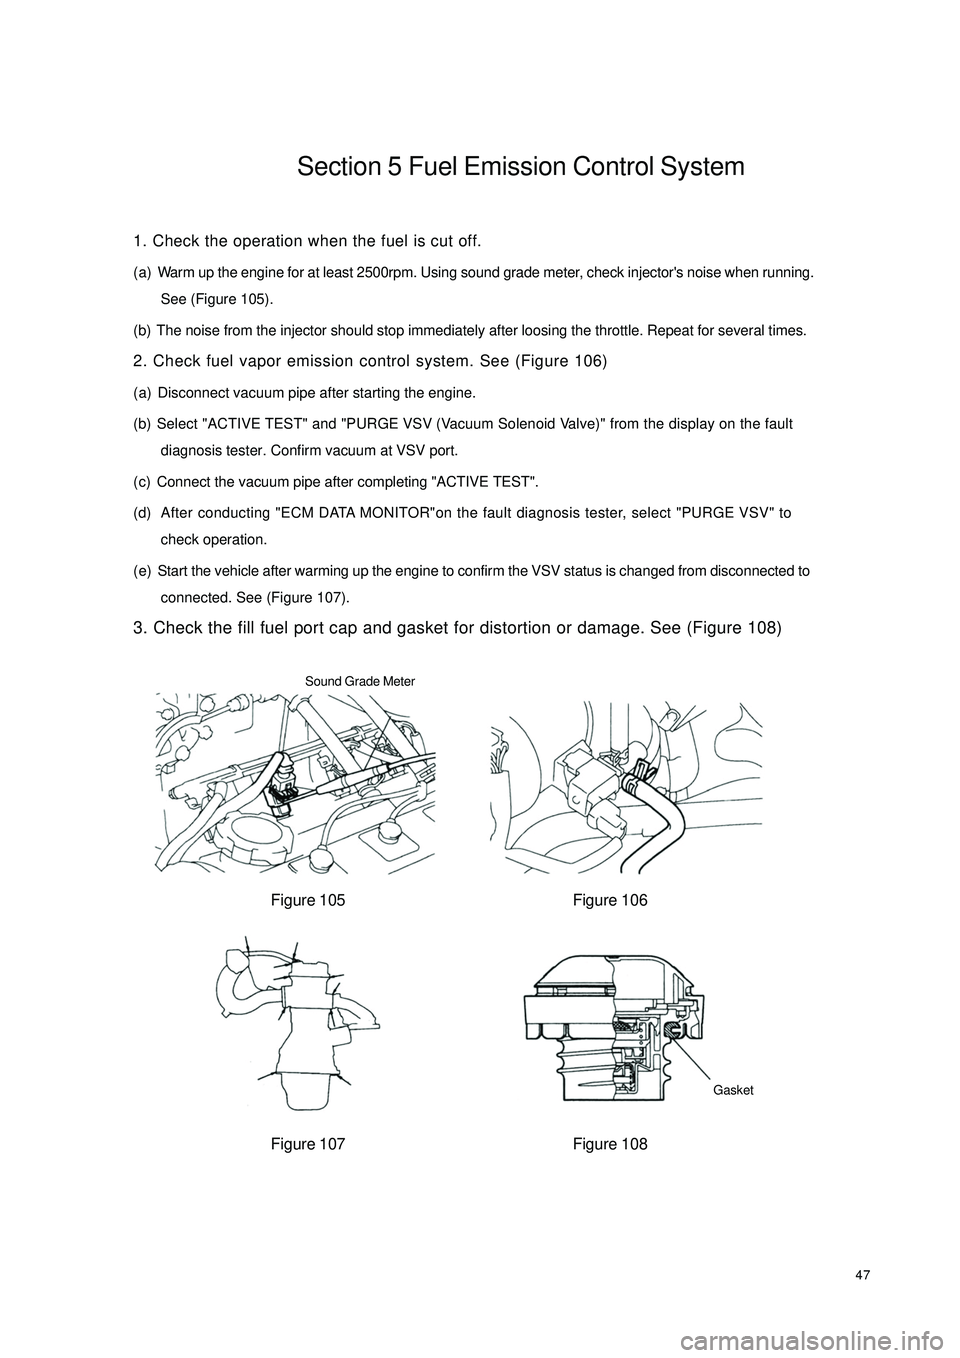
47Section 5 Fuel Emission Control System1. Check the operation when the fuel is cut off.
(a) Warm up the engine for at least 2500rpm. Using sound grade meter, check injector's noise when running.
See (Figure 105).
(b) The noise from the injector should stop immediately after loosing the throttle. Repeat for several times.
2. Check fuel vapor emission control system. See (Figure 106)
(a) Disconnect vacuum pipe after starting the engine.
(b) Select "ACTIVE TEST" and "PURGE VSV (Vacuum Solenoid Valve)" from the display on the fault
diagnosis tester. Confirm vacuum at VSV port.
(c) Connect the vacuum pipe after completing "ACTIVE TEST".
(d) After conducting "ECM DATA MONITOR"on the fault diagnosis tester, select "PURGE VSV" to
check operation.
(e) Start the vehicle after warming up the engine to confirm the VSV status is changed from disconnected to
connected. See (Figure 107).
3. Check the fill fuel port cap and gasket for distortion or damage. See (Figure 108)
Figure 105 Figure 106
Figure 107 Figure 108Sound Grade Meter
Gasket
Page 55 of 392
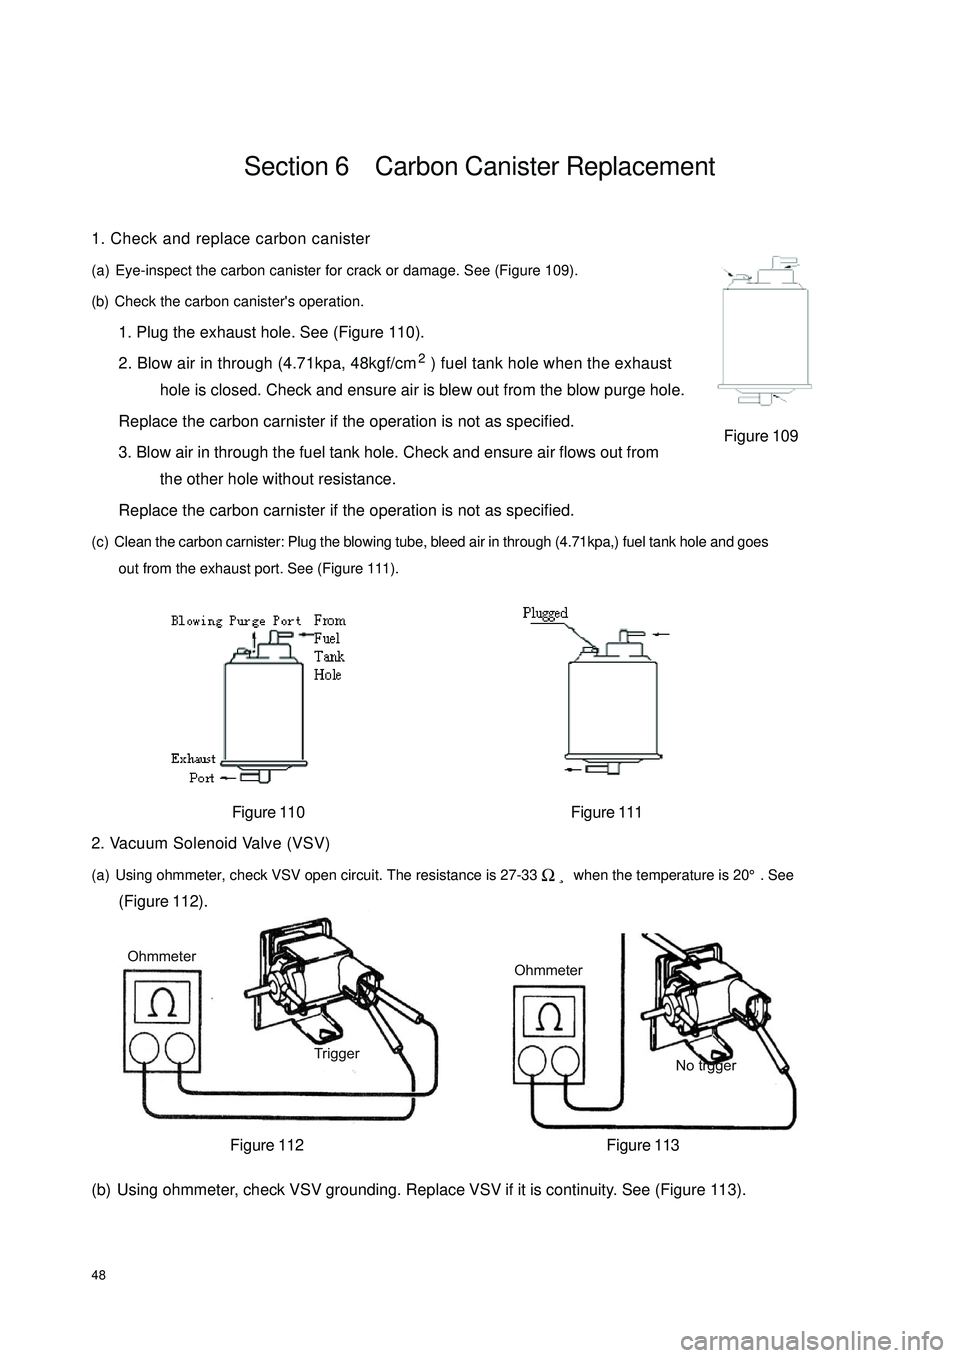
Ohmmeter
No trggerOhmmeter
Trigger48Section 6 Carbon Canister Replacement1. Check and replace carbon canister
(a) Eye-inspect the carbon canister for crack or damage. See (Figure 109).
(b) Check the carbon canister's operation.
1. Plug the exhaust hole. See (Figure 110).
2. Blow air in through (4.71kpa, 48kgf/cm2) fuel tank hole when the exhaust
hole is closed. Check and ensure air is blew out from the blow purge hole.
Replace the carbon carnister if the operation is not as specified.
3. Blow air in through the fuel tank hole. Check and ensure air flows out from
the other hole without resistance.
Replace the carbon carnister if the operation is not as specified.
(c) Clean the carbon carnister: Plug the blowing tube, bleed air in through (4.71kpa,) fuel tank hole and goes
out from the exhaust port. See (Figure 111).
Figure 110 Figure 111
2. Vacuum Solenoid Valve (VSV)
(a) Using ohmmeter, check VSV open circuit. The resistance is 27-33¸ when the temperature is 20°. See
(Figure 112).
(b) Using ohmmeter, check VSV grounding. Replace VSV if it is continuity. See (Figure 113).Figure 112 Figure 113Figure 109Ω
Page 71 of 392
64Chapter 9 General Engine Troubles and Their
TroubleshootingSection 1 Overview The wide application of the electronic technologies to the vehicles brings innovation on diagnosis of the
vehicle, many varieties of diagnosis instruments that are very effective and efficient for the vehicle diagnosis
are innovated. Once the fault occurs, the best choice is to go to service station for help. However, even the
most advanced instrument has its limit. For some faults, manual diagnosis is far more convenient and easier
than that of instrument. In case of the crack, distortion and leakage of the components, the manual diagnosis
is even superior to the instrument diagnosis. The faults occurred shall be carefully analyzed and troubleshot
in accordance with the repair manual for normal usage.Section 2 General Engine Fault and TroubleshootingI. Fuel pipeline and circuit fault causing the engine starting failureengine starting failure normally include: starter does not run or starter runs but fails to crank the engine, or
cranks the engine but cranks slowly; starter can crank but fail to start the engine. There are many causes that
result in starting failure, such as failures in starting system, ignition system, fuel injection system and engine
mechanical failure.
1. starter does not run or fails to crank the engine or cranks slowly
(1) Symptom: starter does not run or spongy rotation
(2) Causes:
b. Low battery voltage, excessive battery discharge, damaged generator or failure in charging circuit;
c. Battery terminal rust and backed out;
d. Failure in starting circuit, ECU can not receive STA signal;
e. Damaged starter.
2. engine can not start and crank
(1) Symptom
With the start switch on, starter can crank but fail to start the engine.
(2) Causes
a. Empty fuel tank;
b. Electrical fuel pump inoperative;
c. Injector inoperative;
d. Low fuel pressure;
e. Unreasonable starting operation;
f. Damaged throttle position sensor or no signal is sent to ECU due to the open in throttle position
sensor circuit;
Page 72 of 392
65g. Ignition system failure;
h. Low engine compression pressure.
(3) Diagnosis and Troubleshooting
a. First, check the fuel tank for fuel level, turn on the ignition switch, if fuel gauge pointer does not
move or fuel level warning lamp lights, then the fuel tank is empty, fuel shall be filled at this time.
b. Check that the electrical fuel pump for operation. Remove the fuel tank, you may use a wire to
connect the two jacks of the fuel pump for short, then turn on the ignition switch. The fuel pump
operation sound shall be able to be heard from the fuel tank nozzle or fuel flow can be felt with hand
pinching the tube; or remove the return hose on the fuel pressure regulator, check that the fuel
flows out; Direct judgment can be made if it is equipped with fuel pressure gage.
If electrical fuel pump is inoperative, check whether the main fuse, main relay, fuel pump relay,
fuel pump control circuit and ECU are OK. If all of them are OK, check fuel pump circuit for open,
short or damaged check valve. Repair or replacement shall be made when problems are found.
c. If there is no injection sound in injector, check injector control circuit for fault. You may use a
testing lamp with big resistance to be connected to the injector wiring connector, turn on the ignition
switch. If the testing lamp lights up, it indicates that the injector has been damaged and shall be
replaced; if the testing lamp does not light up, check whether the main fuse, EFI relay, fuse, ignition
switch and ECU terminal are OK, repair or replace them if they are not OK.
d. If there is low fuel pressure, the injection amount would be small and the engine won't start, you
should check the fuel filter for block and fuel pump safety valve for damage and check whether the
fuel pressure regulator is within the normal range, otherwise those components shall be repaired or
replaced.
e. Electric injection engine normally spot contact start the engine.
f. Check for open in the throttle position sensor (TPS) circuit.
g. Check whether there is Diagnostic Trouble Code (DTC), if there is, check it by the DTC; if there
is not, check the high voltage spark for intensity, if it is too weak, check spark plug, high voltage
wire, high voltage coil, distributor cover for faults, if there are faults, repair or replace them.
h. Check the compression pressure in the cylinder, insert the compression pressure gauge into the
spark plug hole, completely open the throttle, measure the compression pressure while starting the
engine. If the compression pressure is less than 980kPa when engine speed is more than 250r/min,
remove and inspect the engine and troubleshoot it.
3. The engine cranks but can not start
(1) Symptom
When starting the engine, starter can crank the engine but fail to start the engine.
(2) Causes:
a. Ignition advance angle is unfavorable;
b. Ignition is out of sequence, there is misfire;
c. High voltage spark is too weak;
d. The fuel pressure is too low;
e. fuel pressure regulator leakage;
Page 73 of 392
66f. The idle control valve is faulty;
g. The water temperature sensor is damaged;
h. The vacuum pressure sensor is damaged;
i. The air filter is blocked;
j. The injector leaks;
k. The compression pressure in the cylinder is too low;
l. The intake temperature sensor is damaged.
(3) Diagnosis and Troubleshooting
a. Check high pressure spark, check whether the high pressure spark on the ignition coil high pressure
bus and extension are OK, if the bus spark is week, replace the ignition coil, if the bus spark is OK
while the extension spark is too week, replace the ignition coil also; In addition, excessive spark
plug clearance will influence the starting feature, the clearance of the spark plug shall be adjusted
to normal value (0.8±0.1mm);
b. If there is low fuel pressure, check whether the battery voltage is OK, otherwise it shall be
troubleshot or replaced; check fuel pump check valve for leakage, check fuel filter and fuel pipe for
block, if there are leakage or block, replace or troubleshoot them;
c. If there is leakage for fuel pressure regulator, intake manifold is likely to be mixed with gasoline and
it is hard to start, troubleshoot or replace them;
d. Idle control valve can not be opened to maximum position due to mechanical wear, aging or control
circuit failure, the idle control valve shall be replaced and the control circuit failure shall be troubleshot;
e. If the water temperature sensor data is not accurate, it may cause small injection, check the water
temperature sensor based on the standard data and calibrate the data;
f. There is big time lag for intake pressure temperature sensor that makes it somewhat insensitive at
low speed and result in inaccurate injection, adjustment or replacement shall be made;
g. If the air cleaner filter is too dirty, the air flow resistance is excessively big, resulting in hard start,
as a result of it, the filter shall be replaced.
In a word, there are many factors causing the starting failure of the engine, analysis shall be made based on
the severe conditions of the faults. Generally speaking, check the ignition system first, then check intake
system, fuel system, control system, at last check the cylinder pressure, check the DTC before checking the
trouble. The diagnosis and troubleshooting procedures for starting failure of the engine are shown in (Figure
148).
Page 74 of 392
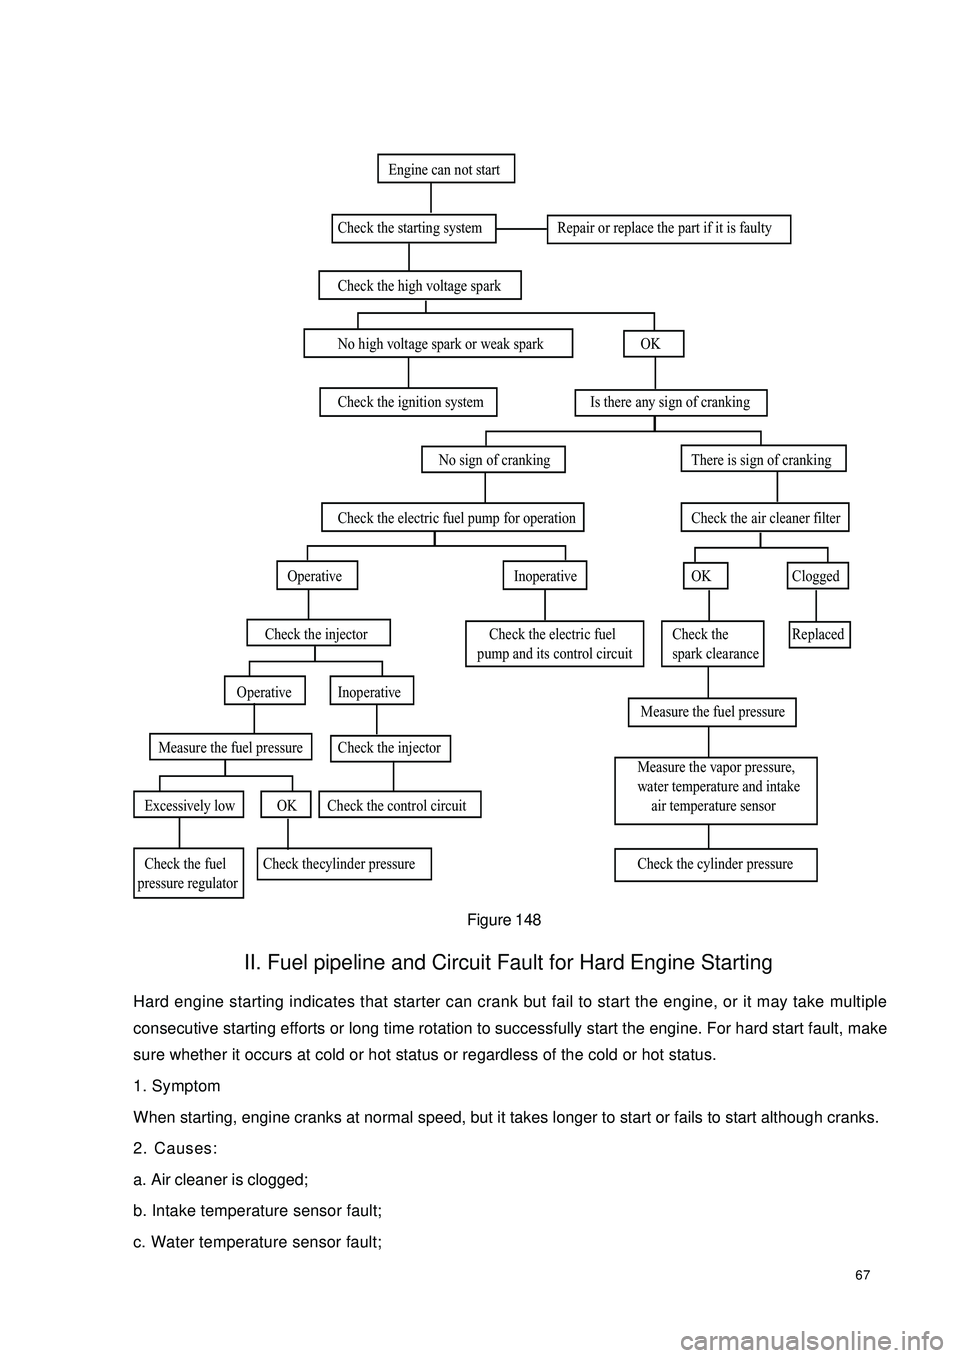
67Figure 148II. Fuel pipeline and Circuit Fault for Hard Engine StartingHard engine starting indicates that starter can crank but fail to start the engine, or it may take multiple
consecutive starting efforts or long time rotation to successfully start the engine. For hard start fault, make
sure whether it occurs at cold or hot status or regardless of the cold or hot status.
1. Symptom
When starting, engine cranks at normal speed, but it takes longer to start or fails to start although cranks.
2. Causes:
a. Air cleaner is clogged;
b. Intake temperature sensor fault;
c. Water temperature sensor fault; Engine can not start
Check the starting system Repair or replace the part if it is faulty
Check the high voltage spark
No high voltage spark or weak spark OK
Check the ignition system Is there any sign of cranking
No sign of cranking There is sign of cranking
Check the electric fuel pump for operation Check the air cleaner filter
Operative Inoperative OK Clogged
Check the injector Check the electric fuel Check the Replaced
pump and its control circuit spark clearance
Operative Inoperative
Measure the fuel pressure
Measure the fuel pressure Check the injector
Measure the vapor pressure,
water temperature and intake
Excessively low OK Check the control circuit air temperature sensor
Check the fuel Check thecylinder pressure Check the cylinder pressure
pressure regulator