GEELY MK 2008 Workshop Manual
Manufacturer: GEELY, Model Year: 2008, Model line: MK, Model: GEELY MK 2008Pages: 416, PDF Size: 25.19 MB
Page 171 of 416

Brake System -Front Brake Disc4-94Component ViewSection 6 Front Brake Disc34Front disc brake pistonSet ring Dust shield Piston oil seal Left front disc
brake cylinder accessory3483088Connector bolt
Washer
Discharge screw
plug capTubeDust shield Front disc brake
cylinder sliding pin
#2 muffle pad
#1 muffle pad
Brake pad
Brake pad#1 muffle pad
#2 muffle pad
Support piece
Front brake pad ISupport piece
Front brake pad IIFront disc brake cylinder
sliding pin88Dust shield
Left cylinder support
Non-reusable parts
Lithium soap base glycol lube
Disc brake lubespecified torqueN.
m :
Page 172 of 416

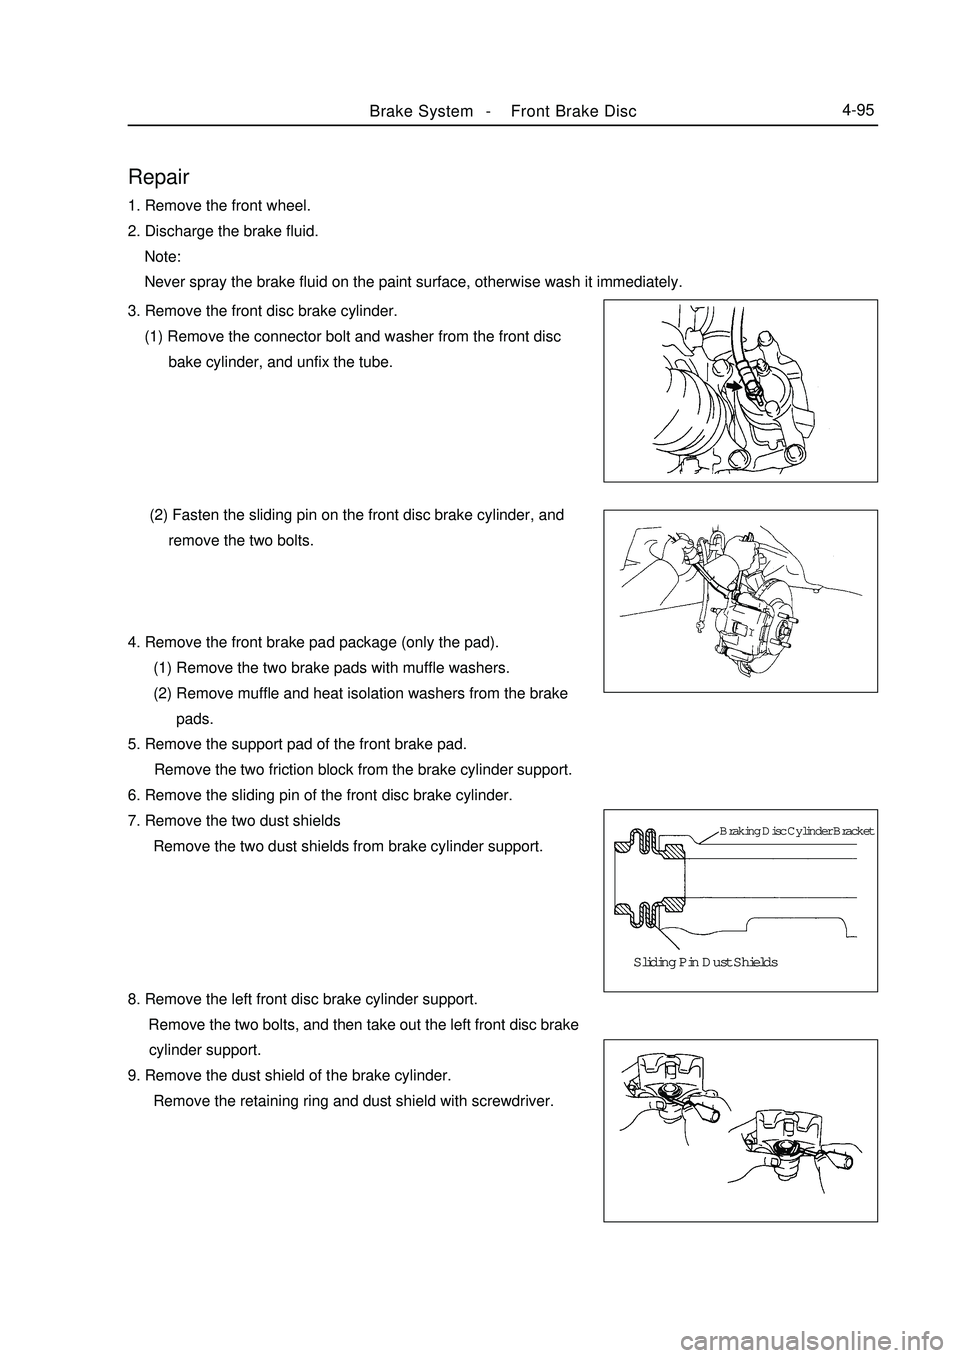
Repair1. Remove the front wheel.
2. Discharge the brake fluid.
Note:
Never spray the brake fluid on the paint surface, otherwise wash it immediately.Brake System -Front Brake Disc4-95Sliding Pin Dust Shields3. Remove the front disc brake cylinder.
(1) Remove the connector bolt and washer from the front disc
bake cylinder, and unfix the tube.
(2) Fasten the sliding pin on the front disc brake cylinder, and
remove the two bolts.
4. Remove the front brake pad package (only the pad).
(1) Remove the two brake pads with muffle washers.
(2) Remove muffle and heat isolation washers from the brake
pads.
5. Remove the support pad of the front brake pad.
Remove the two friction block from the brake cylinder support.
6. Remove the sliding pin of the front disc brake cylinder.
7. Remove the two dust shields
Remove the two dust shields from brake cylinder support.
8. Remove the left front disc brake cylinder support.
Remove the two bolts, and then take out the left front disc brake
cylinder support.
9. Remove the dust shield of the brake cylinder.
Remove the retaining ring and dust shield with screwdriver.Braking Disc Cylinder Bracket
Page 173 of 416

Brake System -Front Brake Disc4-9611. Remove the front brake piston.
(1) Put a piece of cloth or equivalent between the brake cylinder
and the piston.
(2) Blow the piston out of the brake cylinder with compressed air.
Warning:
In the blowing process, the finger shall not be placed before the
piston.
Note:
Don't spray the brake fluid.
12. Remove the piston oil seal.
Take out the oil seal from the brake cylinder with screwdriver.
13. Check the brake cylinder and piston.
Check the cylinder wall and piston whether there is rust or scar.
14. Check the lining thickness of the brake pad.
Measure the lining thickness with ruler.
Standard Thickness: 10.0mm
Minimum Thickness:1.0mm
15. Check the abrasion indicator steel strap of the front brake.
Make sure the abrasion indicator steel strap has adequate flexibility and has no deformation, crack or damage.
All rust, dirt and other impurities shall be cleaned out.
16. Check the thickness of the brake disc.
Measure the thickness of the brake disc with screw micrometer.
Standard Thickness: 20.0mm
Minimum Thickness: 18.0mm
17. Remove the front brake disc.
(1) Make mark on the brake disc and wheel hub.
(2) Remove the brake disc.
18. Install the brake disc.
Tips:
Install the disc at the minimum swing position.
Page 174 of 416

Brake System -Front Brake Disc4-9719. Check the swing of the brake disc.
(1) Fasten the brake disc temporarily.
Torque: 103N.m
(2) Measure the swing of the brake disc at the 10mm from the disc
edge with a dial test indicator.
Maximum Swing: 0.05 mm
(3) If the swing of the brake disc reaches or exceeds the limit,
check the bearing's axial clearance and the wheel hub's swing.
If the bearing and wheel hub run normally, adjust the swing
of the brake disc, or finish it with onboard finishing machine.
20. Tighten the brake discharge bolt temporarily.
Tighten the brake discharge screw plug on the front brake cylinder temporarily.
21. Install the piston oil seal.
(1) Apply the lithium soap-base glycol lube on the new piston oil seal.
(2) Install the new piston oil seal on the brake cylinder.
22. Install the brake piston.
(1) Apply the lithium soap-base glycol lube on the brake piston.
(2) Install the piston on the front disc brake cylinder.
Note:
Don't tighten the piston into the brake cylinder forcefully.
23. Install the dust shield of the brake wheel cylinder.
(1) Apply the lithium soap-base glycol lube on the dust shield of
the new brake wheel cylinder, and install it on the brake
cylinder.
Tips:
Install the dust shield in the groove of the brake wheel cylinder
and piston reliably.
(2) Install the set ring with screwdriver.
Note:
Be careful not to damage to the dust shield of the brake wheel cylinder.
24. Install the left front disc brake wheel cylinder support.
Fasten the front disc brake wheel cylinder support with two blots.
Torque: 88N.m
25. Install the dust shield of the front disc brake bushing.
Apply the lithium soap-base glycol lube on the surface of the two new dust shields.
Install the two dust shields on the front disc brake cylinder support.
26. Install the sliding pin of the front dist brake cylinder.
Apply the lithium soap-base glycol lube on the surface of the two sliding pin and oil seal.
Install the two sliding pins on the front disc brake cylinder support.
Page 175 of 416

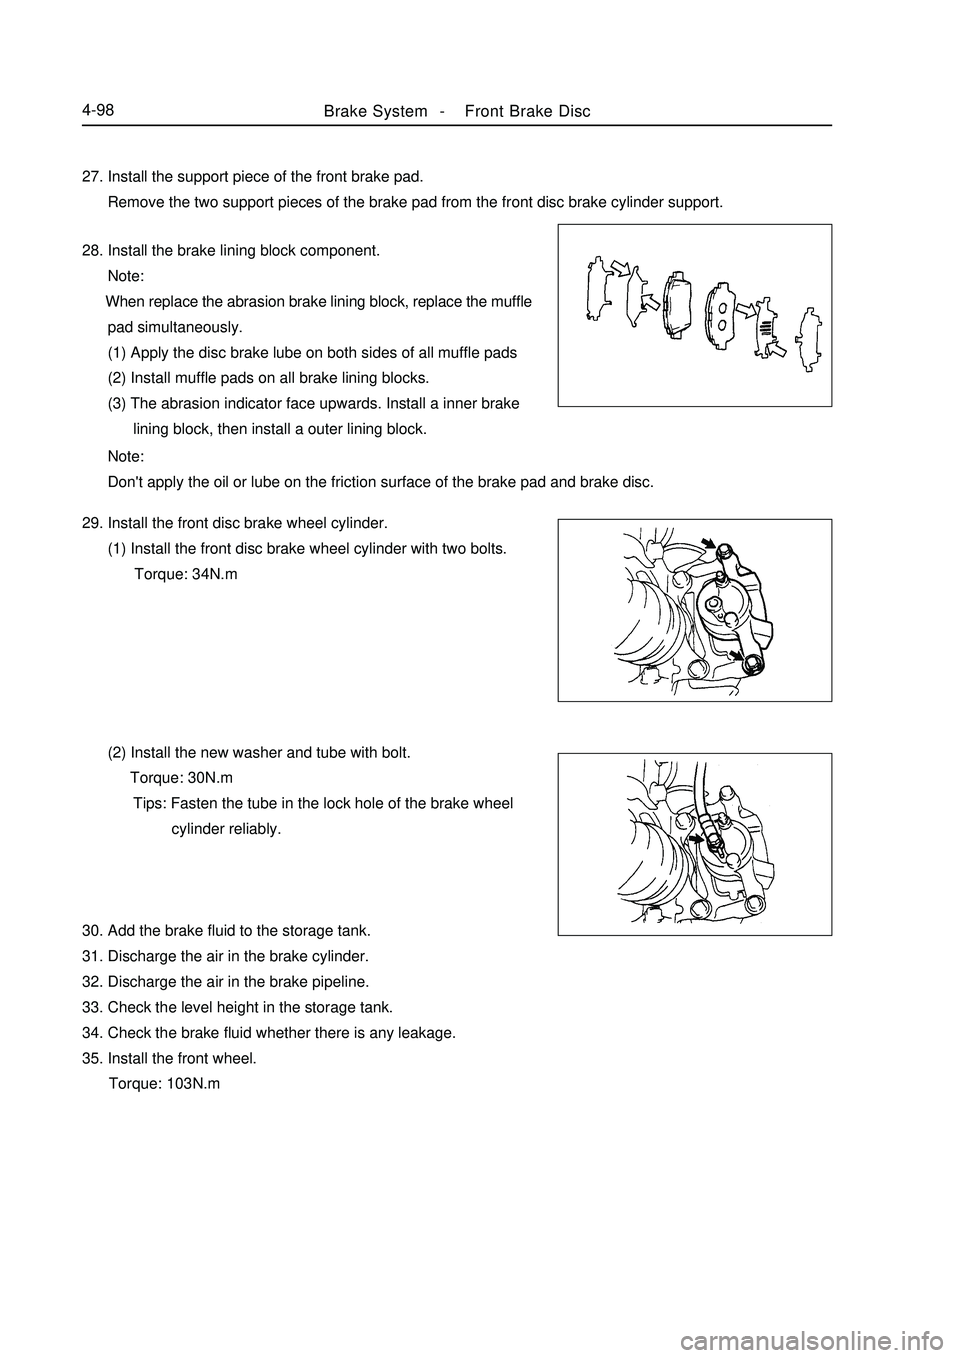
Brake System -Front Brake Disc4-9827. Install the support piece of the front brake pad.
Remove the two support pieces of the brake pad from the front disc brake cylinder support.
28. Install the brake lining block component.
Note:
When replace the abrasion brake lining block, replace the muffle
pad simultaneously.
(1) Apply the disc brake lube on both sides of all muffle pads
(2) Install muffle pads on all brake lining blocks.
(3) The abrasion indicator face upwards. Install a inner brake
lining block, then install a outer lining block.
Note:
Don't apply the oil or lube on the friction surface of the brake pad and brake disc.
29. Install the front disc brake wheel cylinder.
(1) Install the front disc brake wheel cylinder with two bolts.
Torque: 34N.m
(2) Install the new washer and tube with bolt.
Torque: 30N.m
Tips: Fasten the tube in the lock hole of the brake wheel
cylinder reliably.
30. Add the brake fluid to the storage tank.
31. Discharge the air in the brake cylinder.
32. Discharge the air in the brake pipeline.
33. Check the level height in the storage tank.
34. Check the brake fluid whether there is any leakage.
35. Install the front wheel.
Torque: 103N.m
Page 176 of 416

Section 7 Rear Brake DrumComponent ViewDust shield
Piston
Cup
Spring
Rear bake shoe
Locating spring
Rear brake drum Shoe pad positioning spring cover Front brake shoe
Shoe pad positioning spring cover Pin
BaseboardDust
coverPiston
PinCupLeft parking brake shoe pad postCvlinder
Extension springBrake System -Rear Brake Drum4-99Discharge plug
Discharge plug
Hole plug
Pin plug
C-ringExtension rod
Shoe pad positioning spring Adjustment rod springRear brake automatic
adjustment rodParking brake
inhaul cable
Return spring
Non-reusable parts
Lithium soap base glycol lube
Heat-resistant lubespecified torqueN.
m :
Page 177 of 416

Repair Repair the right side as the steps in the left side.
1. Check the thickness of the brake shoe lining.
Remove the hole plug, and check the thickness of the brake shoe
lining through the hole.
If the thickness is less than the minimum thickness, replace a new
brake shoe.
Minimum Thickness: 1.0mm
2. Remove the rear wheel.
3. Discharge the brake fluid.
Note:
Never spray the brake fluid on the paint surface, otherwise wash
it immediately.
4. Remove the rear brake drum.
(1) Loosen the parking brake rod, and remove the brake drum.
Tips: If the brake drum can't be removed easily, carry out the
following steps.
(2) Remove the hole plug, and insert a screwdriver through the
backboard to separate the brake automatic adjustment rod
and the adjustor.
(3) Rotate the adjustment wheel to reduce the length of the
adjustor with another screwdriver.
5. Check the inner diameter of the brake drum.
Measure the inner diameter of the brake drum with a brake drum
gauge or equivalent.
Standard Inner Diameter: 200.0mm
Maximum Inner Diameter: 201.0mm
6. Separate the left positioning post of the parking brake shoe.
Remove the extension spring from the front/rear brake shoe with
a special tool, and separate the left positioning post of the parking
brake shoe.
Note:
Be careful not to damage to the dust shield of the brake cylinder.
7. Remove the front brake shoe.
(1) Remove the end cap, set spring and pin with a special tool.
(2) Unfix the return spring, and remove the front brake shoe.
(3) Remove the left positioning post of the parking brake shoe.Brake System -Rear Brake Drum4-100Rotate
Page 178 of 416

Brake System -Rear Brake Drum4-1018. Remove the left brake automatic adjustment rod.
Remove the brake adjustment rod and its spring.
9. Remove the return spring of the brake shoe.
Remove the return spring from the brake shoe.
10. Remove the rear brake shoe.
(1) Prize the end cover with a special tool, and remove the set
spring and pin.
(2) Remove the parking brake cable from the parking brake
extension rod with a pair of pinchers.
11. Remove the parking brake shoe extension rod accessory.
Remove the C-washer and parking brake shoe extension rod with
screwdriver.
12. Check the thickness of the brake shoe lining.
Measure the thickness of the brake shoe lining with ruler.
Standard Thickness: 5.0mm
Minimum Thickness: 1.0mm
If the thickness reaches the minimum thickness or below, or
serious/uneven abrasion occurs, replace a new brake shoe.
Page 179 of 416

Brake System -Rear Brake Drum4-10213. Check the brake shoe and the brake shoe lining whether they
touch normally.
Mark the inner surface of the brake drum with chalk, joint and
abrade the brake shoe and the inner surface.
If the drum and the lining touch poorly, abrade the brake shoe or
replace a new one.
14. Remove the left front or top brake wheel cylinder.
(1) Unfix the brake oil pipe with a special tool, and collect the
brake fluid with a container.
(2) Remove the bolt and brake wheel cylinder.
15. Remove the brake cup.
(1) Remove the two dust shields from the brake cylinder.
(2) Remove the two pistons and springs.
(3) Remove the two brake cylinder caps from every piston.
16. Check the brake cylinder.
Check the cylinder wall and piston whether there is any rust or nick.
17. Remove the rear discharge screw plug of the brake drum.
18. Tighten the rear discharge screw plug of the brake drum
temporarily.
19. Install the brake wheel cylinder cup.
(1) Apply the lithium soap-base glycol lube on the two brake
wheel cylinder cups and the piston.
(2) Install two brake cylinder caps on every piston.
(3) Install the compression spring and the two pistons on the
brake wheel cylinder.
(4) Install two new dust shields on the brake wheel cylinder.
20. Install the left front or top brake cylinder.
(1) Install the brake cylinder with bolt.
Torque: 9.8N.m
(2) Connect the brake oil pipe with a special tool.
Torque: 15N.m
21. Apply the heat-resistant lube.
Apply the heat-resistant lube on the touch surface of the brake
backboard and the brake shoe.
Page 180 of 416

Brake System -Rear Brake Drum4-10322. Install the parking brake shoe extension rod accessory.
Install a new C-washer, and install the parking brake shoe
extension rod.
23. Install the brake shoe.
(1) Connect the parking brake cable to the parking brake
extension rod with a pair of pinchers.
(2) Install the brake shoe, pin, set spring and set spring cap with
a special tool.
24. Install the return spring of the brake shoe.
Install the return spring on the brake shoe.
25. Install the left brake automatic adjustment rod.
Install the automatic adjustment rod and its spring on the front
brake shoe.
26. Install the parking brake shoe post.
(1) Apply the heat-resistant lube on the adjustment bolt.