brake GEELY MK 2008 User Guide
[x] Cancel search | Manufacturer: GEELY, Model Year: 2008, Model line: MK, Model: GEELY MK 2008Pages: 416, PDF Size: 25.19 MB
Page 35 of 416

2-14
V. Table 1 List of parts to be replaced regularlyThe intervals in the part list are for cars driven under normal condition. If the car is driven in special circumstances,
the replacement can be advanced from the schedule above.SystemParts need to be replaced regularly
1
2
3
4
5
6
7
8
9
10
11
12
13
14
15
16
17
18
19
20
21
22Brake master cylinder cup valve and dust coverBrake master cylinder cup
Brake hose
Brake caliper valve
Brake booster rubber
Brake booster vacuum hose
Brake fluid
MT Transmission oil
AT Transmission oil
Steering fluid
Air Cleaner
Air c leaner f ilter
Lubricant
Oil filter
Fuel filter
Coolant
All hoses
Canister
Timing beltWedge belt (including the power steering pump,
air conditioner compressor and generator belts)PCV system
Spark plugEvery 2 years (or as required)
Every 2 years (or as required)
Every 2 years (or as required)
Every 4 years (or as required)
Every 2 years (or as required)
Every 4 years (or as required)
Every 2 years,or 40000km (or as required)
Every 2 years,or 40000km (or as required)
Every 2 years,or 40000km (or as required)
Every 2 years,or 40000km (or as required)
To be cleaned every 10,000km and changed
every 30,000km (or as required)
First 2500km or 2 months. Every 7500km or
6 months afterward (or as required)
First 2500km or 2 months. Every 7500km or
6 months afterward (or as required)
Every 5000km (or as required)
Every 40000km (or as required)
Every year (or as required)
Every 2 years (or as required)
Every 60000km (or as required)
Every 120000km (or as required)
Every 50000km (or as required)
Every 20000km or 12 months (or as required)
Every 20000km (or as required)Intervals
DrivelineSteering SystemBraking
SystemEngineA/C System
(API) SG or above(Table 1)Usage and Maintenance of MK Series - Maintenance Category and Content of MK Sedan
Page 36 of 416
2-15
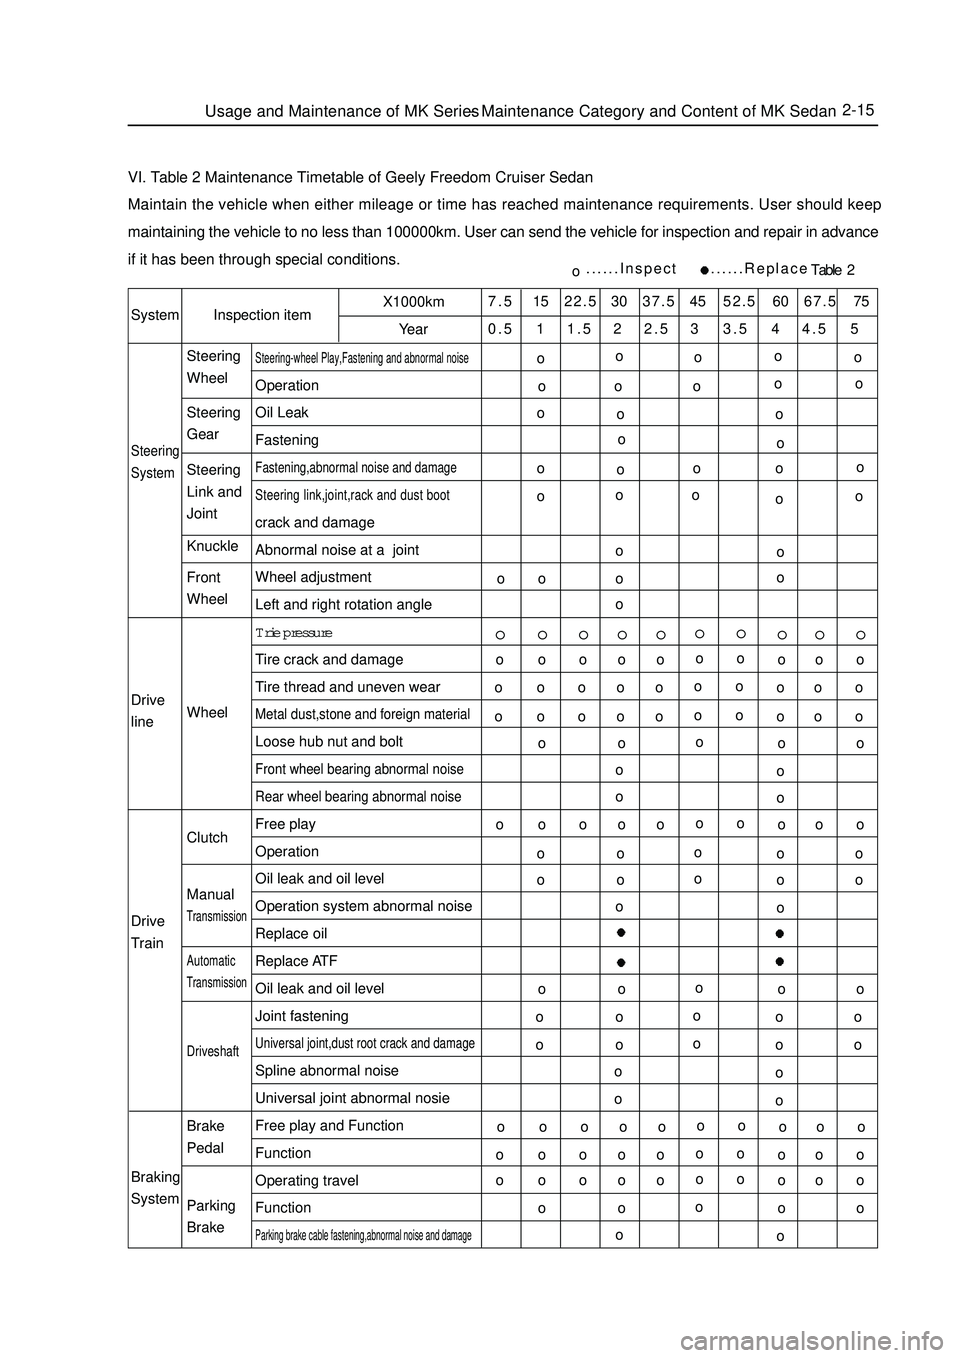
VI. Table 2 Maintenance Timetable of Geely Freedom Cruiser SedanMaintain the vehicle when either mileage or time has reached maintenance requirements. User should keep
maintaining the vehicle to no less than 100000km. User can send the vehicle for inspection and repair in advance
if it has been through special conditions.SystemInspection itemX1000km
Year7.5 15 22.5 30 37.5 45 52.5 60 67.5 75
0.5 1 1.5 2 2.5 3 3.5 4 4.5 5Steering
SystemSteering-wheel Play,Fastening and abnormal noiseOperation
Oil Leak
FasteningFastening,abnormal noise and damage
Steering link,joint,rack and dust bootcrack and damage
Abnormal noise at a joint
Wheel adjustment
Left and right rotation angle
Trie pressure
Tire crack and damage
Tire thread and uneven wearMetal dust,stone and foreign materialLoose hub nut and boltFront wheel bearing abnormal noise
Rear wheel bearing abnormal noiseFree play
Operation
Oil leak and oil level
Operation system abnormal noise
Replace oil
Replace ATF
Oil leak and oil level
Joint fasteningUniversal joint,dust root crack and damageSpline abnormal noise
Universal joint abnormal nosie
Free play and Function
Function
Operating travel
FunctionParking brake cable fastening,abnormal noise and damageo......Inspect ......ReplaceTable 2 Drive
line
Drive
Train
Braking
SystemSteering
Wheel
Steering
Gear
Steering
Link and
Joint
Knuckle
Front
Wheel
Wheel
Clutch
ManualTransmissionAutomaticTransmissionDriveshaftBrake
Pedal
Parking
BrakeUsage and Maintenance of MK Series - Maintenance Category and Content of MK Sedano
o
oo
o o oo o
o o
oo
o o
oo
ooo
o
o oo
o ooo
o o o
o
oo o o o
o o o o
o
oo o o o
o o o o
o
oo o o o
o o o o
o
oo o o o
o o o o
o
oo o o o
o o o o
o
oo o o o
o o o o
o
oo o o o
o o o o
o
oo o o o
o o o o
oo o o
o
o
o o o
o
o
o o o
o
o
o o o
o
o
o o o
o
o
o o o
o
oo o
o o
o o
o o
o o
o oo o o
o
o
Page 37 of 416
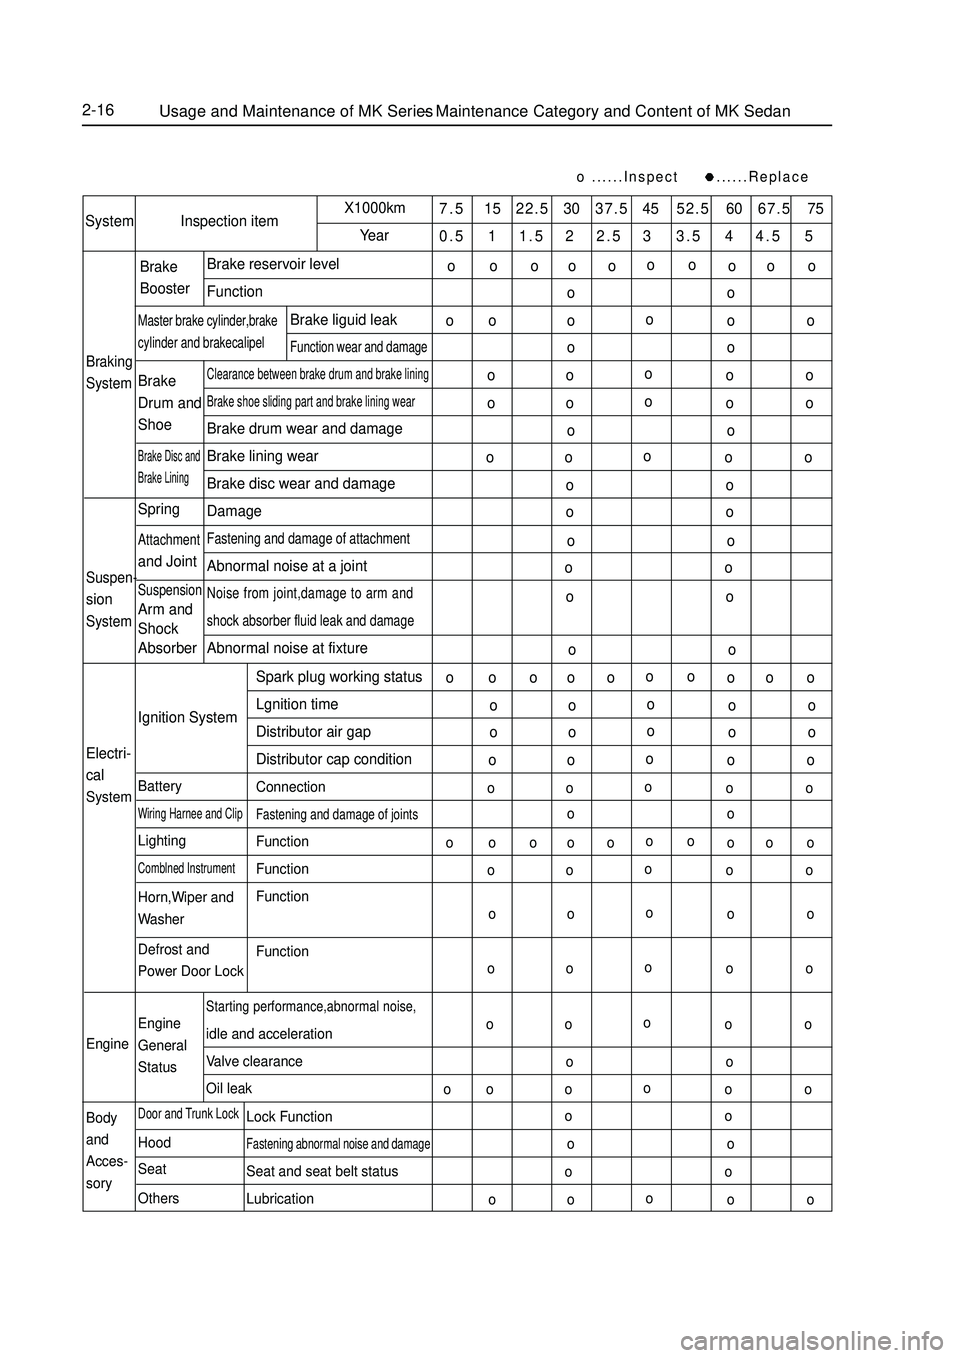
2-16......Inspect ......Replace7.5 15 22.5 30 37.5 45 52.5 60 67.5 75
0.5 1 1.5 2 2.5 3 3.5 4 4.5 5System Inspection itemX1000km
YearBraking
SystemBrake reservoir level
FunctionClearance between brake drum and brake liningBrake shoe sliding part and brake lining wearBrake drum wear and damage
Brake lining wear
Brake disc wear and damage
DamageFastening and damage of attachmentAbnormal noise at a jointNoise from joint,damage to arm and
shock absorber fluid leak and damageAbnormal noise at fixtureBrake
BoosterMaster brake cylinder,brakecylinder and brakecalipelBrake liguid leakFunction wear and damageBrake
Drum and
ShoeBrake Disc and
Brake LiningSuspen-sionSystemSpringAttachmentand JointSuspensionArm and
Shock
Absorber
Electri-
cal
SystemEngine
Body
and
Acces-
soryIgnition System
BatteryWiring Harnee and ClipLightingComblned InstrumentHorn,Wiper and
Washer
Defrost and
Power Door Lock
Engine
General
StatusDoor and Trunk LockHood
Seat
OthersStarting performance,abnormal noise,idle and acceleration
Valve clearance
Oil leakSpark plug working status
Lgnition time
Distributor air gap
Distributor cap condition
ConnectionFastening and damage of jointsFunction
Function
Function
FunctionLock FunctionFastening abnormal noise and damageSeat and seat belt status
LubricationUsage and Maintenance of MK Series - Maintenance Category and Content of MK Sedano
oo
o o o
o
o o ooo o
o o
ooo o
o o
o o
oo o
o o
oo o
o o
oo oo o
o o
o o
o o
o o
o o
o o
oo o o
o o ooo o
o o
oo o
o o
oo o
o o
oo o
o o
oo o
o o
oo o o
o o ooo o
o o
oo o
o o
oo o
o o
oo o
o o
oo o
o o
o o
ooo o
o o
oo oo oo oo o
Page 38 of 416
2-17
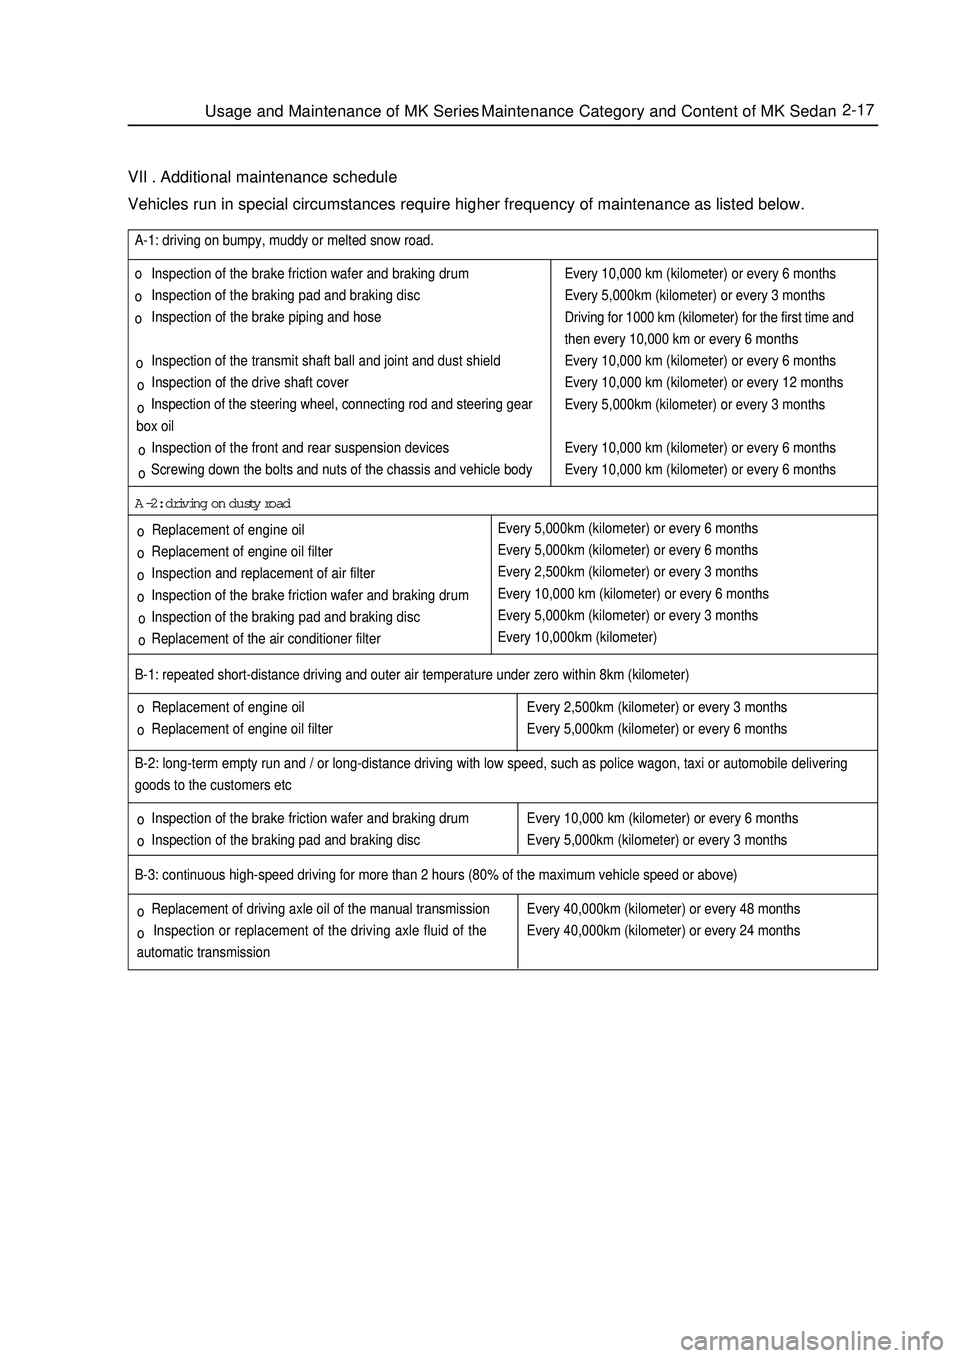
VII . Additional maintenance scheduleVehicles run in special circumstances require higher frequency of maintenance as listed below. Replacement of engine oil
Replacement of engine oil filter B-1: repeated short-distance driving and outer air temperature under zero within 8km (kilometer)
Inspection of the brake friction wafer and braking drum
Inspection of the braking pad and braking disc B-2: long-term empty run and / or long-distance driving with low speed, such as police wagon, taxi or automobile delivering
goods to the customers etcEvery 2,500km (kilometer) or every 3 months
Every 5,000km (kilometer) or every 6 months
Every 10,000 km (kilometer) or every 6 months
Every 5,000km (kilometer) or every 3 monthsB-3: continuous high-speed driving for more than 2 hours (80% of the maximum vehicle speed or above)
Replacement of driving axle oil of the manual transmission
Inspection or replacement of the driving axle fluid of the
automatic transmissionEvery 40,000km (kilometer) or every 48 months
Every 40,000km (kilometer) or every 24 months Inspection of the brake friction wafer and braking drum
Inspection of the braking pad and braking disc
Inspection of the brake piping and hose
Inspection of the transmit shaft ball and joint and dust shield
Inspection of the drive shaft cover
Inspection of the steering wheel, connecting rod and steering gear
box oil
Inspection of the front and rear suspension devices
Screwing down the bolts and nuts of the chassis and vehicle body A-1: driving on bumpy, muddy or melted snow road.
Replacement of engine oil
Replacement of engine oil filter
Inspection and replacement of air filter
Inspection of the brake friction wafer and braking drum
Inspection of the braking pad and braking disc
Replacement of the air conditioner filterA-2: driving on dusty roadEvery 10,000 km (kilometer) or every 6 months
Every 5,000km (kilometer) or every 3 months
Driving for 1000 km (kilometer) for the first time and
then every 10,000 km or every 6 months
Every 10,000 km (kilometer) or every 6 months
Every 10,000 km (kilometer) or every 12 months
Every 5,000km (kilometer) or every 3 months
Every 10,000 km (kilometer) or every 6 months
Every 10,000 km (kilometer) or every 6 months
Every 5,000km (kilometer) or every 6 months
Every 5,000km (kilometer) or every 6 months
Every 2,500km (kilometer) or every 3 months
Every 10,000 km (kilometer) or every 6 months
Every 5,000km (kilometer) or every 3 months
Every 10,000km (kilometer)Usage and Maintenance of MK Series - Maintenance Category and Content of MK Sedanoo o
o o o o
o o
o
o o
o o
o o
o ooo
Page 40 of 416
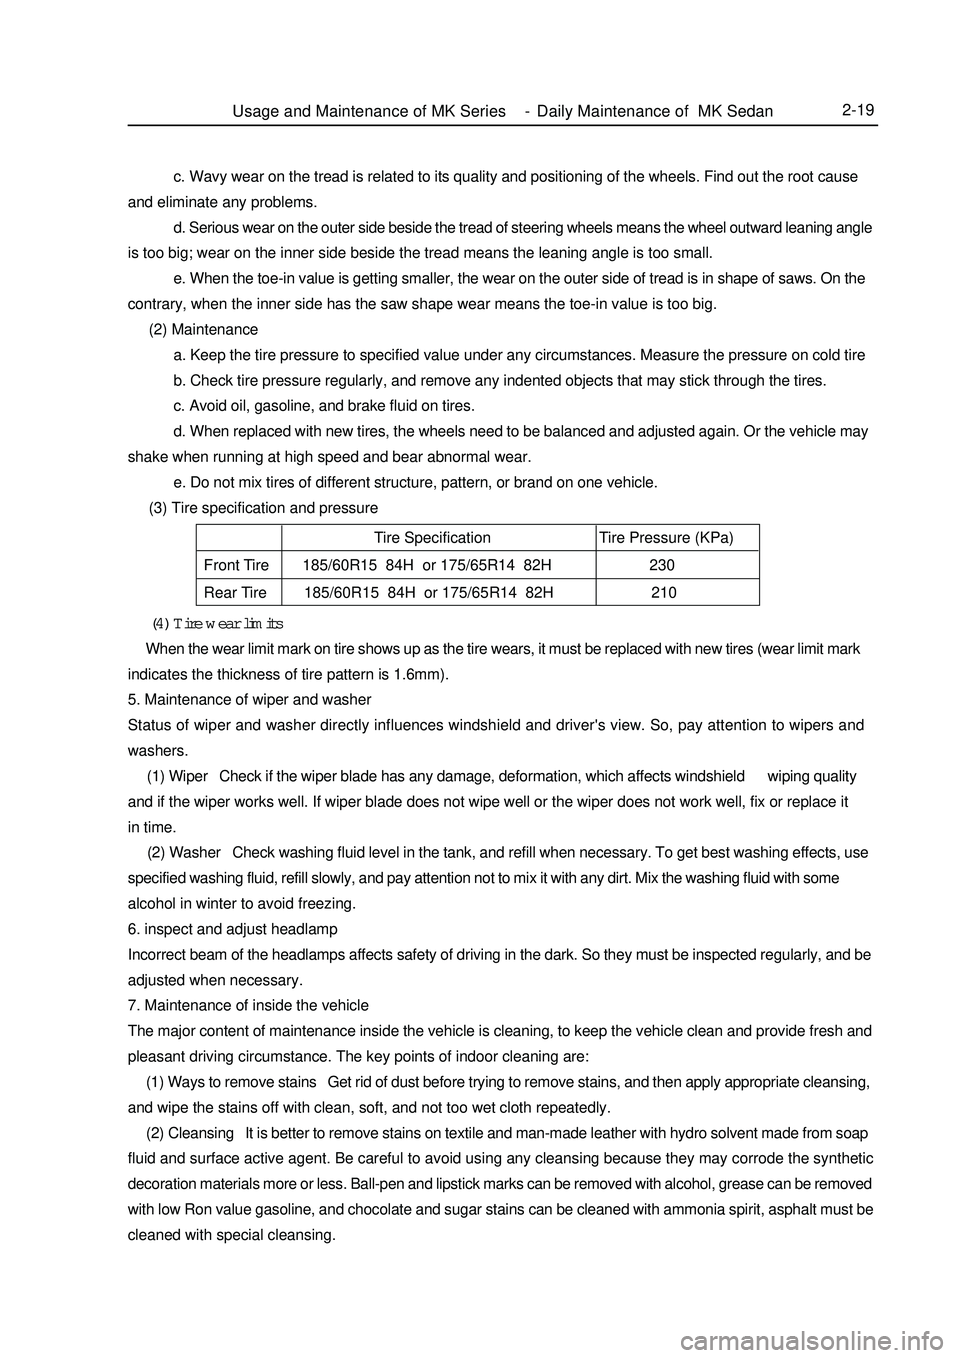
2-19 (4) Tire wear limits When the wear limit mark on tire shows up as the tire wears, it must be replaced with new tires (wear limit mark
indicates the thickness of tire pattern is 1.6mm).
5. Maintenance of wiper and washer
Status of wiper and washer directly influences windshield and driver's view. So, pay attention to wipers and
washers.
(1) Wiper Check if the wiper blade has any damage, deformation, which affects windshield wiping quality
and if the wiper works well. If wiper blade does not wipe well or the wiper does not work well, fix or replace it
in time.
(2) Washer Check washing fluid level in the tank, and refill when necessary. To get best washing effects, use
specified washing fluid, refill slowly, and pay attention not to mix it with any dirt. Mix the washing fluid with some
alcohol in winter to avoid freezing.
6. inspect and adjust headlampIncorrect beam of the headlamps affects safety of driving in the dark. So they must be inspected regularly, and be
adjusted when necessary.
7. Maintenance of inside the vehicle
The major content of maintenance inside the vehicle is cleaning, to keep the vehicle clean and provide fresh and
pleasant driving circumstance. The key points of indoor cleaning are:
(1) Ways to remove stains Get rid of dust before trying to remove stains, and then apply appropriate cleansing,and wipe the stains off with clean, soft, and not too wet cloth repeatedly.
(2) Cleansing It is better to remove stains on textile and man-made leather with hydro solvent made from soap
fluid and surface active agent. Be careful to avoid using any cleansing because they may corrode the synthetic
decoration materials more or less. Ball-pen and lipstick marks can be removed with alcohol, grease can be removed
with low Ron value gasoline, and chocolate and sugar stains can be cleaned with ammonia spirit, asphalt must be
cleaned with special cleansing.Tire Specification Tire Pressure (KPa)
Front Tire 185/60R15 84H or 175/65R14 82H 230
Rear Tire 185/60R15 84H or 175/65R14 82H 210c. Wavy wear on the tread is related to its quality and positioning of the wheels. Find out the root cause
and eliminate any problems.
d. Serious wear on the outer side beside the tread of steering wheels means the wheel outward leaning angle
is too big; wear on the inner side beside the tread means the leaning angle is too small.
e. When the toe-in value is getting smaller, the wear on the outer side of tread is in shape of saws. On the
contrary, when the inner side has the saw shape wear means the toe-in value is too big.
(2) Maintenance
a. Keep the tire pressure to specified value under any circumstances. Measure the pressure on cold tire
b. Check tire pressure regularly, and remove any indented objects that may stick through the tires.
c. Avoid oil, gasoline, and brake fluid on tires.
d. When replaced with new tires, the wheels need to be balanced and adjusted again. Or the vehicle may
shake when running at high speed and bear abnormal wear.
e. Do not mix tires of different structure, pattern, or brand on one vehicle.
(3) Tire specification and pressureUsage and Maintenance of MK Series - Daily Maintenance of MK Sedan
Page 41 of 416
2-20 (3) Long time exposure to sun damages interior. So it is better to use covers on upper seat backs, and rear
separation board that are exposed to sun.
8. Maintenance of body exterior
Body exterior is to keep body cleanness and brightness to give the impression of beauty and comfort, and to avoid
rust and abnormal paint peeling off. The key points of body maintenances are:
(1) Wash body using the method below:
a. Wash the dirty things off the body by pressurized water, and then clean the body with
soft cloth of sponge from up to down.
b. Dry body surface with good white cloth. Apply brake pedal several times when driving
after the car is washed to get rid of water in braking system.
c. Do not wipe the body when it is dry. Do not clean paint surface and glass with gasoline,
coal oil, narkosid, strong lye or alcohol.
(2) Cleaning windshield glass
Do not use silicon-bronze radical products. To get better cleaning effects, use special glass cleanser.
(3) Cleaning asphalt on the body
Do not peel the asphalt off from body or bumper, but use special cleanser
(4) Paint
Scratches or slight damages can be fixed with special paint spray. It dries in the air.
(5) Cleaning exterior decoration parts and aluminum parts. Wash with water with soap fluid or cleanser, and wash with clean water. To keep the gloss of painted surface,
wax on the surface after it is dry. (6) Polish and wax the body paint polishing and waxing keeps the body bright and pretty, and protects the paint
as well.
a. Polish in winter. Make sure the vehicle body is absolutely clean and dry before
polishing, polish with fluid or milky wax.
b. Vehicle body must be absolutely dry and clean before waxing. Use waxing tools (soft
table tissue or smooth cotton cloth) to cover the body paint surface evenly with wax.
Check if the vehicle body is covered by wax: spray some water onto the paint surface,
if water drops are formed, that surface is waxed, otherwise, clean the surface and wax
it again. Attention: do not wax under sun, or in cold weather.
Attention
1) When using high pressure washing machine, do not point the washing sprayer to transmission, steering
mechanism and other rubber protection parts, or exterior decoration parts, roof welding lines, heat radiator
or engine compartment.
2) The bottom of vehicle body is made of anti-corrosion material,and has been through anti-corrosion process.
After the vehicle has been running frequently on roads de-frozen with salt for some time, clean engine
compartment and lower part of vehicle body and take some protection actions.Usage and Maintenance of MK Series - Daily Maintenance of MK Sedan
Page 46 of 416

Table 3Section 2 Removal of the Engine Assembly from the Vehicle1. Avoid petrol overflowing (Disconnect from the fuel tank).
2. Remove the front wheel.Figure 1-5Engine AssemblyRemoval of the Engine Assembly from the Vehicle3-5CO
Normal
Low
HighHC
High
High
HighProblems
Bad idle speed
Bad idle speed
(HC reading fluctuates)
Bad idle speed
(Black smoke exhausts)Causes
1. Ignition fault:
Incorrect ignition timing;
Dirt, short circuit, or incorrect spark plug gap.
2. Incorrect valve gap.
3. Suction and exhaust valve leak.
4. Cylinder leaks.
1. Vacuum leaks.
PCV pipe . manifold;
Idle speed control valve;
Brake booster pipeline.
2. Spark lacks since the mixed gas is too thin.
1. Air filter is blocked.
2. PCV valve is blocked.
3. EFI system fails.
ECU fails.
Pressure regulator of fuel oil is out of order.
Water temperature sensor does not work.
Suction pressure/temperature sensor fails.
Injector fails.
The throttle position sensor fails.3. Discharge the coolant completely.
4. Remove the air filter assembly with hose (see Figure 1-5).
(1) Disconnect the joint of the temperature sensor and the wire
plug.
(2) Disconnect the vent duct from the hose of the air filter.
(3) Release the wire clip bolt on the air filter.
(4) Disconnect the hose of the air filter from the throttle body.
(5) Remove 3 bolts and the air filter assemblies.
5. Remove the battery.
6. Remove the fuel pipe sub-assembly.
7. Disconnect the water pipe; disconnect the water outlet pipe of the
heater from the air conditioner pipe.
8. Release the nut and remove the accelerator control cable. -
Page 70 of 416
Chapter 7 Automatic Transaxle AssemblySection 1 Frequent Problems DiagnosisPossible Cause1. There is no scan information.
(1)The diagnosis system fails.
(2)The automatic transmission unit fails.
2. The engine can't start.
(1)The engine system fails.
(2)The fuel pump or torque meter fails.
3. The vehicle cant' runs forwards.
(1)The circuit voltage is improper.
(2)The rear clutch or single clutch fails.
(3)The valve fails.
4. The vehicle can't run backwards.
(1)The low speed brake or front clutch pressure is improper.
(2)The front clutch or low speed reverse gear fails.
(3)The valve fails.
5. The vehicle can't runs forwards or backwards.
(1)The pressure deduction is improper or the transmission signal fails.
(2)There is pressure in the oil pump or the valve body fails.
6. The engine stalls in gear shift.
(1)The engine system or clutch torque meter fails.
(2)The valve body or torque meter fails.
7. The vehicle vibrates and lasts for a long time when the gear is shifted from N to D.
(1)The rear clutch fails.
(2)The valve body clutch fails.
(3)The restrictor switch fails.
8. The vehicle vibrates and lasts for a long time when the gear is shifted from N to R.
(1)The front clutch pressure fails.
(2)The front clutch or valve body fails.
(3)The low speed reserve gear pressure or low speed reverse gear fails.
9. The vehicle vibrates and lasts for a long time when the gear is shifted from N to D/R.
(1)The pressure reduction fails.
(2)The oil pump fails.
(3)The valve body fails.
10. The gear shift impacts.
(1)The servo switch or restrictor position switch fails.
(2)The pressure is decreases abnormally.
(3)The clutch or brake fails.
11. All gear shift points are either too early or too late in the running status.Automatic Transaxle Assembly Frequent Problems Diagnosis3-29 -
Page 71 of 416
The valve body fails.
12. The vehicle shifts before or after some gear points in the running status.
The vehicle switch or parking switch fails.
13. The vehicle has poor acceleration in running.
(1)The clutch or brake fails.
(2)The engine system fails.
14. The vehicle vibrates when it runs at a constant speed or accelerating speed.
(1)The hydraulic torque clutch pressure or hydraulic torque meter fails.
(2)The engine system or valve fails.
15. The acceleration switch system fails.
(1)The acceleration switch or ignition switch fails.
(2)The connector or automatic transmission control unit fails.I. Automatic transmissions Removal1. Put the select lever in "N" position
2. Remove 3 bolts of the flexibility plate (engine side)
3. Remove starter and 2 cooling hoses.
4. Disconnect neutral switch connector and odometer sensor.
5. Loosen the drain screw under the housing to bleed ATF and tighten the drain screw with sealing glue when
assembling. Tightening torque is 29~35N.m
6. Loosen the locking bolt for select lever cable.
7. Remove Drive Shaft LH&RH, using plastic stopper in the oil sealing of differential.
8. Detach suspension bolts.
9. Separate transmission from engine after bolts between engine and transmission remove.II. Automatic Transmission Installation1. Check whether torque converter of the transmission is in the right position, the methods as follows:
Check whether the distance from 3 anchor point of torque converter to front contact face of the transmission
box A 28mm , If the space A<28 mm, try install again. The way to install is that left hand catch hold of the
central anchor column of the converter and make it in alignment with input shaft as near as possible, push the torque
converter in rotating way by right hand until it gets to the bottom to meet the requirement of A 28 mm. (See
figure 7-1 and 2)
2. Install Flexibility plate and central plate on the crankshaft end face with 6 bolts in the direction of Figure 2.
Tightening torque is 45~55 N.m. Turn the longer hole of the Flexibility plate to the lowest of the engine position
in order to connect torque converter.Section 2 Hydraulic Torque Converter and TransaxleAutomatic Transaxle Assembly Hydraulic Torque Converter and Transaxle3-30 -
Page 81 of 416

8. Install the control cables assembly of the transmission.
(1) Install the retainer on the control cables.
(2) Push the control cables into the floor.
(3) Install the control cables assembly with two bolts.
Torque: 5.0N.m
(4) Connect the control cables assembly and fix the control cable
with bolts.
Torque: 5.0N.m
(5) Connect the ends of the two control cables, and then install
two washers and two new spring clips.
(6) Install two new spring clips on the cable bracket.
(7) Connect the control cables to gear shift lever.
Note:
Make sure the claws engage firmly.
(8) Connect the ends of the control cables to the gear shift lever
selectively, and then install the cotter pin.
Note:
When connecting the control cables, the dents of their ends
hall be made upwards.
The cotter pins are inserted in a direction as shown in the
figure.
(9) Connect the ends of the gear shift cables to the gear shift lever
assembly.
9. Install the middle console body.
10. Install the parking brake cover.
11. Install the handle of the gear shift lever.
12. Install the cup-holder.
13. Install the lower cover in dashboard panel.
14. Install the upper cover in dashboard panel.Transmission ControlCable Type Transmission Control4-4 -