key GMC YUKON DENALI 2009 Owners Manual
[x] Cancel search | Manufacturer: GMC, Model Year: 2009, Model line: YUKON DENALI, Model: GMC YUKON DENALI 2009Pages: 100, PDF Size: 1.41 MB
Page 7 of 100
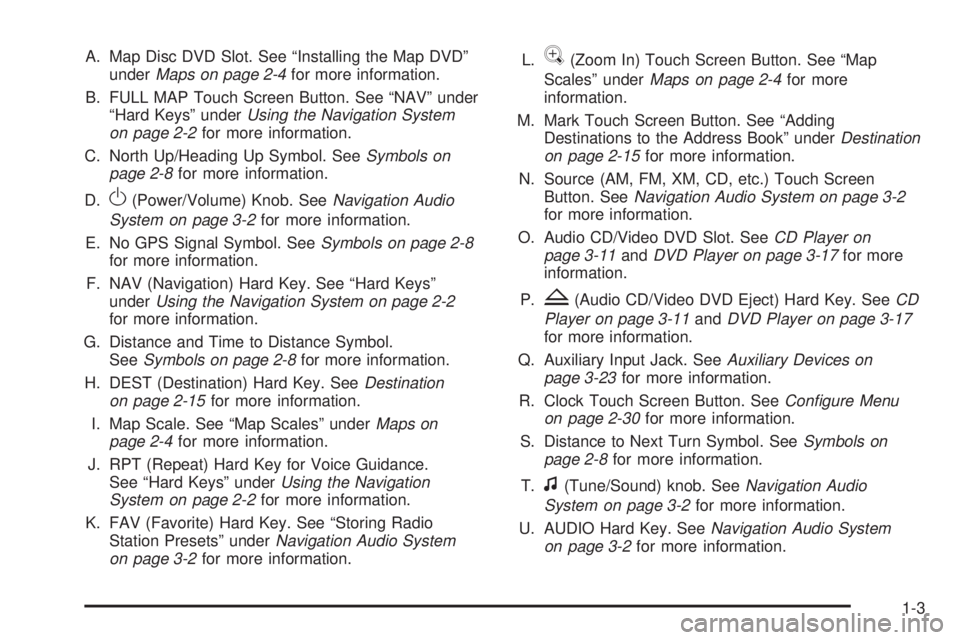
A. Map Disc DVD Slot. See “Installing the Map DVD”
underMaps on page 2-4for more information.
B. FULL MAP Touch Screen Button. See “NAV” under
“Hard Keys” underUsing the Navigation System
on page 2-2for more information.
C. North Up/Heading Up Symbol. SeeSymbols on
page 2-8for more information.
D.
O(Power/Volume) Knob. SeeNavigation Audio
System on page 3-2for more information.
E. No GPS Signal Symbol. SeeSymbols on page 2-8
for more information.
F. NAV (Navigation) Hard Key. See “Hard Keys”
underUsing the Navigation System on page 2-2
for more information.
G. Distance and Time to Distance Symbol.
SeeSymbols on page 2-8for more information.
H. DEST (Destination) Hard Key. SeeDestination
on page 2-15for more information.
I. Map Scale. See “Map Scales” underMaps on
page 2-4for more information.
J. RPT (Repeat) Hard Key for Voice Guidance.
See “Hard Keys” underUsing the Navigation
System on page 2-2for more information.
K. FAV (Favorite) Hard Key. See “Storing Radio
Station Presets” underNavigation Audio System
on page 3-2for more information.L.
V(Zoom In) Touch Screen Button. See “Map
Scales” underMaps on page 2-4for more
information.
M. Mark Touch Screen Button. See “Adding
Destinations to the Address Book” underDestination
on page 2-15for more information.
N. Source (AM, FM, XM, CD, etc.) Touch Screen
Button. SeeNavigation Audio System on page 3-2
for more information.
O. Audio CD/Video DVD Slot. SeeCD Player on
page 3-11andDVD Player on page 3-17for more
information.
P.
Z(Audio CD/Video DVD Eject) Hard Key. SeeCD
Player on page 3-11andDVD Player on page 3-17
for more information.
Q. Auxiliary Input Jack. SeeAuxiliary Devices on
page 3-23for more information.
R. Clock Touch Screen Button. SeeConfigure Menu
on page 2-30for more information.
S. Distance to Next Turn Symbol. SeeSymbols on
page 2-8for more information.
T.
f(Tune/Sound) knob. SeeNavigation Audio
System on page 3-2for more information.
U. AUDIO Hard Key. SeeNavigation Audio System
on page 3-2for more information.
1-3
Page 8 of 100
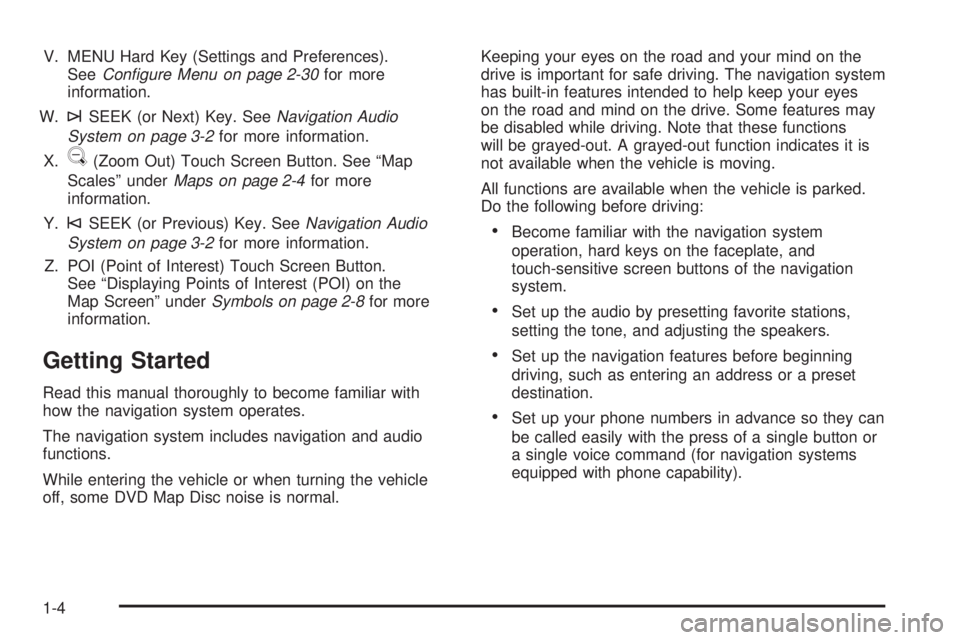
V. MENU Hard Key (Settings and Preferences).
SeeConfigure Menu on page 2-30for more
information.
W.
¨SEEK (or Next) Key. SeeNavigation Audio
System on page 3-2for more information.
X.
U(Zoom Out) Touch Screen Button. See “Map
Scales” underMaps on page 2-4for more
information.
Y.
©SEEK (or Previous) Key. SeeNavigation Audio
System on page 3-2for more information.
Z. POI (Point of Interest) Touch Screen Button.
See “Displaying Points of Interest (POI) on the
Map Screen” underSymbols on page 2-8for more
information.
Getting Started
Read this manual thoroughly to become familiar with
how the navigation system operates.
The navigation system includes navigation and audio
functions.
While entering the vehicle or when turning the vehicle
off, some DVD Map Disc noise is normal.Keeping your eyes on the road and your mind on the
drive is important for safe driving. The navigation system
has built-in features intended to help keep your eyes
on the road and mind on the drive. Some features may
be disabled while driving. Note that these functions
will be grayed-out. A grayed-out function indicates it is
not available when the vehicle is moving.
All functions are available when the vehicle is parked.
Do the following before driving:
Become familiar with the navigation system
operation, hard keys on the faceplate, and
touch-sensitive screen buttons of the navigation
system.
Set up the audio by presetting favorite stations,
setting the tone, and adjusting the speakers.
Set up the navigation features before beginning
driving, such as entering an address or a preset
destination.
Set up your phone numbers in advance so they can
be called easily with the press of a single button or
a single voice command (for navigation systems
equipped with phone capability).
1-4
Page 10 of 100
{CAUTION:
Taking your eyes off the road for extended periods
could cause a crash resulting in injury or death to
you or others.
To help avoid a crash in which you or others could be
killed:
Always concentrate on your driving �rst by keeping
your eyes and mind on the road, and your hands
on the wheel.
Follow system directions only if permitted by traffic
laws, controls, and conditions.
Before using this system, read the owner’s manual
and learn how it operates.
Some system controls cannot be used the when
vehicle is moving.
After you acknowledge the start up information you will
be able to access the NAV (navigation) and DEST
(destination) functions. Once accessed, you can enter
or delete information in the navigation system or access
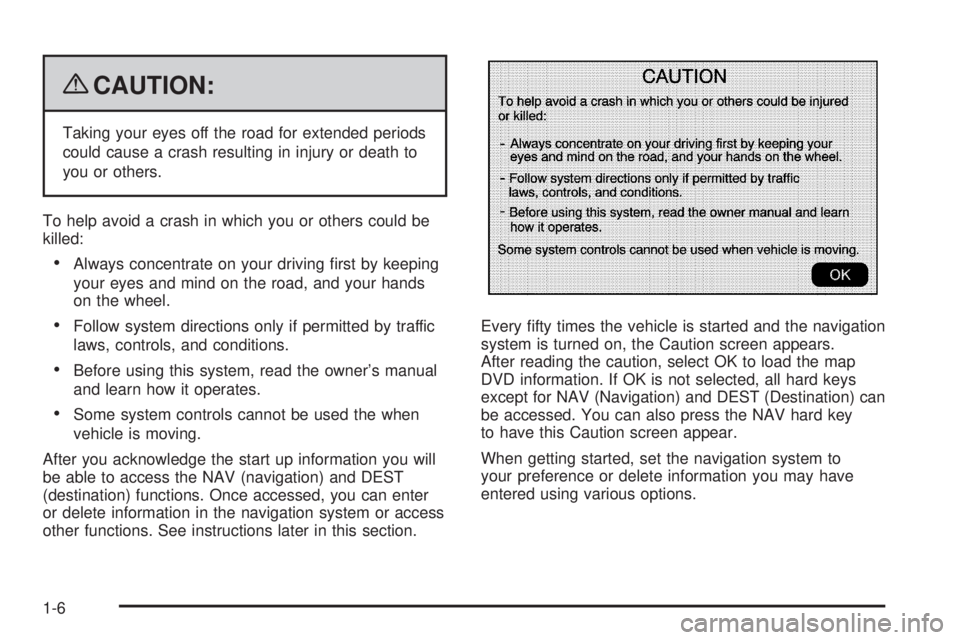
other functions. See instructions later in this section.Every �fty times the vehicle is started and the navigation
system is turned on, the Caution screen appears.
After reading the caution, select OK to load the map
DVD information. If OK is not selected, all hard keys
except for NAV (Navigation) and DEST (Destination) can
be accessed. You can also press the NAV hard key
to have this Caution screen appear.
When getting started, set the navigation system to
your preference or delete information you may have
entered using various options.
1-6
Page 12 of 100
Storing Radio Station Presets
To set preset radio stations, do the following:
1. Press the
O(power) knob to turn the system on.
2. Press the AUDIO hard key and select the desired
band (AM, FM1, FM2, XM1, or XM2 (if equipped)).
3. Use the
f(tune) knob or the SEEK arrows to tune
to the desired station.
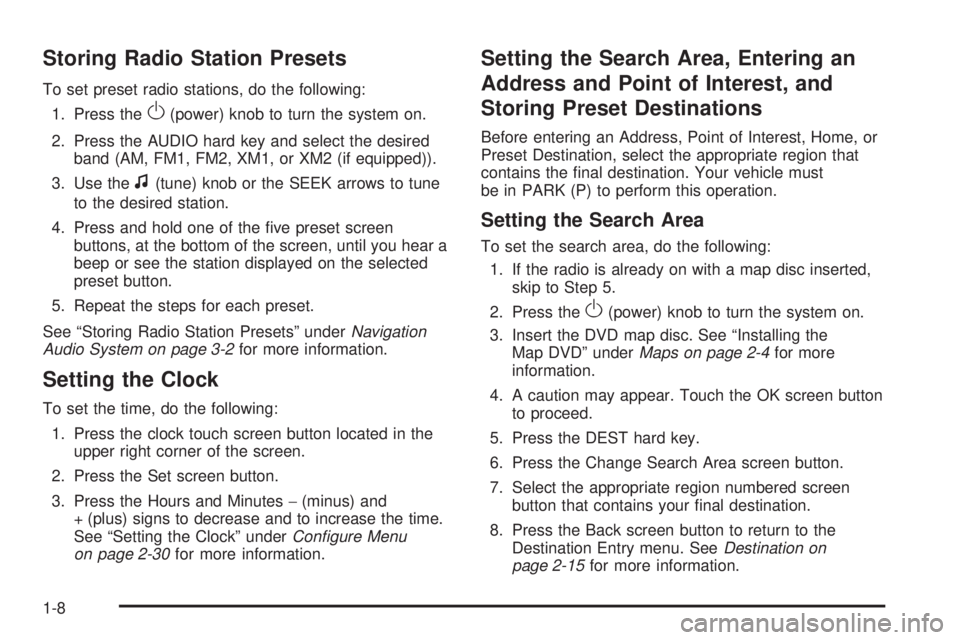
4. Press and hold one of the �ve preset screen
buttons, at the bottom of the screen, until you hear a
beep or see the station displayed on the selected
preset button.
5. Repeat the steps for each preset.
See “Storing Radio Station Presets” underNavigation
Audio System on page 3-2for more information.
Setting the Clock
To set the time, do the following:
1. Press the clock touch screen button located in the
upper right corner of the screen.
2. Press the Set screen button.
3. Press the Hours and Minutes−(minus) and
+ (plus) signs to decrease and to increase the time.
See “Setting the Clock” underConfigure Menu
on page 2-30for more information.
Setting the Search Area, Entering an
Address and Point of Interest, and
Storing Preset Destinations
Before entering an Address, Point of Interest, Home, or
Preset Destination, select the appropriate region that
contains the �nal destination. Your vehicle must
be in PARK (P) to perform this operation.
Setting the Search Area
To set the search area, do the following:
1. If the radio is already on with a map disc inserted,
skip to Step 5.
2. Press the
O(power) knob to turn the system on.
3. Insert the DVD map disc. See “Installing the
Map DVD” underMaps on page 2-4for more
information.
4. A caution may appear. Touch the OK screen button
to proceed.
5. Press the DEST hard key.
6. Press the Change Search Area screen button.
7. Select the appropriate region numbered screen
button that contains your �nal destination.
8. Press the Back screen button to return to the
Destination Entry menu. SeeDestination on
page 2-15for more information.
1-8
Page 13 of 100
Entering an Address
If you are having trouble �nding a city or a street name,
do the following:
Input the street name �rst instead of the city name,
or vice versa.
Input more characters or reduce the amount of
characters to reduce or expand the available
options.
To set a destination by entering a city name, do the
following:
1. If the radio is already on with a map disc inserted,
skip to Step 5.
2. Press the
O(power) knob to turn the system on.
3. Insert the DVD map disc. See “Installing the
Map DVD” underMaps on page 2-4for more
information.
4. A caution may appear. Touch the OK screen button
to proceed.
5. Press the DEST hard key.
6. Press the
6Address Entry screen button.7. The City name category will automatically be
selected for entry. Start entering the city name.
If �ve or less names are available for the entered
characters, a list will display. If more than �ve are
available, there will be a screen button with a number
in it, it represents the number of available cities.
Select this button to view the list and select a city.
8. Once a city is selected the street name category
will automatically be selected for entry. Start
entering the street name.
Do not enter directional information or street type,
and use the space symbol screen button (
U)
between street or city names. For example, the street
name N. Royal Oak Rd. should be entered as royal
Uoak. Use the backspace (q) screen button if
an incorrect character has been entered.
If �ve or less names are available, a list will display.
If more than �ve are available, there will be a
screen button with a number in it, it represents the
number of available streets. Select this button
to view the list.
9. Select the street name with the correct pre�x from
the list (Dr., Ln., St., etc.).
10. Once a street has been selected, the numeric
keyboard will display, allowing you to enter the
house number. The system will display the house
number range that is available for the street.
1-9
Page 14 of 100
11. Select the Go screen button. A map screen, with
the destination marked, will appear.
12. Select the route preference (Fastest, Shortest, or
Other). The system will calculate and highlight the
route.
13. Select the Start Guidance screen button. You are
now ready to start your route.
See “Address Entry” underDestination on page 2-15for
more information.
Entering a Point of Interest (POI)
To set a destination by entering a Point of Interest (POI),
do the following:
1. If the radio is already on with a map disc inserted,
skip to Step 5.
2. Press the
O(power) knob to turn the system on.
3. Insert the DVD map disc. See “Installing the
Map DVD” underMaps on page 2-4for more
information.
4. A caution may appear. Touch the OK screen button
to proceed.
5. Press the DEST hard key.
6. Press the
iPoint of Interest screen button.7. Enter the speci�c title of the POI in the POI name
space (i.e. Washington Monument).
If �ve or less names are available, a list will display.
If more than �ve are available, there will be a
screen button with a number in it, it represents the
number of available POIs. Select this button to
view the list.
8. Select the Go screen button. A map screen, with
the destination marked, will appear.
9. Select the route preference (Fastest, Shortest, or
Other). The system will calculate and highlight the
route.
10. Select the Start Guidance screen button. You are
now ready to start your route.
See “Point of Interest (POI)” underDestination on
page 2-15for more information.
Storing Preset Destinations
1. If the radio is already on with a map disc inserted,
skip to Step 5.
2. Press the
O(power) knob to turn the system on.
3. Insert the DVD map disc. See “Installing the
Map DVD” underMaps on page 2-4for more
information.
1-10
Page 15 of 100
4. A caution may appear. Touch the OK screen button
to proceed.
5. Press the DEST hard key.
6. Enter a destination. SeeDestination on page 2-15
for information on how to enter a destination.
7. Press the Mark screen button from the map screen
to add the current �nal destination as a preset
destination.
The address book screen will appear.
8. Select the Name screen button. An alpha-keyboard
will display. Enter the name.
9. Press and hold one of the screen buttons at the
bottom of the screen until a pop-up con�rmation
displays.
The name will appear in that preset destination
screen button and is now available to select from
the Destination Entry screen. See “Using Your
Stored Preset Destinations” next in this section to
select it as a destination.
See “Adding or Changing Preset Destinations”
underDestination on page 2-15for more information
on how to add preset destinations.Using Your Stored Preset Destinations
These destinations are available for selection while
driving.
1. If the radio is already on with a map disc inserted,
skip to Step 5.
2. Press the
O(power) knob to turn the system on.
3. Insert the DVD map disc. See “Installing the
Map DVD” underMaps on page 2-4for more
information.
4. A caution may appear. Touch the OK screen button
to proceed.
5. Press the DEST hard key.
6. Select one of the available preset destination
screen buttons. A map screen, with the destination
marked, will appear.
7. Select the route preference (Fastest, Shortest, or
Other). The system will calculate and highlight the
route.
8. Select the Start Guidance screen button. You are
now ready to start your route.
See “Preset Destination” underDestination on page 2-15
for more information.
1-11
Page 16 of 100
Canceling Guidance
Guidance will be canceled once you arrive at your �nal
destination. To cancel guidance prior to arrival at the
�nal destination, do the following:
1. Press the DEST hard key.
2. Press the Cancel Guidance screen button.
Guidance Volume
To adjust the volume of voice guidance prompts, do the
following:
1. Press the MENU hard key to enter the menu
options, then press the MENU key repeatedly
until Nav is selected or touch the Nav screen button.
2. Press the
>Voice Prompt screen button.
3. Press the + (plus) or – (minus) screen buttons to
increase or to decrease the volume of the voice
prompts.
See “Voice Prompt” underConfigure Menu on page 2-30
for more information.
Hybrid Screens
See the “Two-Mode Hybrid Manual” for more
information.
Cleaning the Video Screen
Use a soft clean cotton cloth dampened with clean
water.
1-12
Page 18 of 100
Features and Controls
Using the Navigation System
This section presents basic information needed to
operate the navigation system.
Use the hard keys located on the navigation system
along with the available touch-sensitive screen buttons
on the navigation screen to operate the system.
SeeNavigation System Overview on page 1-2for more
information.
Once the vehicle is moving, various functions will be
disabled to reduce driver distractions.
Hard Keys
The following hard keys are located on the navigation
system:
O(Power/Volume):Press this knob to turn the system
on and off. Turn the knob to increase or decrease the
volume to the audio system.
If your vehicle has the Rear Seat Entertainment (RSE)
and Rear Seat Audio (RSA), press and hold this
knob for more than two seconds to turn off the
navigation system, the RSE, and RSA.
f(Tune/Speaker Adjustment):Press this knob to
access the Sound screen to adjust bass, midrange,
treble, and equalization or Digital Signal Processing
(DSP), if the vehicle has the Bose
®sound system.
Turn the tune knob to go to the next or previous radio
station. SeeNavigation Audio System on page 3-2
for more information.
Z(CD/DVD Eject):Press the eject button to eject
CDs or DVDs.
NAV (Navigation):Press this key to view your vehicle’s
current position on the map screen. Each press of
this key will cycle through Full Map and the tab that
displays the current audio source (AM, FM, CD, etc.).
Full Map displays the screen in full map view. Selecting
the audio tab will split the screen between the map
screen and the current audio source screen menu.
See “Audio” underNavigation Audio System on page 3-2
for more information.
DEST (Destination):Press this key to access the
Destination Entry screen to plan a destination or
to change the search area. SeeDestination on
page 2-15for more information.
RPT (Navigation Repeat):Press this key to repeat
the last voice guidance prompt.
2-2
Page 19 of 100
FAV (Favorite):Press this key to access the preset
stations. See “Storing Radio Station Presets” under
Navigation Audio System on page 3-2for more
information.
AUDIO:Press this key to access the full Audio screen
to change AM, FM, XM™ Satellite Radio Service
(if equipped), CD, DVD (if equipped), and auxiliary input.
See “Audio” underNavigation Audio System on
page 3-2for more information.
MENU:Press this key to adjust features for sound,
radio, navigation, and the display. SeeConfigure Menu
on page 2-30for more information.
¨SEEK /©SEEK:Press the seek arrows to seek
and scan radio stations, to seek tracks on a CD, and
to seek chapters on a DVD. SeeNavigation Audio
System on page 3-2,CD Player on page 3-11, and
DVD Player on page 3-17for more information.
Touch-Sensitive Screen Buttons
Touch-sensitive screen buttons are located on the
screen. When a screen button has been selected, a
beep will sound. Screen buttons are highlighted when
a feature is available.
Alpha-Numeric Keyboard
Letters of the alphabet, symbols, punctuation, and
numbers, when available, will display on the navigation
screen as an alpha or numeric keyboard. The alpha
keyboard will display when the system requires entry of
a city or street name.
All characters are touch-sensitive screen buttons.
Touch a character to select it.
A-Y (Accent Alphabet):Select this screen button to
select letters with accent symbols. This button may
toggle to A-Z.
A-Z (Alphabet):Select this screen button to select
letters from the alphabet. This button may toggle to A-Y.
0-9 (Numbers):Select this screen button to select
numbers.
U(Space):Select the space screen button to enter
a space between characters or the words of a name.
q(Backspace):Select the backspace screen button if
an incorrect character has been selected.
To make name selections easier, the system will only
highlight the characters that can follow the last one
entered. For example, if a Z is entered, a T may not be
available for selection.
2-3