GREAT WALL HOVER 2006 Service Repair Manual
Manufacturer: GREAT WALL, Model Year: 2006, Model line: HOVER, Model: GREAT WALL HOVER 2006Pages: 425, PDF Size: 26.05 MB
Page 311 of 425
Brake-25
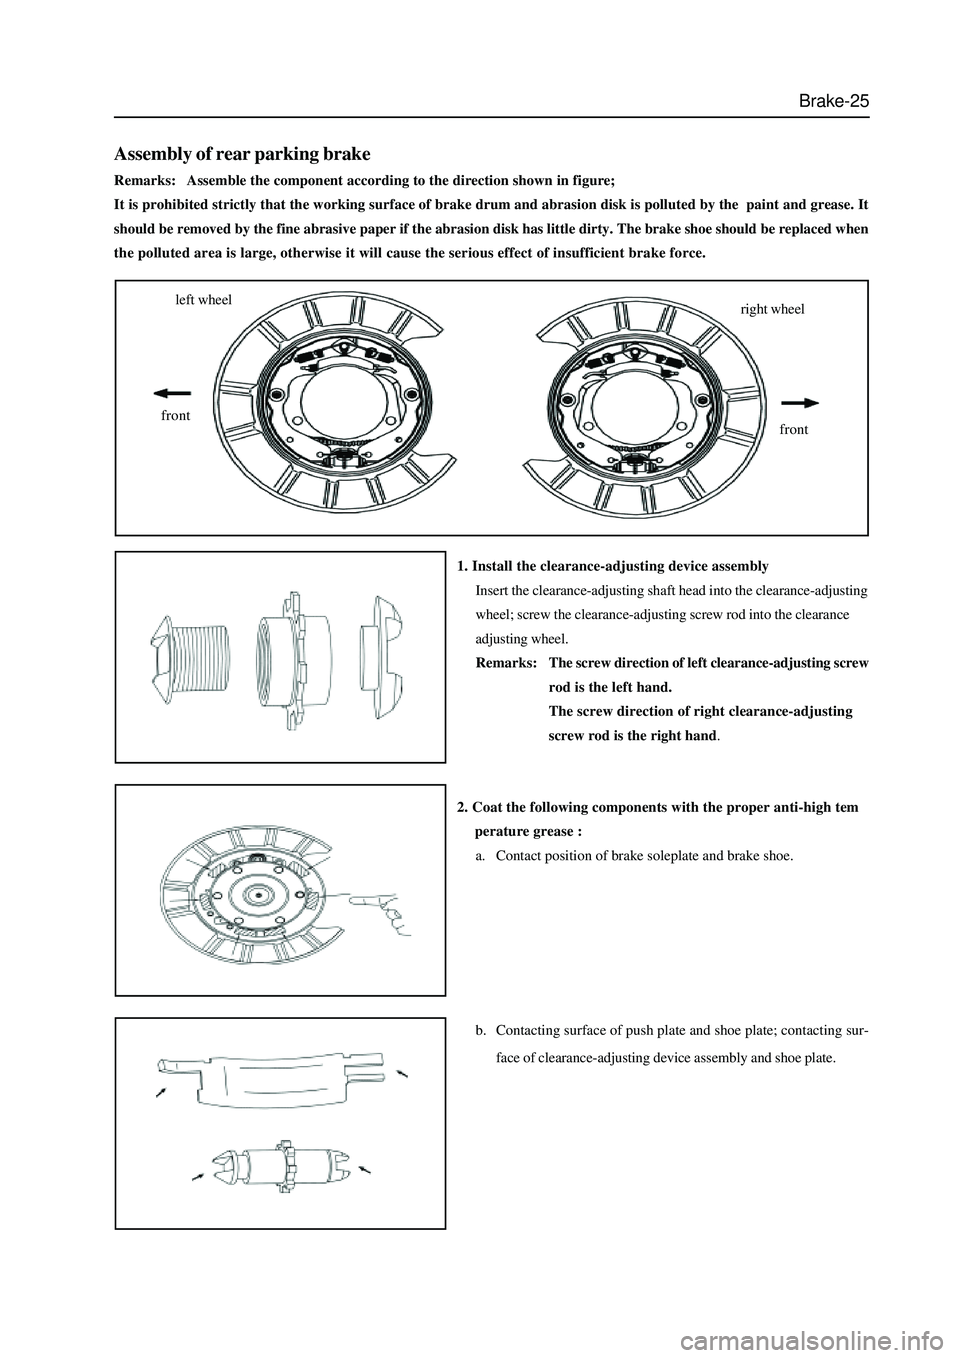
1. Install the clearance-adjusting device assembly
Insert the clearance-adjusting shaft head into the clearance-adjusting
wheel; screw the clearance-adjusting screw rod into the clearance
adjusting wheel.
Remarks:The screw direction of left clearance-adjusting screw
rod is the left hand.
The screw direction of right clearance-adjusting
screw rod is the right hand.
2. Coat the following components with the proper anti-high tem
perature grease :
a. Contact position of brake soleplate and brake shoe.
b. Contacting surface of push plate and shoe plate; contacting sur-
face of clearance-adjusting device assembly and shoe plate.
Assembly of rear parking brake
Remarks: Assemble the component according to the direction shown in figure;
It is prohibited strictly that the working surface of brake drum and abrasion disk is polluted by the paint and grease. It
should be removed by the fine abrasive paper if the abrasion disk has little dirty. The brake shoe should be replaced when
the polluted area is large, otherwise it will cause the serious effect of insufficient brake force.
left wheel
frontright wheel
front
Page 312 of 425
Brake-26
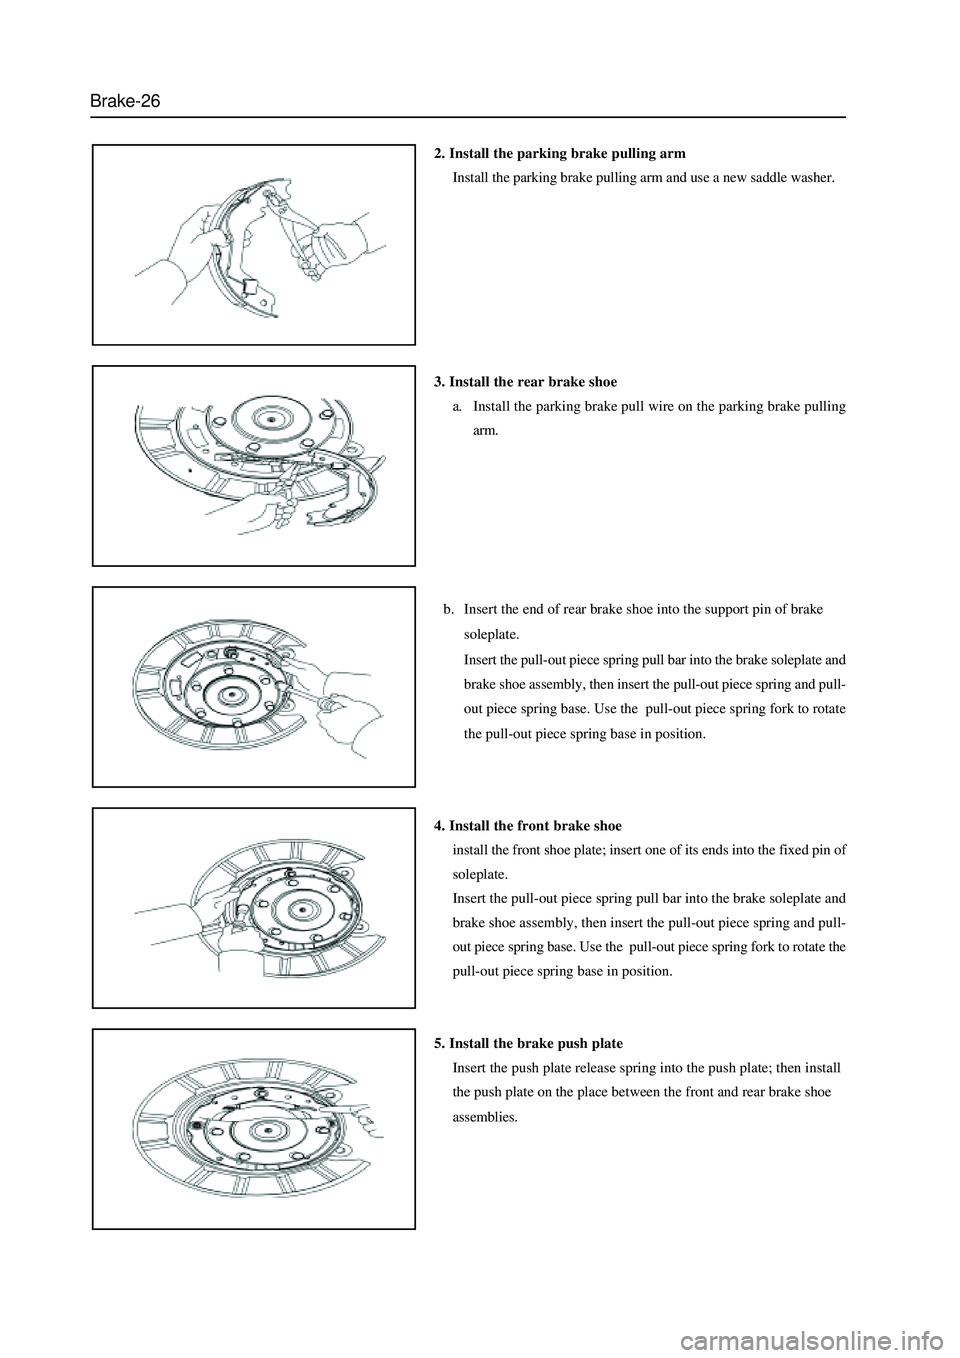
2. Install the parking brake pulling arm
Install the parking brake pulling arm and use a new saddle washer.
3. Install the rear brake shoe
a. Install the parking brake pull wire on the parking brake pulling
arm.
b. Insert the end of rear brake shoe into the support pin of brake
soleplate.
Insert the pull-out piece spring pull bar into the brake soleplate and
brake shoe assembly, then insert the pull-out piece spring and pull-
out piece spring base. Use the pull-out piece spring fork to rotate
the pull-out piece spring base in position.
4. Install the front brake shoe
install the front shoe plate; insert one of its ends into the fixed pin of
soleplate.
Insert the pull-out piece spring pull bar into the brake soleplate and
brake shoe assembly, then insert the pull-out piece spring and pull-
out piece spring base. Use the pull-out piece spring fork to rotate the
pull-out piece spring base in position.
5. Install the brake push plate
Insert the push plate release spring into the push plate; then install
the push plate on the place between the front and rear brake shoe
assemblies.
Page 313 of 425
Brake-27
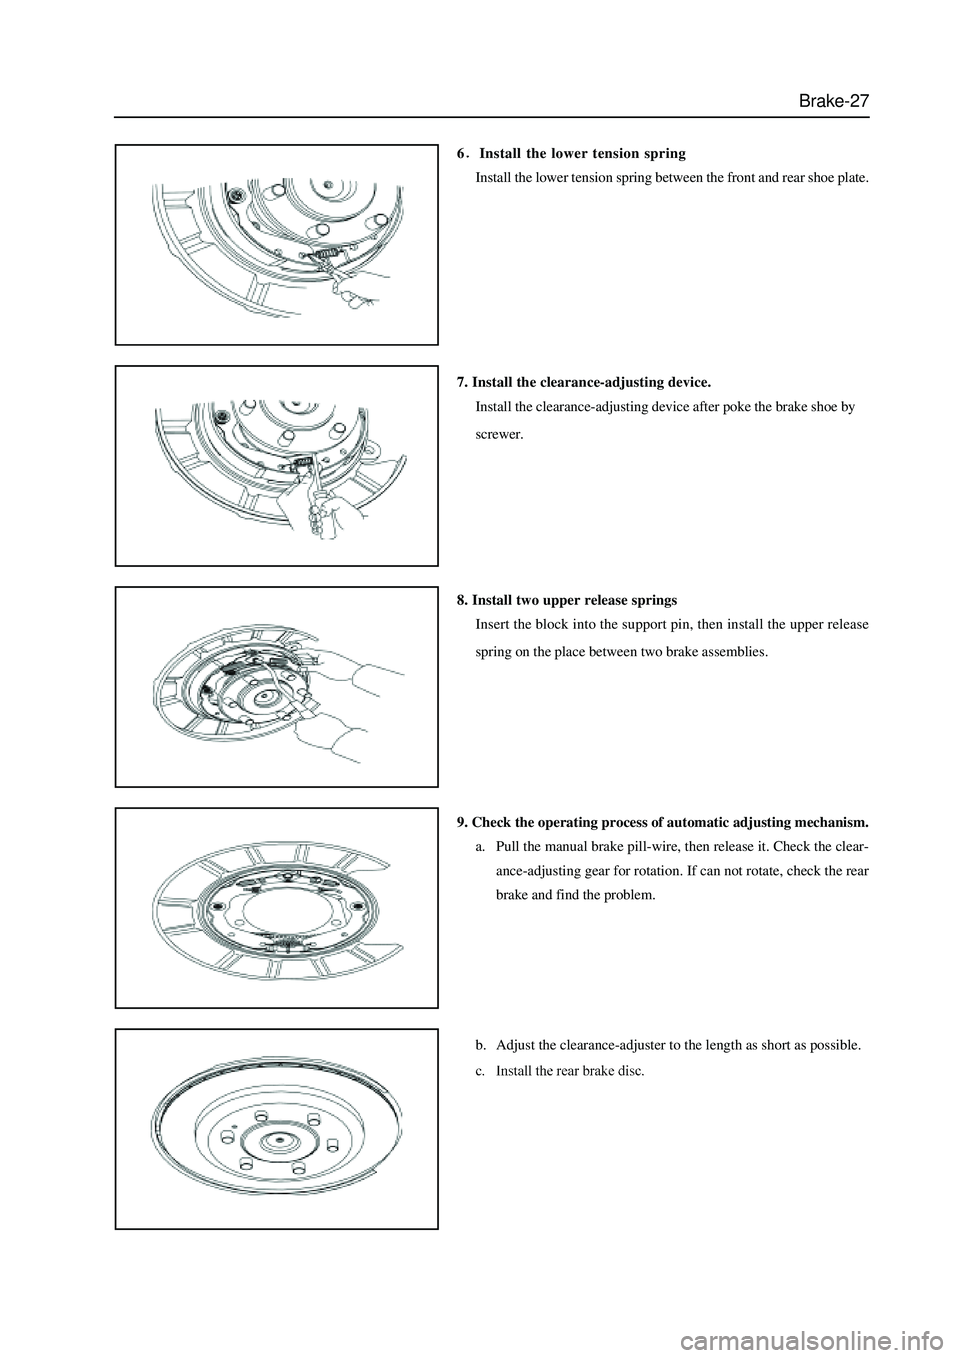
6Install the lower tension spring
Install the lower tension spring between the front and rear shoe plate.
7. Install the clearance-adjusting device.
Install the clearance-adjusting device after poke the brake shoe by
screwer.
8. Install two upper release springs
Insert the block into the support pin, then install the upper release
spring on the place between two brake assemblies.
9. Check the operating process of automatic adjusting mechanism.
a. Pull the manual brake pill-wire, then release it. Check the clear-
ance-adjusting gear for rotation. If can not rotate, check the rear
brake and find the problem.
b. Adjust the clearance-adjuster to the length as short as possible.
Page 314 of 425
Brake-28
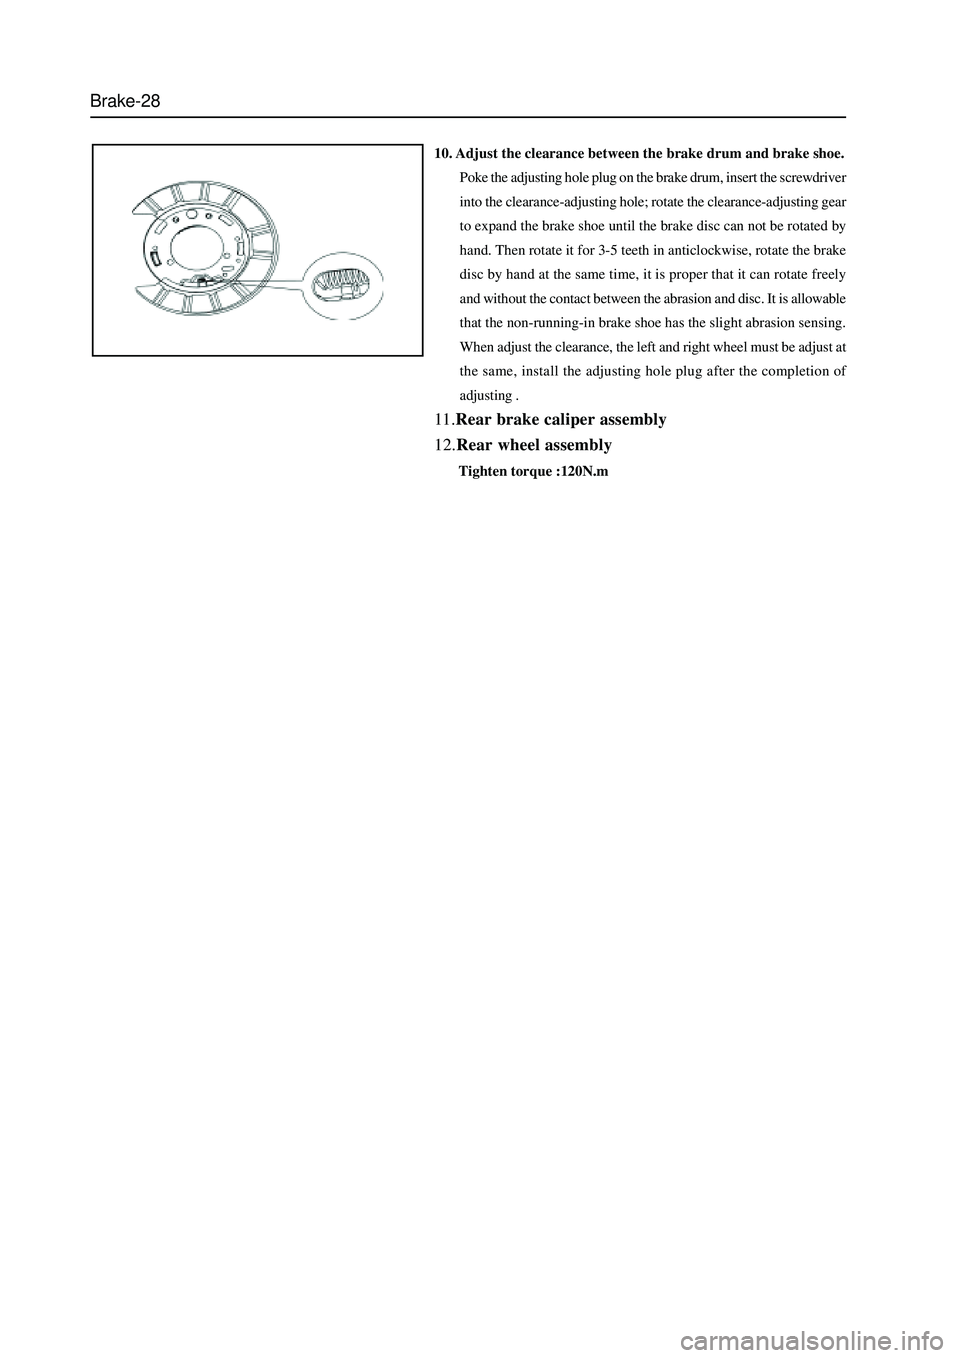
10. Adjust the clearance between the brake drum and brake shoe.
Poke the adjusting hole plug on the brake drum, insert the screwdriver
into the clearance-adjusting hole; rotate the clearance-adjusting gear
to expand the brake shoe until the brake disc can not be rotated by
hand. Then rotate it for 3-5 teeth in anticlockwise, rotate the brake
disc by hand at the same time, it is proper that it can rotate freely
and without the contact between the abrasion and disc. It is allowable
that the non-running-in brake shoe has the slight abrasion sensing.
When adjust the clearance, the left and right wheel must be adjust at
the same, install the adjusting hole plug after the completion of
adjusting .
11.Rear brake caliper assembly
12.Rear wheel assembly
Tighten torque :120N.m
Page 315 of 425
Brake-29
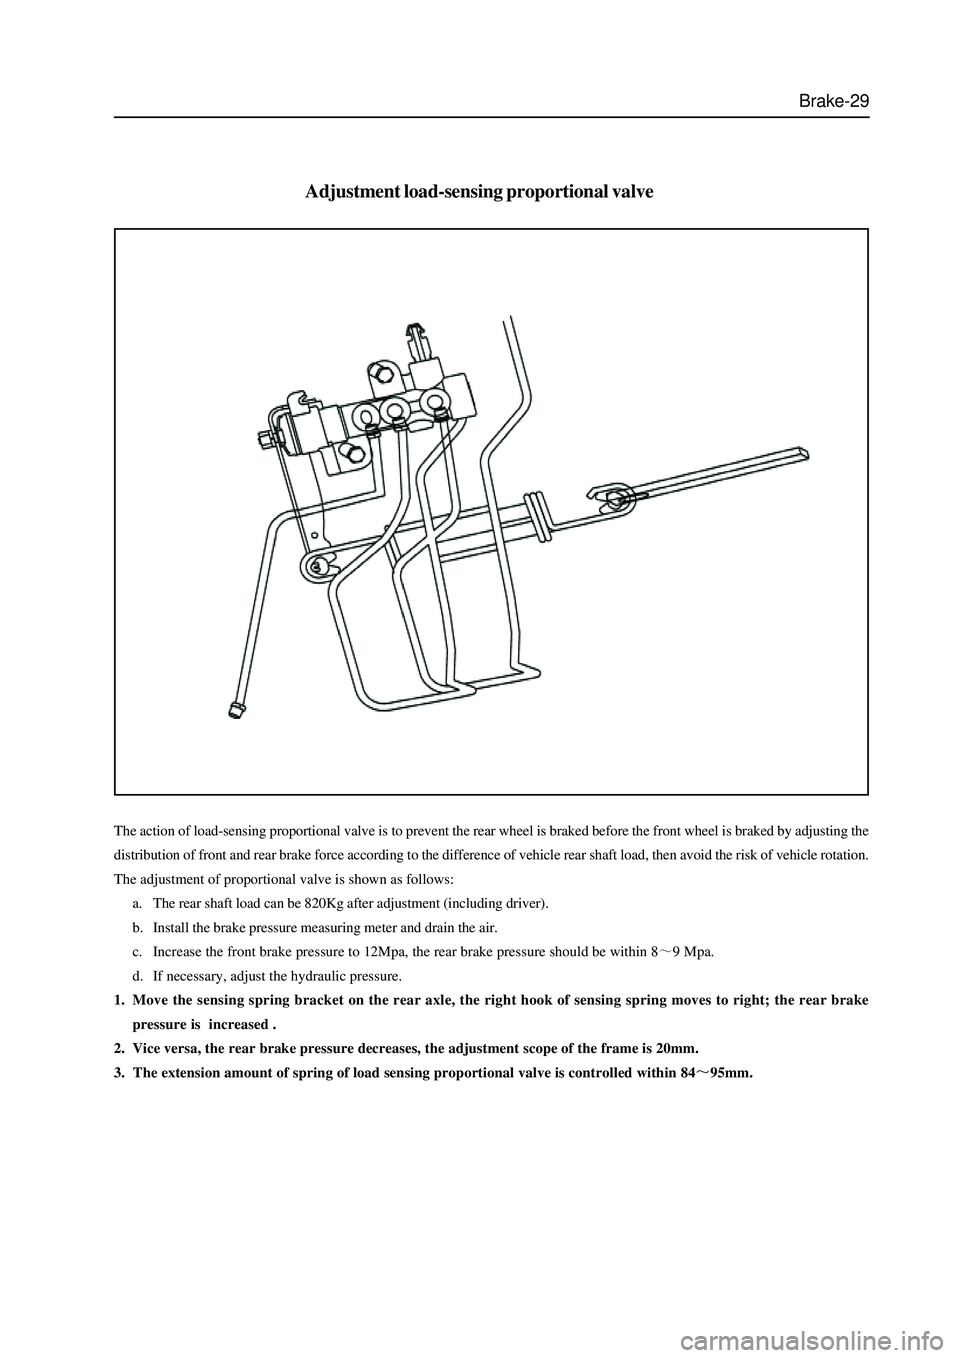
The action of load-sensing proportional valve is to prevent the rear wheel is braked before the front wheel is braked by adjusting the
distribution of front and rear brake force according to the difference of vehicle rear shaft load, then avoid the risk of vehicle rotation.
The adjustment of proportional valve is shown as follows:
a. The rear shaft load can be 820Kg after adjustment (including driver).
b. Install the brake pressure measuring meter and drain the air.
c. Increase the front brake pressure to 12Mpa, the rear brake pressure should be within 8
9 Mpa.
d. If necessary, adjust the hydraulic pressure.
1. Move the sensing spring bracket on the rear axle, the right hook of sensing spring moves to right; the rear brake
pressure is increased .
2. Vice versa, the rear brake pressure decreases, the adjustment scope of the frame is 20mm.
3. The extension amount of spring of load sensing proportional valve is controlled within 84
95mm.
Adjustment load-sensing proportional valve
Page 316 of 425
Brake-30
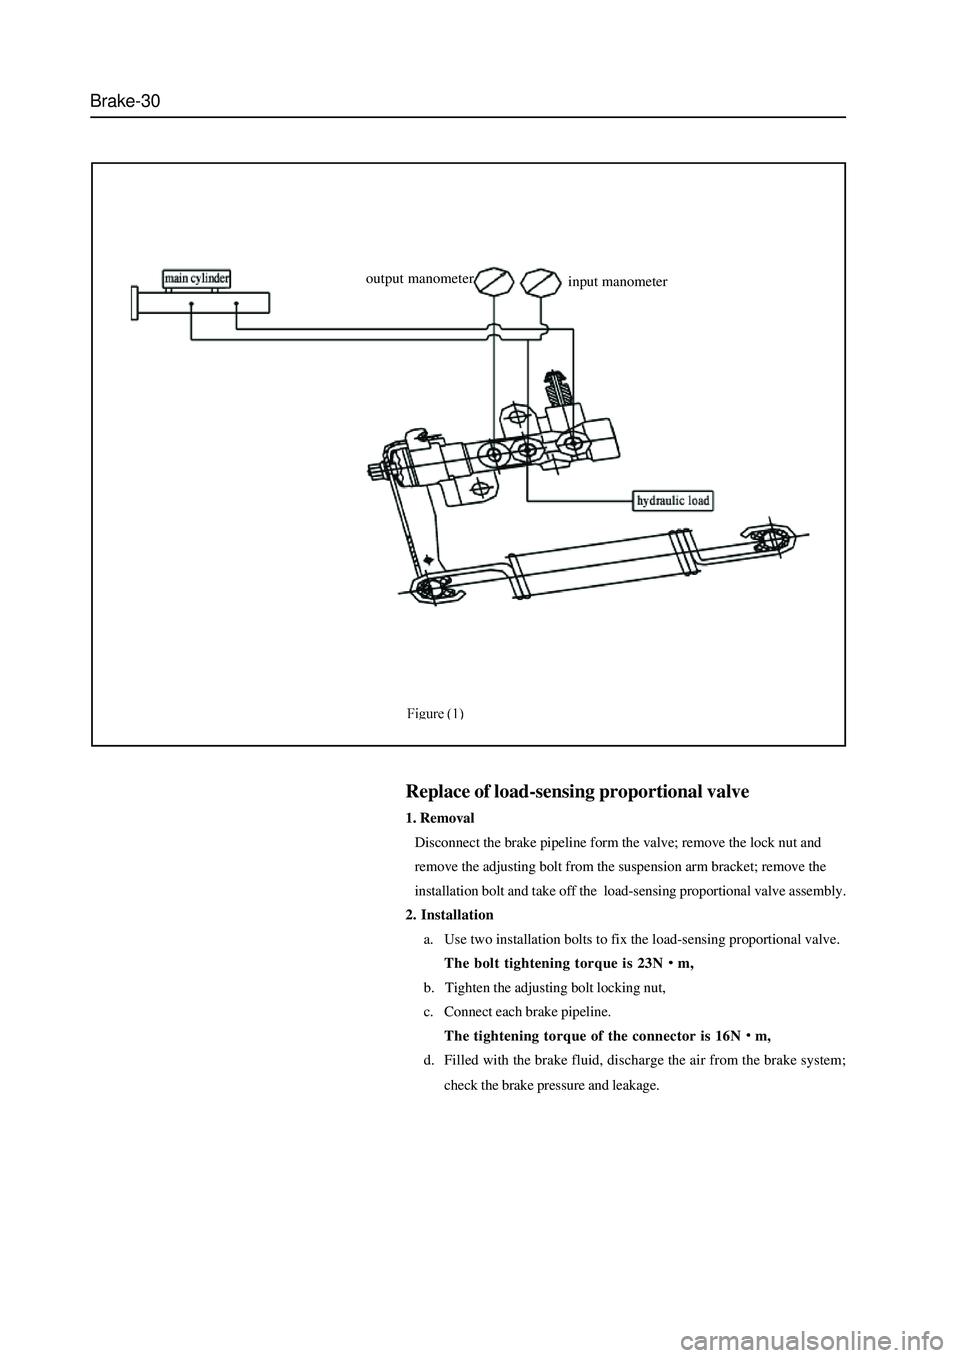
Replace of load-sensing proportional valve
1. Removal
Disconnect the brake pipeline form the valve; remove the lock nut and
remove the adjusting bolt from the suspension arm bracket; remove the
installation bolt and take off the load-sensing proportional valve assembly.
2. Installation
a. Use two installation bolts to fix the load-sensing proportional valve.
The bolt tightening torque is 23N
m,
b. Tighten the adjusting bolt locking nut,
c. Connect each brake pipeline.
The tightening torque of the connector is 16N
m,
d. Filled with the brake fluid, discharge the air from the brake system;
check the brake pressure and leakage. output manometer
input manometer
Page 317 of 425
Brake-31
Antilock Braking System (ABS)
Cautions
1. It must not remove or install the electric elements and wire bunch plug when the ignition switch is in ON to avoid
the damage of ECU. It should turn off the ignition switch if needs disassembly.
2. Pay attention to do not knock or impact the ABS ECU during the maintenance and repair, for it will damage the
ABS ECU easily.
3. The wheel speed sensor and hydraulic unit (integrated with ECU) of BOSCH ABS8.0 can not be repaired, it should
be replaced in integral if damaged.
4. After the brake system is maintained, the brake pedal maybe soft. Discharge the air according to the normal brake
system.
5. It must use the brake fluid from original manufacturer; the brake fluid of different number cannot be used in mixed,
otherwise it will cause the failure of brake system. Select the tyre of original type as most as possible
Repair of Antilock Braking System (ABS)
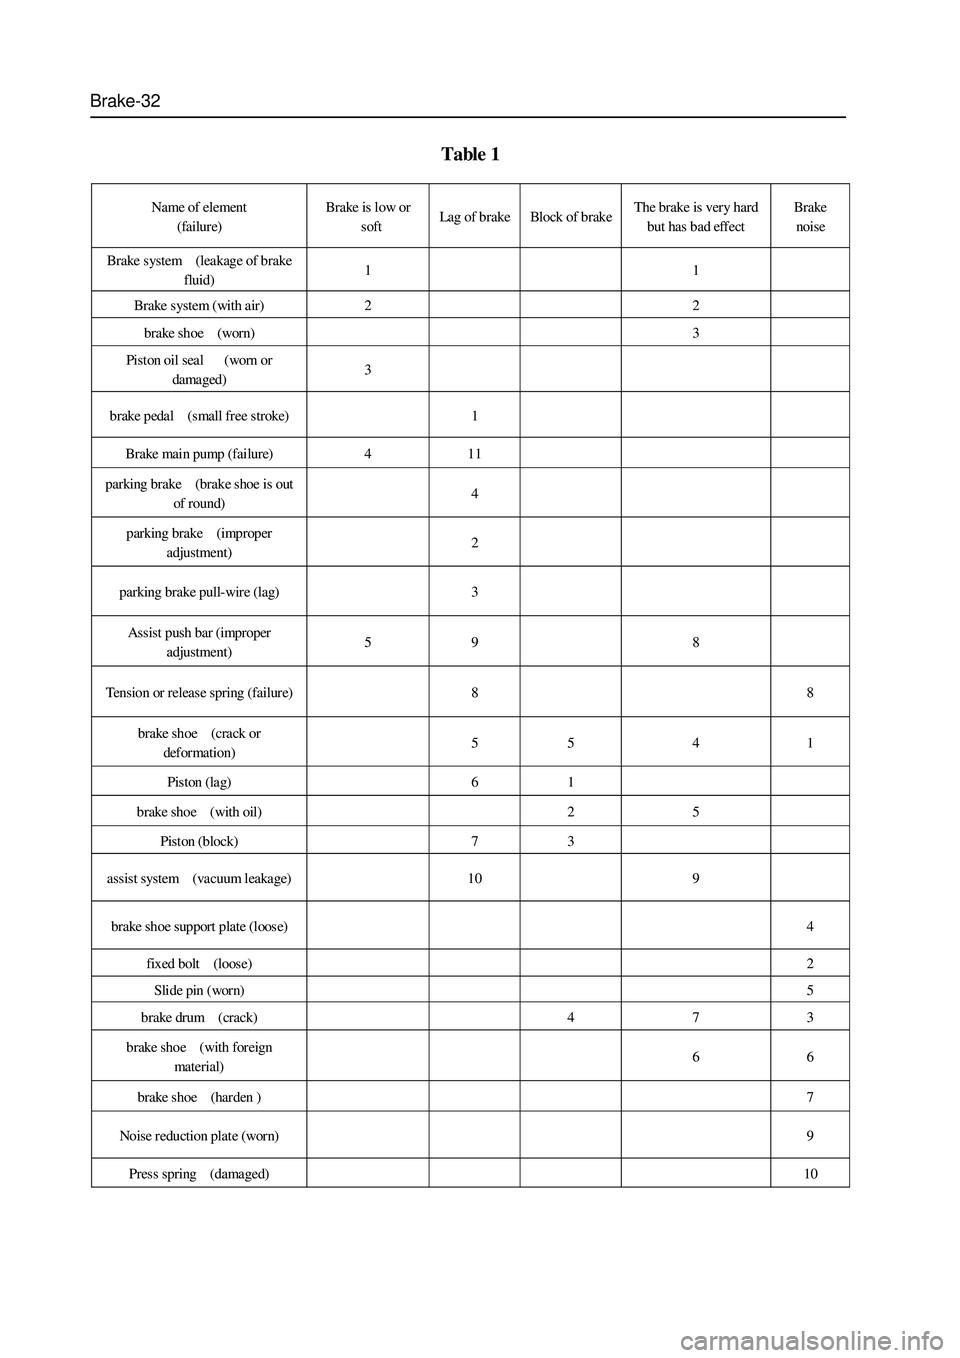
1. It should process the failure diagnosis for the brake system before process the ABS failure diagnosis. It can
diagnose out the failure rapidly by using Table 1. In Table 1, the small number means the failure which occurs most
possibly. Check each element according to the sequence and maintain or replace it if necessary.
2. Check the following elements for normal operation before the diagnosis:
Brake fluid level and brake fluid quality
Pressure of tyre, size of tyre, shape and depth of tyre figure
Other brake component
These components will affect the brake effect of the ABS. Check the system sensor, connecting wire and connector for correct
installation, arrangement and connection. Ensure the completeness of fuse, repair or replace it if necessary.
3. Process the analysis and diagnosis according to the ABS advanced by owner. Use the diagnosis instrument (Annex
1) for final check and confirmation. It must process the run inspection after the competition of all ABS maintenance.
The test condition is shown as follows:
a. Confirm the tyre complies with the requirement, the tyre pressure is normal.
b. The brake system (including brake light ) is normal
c. The brake system is without leakage.
d. The position and installation of wheel speed sensor is correct.
e. All fuses are normal.
4. test method:
Run for 1 min at least when the vehicle speed is beyond 40Km/h, process a proper brake. Then read out the failure code to
ensure the ABS is without failure code.
Page 318 of 425

Brake-32
Page 319 of 425
Brake-32
Table 1
Name of element
(failure) Brake is low or
soft Lag of brake Block of brake The brake is very hard
but has bad eff ect Brake
noise
Brake system (leakage of brake
fluid) 1 1
Brake system (with air) 2 2
brake shoe (worn) 3
Piston oil seal (worn or
damaged) 3
brake pedal (small free stroke) 1
Brake mai n p ump (fai lur e) 4 1 1
parking brake (brake shoe is out
of round) 4
parking brake (improper
adjustment) 2
parking brake pull-wire (lag) 3
Assist push bar (improper
adjustment) 5 9 8
Tension or release spring (failure) 8 8
brake shoe (crack or
deformation) 5 5 4 1
Piston (lag) 6 1
brake shoe (with oil) 2 5
Piston (block) 7 3
assist system (vacuum leakage) 10 9
brake shoe support plate (loose) 4
fixed bolt (loose) 2
Slide pin (worn) 5
brake drum (crack) 4 7 3
brake shoe (with foreign
mater ial) 6 6
brake shoe (harden ) 7
Noise reduction plate (worn) 9
Press spring (damaged) 10
Page 320 of 425
Steering-1
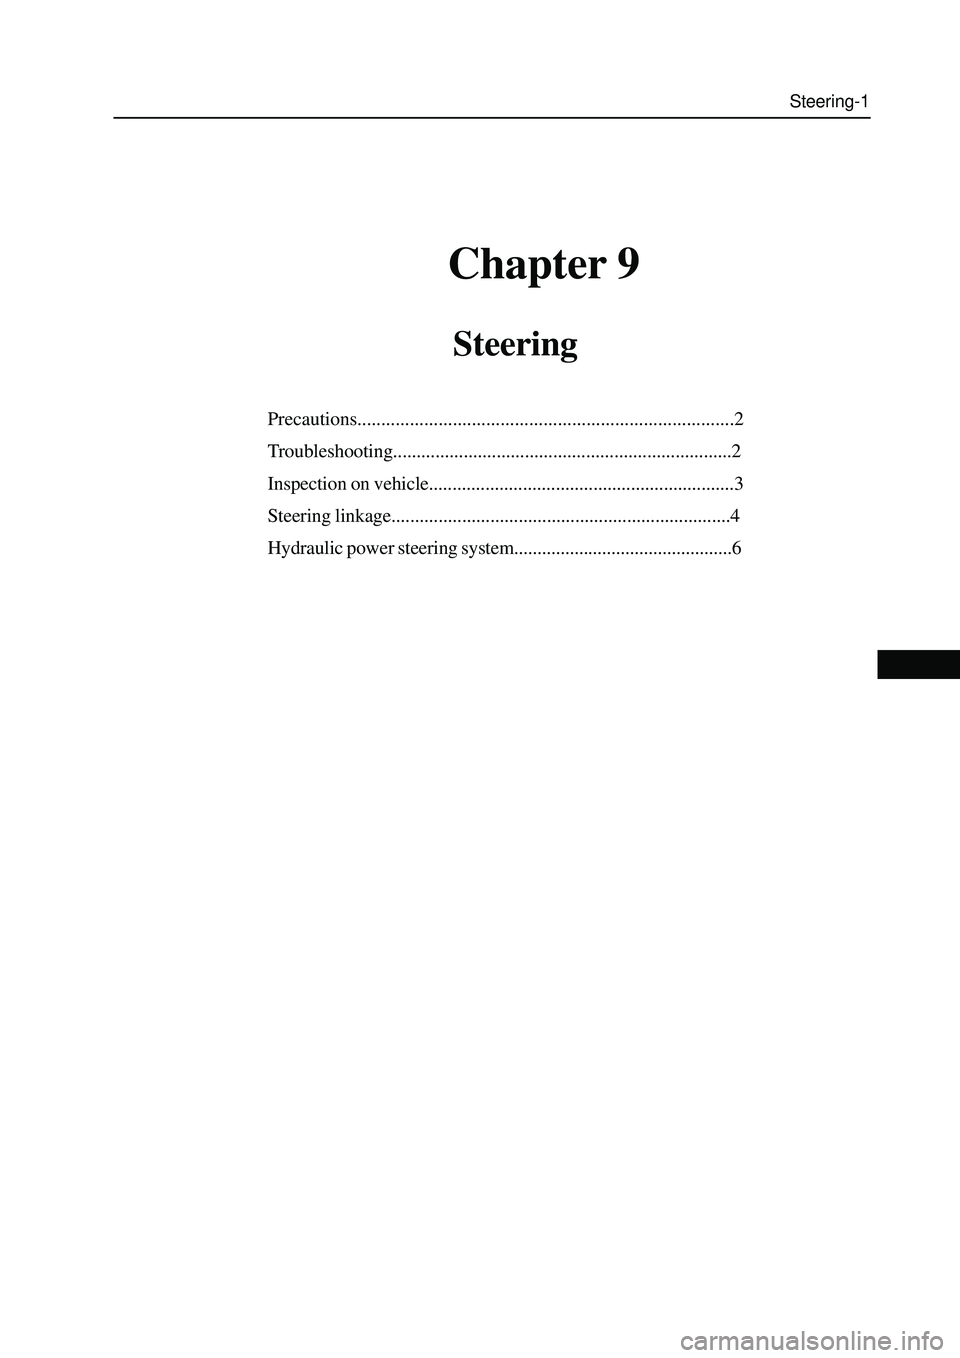
Chapter 9
Steering
Precautions...............................................................................2
Troubleshooting........................................................................2
Inspection on vehicle.................................................................3
Steering linkage........................................................................4
Hydraulic power steering system...............................................6