light HONDA ACCORD HYBRID 2014 9.G Manual PDF
[x] Cancel search | Manufacturer: HONDA, Model Year: 2014, Model line: ACCORD HYBRID, Model: HONDA ACCORD HYBRID 2014 9.GPages: 561, PDF Size: 20.3 MB
Page 441 of 561
uuWhen DrivinguLane Departure Warning (LDW)*
440
Driving
The system begins to search for lane markings when all the following conditions are met: • The vehicle is traveling between 40-90 mph (64-145 km/h).
• The vehicle is on a straight or slightly curved road.
• The turn signals are off.
• The brake pedal is not depressed.
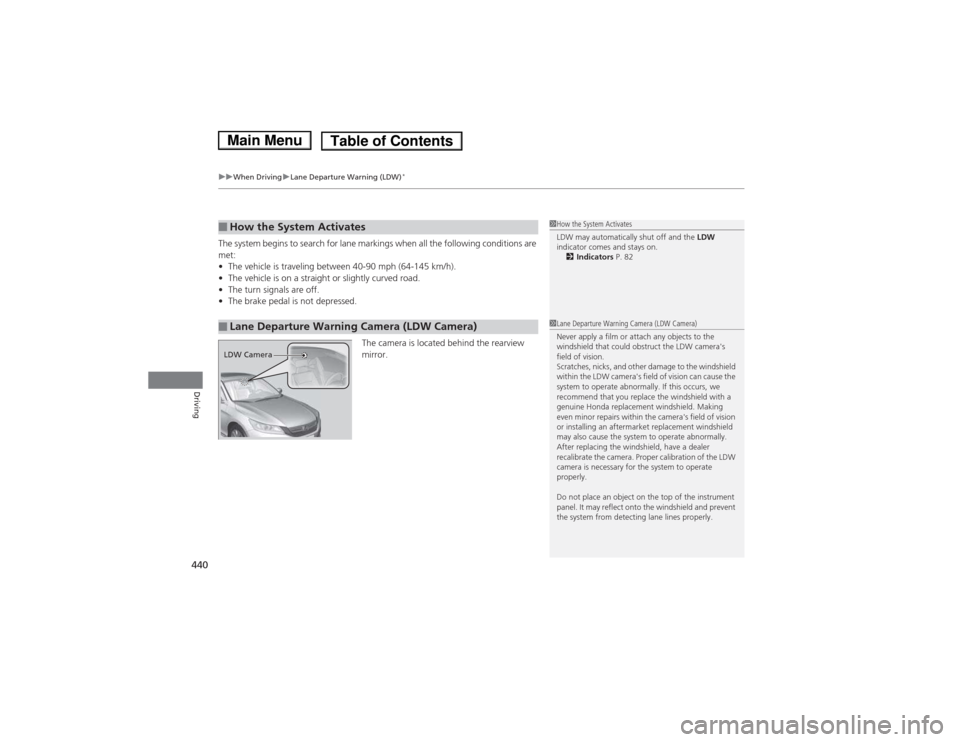
The camera is located behind the rearview mirror.
■How the System Activates
■Lane Departure Warning Camera (LDW Camera)
1How the System Activates
LDW may automatically shut off and the LDW
indicator comes and stays on.
2 Indicators P. 82
1Lane Departure Warning Camera (LDW Camera)
Never apply a film or attach any objects to the
windshield that could obstruct the LDW camera's
field of vision.
Scratches, nicks, and other damage to the windshield
within the LDW camera's field of vision can cause the
system to operate abnormally. If this occurs, we
recommend that you replace the windshield with a
genuine Honda replacement windshield. Making
even minor repairs within the camera's field of vision
or installing an aftermarket replacement windshield
may also cause the system to operate abnormally.
After replacing the windshield, have a dealer
recalibrate the camera. Proper calibration of the LDW
camera is necessary for the system to operate properly.
Do not place an object on the top of the instrument
panel. It may reflect onto the windshield and prevent
the system from detecting lane lines properly.
LDW Camera
Main MenuTable of Contents
Page 443 of 561
442
uuWhen DrivinguLane Departure Warning (LDW)*
Driving
LDW may not activate or may not recognize lanes, and may activate even when
keeping in the middle of a lane under the following conditions.
■LDW Limitations
Condition
●
When you drive in bad weather (rain, fog, etc.).
● A heavy load in the rear or modifications to the suspension tilts your vehicle.
● An abnormal tire condition is detected (wrong tire size, flat tire, etc.).
● When the windshield is blocked by dirt, mud, leaves, wet snow, etc.
● When the temperature inside the system is high.
● A sudden change between light and dark such as an entrance or exit of a tunnel.
● You drive into the sunlight (e.g. at dawn or dusk).
● When the windshield is dirty or cloudy.
● When you drive in the shadows of trees, buildings, etc.
● When you drive on a wet road surface following another vehicle.
uThe camera may perceive the tire tracks in the water as lane lines.
● When there is snow or wheel tracks on the side of the road.
● When the road has many repaired areas or erased lines.
● When the vehicle is running over painted signs or crosswalk markings.
● When you drive in a lane with worn-out lane markings.
Main MenuTable of Contents
Page 446 of 561
445
uuWhen DrivinguLaneWatchTM
Continued
Driving
LaneWatch TM
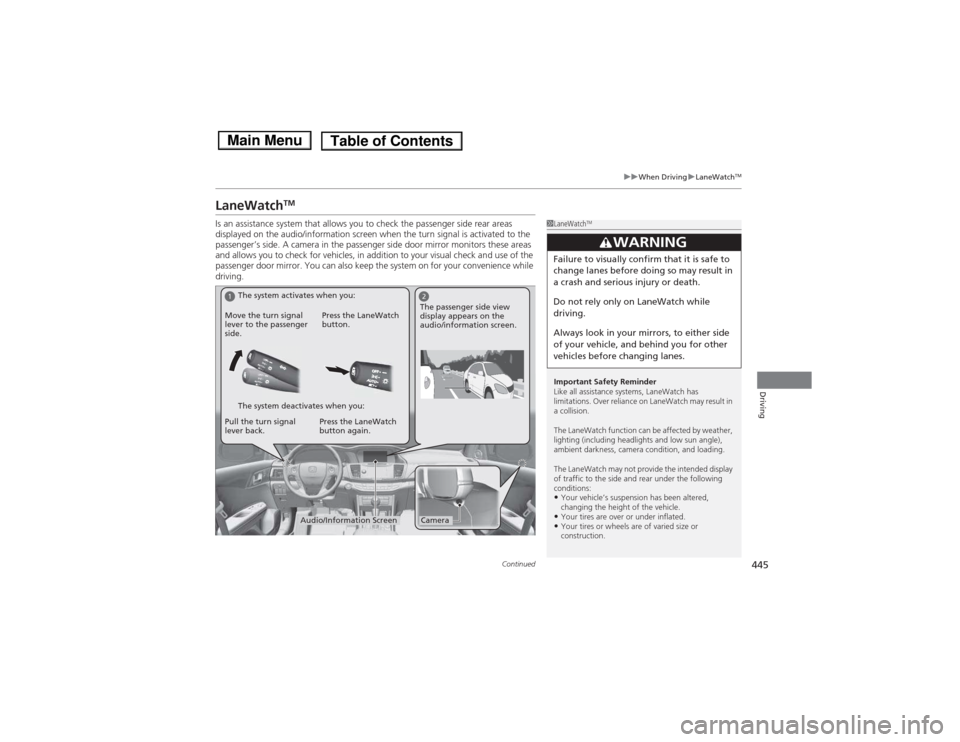
Is an assistance system that allows you to check the passenger side rear areas
displayed on the audio/information screen when the turn signal is activated to the
passenger’s side. A camera in the passenger side door mirror monitors these areas
and allows you to check for vehicles, in addition to your visual check and use of the
passenger door mirror. You can also keep the system on for your convenience while
driving.
1LaneWatch TM
Important Safety Reminder
Like all assistance systems, LaneWatch has
limitations. Over reliance on LaneWatch may result in a collision.
The LaneWatch function can be affected by weather,
lighting (including headlights and low sun angle),
ambient darkness, camera condition, and loading.
The LaneWatch may not provide the intended display
of traffic to the side and rear under the following
conditions: • Your vehicle’s suspension has been altered,
changing the height of the vehicle.
• Your tires are over or under inflated.
• Your tires or wheels are of varied size or
construction.
3WARNING
Failure to visually confirm that it is safe to
change lanes before doing so may result in
a crash and serious injury or death.
Do not rely only on LaneWatch while
driving.
Always look in your mirrors, to either side
of your vehicle, and behind you for other
vehicles before changing lanes.
12
CameraAudio/Information Screen
Move the turn signal
lever to the passenger
side.
Press the LaneWatch
button.
Pull the turn signal
lever back. Press the LaneWatch button again. The passenger side view
display appears on the
audio/information screen.
The system activates when you:
The system deactivates when you:
Main MenuTable of Contents
Page 447 of 561
uuWhen DrivinguLaneWatchTM
446
Driving
■ Customizing the LaneWatch settings
You can customize the following items using the audio/information screen. • Show with Turn Signal : Selects whether LaneWatch monitor comes on when
you operate the turn signal light lever.
• Reference Lines : Selects whether the reference lines appear on the LaneWatch
monitor.
• Next Maneuver Pop up *
: Selects whether a turn direction screen of the
navigation system interrupts the LaneWatch display.
• Display : Adjusts display settings.
2 Customized Features P. 293
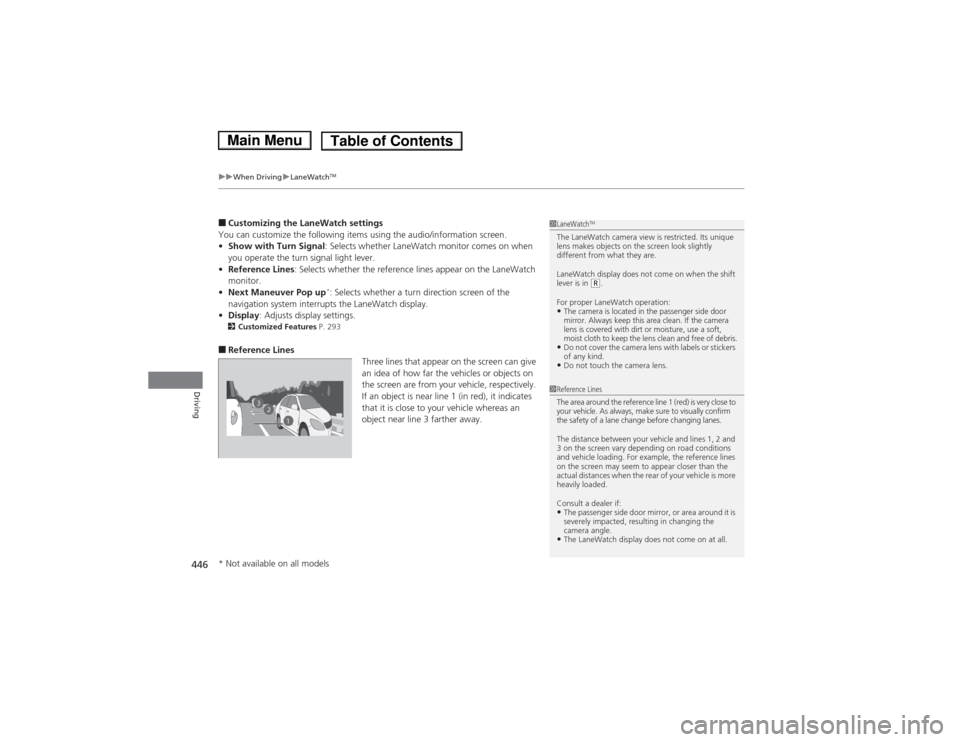
■ Reference Lines
Three lines that appear on the screen can give
an idea of how far the vehicles or objects on
the screen are from your vehicle, respectively.
If an object is near line 1 (in red), it indicates
that it is close to your vehicle whereas an
object near line 3 farther away.1LaneWatchTM
The LaneWatch camera view is restricted. Its unique
lens makes objects on the screen look slightly
different from what they are.
LaneWatch display does not come on when the shift lever is in
(R .
For proper LaneWatch operation: • The camera is located in the passenger side door
mirror. Always keep this area clean. If the camera
lens is covered with dirt or moisture, use a soft,
moist cloth to keep the lens clean and free of debris.
• Do not cover the camera lens with labels or stickers of any kind.
• Do not touch the camera lens.
23
1
1Reference Lines
The area around the reference line 1 (red) is very close to
your vehicle. As always, make sure to visually confirm
the safety of a lane change before changing lanes.
The distance between your vehicle and lines 1, 2 and
3 on the screen vary depending on road conditions
and vehicle loading. For example, the reference lines
on the screen may seem to appear closer than the
actual distances when the rear of your vehicle is more heavily loaded.
Consult a dealer if: •The passenger side door mirror, or area around it is
severely impacted, resulting in changing the camera angle.
• The LaneWatch display does not come on at all.
* Not available on all models
Main MenuTable of Contents
Page 453 of 561
452
Driving
Braking
Brake System
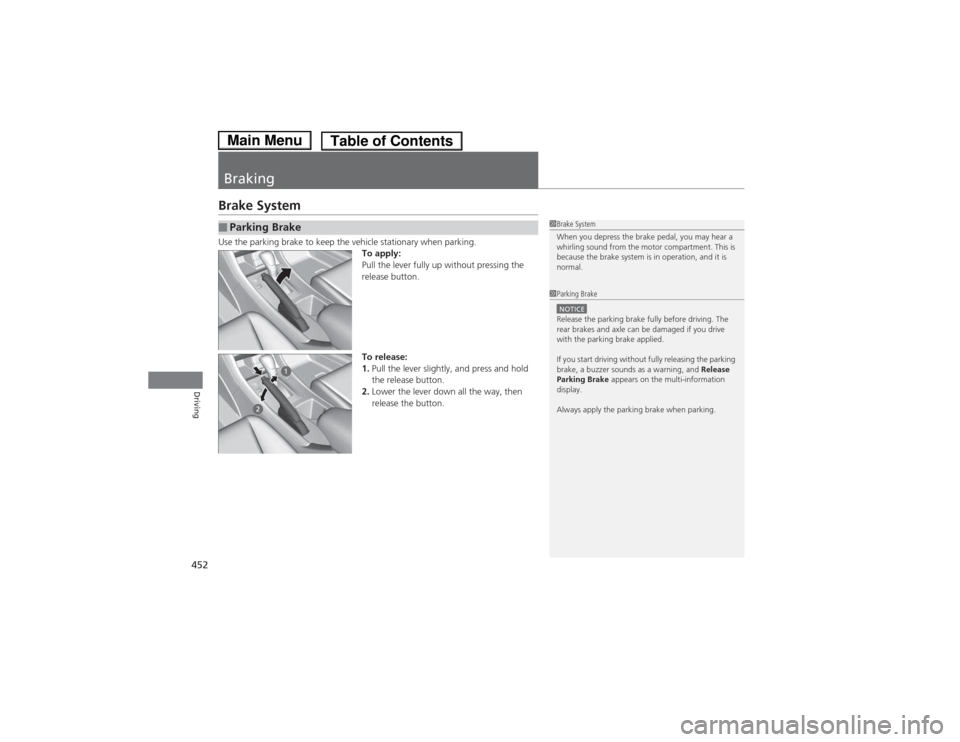
Use the parking brake to keep the vehicle stationary when parking.To apply:
Pull the lever fully up without pressing the release button.
To release: 1.Pull the lever slightly, and press and hold
the release button.
2. Lower the lever down all the way, then
release the button.
■Parking Brake1Brake System
When you depress the brake pedal, you may hear a
whirling sound from the motor compartment. This is
because the brake system is in operation, and it is
normal.
1Parking Brake
NOTICERelease the parking brake fully before driving. The
rear brakes and axle can be damaged if you drive
with the parking brake applied.
If you start driving without fully releasing the parking
brake, a buzzer sounds as a warning, and Release
Parking Brake appears on the multi-information
display.
Always apply the parking brake when parking.
Main MenuTable of Contents
Page 454 of 561
453
uuBrakinguBrake System
Driving
Your vehicle is equipped with disc brakes at all four wheels. The brake assist system
increases the stopping force when you depress the brake pedal hard in an
emergency situation. The anti-lock brake system (ABS) helps you retain steering
control when braking very hard.2 Brake Assist System P. 455
2 Anti-lock Brake System (ABS) P. 454
■Foot Brake1Foot Brake
Check the brakes after driving through deep water,
or if there is a buildup of road surface water. If
necessary, dry the brakes by lightly depressing the
pedal several times.
If you hear a continuous metallic friction sound when
applying the brakes, the brake pads need to be
replaced. Have your vehicle checked by a dealer.
Constantly using the brake pedal while going down a
long hill builds up heat, which reduces the brake
effectiveness. Apply regenerative braking by taking
your foot off the accelerator pedal and shifting to .
Do not rest your foot on the brake pedal while
driving, as it will lightly apply the brakes and cause
them to lose effectiveness over time and reduce pad
life. It will also confuse drivers behind you.
When you depress the brake pedal, you may hear a
motor sound coming from the engine compartment
while the brake system activates. This is normal.
B
Main MenuTable of Contents
Page 455 of 561
454
uuBrakinguAnti-lock Brake System (ABS)
Driving
Anti-lock Brake System (ABS)
Helps prevent the wheels from locking up, and helps you retain steering control by
pumping the brakes rapidly, much faster than you.
The electronic brake distribution (EBD) system, which is part of the ABS, also
balances the front-to-rear braking distribution according to vehicle loading.
You should never pump the brake pedal. Let the ABS work for you by always
keeping firm, steady pressure on the brake pedal. This is sometimes referred to as “stomp and steer.” ■ABS operation
The brake pedal may pulsate slightly when the ABS is working. Keep holding the
pedal firmly down. On dry pavement, you will need to press on the brake pedal very
hard before the ABS activates. However, you may feel the ABS activate immediately
if you are trying to stop on snow or ice.
When the vehicle speed goes under 6 mph (10 km/h), the ABS stops.
■ABS1Anti-lock Brake System (ABS)
NOTICEThe ABS may not function correctly if you use an
incorrect tire type and size.
When the ABS indicator comes on while driving,
there may be a problem with the system.
While normal braking is not affected, there is a
possibility of the ABS not operating. Have your
vehicle checked by a dealer immediately.
The ABS does not reduce the time or distance it takes
to stop the vehicle. It only helps with steering control
during hard braking.
In the following cases, your vehicle may need more
stopping distance than a vehicle without the ABS: • When driving on rough road surfaces, including
when driving on uneven surfaces, such as gravel or
snow.
• When snow chains are installed.
You may hear a motor sound coming from the
engine compartment while system checks are being
performed immediately after turning the power
system on or while driving. This is normal.
Main MenuTable of Contents
Page 456 of 561
455
uuBrakinguBrake Assist System
Driving
Brake Assist System
Designed to assist the driver by generating greater braking force when you depress
the brake pedal hard during emergency braking. ■Brake assist system operation
Press the brake pedal firmly for more powerful braking.
When brake assist operates, the pedal may wiggle slightly and an operating noise
may be heard. This is normal. Keep holding the brake pedal firmly down.
■Brake Assist System
Main MenuTable of Contents
Page 458 of 561
457
Driving
Multi-View Rear Camera
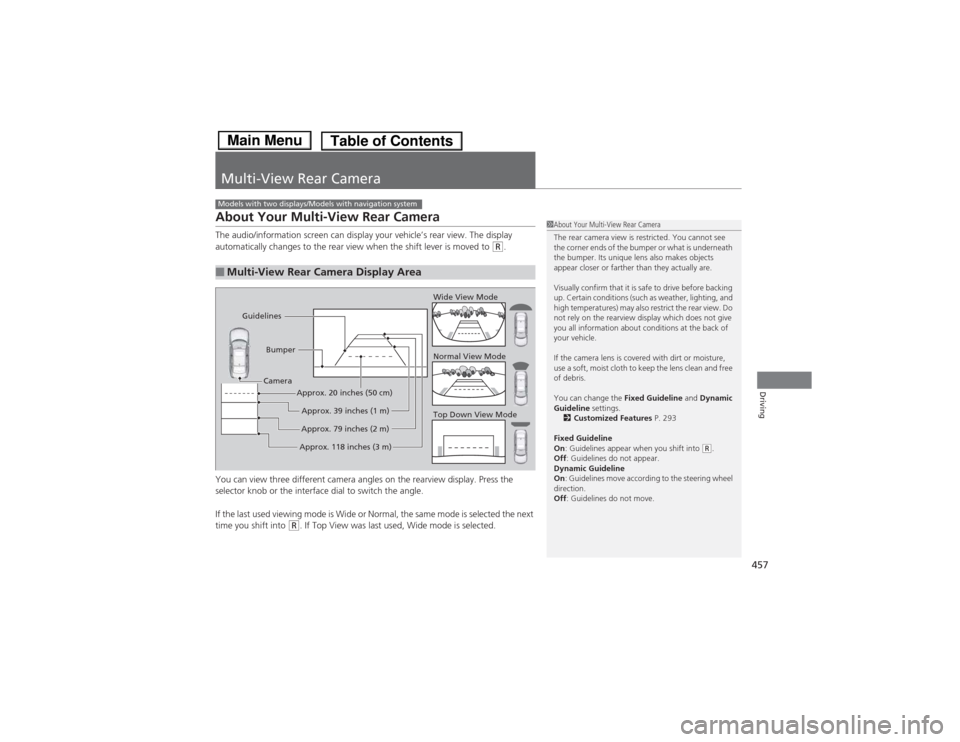
About Your Multi-View Rear Camera
The audio/information screen can display your vehicle’s rear view. The display
automatically changes to the rear view when the shift lever is moved to
(R.
You can view three different camera angles on the rearview display. Press the
selector knob or the interface dial to switch the angle.
If the last used viewing mode is Wide or Normal, the same mode is selected the next
time you shift into
(R . If Top View was last used, Wide mode is selected.
■Multi-View Rear Camera Display Area
Models with two displays/Models with navigation system
1About Your Multi-View Rear Camera
The rear camera view is restricted. You cannot see
the corner ends of the bumper or what is underneath
the bumper. Its unique lens also makes objects
appear closer or farther than they actually are.
Visually confirm that it is safe to drive before backing
up. Certain conditions (such as weather, lighting, and
high temperatures) may also restrict the rear view. Do
not rely on the rearview display which does not give
you all information about conditions at the back of your vehicle.
If the camera lens is covered with dirt or moisture,
use a soft, moist cloth to keep the lens clean and free
of debris.
You can change the Fixed Guideline and Dynamic
Guideline settings.
2 Customized Features P. 293
Fixed Guideline On : Guidelines appear when you shift into
(R.
Off : Guidelines do not appear.
Dynamic Guideline On : Guidelines move according to the steering wheel
direction. Off : Guidelines do not move.
Top Down View Mode
Normal View Mode
Wide View Mode
Guidelines
Bumper
Camera
Approx. 118 inches (3 m)Approx. 79 inches (2 m)Approx. 39 inches (1 m)
Approx. 20 inches (50 cm)
Main MenuTable of Contents
Page 459 of 561
458
Driving
Rearview Camera
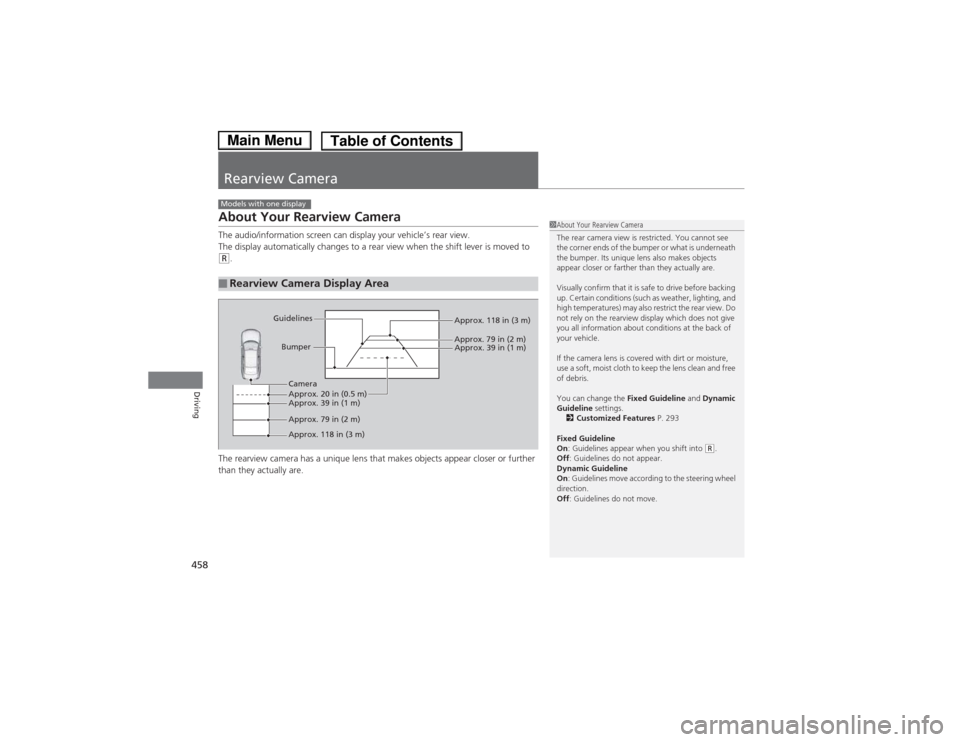
About Your Rearview Camera
The audio/information screen can display your vehicle’s rear view.
The display automatically changes to a rear view when the shift lever is moved to
(R.
The rearview camera has a unique lens that makes objects appear closer or further
than they actually are.
■Rearview Camera Display Area
Models with one display
1About Your Rearview Camera
The rear camera view is restricted. You cannot see
the corner ends of the bumper or what is underneath
the bumper. Its unique lens also makes objects
appear closer or farther than they actually are.
Visually confirm that it is safe to drive before backing
up. Certain conditions (such as weather, lighting, and
high temperatures) may also restrict the rear view. Do
not rely on the rearview display which does not give
you all information about conditions at the back of your vehicle.
If the camera lens is covered with dirt or moisture,
use a soft, moist cloth to keep the lens clean and free
of debris.
You can change the Fixed Guideline and Dynamic
Guideline settings.
2 Customized Features P. 293
Fixed Guideline On : Guidelines appear when you shift into
(R.
Off : Guidelines do not appear.
Dynamic Guideline On : Guidelines move according to the steering wheel
direction. Off : Guidelines do not move.
Bumper
Guidelines
Approx. 118 in (3 m)
Approx. 79 in (2 m) Approx. 39 in (1 m)
Approx. 20 in (0.5 m)
Approx. 118 in (3 m)
Approx. 79 in (2 m)
Approx. 39 in (1 m) Camera
Main MenuTable of Contents