light HONDA ACCORD HYBRID 2014 9.G Owners Manual
[x] Cancel search | Manufacturer: HONDA, Model Year: 2014, Model line: ACCORD HYBRID, Model: HONDA ACCORD HYBRID 2014 9.GPages: 561, PDF Size: 20.3 MB
Page 491 of 561
490
uuReplacing Light BulbsuRear License Plate Light Bulbs
Maintenance
Rear License Plate Light Bulbs
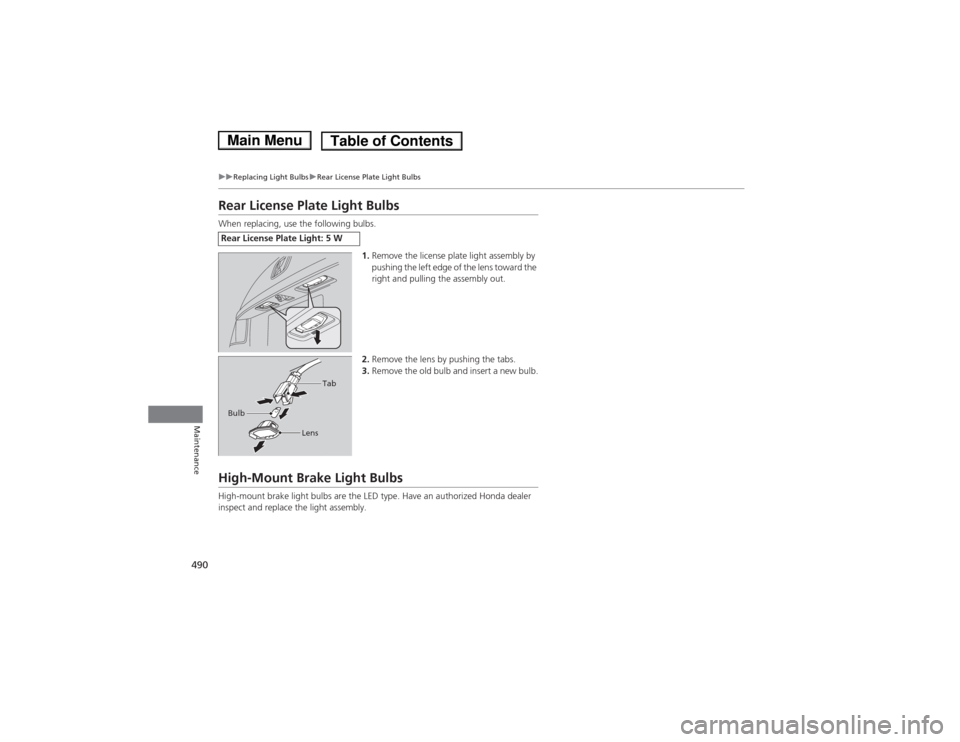
When replacing, use the following bulbs.1.Remove the license plate light assembly by
pushing the left edge of the lens toward the
right and pulling the assembly out.
2. Remove the lens by pushing the tabs.
3. Remove the old bulb and insert a new bulb.
High-Mount Brake Light Bulbs
High-mount brake light bulbs are the LED type. Have an authorized Honda dealer
inspect and replace the light assembly.
Rear License Plate Light: 5 W
Bulb
Tab
Lens
Main MenuTable of Contents
Page 511 of 561
510
Handling the Unexpected
If a Tire Goes Flat
Temporarily Repairing a Flat Tire
This vehicle is not equipped with a spare tire. If the tire has a large cut or is otherwise
severely damaged, you will need to have the vehicle towed. If the tire only has a
small puncture, from a nail for instance, you can use the temporary tire repair kit so
that you can drive to the nearest service station for a more permanent repair.
If a tire goes flat while driving, grasp the steering wheel firmly, and brake gradually
to reduce speed. Then stop in a safe place. 1.Park the vehicle on firm, level, and non-slippery surface and apply the parking brake.
2. Put the shift lever in
(P .
3. Turn on the hazard warning lights and set the power mode to VEHICLE OFF
(LOCK).
1Temporarily Repairing a Flat Tire
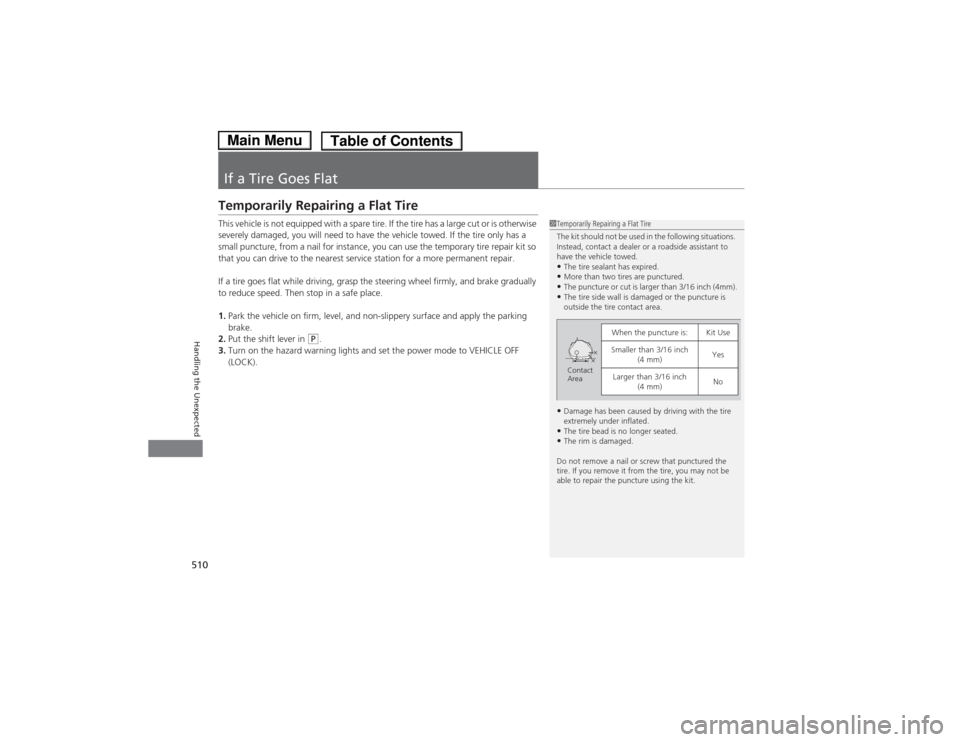
The kit should not be used in the following situations.
Instead, contact a dealer or a roadside assistant to
have the vehicle towed.•The tire sealant has expired.
• More than two tires are punctured.
• The puncture or cut is larger than 3/16 inch (4mm).
• The tire side wall is damaged or the puncture is
outside the tire contact area.
• Damage has been caused by driving with the tire
extremely under inflated.
• The tire bead is no longer seated.
• The rim is damaged.
Do not remove a nail or screw that punctured the
tire. If you remove it from the tire, you may not be
able to repair the puncture using the kit.
When the puncture is:Kit Use
Smaller than 3/16 inch (4 mm)Yes
Larger than 3/16 inch (4 mm)NoContact
Area
Main MenuTable of Contents
Page 520 of 561
519
Handling the Unexpected
Power System Won’t Start
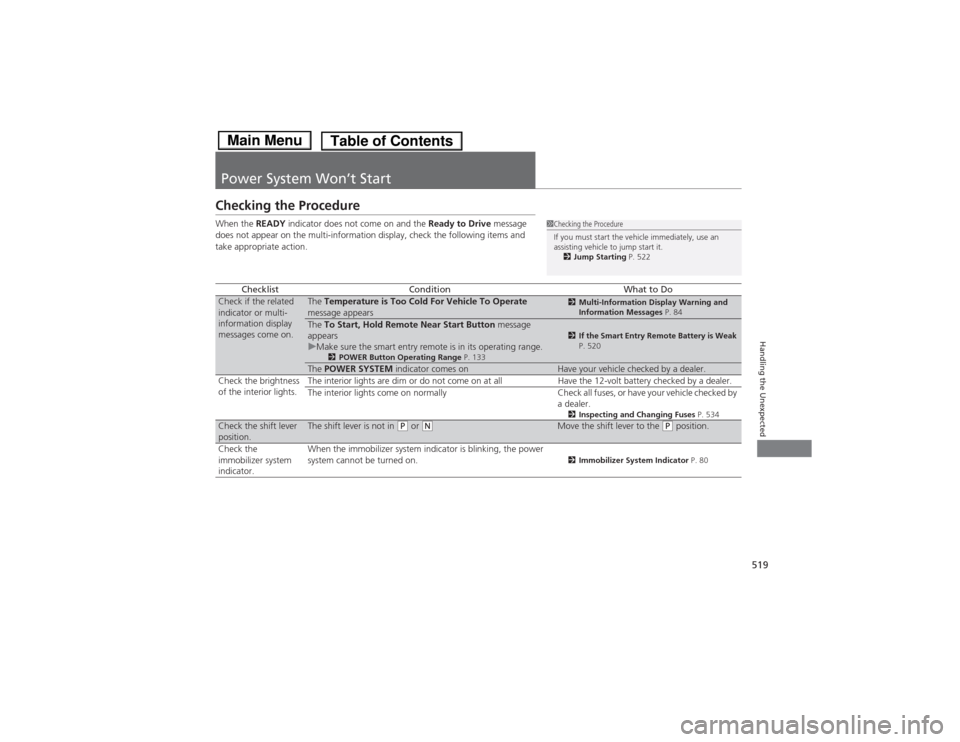
Checking the Procedure When the READY indicator does not come on and the Ready to Drive message
does not appear on the multi-information display, check the following items and
take appropriate action.
ChecklistConditionWhat to DoCheck if the related
indicator or multi- information display
messages come on.The Temperature is Too Cold For Vehicle To Operate
message appears2 Multi-Information Display Warning and
Information Messages P. 84
The To Start, Hold Remote Near Start Button message
appears
uMake sure the smart entry remote is in its operating range. 2POWER Button Operating Range P. 1332If the Smart Entry Remote Battery is Weak
P. 520
The POWER SYSTEM indicator comes onHave your vehicle checked by a dealer.
Check the brightness
of the interior lights. The interior lights are dim or do not come on at all Have the 12-volt battery checked by a dealer.
The interior lights come on normally Check all fuses, or have your vehicle checked by
a dealer.2Inspecting and Changing Fuses P. 534
Check the shift lever
position.The shift lever is not in (P or (NMove the shift lever to the (P position.
Check the
immobilizer system indicator. When the immobilizer system indicator is blinking, the power
system cannot be turned on.
2
Immobilizer System Indicator P. 80
1Checking the Procedure
If you must start the vehicle immediately, use an
assisting vehicle to jump start it.
2 Jump Starting P. 522
Main MenuTable of Contents
Page 523 of 561
522
Handling the Unexpected
Jump Starting
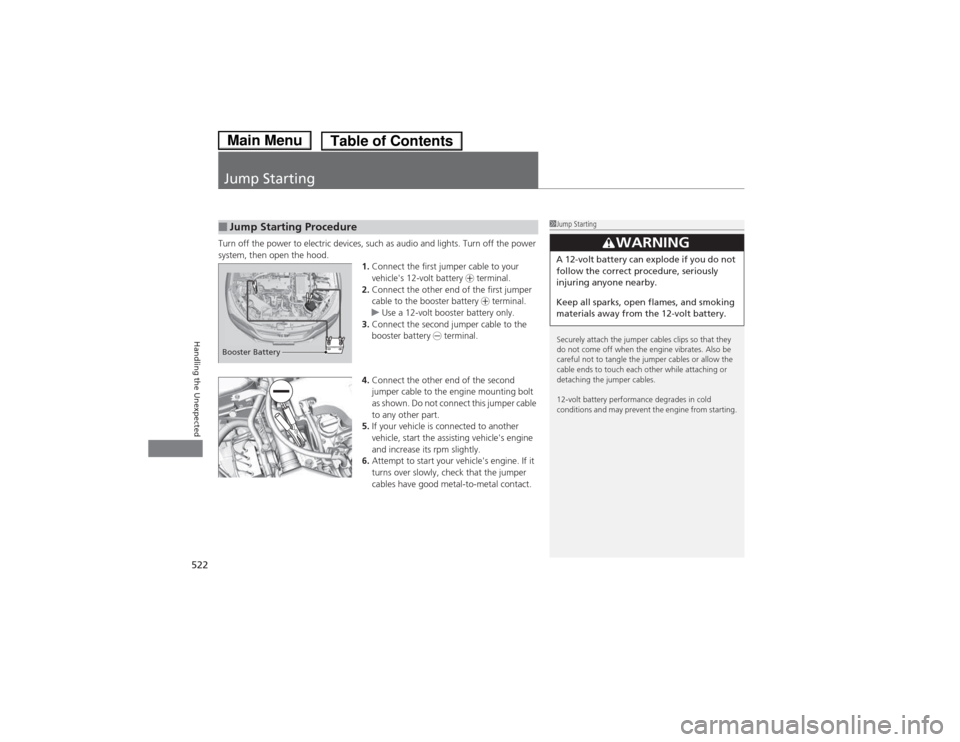
Turn off the power to electric devices, such as audio and lights. Turn off the power
system, then open the hood.1.Connect the first jumper cable to your vehicle's 12-volt battery + terminal.
2. Connect the other end of the first jumper
cable to the booster battery + terminal.
uUse a 12-volt booster battery only.
3. Connect the second jumper cable to the
booster battery - terminal.
4. Connect the other end of the second
jumper cable to the engine mounting bolt
as shown. Do not connect this jumper cable
to any other part.
5. If your vehicle is connected to another
vehicle, start the assisting vehicle's engine
and increase its rpm slightly.
6. Attempt to start your vehicle's engine. If it
turns over slowly, check that the jumper
cables have good metal-to-metal contact.
■Jump Starting Procedure1Jump Starting
Securely attach the jumper cables clips so that they
do not come off when the engine vibrates. Also be
careful not to tangle the jumper cables or allow the
cable ends to touch each other while attaching or
detaching the jumper cables.
12-volt battery performance degrades in cold
conditions and may prevent the engine from starting.
3WARNING
A 12-volt battery can explode if you do not
follow the correct procedure, seriously
injuring anyone nearby.
Keep all sparks, open flames, and smoking
materials away from the 12-volt battery.
Booster Battery
Main MenuTable of Contents
Page 526 of 561
525
Continued
Handling the Unexpected
Overheating
How to Handle Overheating
Overheating symptoms are as follows: •
The High Temperature. Power Reduced. message appears on the multi-
information display.
• The Engine Temperature Too Hot message appears on the multi-information
display.
• Steam or spray comes out of the engine compartment.
The High Temperature. Power Reduced. message appears on the multi-
information display when the power system temperature is high. 2 Multi-Information Display Warning and Information Messages P. 90
1. Immediately park the vehicle in a safe place.
uMove the shift lever to (P , and set the parking brake. Turn off all accessories
and turn on the hazard warning lights.
2. Keep the power mode on, and wait until the message disappears.
uIf the message does not disappear, have your vehicle inspected at a dealer.
■The High Temperature. Power Reduced. Message Appears
on the Multi-Information Display
Main MenuTable of Contents
Page 527 of 561
uuOverheatinguHow to Handle Overheating
526
Handling the Unexpected
■ First thing to do
1. Immediately park the vehicle in a safe place.
2. Turn off all accessories and turn on the hazard warning lights.
uNo steam or spray present: Keep the power system on and open the hood.uSteam or spray is present: Turn off the power system and wait until it
subsides. Then open the hood.
■The Engine Temperature Too Hot Message Appears on the
Multi-Information Display1The Engine Temperature Too Hot Message Appears on the Multi-Information Display
NOTICEContinuing to drive with the Engine Temperature
Too Hot message on the multi-information display
may damage the engine.
3WARNING
Steam and spray from an overheated
engine can seriously scald you.
Do not open the hood if steam is coming
out.
Main MenuTable of Contents
Page 529 of 561
528
Handling the Unexpected
Indicator, Coming On/Blinking
If the Low Oil Pressure Indicator Comes On■Reasons for the indicator to come on
Comes on when the engine oil pressure is low. ■ What to do as soon as the indicator comes on
1. Immediately park the vehicle in a safe place.
2. If necessary, turn the hazard warning lights on.
■ What to do after parking the vehicle
1. Turn the power system off and let the engine sit for about one minute.
2. Open the hood and check the oil level.
uAdd oil as necessary.
3. Turn the power system on and check the low oil pressure indicator.
uThe indicator goes off: Start driving again.uThe indicator does not go off within 10 seconds: Turn the power
off and contact a dealer for repairs immediately.
If the 12-Volt Battery Charging System Indicator
Comes On ■Reasons for the indicator to come on
Comes on when the 12-volt battery is not being charged. ■ What to do when the indicator comes on
Turn off the climate control system, rear defogger, and other electrical
systems, and immediately contact a dealer for repairs.
1If the Low Oil Pressure Indicator Comes On
NOTICERunning the engine with low oil pressure can cause
serious mechanical damage almost immediately.
Main MenuTable of Contents
Page 531 of 561
530
uuIndicator, Coming On/BlinkinguIf the Brake System Indicator (Red) Comes On
Handling the Unexpected
If the Brake System Indicator (Red) Comes On■Reasons for the indicator to come on
• The brake fluid is low.
• There is a malfunction in the brake system.
■ What to do when the indicator comes on while driving
Press the brake pedal lightly to check pedal pressure. • If normal, check the brake fluid level the next time you stop.
• If abnormal, take immediate action. If necessary, downshift the
transmission to slow the vehicle using regenerative braking.
If the Electric Power Steering (EPS) System Indicator
Comes On ■Reasons for the indicator to come on
• Comes on when there is a problem with the EPS system.
■ What to do when the indicator comes on
Stop the vehicle in a safe place and turn on the power system again.
If the indicator comes on and stays on, immediately have your vehicle inspected by a dealer.
1If the Brake System Indicator (Red) Comes On
Have your vehicle repaired immediately.
It is dangerous to drive with low brake fluid. If there
is no resistance from the brake pedal, stop
immediately in a safe place. If necessary downshift
the transmission.
If the brake system indicator (red) and ABS indicator
come on simultaneously, the electronic brake
distribution system is not working. This can result in
vehicle instability under sudden braking.
Have your vehicle inspected by a dealer immediately.
If both red and amber brake system indicators come
on, stop the vehicle in a safe place and have it
inspected by a dealer immediately.U.S.
Canada
Main MenuTable of Contents
Page 533 of 561
532
Handling the Unexpected
Fuses
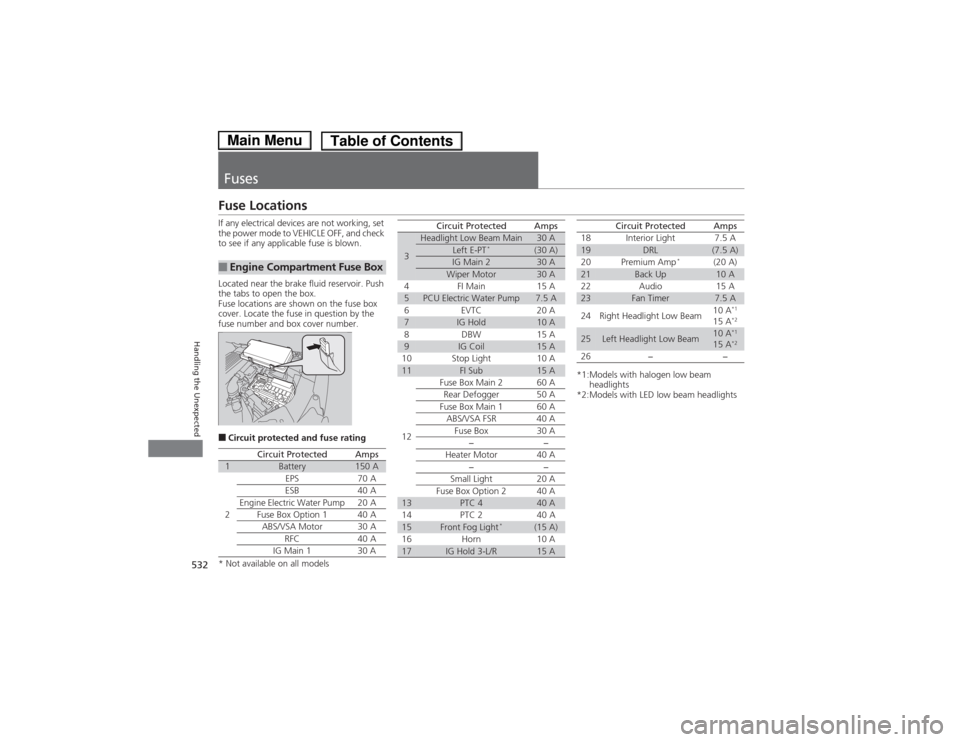
Fuse Locations
If any electrical devices are not working, set
the power mode to VEHICLE OFF, and check
to see if any applicable fuse is blown.
Located near the brake fluid reservoir. Push
the tabs to open the box.
Fuse locations are shown on the fuse box
cover. Locate the fuse in question by the
fuse number and box cover number. ■Circuit protected and fuse rating
■Engine Compartment Fuse Box
Circuit ProtectedAmps1Battery150 A
2
EPS70 A
ESB 40 A
Engine Electric Water Pump20 A
Fuse Box Option 1 40 A
ABS/VSA Motor30 A
RFC 40 A
IG Main 1 30 A
3
Headlight Low Beam Main30 ALeft E-PT *(30 A)IG Main 230 AWiper Motor30 A
4 FI Main 15 A
5PCU Electric Water Pump7.5 A
6E VTC 2 0A
7IG Hold10 A
8 DBW 15 A
9IG Coil15 A
10 Stop Light 10 A
11FI Sub15 A
12 Fuse Box Main 2 60 A
Rear Defogger 50 A
Fuse Box Main 1 60 A ABS/VSA FSR 40 A
Fuse Box 30 A −−
Heater Motor 40 A −−
Small Light 20 A
Fuse Box Option 2 40 A
13PTC 440 A
14 PTC 2 40 A
15Front Fog Light *(15 A)
16 Horn 10 A
17IG Hold 3-L/R15 A
Circuit ProtectedAmps
*1:Models with halogen low beam headlights
*2:Models with LED low beam headlights 18 Interior Light 7.5 A
19DRL(7.5 A)
20 Premium Amp *
(20 A)
21Back Up10 A
22 Audio 15 A
23Fan Timer7.5 A
24 Right Headlight Low Beam 10 A
*1
15 A *2
25Left Headlight Low Beam10 A*1
15 A *2
26 − −
Circuit ProtectedAmps
* Not available on all models
Main MenuTable of Contents
Page 534 of 561
533
uuFusesuFuse Locations
Handling the Unexpected
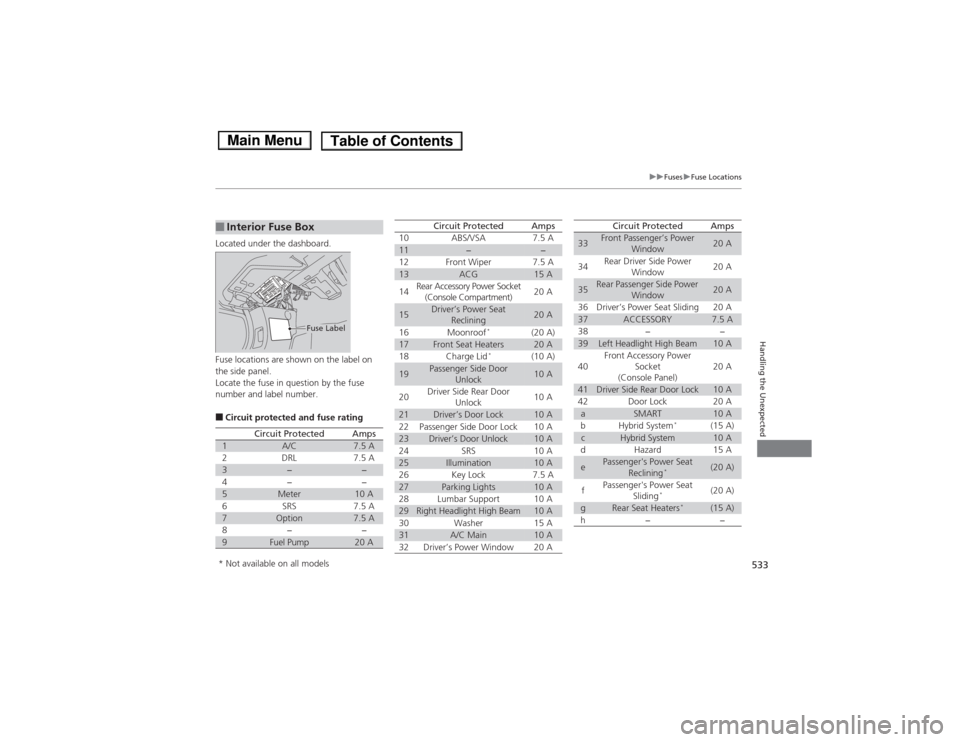
Located under the dashboard.
Fuse locations are shown on the label on
the side panel.
Locate the fuse in question by the fuse
number and label number. ■Circuit protected and fuse rating
■Interior Fuse Box
Fuse Label
Circuit ProtectedAmps1A/C7.5 A2DRL7.5 A3−−4−−5Meter10 A6SRS7.5 A7Option7.5 A8−−9Fuel Pump20 A
10ABS/VSA7.5 A11−−12Front Wiper7.5 A13ACG15 A
14Rear Accessory Power Socket
(Console Compartment)20 A
15Driver’s Power Seat Reclining20 A
16Moonroof *(20 A)17Front Seat Heaters20 A18Charge Lid
*(10 A)
19Passenger Side Door
Unlock10 A
20Driver Side Rear Door Unlock10 A
21Driver’s Door Lock10 A22Passenger Side Door Lock10 A23Driver’s Door Unlock10 A24SRS10 A25Illumination10 A26Key Lock7.5 A27Parking Lights10 A28Lumbar Support10 A29Right Headlight High Beam10 A30Washer15 A31A/C Main10 A32Driver’s Power Window20 A
Circuit ProtectedAmps
33Front Passenger’s Power Window20 A
34Rear Driver Side Power Window20 A
35Rear Passenger Side Power
Window20 A
36Driver’s Power Seat Sliding20 A37ACCESSORY7.5 A38−−39Left Headlight High Beam10 A
40Front Accessory Power Socket
(Console Panel)20 A
41Driver Side Rear Door Lock10 A42Door Lock20 AaSMART10 AbHybrid System *(15 A)cHybrid System10 AdHazard15 A
ePassenger's Power Seat
Reclining *(20 A)
fPassenger's Power Seat
Sliding*(20 A)
gRear Seat Heaters
*(15 A)h−−
Circuit ProtectedAmps
* Not available on all models
Main MenuTable of Contents