HONDA CIVIC 2002 7.G Workshop Manual
CIVIC 2002 7.G
HONDA
HONDA
https://www.carmanualsonline.info/img/13/5744/w960_5744-0.png
HONDA CIVIC 2002 7.G Workshop Manual
Trending: key fob battery, clutch, headlights, Tacho, sensor, radio removal, wheel alignment
Page 181 of 1139
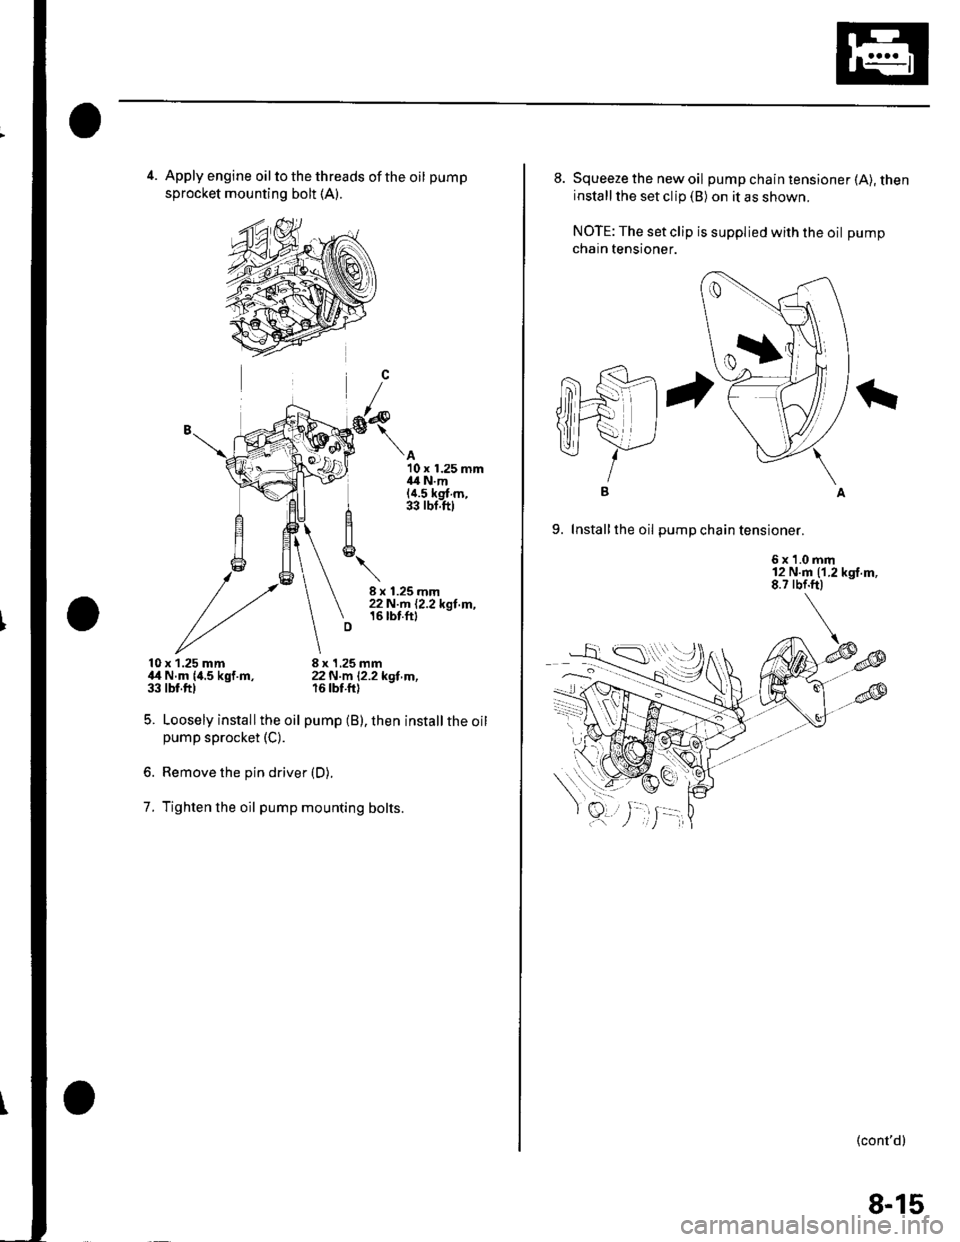
4. Apply engine oil to the threads of the oil pump
sprocket mounting bolt (A).
A10 x 1.25 mm{4 N.m(a.5 kg{ m,33 rbf.ftl
10x 1.25 mm,l,t N.m {4.5 kgf.m,33 tbt.ftl
5. Loosely installthe oil
pump sprocket (C).
8 x 1,25 mm22N m l2.2kot m.r6 tbt.fti
pump (B), then installthe oil
7.
Remove the pin driver (D).
Tighten lhe oil pump mounting bolts.
I
8-15
8. Squeeze the new oil pump chain tensioner (A), theninstall the set clip (B) on it as shown.
NOTE: The set clip is supplied with the oil pump
chain tensioner.
9. Install the oil Dum D cha in tensioner.
6x1.0mm12 N.m (1.2 kgf.m,8.7 rbf.ft)
IB
(cont'd)
Page 182 of 1139
Engine Lubrication
Oil Pump Overhaul (cont'dl
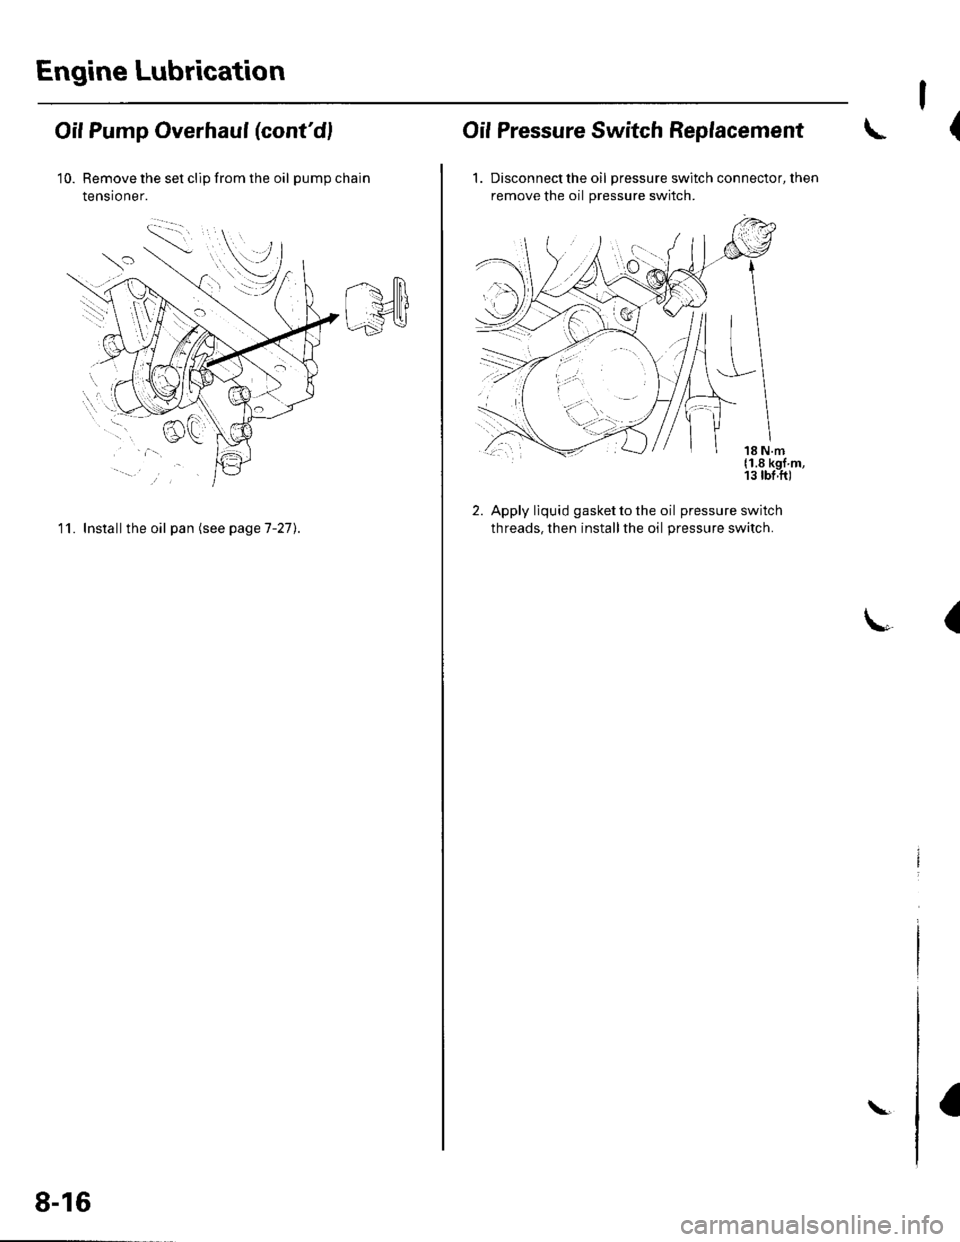
10. Remove the set clip from the oil pumpchain
tensioner.
11. Install the oil pan (see pageT-27).
8-16
\
I
(Oif Pressure Switch Replacement
1. Discon nect the oil pressure switch connector, then
remove the oil pressure switch.
2. Apply liquid gasket to the oil pressure switch
threads, then installthe oil pressure switch.
(
Page 183 of 1139
Engine Mechanical
Intake Manifold and Exhaust System
lntake Manifold Removal and Installation ................. 9-2
Exhaust Manifold Removal and Installation .............. 9-7
Exhaust Pipe and Muffler Replacement ..................... 9-8
r
r-!i!1
Page 184 of 1139
Intake Manifold and Exhaust System
lntake Manifold Removal and Installation
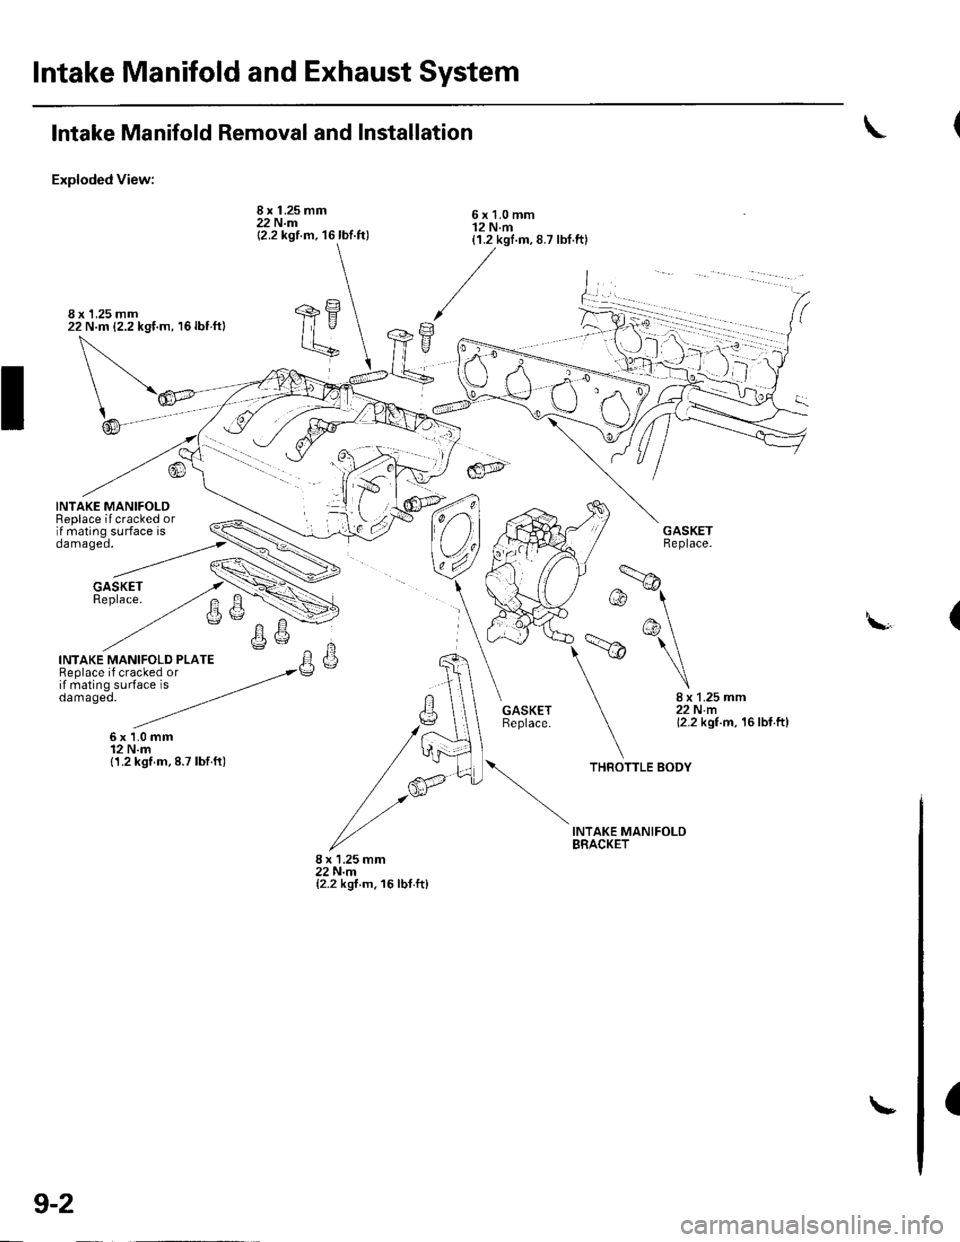
Exploded View:
INTAKE MANIFOLD PLATEReplace if cracked orif mating surface isdamaged.
6x1.0mm12 N.m{1.2 kgf.m,8.7 lbf.ft)
\
I
GASKETReplace.
8 x 1.2522Nm12.2 ksf
\
\8x22
k'e)
t9
w)
k
('!
16
.25 mm'mkgf.m, 1
8 x 1.25 mm22 N.m(2.2 kgf m. 16 lbt.ft)
(
8 x 1,25 mm22 N.m {2.2 kgf.m, 16 lbf ft}
INTAKE MANIFOLDReplace if cracked orif mating surface is
9-2
\-
Page 185 of 1139
Removal:
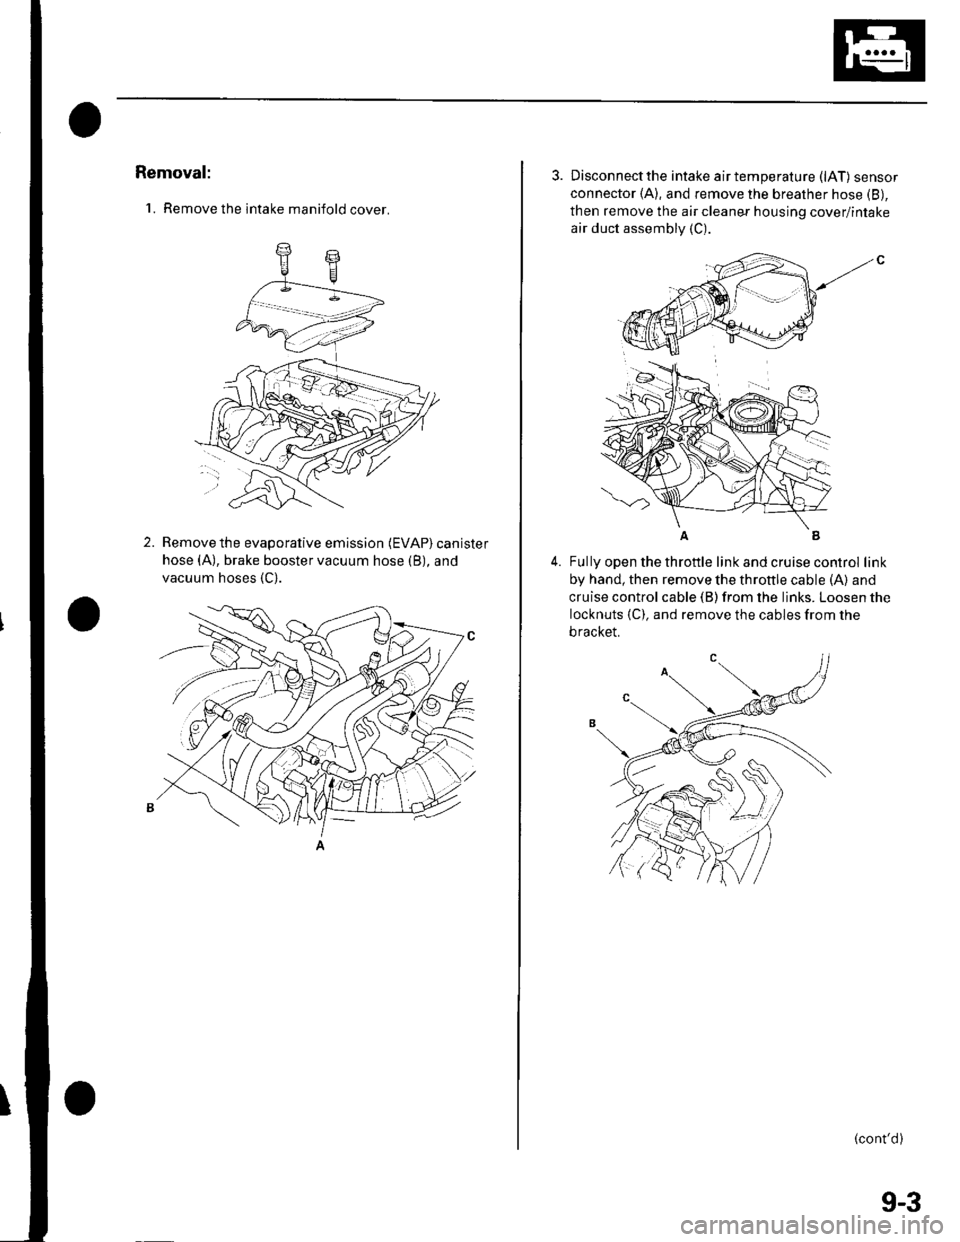
'1. Remove the intake manifold cover.
2.Remove the evaporative emission (EVAP) canister
hose (A), brake booster vacuum hose (B), and
vacuum hoses {C).
3. Disconnectthe intake airtemperature (lAT) sensor
connector (A), and remove the breather hose (B),
then remove the air cleaner housing cover/intake
air duct assembly (C).
4.Fully open the throttle link and cruise control link
by hand, then remove the throttle cable (A) and
cruise control cable (B) from the links. Loosen the
locknuts {C). and remove the cables from the
bracket.
(cont'd)
(
9-3
Page 186 of 1139
Intake Manifold and Exhaust System
Intake Manifold Removal and Installation (cont'dl
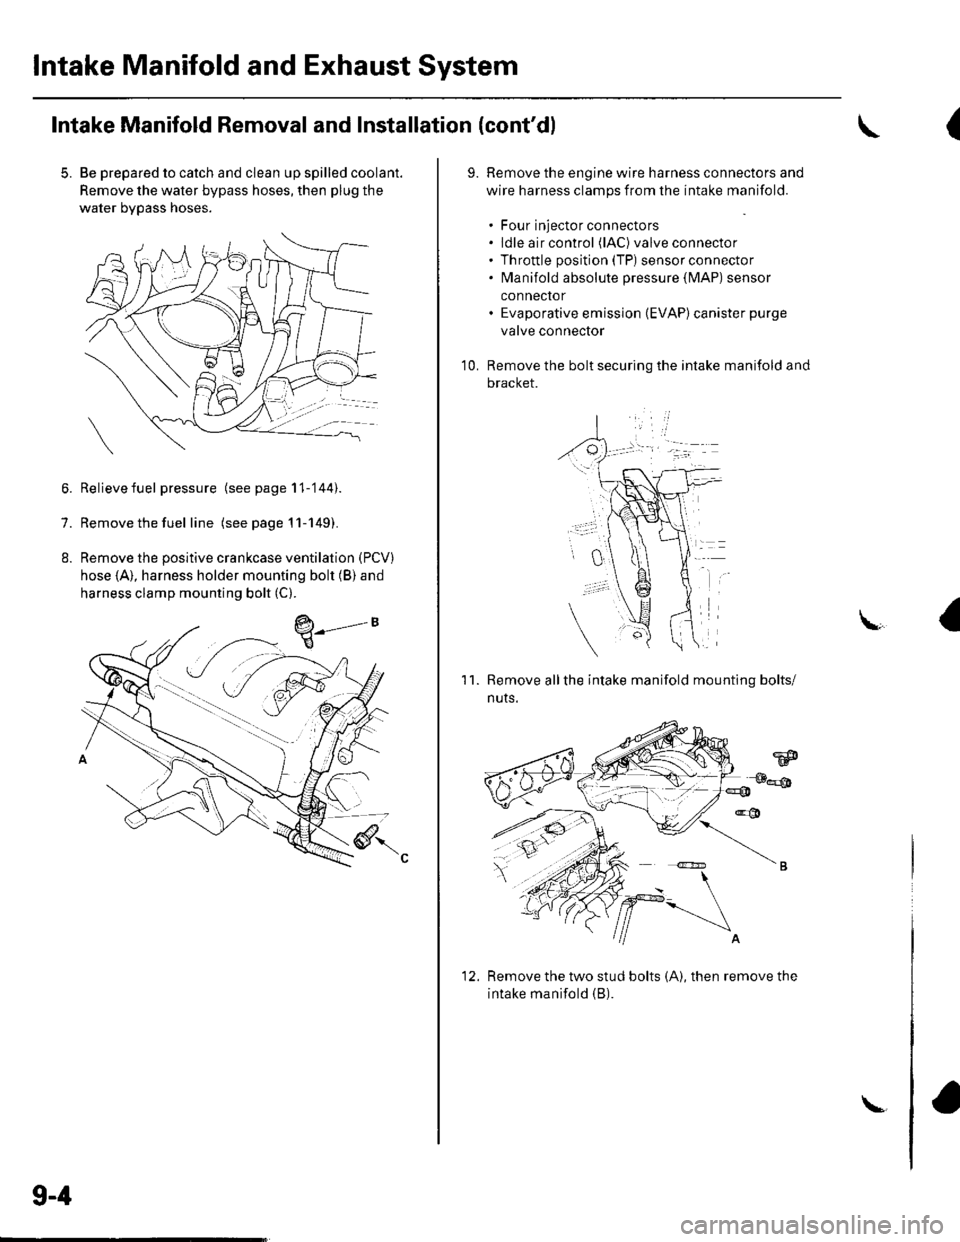
5. Be prepared to catch and clean up spilled coolant.
Remove the water bypass hoses, then plug the
water bypass hoses.
6. Relievefuel pressure (see page 11-'144).
7. Remove the fuel line (seepagell-149).
8. Remove the positive crankcase ventilation (PCV)
hose (A), harness holder mounting bolt (B) and
harness clamp mounting bolt (C).
9-4
\-
(
9.Remove the engine wire harness connectors and
wire harness clamps from the intake manifold.
. Four injector connectors. ldle air control (lAC) valve connector. Throttle position (TP) sensor connector. fvlanifold absolute pressure {lvlAP) sensor
connector. Evaporative emission (EVAP)canister purge
valve connector
Remove the bolt securing the intake manifold and
bracket.
'1 0.
11.Remove allthe intake manifold mounting bolts/
nuts.
Remove the two stud bolts (A), then remove the
intake manifold (B).
1'>
Page 187 of 1139
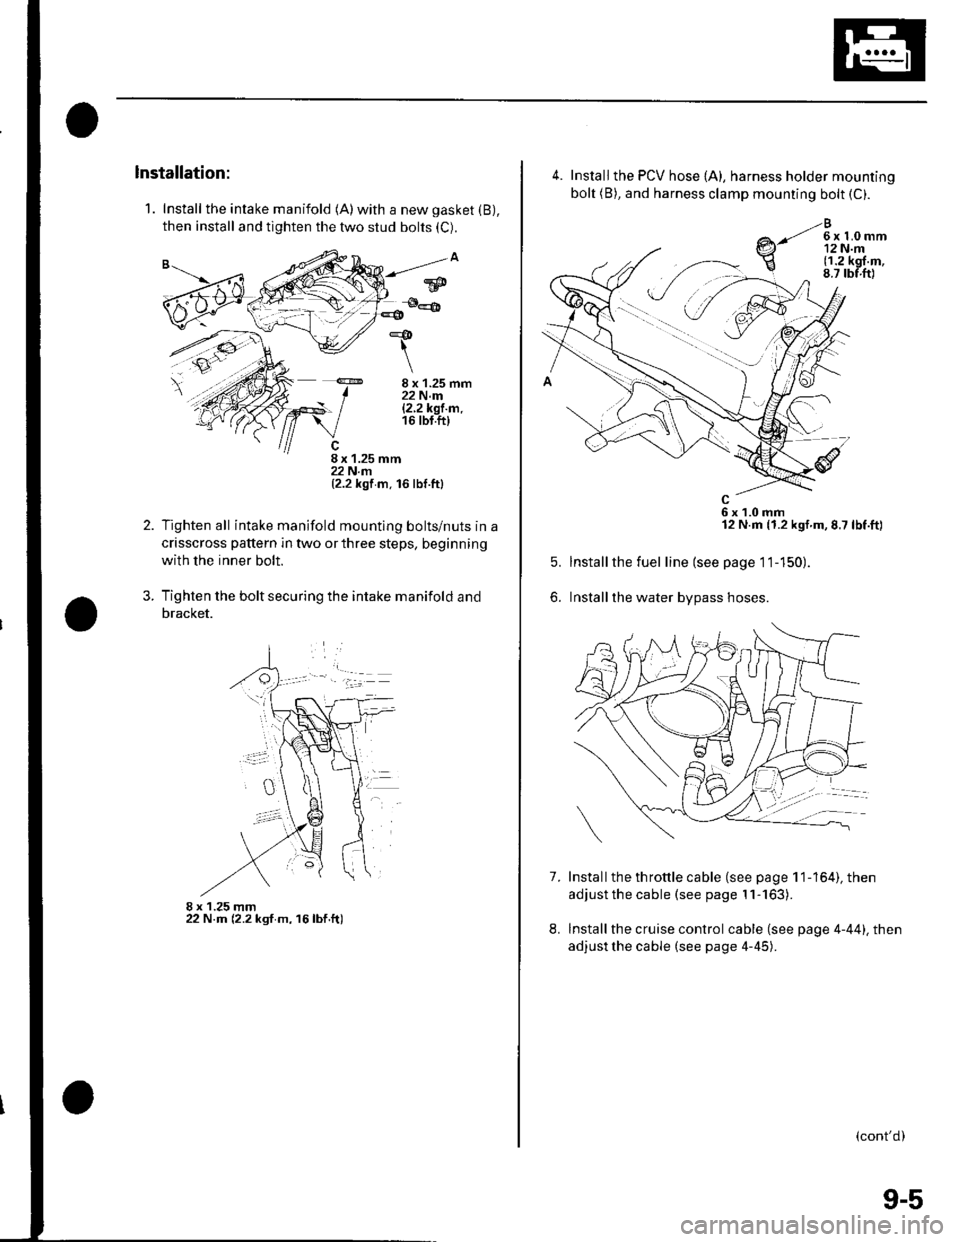
1. Install the intake manifold (A)with a new gasket (B),
then install and tighten the two stud bolts (C).
8 x 1.25 mm22 N.m|.2.2k91.m.16 tbt.ft)
8 x 1.25 mm22 N.rn(2.2 kgf m. 16 lbf.ttl
Tighten all intake manifold mountlng bolts/nuts in a
crisscross pattern in two or three steps, beginning
with the inner bolt.
Tighten the bolt securing the intake manifold and
bracket.
8 x 1.25 mm22 N.m (2.2 ksf m, 16lbf.ft)
*&
\
2.
?
w
4.
7.
5.
6.
Install the PCV hose {A), harness holder mounting
bolt (B), and harness clamp mounting bolt (C).
e-li*h,r
6x1.0mm12 N.m (1.2 kgf.m,8.7 lbf.ft)
Installthe fuel line (see page 11-150).
Installthe water bypass hoses.
Install the th rottle cable (see page 1 1-164), then
adjust the cable (see page 11-163).
Install the cruise control cable (see page 4-44). then
adjust the cable (see page 4-45).
8.
(cont'd)
9-5
Page 188 of 1139
lntake Manifold and Exhaust System
Intake Manifold Removal and Installation (cont'd)
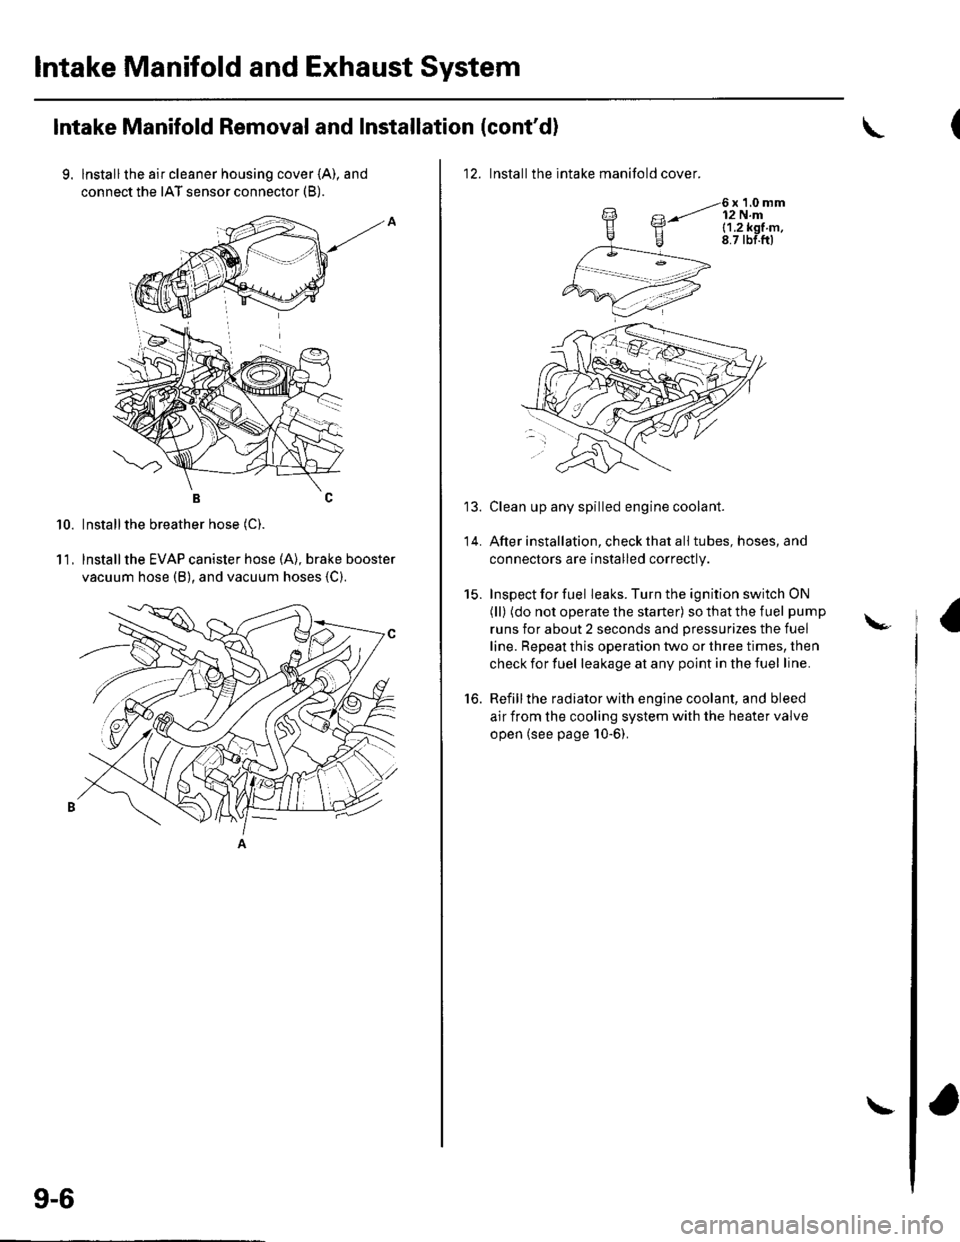
9. lnstallthe air cleaner housing cover (A), and
connect the IAT sensor connector (B).
BC
Installthe breather hose (C).
lnstallthe EVAP canister hose (A), brake booster
vacuum hose (B), and vacuum hoses {C).
10.
11.
9-6
\
12. Installthe intake manifold cover.
6x1.0mm12 N.ml.1.2k91.m,8.7 tbf.ftl
Clean up any spilled engine coolant.
After installation, check that all tubes, hoses, and
connectors are installed correctly.
Inspect for fuel leaks. Turn the ignition switch ON
(ll) (do not operate the starter) so that the fuel pump
runs for about 2 seconds and pressurizes the fuel
line. Repeat this operation two or three times, then
check for fuel leakage at any point in the fuel line.
Refill the radiator with engine coolant, and bleed
air from the cooling system with the heater valve
open (see page 10-6).
to.
\-
Page 189 of 1139
1.
2.
3.
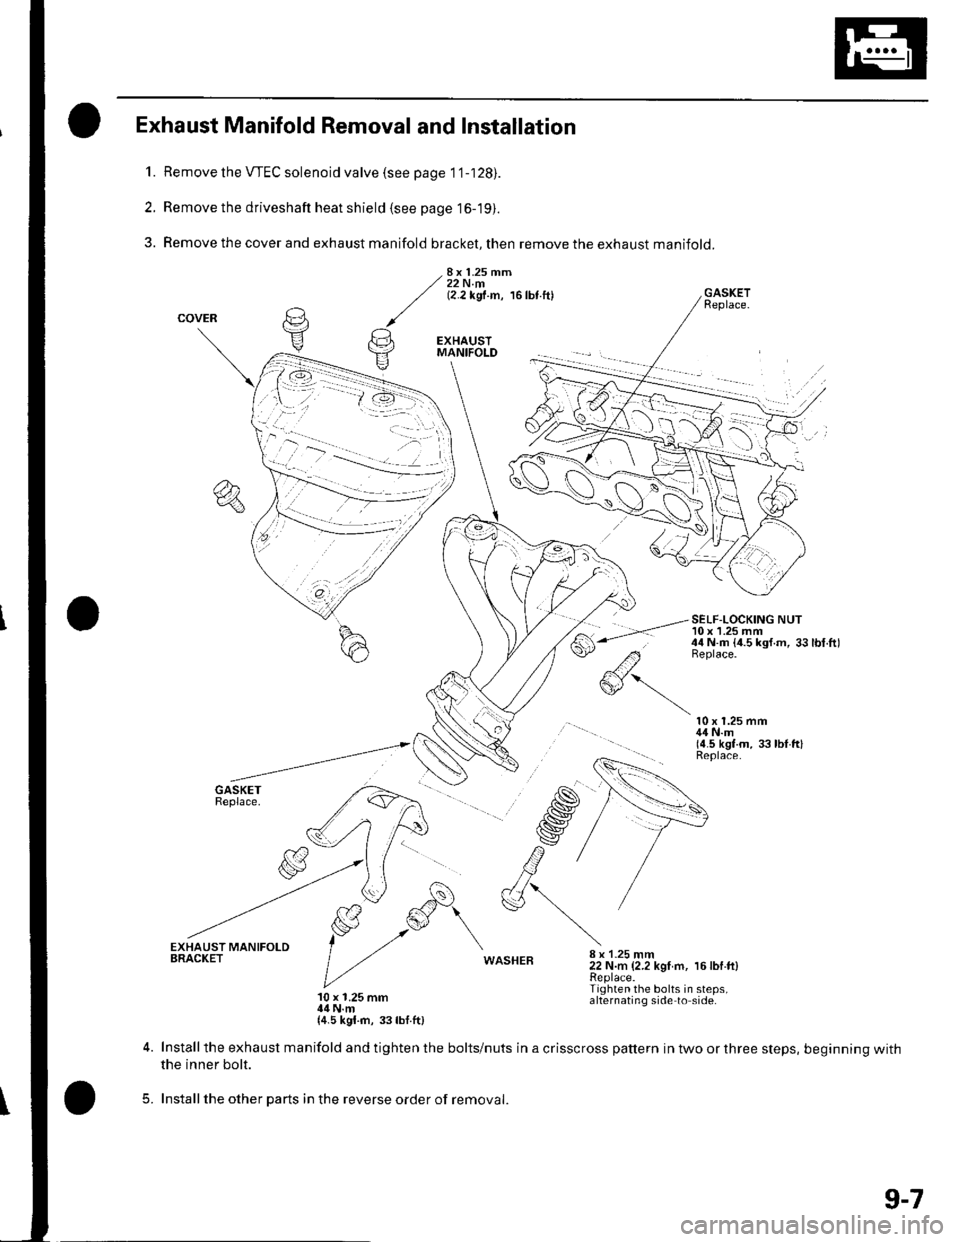
Exhaust Manifold Removal and Installation
Remove the VTEC solenoid valve (see page 1 '1-128).
Remove the driveshaft heat shield (see page 16-19).
Remove the cover and exhaust manifold bracket, then remove the exhaust manifold.
8x 1.25 mm22 N.m(2.2 kgf.m, 16lbt.ftl
#'-.-
GASKETReplace.
SELF-LOCKING NUT10 x 1.25 mm44 N.m {4.5 ksf.m, 33lbt.ftlBeplace.
10 x 1.25 mm44 N.m(4.5 kgt.m, 33 lbl ftlReplace.
WASHEB8 x 1-25 mm22 N.m (2.2 kgI m, 16lbf.ft)Replace.Tighten the bolts in steps,alternating side to side.10 x 1.25 mm14 N.m{4.5 kgl.rn, 33lbf.ft)
5.
Install the exhaust manifold and tighten the bolts/nuts in a crisscross pattern in two or three steps, beginning withthe inner bolt.
Installthe other parts in the reverse order of removal.
9-7
Page 190 of 1139
lntake Manifold and Exhaust System
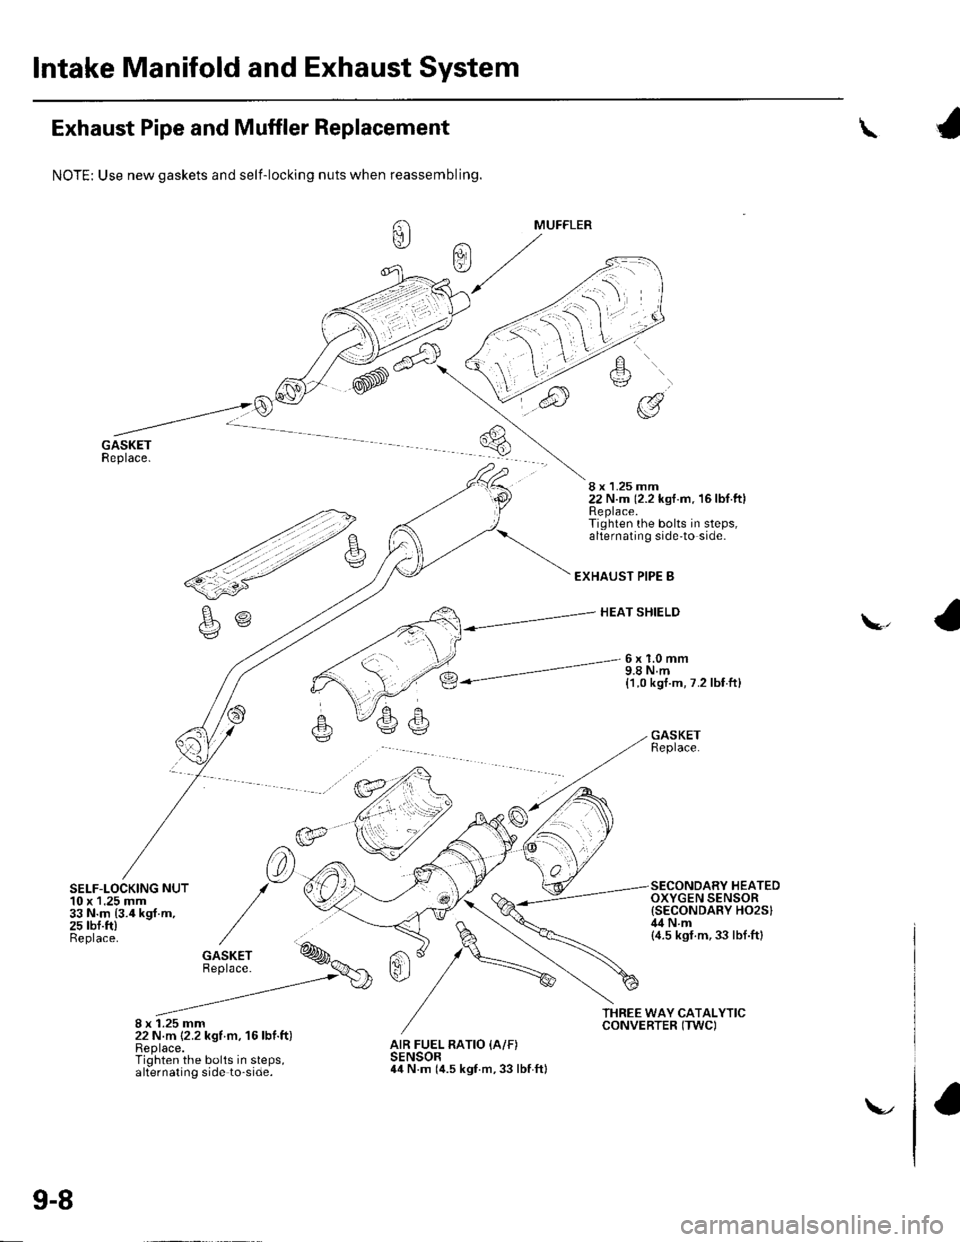
Exhaust Pipe and Muffler Replacement
SELF-LOCKING NUT10 x 1.25 mm33 N.m {3.4 kgf.m,25 rbf.ft)Beplace.
8 x 1.25 mm22 N.m {2.2 kgf m, 16lbf.ft)Replace.Tighten the bolts in steps,alternating side to-side.
\
NOTE: Use new gaskets and self-locking nuts when reassembling.
8 x 1.25 mm22 N.m (2.2 kst.m. 16lbf.ftlReplace.Tighten the bolts in steps,alternating side'to side.
EXHAUST PIPE B
HEAT SHIELD\,
6x1.0mm9.8 N.m{1.0 kgt.m, 7.2 lbf ft}
GASKETReplace.
SECONDARY HEATEDOXYGEN SENSOR{SECONDARY HO2SIil4Nm(4.5 ksf.m,33 lbf.ftl
AIR FUEL RATIO {A/F)SENSOR44 N.m (it.s kgf.m, 33 lbf ftl
9-8
\-.
Trending: key, Motor, wipers, air conditioning, maintenance schedule, start stop button, washer fluid
