fuse HONDA CIVIC 2002 7.G Repair Manual
[x] Cancel search | Manufacturer: HONDA, Model Year: 2002, Model line: CIVIC, Model: HONDA CIVIC 2002 7.GPages: 1139, PDF Size: 28.19 MB
Page 643 of 1139
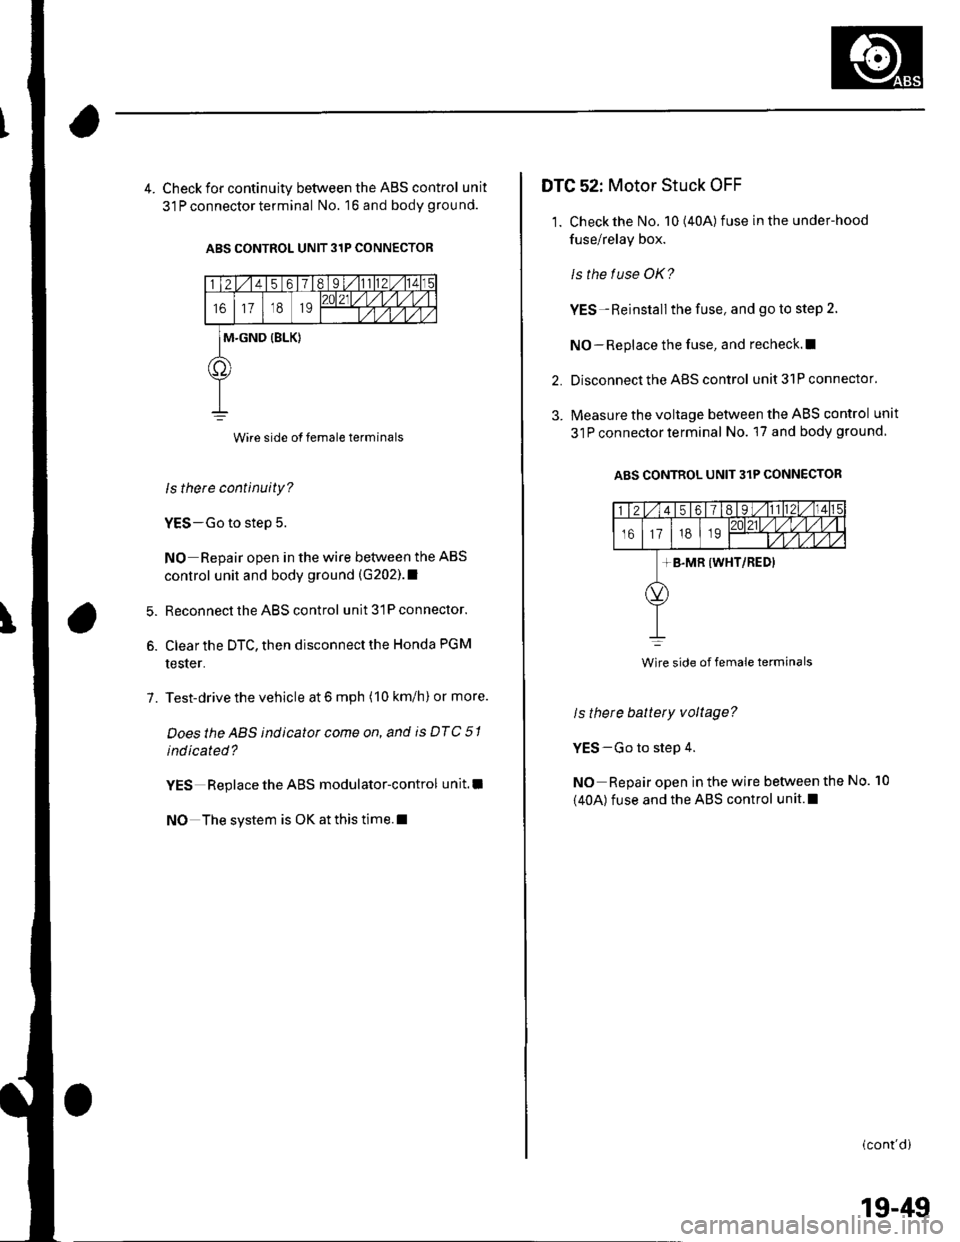
4. Check for continuity between the ABS control unit
31 P connector terminal No. 16 and body grou nd.
ABS CONTROL UNIT 31P CONNECTOR
Wire side of female terminals
ls there continuity?
YES-Go to step 5.
NO Repair open in the wire between the ABS
control unit and body ground (G202).1
Reconnect the ABS control unit 31P connector.
Clear the DTC, then disconnect the Honda PGM
tester.
Test-drive the vehicle at 6 mph (10 km/h) or more.
Doesthe ABS indicator come on, and is DTC 51
indicated?
YES Replace the ABS modulator-control unit.l
NO The system is OK at this time.l
6.
7.
DTG 52: Motor Stuck OFF
1. Check the No. 10(40A) fuse in the under-hood
fuse/relay box.
ls the f use OK?
YES-Reinstall the fuse, and go to step 2.
NO-Replace the fuse, and recheck.l|
Disconnect the ABS control unit 31P connector.
Measure the voltage between the ABS control unit
31P connector terminal No. 17 and body ground
ABS CONTROL UNIT 31P CONNECTOR
2.
3.
ls there battery voltage?
YES-Go to step 4.
NO Repair open in the wire between the
(40A) fuse and the ABS control unit.l
No. 10
(cont'di
Wire side of female terminals
19-49
Page 645 of 1139
DTC 54: Main Relay Stuck OFF
1. Checkthe No.8 (20A) fuse in the under-hood fuse/
relay box, and reinstallthe fuse if it is OK.
ls the f use OK?
YES-Go to step 2.
NO Replace the fuse, and recheck.l
2. Disconnect the ABS control unit 31P connector.
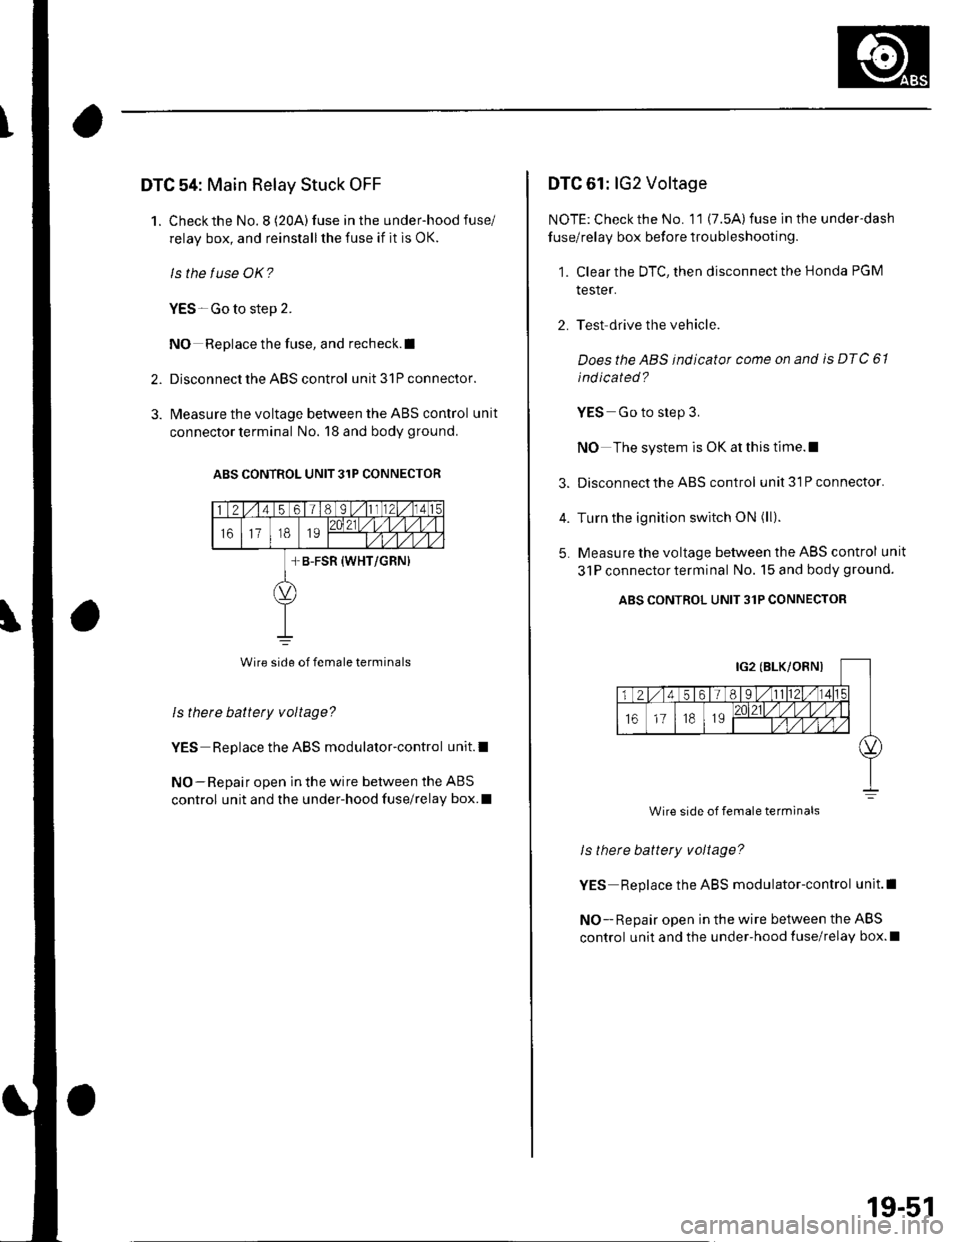
3. l\4easure the voltage between the ABS control unit
connector terminal No. 18 and body ground.
ABS CONTROL UNIT 31P CONNECIOR
Wire side of female terminals
Is there battety voltage?
YES Replace the ABS modulator-control unit.l
NO-Repair open in the wire between the ABS
control unit and the under-hood fuse/relay box.I
DTC 61: lG2 Voltage
NOTE: Check the No. 11 (7.5A) fuse in the under-dash
fuse/relay box before troubleshooting.
1. Clear the DTC, then disconnect the Honda PGM
tesler.
2. Test drive the vehicle.
Doesthe ABS indicator come on and is DTC 61
ind icated ?
YES Go to step 3.
NO The system is OK at this time.l
3. Disconnect the ABS control unit3lPconnector.
4. Turn the ignition switch ON (ll).
5. Measure the voltage between the ABS control unit
31P connectorterminal No. 15 and body ground.
ABS CONTROL UNIT 31P CONNECTOR
ls there battery voltage?
YES Replace the ABS modulator-control unit.l
NO - Repair open in the wire between the ABS
control unit and the under-hood {use/relay box.l
Wire side of female terminals
19-51
Page 646 of 1139
ABS Components
DTC Troubleshooting (cont'd)
DTC 81: CPU (Central Processing Unit)
1. Clear the DTC, then disconnect the Honda PGM
Tester.
2. Test-drive the vehicle.
Does the ABS indicator come on and is DTC 81
indicated ?
YES Replace the ABS modulator-control unit.l
NO-The system is OK at this time. t
19-52
ABS Indicator Gircuit
Troubleshooting
ABS indicator does not come on
1. Turn the ignition switch ON (ll), and watch the ABS
indicator.
Does the ABS indicator come on?
YES The system is OK at this time.I
NO Go to step 2,
Pull up the parking brake lever.
Does the btake system indicator come on?
YES Go to step 3.
NO Repair open in the indicator power source
circuit. lf necassary, substitute a known-good ABS
modulator-control unit, and recheck. I. Blown No, 10 (7.5A) fuse.. Open in the wire between the No. 10 (7.5A)fuse
and lhe gauge assembly,. Open circuit inside the fuse box.
Turn the ignition switch OFF.
Disconnect the ABS control unit 31P connector.
Turn the ignition switch ON (ll).
Does the ABS indicator come on?
YES-Check for loose terminals in the ABS control
unit 31P connector. lf necessary, substitute a
known-good ABS modulator-control unit, and
recheck.l
NO Go to step 6.
Turn the ignition switch OFF.
Remove the gauge assembly (see page 22-64).
3.
5.
6.
7.
Page 647 of 1139
8.
9.
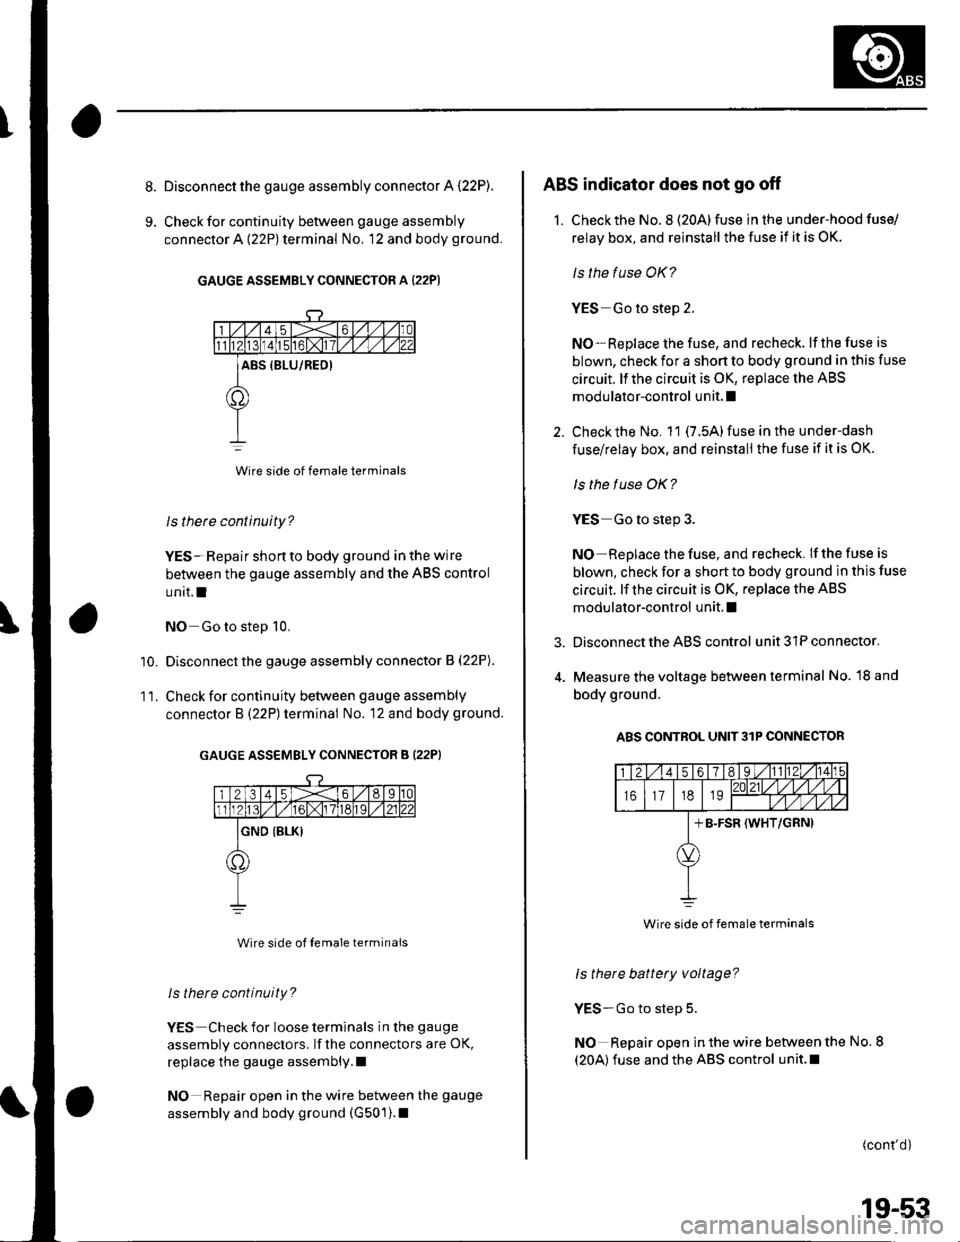
Disconnect the gauge assembly connector A (22P).
Check for continuity between gauge assembly
connector A {22P) terminal No, 12 and body ground.
GAUGE ASSEMBLY CONNECTOR A (22P)
Wire side of female terminals
ls there continuity?
YES- Repair shon to body ground in the wire
between the gauge assembly and the ABS control
unit.l
NO Go to step 10.
Disconnect the gauge assembly connector B (22P).
Check for continuity between gauge assembly
connector B (22P) terminal No. 12 and body ground.
GAUGE ASSEMBLY CONNECTOR B (22PI
Wire side ol Iemale terminals
ls there continuity?
YES Check for loose terminals in the gauge
assembly connectors. lf the connectors are OK,
replace the gauge assembly.l
NO Repair open in the wire between the gauge
assembly and body ground (G501).1
'10.
11.
3.
ABS indicator does not go off
1. Checkthe No. 8 (20Alfuse in the under-hood fuse/
relay box, and reinstall the fuse if it is OK.
ls the fuse OK?
YES Go to step 2.
NO-Replace the fuse, and recheck. lf the fuse is
blown, check for a shon to body ground in this fuse
circuit. ll the circuit is OK, replace the ABS
modulator-control unit. I
Check the No. 11 (7.5A) fuse in the under-dash
fuse/relay box, and reinstall the fuse if it is OK.
ls the f use OK?
YES Go to step 3.
NO Replace the fuse, and recheck. If the fuse is
blown, check for a short to body ground in this fuse
circuit. lf the circuit is OK, replace the ABS
modulator-control unit. I
Disconnect the ABS control unit 31P connector.
Measure the voltage between terminal No. l8 and
body ground.
A8S CONTROL UNIT3lP CONNECTOR
ls there battery voltage?
YES-Go to step 5.
NO Repair open in the wire between the No. 8
(20A) fuse and the ABS control unit.l
(cont'd)
Wire side of female terminals
19-53
Page 648 of 1139
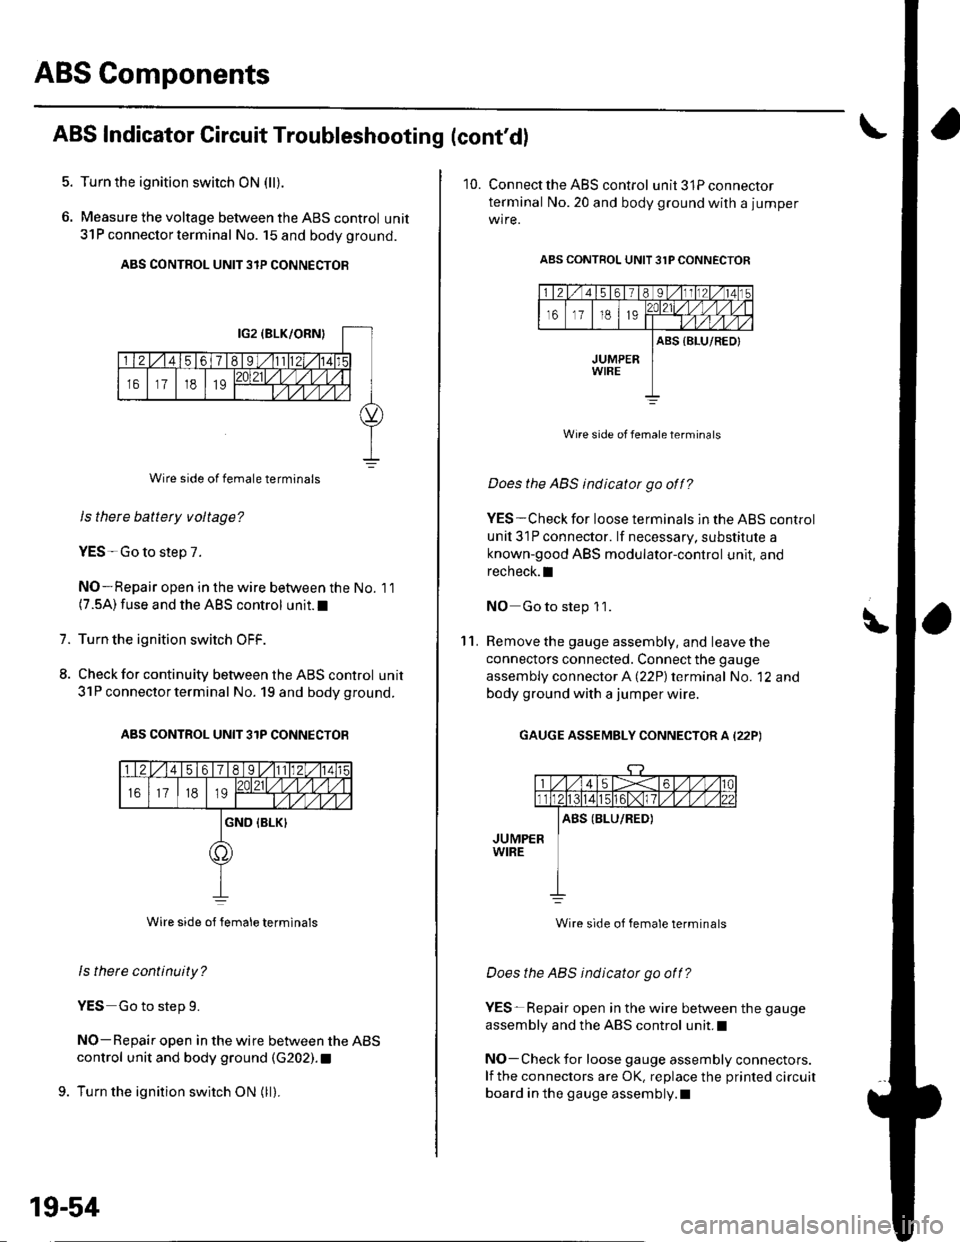
ABS Components
5.
6.
ABS Indicator Circuit Troubleshooting (cont'dl
Turn the ignition switch ON (ll).
Measure the voltage between the ABS control unit
31P connector termina I No. 15 and body ground.
ABS CONTROL UNIT 3IP CONNECTOR
Wire side of female terminals
Is there battety voltage?
YES-Go to step 7.
NO-Repair open in the wire between the No. 11(7.5A) fuse and the ABS control unit.I
Turn the ignition switch OFF.
Check for continuity between the ABS control unit
31P connector terminal No. 19 and body ground.
ABS CONTROL UNIT 31P CONNECTOB
Wire side ot Iemale terminals
ls there continuity?
YES Go to step 9.
NO-Repair open in the wire between the ABS
control unit and body ground (G202). t
9. Turn the ignition switch ON (ll).
1.
8.
19-54
10. Connect the ABS control unit3lPconnector
terminal No.20 and body ground with a jumper
wire.
ABS CONTROL UNIT 31P CONNECTOR
Wire side of female terminats
Does the ABS indicator go off?
YES-Check for loose terminals in the ABS control
unil 31P connector. lf necessary, substitute a
known-good ABS modulator-control unit, and
recheck.I
NO Go to step 1 1.
Remove the gauge assembly, and leave the
connectors connected. Connect the gauge
assembly connector A (22P) terminal No. '12 and
body ground with a jumper wire.
GAUGE ASSEMBLY CONNECTOR A (22P)
\'l '1.
Wire side of female terminals
Does the ABS indicator go off?
YES-Repair open in the wire between the gauge
assembly and the ABS control unit.I
NO-Check for loose gauge assembly connectors.
lf the connectors are OK, replace the printed circuit
board in the gauge assembly.l
Page 690 of 1139
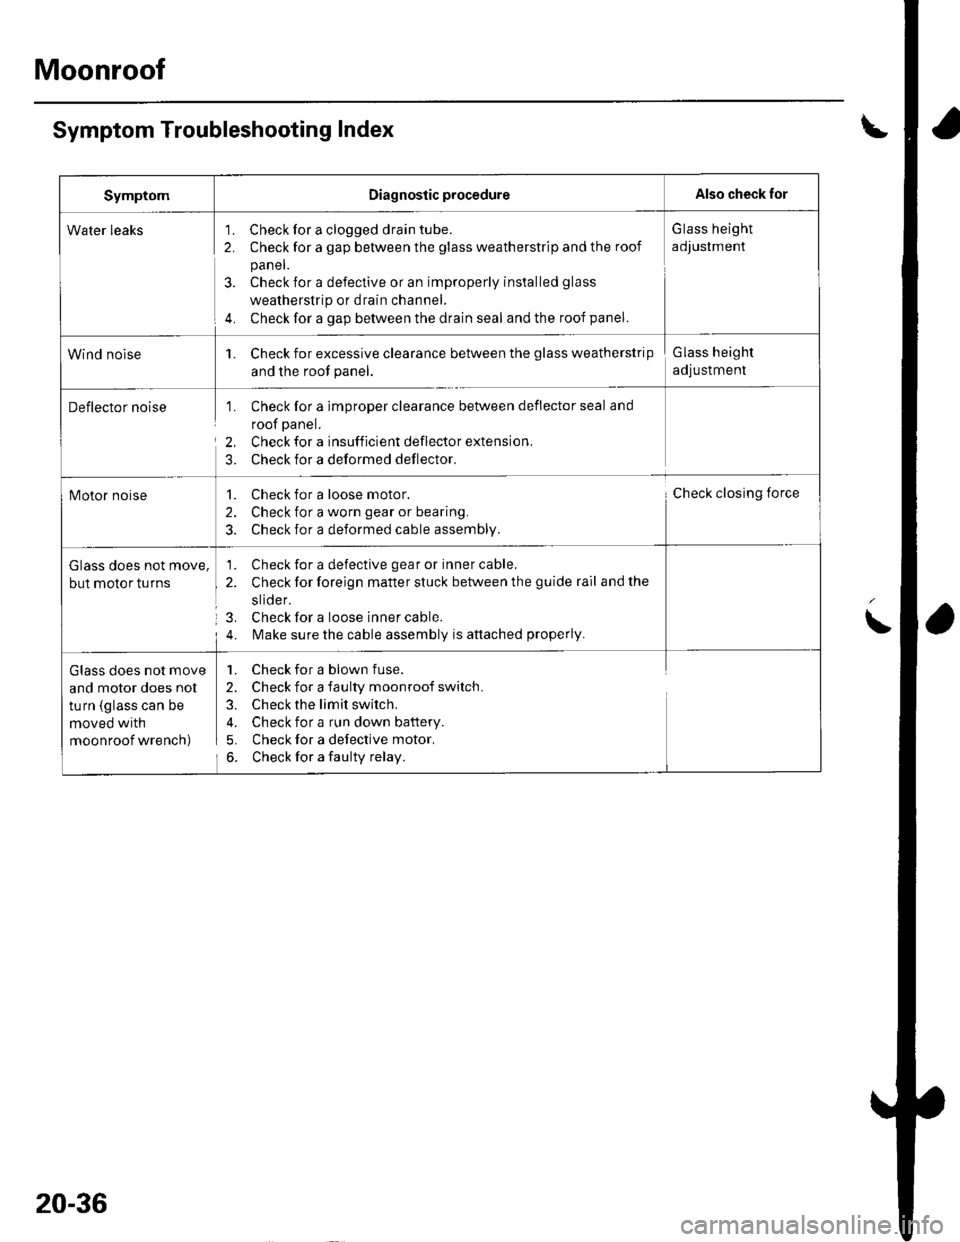
Moonroof
Symptom Troubleshooting Index
SymptomDiagnostic procedureAlso check for
Water leaks'1. Check for a clogged drain tube.
2. Check for a gap between the glass weatherstrip and the roof
panel.
3. Check for a defective or an improperly installed glass
weatherstrip or drain channel.
4. Check for a gap between the drain seal and the roof panel.
G lass height
adJustment
Wind nolse1. Check for excessive clearance between the glass weatherstrip
and the root panel.
Glass height
adjustment
Deflector noise1. Check for a imDrooer clearance between deflector seal and
roof panel.
2, Check for a insufficient deflector extension.
3. Check for a deformed deflector.
Motor noise1. Check for a loose motor.
2. Check for a worn gear or bearing.
3. Check for a deformed cable assembly.
Check closing force
Glass does not move,
but motor turns
1. Check for a defective gear or inner cable.
2. Check for foreign matter stuck between the guide rail and the
slide r.
3. Check for a loose inner cable.
4. l\,4ake sure the cable assembly is attached properly.
Glass does not move
and motor does nol
turn (glass can be
moved with
moonroof wrench)
1. Check for a blown fuse.
2. Check for a faulty moonroof switch.
3. Check the limit switch.
4. Check for a run down battery.
5. Check for a defective motor.
6. Check for a faulty relay.
20-36
Page 721 of 1139
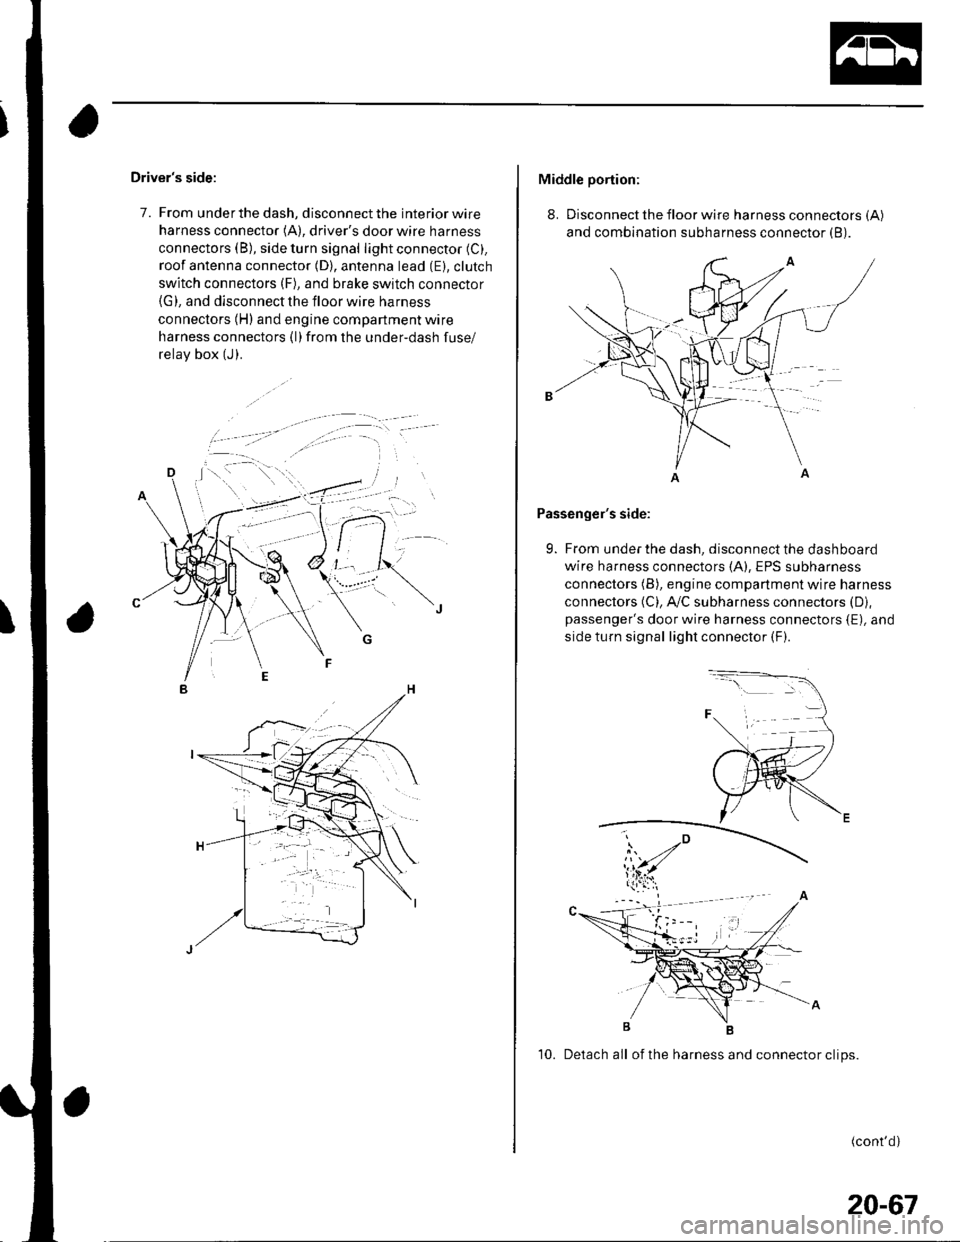
Driver's side:
7. From under the dash, disconnect the interior wire
harness connector (A), driver's door wire harness
connectors (B), side turn signal light connector (C).
roof antenna connector (D), antenna lead (E). clutch
switch connectors (F), and brake switch connector(G), and disconnect the floor wire harness
connectors (H) and engine compartment wire
harness connectors (l)from the under-dash fuse/
relav box (J).
Middle portion:
8. Disconnect the floor wire harness connectors (A)
and combination subharness connector (B).
Passenger's side:
9. From under the dash, disconnect the dashboard
wire harness connectors (A), EPS subharness
connectors (B), engine compartment wire harness
connectors (C), A,/C subharness connectors (D),
passenger's door wire harness connectors {E), and
side turn signal light connector (F).
10. Detach all of the harness and connector clips.
(cont'd)
20-67
Page 776 of 1139
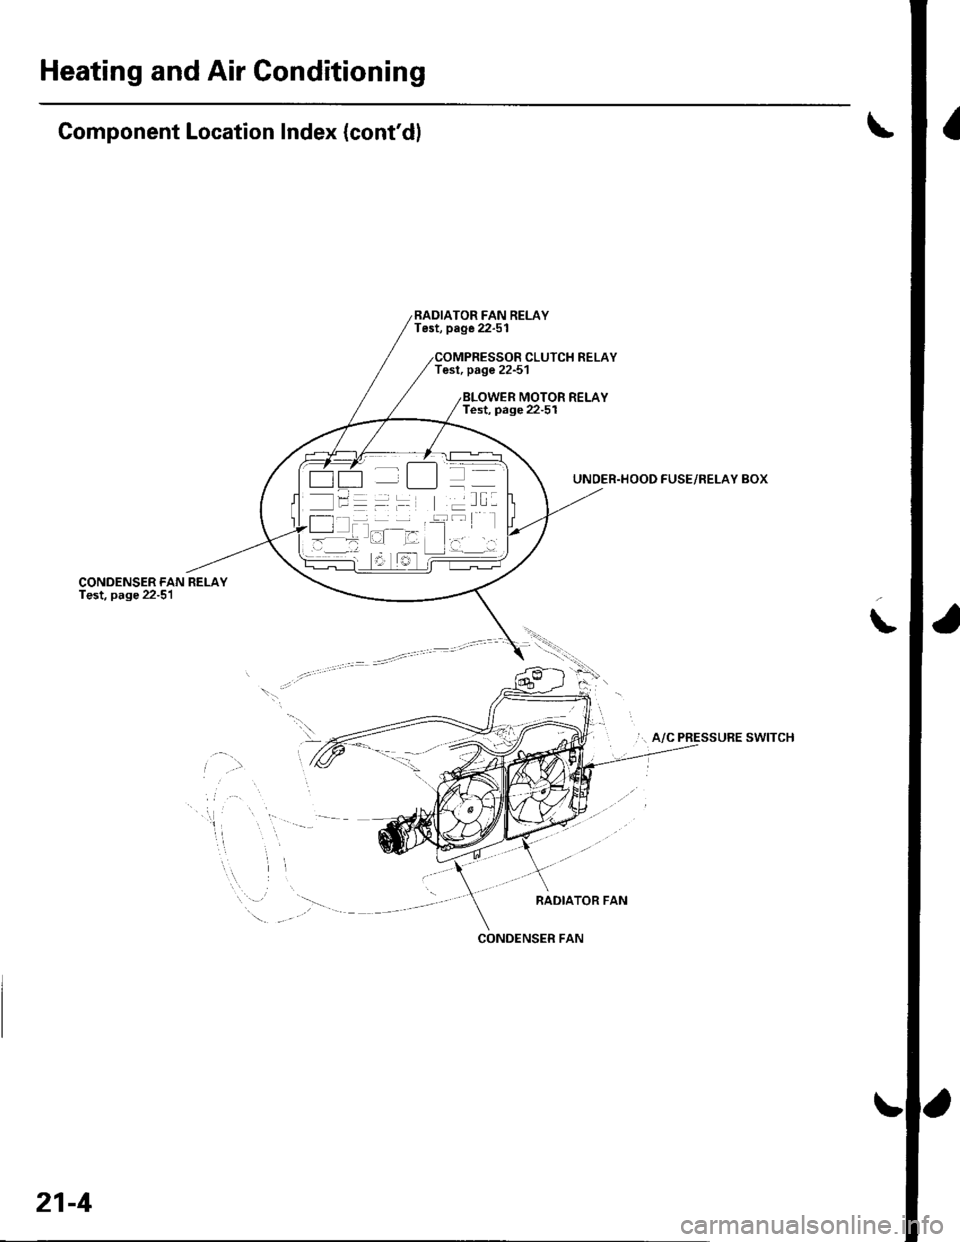
Heating and Air Conditioning
Component Location Index (cont'dl
CONDENSER FANTest, page 22-51
RADIATOR FAN RELAYTest, page 22-51
Tesl, page 22-51CLUTCH RELAY
MOTOR RELAYTest, page 22-5I
UNDER.HOOD FUSE/RELAY BOX
... A/C PRESSURE SWITCH
RADIATOR FAN
\
.\
-
'-t t_]]l
/l I T I --::--
l- -l -
CONOENSER FAN
21-4
Page 782 of 1139
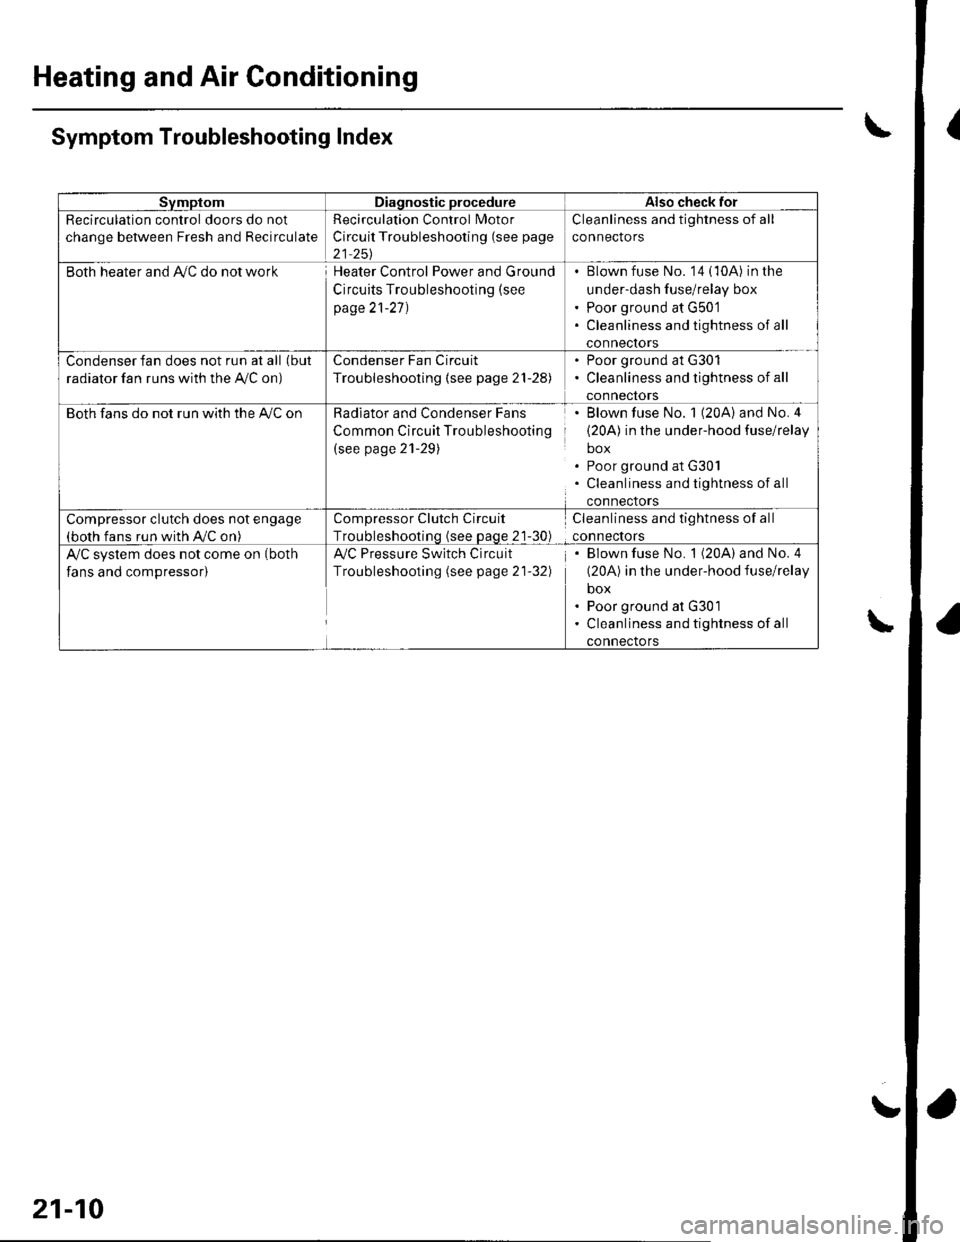
Heating and Air Conditioning
{
a
a
SvmptomDiagnostic procedureAlso check for
Recirculation control doors do not
change between Fresh and Recirculate
Recirculation Control Motor
Circuit Troubleshooting (see page
21 251
Cleanliness and tightness of all
connectors
Both heater and Ay'C do not workHeater Control Power and Ground
Circuits Troubleshooting (see
page 21-27)
Blown fuse No. '14 (10A) in the
under-dash fuse/relay box
Poor ground at G501
Cleanliness and tightness of all
conneclors
Condenser fan does not run at all (but
radiator fan runs with the Ay'C on)
Condenser Fan Circuit
Troubleshooting {see page 21-28)
. Poor ground at G301. Cleanliness and tightness of all
connectors
Both fans do not run with the A,/C onRadiator and Condenser Fans
Common Circuit Troubleshooting
(see page 21-29)
Blown fuse No. 1 (20A) and No.4
(20A) in the under-hood fuse/relay
box
Poor ground at G30l
Cleanliness and tightness of all
connectors
Compressor clutch does not engage(both fans run with A,/C on)
Compressor Clutch Circuit
Troubleshootinq (see Daqe 21-30)
Cleanliness and tightness of all
connectors
A/C system does not come on (both
fans and compressor)
Ay'C Pressure Switch Circuit
Troubleshooting (see page 21-32)
Blown fuse No. 1 (20A) and No. 4
(20A) in the under-hood fuse/relay
box
Poor ground at G301
Cleanliness and tightness of all
connectors
\Symptom Troubleshooting Index
\
21-10
!
Page 785 of 1139
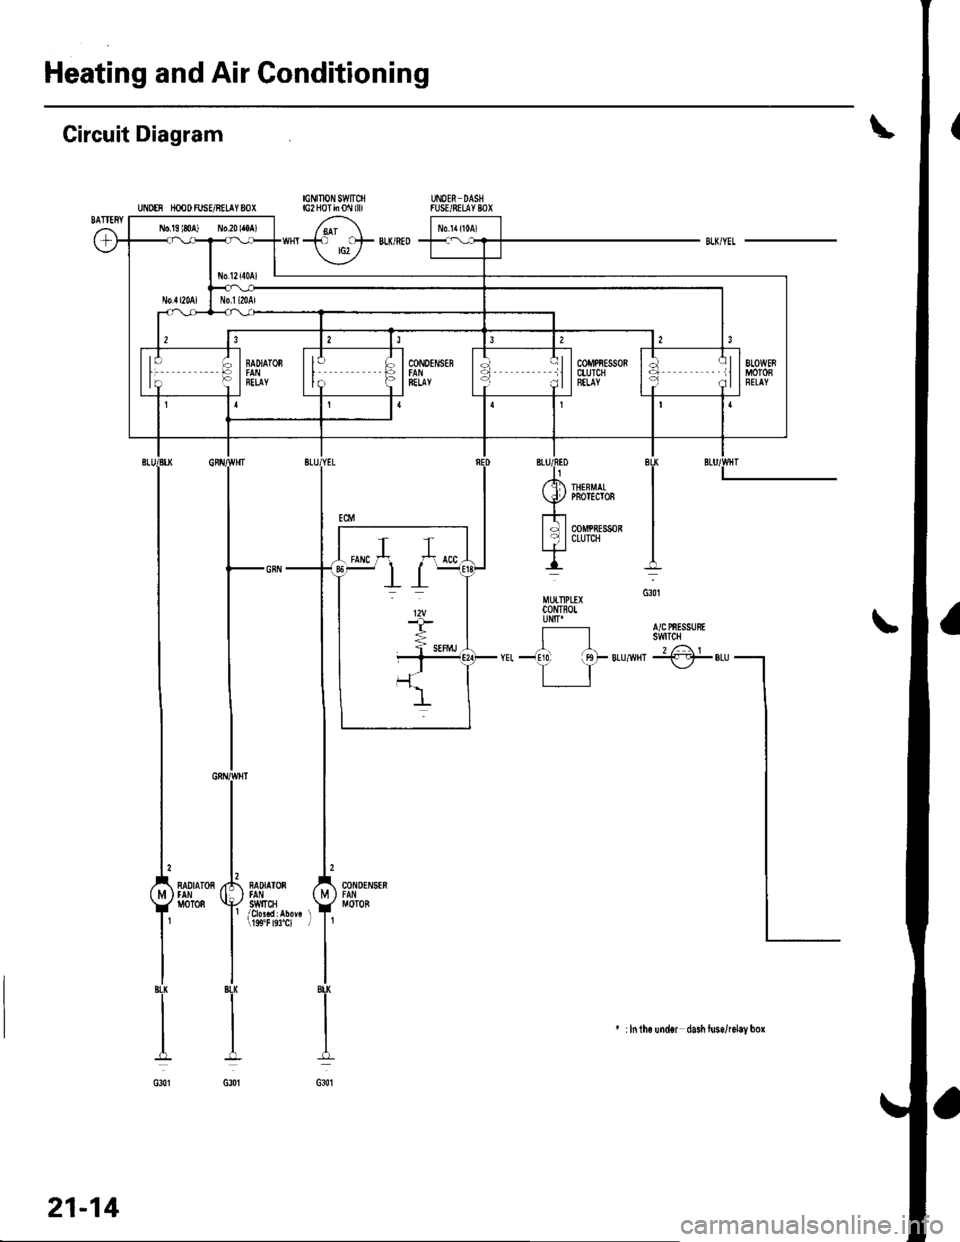
Heating and Air Conditioning
Gircuit Diagram
UNDEN rcODFUSVRELIYSOXUNOER DASNfUSE/8EIlYBOX|GNUION SWTCfilG2 HoI ii 0l\l llll
+. C}F BLK/RED rG2 /
II
I
I
In.G301
A/C PnESSUEtswTOt
t...iCF
RADIATOS
oT0n
NADIATOS) tAl'// swtlcllj 19S"F 193"C) l
CONDEN$N
MOTOB
I8u(
I
IBLX
I
G301
l
;
/ .I IHEFMAI
Y PBorEcro8
lTl *n*,*,|
MUITIPLD(CONTFOIUNITI
-!10. irgF 8Ll
TT
BLU
I ilntho undor dasi luse/lelay box
21-14