Circuit HONDA CIVIC 2003 7.G Workshop Manual
[x] Cancel search | Manufacturer: HONDA, Model Year: 2003, Model line: CIVIC, Model: HONDA CIVIC 2003 7.GPages: 1139, PDF Size: 28.19 MB
Page 1051 of 1139
sRs
DTG Troubleshooting (cont'd)
11.
Read the DTC.
ls DTC 2-3 ind icated?
YES Go to step 9.
NO-Short in the front passenger's airbag inflator;
replace the front passenger's airbag (see page 23-
114). t
Turn the ignition switch OFF. Disconnect the
battery negative cable, and wait for 3 minutes.
Disconnect the driver's airbag 4P connector from
the cable reel {see step 2 on page 23-21).
Disconnect both seat belt tensioner 2P connectors
from the floor wire harness (see step 5 on page 23-
221.
9.
10.
23-44
TJ
qJ
'12. Disconnect SRS unit connector A (18P) from the
S R S u n it (see ste p 7 on page 23-22l. .
13. Disconnectthe special tool from dashboard wire
harness B.
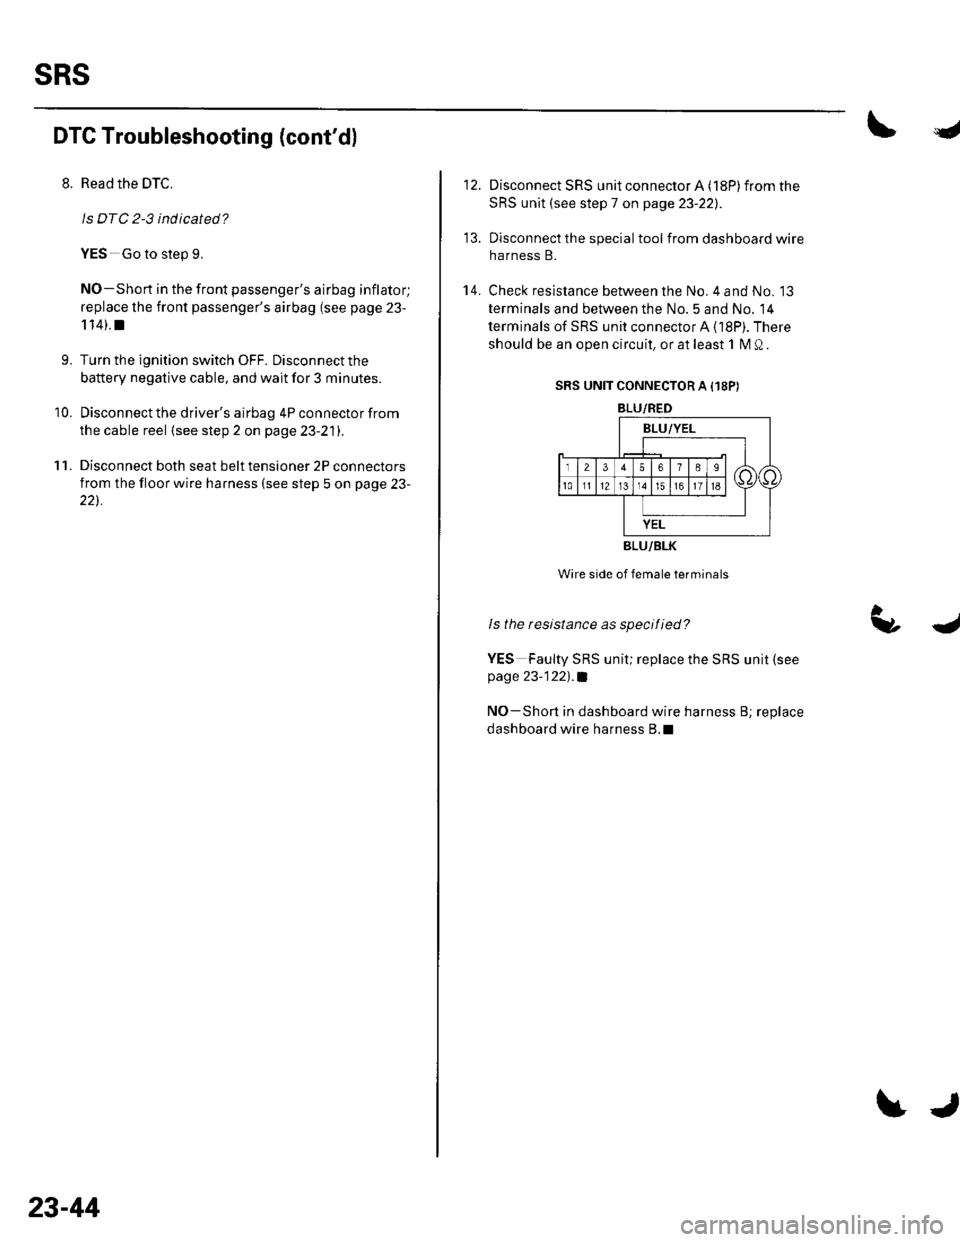
14. Check resistance between the No. 4 and No. 13
terminals and between the No. 5 and No. 14
terminals of SRS unit connector A (18P). There
should be an open circuit, or at least 1 M Q.
SRS UNIT CONNECTOR A I18P)
BLU/RED
BLU/BLK
Wire side of female terminals
ls the resistance as specitied?
YES Faulty SRS unit; replace the SRS unit (see
page 23-122)'.a
NO-Shon in dashboard wire harness B; replace
dashboard wire harness B.l
Page 1054 of 1139
I
7.
11.
9.
10.
Reconnect the battery negative cable.
Erase the DTC memory.
Read the DTC.
ls DTC 2-5 indicated?
YES-Go to step 9.
NO-Shon to ground in the front passenger's
airbag inflator; replace the front passenger's airbag
(see page 23-1 14).1
Turn the ignition switch OFF. Disconnectthe
battery negative cable, and wait for 3 minutes.
Disconnect the driver's airbag 4P connector from
the cable reel {see step 2 on page 23-21).
Disconnect both seat belt tensioner 2P connectors
from the floor wire harness (see step 5 on page 23-
22).
I
I
I
12.
13.
't 4.
Disconnect SRS unit connector A (18P) from the
SRS unit (see step 7 on page 23-221.
Disconnectthe special tool from dashboard wire
harness B.
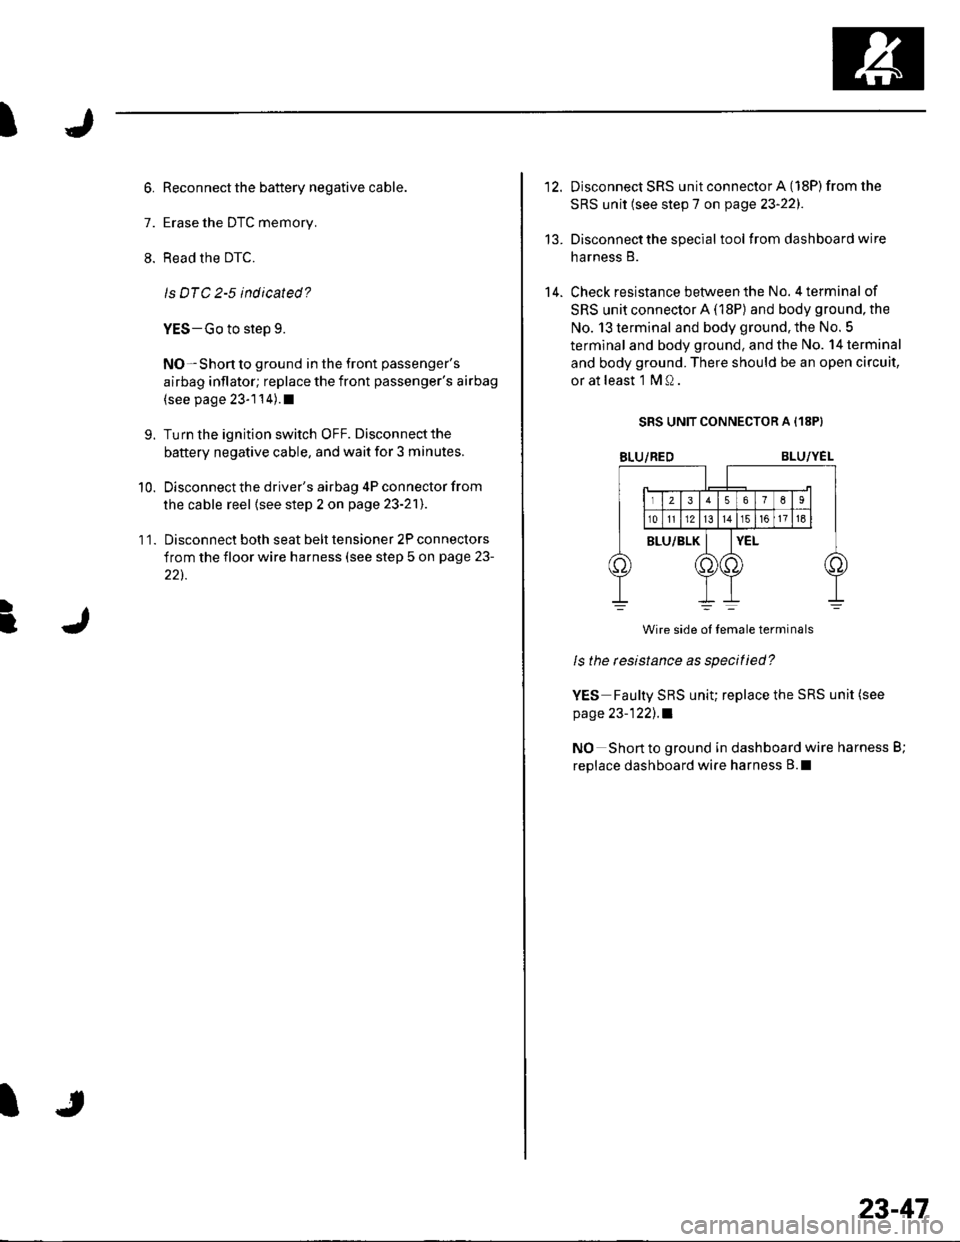
Check resistance between the No. 4 terminal of
SRS unit connector A (18P) and body ground, the
No. 13 terminal and body ground. the No. 5
terminal and body ground, and the No. 14 terminal
and body ground. There should be an open circuit,
or at least l MQ.
SRS UNIT CONNECTOR A {18P}
BLU/REDBLU/YEL
Wire side ol temale terminals
ls the tesistance as specitied?
YES Faulty SRS uniu replace the SRS unit (see
page 23-122), .l
NO Short to ground in dashboard wire harness B;
replace dashboard wire harness B.l
23-47
Page 1057 of 1139
sRs
DTC Troubleshooting (cont'd)
6. Reconnectthe battery negative cable.
7. Erase the DTC memory.
8. Read the DTC.
ls DTC 3-3 indicated?
YES-Go to step L
NO-Shon in the driver's seat belt tensioner;
replace the driver's seat belt (see page 23-4).1
L Turn the ignition switch OFF. Disconnectthe
battery negative cable, and wait for 3 minutes.
10. Disconnect floor wire harness 4P connector C403(A)from dashboard wire harness B.
07sAz-TB4or 1A
Connectthe SRS inflator simulator (2 Q
connectors) and simulator lead F to dashboard wire
harness B.
Reconnect the battery negative cable.
Erase the DTC memory.
Read the DTC.
ls DTC 3-3 indicated?
YES-Go to step 15.
NO Short in the floor wire harness; replace the
floor wire harness.l
Turn the ignition switch OFF. Disconnect the
battery negative cable, and wait for 3 minutes.
11.
13.
14.
23-50
tJ
16. Disconnect the driver's airbag connector (see step
2 on page 23-211,lront passenger's airbag
connector (see step 3 on page 23-21), and frontpassenger's seat belt tensioner connector (see step
5 on page 23-22).
17. Disconnect SRS unit connector A (18P) from the
SRS unit (see step 7 on page 23-22:,.
18. Disconnect the special tool from dashboard wire
harness B.
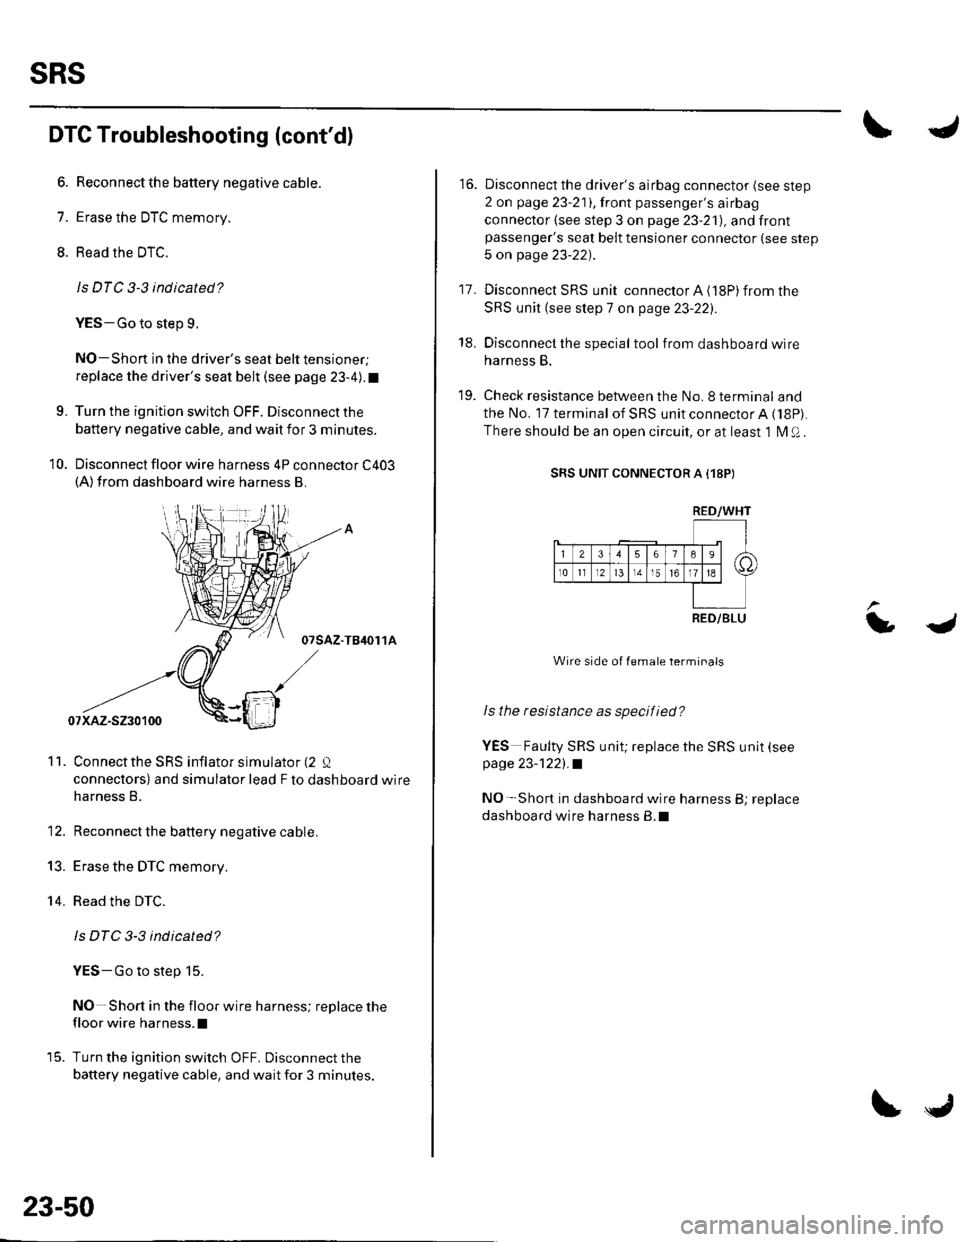
19. Check resistance between the No.8 terminal and
the No. 17 terminal of SRS unit connector A ('l8P).
There should be an open circuit, or at least 1 l\4 Q .
SRS UNIT CONNECTOR A I18P)
Wire side of female terminals
ls the resistance as specif ied?
YES Faulty SRS unit; replace the SRS unit (see
page 23-1221.a
NO- Short in dashboard wire harness B; replace
dashboard wire harness B.l
LJ
RED/WHT
RED/BLU
Page 1060 of 1139
t
)
6. Reconnect the battery negative cable.
7. Erase the DTC memory.
8. Read the DTC.
ls DTC 3-5 indicated?
YES-Go to step 9,
NO Shortto ground in the driver's seat belt
tensioner; replace the driver's seat belt(see page 23-4).I
9. Turn the ignition switch OFF. Disconnect the
battery negative cable, and wait for 3 minutes.
10. Disconnect floor wire harness 4P connector C403(A)from dashboard wire harness B.
07sAz-T84011A
Connect the SRS inflator simulator (2 Q
connectors) and simulator lead F to dashboard wire
harness B.
Reconnect the battery negative cable.
Erase the DTC memory.
Read the DTC.
ls DTC 3-5 ind icated?
YES Go to step 15.
NO-Short to ground in the floor wire harness;
replace the floor wire harness.l
Turn the ignition switch OFF. Disconnect the
battery negative cable, and wait for 3 minutes.
'11.
14.
I
23-53
16. Disconnectthe driver's airbag connector (see step
2 on page 23-211,lront passenger's airbag
connector (see step 3 on page 23-21), and front
passenger's seat belt tensioner connector (see step
5 on page 23-22).
17, Disconnect SRS unit connector A ('l8P) from the
SRS unit (see step 7 on page 23-221.
18. Disconnect the specialtoolfrom dashboard wire
harness B.
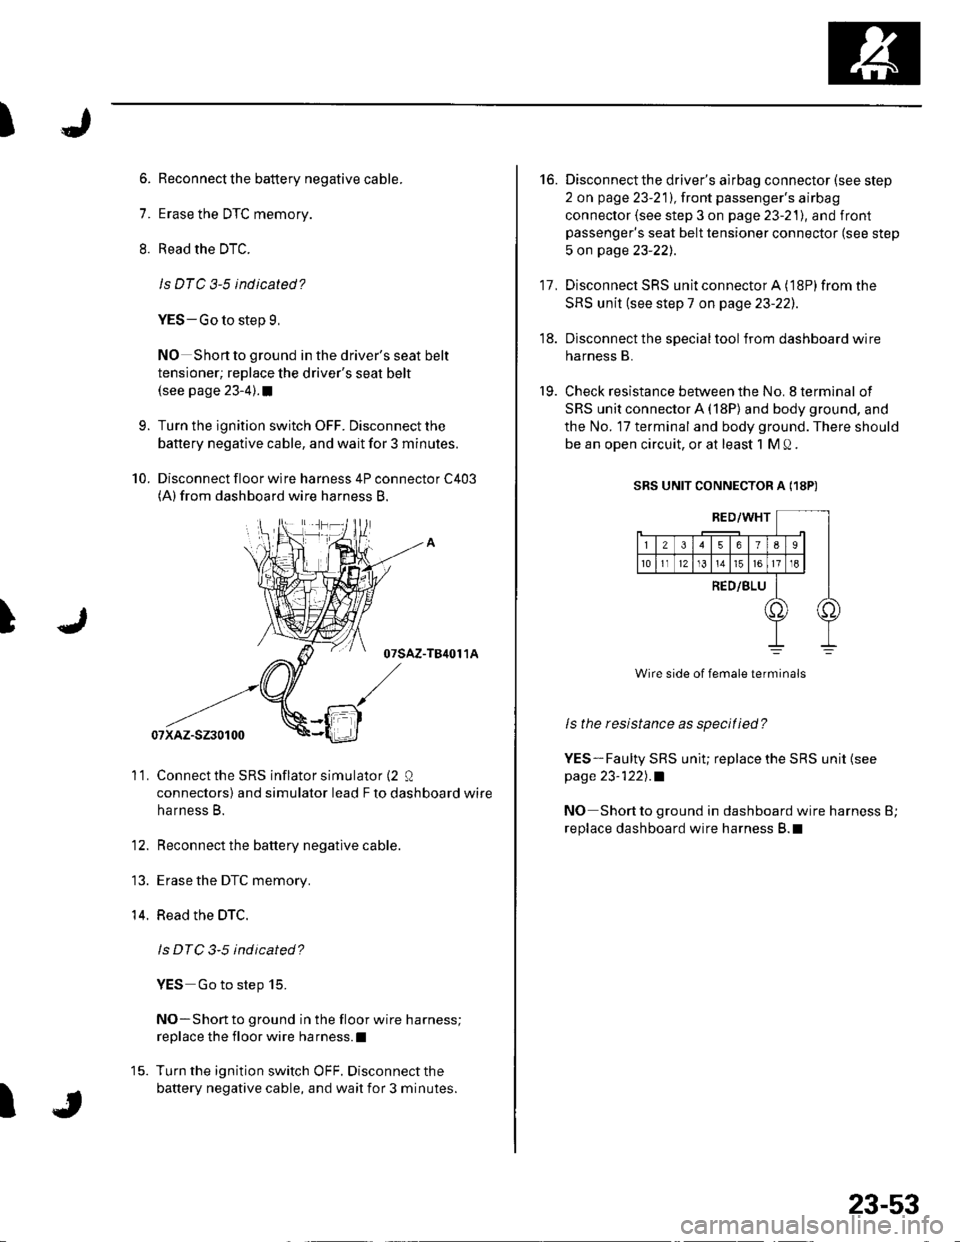
19. Check resistance between the No. 8 terminal of
SRS unit connector A (18P) and body ground, and
the No. 17 terminal and body ground. There should
be an open circuit, or at least 1 M Q .
SRS UNIT CONNECTOR A (18P)
ls the resistance as specified?
YES-Faulty SRS uniu replace the SRS unit {seepage 23-122l,.a
NO Short to ground in dashboard wire harness B;
replace dashboard wire harness B.l
Page 1062 of 1139
I
I
f
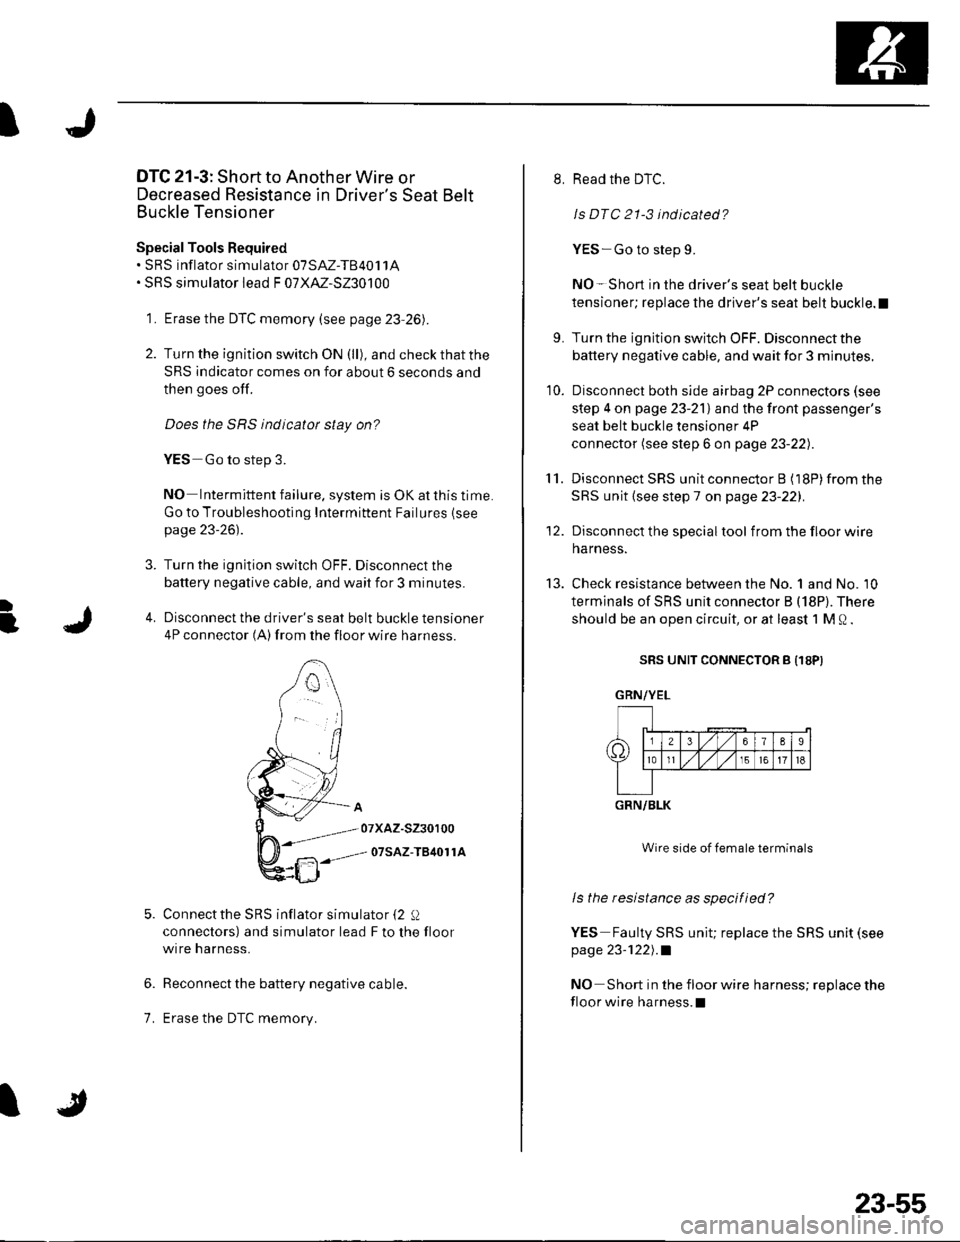
DTC 21-3: Short to Another Wire or
Decreased Resistance in Driver's Seat Belt
Euckle Tensioner
Special Tools Required. SRS inflator simulator 07SAZ-T840't1A. SRS simulator lead F 07XAZ-S230100
1. Erase the DTC memory (see page 23-26).
2. Turn the ignition switch ON (ll), and check that the
SRS indicator comes on for about 6 seconds and
then goes off.
Does the SRS indicator stay on?
YES Go to step 3.
NO Intermittent failure. system is OK at this time.
Go to Troubleshooting Intermittent Failures lseepage 23-26).
Turn the ignition switch OFF. Disconnect the
battery negative cable, and wait for 3 minutes.
Disconnect the driver's seat belt buckle tensioner
4P connector (A) from the floor wire harness.
Connectthe SRS inflator simulator (2 i)
connectors) and simulator lead F to the floor
wtre narness.
Reconnect the battery negative cable.
Erase the DTC memory.
6.
7.
8. Read the DTC.
ls DTC 21-3 ind icated?
YES-Go to step 9.
NO- Short in the driver's seat belt buckle
tensioner; replace the driver's seat belt buckle.l
9. Turn the ignition switch OFF. Disconnectthe
battery negative cable, and wait for 3 minutes,
10. Disconnect both side airbag 2P connectors (see
step 4 on page 23-21) and the front passenger's
seat belt buckle tensioner 4P
connector (see slep 6 on page 23-22).
11. DisconnectSRS unitconnectorB (18P)fromthe
SRS unit {see step 7 on page 23-22l�.
'12. Disconnect the specialtool f rom the floor wire
harness.
13. Check resistance between the No. 1 and No. 10
terminals of SRS unit connector B (18P). There
should be an open circuit, or at least 1 M Q.
SRS UNIT CONNECTOR B {18PI
Wire side of female terminals
ls the resistance as specified?
YES Faulty SRS unit; replace the SRS unit (see
page 23-1221.a
NO Short in the floor wire harness; replace the
floor wire harness.l
GRN/YEL
GRN/BLK
23-55
Page 1065 of 1139
sRs
9.
10.
DTC Troubleshooting (cont'dl
11.
Read the DTC.
ls DTC 21-5 indicated?
YES Go to step 9.
NO Short to ground in the driver's seat belt
buckle tensioner; replace the driver's seat belt
buckle.l
Turn the ignition switch OFF. Disconnect the
battery negative cable, and wait for 3 minutes.
Disconnect both side airbag 2P connectors (see
step 4 on page 23-21)and the front passenger's
seat belt buckle tensioner 4P connector (see step 6
on page 23-221.
Disconnect SRS unit connector B (18P) from the
SRS unit (see step 7 on page 23-22)
Disconnect the special tool from the floor wire
harness.
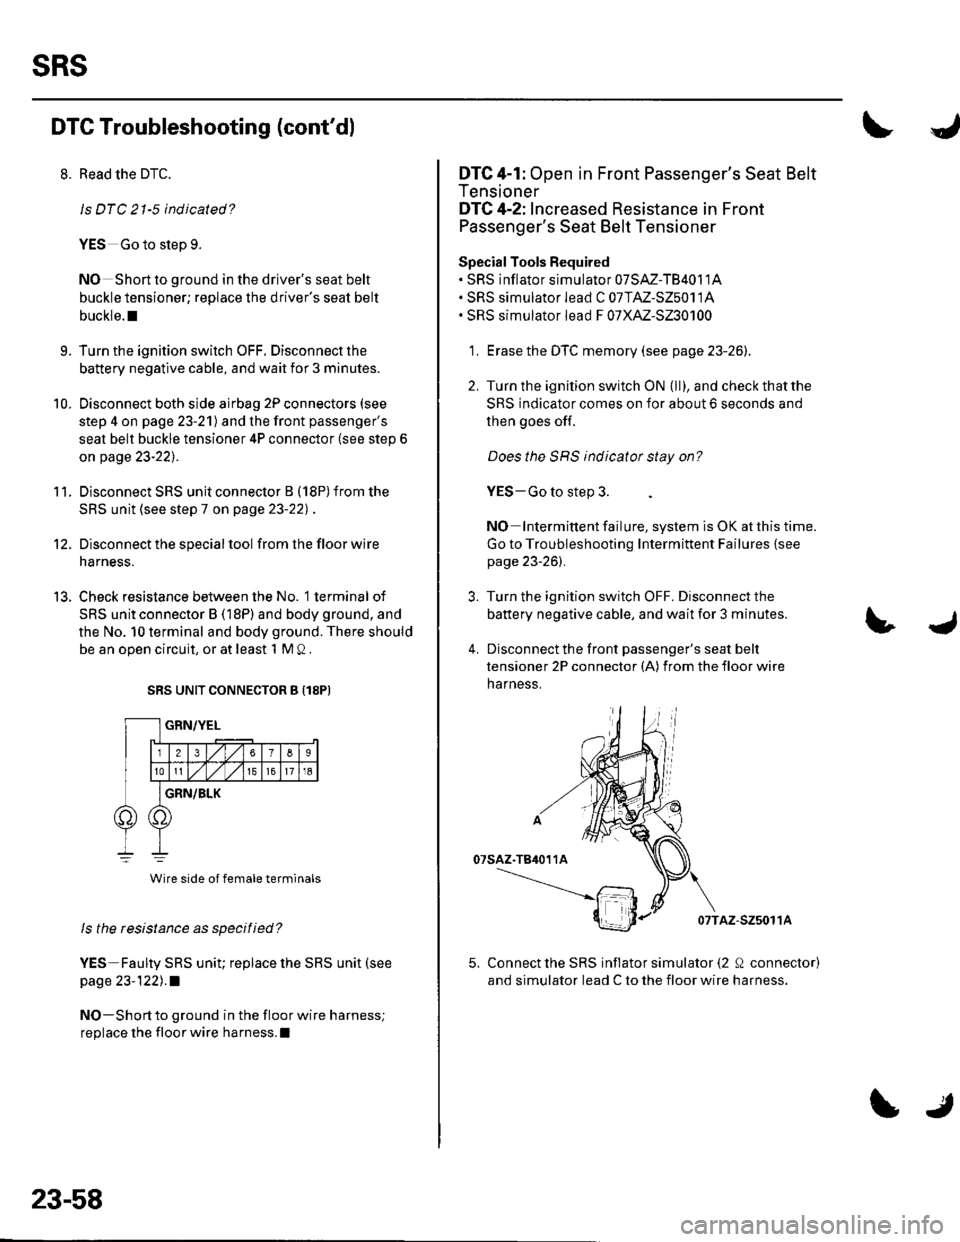
Check resistance between the No. '1 terminal of
SRS unit connector B (18P) and body ground, and
the No. 10 terminal and body ground. There should
be an open circuit, or at least 1 M Q.
12.
13.
SRS UNIT CONNECTOR B {18PI
ls the tesistance as specilied?
YES Faulty SRS uniu replace the SRS unit (see
page 23-122) .a
NO-Short to ground in the floor wire harness;
replace the floor wire harness.l
23-58
\J
'L
DTC 4-1: Open in Front Passenger's Seat Belt
renstoner
DTC 4-2: lncreased Resistance in Front
Passenger's Seat Belt Tensioner
Special Tools Required. SRS inflator simulator 07SM-T84011A. SRS simulator lead C 07TAZ-S25011A. SRS simulator lead F 07XAZ-S230100
Erase the DTC memory (see page 23-26).
Turn the ignition switch ON {ll), and check that the
SRS indicator comes on for about 6 seconds and
then goes off.
Does the SBS indicator stay on?
YES-Go to step 3.
NO- Intermittent failure, system is OK at this time.
Go to Troubleshooting Intermittent Failures {seepage 23-26).
Turn the ignition switch OFF. Disconnect the
battery negative cable, and wait for 3 minutes.
Disconnect the front passenger's seat belt
tensioner 2P connector (A) from the floor wire
harness.
07TAZ-525011A
5. Connect the SRS inflator simulator (2 0 connector)
and simulator lead C to the floor wire harness.
Page 1068 of 1139
![HONDA CIVIC 2003 7.G Workshop Manual I
]
16. Disconnectthe drivers airbag connector (see step2 on page 23-211, front passengers airbagconnector (see step 3 on page 23-21), and driver,sseat belt tensioner connector (see step 5 on page
2 HONDA CIVIC 2003 7.G Workshop Manual I
]
16. Disconnectthe drivers airbag connector (see step2 on page 23-211, front passengers airbagconnector (see step 3 on page 23-21), and driver,sseat belt tensioner connector (see step 5 on page
2](/img/13/5744/w960_5744-1067.png)
I
]
16. Disconnectthe driver's airbag connector (see step2 on page 23-211, front passenger's airbagconnector (see step 3 on page 23-21), and driver,sseat belt tensioner connector (see step 5 on page
23-221.
17. Disconnect SRS unit connector A (18p) from the
SRS unit (see step 7 on page 23-22).
18. Disconnect the special tool from dashboard wireharness B.
19. Check resistance between the No. 9 terminal andthe No. 18 terminal of SRS unit connector A (18p).
There should be an open circuit, or at least 1 Me.
SRS UNIT CONNECTOR A I18P}
Wire side of female terminals
ls the resistance as specified?
YES-Faulty SRS unit; replace the SRS unit (see
page 23-1221 .f
NO-Short in dashboard wire harness B; replace
dashboard wire harness B. I
RED/YEL
I]
t6r8 l \P
T
234568
10tl12t3151617
RED/BLK
DTC 4-4: Short to Power in Front Passenger's
Seat Belt Tensioner
Special Tools Required. SRS inflator simulator 07SAZ-T84011A. SRS simulator lead C 07TAZ-S25011A. SRS simulator lead F 07XAZ-S230100
1. Erase the DTC memory (see page 23-26).
2. Turn the ignition switch ON {ll), and check that the
SRS indicator comes on for about 6 seconds and
then goes off.
Does the SRS indicator stay on?
YES Go to step 3.
NO- Intermiftent failure. system is OK at this time.Go to Troubleshooting Intermittent Failures (see
page 23-261.
3. Turn the ignition switch OFF. Disconnect the
battery negative cable, and wait for 3 minutes.
4. Disconnectthe front passenger's seat belttensioner 2P connector (A) from the floor wire
harness.
07TAZ-S2501'lA
5. Connect the SRS inflator simulator (2 e connector)and simulator lead C to the floor wire harness.
{cont'd)
23-61
Page 1071 of 1139
sRs
DTC Troubleshooting (cont'dl
16. Disconnect the driver's airbag connector (see step
2 on page 23-21), front passenger's airbag
connector (see step 3 on page 23-21). and driver's
seat belt tensioner connector (see step 5 on page
23-22).
17. Disconnect SRS unit connector A (18P)from the
SRS unit (see step 7 on page 23-221.
18. Disconnect the specialtool from dashboard wire
harness B.
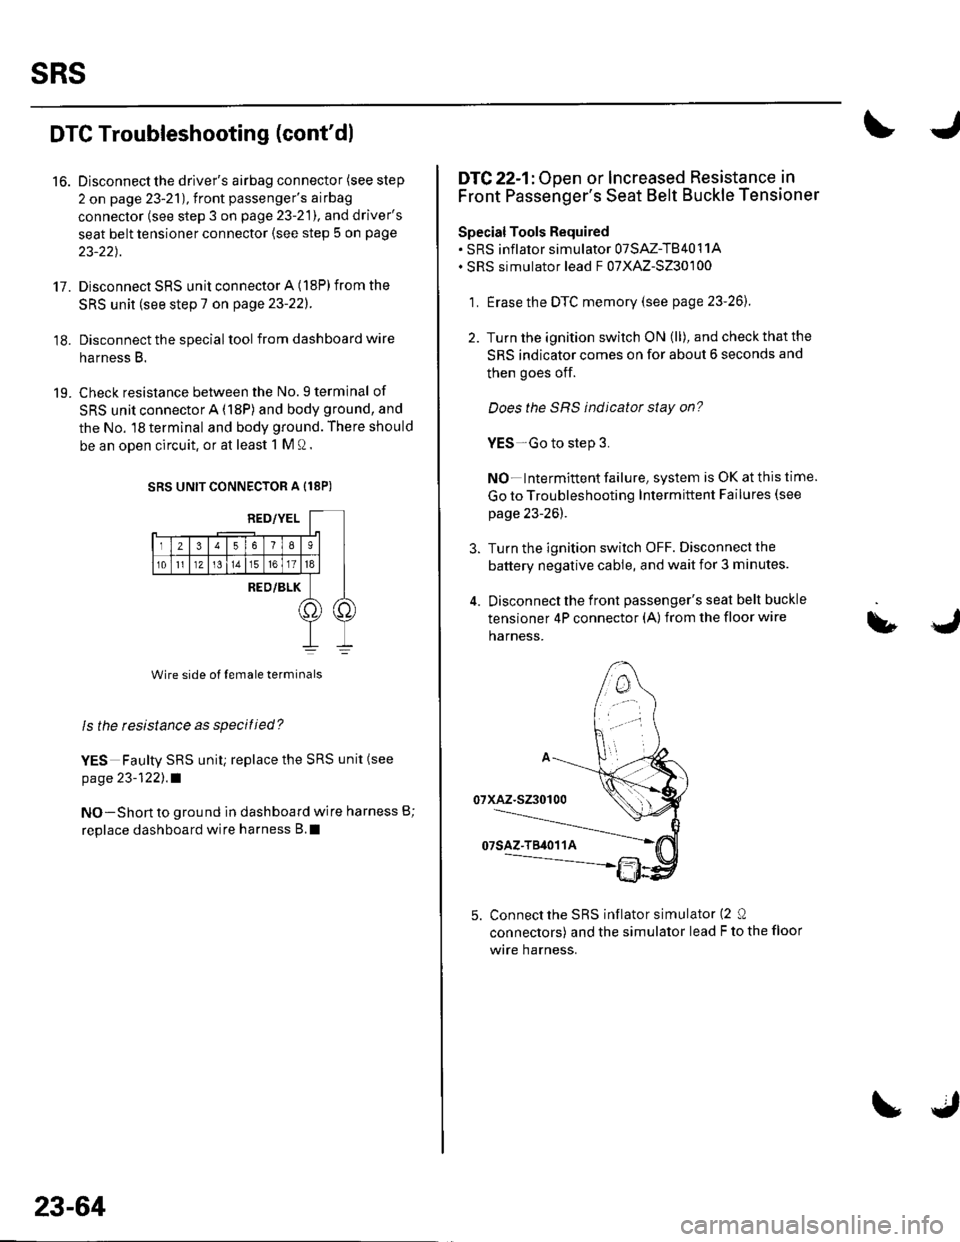
19. Check resistance between the No.9 terminal of
SRS unit connector A (18P) and body ground, and
the No. l8 terminal and body ground. There should
be an open circuit. or at least 1 M Q.
SRS UNIT CONNECTOR A {18P)
wire side of lemale terminals
ls the rcsistance as specified?
YES Faulty SRS uniU replace the SRS unit (see
page 23-1221.1
NO-Short to ground in dashboard wire harness B;
replace dashboard wire harness B.I
23-64
DTC 22-1: Open or Increased Resistance in
Front Passenger's Seat Belt Buckle Tensioner
Special Tools Required. SRS inflator simulator 07SAZ-T84011A. SRS simulator lead F 07XAZ-S230100
1 . Erase the DTC memory (see page 23-261.
2. Turn the ignition switch ON (ll), and check that the
SRS indicator comes on for about 6 seconds and
then goes otf.
Does the SRS indicator stay on?
YES-Go to step 3.
NO-lntermittent failure, system is OK at this time.
Go to Troubleshooting Intermittent Failures (see
page 23-26).
3. Turn the ignition switch oFF. Disconnect the
battery negative cable, and wait for 3 minutes.
4. Disconnectthe front passenger's seat belt buckle
tensioner 4P connector (A) from the floor wire
harness.
5. Connect the SRS inflator simulator (2 Q
connectors) and the simulator lead F to the floor
wtre harness.
\,
Page 1073 of 1139
sRs
DTC Troubleshooting (cont'dl
8. Read the DTC.
ls DTC 22-3 indicated?
YES Go to slep 9.
NO-Short in the front passenger's seat belt buckle
tensioner; replace the front passenger's seat belt
buckle.l
9. Turn the ignition switch OFF. Disconnect the
battery negative cable, and wait for 3 minutes.
10. Disconnect both side airbag 2P connectors (see
step 4 on page 23-21)and the driver's seat belt
buckle tensioner 4P connector (see step 6 on page
23-22).
'11. Disconnect SRS unit connector B {18P)from the
SRS unit (see step 7 on page 23-221.
12. Disconnect the special tool from the floor wire
h a rness.
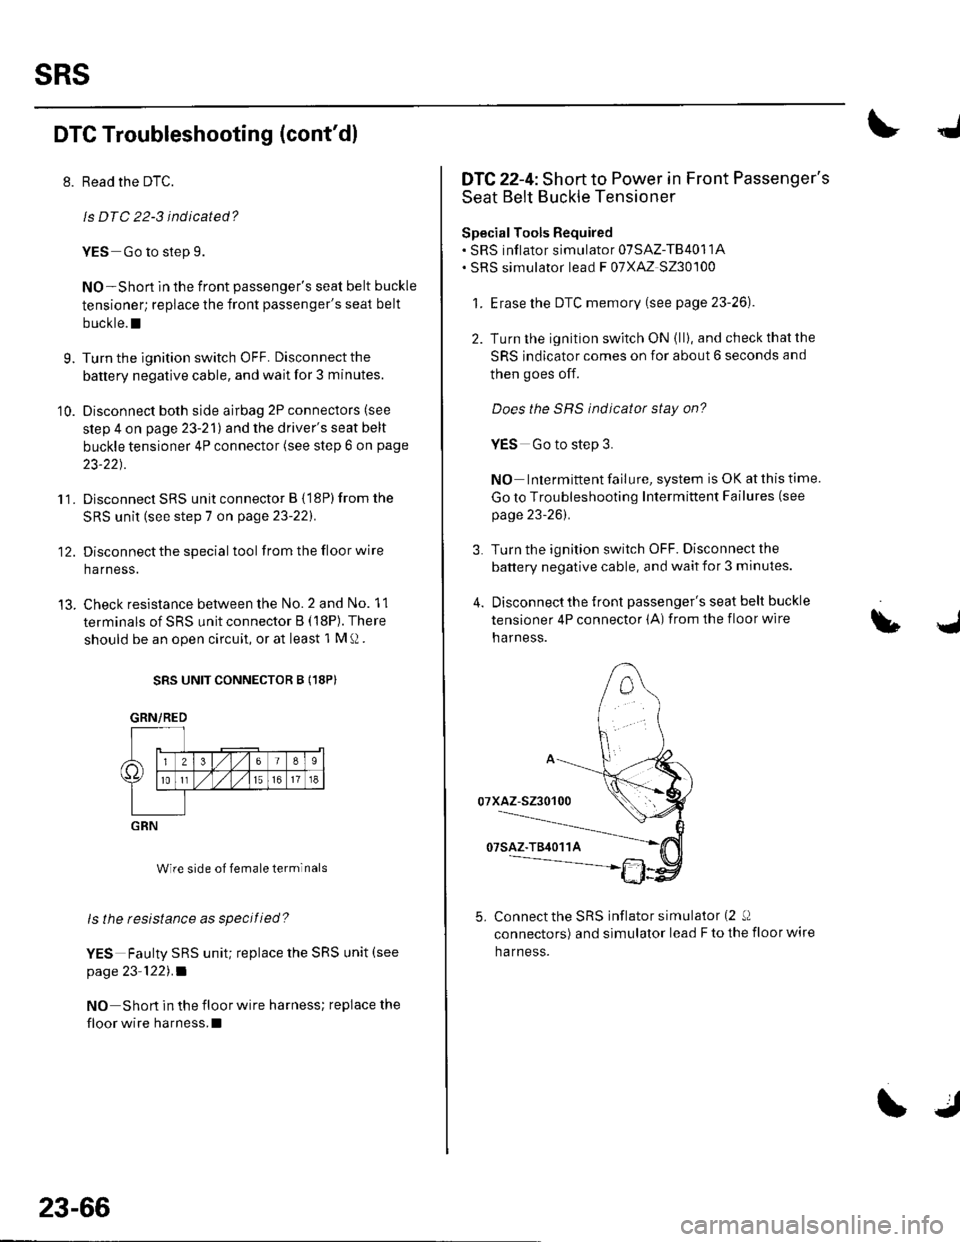
13. Check resistance between the No.2 and No. 11
terminals of SRS unit connector B ( 18P). There
should be an open circuit, or at least 'l M !) .
SRS UNIT CONNECTOR B {18P}
GRN/RED
Wire side oI female terminals
ls the resistance as specified?
YES Faulty SRS unit; replace the SRS unit (see
page 23'1221 .a
NO Short in the floor wire harness; replace the
floor wire harness.I
GRN
23-66
\J
DTC 22-4: Short to Power in Front Passenger's
Seat Belt Buckle Tensioner
SpecialTools Required. SRS inflator simulator 07SAZ-TB4011A. SRS simulator lead F 07XAz 5230100
1. Erase the DTC memory (see p age 23-26).
2. Turn the ignition switch ON {ll}, and check that the
SRS indicator comes on for about 6 seconds and
then goes off.
Does the SHS indicator stay on?
YES Go to step 3.
NO Inlermittentfailure,system isOKatthistime.
Go to Troubleshooting Intermittent Failures (see
page 23-261.
3. Turn the ignition switch OFF. Disconnect the
battery negative cable, and wait for 3 minutes.
4. Disconnect the front passenger's seat belt buckle
tensioner 4P connector (A) from the floor wire
narness.
5. Connect the SRS inflator simulator (2 !J
connectors) and simulator lead F to the floor wire
ha rness.
u
Page 1075 of 1139
sRs
DTC Troubleshooting (cont'dl
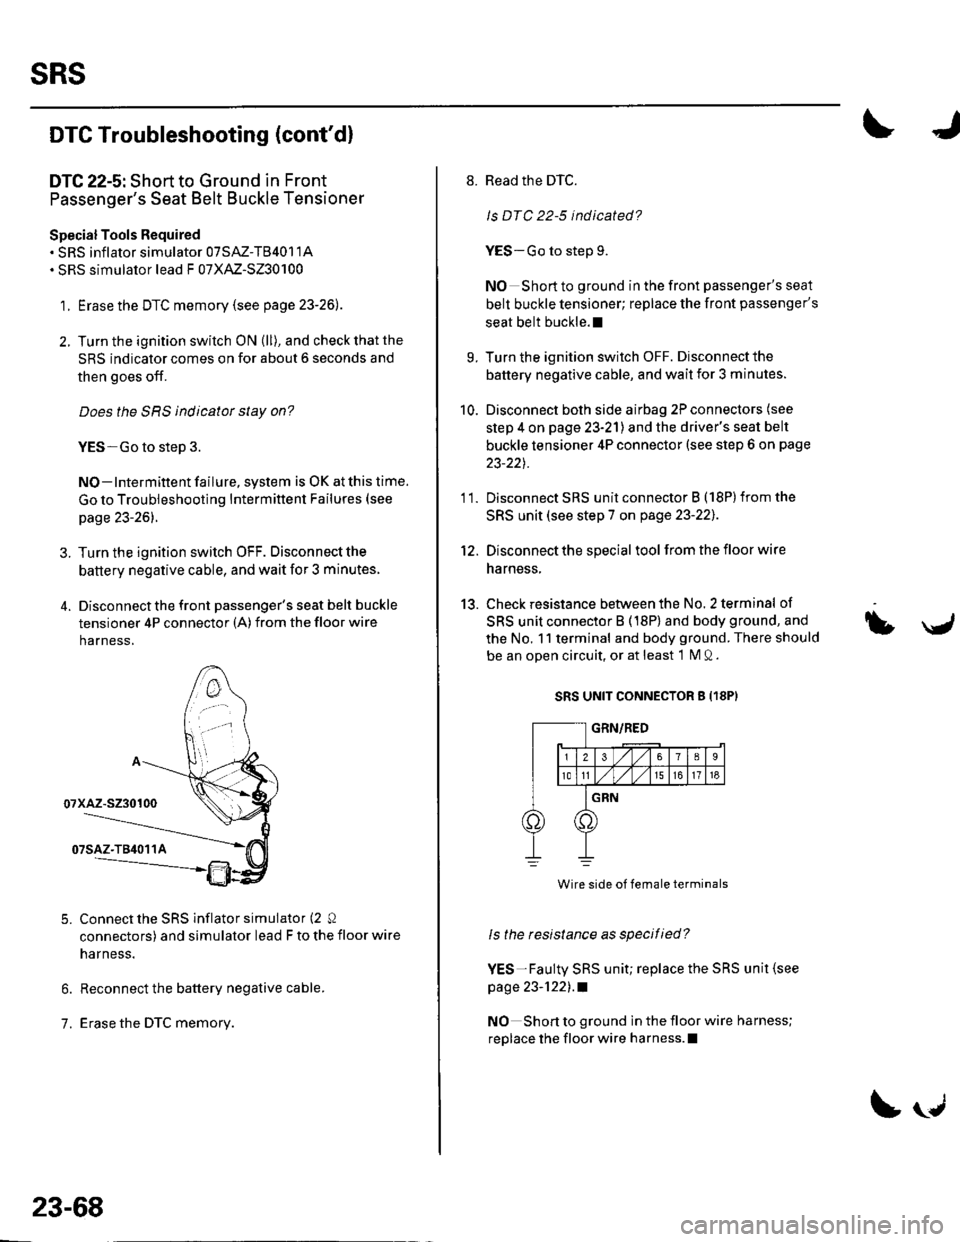
DTC 22-5: Short to Ground in Front
Passenger's Seat Belt Buckle Tensioner
Special Tools Required. SRS inflator simulator 07SAZ-T84011A. SRS simulator lead F 07XAZ-S230100
1 . Erase the DTC memory (see page 23-26).
2. Turn the ignition switch ON (ll), and check that the
SRS indicator comes on for about 6 seconds and
then goes off.
Does the SRS indicator stay on?
YES-Go to step 3.
NO - Intermittent failure, system is OK at this time.
Go to Troubleshooting Intermittent Failures (see
page 23-26).
3. Turn the ignition switch OFF. Disconnectthe
battery negative cable, and wait for 3 minutes.
4. Disconnectthe front passenger's seat belt buckle
tensioner 4P connector (A) from the floor wire
harness,
Connect the SRS inflator simulator (2 Q
connectors) and simulator lead F to the floor wire
narness.
Reconnect the battery negative cable.
Erase the DTC memory.
5.
6.
1.
23-68
!U
8. Read the DTC.
ls DTC 22-5 indicated?
YES-Go to step 9.
NO Short to ground in the front passenger's seat
belt buckle tensioner; replace the front passenger's
seat belt buckle.l
9. Turn the ignition switch OFF. Disconnectthe
battery negative cable, and wait for 3 minutes.
10. Disconnect both side airbag 2P connectors (see
step 4 on page 23-21) and the driver's seat belt
buckle tensioner 4P connector (see step 6 on page
23-22t.
11. Disconnect SRS unit connector B (18Plfrom the
SRS unit (see step 7 on page 23-221.
12. Disconnect the special tool from the floor wire
harness,
13. Check resistance between the No. 2 terminal of
SRS unit connector B (18P) and body ground, and
the No, 11 terminal and body ground. There should
be an open circuit, or at least 1 M Q.
SRS UNIT CONNECTOR g {18PI
ls the resistance as specified?
YES-Faulty SRS unit; replace the SRS unit (see
page 23-1221 .a
NO Short to ground in the floor wire harness;
replace the floor wire harness.l
bU
Wire side of female terminals