relay HONDA CIVIC 2003 7.G Repair Manual
[x] Cancel search | Manufacturer: HONDA, Model Year: 2003, Model line: CIVIC, Model: HONDA CIVIC 2003 7.GPages: 1139, PDF Size: 28.19 MB
Page 538 of 1139
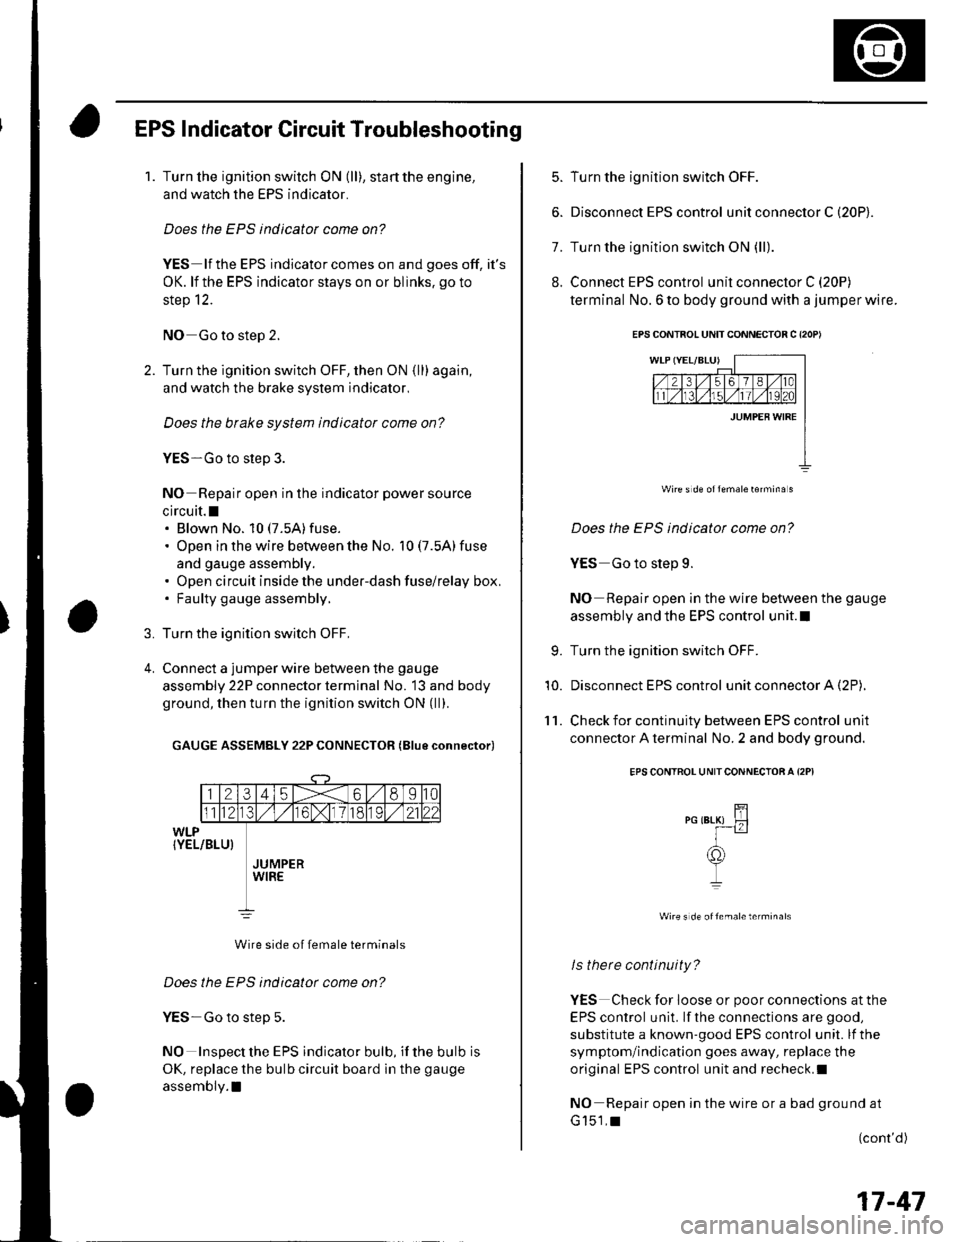
EPS Indicator Circuit Troubleshooting
1.Turn the ignition switch ON (ll), start the engine,
and watch the EPS indicator.
Does the EPS indicator come on?
YES lf the EPS indicator comes on and goes off, it's
OK. lf the EPS indicator stays on or blinks. go to
step 12.
NO Go to step 2.
Turn the ignition switch OFF, then ON (ll) again,
and watch the brake system indicator,
Does the brake system indicator come on?
YES-Go to step 3.
NO Repair open in the indicator power source
circuit.l. Blown No. 10 (7.5A)fuse.
. Open in the wire between the No. 10 (7.5A) fuse
and gauge assembly.. Open circuit inside the under-dash fuse/relay box,. Faulty gauge assembly.
Turn the ignition switch OFF,
Connect a jumper wire between the gauge
assembly 22P connector terminal No. 13 and body
ground, then turn the ignition switch ON (ll).
GAUGE ASSEMBLY 22P CONNECTOR (Blue connector)
Wire side of female terminals
Does the EPS indicator come on?
YES-Go to step 5.
NO Inspect the EPS indicator bulb, if the bulb is
OK, replace the bulb circuit board in the gauge
assembly.l
3.
4.
5. Turn the ignition switch OFF.
6. Disconnect EPS control u n it connector C (20P).
7. Turn the ignition switch ON (ll).
8. Connect EPS control unit connector C (20P)
terminal No. 6 to body ground with a jumper wire.
Wire s d€ oflemale16rmina s
Does the EPS indicatot come on?
YES Go to step 9.
NO Repair open in the wire between the gauge
assembly and the EPS control unit.l
Turn the ignition switch OFF.
Disconnect EPS control unit connector A (2P),
Check for continuity between EPS control unit
connector A terminal No. 2 and body ground.
EPS CONTROL UNITCONNECTOA A I2PI
wire s de oftemale terminals
ls there continuity?
YES Check for loose or poor connections at the
EPS control unit. lf the connections are good,
substitute a known-good EPS control unit. lf the
symptom/indication goes away, replace the
original EPS control unit and recheck.I
NO Repair open in the wire or a bad ground at
G151,t(cont'd)
9.
10.
'l 1.
EPS CONTBOL UNIT CONNECTOB C {2OP)
17-47
Page 539 of 1139
EPS Components
I
12.
EPS Indicator Circuit Troubleshooting (cont'dl
Turn the ignition switch OFF.
Disconnect EPS control unit connector C (20P).
Turn the ignition switch ON (ll).
Does the EPS indicator come on?
YES-Repair short to ground in the YEUBLU wire
between the gauge assembly and the EPS control
unit, or replace the bulb circuit board in the gauge
assembly.l
NO-Go to step 15.
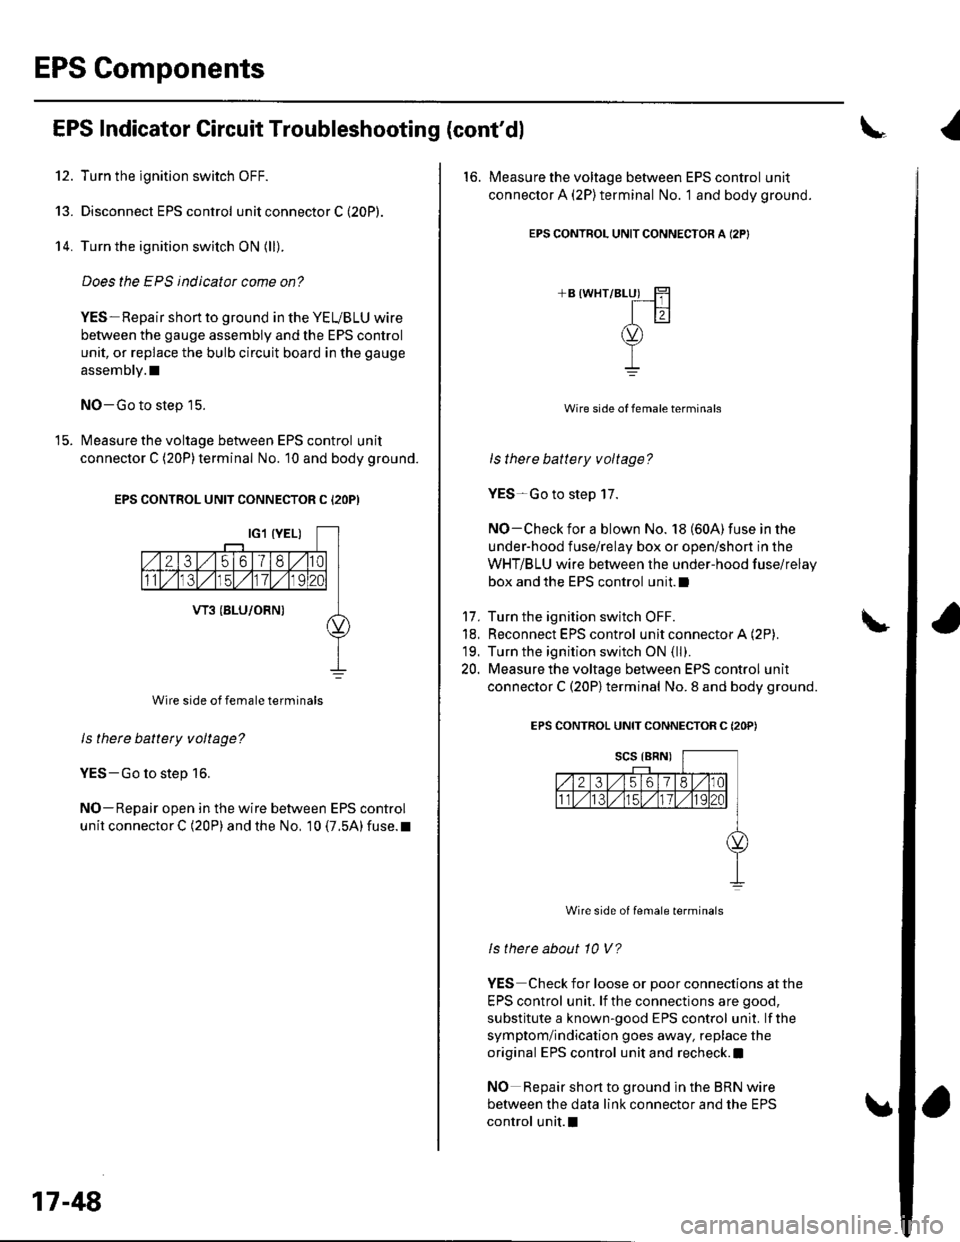
Measure the voltage between EPS control unit
connector C (20P)terminal No. 10 and body ground.
EPS CONTROL UNIT CONNECTOR C I2OP)
Wire side of female terminals
ls there battery voltage?
YES-Go to step 16.
NO-Repair open in the wire between EPS control
unit connector C (20P) and the No, 10 (7.5A) fuse. t
13.
14.
17-48
16. Measure the voltage between EPS control unit
connector A (2P)terminal No. '1 and body ground.
EPS CONTROL UNITCONNECTON A (2P}
+B (WHT/BLUI H
Itr
v-L
17.
18,
19.
20.
Wire side of female terminals
ls there battery voltage?
YES-Go to step 17.
NO-Check for a blown No. 18 (604) fuse in the
under-hood fuse/relay box or open/short in the
WHT/BLU wire between the under-hood fuse/relay
box and the EPS control unit.l
Turn the ignition switch OFF.
Reconnect EPS control unit connector A (2P).
Turn the ignition switch ON (ll).
Measure the voltage between EPS control unit
connector C (20P)terminal No. 8 and body ground.
EPS CONTROL UNIT CONNECTOR C (2OP)
Wire side of female terminals
ls therc about 10 V?
YES Check for loose or poor connections at the
EPS control unit. lf the connections are good,
substitute a known-good EPS control unit. lf the
symptom/indication goes away, replace the
original EPS control unit and recheck.l
NO Repair short to ground in the BRN wire
between the data link connector and the EPS
control unit.I
Page 545 of 1139
EPS Components
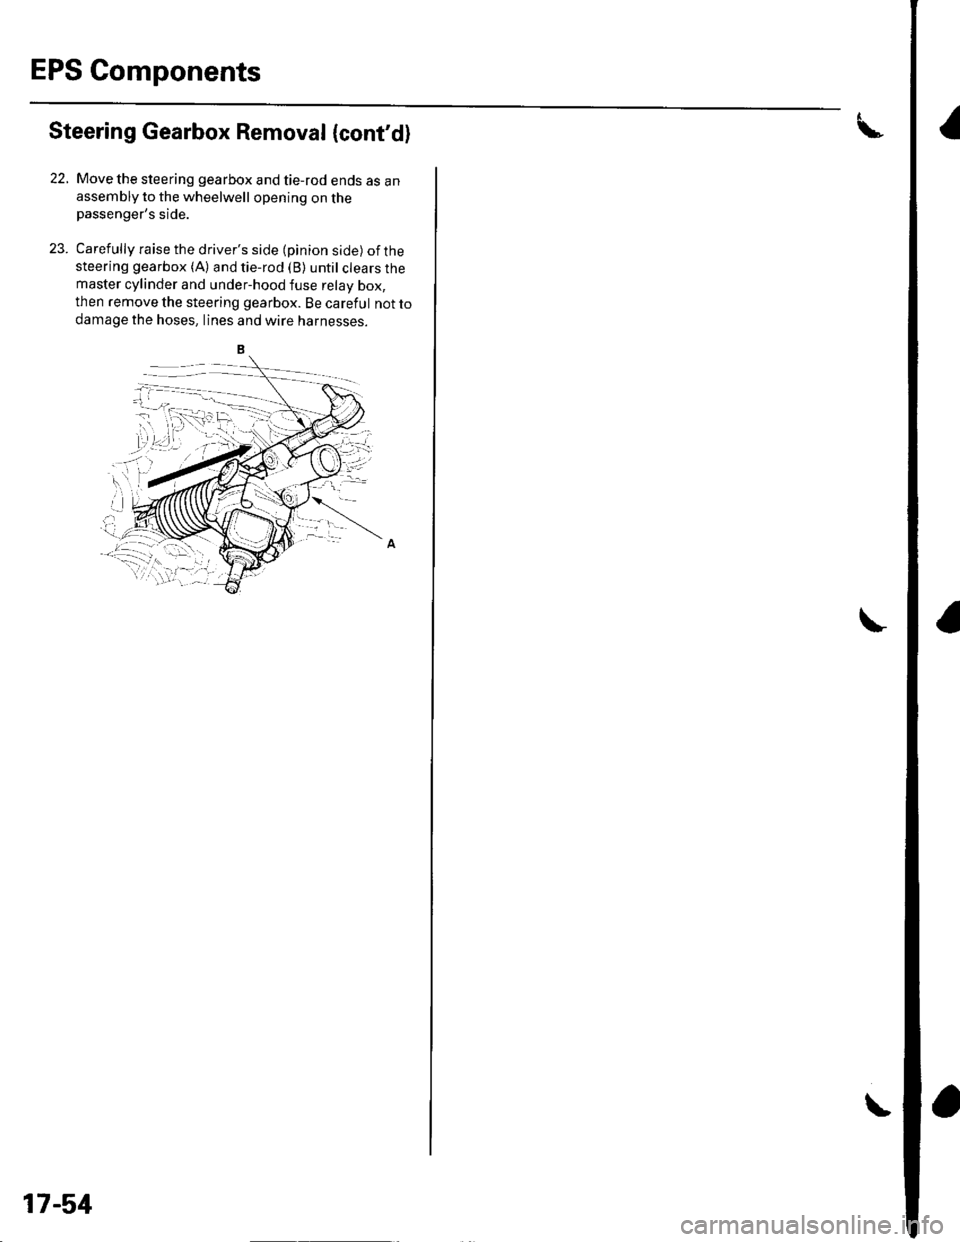
Steering Gearbox Removal {cont'd)
22. Move the steering gearbox and tie-rod ends as anassembly to the wheelwell opening on thepassenger's side.
23. Carefully raise the driver's side (pinion side) ofthesteering gearbox (A) and tie-rod (B) until clears themaster cylinder and under-hood fuse relay box,
then remove the steering gearbox. Be careful not to
damage the hoses, lines and wtre narnesses.
17-51
Page 624 of 1139
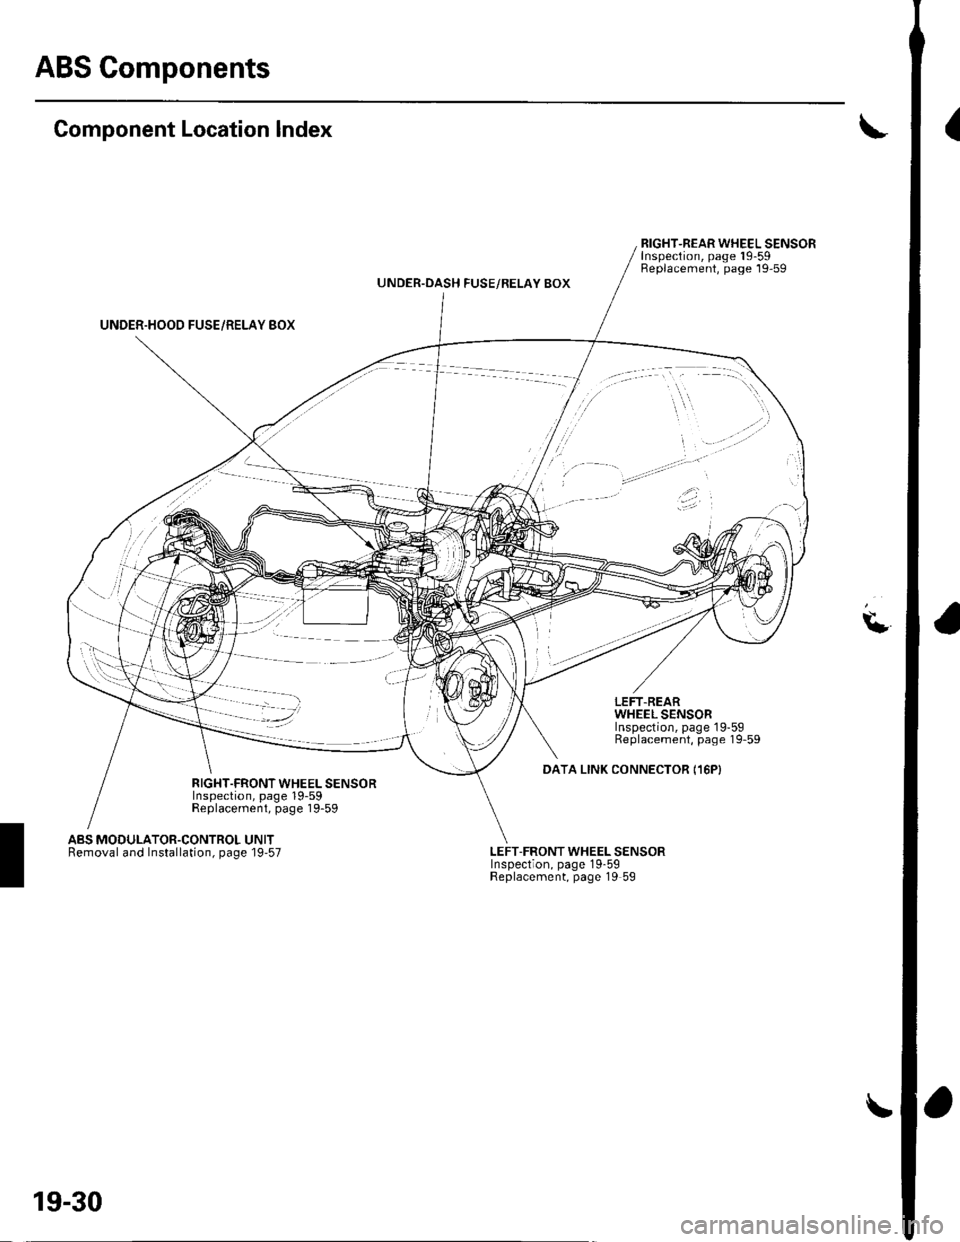
ABS Gomponents
(Component Location Index
UNDER.HOOD FUSE/RELAY BOX
RIGHT-REAR WHEEL SENSORInspection, page 19-59Replacement, page 19-59UNDER.OASH FUSE/RELAY BOX
\L
LEFT.REARWHEEL SENSORInspection, page 19-59Replacement, page 19-59
DATA LINK CONNECTOR I16PIRIGHT.FRONT WHEEL SENSORInspection, page 19-59Replacement, page 19-59
ABS MODULATOR.CONTROL UNITRemoval and Installation, page 19'57LEFT-FRONT WHEEL SENSORInspection, page 19-59Replacement, page 19 59
19-30
Page 638 of 1139
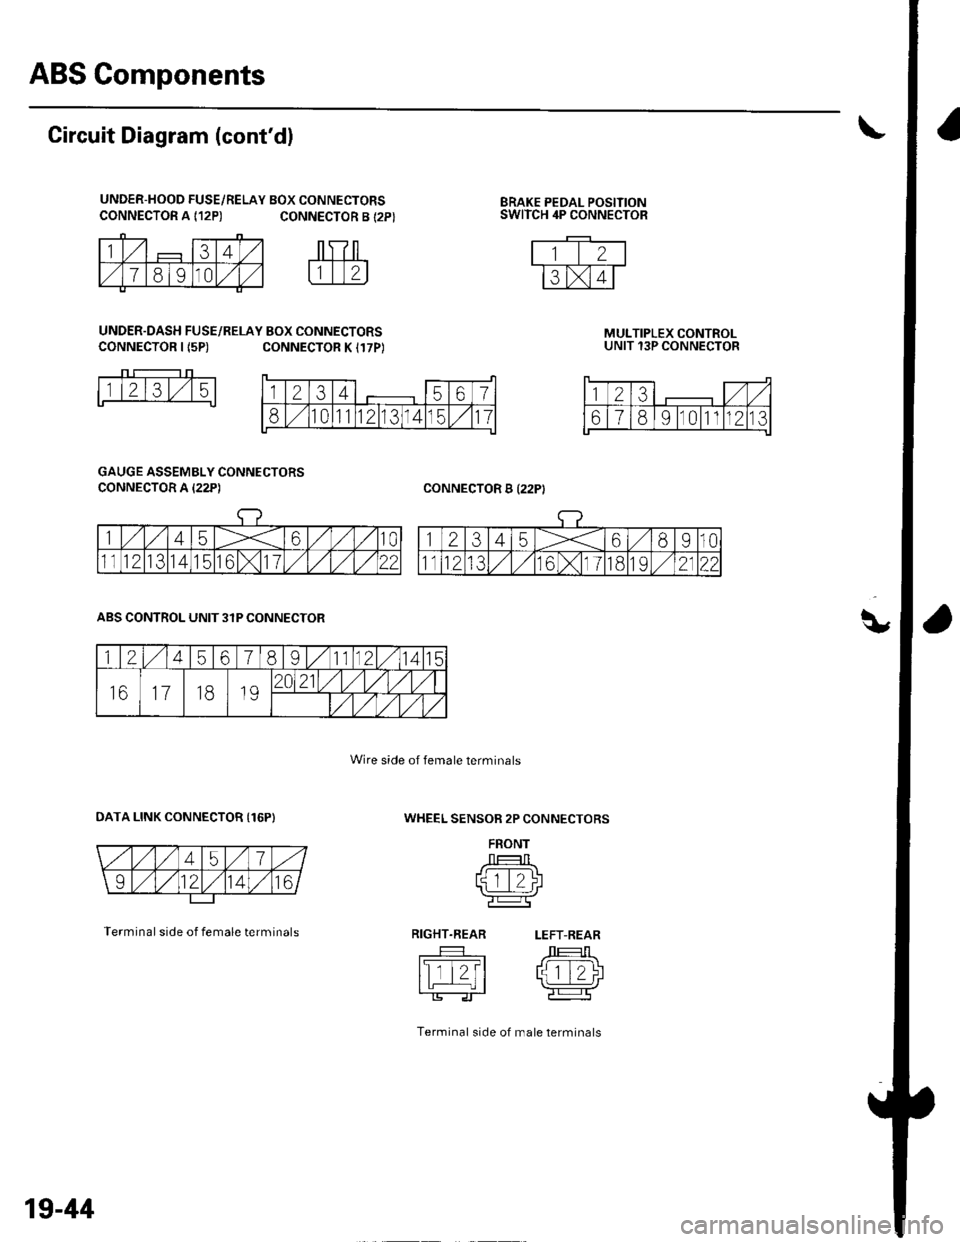
ABS Components
q,
CONNECTOR A {12P)BRAKE PEDAL POSITIONSWITCH 4P CONNECTOR
Circuit Diagram (cont'd)
UNDER-HOOD FUSE/RELAY BOX CONNECTORSCONNECTOR A {12P) CONNECTOR B {2P}
UNDER.DASH FUSE/RELAY BOX CONNECTORSCONNECTOR I {5P)CONNECTOR K I17P)MULTIPLEX CONTROLUNIT 13P CONNECTOR
CONNECTOR B I22PI
1l2l3l,/15
GAUGE ASSEMBLY CONNECTORS
CONNECTOR A I22P)
WHEEL SENSOR 2P CONNECTORS
FRONT
J --T:-l Ltqtt/)l'l L_.:-:J r\-r-----Tr'e:l
RIGHT.REAR LEFT-REAR
tslTt?t /J 1T-1\I tL | rlziJ
Terminal side of male lerminals
ABS CONTROL UNIT 3IP CONNECTOR
OATA LINK CONNECTOR {16P)
Terminal side of female terminals
Wire side of female terminals
1234567
810111213141511
123,/ ,/
67891011n213
1245678I11121415
161118192021/1,/1,/vl,/l
/t,/t/t,/t/
19-44
Page 643 of 1139
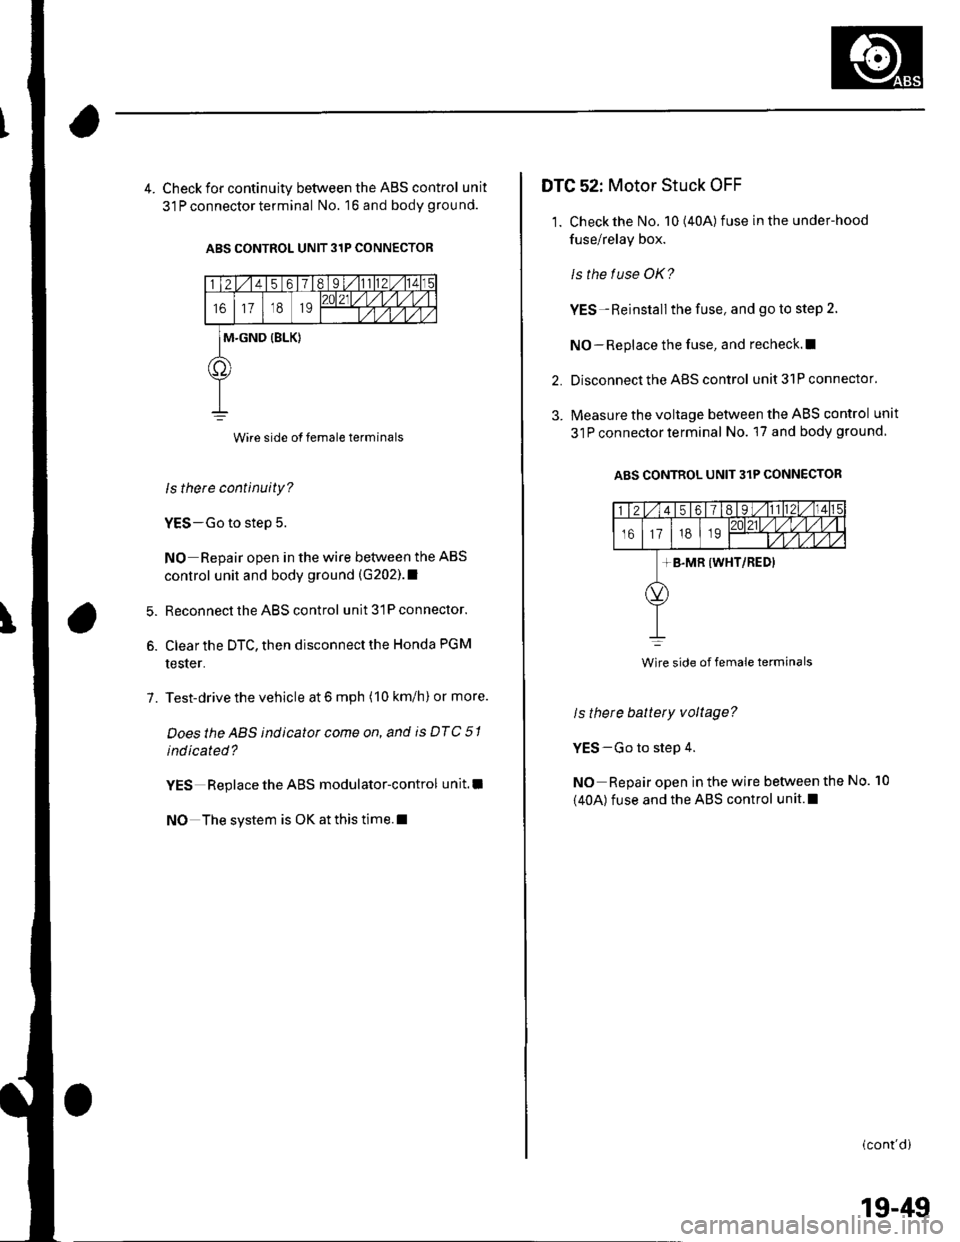
4. Check for continuity between the ABS control unit
31 P connector terminal No. 16 and body grou nd.
ABS CONTROL UNIT 31P CONNECTOR
Wire side of female terminals
ls there continuity?
YES-Go to step 5.
NO Repair open in the wire between the ABS
control unit and body ground (G202).1
Reconnect the ABS control unit 31P connector.
Clear the DTC, then disconnect the Honda PGM
tester.
Test-drive the vehicle at 6 mph (10 km/h) or more.
Doesthe ABS indicator come on, and is DTC 51
indicated?
YES Replace the ABS modulator-control unit.l
NO The system is OK at this time.l
6.
7.
DTG 52: Motor Stuck OFF
1. Check the No. 10(40A) fuse in the under-hood
fuse/relay box.
ls the f use OK?
YES-Reinstall the fuse, and go to step 2.
NO-Replace the fuse, and recheck.l|
Disconnect the ABS control unit 31P connector.
Measure the voltage between the ABS control unit
31P connector terminal No. 17 and body ground
ABS CONTROL UNIT 31P CONNECTOR
2.
3.
ls there battery voltage?
YES-Go to step 4.
NO Repair open in the wire between the
(40A) fuse and the ABS control unit.l
No. 10
(cont'di
Wire side of female terminals
19-49
Page 645 of 1139
DTC 54: Main Relay Stuck OFF
1. Checkthe No.8 (20A) fuse in the under-hood fuse/
relay box, and reinstallthe fuse if it is OK.
ls the f use OK?
YES-Go to step 2.
NO Replace the fuse, and recheck.l
2. Disconnect the ABS control unit 31P connector.
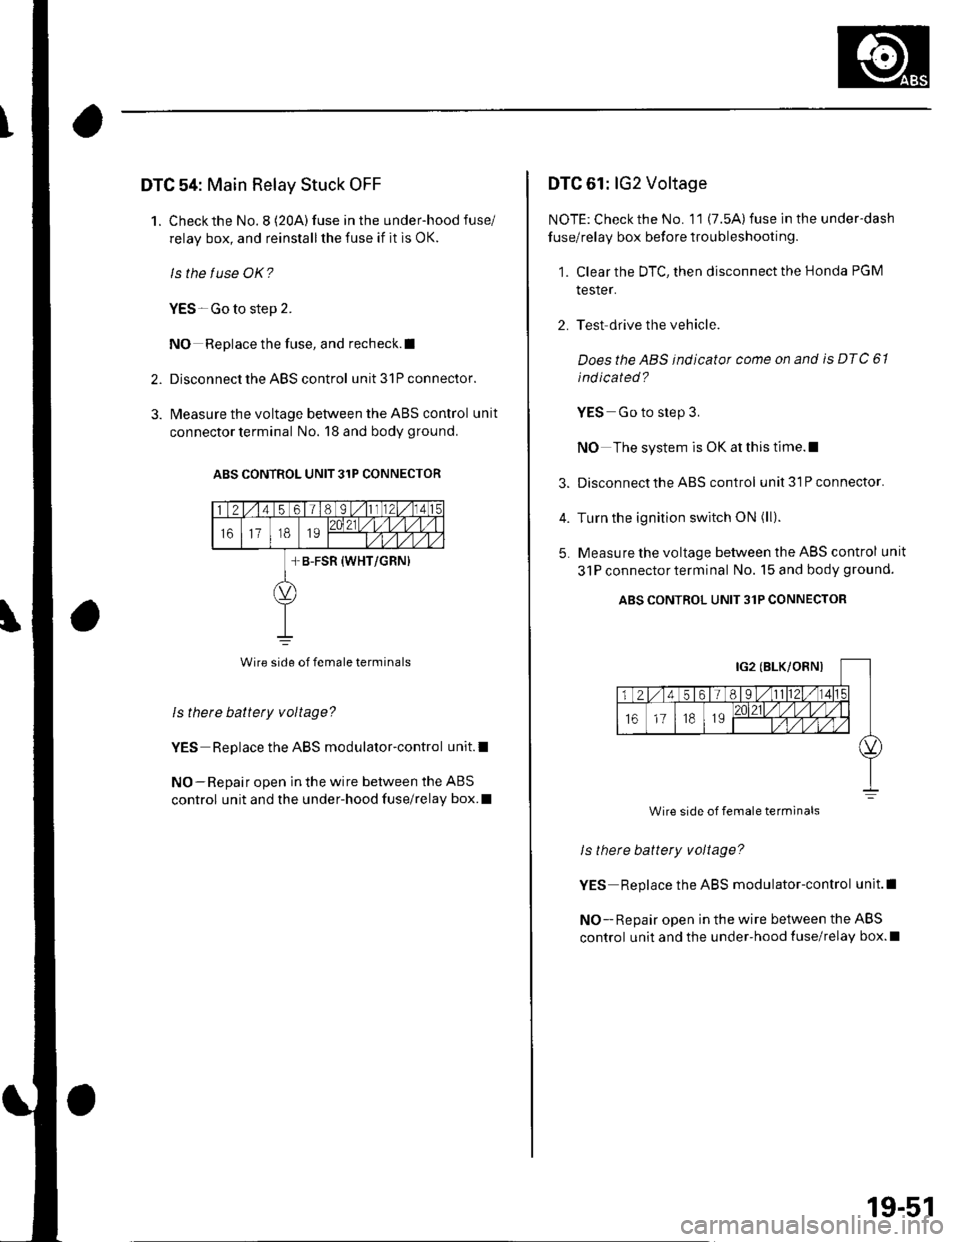
3. l\4easure the voltage between the ABS control unit
connector terminal No. 18 and body ground.
ABS CONTROL UNIT 31P CONNECIOR
Wire side of female terminals
Is there battety voltage?
YES Replace the ABS modulator-control unit.l
NO-Repair open in the wire between the ABS
control unit and the under-hood fuse/relay box.I
DTC 61: lG2 Voltage
NOTE: Check the No. 11 (7.5A) fuse in the under-dash
fuse/relay box before troubleshooting.
1. Clear the DTC, then disconnect the Honda PGM
tesler.
2. Test drive the vehicle.
Doesthe ABS indicator come on and is DTC 61
ind icated ?
YES Go to step 3.
NO The system is OK at this time.l
3. Disconnect the ABS control unit3lPconnector.
4. Turn the ignition switch ON (ll).
5. Measure the voltage between the ABS control unit
31P connectorterminal No. 15 and body ground.
ABS CONTROL UNIT 31P CONNECTOR
ls there battery voltage?
YES Replace the ABS modulator-control unit.l
NO - Repair open in the wire between the ABS
control unit and the under-hood {use/relay box.l
Wire side of female terminals
19-51
Page 647 of 1139
8.
9.
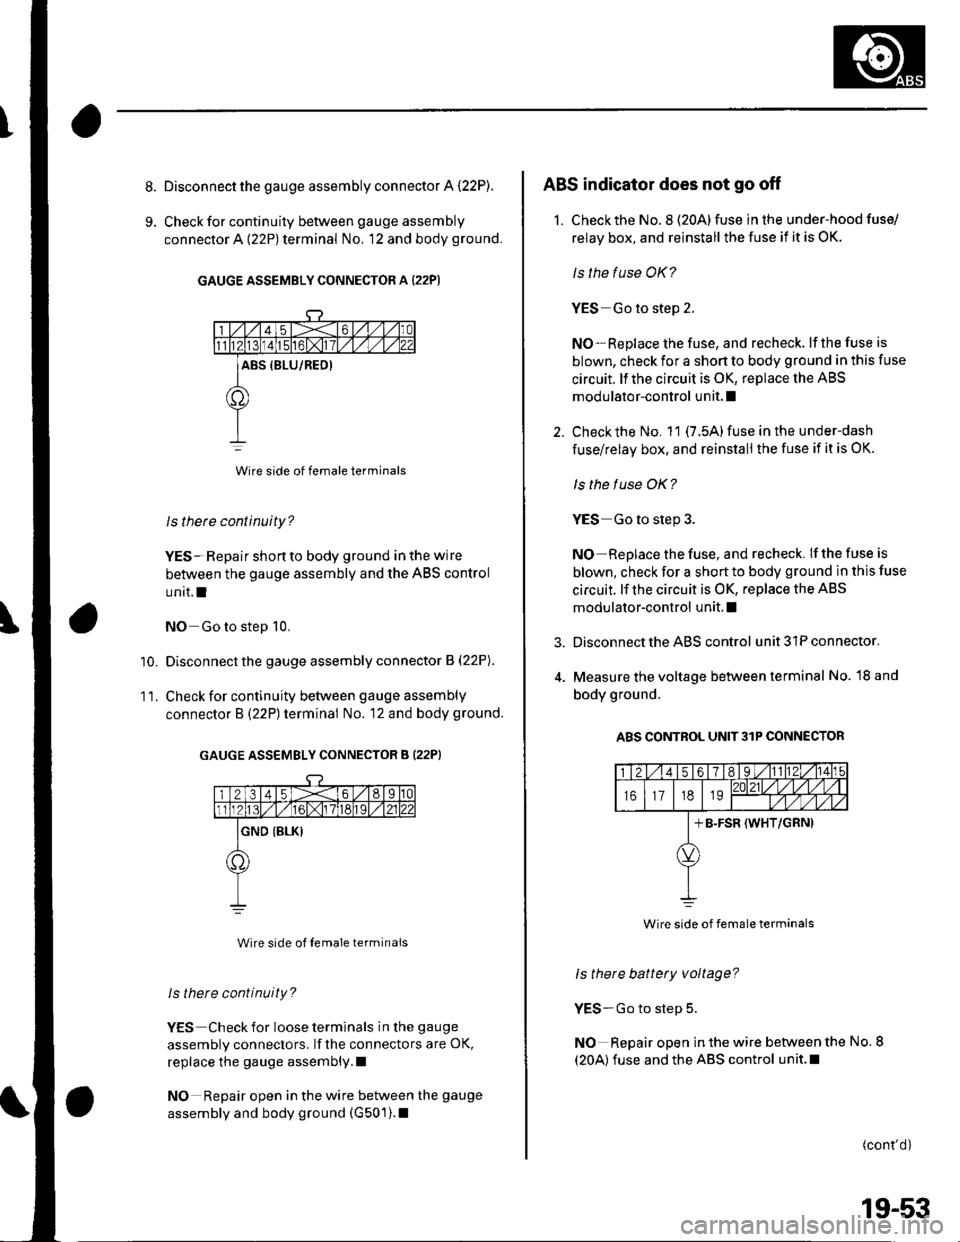
Disconnect the gauge assembly connector A (22P).
Check for continuity between gauge assembly
connector A {22P) terminal No, 12 and body ground.
GAUGE ASSEMBLY CONNECTOR A (22P)
Wire side of female terminals
ls there continuity?
YES- Repair shon to body ground in the wire
between the gauge assembly and the ABS control
unit.l
NO Go to step 10.
Disconnect the gauge assembly connector B (22P).
Check for continuity between gauge assembly
connector B (22P) terminal No. 12 and body ground.
GAUGE ASSEMBLY CONNECTOR B (22PI
Wire side ol Iemale terminals
ls there continuity?
YES Check for loose terminals in the gauge
assembly connectors. lf the connectors are OK,
replace the gauge assembly.l
NO Repair open in the wire between the gauge
assembly and body ground (G501).1
'10.
11.
3.
ABS indicator does not go off
1. Checkthe No. 8 (20Alfuse in the under-hood fuse/
relay box, and reinstall the fuse if it is OK.
ls the fuse OK?
YES Go to step 2.
NO-Replace the fuse, and recheck. lf the fuse is
blown, check for a shon to body ground in this fuse
circuit. ll the circuit is OK, replace the ABS
modulator-control unit. I
Check the No. 11 (7.5A) fuse in the under-dash
fuse/relay box, and reinstall the fuse if it is OK.
ls the f use OK?
YES Go to step 3.
NO Replace the fuse, and recheck. If the fuse is
blown, check for a short to body ground in this fuse
circuit. lf the circuit is OK, replace the ABS
modulator-control unit. I
Disconnect the ABS control unit 31P connector.
Measure the voltage between terminal No. l8 and
body ground.
A8S CONTROL UNIT3lP CONNECTOR
ls there battery voltage?
YES-Go to step 5.
NO Repair open in the wire between the No. 8
(20A) fuse and the ABS control unit.l
(cont'd)
Wire side of female terminals
19-53
Page 690 of 1139
Moonroof
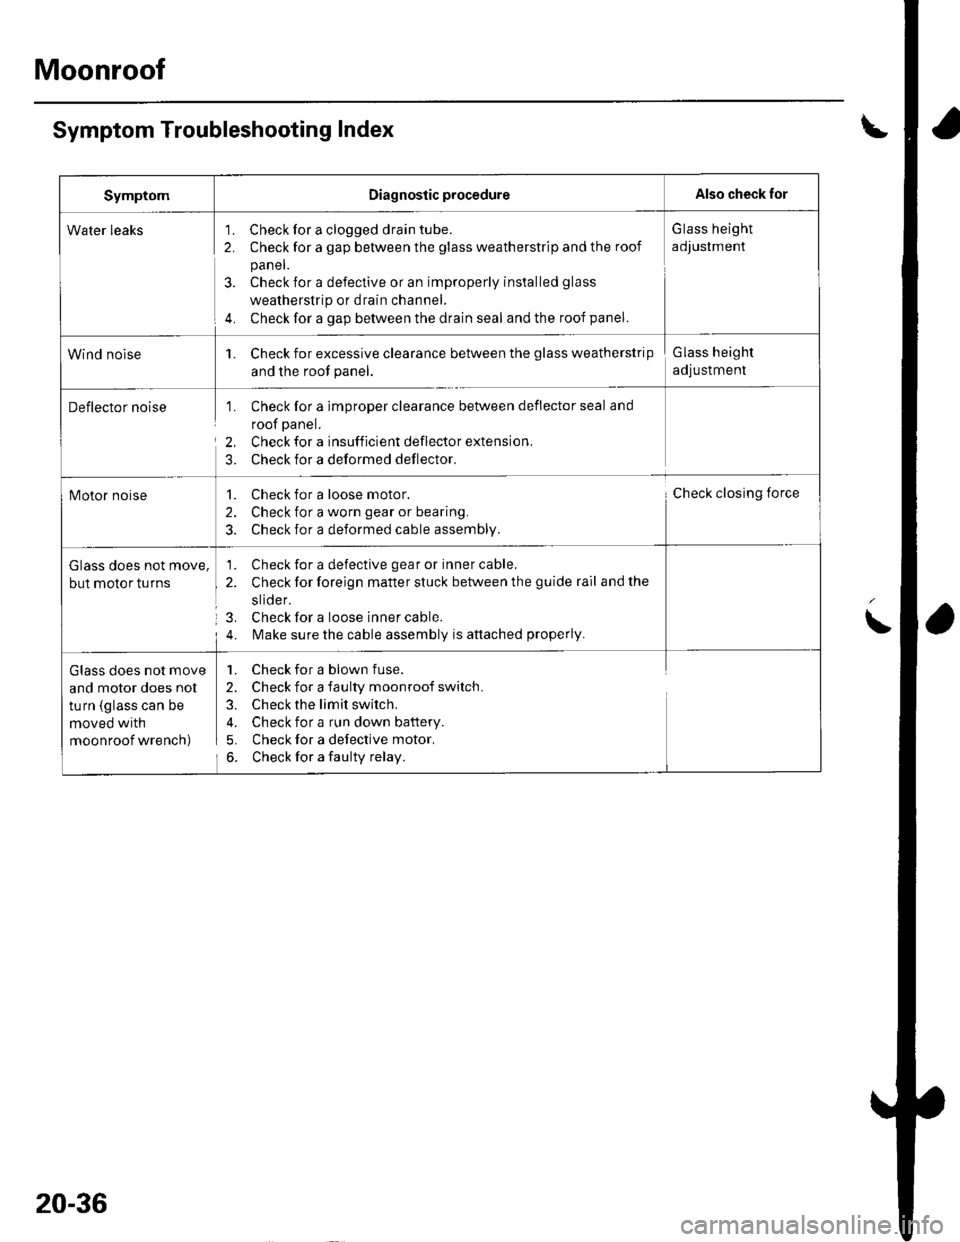
Symptom Troubleshooting Index
SymptomDiagnostic procedureAlso check for
Water leaks'1. Check for a clogged drain tube.
2. Check for a gap between the glass weatherstrip and the roof
panel.
3. Check for a defective or an improperly installed glass
weatherstrip or drain channel.
4. Check for a gap between the drain seal and the roof panel.
G lass height
adJustment
Wind nolse1. Check for excessive clearance between the glass weatherstrip
and the root panel.
Glass height
adjustment
Deflector noise1. Check for a imDrooer clearance between deflector seal and
roof panel.
2, Check for a insufficient deflector extension.
3. Check for a deformed deflector.
Motor noise1. Check for a loose motor.
2. Check for a worn gear or bearing.
3. Check for a deformed cable assembly.
Check closing force
Glass does not move,
but motor turns
1. Check for a defective gear or inner cable.
2. Check for foreign matter stuck between the guide rail and the
slide r.
3. Check for a loose inner cable.
4. l\,4ake sure the cable assembly is attached properly.
Glass does not move
and motor does nol
turn (glass can be
moved with
moonroof wrench)
1. Check for a blown fuse.
2. Check for a faulty moonroof switch.
3. Check the limit switch.
4. Check for a run down battery.
5. Check for a defective motor.
6. Check for a faulty relay.
20-36
Page 696 of 1139
Moonroof
1.
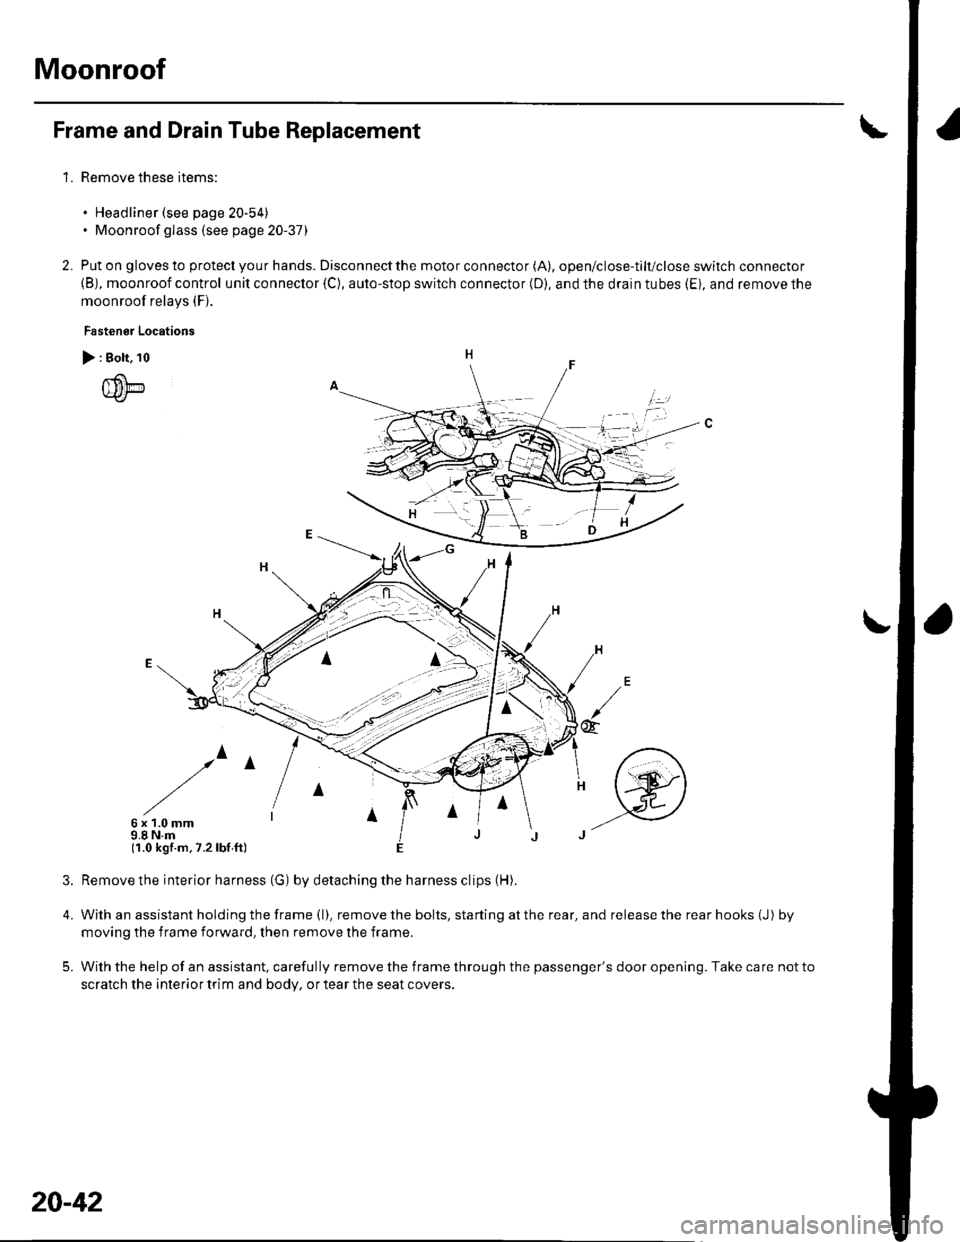
Frame and Drain Tube Replacement
Remove these items:
. Headliner (see page 20-54). Moonroof glass (see page 20-37)
Put on gloves to protect you r hands. Disconnect the motor connector (A), open/close-tilt/close switch connector
{B), moonroof control unit connector {C), auto-stop switch connector (D), and the drain tubes (Ei, and remove the
moonroof relays (F).
Fastenor Locations
> : Bolt, 10
{um
/^
6x1.0mm9.8 N.m(1.0 kgf.m,7.2lbf ft)
4.
5.
2.
irl
@
Remove the interior harness (G) by detaching the harness clips (H).
With an assistant holding the frame (l). remove the bolts, starting at the rear, and release the rear hooks (J) by
moving the f rame forward, then remove the frame.
With the help of an assistant, carefully remove the frame through the passenger's door opening. Take care not to
scratch the interior trim and body, or tear the seat covers.
20-42