HONDA CIVIC 2003 7.G Workshop Manual
Manufacturer: HONDA, Model Year: 2003, Model line: CIVIC, Model: HONDA CIVIC 2003 7.GPages: 1139, PDF Size: 28.19 MB
Page 501 of 1139
T
\
Steering Column Removal and Installation
SRS components are located in this area. Review the SRS component locations (see page 23-13) and precautions andprocedures (see page 23-14) in the SRS section before performing repairs or service.
Removal
1, Record the radio station presets, and disconnect the battery.
2. Removethedriver'sairbagassembly(seepage23-113) and the steering wheel (see page 17-6).
3. Removethe driver's dashboard lowercover(see page 20-59) and undercover(see page 20-60).
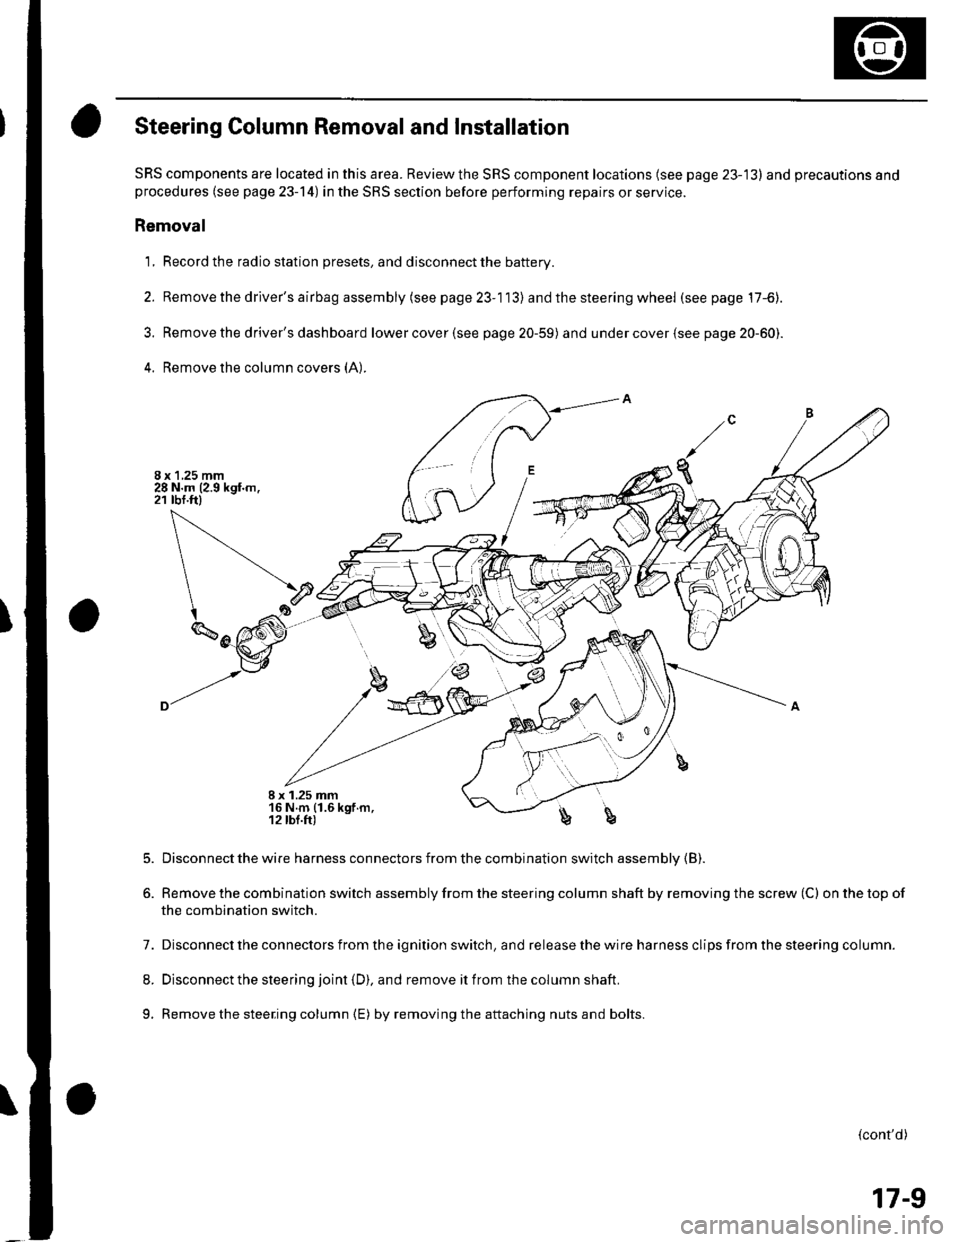
4. Remove the column covers (A:
I x 1.25 mm16 N.m (1.6 kgf.m,12 lbl.fr)b
5.
6.
Disconnect the wire harness connectors from the combination switch assembly {B).
Remove the combination switch assembly from the steering column shaft by removing the screw (C) on the top of
the combination switch.
7. Disconnect the connectors from the ignition switch, and release the wire harness clips from the steering column.
8. Disconnect the steering joint (D), and remove it from the column shaft.
9. Remove the steering column {E) by removingthe attaching nuts and bolts.
(cont'd)
17-9
Page 502 of 1139
Steering
Steering Column Removal
lnstallation
1.
4.
Install the steering column, and make sure the
wires are not caught or pinched by any parts.
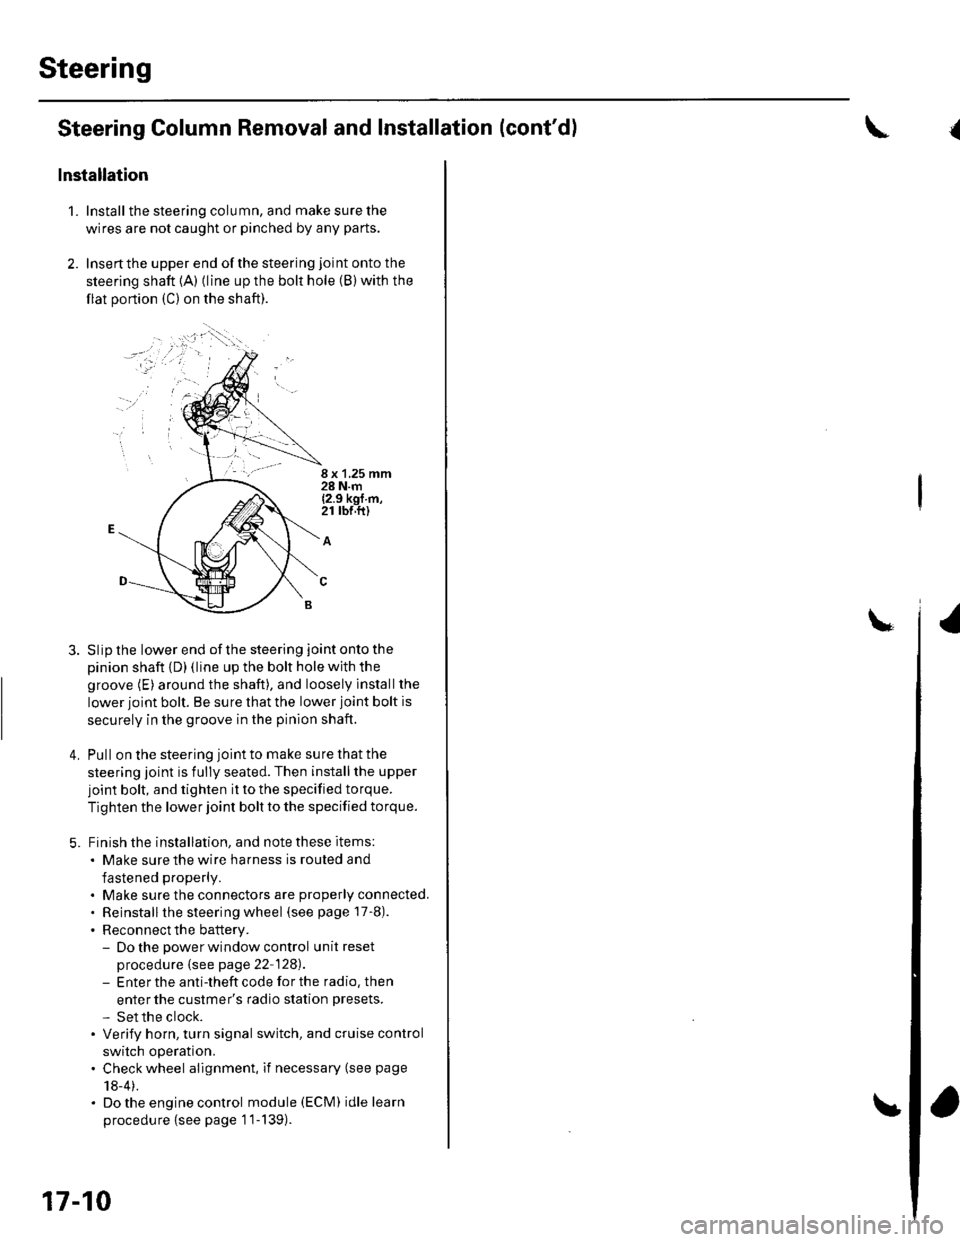
Insertthe upper end ofthe steering joint onto the
steering shaft {A) (line up the bolt hole (B) with the
flat portion (C) on the shaft).
8 x 1,25 mm28 N.m{2.9 kgf m,21 rbr.ft)
A
Slip the lower end of the steering joint onto the
pinion shaft {D) (line up the bolt hole with the
groove (E) around the shaft), and loosely lnstallthe
lower joint bolt. Be sure that the lower joint bolt is
securely in the groove in the pinion shaft.
Pull on the steering joint to make su re that the
steering joint is fully seated. Then installthe upper
joint bolt, and tighten it to the specified torque.
Tighten the lower joint bolt to the specified torque.
Finish the installation, and note these items:
. Make sure the wire harness is routed and
fastened properly.
. Make sure the connectors are properly connected.. Reinstallthe steering wheel (see page 17-8).
. Reconnect the battery.- Do the power window control unitreset
procedure {see page 22-128).- Enter the anti-theft code for the radio, then
enter the custmer's radio station presets.
- Set the clock.. Verify horn, turn signal switch, and cruise control
switch operation.. Check wheel alignment, if necessary (see page
18-4).. Do the engine control module (ECM) idle learn
procedu re {see page '11-139).
17-10
and Installation (cont'd){
Page 503 of 1139
Steering Column Inspection
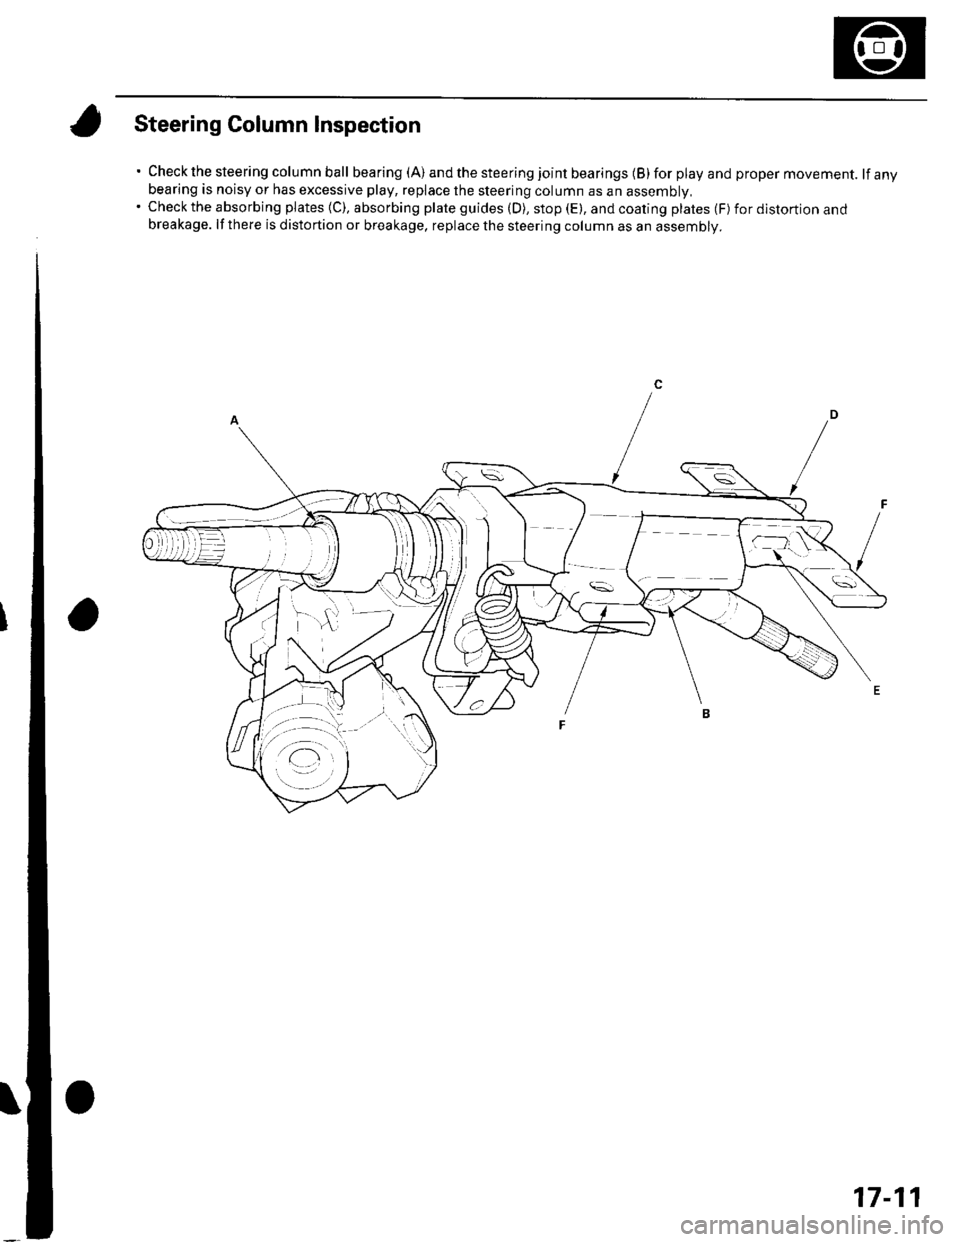
. Check the steering column ball bearing(A) andthesteeringjointbearings(B)forplayandpropermovement. lfanybearing is noisy or has excessive play, replace the steering column as an assembly,'Checktheabsorbingplates(C),absorbingplateguides(D),stop(E),andcoatingplates(F) for distortion andbreakage. lf there is distortion or breakage, replace the steering column as an assembly.
17-11
Page 504 of 1139
Steering
Steering Lock Replacement
NOTE: Do not try to re-key a replacement steering lock.
lf necessary, re-key the other locks.
1. Remove the steering column (see page 17-9).
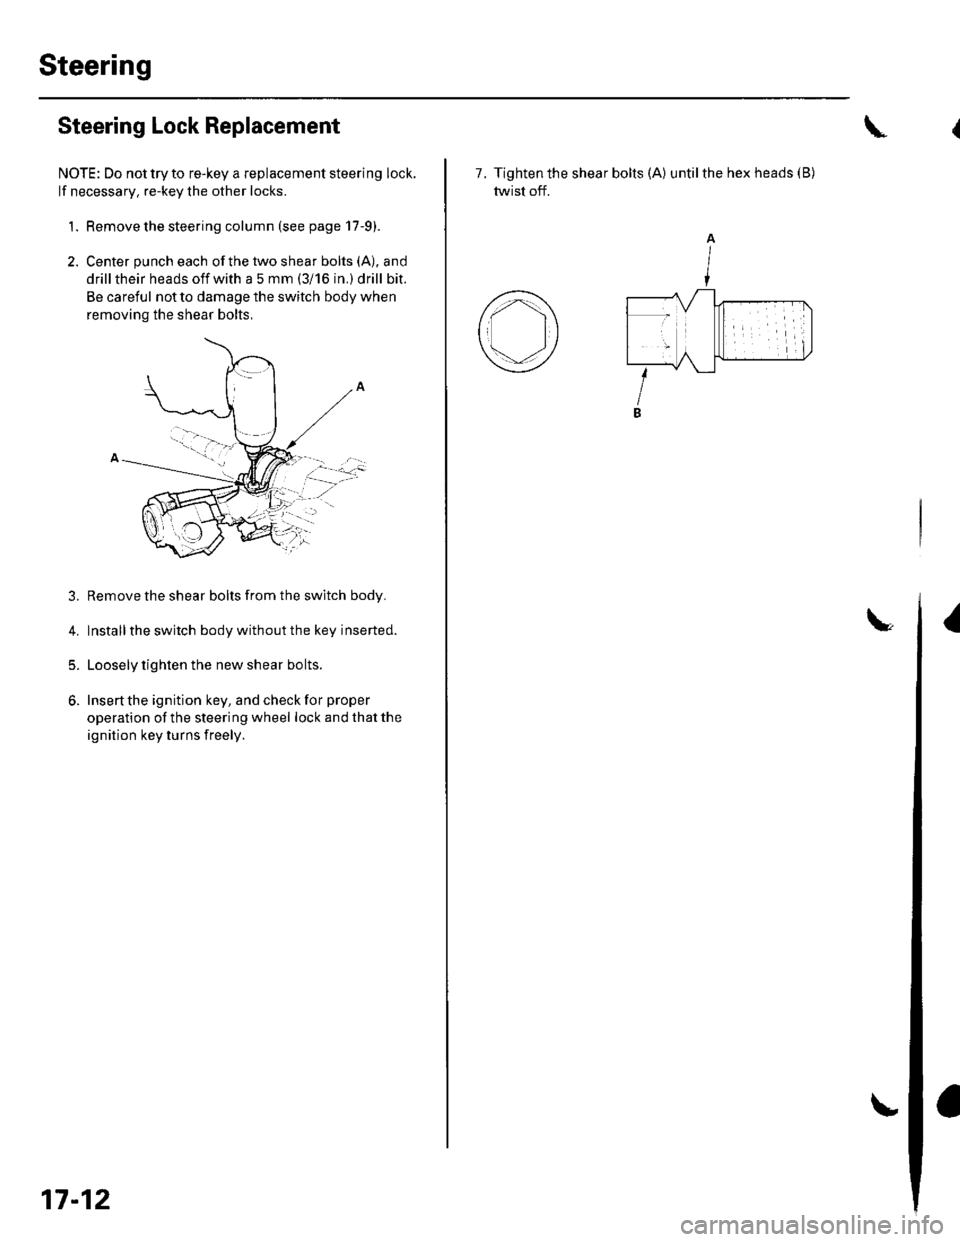
2. Center punch each ofthe two shear bolts (A), and
drill their heads off with a 5 mm (3i 16 in.) drill bit.
Be careful not to damage the switch body when
removing the shear bolts,
3. Remove the shear bolts from the switch body.
4. Installthe switch body without the key inserted.
5. Loosely tighten the new shear bolts.
6. Insert the ignition key, and check for proper
operation of the steering wheel lock and that the
ignition key turns freely.
:..'-":'
17-12
7. Tighten the shear bolts (A) untilthe hex heads (B)
twist off.
I
A
I
Page 505 of 1139
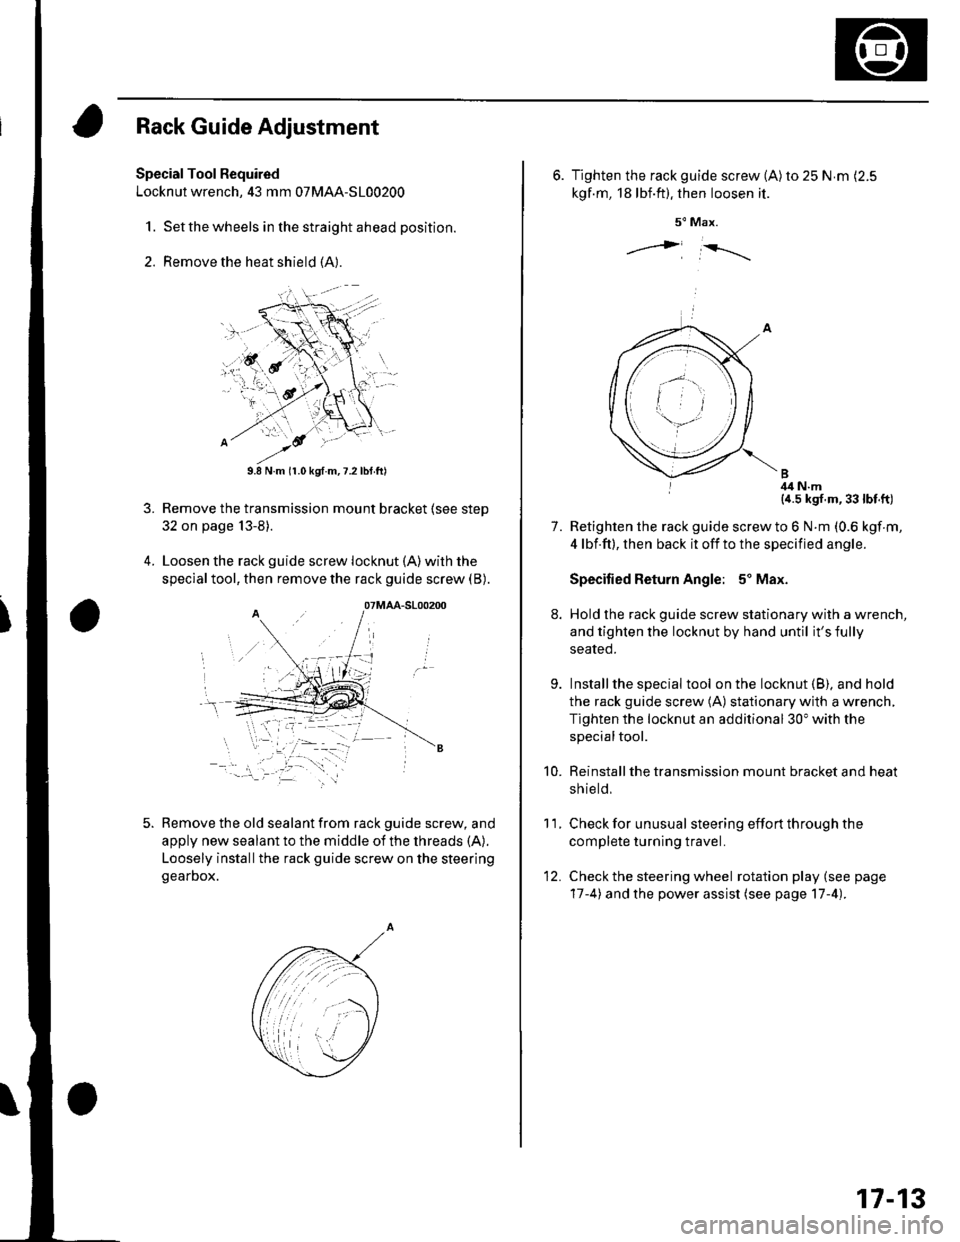
Rack Guide Adjustment
Special Tool Required
Locknut wrench, 43 mm 07MAA-S100200
1. Set the wheels in the straight ahead position.
2. Remove the heat shield (A).
3.
9.8 N.m (r.0 kgf.m,7.2lbtft)
Remove the transmission mount bracket (see step
32 on page 13-8).
Loosen the rack guide screw locknut (A)with the
special tool, then remove the rack guide screw (B).
Remove the old sealant from rack guide screw, and
apply new sealant to the middle of the threads (A).
Loosely installthe rack guide screw on the steering
gearDox.
'-.i. '' '
07MAA-S100200
6. Tighten the rack guide screw (A)ro 25 N.m (2.5
kgf.m, 18lbf.ft). then loosen it.
5" Max.
j i-rrrr-,
I 4il N.m{a.5 kgf.m,33lbt.ft)
Retighten the rack guide screw to 6 N.m (0.6 kgf m,
4 lbf.ft), then back it off to the specified angle.
Specified Return Angle: 5' Max.
Hold the rack guide screw stationary with a wrench,
and tighten the locknut by hand until it's fully
seated.
Installthe special tool on the locknut (B), and hold
the rack guide screw (A) stationary with a wrench,
Tighten the locknut an additional 30" with the
specialtool.
Reinstall the transmission mount bracket and heat
sh ie ld,
Check for unusual steering effort through the
complete turning travel.
Check the steering wheel rotation play (see page
17-4) and the power assist (see page 17-4).
11.
7.
9.
10.
12.
17-13
Page 506 of 1139
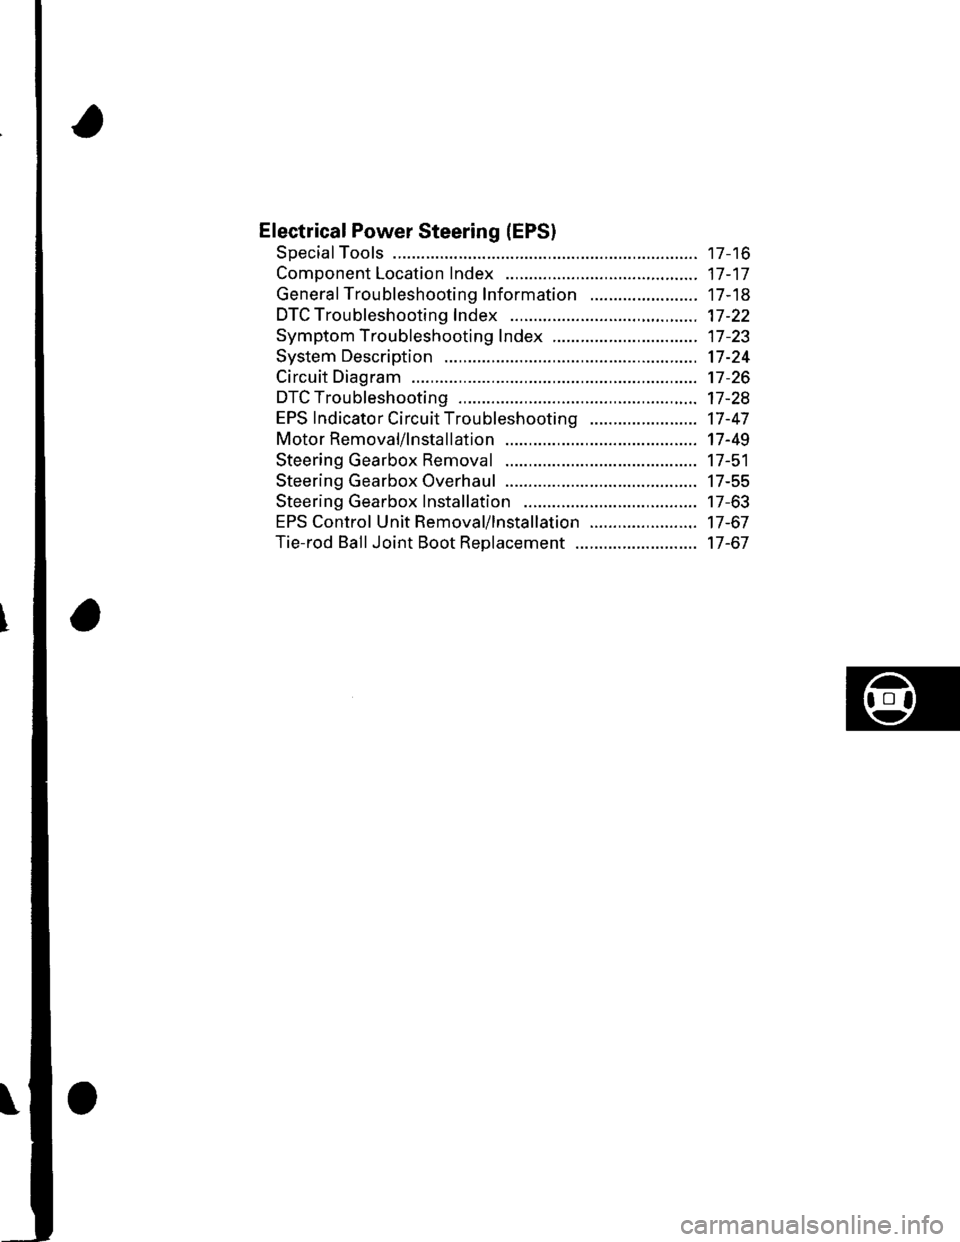
Electrical Power Steering (EPSI
SpecialTools ............. 17 -16
Component Location Index ......................................... 17-17
General Troubleshooting Information ....................... 17-18
DTC Troubleshooting Index .............. 17-22
Symptom Troubleshooting Index ............................... 17 -23
System Description ................. ........... 17-24
Circuit Diagram ......... 17-26
DTC Troubleshooting ............... .......... 17-28
EPS lndicator Circuit Troubleshooting ....................... 17-47
Motor Removal/lnstallation ............... 17-49
Steering Gearbox Removal ............... 17-51
Steering Gearbox Overhaul ............... 17-55
Steering Gearbox Installation ........... 17-63
EPS Control Unit Remova l/lnsta llation ....................... 17-67
Tie-rod Ball Joint Boot Replacement .......................... 17-67
Page 507 of 1139
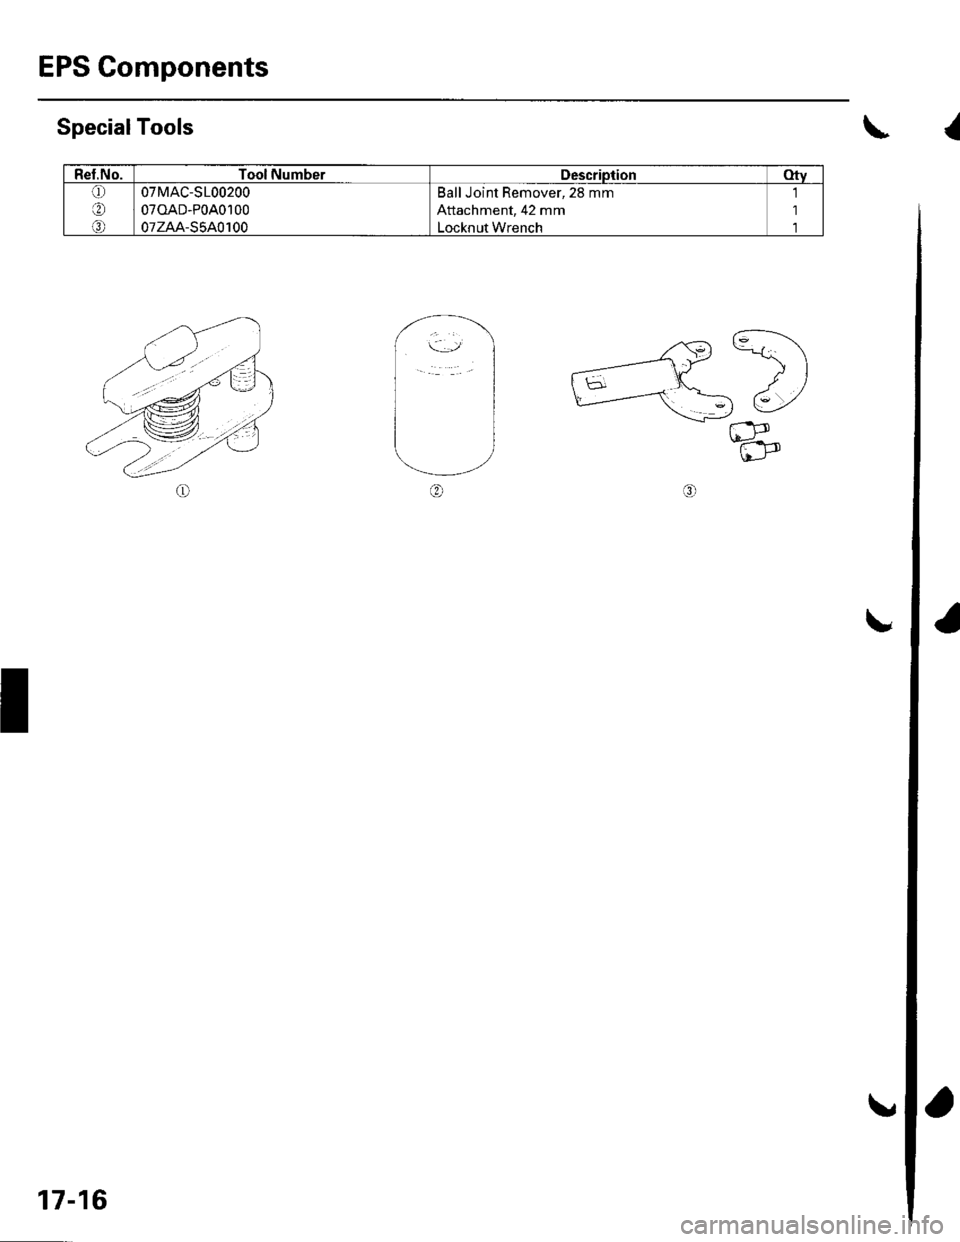
EPS Components
Rel.No.Tool NumberDescriptionotv(!)
at'
o
07MAC-S100200
070AD-P0A0100
07zAA-S5A0100
Ball Joint Remover, 28 mm
Attachment, 42 mm
Locknut Wrench
'1
1'l
SpecialTools\
,.^G) C\
_---1t
-)
)
h5--d-'
u_r-.c_-tt)\L-,
t
I
17-16
a
Page 508 of 1139
![HONDA CIVIC 2003 7.G Workshop Manual Component Location Index
UNDER.HOODFUSE/RELAY BOX
EPS CONTROL UNITEPS Control Unit Removal/lnstallation,page 17 -67
UNDER.DASH FUSE/RELAY BOX
-,/.,....
.,i,
X ]
DATA LINK CONNECTOR I16P)
TOROUE SENS HONDA CIVIC 2003 7.G Workshop Manual Component Location Index
UNDER.HOODFUSE/RELAY BOX
EPS CONTROL UNITEPS Control Unit Removal/lnstallation,page 17 -67
UNDER.DASH FUSE/RELAY BOX
-,/.,....
.,i,
X ]
DATA LINK CONNECTOR I16P)
TOROUE SENS](/img/13/5744/w960_5744-507.png)
Component Location Index
UNDER.HOODFUSE/RELAY BOX
EPS CONTROL UNITEPS Control Unit Removal/lnstallation,page 17 -67
UNDER.DASH FUSE/RELAY BOX
-,'/.,....
'.,i,
X ]
DATA LINK CONNECTOR I16P)
TOROUE SENSOR
STEERING GEARBOXSteering Gearbox Removal, page 17-51Steering Gearbox Overhaul, page 17-55Steering Gearbox Installation, page 17-63
Removal/lnstallation,page l7-49
GAUGE ASSEMBLY
MOTOR
17-17
Page 509 of 1139
EPS Components
aGeneral Troubleshooting Information
EPS Indicator
Under normal conditions, the EPS indicator comes on when
the ignitlon switch is turned to the ON (ll) position, then goes
off after the engine is started. This indicates that the bulb and
its circuit are operating correctly.
lf there is any trouble in the system after the engine is started,
the EPS indicator will stay on, and the power assist is turned
off.
When EPS indicator light comes on, the control unit
memorizes the DTC. In this case, the control unit will not
activate the EPS system after the engine starts again, but it
keeps the EPS indicator on.
When DTC 12, 16, 17, 18 or 67 is stored in the control unit, the
EPS indicator will stay on until the DTC is erased. When a
problem is detected and the EPS indicator comes on, there are
cases when the indicator stays on untilthe ignition switch is
turned 0FF, and cases when the indicator goes off
automatically when the system returns to normal. Even though
the system is operating normally, the EPS indicator will come
on under the following conditions:
Condition '1:
. The vehicle was traveling at least 12.4 mph (20 km/h), then. A rapid change in vehicle speed was detected, then. The vehicle (or the vehicle speed sensor signal) stopped for
at least 5 seconds. The engine speed was still 'l,640rpmorhigherforatleastS
seconds
Condition 2:
After the vehicle (or the vehicle speed sensor signal) has
stopped for at least 10 seconds, yet the engine speed was still
1,640 rpm or higherfor at least 20 seconds.
Condition 3:
When the engine speed is 280 rpm or less, and the vehicle is traveling at
a speed of 6,2 mph (10 km/h) or more for 3 seconds.
To determine the actual cause ofthe problem, question the
customer about the conditions during which the problem
occured, taking the above conditions into consideration.
Diagnostic Trouble Code (DTCI
. lf the CPU cannot be activated, or itfails,the EPS indicator
comes on, but the DTC is not memorized.. The memory can hold any number of DTCS. However, when
the same DTC is detected more than once, the most recent
DTC is written over the prior DTC, therefore only one
occurrence is memorized.. The DTCS are indicated repeatedly untilthe ignition switch is
turned OFF.. lf the DTC is not memorized,the EPS indicator blinks.
. The DTCS are memorized in the EEPRO| (non-volatile
memory) therefore the memorized DTCS cannot be erased
by disconnecting the battery. Perform the specified
procedures to clear DTCS.
Self-diagnosis
Self-diagnosis can be classified into two categories:.Initial diagnosis: performed right after the engine
starts and until the EPS indicator goes off.. Regular diagnosis: performed right after the initial
diagnosis until the ignition switch is turned OFF.
The EPS control unit performs the following functions
when a problem is detected by self-diagnosis;
'1. Turns on the EPS indicator.
2. Memorizes the DTC.
3. Stops power assist and manual steering operation
begrns.
NOTE:. When DTC 23 (a problem with the circuit for
engine speed signal) is detected, the power
assist will return to normal when the vehicle
speed is 0.62 mph (1 km/h) or above.. Fot DfCs 22,23, 64, or 66 the EPS indicator goes
off automatically when the system relurns to
normal. For all other codes, the EPS indicator
goes off when the system is OK after the ignition
switch is turned from OFF to ON (ll).
Restriction on Power Assist Operation
Repeated extreme steering force. such as turning the
steering wheel continuously back-and-forth with the
vehicle stopped, causes an increase of power
consumption in the EPS motor. The increase of electric
current causes the motor to heat up. Because this heat
adversely affects the system, the control unit monitors
the electric current of the motor.
When the control unit detects heat build-up in the motor,
it reduces the electric current to the motor gradually to
protect the system, and it restricts the power assist
operation. The EPS indicator does not come on during
this function.
When steering torque is not applied to the steering
wheel, or when the ignition is turned off, and the motor
cools, the control unit will restore the power assist
gradually until it's fully restored (after approximately 15
minutes maximum).
17-18
Page 510 of 1139
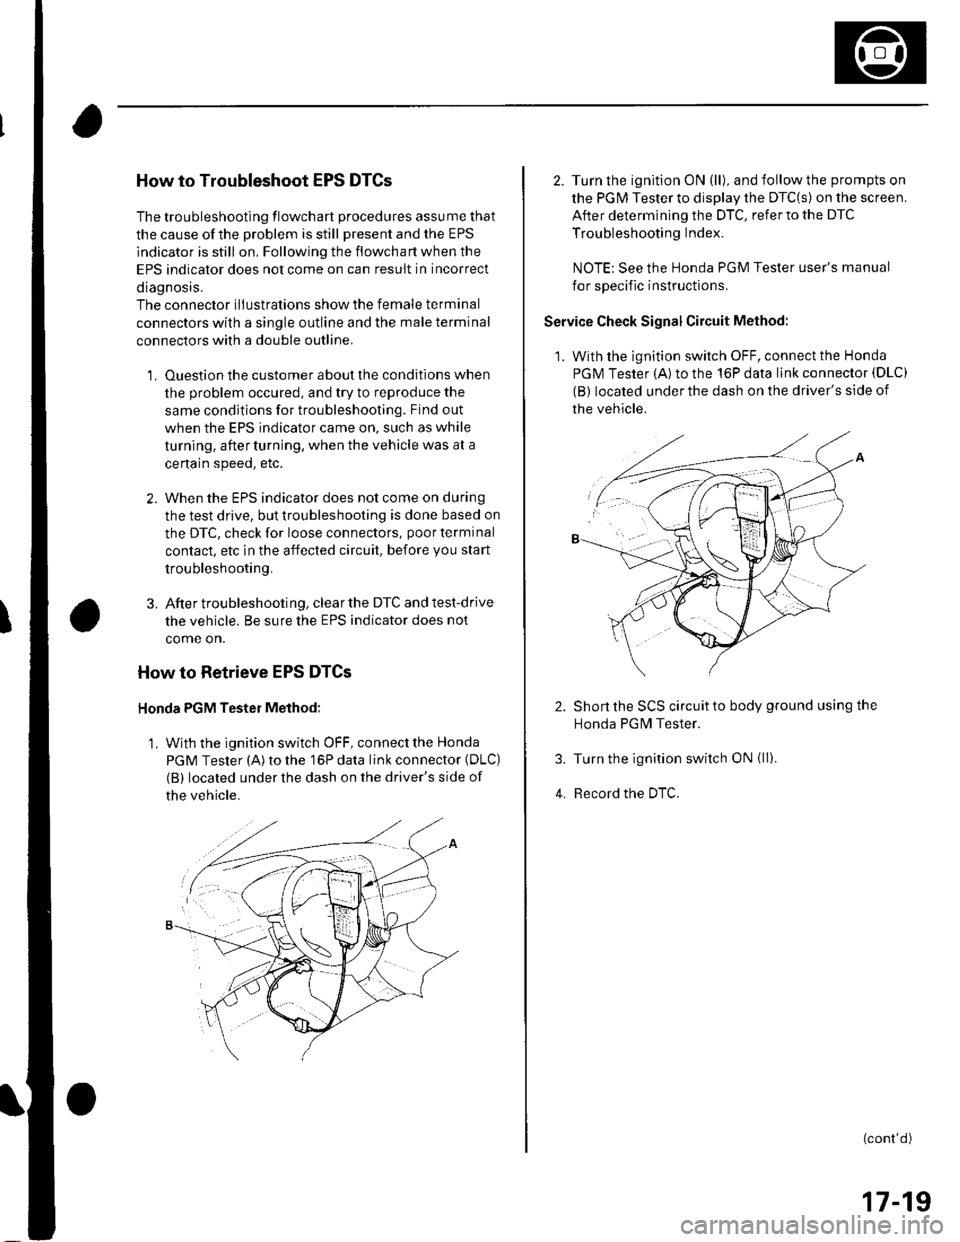
How to Troubleshoot EPS DTCs
The troubleshooting flowchart procedures assume that
the cause of the problem is still present and the EPS
indicator is still on, Following the flowchart when the
EPS indicator does not come on can result in incorrect
diagnosis.
The connector iliustrations show the female terminal
connectors with a single outline and the male terminal
connectors with a double outline.
1. Ouestion the customer about the conditions when
the problem occured, and try to reproduce the
same conditions for troubleshooting. Find out
when the EPS indicator came on, such as while
turning. afterturning, when the vehicle was at a
ce rta in speed, etc.
2. When the EPS indicator does not come on during
the test drive, but troubleshooting is done based on
the DTC, check for loose connectors, poor terminal
contact. etc in the affected circuit, before you start
troubleshooting.
3. After trou bleshooting, clear the DTC and test-drive
the vehicle. Be sure the EPS indicator does not
come on.
How to Retrieve EPS DTCs
Honda PGM Tester Method:
1, With the ignition switch OFF, connect the Honda
PGM Tester (A) to the 16P data link connector (DLC)
(B) located under the dash on the driver's side of
the vehicle.
2. Turn the ignition ON (ll), and follow the prompts on
the PGM Tester to display the DTC(s) on the screen.
After determining the DTC, refer to the DTC
Troubleshooting Index.
NOTE: See the Honda PGM Tester user's manual
for specific instructions.
Service Check Signal Circuit Method:
1. With the ignition switch OFF, connect the Honda
PGM Tester (A)to the 16P data link connector (DLC)
(B) located under the dash on the driver's side of
the vehicle.
Short the SCS circuit to body ground using the
Honda PGN4 Tester.
Turn the ignition switch ON {ll).
Record the DTC.
(cont'd)
17-19